paper:Towards Total Recall in Industrial Anomaly Detection
code:GitHub - amazon-science/patchcore-inspection
存在的问题
目前无监督缺陷检测常用的一种方法是直接利用在ImageNet上预训练的模型中的表示,而不专门进行目标分布的迁移和适配,比如PaDiM。由于这类方法是non-adaptive的,因此网络在更深更抽象层上的适配置信度有限,因为从ImageNet上学习到的高级抽象特征和工业环境中所需要的抽象特征相关度不高。此外,由于可提取的高维特征表示较少,这类方法在测试时可用的nominal context也受到了限制。
本文的创新点
针对上述问题,本文提出了一种新的无监督缺陷检测算法PatchCore,它具有以下特点
- 最大化测试阶段可用的nominal information
- 减少对ImageNet数据的bias
- 保持高推理速度、
具体包括
- 使用局部聚合的,mid-level的特征patch
a. 特征的抽象语义信息太少,深层特征对ImageNet数据的bias又太大,采用mid-level的特征可以在细节信息、抽象语义信息、对ImageNet的bias之间获得很好的平衡。
b. 在局部邻域上进行特征聚合可以保留足够的spatial context - 引入greedy coreset subsampling
显著降低存储内存,提高推理速度
方法与实现
Locally aware patch features
首先为了保留足够的细节信息同时又不会让提取的抽象信息太过于偏向ImageNet的数据,作者选用中间层的特征表示,对于ResNet模型选用第2、3层的特征图。
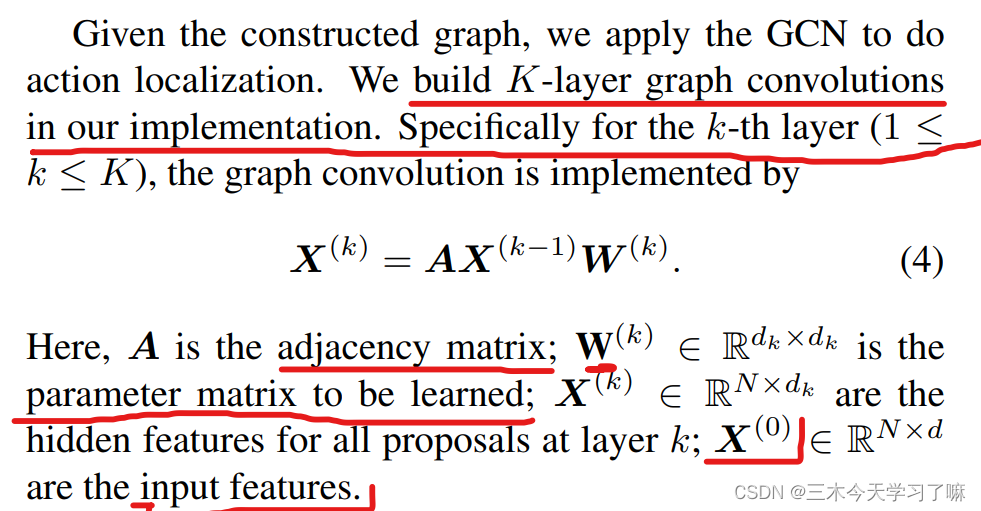
作者通过在局部邻域上进行特征聚合的方式来提取特征

这里 \(\mathcal{N}^{(h,w)}_{p} \) 表示特征图上位置 \((h,w)\) 处大小为 \(p\times p\) 的一块patch,文中取p=3。则位置 \((h,w)\) 处的locally aware features如下所示

其中 \(f_{agg}\) 是邻域特征向量的聚合函数,文中采用adaptive average pooling。
提取邻域特征向量的代码如下,首先提取预训练模型中的layer2、layer3。对于原始输入经过预处理后送入模型的大小为 224 x 224,假设 batch_size=2,则输入大小为 (2, 3, 224, 224),layer2、layer3的输出大小分别为(2, 512, 28, 28)、(2, 1024, 14, 14)。然后通过patchfiy函数提取局部邻域内的特征,这里通过torch.nn.Unfold实现,这个函数的用法见torch.nn.functional.unfold 用法解读_00000cj的博客-CSDN博客。这里和PaDiM中不一样的是,PaDiM中的stride=patchsize,也就是每个patch之间是互不重合的,对于28x28的feature map,patch_size=2,stride=2,padding=0,输出14x14。而这里patch_size=3,stride=1,padding=1,输出28x28。layer2、layer3经过patchify提出的邻域特征表示维度分别为(2, 784, 512, 3, 3)、(2, 196, 1024, 3, 3),其中784=28x28, 196=14x14。
features = [features[layer] for layer in self.layers_to_extract_from]
# {'layer2': torch.Size([2, 512, 28, 28])
#  'layer3': torch.Size([2, 1024, 14, 14])}

features = [
    self.patch_maker.patchify(x, return_spatial_info=True) for x in features
]

class PatchMaker:
    def __init__(self, patchsize, stride=None):
        self.patchsize = patchsize  # 3
        self.stride = stride  # 1

    def patchify(self, features, return_spatial_info=False):
        """Convert a tensor into a tensor of respective patches.
        Args:
            x: [torch.Tensor, bs x c x w x h]
        Returns:
            x: [torch.Tensor, bs * w//stride * h//stride, c, patchsize,
            patchsize]
        """
        padding = int((self.patchsize - 1) / 2)  # 1
        unfolder = torch.nn.Unfold(
            kernel_size=self.patchsize, stride=self.stride, padding=padding, dilation=1
        )
        unfolded_features = unfolder(features)  # (2,512,28,28)->(2,4608,784)
        number_of_total_patches = []
        for s in features.shape[-2:]:  # [28,28]
            n_patches = (
                s + 2 * padding - 1 * (self.patchsize - 1) - 1
            ) / self.stride + 1
            number_of_total_patches.append(int(n_patches))  # [28,28]
        unfolded_features = unfolded_features.reshape(
            *features.shape[:2], self.patchsize, self.patchsize, -1
        )  # (2,512,3,3,784)
        unfolded_features = unfolded_features.permute(0, 4, 1, 2, 3)  # (2,784,512,3,3)

        if return_spatial_info:  # True
            return unfolded_features, number_of_total_patches
        return unfolded_features
然后对layer3的输出进行bilinear插值使之与layer2匹配,得到features如下,其中1568=2x28x28,将batch_size维度和spatial维度合并到了一起。
features = [x.reshape(-1, *x.shape[-3:]) for x in features] # [(1568,512,3,3),(1568,1024,3,3)]然后通过自适应平均池化进行特征聚合,即上面提到的 \(f_{agg}\),这样对于预训练模型输出feature map上的每个位置(h, w),都得到一个预先设定维度 \(d\) 的单一表示,文中 \(d=1024\)。
代码如下
调用 features = self.forward_modules["preprocessing"](features) # (1568,2,1024)
class MeanMapper(torch.nn.Module):
    def __init__(self, preprocessing_dim):
        super(MeanMapper, self).__init__()
        self.preprocessing_dim = preprocessing_dim

    def forward(self, features):
        features = features.reshape(len(features), 1, -1)  # (1568,512,3,3)->(1568,1,4608)
        return F.adaptive_avg_pool1d(features, self.preprocessing_dim).squeeze(1)  # (1568,1,4608)->(1568,1024)


class Preprocessing(torch.nn.Module):
    def __init__(self, input_dims, output_dim):
        super(Preprocessing, self).__init__()
        self.input_dims = input_dims  # [512,1024]
        self.output_dim = output_dim  # 1024

        self.preprocessing_modules = torch.nn.ModuleList()
        for input_dim in input_dims:
            module = MeanMapper(output_dim)
            self.preprocessing_modules.append(module)

    def forward(self, features):  # [(1568,512,3,3),(1568,1024,3,3)]
        _features = []
        for module, feature in zip(self.preprocessing_modules, features):
            _features.append(module(feature))  # [(1568,1024),(1568,1024)]
        return torch.stack(_features, dim=1)  # (1568,2,1024)
这样layer2、layer3的聚合特征[(1568, 512, 3, 3), (1568, 1024, 3, 3)]经过预处理,即分别经过自适应均值池化然后stack一起得到 (1568,2,1024)的输出特征。
然后再进一步进行聚合,得到(1568, 1024)的输出。
features = self.forward_modules["preadapt_aggregator"](features) # (1568,1024)
class Aggregator(torch.nn.Module):
    def __init__(self, target_dim):
        super(Aggregator, self).__init__()
        self.target_dim = target_dim  # 1024

    def forward(self, features):  # (1568,2,1024)
        """Returns reshaped and average pooled features."""
        # batchsize x number_of_layers x input_dim -> batchsize x target_dim
        features = features.reshape(len(features), 1, -1)  # (1568,1,2048)
        features = F.adaptive_avg_pool1d(features, self.target_dim)  # (1568,1,1024)
        return features.reshape(len(features), -1)  # (1568,1024)
Coreset-reduced patch-feature memory bank
上面的代码中batch_size=2,一个batch的输出为(1568, 1024),其中1568=2x784=28x28,MVTec数据集中的bottle类别训练集共209张,因此整个训练集最终得到的memory bank \(\mathcal{M} \) 的维度为(163856, 1024),其中163856=28x28x209,随着训练集 \(\mathcal{X}_{N} \) size的增大,\(\mathcal{M} \) 也变得越来越大,最终的推理时间和存储空间也随之增大,因此通常需要对 \(\mathcal{M} \) 进行降维,且尽可能保存 \(\mathcal{M} \) 中编码的nominal feature。随机下采样会丢失 \(\mathcal{M} \) 中的有用信息,本文使用coreset subsampling方法来减小 \(\mathcal{M} \),coreset selection旨在找到一个子集 \(\mathcal{S}\subset \mathcal{A}\),对于通过 \(\mathcal{A}\) 得到的解,通过 \(\mathcal{S}\) 可以快速得到最近似解。根据不同的问题,coreset selection的目标也不同,因为PatchCore采用的是nearest neighbour computation,因此本文选用minmax facility location coreset selection来寻找子集 \(\mathcal{M}_{C}\),为了减少coreset selection的时间,本文通过random linear projection \(\psi :\mathbb{R} ^{d}\to\mathbb{R} ^{d^{*}},d^{*}<d\) 来减小元素 \(m\in\mathcal{M}\) 的维度,具体的步骤如下所示
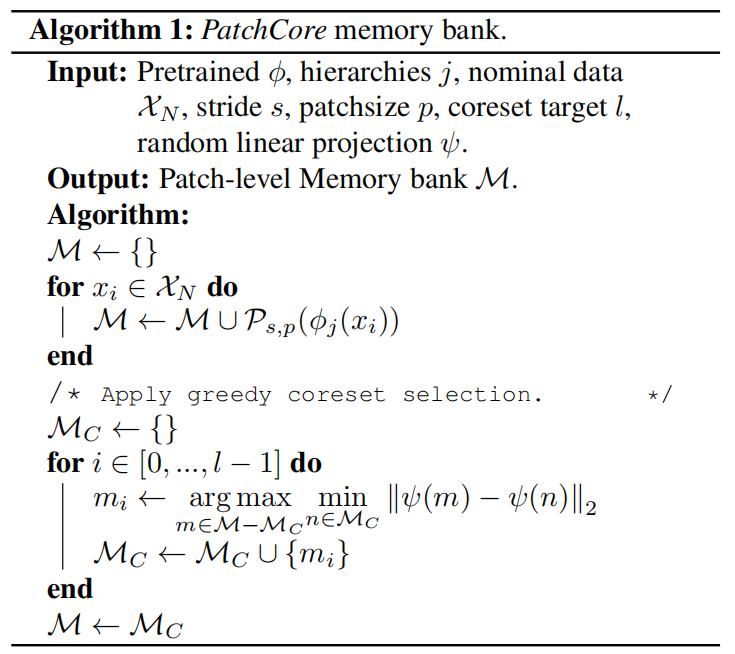
实现代码如下,其中percentage=0.1表示维度缩减为十分之一,\(d^{*}=128\),实现中为了减小内存采用的ApproximateGreedyCoresetSampler的实现,从维度163856中随机挑选10个作为初始点,这样distance matrix的计算就从163856x163856减小到了163856x10。
features = self.featuresampler.run(features) # (16385, 1024)
调用coreset sampler,实现中ApproximateGreedyCoresetSampler类继承的GreedyCoresetSampler,并覆盖了_compute_greedy_coreset_indices方法,这里为了方便显示把GreedyCoresetSampler类中的run和_compute_batchwise_differences方法复制到ApproximateGreedyCoresetSampler中了。
class ApproximateGreedyCoresetSampler(GreedyCoresetSampler):
    def __init__(
        self,
        percentage: float,  # 0.1
        device: torch.device,  # cuda:0
        number_of_starting_points: int = 10,  # 10
        dimension_to_project_features_to: int = 128,  # 128
    ):
        """Approximate Greedy Coreset sampling base class."""
        self.number_of_starting_points = number_of_starting_points
        super().__init__(percentage, device, dimension_to_project_features_to)

    def run(
        self, features: Union[torch.Tensor, np.ndarray]
    ) -> Union[torch.Tensor, np.ndarray]:
        """Subsamples features using Greedy Coreset.

        Args:
            features: [N x D]
        """
        if self.percentage == 1:
            return features
        self._store_type(features)
        if isinstance(features, np.ndarray):
            features = torch.from_numpy(features)
        reduced_features = self._reduce_features(features)  # (163856, 1024) -> (163856, 128)
        sample_indices = self._compute_greedy_coreset_indices(reduced_features)  # (16385,)
        features = features[sample_indices]  # (16385, 1024)
        return self._restore_type(features)

    @staticmethod
    def _compute_batchwise_differences(
        matrix_a: torch.Tensor, matrix_b: torch.Tensor  # (163856, 128),(10,128)
    ) -> torch.Tensor:
        """Computes batchwise Euclidean distances using PyTorch."""
        # (163856,1,128).bmm(163856,128,1)->(163856,1,1)
        a_times_a = matrix_a.unsqueeze(1).bmm(matrix_a.unsqueeze(2)).reshape(-1, 1)  # (163856,1)
        # (10,1,128).bmm(10,128,1)->(10,1,1)
        b_times_b = matrix_b.unsqueeze(1).bmm(matrix_b.unsqueeze(2)).reshape(1, -1)  # (1,10)
        a_times_b = matrix_a.mm(matrix_b.T)  # (163856,10)

        return (-2 * a_times_b + a_times_a + b_times_b).clamp(0, None).sqrt()  # (163856,10)

    def _compute_greedy_coreset_indices(self, features: torch.Tensor) -> np.ndarray:
        """Runs approximate iterative greedy coreset selection.

        This greedy coreset implementation does not require computation of the
        full N x N distance matrix and thus requires a lot less memory, however
        at the cost of increased sampling times.

        Args:
            features: [NxD] input feature bank to sample.
        """
        number_of_starting_points = np.clip(
            self.number_of_starting_points, None, len(features)
        )  # 10
        start_points = np.random.choice(
            len(features), number_of_starting_points, replace=False  # 163856
        ).tolist()  # [61587, 130619, 91549, 30689, 32225, 130105, 25966, 96545, 31837, 4447]

        approximate_distance_matrix = self._compute_batchwise_differences(
            features, features[start_points]  # (163856,128),(10,128)
        )  # (163856,10)
        approximate_coreset_anchor_distances = torch.mean(
            approximate_distance_matrix, axis=-1
        ).reshape(-1, 1)  # # torch.Size([163856]) -> torch.Size([163856,1])
        coreset_indices = []
        num_coreset_samples = int(len(features) * self.percentage)  # 16385

        with torch.no_grad():
            for _ in tqdm.tqdm(range(num_coreset_samples), desc="Subsampling..."):
                select_idx = torch.argmax(approximate_coreset_anchor_distances).item()
                coreset_indices.append(select_idx)
                coreset_select_distance = self._compute_batchwise_differences(
                    features, features[select_idx : select_idx + 1]  # noqa: E203
                )  # (163856,128),(1,128)->(163856,1)
                approximate_coreset_anchor_distances = torch.cat(
                    [approximate_coreset_anchor_distances, coreset_select_distance],
                    dim=-1,
                )  # (163856,2)
                approximate_coreset_anchor_distances = torch.min(
                    approximate_coreset_anchor_distances, dim=1
                ).values.reshape(-1, 1)  # (163856)->(163856,1)

        return np.array(coreset_indices)  # (16385,)
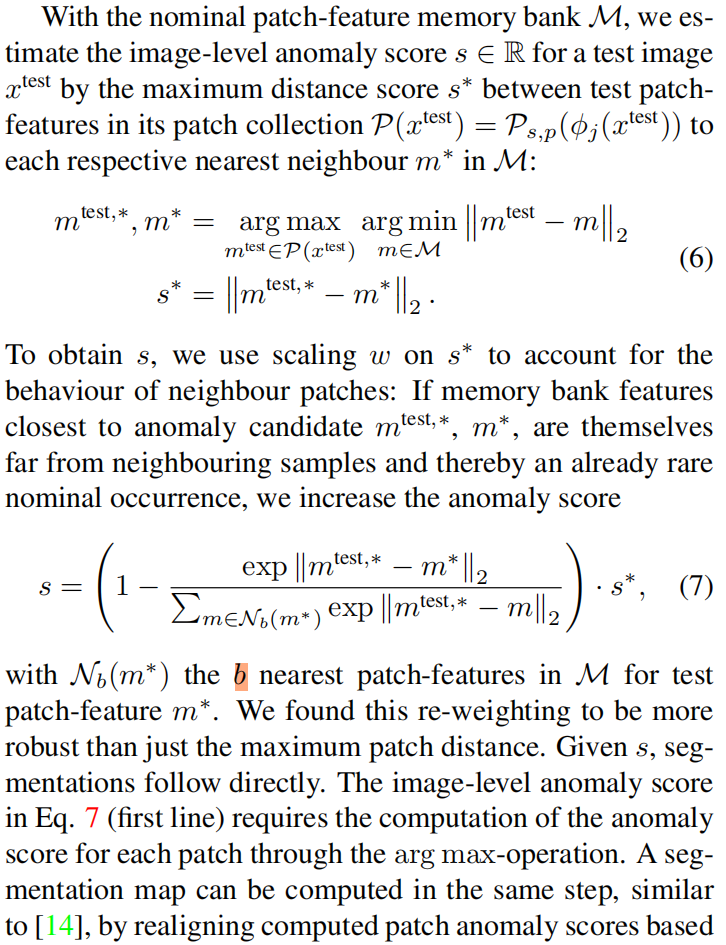
Anomaly Detection with PatchCore
这一部分原文没太看懂,官方实现中最近邻检索和距离计算直接调用的第三方库faiss,对faiss的原理不太了解。并且实现中好像并没有用到式(7),等后续看懂了再来补充吧。这里贴一下原文
代码实现
整个训练集经过coreset selection得到的memory bank \(\mathcal{M}\) 的维度为(16385, 1024)。然后送入faiss的search index中,核心代码就是下面两行
search_index = faiss.IndexFlatL2(features.shape[-1])
search_index.add(features)
在测试时,假设batch_size=2,提取的聚合特征维度为(1568, 1024),其中1568=2x28x28,然后从训练集 \(\mathcal{M}\) 中找到nearest distance and indice,然后沿特征维度取均值就得到了异常得分anomaly scores,代码如下
query_distances, query_nns = search_index.search(query_features, n_nearest_neighbours=1) # (1568,1024),(1568,1)
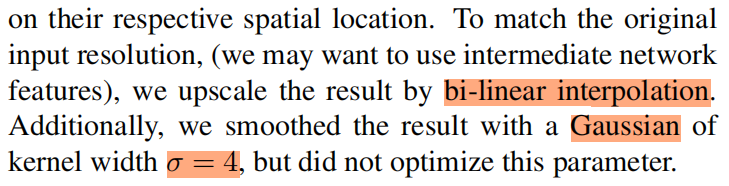
anomaly_scores = np.mean(query_distances, axis=-1) # (1568,)异常得分reshape成(2, 28, 28),沿spatial维度取最大值就得到了整张图片的异常分数,shape=(2, )。进行bilinear插值上采样,然后高斯滤波得到(2, 224, 224)的输出mask,即整张图片每个像素点的异常得分,用于进行异常区域的分割。
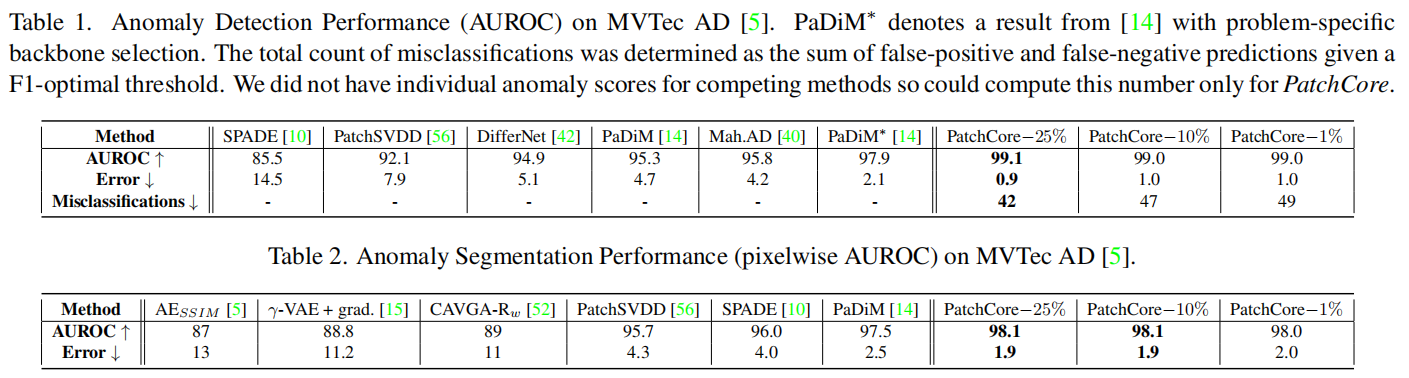
实验结果


![[山东科技大学OJ]1490 Problem F: 该按哪些键](http://192.168.119.211/JudgeOnline/upload/201312/c.jpg)