阿里云OSS的分片上传(Multipart Upload)是一种针对大文件优化的上传方式,其核心流程和关键特性如下:
1. 核心流程
分片上传分为三个步骤:
- 初始化任务:调用InitiateMultipartUpload接口创建上传任务,获取唯一标识(Upload ID)。
- 上传分片:通过UploadPart接口并发上传切分后的文件块(Part),每个Part需指定序号(partNumber),但上传顺序不影响最终合并。
- 合并文件:调用CompleteMultipartUpload接口将所有Part按序号合并为完整文件。若中途放弃上传,需调用AbortMultipartUpload清理未完成的Part。
2. 适用场景
- 大文件加速上传:文件超过5GB时,分片上传通过并行传输显著提升速度。
- 网络环境波动:单个Part失败仅需重传该部分,避免全文件重传。
- 暂停与恢复:任务无过期时间,可随时中断后继续上传。
- 未知文件大小:如视频监控等场景,可在文件生成过程中开始上传。
3. 技术细节与建议
- 分片大小:官方建议文件大于100MB时采用分片上传,过小分片可能导致进度显示异常。
- 并发控制:并非并发数越多越快,需权衡网络带宽和设备负载。
- 安全实践:浏览器端使用时应通过临时访问凭证(STS)授权,避免暴露主账号密钥。
- 跨域配置:浏览器直接上传需预先设置OSS的CORS规则。
4. 操作方式
- 工具支持:OSS控制台不支持分片上传,需使用ossbrowser(图形化工具)、ossutil(命令行)或SDK(如Browser.js、阿里云SDK)。
- 代码示例:Vue项目中可通过ali-oss SDK实现分片上传,结合进度条组件(如Element UI)提升用户体验。
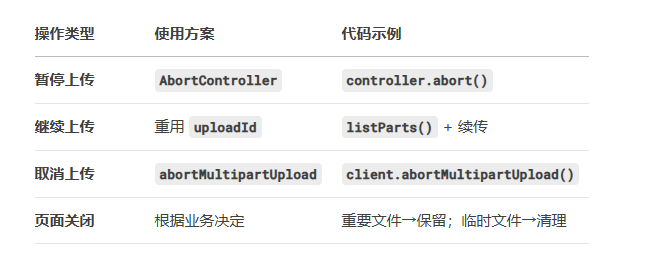
5. 注意事项
- 碎片清理:未完成的分片会占用存储空间,需手动调用AbortMultipartUpload或配置生命周期规则自动清理。
- 费用影响:未清理的分片会产生存储费用,每月费用 = 分片大小 × 分片数量 × 存储单价 × 存储天数。始终对放弃的上传调用
abortMultipartUpload - 自动清理机制:OSS 默认 7 天后清理未完成的分片。可通过生命周期规则缩短:
xml:
<LifecycleConfiguration>
  <Rule>
    <AbortIncompleteMultipartUpload>
      <DaysAfterInitiation>1</DaysAfterInitiation> <!-- 1天后清理 -->
    </AbortIncompleteMultipartUpload>
  </Rule>
</LifecycleConfiguration>
- API灵活性:若需高度定制化,可直接调用REST API(需自行计算签名)。
一:阿里官方文档:Node.js用一个步骤实现分片上传
二:阿里官方文档:Node.js分三个步骤实现分片上传,可扩展暂停/继续上传和取消上传操作

一个步骤实现:
以上分片上传完整示例调用的方法multipartUpload中封装了初始化分片上传、上传分片以及完成分片上传三个API接口。如果您希望分步骤实现分片上传,请依次调用.initMultipartUpload、.uploadPart以及.completeMultipartUpload方法。

<template>
<div class="upload-container">
<el-upload ref="upload" drag action="" :auto-upload="false" :on-change="handleFileChange" :limit="1" :on-exceed="handleExceed">
<i class="el-icon-upload"></i>
<div class="el-upload__text">将文件拖到此处,或<em>点击上传</em></div>
</el-upload>
<el-button style="margin-top: 20px;" type="primary" @click="uploadFile" :disabled="!isupload">开始上传</el-button>
<el-progress v-if="uploading" :text-inside="true" :stroke-width="26" :percentage="uploadPercentage"></el-progress>
</div>
</template>
<script>
import OSS from 'ali-oss'; // npm install ali-oss
import md5 from 'js-md5'; // npm install js-md5
export default {
data() {
return {
file: null,
uploading: false,
isupload: false,
uploadPercentage: 0,
};
},
methods: {
handleFileChange(file) {
this.file = file.raw;
this.isupload = true;
},
handleExceed() {
this.$message.warning('只能上传一个文件');
},
async uploadFile() {
if (!this.file) {
this.$message.error('请先选择文件');
return;
}
this.uploading = true;
try {
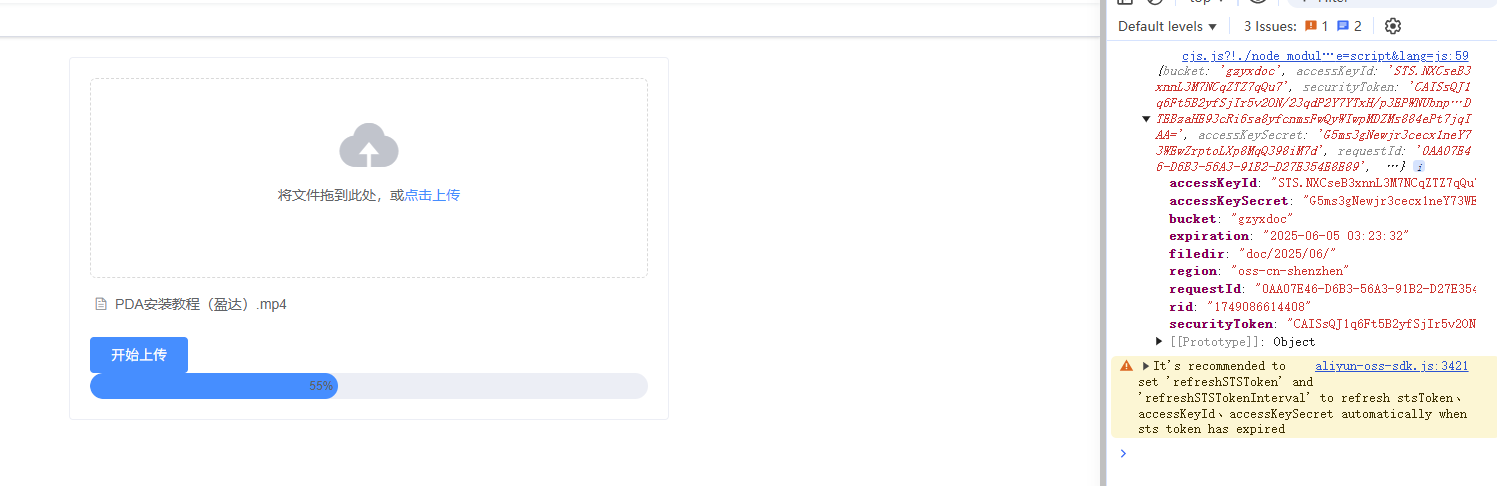
let content = this.setConfig(this.$ossConfig);//这里涉及身份识别,我这里是取接口返回在解密获得(如上图),下同,不再解释
console.log(content)
const client = new OSS({
region: content.region,
bucket: content.bucket,
accessKeyId: content.accessKeyId,
accessKeySecret: content.accessKeySecret,
stsToken: content.securityToken,
});
const fileName = `uploads/${this.file.name}`;
const options = {
partSize: 1024 * 1024 * 5, // 分片大小为 5MB
parallel: 3, // 并发上传的分片数量
progress: (p, cpt, res) => {
this.uploadPercentage = Math.round(p * 100);
},
};
const result = await client.multipartUpload(fileName, this.file, options);
this.$message.success('文件上传成功');
console.log('Upload result:', result);
} catch (error) {
this.$message.error('文件上传失败');
console.error('Upload error:', error);
} finally {
this.uploading = false;
this.uploadPercentage = 0;
}
},
setConfig(content) {
let Base64 = require('js-base64').Base64
let str1 = Base64.decode(content.substr(1, 3) + content.substr(5, 3) + content.substr(9, content.length - 9));
let contentN = Base64.decode(str1.substr(1, 3) + str1.substr(5, 3) + str1.substr(9, str1.length - 9));
return JSON.parse(contentN);
},
},
};
</script>
<style scoped>
.upload-container {
max-width: 600px;
margin: 20px auto;
padding: 20px;
border: 1px solid #ebeef5;
border-radius: 4px;
}
</style>
效果:

扩展:一个步骤扩展暂停/继续上传、取消上传
<template>
  <div class="upload-container">

    <!-- <el-upload ref="uploadRef" class="upload-demo" drag :action="''" :auto-upload="false" :show-file-list="false" accept="*" :limit="2" :on-change="handleChange" :on-exceed="handleExceed"> -->
    <el-upload ref="uploadRef" class="upload-demo" drag :action="''" :auto-upload="true" :show-file-list="false" accept="*" :limit="1" :before-upload="handleChange">
      <i class="el-icon-upload"></i>
      <div class="el-upload__text">将文件拖到此处,或<em>点击上传3</em></div>
    </el-upload>

    <div v-if="file" class="file-info">
      <div>文件名称: {{ file.name }}</div>
      <div>文件大小: {{ formatFileSize(file.size) }}</div>
      <div>分片大小: {{ (chunkSize / 1024 / 1024).toFixed(2) }} MB</div>
      <div>分片数量: {{ chunks }}</div>
    </div>

    <el-progress v-if="showProgress && !isUploaded" :percentage="percentage" :status="uploadStatus" :stroke-width="16" style="margin: 20px 0"></el-progress>
    <el-button v-if="isUploaded" type="text">上传成功</el-button>

    <div v-if="showButtons">
      <!-- <el-button type="primary" @click="submitForm" v-if="!isUploading && !isUploaded && !tempCheckpoint">开始上传</el-button> -->
      <el-button type="primary" icon="el-icon-refresh-left" @click="submitForm" v-if="!isUploading && !isUploaded && !tempCheckpoint">重试</el-button>

      <el-button type="text" @click="shareclearn" v-if="isUploaded">分享 | 清除记录</el-button>

      <el-button type="primary" icon="el-icon-video-pause" @click="pauseUpload()" v-if="paused && isUploading && !isUploaded">暂停上传</el-button>
      <el-button type="primary" icon="el-icon-video-play" @click="resumeUpload()" v-if="!paused && !isUploaded">继续上传</el-button>

      <el-button type="danger" icon="el-icon-circle-close" @click="cancelUpload" v-if="!isUploaded && tempCheckpoint">取消上传</el-button>
    </div>

  </div>
</template>

<script>
import OSS from 'ali-oss'
import md5 from 'js-md5'

export default {
  data() {
    return {
      client: null,
      parallel: 3, // 并发上传的分片数量
      chunkSize: 2 * 1024 * 1024, // 分片大小 2MB
      chunks: 0,// 总分片数量

      file: null,
      ossKey: '',

      uploadStatus: null, // 进度条上传状态
      percentage: 0, // 进度条百分比
      showProgress: false,// 是否显示进度条

      showButtons: false,// 是否显示按钮
      tempCheckpoint: null, // 用于缓存当前切片内容
      uploadId: '',
      isUploading: false,// 是否上传中
      isUploaded: false,//是否上传完毕
      paused: true,//是否暂停
    };
  },
  created() {
    this.initOSSClient();
  },
  methods: {
    async initOSSClient() {
      try {
        let content = this.setConfig(this.$ossConfig);
        console.log(content)
        this.client = new OSS({
          region: content.region,
          bucket: content.bucket,
          accessKeyId: content.accessKeyId,
          accessKeySecret: content.accessKeySecret,
          stsToken: content.securityToken,
        });

      } catch (error) {
        console.error('OSS初始化失败:', error);
        this.$message.error('上传服务初始化失败');
      }
    },
    setConfig(content) {
      let Base64 = require('js-base64').Base64
      let str1 = Base64.decode(content.substr(1, 3) + content.substr(5, 3) + content.substr(9, content.length - 9));
      let contentN = Base64.decode(str1.substr(1, 3) + str1.substr(5, 3) + str1.substr(9, str1.length - 9));
      return JSON.parse(contentN);
    },


    // 选择文件
    async handleChange(file) {
      // console.log(file)
      this.resetState();
      this.file = file//.raw;
      this.ossKey = `uploads/${Date.now()}_${this.file.name}`;
      this.chunks = Math.ceil(this.file.size / this.chunkSize);
      this.showButtons = true;
      this.submitForm();
    },
    // 开始上传
    submitForm() {
      this.initMultipartUpload();
      this.multipartUpload();
    },
    // 初始化分片上传
    async initMultipartUpload() {
      const result = await this.client.initMultipartUpload(this.ossKey);
      this.uploadId = result.uploadId;
      console.log(`初始化分片上传成功, uploadId: ${this.uploadId}`);
    },
    // 开始分片上传
    async multipartUpload() {
      if (!this.file) {
        this.$message.error('请选择文件');
        return;
      }
      this.uploadStatus = null;
      this.percentage = 0;
      this.showProgress = true;
      this.isUploading = true;
      try {
        const result = await this.client.multipartUpload(this.file.name, this.file, {
          progress: (p, checkpoint) => {
            this.tempCheckpoint = checkpoint;
            // this.uploadId = checkpoint.uploadId;
            this.percentage = Math.floor(p * 100);
          },
          parallel: this.parallel,
          partSize: this.chunkSize,
        });
        this.uploadStatus = 'success';
        this.isUploading = false;
        this.isUploaded = true;
        this.$message.success('上传成功');
        console.log(result, '切片上传完毕');
      } catch (e) {
        if (e.code === 'ConnectionTimeoutError') {
          this.uploadStatus = 'exception';
          window.addEventListener('online', this.resumeUpload);
        }
        this.isUploading = false;
        console.error(e);
      }
    },

    // 取消上传
    cancelUpload() {
      this.pauseUpload();
      this.paused = true;
      this.showProgress = false;
      this.percentage = 0;
      this.uploadStatus = null;
      this.tempCheckpoint = null;
      this.uploadId = '';
    },

    // 暂停上传
    pauseUpload() {
      this.isUploading = false;
      this.paused = false;
      this.client.cancel();
    },
    // 继续上传
    async resumeUpload() {
      if (!this.tempCheckpoint) {
        this.$message.error('请先上传');
        return;
      }
      this.uploadStatus = null;
      this.isUploading = true;
      this.paused = true;
      try {
        const result = await this.client.multipartUpload(this.file.name, this.file, {
          progress: (p) => {
            this.percentage = Math.floor(p * 100);
          },
          checkpoint: this.tempCheckpoint,
        });
        this.uploadStatus = 'success';
        this.isUploading = false;
        this.isUploaded = true;
        this.$message.success('续传成功');
        console.log(result, '恢复上传完毕');
      } catch (e) {
        this.isUploading = false;
        console.error(e);
      }
    },


    // 重置
    resetState() {
      this.file = null;
      this.ossKey = '';

      this.uploadStatus = null;
      this.percentage = 0;
      this.showProgress = false;

      this.showButtons = false;
      this.tempCheckpoint = null;
      this.uploadId = '';
      this.isUploading = false;
      this.isUploaded = false;
      this.paused = true;
    },
    // 限制上传一个文件,重新选择文件替换原来的文件
    handleExceed(files) {
      // console.log(this.$refs.uploadRef)
      if (this.$refs.uploadRef.uploadFiles.length > 1) {
        this.$refs.uploadRef.uploadFiles.shift();
      }
    },
    // 格式化文件大小
    formatFileSize(size) {
      const units = ['B', 'KB', 'MB', 'GB'];
      let unitIndex = 0;
      while (size >= 1024 && unitIndex < units.length - 1) {
        size /= 1024;
        unitIndex++;
      }
      return `${size.toFixed(2)} ${units[unitIndex]}`;
    },

    shareclearn() {
      console.log('分享 | 清除记录')
    },

  },
};
</script>

<style scoped>
.upload-container {
  width: 100%;
  max-width: 600px;
  margin: 0 auto;
}

.el-button {
  margin-right: 10px;
}

.file-info {
  margin: 20px 0;
  padding: 15px;
  background-color: #f8f9fa;
  border-radius: 4px;
}

.file-info div {
  margin-bottom: 10px;
  color: #606266;
}
</style>
效果:
一个步骤分片上传(扩展暂停继续取消)
三个步骤实现:
<template>
  <div class="upload-container">
    <!-- multiple drag on-change -->
    <el-upload class="upload-demo" action="" :show-file-list="false" :auto-upload="true" :before-upload="handleFileChange" :accept="'*'">
      <!-- <i class="el-icon-upload"></i>
      <div class="el-upload__text">将文件拖到此处,或<em>点击上传</em></div> -->
      <el-button size="small" type="primary">选择文件</el-button>
    </el-upload>

    <div class="file-info" v-if="file">
      <div>文件名: {{ file.name }}</div>
      <div>文件大小: {{ formatFileSize(file.size) }}</div>
      <div>分片大小: {{ (chunkSize / 1024 / 1024).toFixed(2) }} MB</div>
      <div>分片数量: {{ chunks }}</div>

      <el-progress v-if="isUploading" :percentage="progressPercent" :status="uploadStatus" :stroke-width="14"></el-progress>
      <div>
        <el-button type="primary" :icon="isPaused?'el-icon-video-play':'el-icon-video-pause'" @click="togglePause" v-if="isUploading">{{ isPaused ? '继续' : '暂停' }}</el-button>
        <el-button type="danger" icon="el-icon-circle-close" @click="cancelUpload" v-if="isUploading">取消</el-button>
        <el-button type="primary" icon="el-icon-refresh-left" @click="startUpload" v-if="!isUploading && !uploaded">重试</el-button>
        <el-button type="text" v-if="!isUploading && uploaded">分享 | 清除记录</el-button>
      </div>
    </div>
  </div>
</template>

<script>
import OSS from 'ali-oss'
import md5 from 'js-md5'

export default {
  data() {
    return {
      file: null,
      chunkSize: 2 * 1024 * 1024, // 5MB 分片
      chunks: 0,                  // 分片数量

      uploadedChunks: [],  // 已上传的分片索引
      uploadId: '',        // OSS 分片上传 ID
      client: null,        // OSS 客户端
      isPaused: false,     // 是否暂停
      isUploading: false,  // 上传中
      uploaded: false,     // 上传完成

      progressPercent: 0,  // 进度条-百分比
      uploadStatus: null,  // 进度条-状态

      concurrency: 3,      // 并发数
      activeChunks: 0,     // 当前活跃的分片数
      cancelTokens: {},    // 取消令牌
      parts: [],           // 分片列表
    };
  },
  created() {
    this.initOSSClient();
  },
  methods: {
    async initOSSClient() {
      // 这里应该从后端获取临时凭证(安全考虑)
      // 以下是模拟数据,实际使用需替换为真实接口
      const credentials = await this.getSTSToken();
      this.client = new OSS({
        region: credentials.region,
        accessKeyId: credentials.accessKeyId,
        accessKeySecret: credentials.accessKeySecret,
        stsToken: credentials.securityToken,
        bucket: credentials.bucket,
        refreshSTSToken: async () => {
          const newCredentials = await this.getSTSToken();
          return {
            accessKeyId: newCredentials.accessKeyId,
            accessKeySecret: newCredentials.accessKeySecret,
            stsToken: newCredentials.securityToken
          };
        }
      });
    },
    async getSTSToken() {
      // 实际项目中从这里获取STS token
      // 示例返回结构:
      var content = this.setConfig(this.$ossConfig);
      console.log(content)
      return {
        region: content.region,
        bucket: content.bucket,
        accessKeyId: content.accessKeyId,
        accessKeySecret: content.accessKeySecret,
        securityToken: content.securityToken,
      };
    },
    setConfig(content) {
      let Base64 = require('js-base64').Base64
      let str1 = Base64.decode(content.substr(1, 3) + content.substr(5, 3) + content.substr(9, content.length - 9));
      let contentN = Base64.decode(str1.substr(1, 3) + str1.substr(5, 3) + str1.substr(9, str1.length - 9));
      return JSON.parse(contentN);
    },

    // 格式化文件大小
    formatFileSize(size) {
      const units = ['B', 'KB', 'MB', 'GB'];
      let unitIndex = 0;
      while (size >= 1024 && unitIndex < units.length - 1) {
        size /= 1024;
        unitIndex++;
      }
      return `${size.toFixed(2)} ${units[unitIndex]}`;
    },
    // 标准化ETag格式
    normalizeETag(etag) {
      let cleanETag = String(etag)
        .replace(/^"+/, '')
        .replace(/"+$/, '')
        .replace(/\\/g, '');

      if (!/^[0-9A-F]{32}$/i.test(cleanETag)) {
        throw new Error(`无效的ETag格式: ${etag}`);
      }
      return `"${cleanETag}"`;
    },
    // 重置上传
    resetState() {
      this.uploadedChunks = [];
      this.uploadId = '';

      this.isPaused = false;
      this.isUploading = false;
      this.uploaded = false;

      this.progressPercent = 0;
      this.uploadStatus = null;

      this.activeChunks = 0;
      this.cancelTokens = {};


      // // 取消所有进行中的请求
      // Object.values(this.cancelTokens).forEach(ctrl => ctrl.abort());
      // this.cancelTokens = {};

      // // 强制更新视图
      // this.$nextTick();

    },

    handleFileChange(file) {
      // console.log(file)
      this.resetState();
      this.file = file;//file.raw;
      this.chunks = Math.ceil(this.file.size / this.chunkSize);
      this.startUpload();
    },

    // 1、初始化分片上传
    async startUpload() {
      if (!this.file) return;

      try {
        this.isUploading = true;
        this.isPaused = false;

        if (!this.uploadId) {
          const result = await this.client.initMultipartUpload(
            this.file.name,
            { timeout: 60000 }
          );
          this.uploadId = result.uploadId;
          console.log(`初始化分片上传成功, uploadId: ${this.uploadId}`);
        }


        // 获取未上传的分片
        const unuploaded = Array.from({ length: this.chunks }, (_, i) => i)
          .filter(i => !this.uploadedChunks.includes(i));

        // 并发控制
        const uploadNext = async () => {
          if (this.isPaused || !this.isUploading) return;

          // 上传完,合并分片
          if (unuploaded.length === 0 && this.activeChunks === 0) {
            await this.completeUpload();
            return;
          }

          if (this.activeChunks < this.concurrency && unuploaded.length > 0) {
            const chunkIndex = unuploaded.shift();
            this.activeChunks++;

            // 取消步骤一:创建取消令牌,取消正在进行的 HTTP 请求(分片上传请求)
            const controller = new AbortController();
            this.cancelTokens[chunkIndex] = controller;


            // 2、调用上传分片-s
            this.uploadChunk(chunkIndex, controller.signal)
              .then((res) => {
                // console.log(res)
                // console.log(chunkIndex)
                // this.parts.push({ partNumber: chunkIndex + 1, etag: res.etag });
                this.uploadedChunks.push(chunkIndex);
                this.updateProgress();
              })
              .catch(err => {
                if (err.name !== 'AbortError') {
                  console.error(`分片 ${chunkIndex} 上传失败:`, err);
                }
              })
              .finally(() => {
                this.activeChunks--;
                delete this.cancelTokens[chunkIndex];
                uploadNext();
              });
            // 调用上传分片-e


            uploadNext();
          }
        };

        // 启动并发上传
        for (let i = 0; i < this.concurrency; i++) {
          uploadNext();
        }

      } catch (err) {
        console.error('上传初始化失败:', err);
        this.$message.error('上传初始化失败');
        this.resetState();
      }
    },

    // 2、分片上传
    async uploadChunk(index, signal) {
      const start = index * this.chunkSize;
      const end = Math.min(start + this.chunkSize, this.file.size);
      const chunk = this.file.slice(start, end);

      return this.client.uploadPart(
        this.file.name,
        this.uploadId,
        index + 1,
        chunk,
        signal,
      );
    },

    // 3、完成上传
    async completeUpload() {
      try {
        // 获取已上传分片列表
        const listParts = await this.client.listParts(
          this.file.name,
          this.uploadId,
        );
        // console.log(listParts)

        // 按分片号排序
        const sortedParts = listParts.parts.sort((a, b) => a.partNumber - b.partNumber);
        // console.log(sortedParts)

        this.parts = await sortedParts.map(p => ({
          number: Number(p.PartNumber),//!!!注意!!!键名只能用number
          etag: this.normalizeETag(p.ETag),//!!!注意!!!键名只能用etag
        }))
        // console.log(this.parts)

        // 完成上传
        const completeResult = await this.client.completeMultipartUpload(
          this.file.name,
          this.uploadId,
          this.parts,
        );
        console.log(completeResult)

        this.$message.success('完成上传-成功');
        this.uploadStatus = 'success';
        this.uploaded = true;
        this.isUploading = false;
      } catch (err) {
        this.uploadStatus = 'exception';
        console.error('完成上传-失败:', err);
        this.$message.error('完成上传-失败');
      }
    },


    // 暂停/继续 上传
    togglePause() {
      this.isPaused = !this.isPaused;
      if (!this.isPaused) {
        this.startUpload();
      }
    },

    // 取消上传
    cancelUpload() {
      this.isUploading = false;

      // 取消所有正在上传的分片
      Object.values(this.cancelTokens).forEach(controller => {
        controller.abort();
      });

      // 取消步骤二:清理OSS上传记录,清理掉OSS上存储的所有已经上传的分片,终止本次分片上传过程,并删除所有已上传的分片数据。
      // 这样确保不会在 OSS 上留下无效的分片数据,避免产生不必要的存储费用。
      if (this.uploadId && this.file) {
        try {
          this.client.abortMultipartUpload(this.file.name, this.uploadId)
            .finally(() => {
              this.resetState();
            })
            .catch((err) => {
              console.error('取消上传失败:', err)
            });
        } catch (err) {
          console.error('OSS清理异常:', err);
        }
      }

      this.$message.info('上传已取消');

      // 使用Vue的强制更新视图(针对Element UI进度条)
      this.$nextTick(() => {
        this.$forceUpdate();
      });
    },

    // 更新进度条
    updateProgress() {
      // 如果不在上传状态,不更新进度
      if (!this.isUploading) return;

      const percent = Math.round(
        (this.uploadedChunks.length / this.chunks) * 100
      );
      this.progressPercent = Math.min(percent, 100);
    },


  }
};
</script>

<style scoped>
.upload-container {
  max-width: 600px;
  margin: 20px auto;
  padding: 20px;
  border: 1px solid #ebeef5;
  border-radius: 4px;
}
.upload-demo {
  width: 300px;
  margin: 0 auto;
}
.file-info {
  margin-top: 20px;
  padding: 15px;
  background-color: #f8f9fa;
  border-radius: 4px;
}
.file-info div {
  margin-bottom: 10px;
  color: #606266;
}
.el-progress {
  margin-top: 20px;
}
</style>
效果:
三个步骤分片上传


![[6-01-01].第12节:字节码文件内容 - 属性表集合](https://img-blog.csdnimg.cn/direct/95c228a03ad64d2b977e0794e4fdebf8.png)