vue-element-admin动态菜单(后台获取),此教程面向纯小白攻略,不要嫌我啰嗦,翻到自己需要的地方即可
前提
vue-element-admin官网: vue-element-admin (gitee.io)
vue-element-admin页面展示:vue-element-adminVue Element Admin
vue-element-admin下载:PanJiaChen/vue-element-admin
安装依赖报错解决方案:vue-element-admin项目安装依赖报错
首先我们拿到项目,得了解一下目录结构
他是通过src->router->index.js,根据路由来进行页面的跳转
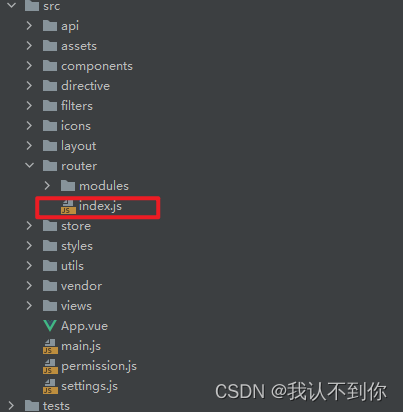
我们查看一下里面的文件,再对比一下项目的目录
export const asyncRoutes = [
  {
    path: '/permission',
    component: Layout,
    redirect: '/permission/page',
    alwaysShow: true, // will always show the root menu
    name: 'Permission',
    meta: {
      title: 'Permission',
      icon: 'lock',
      roles: ['admin', 'editor'] // you can set roles in root nav
    },
    children: [
      {
        path: 'page',
        component: () => import('@/views/permission/page'),
        name: 'PagePermission',
        meta: {
          title: 'Page Permission',
          roles: ['admin'] // or you can only set roles in sub nav
        }
      },
      {
        path: 'directive',
        component: () => import('@/views/permission/directive'),
        name: 'DirectivePermission',
        meta: {
          title: 'Directive Permission'
          // if do not set roles, means: this page does not require permission
        }
      },
      {
        path: 'role',
        component: () => import('@/views/permission/role'),
        name: 'RolePermission',
        meta: {
          title: 'Role Permission',
          roles: ['admin']
        }
      }
    ]
  },

  {
    path: '/icon',
    component: Layout,
    children: [
      {
        path: 'index',
        component: () => import('@/views/icons/index'),
        name: 'Icons',
        meta: { title: 'Icons', icon: 'icon', noCache: true }
      }
    ]
  },

  /** when your routing map is too long, you can split it into small modules **/
  componentsRouter,
  chartsRouter,
  nestedRouter,
  tableRouter,

  {
    path: '/example',
    component: Layout,
    redirect: '/example/list',
    name: 'Example',
    meta: {
      title: 'Example',
      icon: 'el-icon-s-help'
    },
    children: [
      {
        path: 'create',
        component: () => import('@/views/example/create'),
        name: 'CreateArticle',
        meta: { title: 'Create Article', icon: 'edit' }
      },
      {
        path: 'edit/:id(\\d+)',
        component: () => import('@/views/example/edit'),
        name: 'EditArticle',
        meta: { title: 'Edit Article', noCache: true, activeMenu: '/example/list' },
        hidden: true
      },
      {
        path: 'list',
        component: () => import('@/views/example/list'),
        name: 'ArticleList',
        meta: { title: 'Article List', icon: 'list' }
      }
    ]
  },

  {
    path: '/tab',
    component: Layout,
    children: [
      {
        path: 'index',
        component: () => import('@/views/tab/index'),
        name: 'Tab',
        meta: { title: 'Tab', icon: 'tab' }
      }
    ]
  },

  {
    path: '/error',
    component: Layout,
    redirect: 'noRedirect',
    name: 'ErrorPages',
    meta: {
      title: 'Error Pages',
      icon: '404'
    },
    children: [
      {
        path: '401',
        component: () => import('@/views/error-page/401'),
        name: 'Page401',
        meta: { title: '401', noCache: true }
      },
      {
        path: '404',
        component: () => import('@/views/error-page/404'),
        name: 'Page404',
        meta: { title: '404', noCache: true }
      }
    ]
  },

  {
    path: '/error-log',
    component: Layout,
    children: [
      {
        path: 'log',
        component: () => import('@/views/error-log/index'),
        name: 'ErrorLog',
        meta: { title: 'Error Log', icon: 'bug' }
      }
    ]
  },

  {
    path: '/excel',
    component: Layout,
    redirect: '/excel/export-excel',
    name: 'Excel',
    meta: {
      title: 'Excel',
      icon: 'excel'
    },
    children: [
      {
        path: 'export-excel',
        component: () => import('@/views/excel/export-excel'),
        name: 'ExportExcel',
        meta: { title: 'Export Excel' }
      },
      {
        path: 'export-selected-excel',
        component: () => import('@/views/excel/select-excel'),
        name: 'SelectExcel',
        meta: { title: 'Export Selected' }
      },
      {
        path: 'export-merge-header',
        component: () => import('@/views/excel/merge-header'),
        name: 'MergeHeader',
        meta: { title: 'Merge Header' }
      },
      {
        path: 'upload-excel',
        component: () => import('@/views/excel/upload-excel'),
        name: 'UploadExcel',
        meta: { title: 'Upload Excel' }
      }
    ]
  },

  {
    path: '/zip',
    component: Layout,
    redirect: '/zip/download',
    alwaysShow: true,
    name: 'Zip',
    meta: { title: 'Zip', icon: 'zip' },
    children: [
      {
        path: 'download',
        component: () => import('@/views/zip/index'),
        name: 'ExportZip',
        meta: { title: 'Export Zip' }
      }
    ]
  },

  {
    path: '/pdf',
    component: Layout,
    redirect: '/pdf/index',
    children: [
      {
        path: 'index',
        component: () => import('@/views/pdf/index'),
        name: 'PDF',
        meta: { title: 'PDF', icon: 'pdf' }
      }
    ]
  },
  {
    path: '/pdf/download',
    component: () => import('@/views/pdf/download'),
    hidden: true
  },

  {
    path: '/theme',
    component: Layout,
    children: [
      {
        path: 'index',
        component: () => import('@/views/theme/index'),
        name: 'Theme',
        meta: { title: 'Theme', icon: 'theme' }
      }
    ]
  },

  {
    path: '/clipboard',
    component: Layout,
    children: [
      {
        path: 'index',
        component: () => import('@/views/clipboard/index'),
        name: 'ClipboardDemo',
        meta: { title: 'Clipboard', icon: 'clipboard' }
      }
    ]
  },

  {
    path: 'external-link',
    component: Layout,
    children: [
      {
        path: 'https://github.com/PanJiaChen/vue-element-admin',
        meta: { title: 'External Link', icon: 'link' }
      }
    ]
  },

  // 404 page must be placed at the end !!!
  { path: '*', redirect: '/404', hidden: true }
]
我拿一部分来跟目录做一下对比,下面我将参数讲解一下
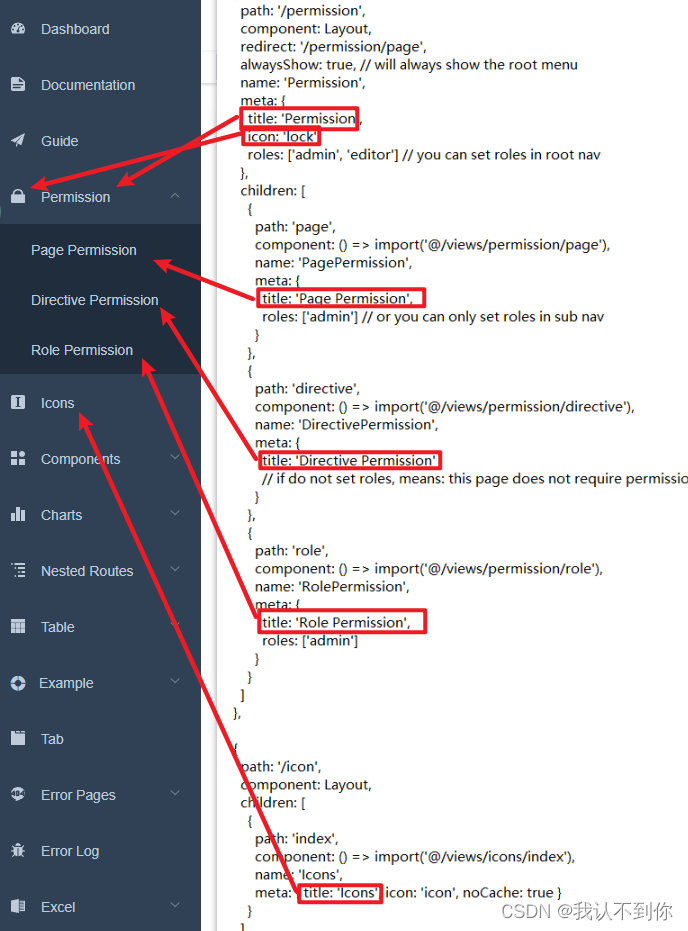
各个参数的意思
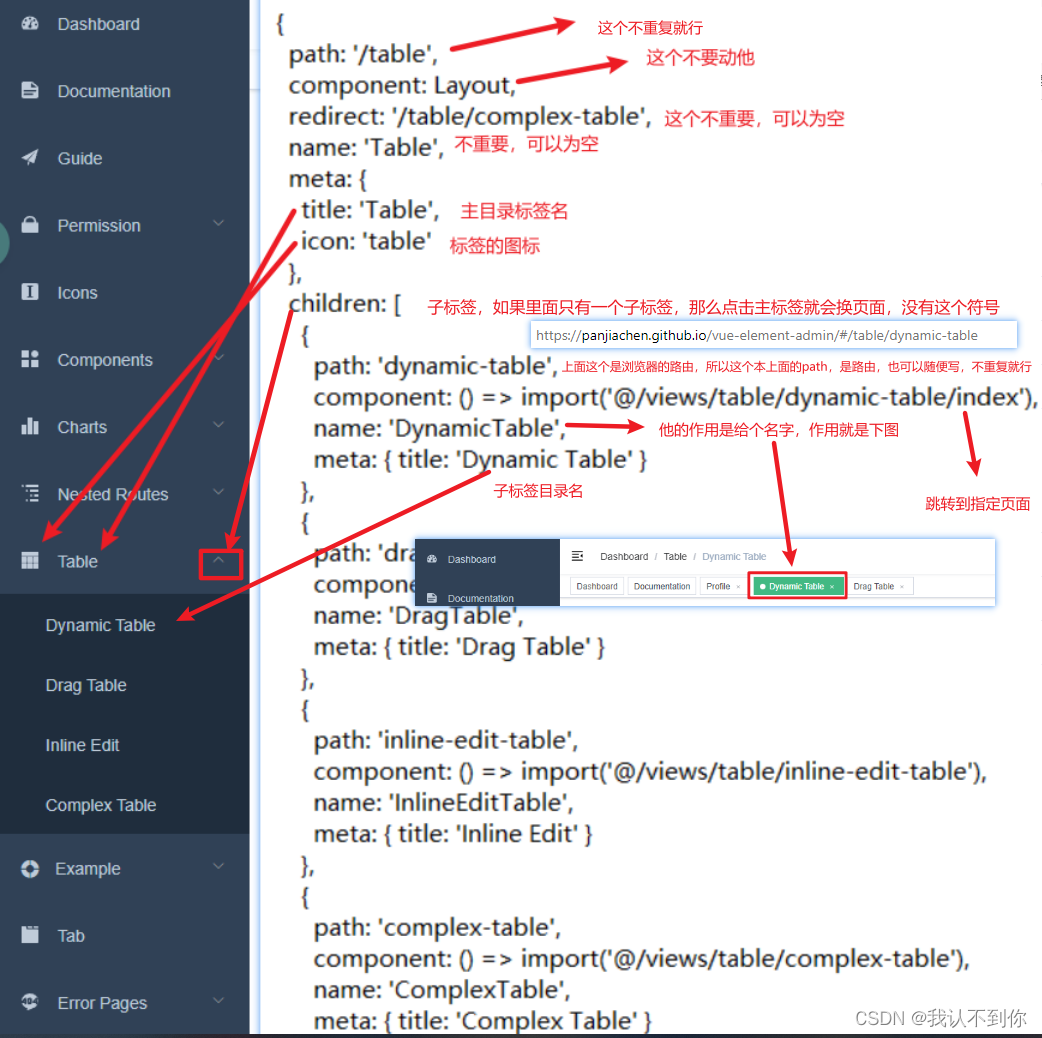
有子目录的目录,以最常见的table举例,table在这里,ctrl+左键点进去就行

如果使用的 vscode 跳转不了,他的目录是 src\router\modules\table.js
参数与目录的对照
动态菜单思路
我们要做到的是,根据后端返回的json对象,动态的显示目录
而vue-element-admin,是写死了的菜单,所以我们调用后端接口,实现目录的拼接,最终达到实现动态菜单的目的
那么我们就要仿造router目录下index.js文件,动态的生成相似的json对象
生成动态菜单,修改文件
修改src/store/modules目录下的permission.js文件,这个文件就是用来生成菜单的(上面的index.js只是目录的结构,并不是生成的途径)
源文件
//这个asyncRoutes不眼熟吗,不就是刚才我们看的目录结构吗
import { asyncRoutes, constantRoutes } from '@/router'

//不管
function hasPermission(roles, route) {
  if (route.meta && route.meta.roles) {
    return roles.some(role => route.meta.roles.includes(role))
  } else {
    return true
  }
}

//不管
export function filterAsyncRoutes(routes, roles) {
  const res = []

  routes.forEach(route => {
    const tmp = { ...route }
    if (hasPermission(roles, tmp)) {
      if (tmp.children) {
        tmp.children = filterAsyncRoutes(tmp.children, roles)
      }
      res.push(tmp)
    }
  })

  return res
}
//不管
const state = {
  routes: [],
  addRoutes: []
}
//不管
const mutations = {
  SET_ROUTES: (state, routes) => {
    state.addRoutes = routes
    state.routes = constantRoutes.concat(routes)
  }
}
//重要的是这个,这里不用看,但你要知道这里很重要,是加载目录的地方
const actions = {
  generateRoutes({ commit }, roles) {
    return new Promise(resolve => {
      let accessedRoutes
      if (roles.includes('admin')) {
        accessedRoutes = asyncRoutes || []
      } else {
        accessedRoutes = filterAsyncRoutes(asyncRoutes, roles)
      }
      commit('SET_ROUTES', accessedRoutes)
      resolve(accessedRoutes)
    })
  }
}
//不管
export default {
  namespaced: true,
  state,
  mutations,
  actions
}
我修改的permission.js文件,下面有json文件,一定要对照着看,不然看不懂
import { asyncRoutes, constantRoutes } from '@/router'

import { authMenu } from '@/api/user'// 【新加入】引入请求,后面有文件,先不慌
import Layout from '@/layout'// 【新加入】引入layout

// 这里是因为我之前没用动态菜单的时候报错,从网上搜的,改了点,好像也不太重要
function hasPermission(roles, route) {
  if (route.meta && route.meta.roles) {
    if (route.meta.roles.indexOf(roles) > -1) {
      return true
    } else {
      return false
    }
    // return roles.some(role => route.meta.roles.includes(role))
  } else {
    return true
  }
}

//这里自己写方法,作用就是向 asyncRoutes 插入路由,达到动态路由的效果
/**
 * 【新加入】后台查询的菜单数据拼装成路由格式的数据
 * @param routes
 */
export function generaMenu(routes, data) {
    //data挨个遍历
  data.forEach(item => {
      //path不为空的话,就新建一个对象,装数据
    if (item.path !== '') {
        //这个就仿照目录的机构,搭建
      const menu = {
        path: item.path,
        component: Layout, //这个不用写data里面的内容,引用就行了
        redirect: item.redirect,
        children: [],
        name: item.name,
        meta: item.meta
      }
      //遍历子标签,并加入到主目录的children中去
      item.children.forEach(item => {
        const menu2 = {
          path: item.path,
          component: (resolve) => require([`@/views${item.component}`], resolve),
          name: item.name,
          meta: item.meta
        }
        //加入到主目录的children中去
        menu.children.push(menu2)
      })
  	  //追加
      routes.push(menu)
    }
  })
//把404加到最后,因为作者说  // 404 page must be placed at the end !!!
  const menu3 = {
    path: '*',
    redirect: '/404',
    hidden: true
  }
  //追加
  routes.push(menu3)
}

//不看
export function filterAsyncRoutes(routes, roles) {
  const res = []

  routes.forEach(route => {
    const tmp = { ...route }
    if (hasPermission(roles, tmp)) {
      if (tmp.children) {
        tmp.children = filterAsyncRoutes(tmp.children, roles)
      }
      res.push(tmp)
    }
  })

  return res
}
//不看
const state = {
  routes: [],
  addRoutes: []
}
//不看
const mutations = {
  SET_ROUTES: (state, routes) => {
    state.addRoutes = routes
    state.routes = constantRoutes.concat(routes)
  }
}

const actions = {
  generateRoutes({ commit }, roles) {
    return new Promise(resolve => {
      // 【新加入】开始
      const loadMenuData = []
      // 先查询后台并返回左侧菜单数据并把数据添加到路由,authMenu(state.token)后面会写
      authMenu(state.token).then(response => {
        let data = response
        //我的code为100200为正常
        if (response.code !== 100200) {
          this.$message({
            message: '菜单数据加载异常',
            type: 0
          })
        } else {
            //获取目录的json
          data = response.data
            //把data的数据拷贝到loadMenuData里面
          Object.assign(loadMenuData, data)
            //把asyncRoutes的数据拷贝到tempAsyncRoutes里面
          const tempAsyncRoutes = Object.assign([], asyncRoutes)
          // 最最重要的,把loadMenuData追加到tempAsyncRoutes后面
          generaMenu(tempAsyncRoutes, loadMenuData)
            //定义accessedRoutes
          let accessedRoutes
          // 把 tempAsyncRoutes 的值给 accessedRoutes ,并输出
          // eslint-disable-next-line prefer-const
          accessedRoutes = tempAsyncRoutes || []
            //下面这些就是加载目录了
          commit('SET_ROUTES', accessedRoutes)
          resolve(accessedRoutes)
        }
      })
    }).catch(error => {
      console.log(error)
    })
  }
}

export default {
  namespaced: true,
  state,
  mutations,
  actions
}
JSON文件,后台返回的值
{
    "code":100200,
    "msg":"返回成功",
    "data":[
        {
            "path":"/maintenance",
            "component":"Layout",
            "redirect":"",
            "name":"",
            "meta":{
                "title":"",
                "icon":"table"
            },
            "children":[
                {
                    "path":"/maintenance-task-management",
                    "component":"/table/complex-table",
                    "name":"maintenance-task-management"
                    "meta":{
                        "title":"维修任务管理"
                    }
                }
            ]
        },
        {
            "path":"/complete",
            "component":"Layout",
            "redirect":"",
            "name":"",
            "meta":{
                "title":"",
                "icon":"table"
            },
            "children":[
                {
                    "path":"/complete-maintenance-management",
                    "component":"/table/complex-table",
                    "name":"complete-maintenance-management"
                    "meta":{
                        "title":"维修完成管理"
                    }
                }
            ]
        },
        {
            "path":"/plant",
            "component":"Layout",
            "redirect":"",
            "name":"",
            "meta":{
                "title":"",
                "icon":"table"
            },
            "children":[
                {
                    "path":"/plant-maintenance-management",
                    "component":"/table/complex-table",
                    "name":"plant-maintenance-management"
                    "meta":{
                        "title":"送厂维修管理"
                    }
                }
            ]
        },
        {
            "path":"/device",
            "component":"Layout",
            "redirect":"",
            "name":"",
            "meta":{
                "title":"",
                "icon":"table",
            },
            "children":[
                {
                    "path":"/device-information-search",
                    "component":"/table/complex-table",
                    "name":"device-information-search"
                    "meta":{
                        "title":"设备信息查找"
                    }
                }
            ]
        }
    ]
}
添加authMenu接口
引入后台接口的方法(也就是封装好的axios,然后把接口统一写在一个js文件里,用的时候直接引入,方便后期维护)
首先在src->api>user.js,加入一个接口方法
import request from '@/utils/request'

export function login(data) {
  return request({
    url: '/fix/user/login',
    method: 'post',
    data
  })
}

export function getInfo(token) {
  return request({
    url: '/fix/user/info',
    method: 'get',
    params: { token }
  })
}

export function logout() {
  return request({
    url: '/fix/user/logout',
    method: 'post'
  })
}
//这里加一个,根据data的不同,后台会返回不同的字符串结果,动态菜单完成
export function authMenu(data) {
  return request({
    url: '/fix/user/selectMenu',
    method: 'post',
    data
  })
}
修改index.js中的asyncRoutes方法,使其为空,要我们动态的加入菜单
export const asyncRoutes = [
]


![[R]第二节 对象介绍与赋值运算](https://img-blog.csdnimg.cn/img_convert/503ef4cdf5d769cc9c3aeda4a2989a4e.png)