一、项目效果展示
-
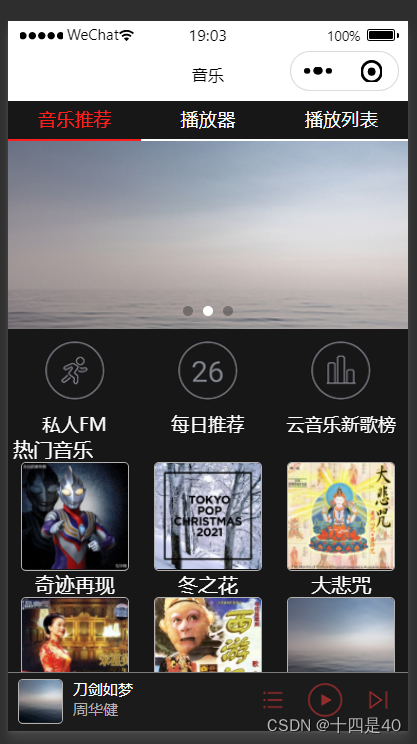
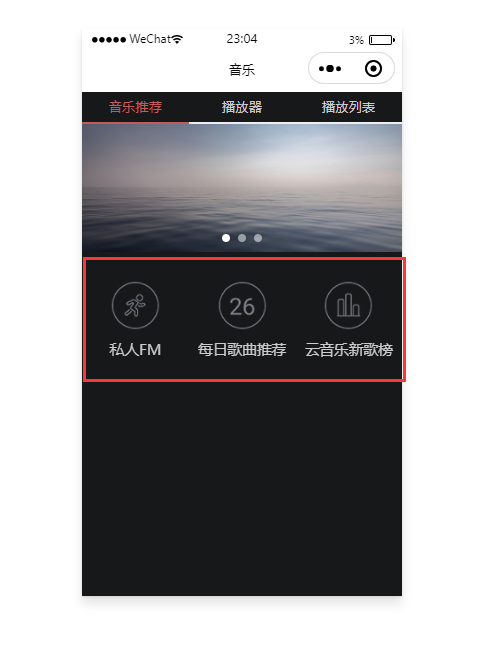
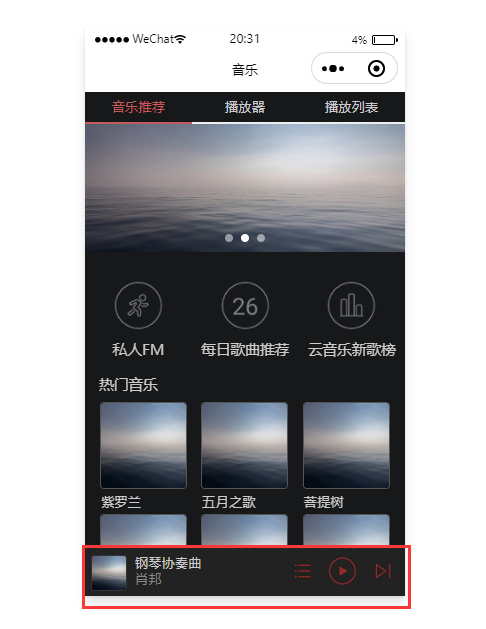
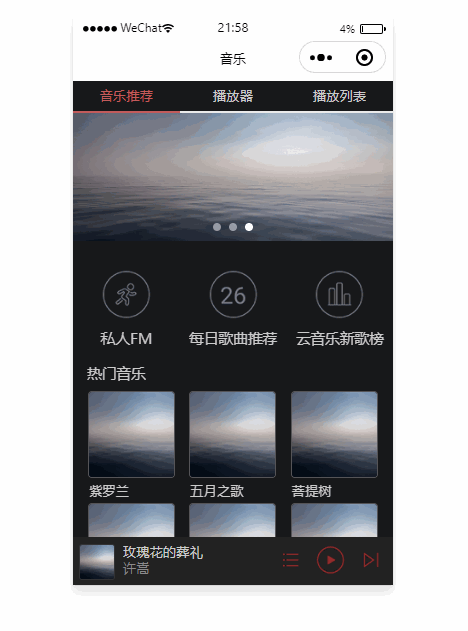
音乐推荐页面展示
-
播放器展示
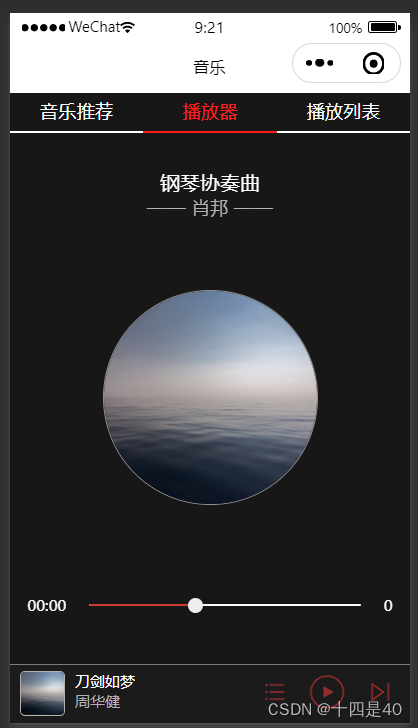
-
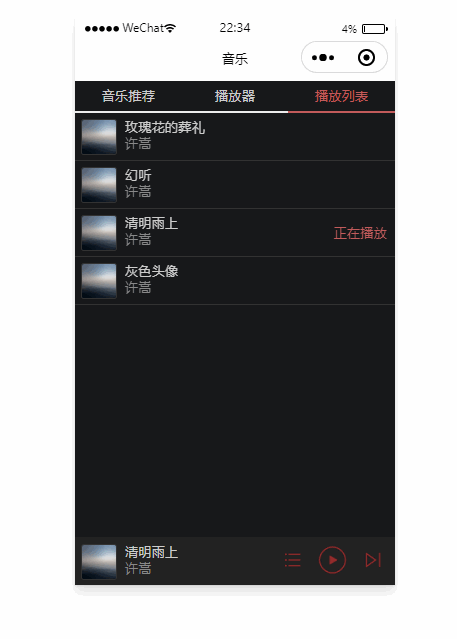
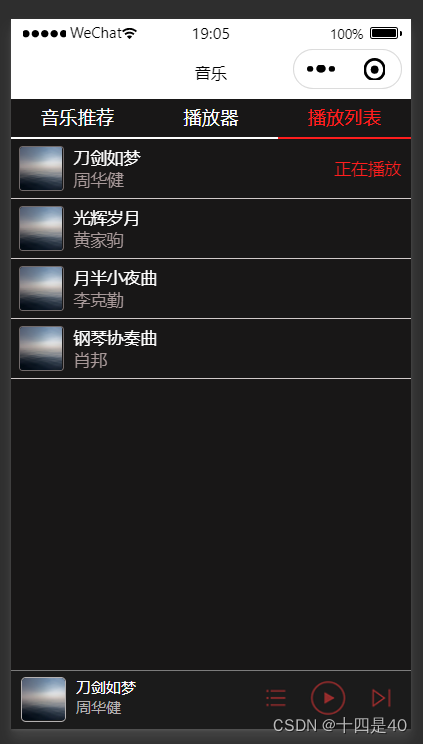
播放列表展示
二、项目结构
- 音乐小程序项目页面结构:
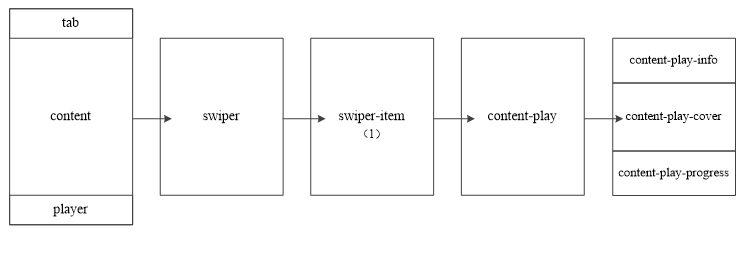
1.tab导航栏
2.content内容区
3.player音乐播放器控件

-
开发者工具创建空白项目:
-
新建项目 —— 设置项目名称和路径 —— 选择你注册的AppID —— 不使用云服务 —— 选择JavaScript基础模板 —— 点击确定创建项目
-
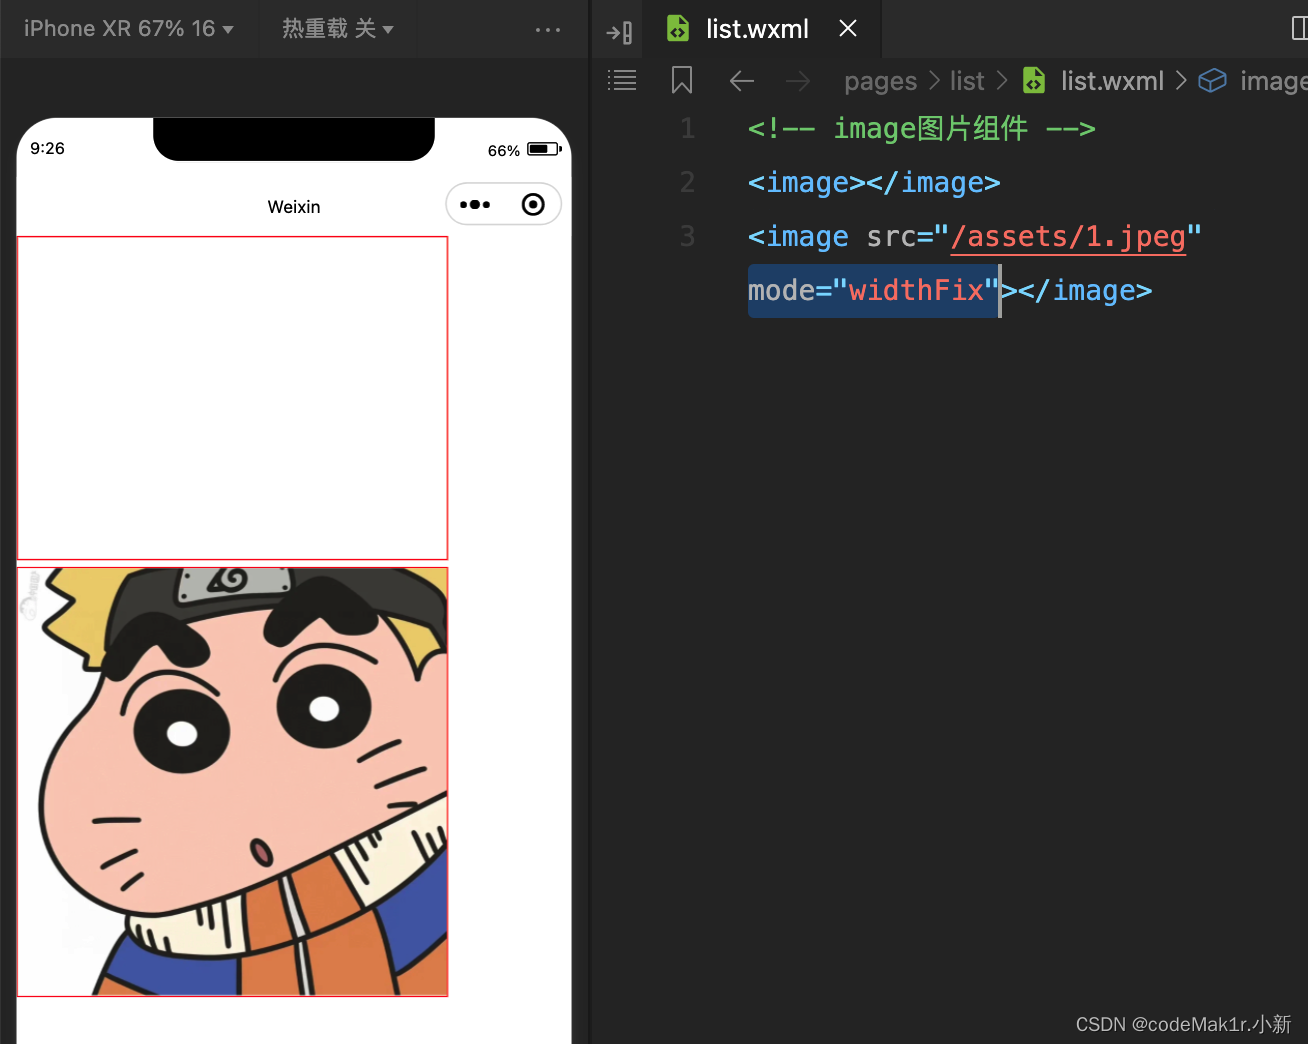
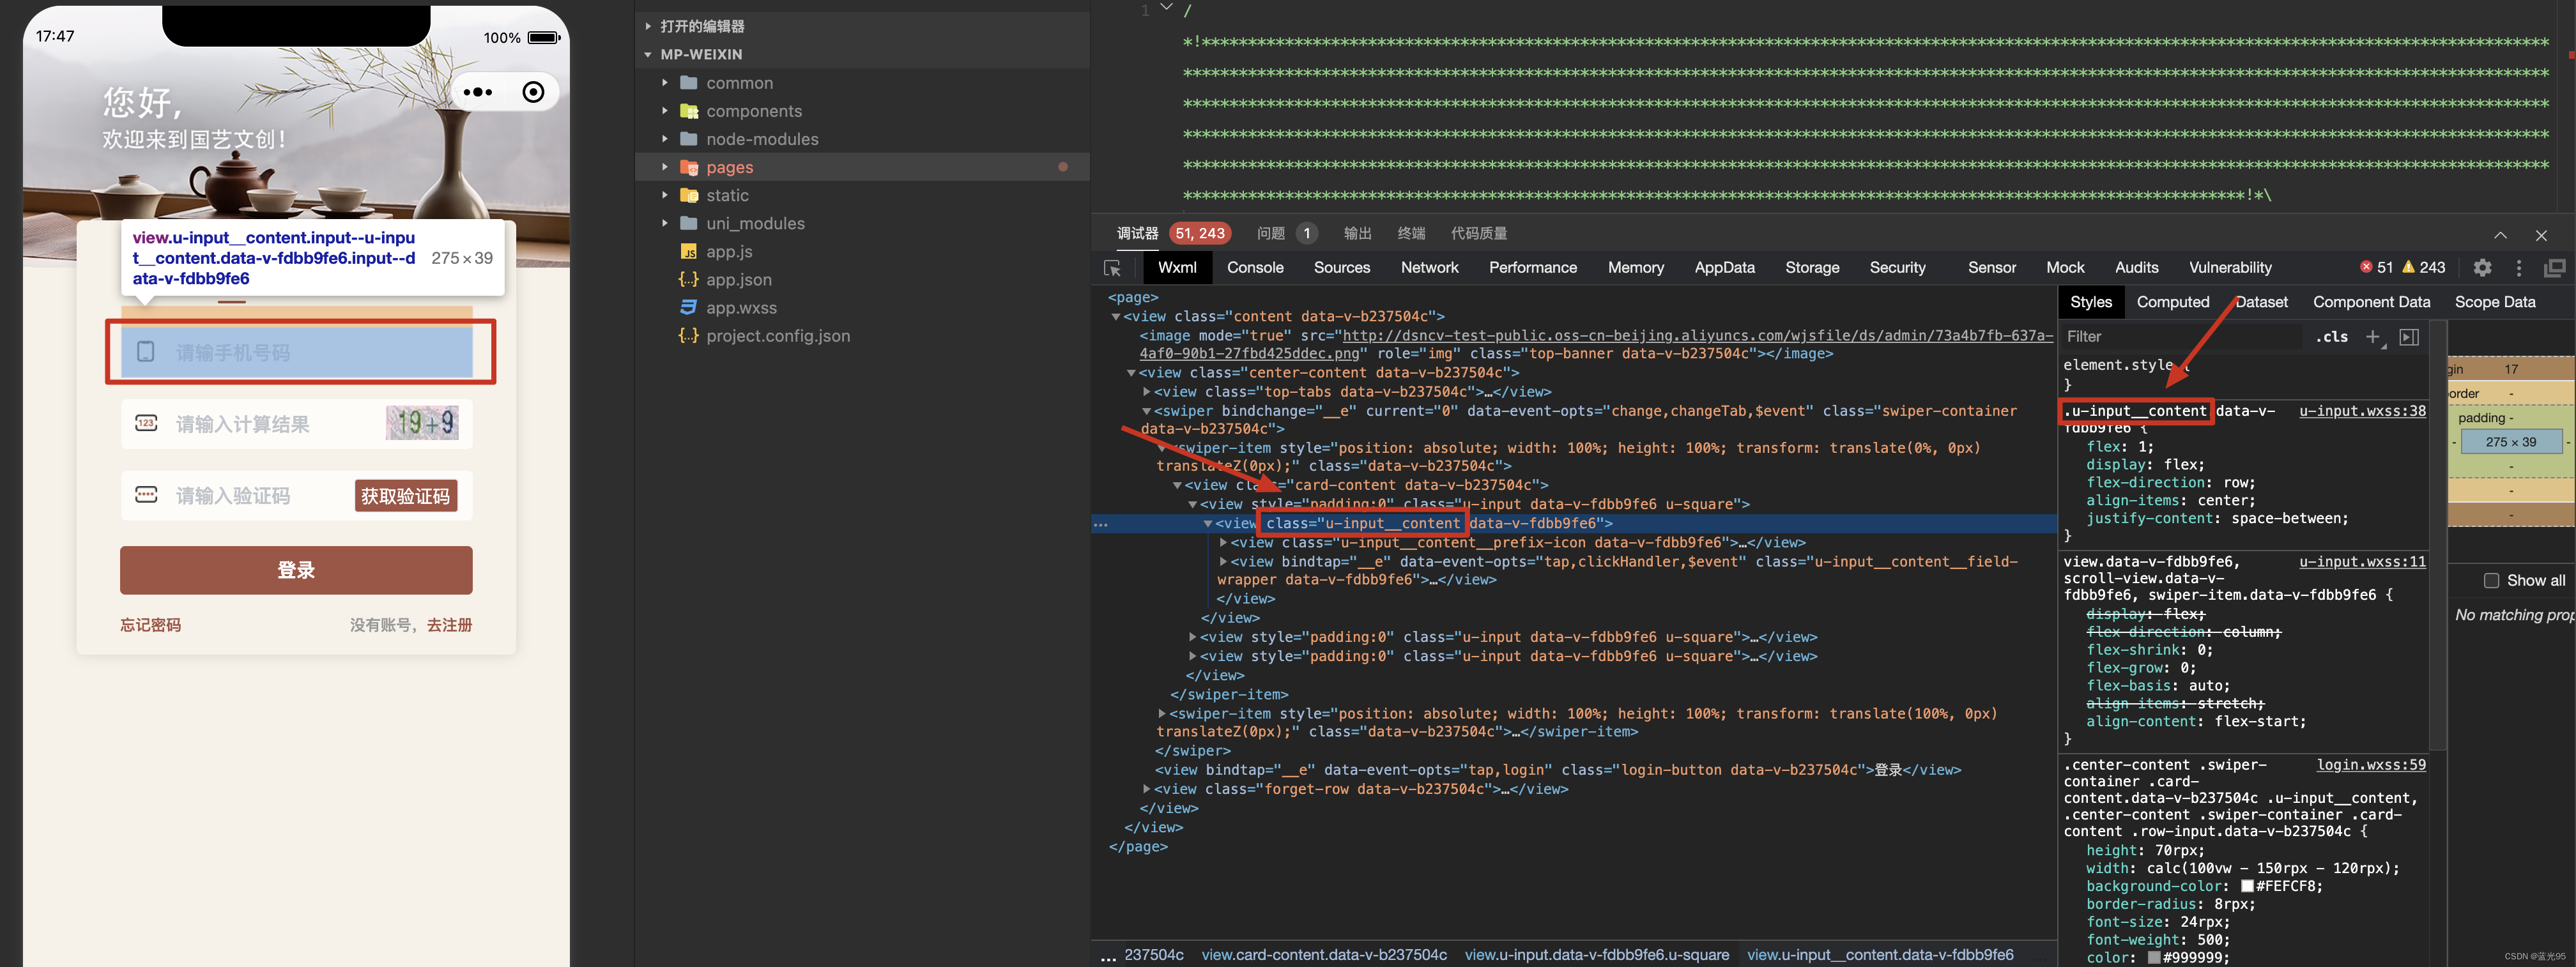
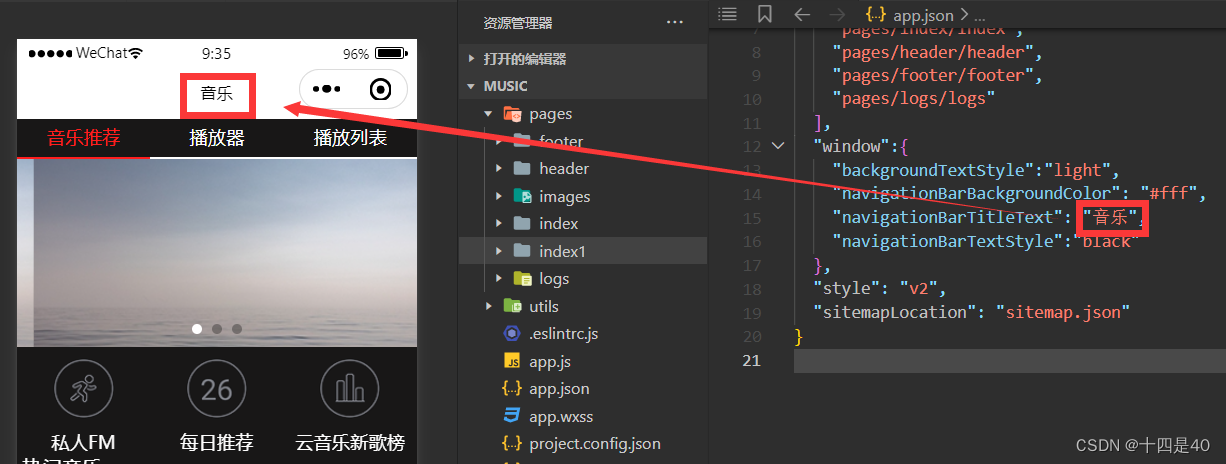
修改
app.json
{
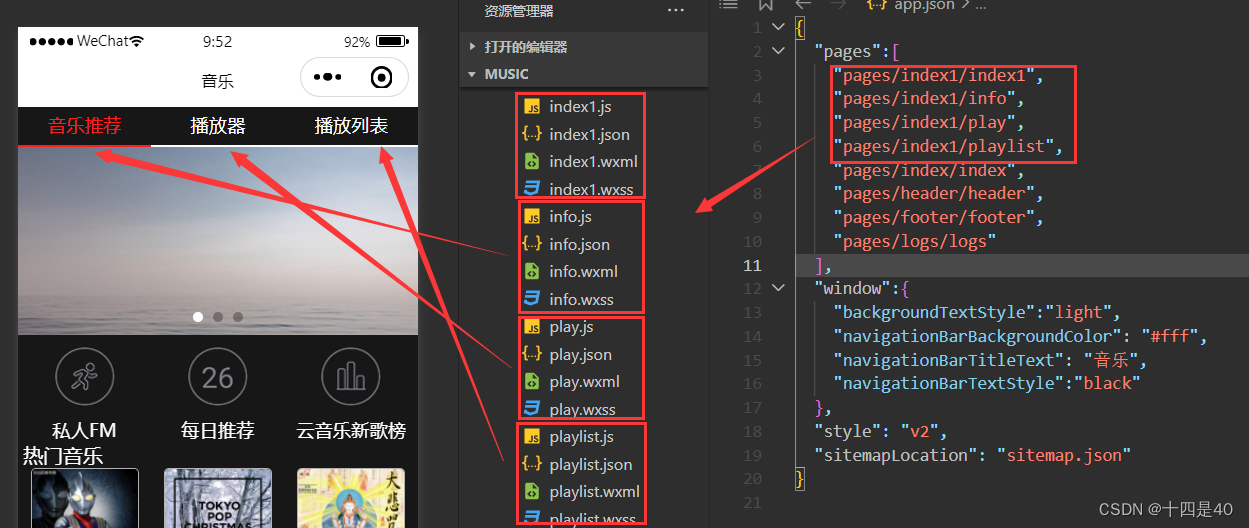
"pages":[
"pages/index1/index1",
"pages/index1/info",
"pages/index1/play",
"pages/index1/playlist",
"pages/index/index",
"pages/header/header",
"pages/footer/footer",
"pages/logs/logs"
],
"window":{
"backgroundTextStyle":"light",
"navigationBarBackgroundColor": "#fff",
"navigationBarTitleText": "音乐",
"navigationBarTextStyle":"black"
},
"style": "v2",
"sitemapLocation": "sitemap.json"
}
- 在
index1中编写顶部tab导航栏、中部content内容区页面和底部player音乐播放栏 - 在
info中编写音乐推荐页面 - 在
play中编写播放器页面 - 在
playlist中编写播放列表页面
三、项目实现
(一)index1
index1.wxml代码:
<view class="tab">
    <view class="tab-item {{item==0?'active':''}}" bindtap="changeItem" data-item="0">音乐推荐</view>
    <view class="tab-item  {{item==1?'active':''}}" bindtap="changeItem" data-item="1">播放器</view>
    <view class="tab-item  {{item==2?'active':''}}" bindtap="changeItem" data-item="2">播放列表</view>
</view>
<view class="content" style="color: #ffffff;">
    <swiper current="{{item}}" bindchange="changeTab">
        <swiper-item>
            <include src="./info"></include>
        </swiper-item>
        <swiper-item>
            <include src="./play"></include>
        </swiper-item>
        <swiper-item>
            <include src="./playlist"></include>
        </swiper-item>
    </swiper>

</view>
<view class="player">
    <image src="{{play.coverImage}}"></image>
    <view class="player-info">
        <view>{{play.title}}</view>
        <view class="player-info-auth">{{play.singer}}</view>
    </view>
    <view class="player-controls">
        <image src="../images/01.png"></image>
        <image wx:if="{{ state=='paused' }}" src="../images/02.png" bindtap="play"></image>
        <image wx:if="{{ state=='running' }}" src="../images/02stop.png" bindtap="pause"></image>
        <image src="../images/03.png" bindtap="next"></image>
    </view>
</view>
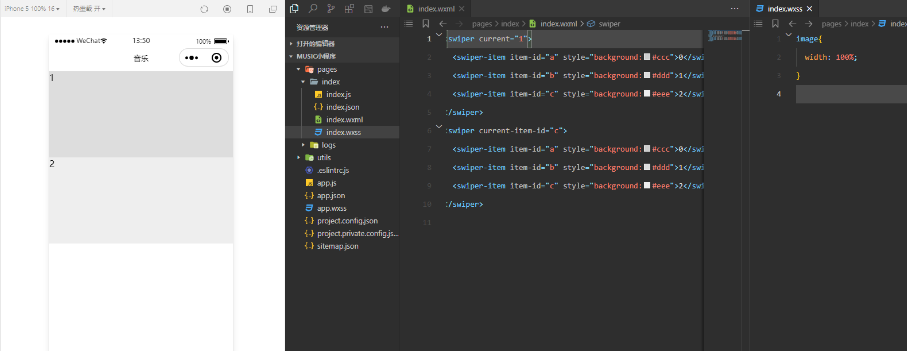
swiper组件编写滑动页面结构:
<swiper>
  <swiper-item style="background:#ccc">0</swiper-item>
  <swiper-item style="background:#ddd">1</swiper-item>
  <swiper-item style="background:#eee">2</swiper-item>
</swiper>
三、编写页面结构和样式
- 在
pages/index/index.wxml编写页面和tab导航栏
<!-- 标签页标题 -->
<view class="tab">
  <view class="tab-item {{tab==0?'active':''}}" bindtap="changeItem" data-item="0">音乐推荐</view>
  <view class="tab-item {{tab==1?'active':''}}" bindtap="changeItem" data-item="1">播放器</view>
  <view class="tab-item {{tab==2?'active':''}}" bindtap="changeItem" data-item="2">播放列表</view>
</view>
<!-- 内容区域 -->
<view class="content"></view>
<!-- 底部播放器 -->
<view class="player"></view>
- 在
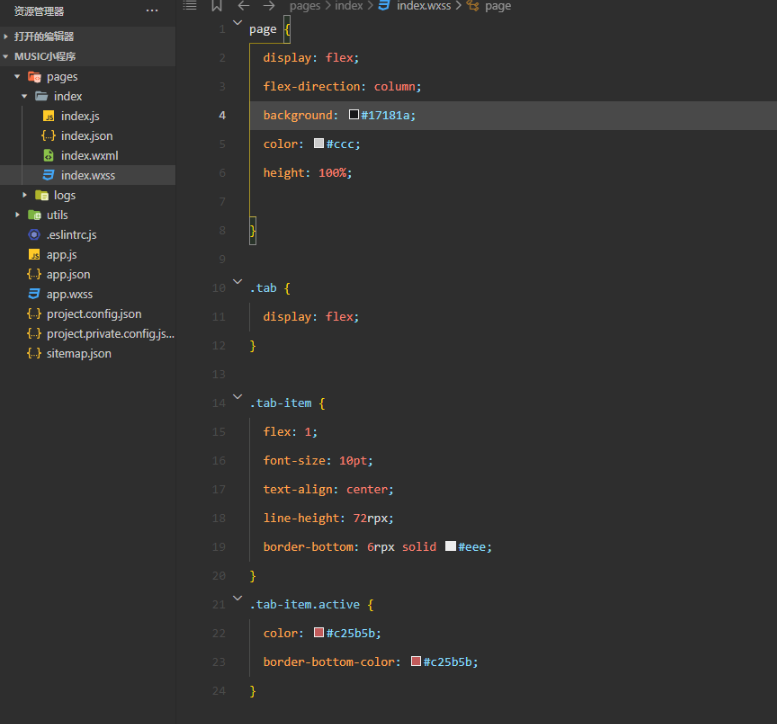
pages/index/index.wxss编写页面样式和tab导航栏样式
page {
  display: flex;
  flex-direction: column;
  background: #17181a;
  color: #ccc;
  height: 100%;

}

.tab {
  display: flex;
}

.tab-item {
  flex: 1;
  font-size: 10pt;
  text-align: center;
  line-height: 72rpx;
  border-bottom: 6rpx solid #eee;
}
.tab-item.active {
  color: #c25b5b;
  border-bottom-color: #c25b5b;
}
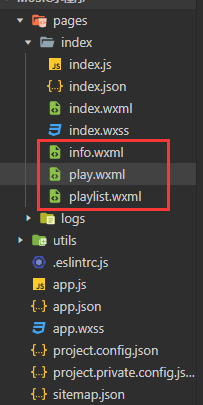
-
添加页面
info.wxml、playlist.wxml、play.wxml文件
-
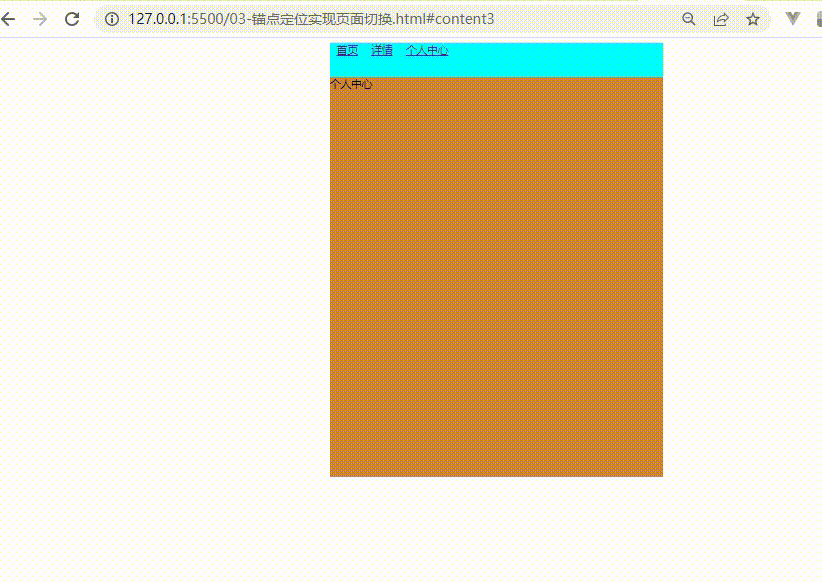
实现标签页切换,通过滚动事件切换页面效果
<!-- 标签页标题 -->
<view class="tab">
  <view class="tab-item {{tab==0?'active':''}}" bindtap="changeItem" data-item="0">音乐推荐</view>
  <view class="tab-item {{tab==1?'active':''}}" bindtap="changeItem" data-item="1">播放器</view>
  <view class="tab-item {{tab==2?'active':''}}" bindtap="changeItem" data-item="2">播放列表</view>
</view>
<!-- 内容区域 -->
<view class="content">
  <swiper current="{{item}}" bindchange="changeTab">
    <swiper-item>
      <include src="info.wxml"></include>
    </swiper-item>
    <swiper-item>
      <include src="play.wxml"></include>
    </swiper-item>
    <swiper-item>
      <include src="playlist.wxml"></include>
    </swiper-item>
  </swiper>
</view>
<!-- 底部播放器 -->
<view class="player"></view>
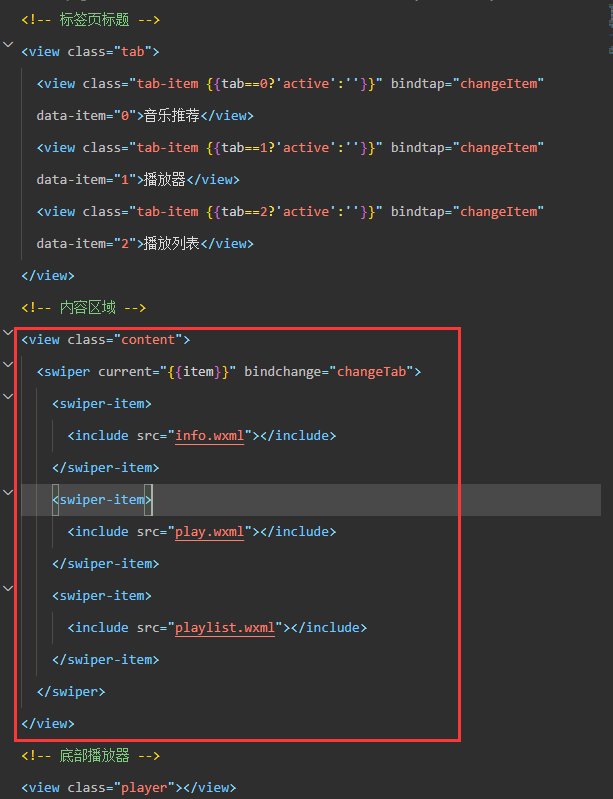
- 滚动事件
    // tab切换
    changeTab: function(e) {
      this.setData({
        tab: e.detail.current
      })
    },
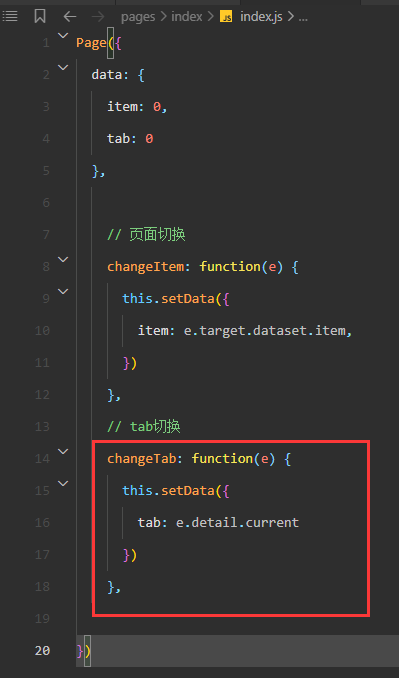
- 通过滚动事件切换页面
第三章 音乐推荐
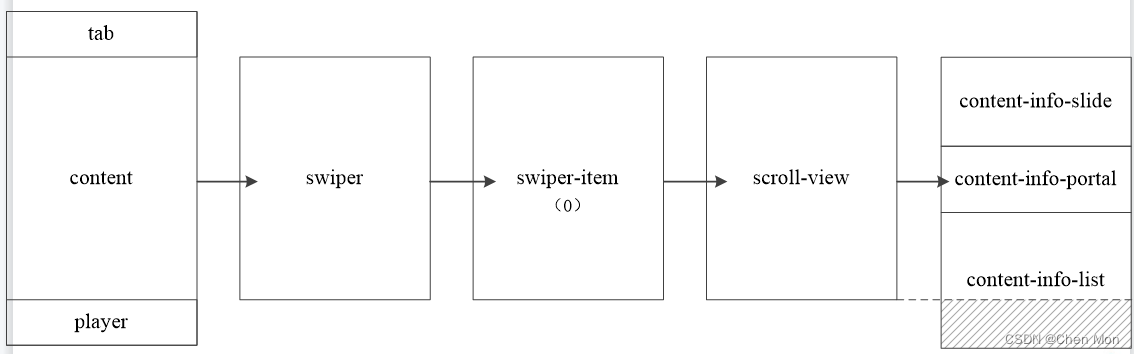
一、任务分析
- 音乐推荐页面结构图
二、组件介绍
scroll-view组件的属性及说明
| 可选值 | 说明 | 默认 |
|---|---|---|
| scroll-x | Boolean | 允许横向滚动,默认为false |
| scroll-y | Boolean | 允许纵向滚动,默认为false |
| scroll-top | Number / String | 设置竖向滚动条的位置 |
| scroll-left | Number / String | 设置横向滚动条的位置 |
| bindscrolltoupper | EventHandle | 滚动到顶部/左边时触发的事件 |
| bindscrolltolower | EventHandle | 滚动到底部/右边时触发的事件 |
| scroll-with-animation | Boolean | 滚动到顶部/左边时触发的事件 |
| scroll-into-view | String | 设置哪个方向可滚动,则在哪个方向滚动到该元素。值应为某子元素id(id不能以数字开头) |
| bindscroll | EventHandle | 滚动时触发的事件 |
三、编写音乐推荐页面结构和样式
- 在
info.wxml里实现内容区域滚动和轮播图
<!-- 内容滚动区域 -->
<scroll-view class="content-info" scroll-y>
  <!-- 轮播图 -->
  <swiper class="content-info-slide" indicator-color="rgba(255,255,255,.5)" indicator-active-color="#fff" indicator-dots circular autoplay>
    <swiper-item>
      <image src="/images/banner.jpg" />
    </swiper-item>
    <swiper-item>
      <image src="/images/banner.jpg" />
    </swiper-item>
    <swiper-item>
      <image src="/images/banner.jpg" />
    </swiper-item>
  </swiper>
</scroll-view>
.content-info {
height: 100%;
}
::-webkit-scrollbar {
width: 0;
height: 0;
color: transparent;
}
/* 轮播图 */
.content-info-slide {
height: 302rpx;
margin-bottom: 20px;
}
.content-info-slide image {
width: 100%;
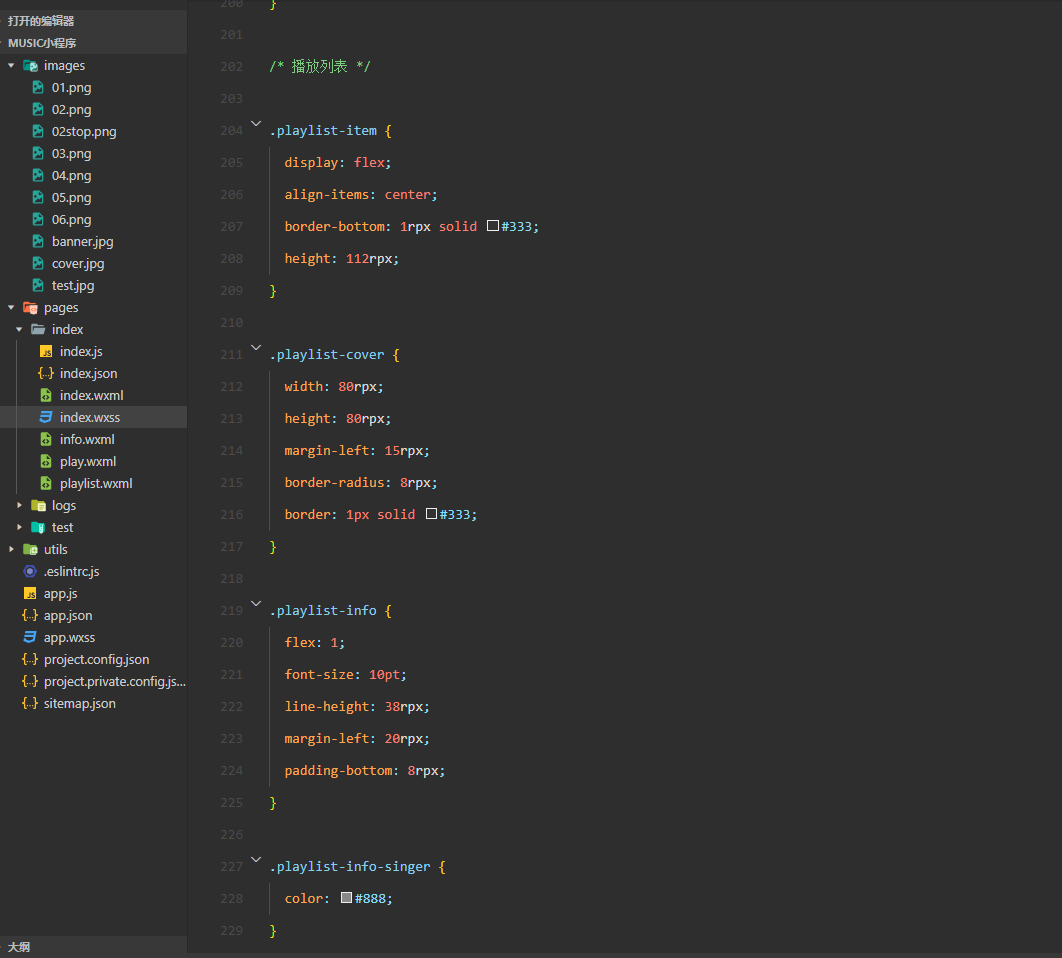
height: 100%;
}
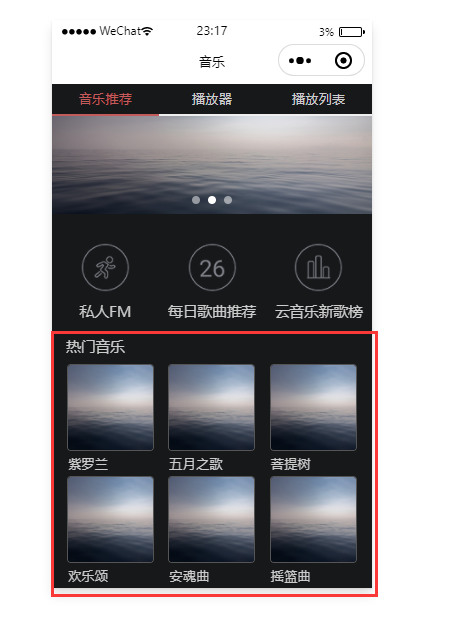
- 实现展示

- 在
info.html里实现功能按钮
<!-- 功能按钮 -->
  <view class="content-info-portal">
    <view>
      <image src="/images/04.png" />
      <text>私人FM</text>
    </view>
    <view>
      <image src="/images/05.png" />
      <text>每日歌曲推荐</text>
    </view>
    <view>
      <image src="/images/06.png" />
      <text>云音乐新歌榜</text>
    </view>
  </view>
/* 功能按钮 */

.content-info-portal {
  display: flex;
  margin-bottom: 15px;
}

.content-info-portal>view {
  flex: 1;
  font-size: 11pt;
  text-align: center;
}

.content-info-portal image {
  width: 120rpx;
  height: 120rpx;
  display: block;
  margin: 20rpx auto;
}
- 实现展示
flex布局实现热门音乐的页面布局
  <!-- 热门音乐 -->
  <view class="content-info-list">
    <view class="list-title">推荐歌曲</view>
    <view class="list-inner">
      <view class="list-item">
        <image src="/images/cover.jpg" />
        <view>紫罗兰</view>
      </view>
      <view class="list-item">
        <image src="/images/cover.jpg" />
        <view>五月之歌</view>
      </view>
      <view class="list-item">
        <image src="/images/cover.jpg" />
        <view>菩提树</view>
      </view>
      <view class="list-item">
        <image src="/images/cover.jpg" />
        <view>欢乐颂</view>
      </view>
      <view class="list-item">
        <image src="/images/cover.jpg" />
        <view>安魂曲</view>
      </view>
      <view class="list-item">
        <image src="/images/cover.jpg" />
        <view>摇篮曲</view>
      </view>
    </view>
  </view>
/* 热门音乐 */

.content-info-list {
  font-size: 11pt;
  margin-bottom: 20rpx;
}

.content-info-list > .list-title {
  margin: 20rpx 35rpx;
}

.content-info-list > .list-inner {
  display: flex;
  flex-wrap: wrap;
  margin: 0 20rpx;
}

.content-info-list > .list-inner > .list-item {
  flex: 1;
}

.content-info-list > .list-inner > .list-item > image {
  display: block;
  width: 200rpx;
  height: 200rpx;
  margin: 0 auto;
  border-radius: 10rpx;
  border: 1rpx solid #555;
}

.content-info-list > .list-inner > .list-item > view {
  width: 200rpx;
  margin: 10rpx auto;
  font-size: 10pt;

}
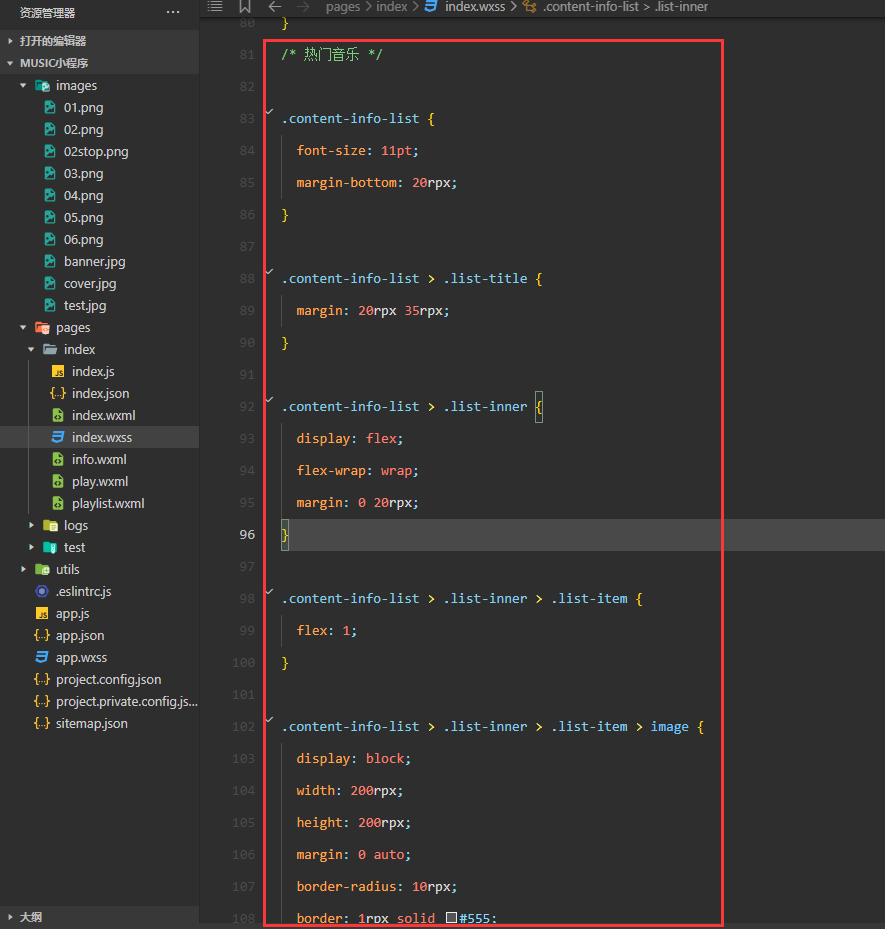
- 实现展示
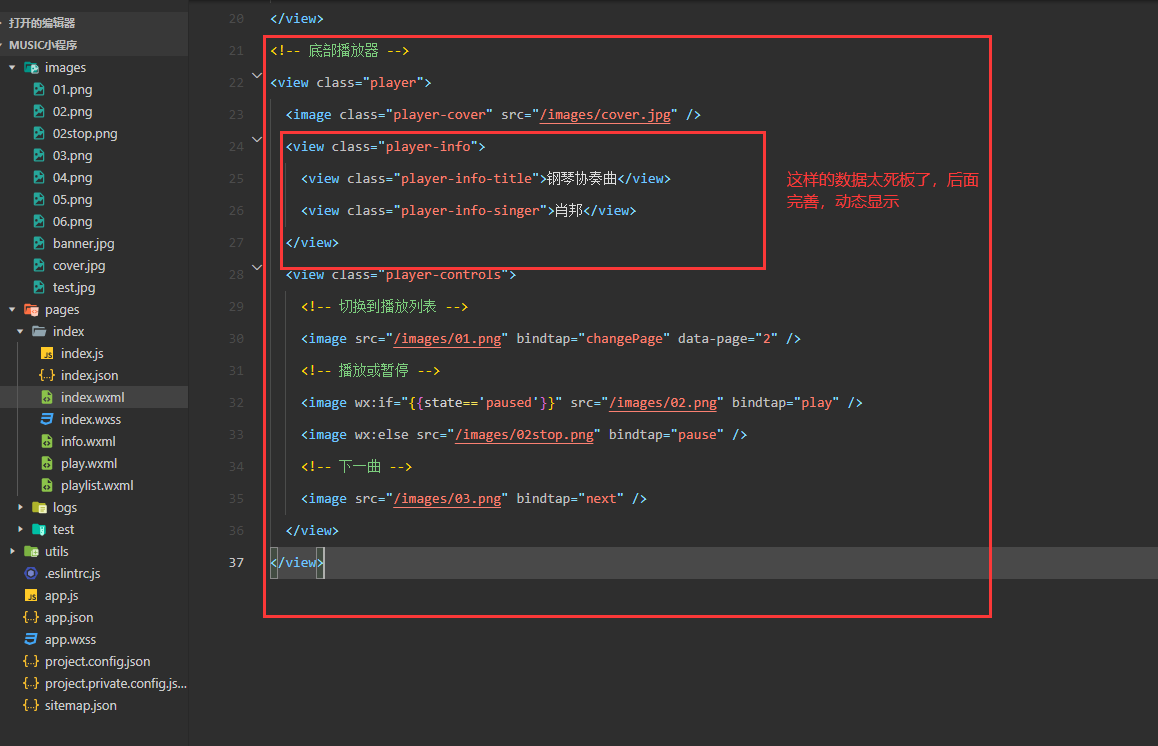
- 在
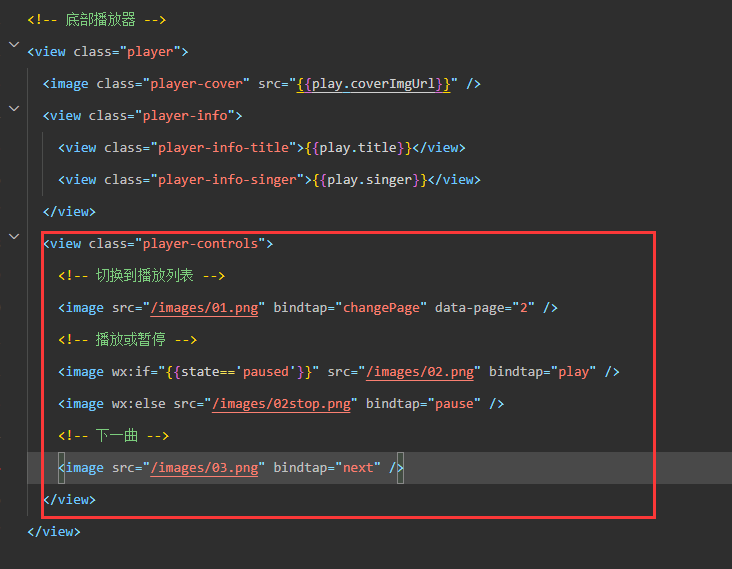
index.wxml里编写底部播放器
<!-- 底部播放器 -->
<view class="player">
  <image class="player-cover" src="/images/cover.jpg" />
  <view class="player-info">
    <view class="player-info-title">钢琴协奏曲</view>
    <view class="player-info-singer">肖邦</view>
  </view>
  <view class="player-controls">
    <!-- 切换到播放列表 -->
    <image src="/images/01.png" bindtap="changePage" data-page="2" />
    <!-- 播放或暂停 -->
    <image wx:if="{{state=='paused'}}" src="/images/02.png" bindtap="play" />
    <image wx:else src="/images/02stop.png" bindtap="pause" />
    <!-- 下一曲 -->
    <image src="/images/03.png" bindtap="next" />
  </view>
</view>
</view>
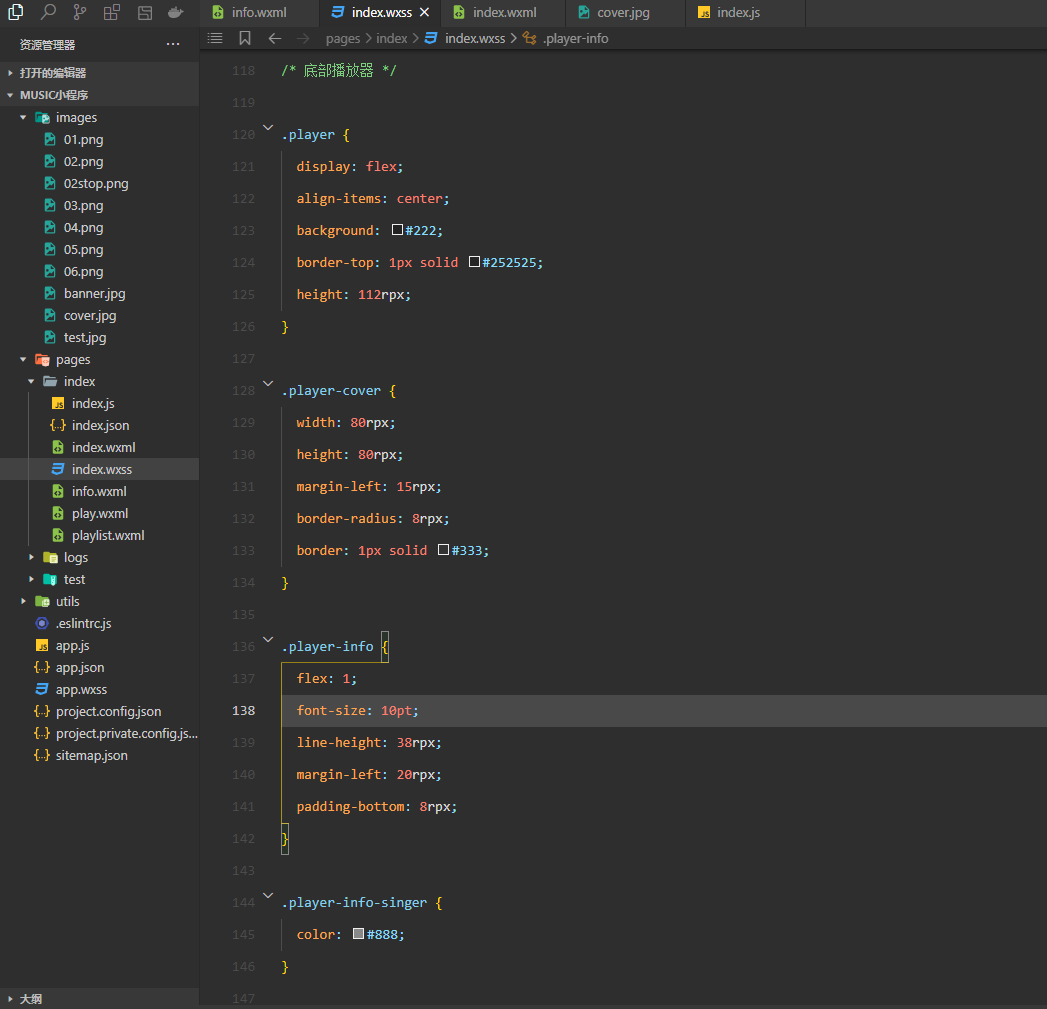
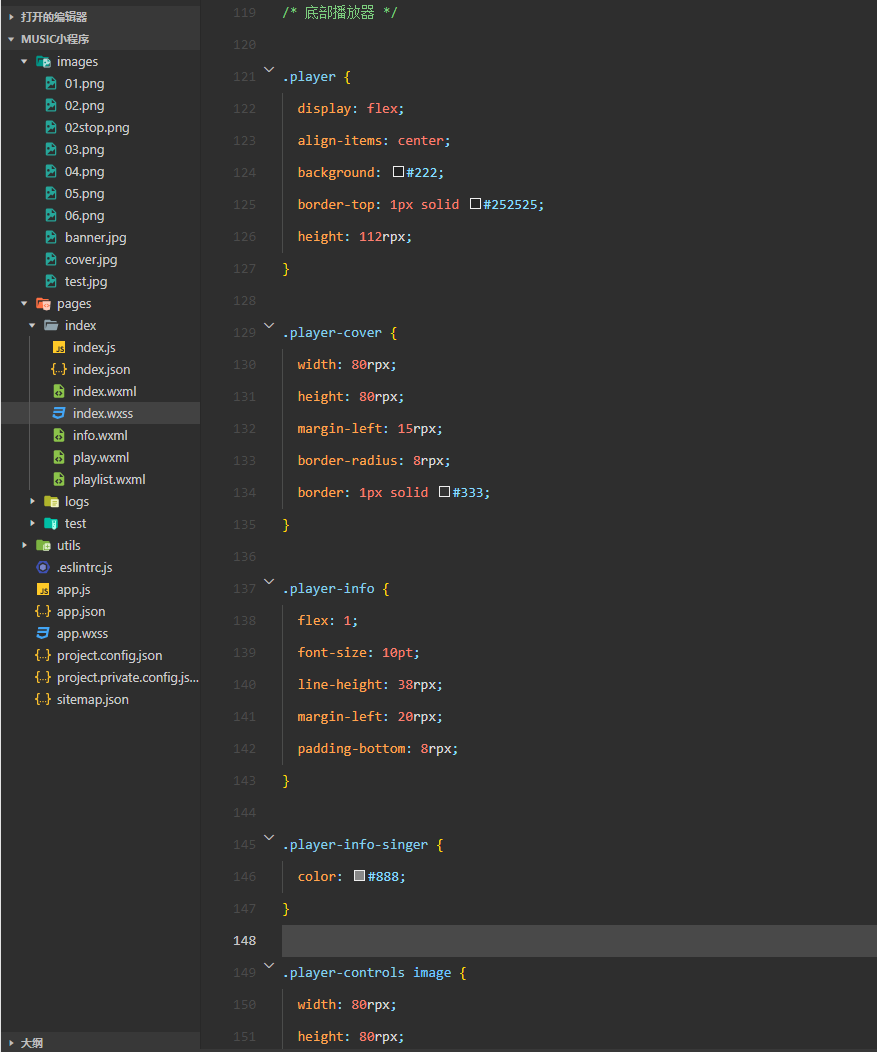
- 底部播放器样式
/* 底部播放器 */

.player {
  display: flex;
  align-items: center;
  background: #222;
  border-top: 1px solid #252525;
  height: 112rpx;
}

.player-cover {
  width: 80rpx;
  height: 80rpx;
  margin-left: 15rpx;
  border-radius: 8rpx;
  border: 1px solid #333;
}

.player-info {
  flex: 1;
  font-size: 10pt;
  line-height: 38rpx;
  margin-left: 20rpx;
  padding-bottom: 8rpx;
}

.player-info-singer {
  color: #888;
}

.player-controls image {
  width: 80rpx;
  height: 80rpx;
  margin-right: 15rpx;
}
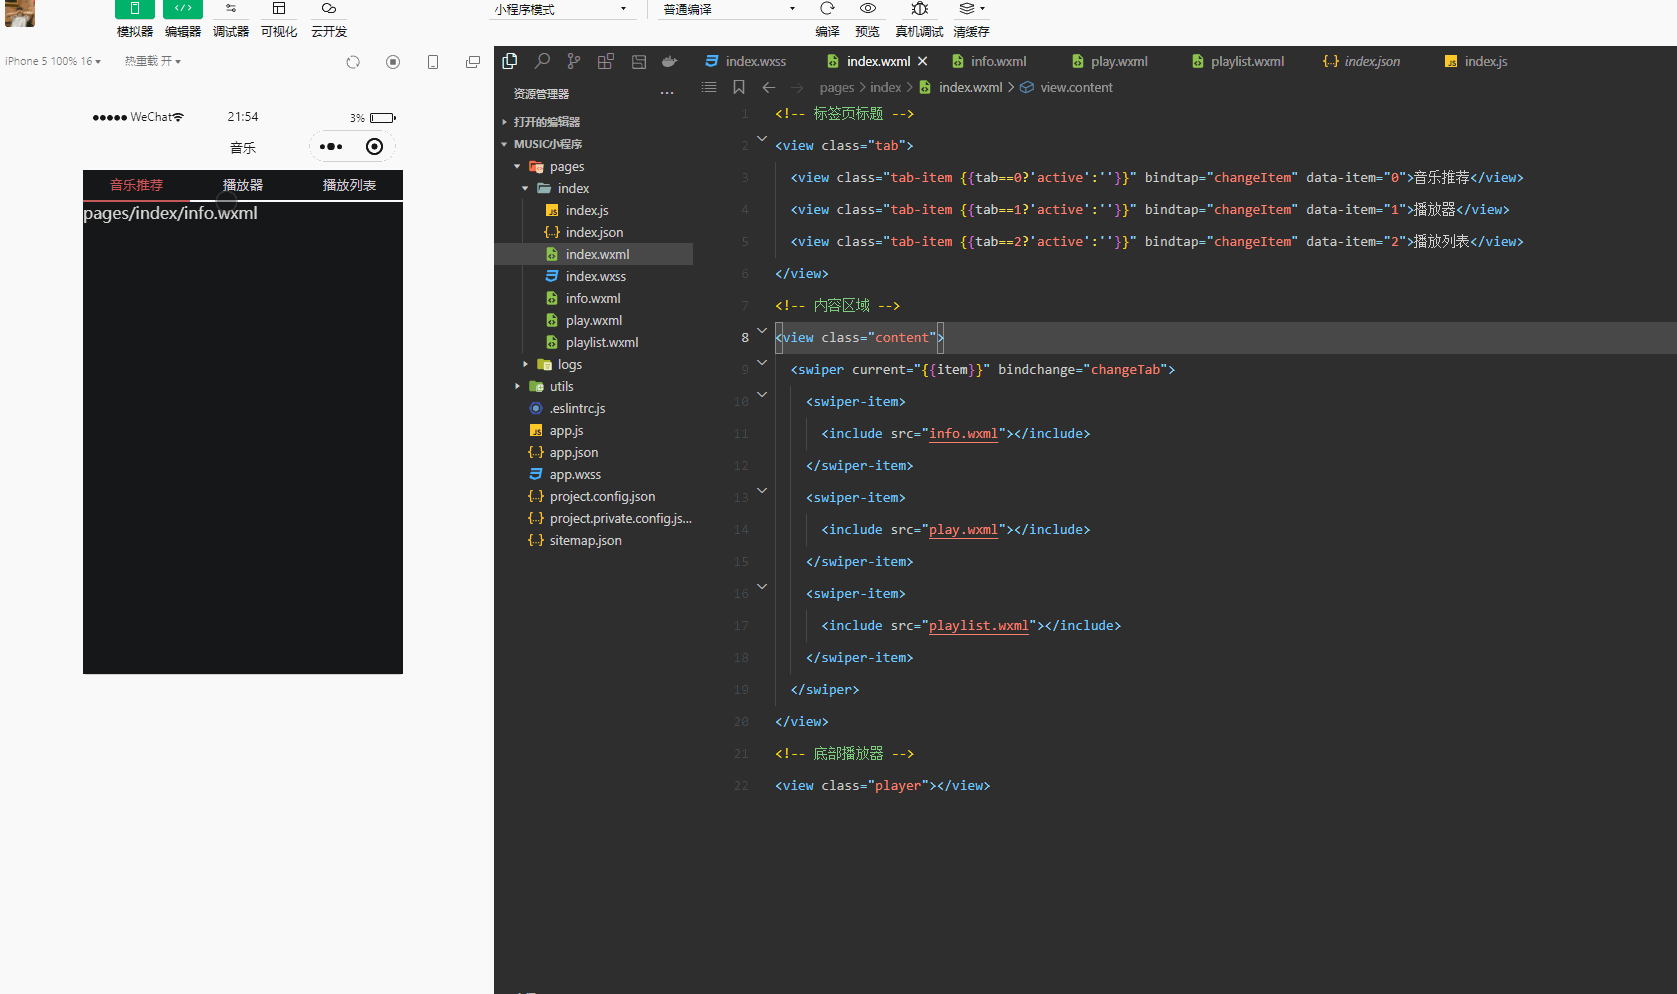
- 测试效果
第四章 播放器
一、任务分析
- 播放器标签页结构图:
- 播放器具体功能分析
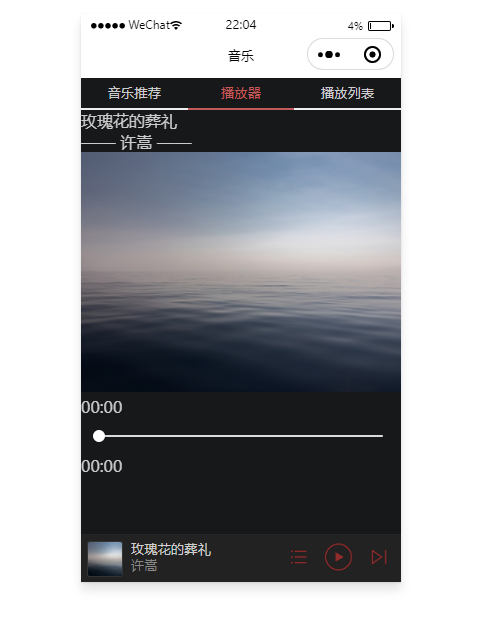
1.音乐信息:显示当前播放曲目的标题和艺术家
2.专辑封面:当音乐播放时,专辑封面会顺时针旋转
3.播放进度:显示播放进度,调节音乐进度
二、组件介绍
audioCtx对象声明的方式
var audioCtx = wx.createInnerAudioContext();
- 音频
API接口的属性及说明
| 可选值 | 名称 | 说明 | ||||
|---|---|---|---|---|---|---|
|
|
|
| ||||
|
|
| |||||
|
|
| |||||
|
|
| |||||
|
|
| |||||
|
|
| |||||
|
|
| |||||
|
|
| |||||
三、实现播放器功能
- 在
index.js里定义基础播放列表和音乐状态数据
/**
   * 页面的初始数据
   */
  data: {
    item: 0,
    tab: 0,
    // 播放列表数据
    playlist: [{
      id: 1,
      title: '玫瑰花的葬礼',
      singer: '许嵩',
      src: 'https://www.ytmp3.cn/down/78393.mp3',
      coverImgUrl: '/images/cover.jpg'
    }, {
      id: 2,
      title: '幻听',
      singer: '许嵩',
      src: 'https://www.ytmp3.cn/down/59696.mp3',
      coverImgUrl: '/images/cover.jpg'
    }, {
      id: 3,
      title: '清明雨上',
      singer: '许嵩',
      src: 'https://www.ytmp3.cn/down/36119.mp3',
      coverImgUrl: '/images/cover.jpg'
    }, {
      id: 4,
      title: '灰色头像',
      singer: '许嵩',
      src: 'https://www.ytmp3.cn/down/59697.mp3',
      coverImgUrl: '/images/cover.jpg'
    }],
    state: 'paused',
    playIndex: 0,
    play: {
      currentTime: '00:00',
      duration: '00:00',
      percent: 0,
      title: '',
      singer: '',
      coverImgUrl: '/images/cover.jpg',
    }
  },

- 在
index.js编辑音乐播放逻辑代码
// 实现播放器播放功能
audioCtx: null,
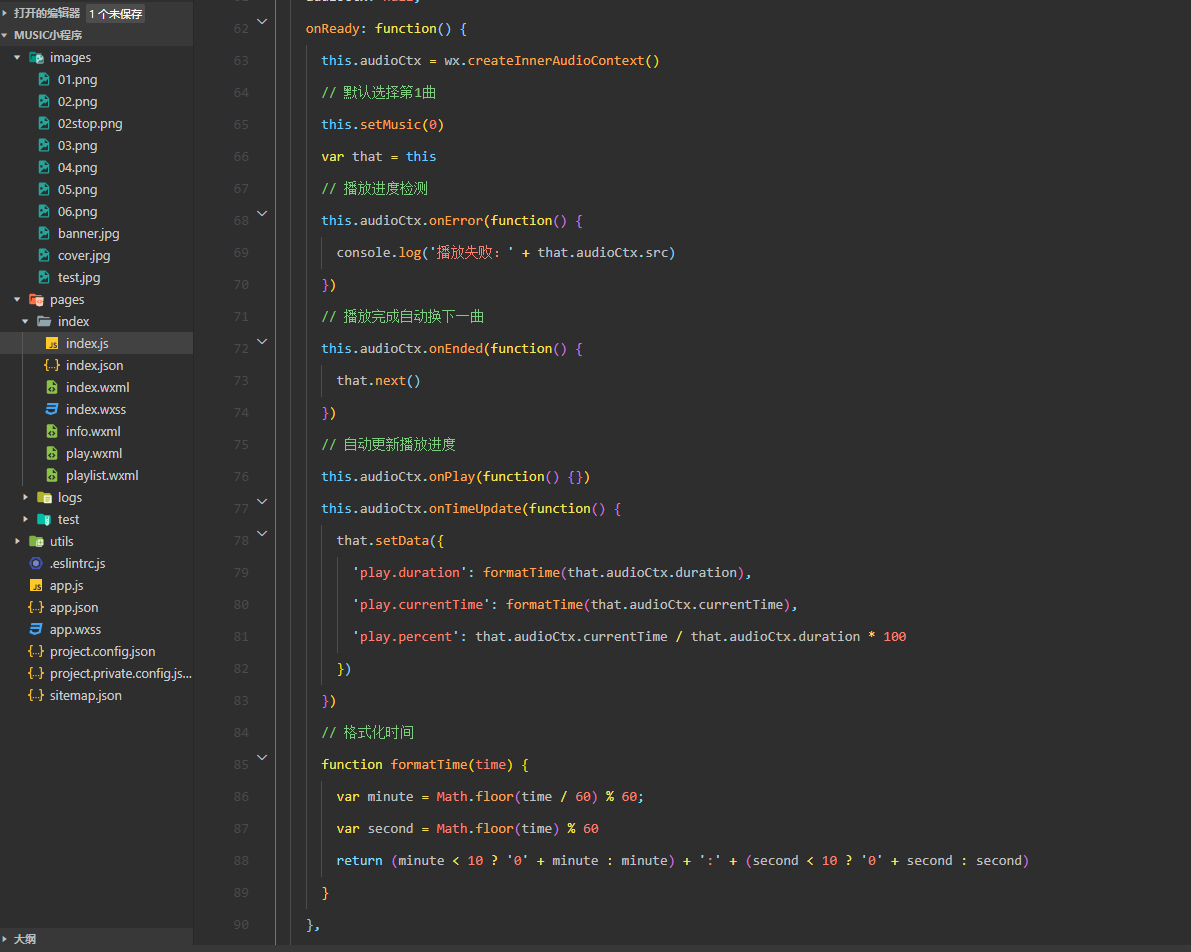
onReady: function() {
this.audioCtx = wx.createInnerAudioContext()
// 默认选择第1曲
this.setMusic(0)
var that = this
// 播放进度检测
this.audioCtx.onError(function() {
console.log('播放失败:' + that.audioCtx.src)
})
// 播放完成自动换下一曲
this.audioCtx.onEnded(function() {
that.next()
})
// 自动更新播放进度
this.audioCtx.onPlay(function() {})
this.audioCtx.onTimeUpdate(function() {
that.setData({
'play.duration': formatTime(that.audioCtx.duration),
'play.currentTime': formatTime(that.audioCtx.currentTime),
'play.percent': that.audioCtx.currentTime / that.audioCtx.duration * 100
})
})
// 格式化时间
function formatTime(time) {
var minute = Math.floor(time / 60) % 60;
var second = Math.floor(time) % 60
return (minute < 10 ? '0' + minute : minute) + ':' + (second < 10 ? '0' + second : second)
}
},
// 音乐播放
setMusic: function(index) {
var music = this.data.playlist[index]
this.audioCtx.src = music.src
this.setData({
playIndex: index,
'play.title': music.title,
'play.singer': music.singer,
'play.coverImgUrl': music.coverImgUrl,
'play.currentTime': '00:00',
'play.duration': '00:00',
'play.percent': 0
})
},
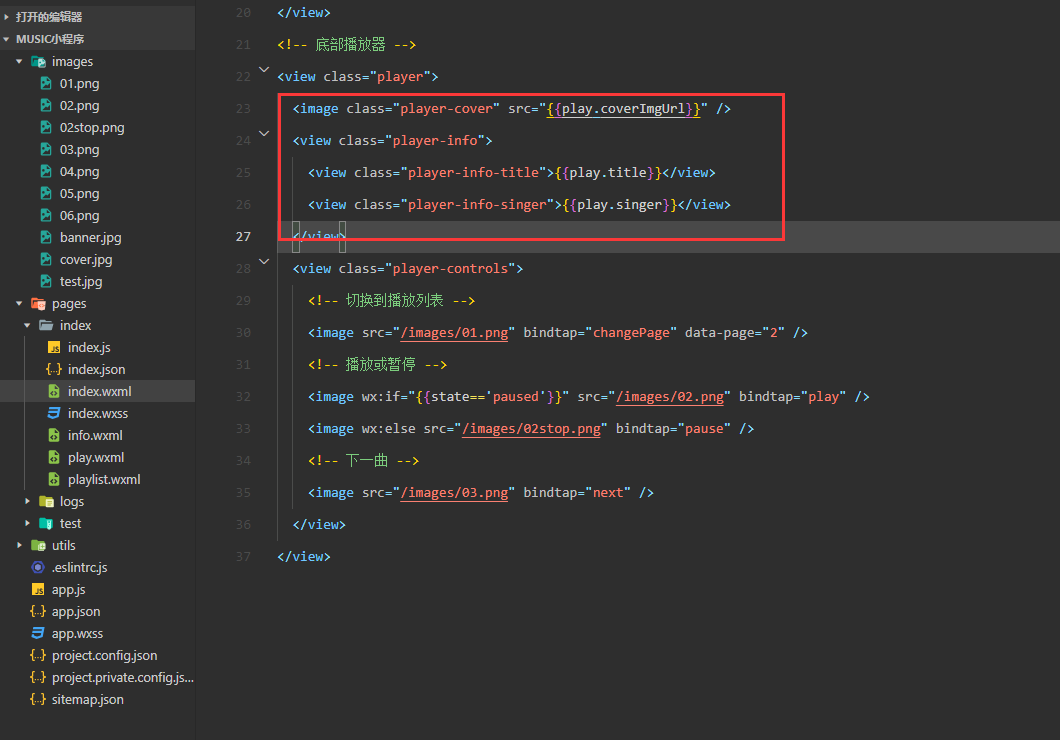
- 修改底部播放器的结构代码
<!-- 底部播放器 -->
<view class="player">
  <image class="player-cover" src="{{play.coverImgUrl}}" />
  <view class="player-info">
    <view class="player-info-title">{{play.title}}</view>
    <view class="player-info-singer">{{play.singer}}</view>
  </view>
  <view class="player-controls">
    <!-- 切换到播放列表 -->
    <image src="/images/01.png" bindtap="changePage" data-page="2" />
    <!-- 播放或暂停 -->
    <image wx:if="{{state=='paused'}}" src="/images/02.png" bindtap="play" />
    <image wx:else src="/images/02stop.png" bindtap="pause" />
    <!-- 下一曲 -->
    <image src="/images/03.png" bindtap="next" />
  </view>
</view>
- 底部播放器样式代码
/* 底部播放器 */

.player {
  display: flex;
  align-items: center;
  background: #222;
  border-top: 1px solid #252525;
  height: 112rpx;
}

.player-cover {
  width: 80rpx;
  height: 80rpx;
  margin-left: 15rpx;
  border-radius: 8rpx;
  border: 1px solid #333;
}

.player-info {
  flex: 1;
  font-size: 10pt;
  line-height: 38rpx;
  margin-left: 20rpx;
  padding-bottom: 8rpx;
}

.player-info-singer {
  color: #888;
}

.player-controls image {
  width: 80rpx;
  height: 80rpx;
  margin-right: 15rpx;
}
- 底部播放器播放功能
- 在indexjs里编写底部播放器暂停/播放按钮控制歌曲以及播放器切换下一曲歌曲功能
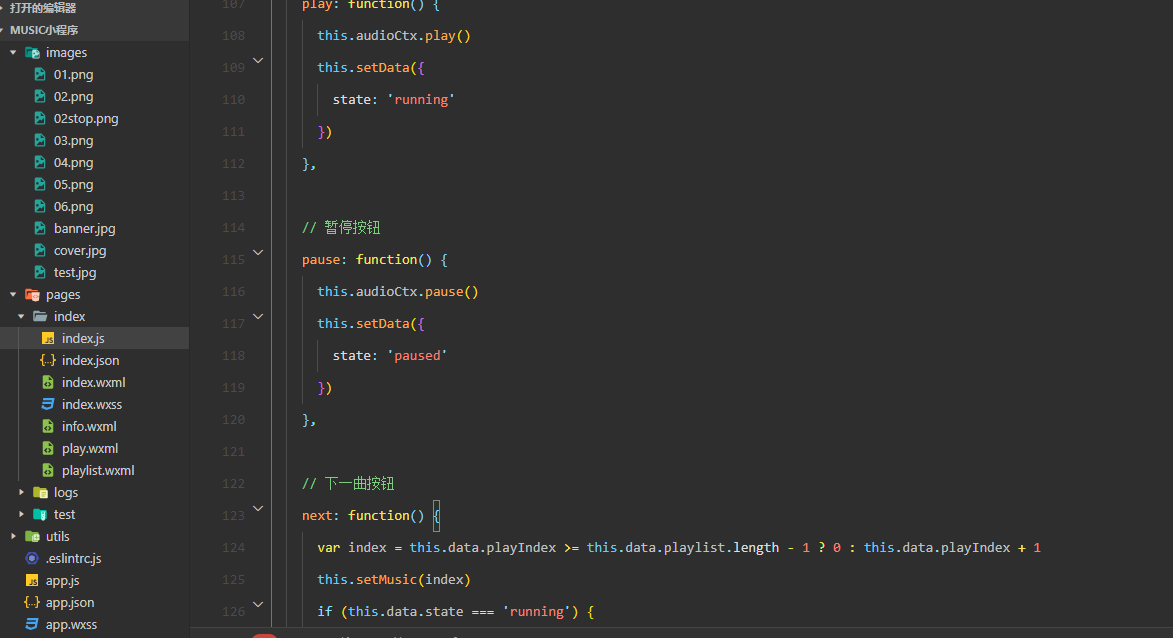
// 播放按钮
  play: function() {
    this.audioCtx.play()
    this.setData({
      state: 'running'
    })
  },

  // 暂停按钮
  pause: function() {
    this.audioCtx.pause()
    this.setData({
      state: 'paused'
    })
  },

  // 下一曲按钮
  next: function() {
    var index = this.data.playIndex >= this.data.playlist.length - 1 ? 0 : this.data.playIndex + 1
    this.setMusic(index)
    if (this.data.state === 'running') {
      this.play()
    }
  },
- 测试底部播放功能
四、编写播放器页面
- 在
play.wxml编写播放器页面代码
<!-- 播放器 -->
<view class="content-play">
  <!-- 显示音乐信息 -->
  <view class="content-play-info">
    <text>{{play.title}}</text>
    <view>—— {{play.singer}} ——</view>
  </view>
  <!-- 显示专辑封面 -->
  <view class="content-play-cover">
    <image src="{{play.coverImgUrl}}" style="animation-play-state:{{state}}" />
  </view>
  <!-- 显示播放进度和时间 -->
  <view class="content-play-progress">
    <text>{{play.currentTime}}</text>
    <view>
      <slider bindchange="sliderChange" activeColor="#d33a31" block-size="12" backgroundColor="#dadada" value="{{play.percent}}" />
    </view>
    <text>{{play.duration}}</text>
  </view>
</view>
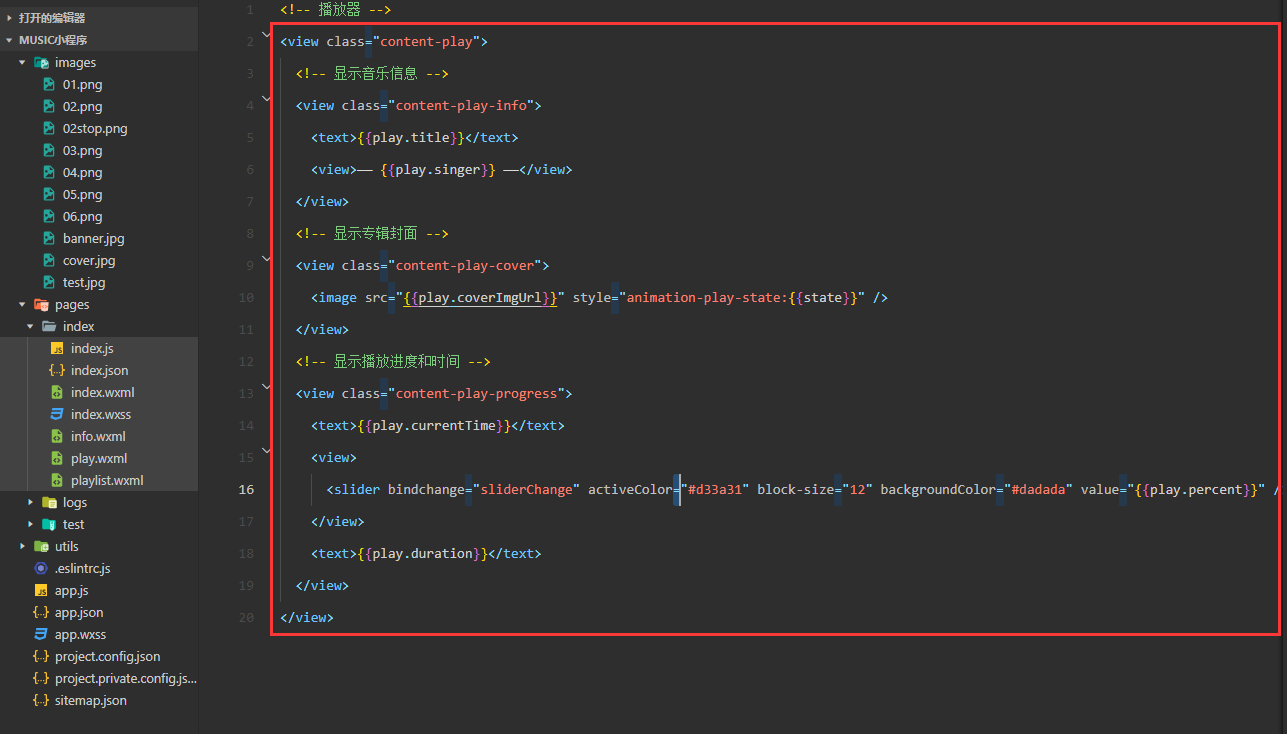
- 查看页面
- 在
index.wxss编写播放器样式
/* 播放器 */

.content-play {
  display: flex;
  justify-content: space-around;
  flex-direction: column;
  height: 100%;
  text-align: center;
}

.content-play-info > view {
  color: #888;
  font-size: 11pt;
}
/* 显示专辑页面样式 */

.content-play-cover image {
  animation: rotateImage 10s linear infinite;
  width: 400rpx;
  height: 400rpx;
  border-radius: 50%;
  border: 1px solid #333;
}

@keyframes rotateImage {
  from {
    transform: rotate(0deg);
  }

  to {
    transform: rotate(360deg);
  }
}

/* 播放进度和时间 */

.content-play-progress {
  display: flex;
  align-items: center;
  margin: 0 35rpx;
  font-size: 9pt;
  text-align: center;
}

.content-play-progress > view {
  flex: 1;
}
- 查看播放器页面

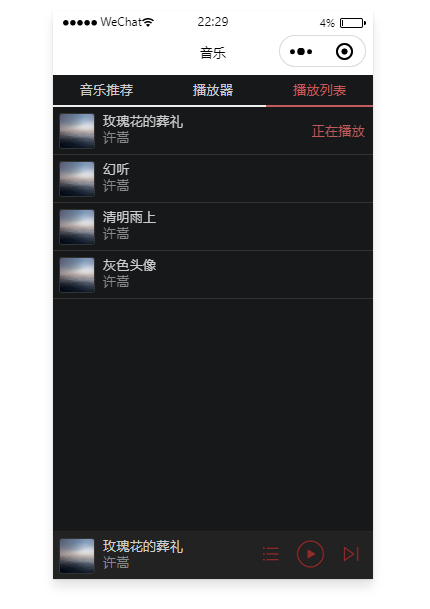
第五章 播放列表
一、任务分析
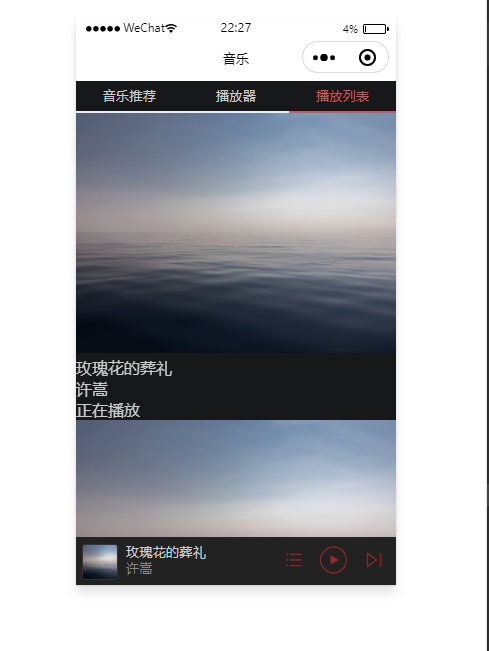
- 播放器列表结构

二、实现播放列表功能
- 在
playlist.wxml编写播放列表结构
<scroll-view class="content-playlist" scroll-y>
  <view class="playlist-item" wx:for="{{playlist}}" wx:key="id" bindtap="change" data-index="{{index}}">
    <image class="playlist-cover" src="{{item.coverImgUrl}}" />
    <view class="playlist-info">
      <view class="playlist-info-title">{{item.title}}</view>
      <view class="playlist-info-singer">{{item.singer}}</view>
    </view>
    <view class="playlist-controls">
      <text wx:if="{{index==playIndex}}">正在播放</text>
    </view>
  </view>
</scroll-view>
- 查看结果
- 在
index.wxss编写播放列表样式
/* 播放列表 */

.playlist-item {
  display: flex;
  align-items: center;
  border-bottom: 1rpx solid #333;
  height: 112rpx;
}

.playlist-cover {
  width: 80rpx;
  height: 80rpx;
  margin-left: 15rpx;
  border-radius: 8rpx;
  border: 1px solid #333;
}

.playlist-info {
  flex: 1;
  font-size: 10pt;
  line-height: 38rpx;
  margin-left: 20rpx;
  padding-bottom: 8rpx;
}

.playlist-info-singer {
  color: #888;
}

.playlist-controls {
  font-size: 10pt;
  margin-right: 20rpx;
  color: #c25b5b;
}
- 查看结果
- 在
index.js里实现播放列表的切换功能
// 播放列表换曲功能
    change: function(e) {
      this.setMusic(e.currentTarget.dataset.index)
      this.play()
  }

三、测试播放列表切换功能
- 播放列表测试