一、属性动画概述NETX
- 作用:实现组件通用属性的渐变过渡效果,提升用户体验。
- 支持属性:
width、height、backgroundColor、opacity、scale、rotate、translate等。 - 注意事项:
-
- 布局类属性(如宽高)变化时,若需内容跟随变化,需通过
renderFit属性配置。 - 生效范围:仅对写在
animation接口前面的属性生效,对组件构造器中的属性(如Column的space)无效。
- 布局类属性(如宽高)变化时,若需内容跟随变化,需通过
二、接口定义
animation(value: AnimateParam)
- 支持版本:
-
- 基础支持:API version 7。
- 卡片能力:API version 9(支持在ArkTS卡片中使用)。
- 元服务API:API version 11。
- 系统能力:
SystemCapability.ArkUI.ArkUI.Full。 - 参数说明:
| 参数 | 类型 | 必填 | 描述 |
|
|
| 是 | 设置动画效果相关参数 |
AnimateParam参数详解
| 属性名 | 类型 | 说明 |
|
|
| 动画持续时间(毫秒),必填。 |
|
|
| 动画曲线(如 |
|
|
| 动画延迟时间(毫秒),默认 |
|
|
| 动画循环次数: |
|
|
| 动画播放模式: |
|
|
| 期望帧率范围(优化性能),可选。 |
三、示例代码
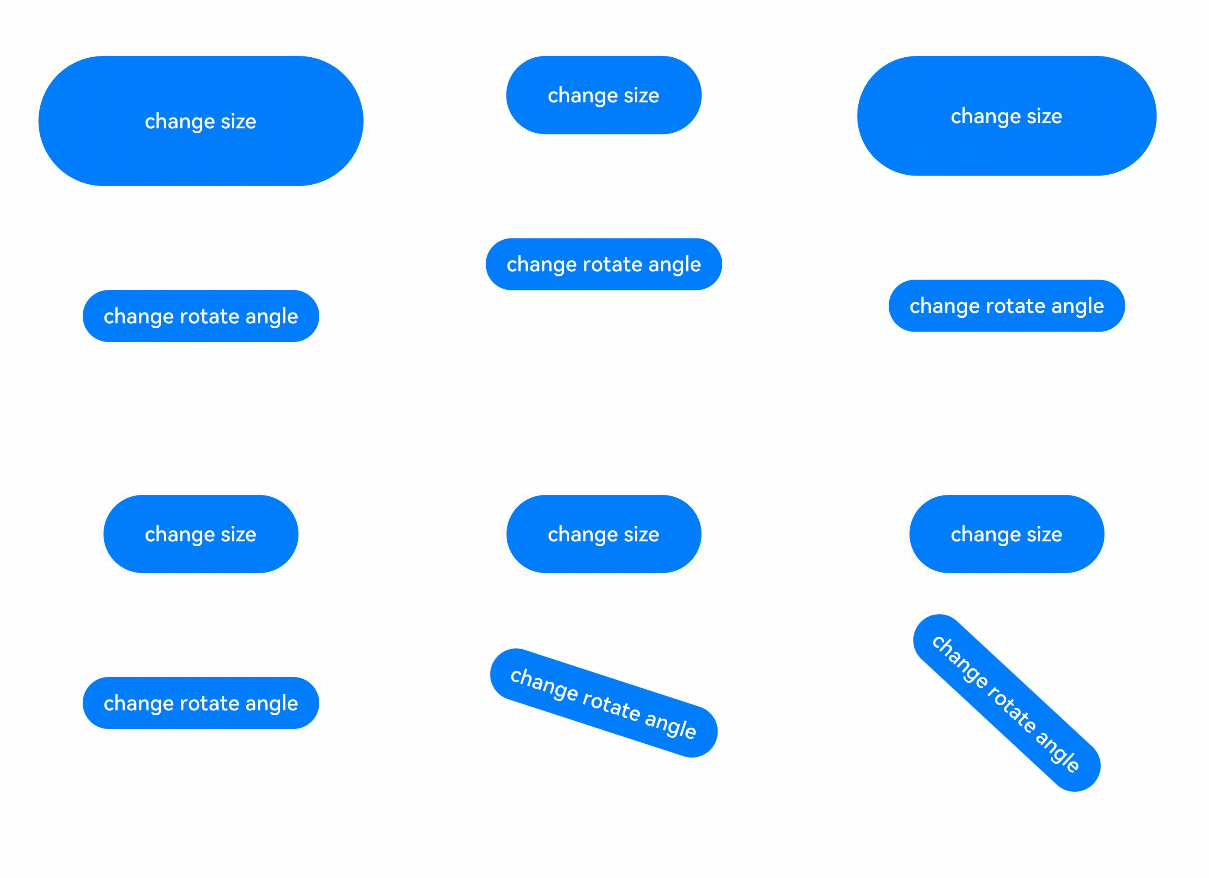
示例1:尺寸变化动画
// xxx.ets
@Entry
@Component
struct AttrAnimationExample {
  @State widthSize: number = 250
  @State heightSize: number = 100
  @State rotateAngle: number = 0
  @State flag: boolean = true

  build() {
    Column() {
      Button('change size')
        .onClick(() => {
          if (this.flag) {
            this.widthSize = 150
            this.heightSize = 60
          } else {
            this.widthSize = 250
            this.heightSize = 100
          }
          this.flag = !this.flag
        })
        .margin(30)
        .width(this.widthSize)
        .height(this.heightSize)
        .animation({
          duration: 2000,
          curve: Curve.EaseOut,
          iterations: 3,
          playMode: PlayMode.Normal
        })
      Button('change rotate angle')
        .onClick(() => {
          this.rotateAngle = 90
        })
        .margin(50)
        .rotate({ angle: this.rotateAngle })
        .animation({
          duration: 1200,
          curve: Curve.Friction,
          delay: 500,
          iterations: -1, // 设置-1表示动画无限循环
          playMode: PlayMode.Alternate,
          expectedFrameRateRange: {
            min: 20,
            max: 120,
            expected: 90,
          }
        })
    }.width('100%').margin({ top: 20 })
  }
}
示例 2:组件出现时的动画(带循环和回调)
typescript
@Entry
@Component
struct AnimateToExample {
  @State widthSize: number = 250;
  @State heightSize: number = 100;
  @State rotateAngle: number = 0;

  build() {
    Column() {
      Button('change size')
        .width(widthSize)
        .height(heightSize)
        .onClick(() => {
          // 使用UIContext调用(推荐)
          this.getUIContext()?.animateTo({
            duration: 2000,
            curve: Curve.EaseOut,
            iterations: 3,
            playMode: PlayMode.Normal,
            onFinish: () => console.info('动画结束'),
          }, () => {
            widthSize = this.flag ? 150 : 250;
            heightSize = this.flag ? 60 : 100;
            this.flag = !this.flag;
          });
        });

      Button('stop rotating')
        .rotate({ z: 1, angle: rotateAngle })
        .onAppear(() => {
          this.getUIContext()?.animateTo({
            duration: 1200,
            curve: Curve.Friction,
            delay: 500,
            iterations: -1, // 无限循环
            playMode: PlayMode.Alternate,
          }, () => {
            rotateAngle = 360; // 持续旋转
          });
        })
        .onClick(() => {
          // 停止动画:设置duration=0并修改属性
          this.getUIContext()?.animateTo({ duration: 0 }, () => {
            rotateAngle = 0;
          });
        });
    }
  }
}
示例 3:动画结束后组件消失
typescript
// xxx.ets
@Entry
@Component
struct AttrAnimationExample {
  @State heightSize: number = 100;
  @State isShow: boolean= true;
  @State count: number= 0;
  private isToBottom: boolean = true; // 向下


  build() {
    Column() {
      if (this.isShow) {
        Column()
          .width(200)
          .height(this.heightSize)
          .backgroundColor('blue')
          .onClick(() => {
            // 建议使用this.getUIContext()?.animateTo()
            animateTo({
              duration: 2000,
              curve: Curve.EaseOut,
              iterations: 1,
              playMode: PlayMode.Normal,
              onFinish: () => {
                this.count--;
                if (this.count == 0 && !this.isToBottom) { // 组件只有在向下做完动画才会消失
                  this.isShow = false;
                }
              }
            }, () => {
              this.count++;
              if (this.isToBottom) {
                this.heightSize = 60;
              } else {
                this.heightSize = 100;
              }
              this.isToBottom = !this.isToBottom;
            })
          })
      }
    }.width('100%').height('100%').margin({ top: 5 })
    .justifyContent(FlexAlign.End)
  }
}
示例 4: KeyframeAnimateParam(关键帧动画)
typescript
// xxx.ets
import { UIContext } from '@kit.ArkUI';


@Entry
@Component
struct KeyframeDemo {
  @State myScale: number = 1.0;
  uiContext: UIContext | undefined = undefined;


  aboutToAppear() {
    this.uiContext = this.getUIContext?.();
  }


  build() {
    Column() {
      Circle()
        .width(100)
        .height(100)
        .fill("#46B1E3")
        .margin(100)
        .scale({ x: this.myScale, y: this.myScale })
        .onClick(() => {
          if (!this.uiContext) {
            console.info("no uiContext, keyframe failed");
            return;
          }
          this.myScale = 1;
          // 设置关键帧动画整体播放3次
          this.uiContext.keyframeAnimateTo({ iterations: 3 }, [
            {
              // 第一段关键帧动画时长为800ms,scale属性做从1到1.5的动画
              duration: 800,
              event: () => {
                this.myScale = 1.5;
              }
            },
            {
              // 第二段关键帧动画时长为500ms,scale属性做从1.5到1的动画
              duration: 500,
              event: () => {
                this.myScale = 1;
              }
            }
          ]);
        })
    }.width('100%').margin({ top: 5 })
  }
}

示例 5:自定义入场 / 退场动画(缩放 + 透明度)
typescript
// index.ets
import { router } from '@kit.ArkUI';


@Entry
@Component
struct Index {
  @State scale1: number = 1;
  @State opacity1: number = 1;


  build() {
    Column() {
      Image($r("app.media.transition_image1")).width('100%').height('100%')
    }
    .width('100%')
    .height('100%')
    .scale({ x: this.scale1 })
    .opacity(this.opacity1)
    .onClick(() => {
      router.pushUrl({ url: 'pages/Page1' })
    })
  }


  pageTransition() {
    PageTransitionEnter({ duration: 1200, curve: Curve.Linear })
      .onEnter((type: RouteType, progress: number) => {
        if (type == RouteType.Push || type == RouteType.Pop) {
          this.scale1 = progress;
          this.opacity1 = progress;
        }
      })
    PageTransitionExit({ duration: 1200, curve: Curve.Ease })
      .onExit((type: RouteType, progress: number) => {
        if (type == RouteType.Push) {
          this.scale1 = 1 - progress;
          this.opacity1 = 1 - progress;
        }
      })
  }
}
// page1.ets
import { router } from '@kit.ArkUI';
@Entry
@Component
struct Page1 {
@State scale2: number = 1;
@State opacity2: number = 1;
build() {
Column() {
Image($r("app.media.transition_image2")).width('100%').height('100%') // 图片存放在media文件夹下
}
.width('100%')
.height('100%')
.scale({ x: this.scale2 })
.opacity(this.opacity2)
.onClick(() => {
router.pushUrl({ url: 'pages/Index' })
})
}
pageTransition() {
PageTransitionEnter({ duration: 1200, curve: Curve.Linear })
.onEnter((type: RouteType, progress: number) => {
if (type == RouteType.Push || type == RouteType.Pop) {
this.scale2 = progress;
}
this.opacity2 = progress;
})
PageTransitionExit({ duration: 1200, curve: Curve.Ease })
.onExit((type: RouteType, progress: number) => {
if (type == RouteType.Pop) {
this.scale2 = 1 - progress;
this.opacity2 = 1 - progress;
}
})
}
}
示例 6:使用系统默认滑动效果
typescript
// index.ets
@Entry
@Component
struct PageTransitionExample {
  build() {
    Column() {
      Navigator({ target: 'pages/page1', type: NavigationType.Push }) {
        Image($r('app.media.bg1')).width('100%').height('100%') // 图片存放在media文件夹下
      }
    }
  }


  // 自定义方式2:使用系统提供的多种默认效果(平移、缩放、透明度等)
  pageTransition() {
    // 该页面进入动画时长为1200ms,尽量与另一页面的退出动画时长匹配
    PageTransitionEnter({ duration: 1200 })
      .slide(SlideEffect.Left)
    // 该页面退出动画时长为1000ms,尽量与另一页面的进入动画时长匹配
    PageTransitionExit({ duration: 1000 })
      .translate({ x: 100.0, y: 100.0 })
      .opacity(0)
  }
}
// page1.ets
@Entry
@Component
struct PageTransitionExample1 {
build() {
Column() {
Navigator({ target: 'pages/index', type: NavigationType.Push }) {
Image($r('app.media.bg2')).width('100%').height('100%') // 图片存放在media文件夹下
}
}
}
// 自定义方式2:使用系统提供的多种默认效果(平移、缩放、透明度等)
pageTransition() {
// 该页面进入动画时长为1000ms,尽量与另一页面的退出动画时长匹配
PageTransitionEnter({ duration: 1000 })
.slide(SlideEffect.Left)
// 该页面退出动画时长为1200ms,尽量与另一页面的进入动画时长匹配
PageTransitionExit({ duration: 1200 })
.translate({ x: 100.0, y: 100.0 })
.opacity(0)
}
}
示例 7:对称转场效果(出现 / 消失使用相同动画)
typescript
// xxx.ets
@Entry
@Component
struct TransitionEffectExample1 {
  @State flag: boolean = true;
  @State show: string = 'show';


  build() {
    Column() {
      Button(this.show).width(80).height(30).margin(30)
        .onClick(() => {
          // 点击Button控制Image的显示和消失
          if (this.flag) {
            this.show = 'hide';
          } else {
            this.show = 'show';
          }
          this.flag = !this.flag;
        })
      if (this.flag) {
        // Image的显示和消失配置为相同的过渡效果(出现和消失互为逆过程)
        // 出现时从指定的透明度为0、绕z轴旋转180°的状态,变为默认的透明度为1、旋转角为0的状态,透明度与旋转动画时长都为2000ms
        // 消失时从默认的透明度为1、旋转角为0的状态,变为指定的透明度为0、绕z轴旋转180°的状态,透明度与旋转动画时长都为2000ms
        Image($r('app.media.testImg')).width(200).height(200)
          .transition(TransitionEffect.OPACITY.animation({ duration: 2000, curve: Curve.Ease }).combine(
            TransitionEffect.rotate({ z: 1, angle: 180 })
          ))
      }
    }.width('100%')
  }
}
示例 8:非对称转场效果(出现 / 消失动画不同)
typescript
// xxx.ets
@Entry
@Component
struct TransitionEffectExample2 {
  @State flag: boolean = true;
  @State show: string = 'show';


  build() {
    Column() {
      Button(this.show).width(80).height(30).margin(30)
        .onClick(() => {
          // 点击Button控制Image的显示和消失
          if (this.flag) {
            this.show = 'hide';
          } else {
            this.show = 'show';
          }
          animateTo({ duration: 2000 }, () => {
            // 第一张图的TransitionEffect包含了animation,transition的动画参数由TransitionEffect指定
            // 第二张图的TransitionEffect不包含animation,transition的动画参数由animateTo指定
            this.flag = !this.flag;
          });
        })
      if (this.flag) {
        // Image的显示和消失配置为不同的过渡效果
        // 出现时做从指定的透明度为0变为默认的透明度1的动画,该动画时长为1000ms,以及做从指定的绕z轴旋转180°变为默认的旋转角为0的动画,该动画1000ms后播放,时长为1000ms
        // 消失时做从默认的透明度为1变为指定的透明度0的动画,该动画1000ms后播放,时长为1000ms,以及做从默认的旋转角0变为指定的绕z轴旋转180°的动画,该动画时长为1000ms
        Image($r('app.media.testImg')).width(200).height(200)
          .transition(
            TransitionEffect.asymmetric(
              TransitionEffect.OPACITY.animation({ duration: 1000 }).combine(
              TransitionEffect.rotate({ z: 1, angle: 180 }).animation({ delay: 1000, duration: 1000 }))
              ,
              TransitionEffect.OPACITY.animation({ delay: 1000, duration: 1000 }).combine(
              TransitionEffect.rotate({ z: 1, angle: 180 }).animation({ duration: 1000 }))
            )
          )
        // 出现时做从x方向和y方向scale都为0变为默认的x方向和y方向scale都为1的动画,该动画时长为animateTo中指定的2000ms
        // 消失时无转场效果
        Image($r('app.media.testImg')).width(200).height(200).margin({ top: 100 })
          .transition(
            TransitionEffect.asymmetric(
              TransitionEffect.scale({ x: 0, y: 0 }),
              TransitionEffect.IDENTITY
            )
          )
      }
    }.width('100%')
  }
}
示例 9:父子组件联动转场
typescript
// xxx.ets
@Entry
@Component
struct TransitionEffectExample3 {
  @State flag: boolean = true;
  @State show: string = 'show';


  build() {
    Column() {
      Button(this.show).width(80).height(30).margin(30)
        .onClick(() => {
          // 点击Button控制Image的显示和消失
          if (this.flag) {
            this.show = 'hide';
          } else {
            this.show = 'show';
          }
          this.flag = !this.flag;
        })
      if (this.flag) {
        // 改flag条件时,会触发id为"column1"、"image1"、"image2"的transition动画。
        // id为"column1"的组件是这棵新出现/消失的子树的根节点。
        Column() {
          Row() {
            Image($r('app.media.testImg')).width(150).height(150).id("image1")
              .transition(TransitionEffect.OPACITY.animation({ duration: 1000 }))
          }


          Image($r('app.media.testImg'))
            .width(150)
            .height(150)
            .margin({ top: 50 })
            .id("image2")
            .transition(TransitionEffect.scale({ x: 0, y: 0 }).animation({ duration: 1000 }))
          Text("view").margin({ top: 50 })
        }
        .id("column1")
        .transition(TransitionEffect.opacity(0.99).animation({ duration: 1000 }),
          // 结束回调设置在消失的第一层节点上,确保能有消失的结束回调
          (transitionIn: boolean) => {
            console.info("transition finish, transitionIn:" + transitionIn);
          }
        )
      }
    }.width('100%')
  }
}
示例10:图片跳转的共享元素动画
typescript
// xxx.ets
@Entry
@Component
struct SharedTransitionExample {
  @State active: boolean = false


  build() {
    Column() {
      Navigator({ target: 'pages/PageB', type: NavigationType.Push }) {
        Image($r('app.media.ic_health_heart')).width(50).height(50)
          .sharedTransition('sharedImage', { duration: 800, curve: Curve.Linear, delay: 100 })
      }.padding({ left: 20, top: 20 })
      .onClick(() => {
        this.active = true
      })
    }
  }
}
// PageB.ets
@Entry
@Component
struct pageBExample {
  build() {
    Stack() {
      Image($r('app.media.ic_health_heart')).width(150).height(150)
        .sharedTransition('sharedImage', { duration: 800, curve: Curve.Linear, delay: 100 })
    }.width('100%').height('100%')
  }
}
示例11:图片与容器的几何过渡
typescript
// xxx.ets
@Entry
@Component
struct Index {
  @State isShow: boolean = false;


  build() {
    Stack({ alignContent: Alignment.Center }) {
      if (this.isShow) {
        Image($r('app.media.pic'))
          .autoResize(false)
          .clip(true)
          .width(300)
          .height(400)
          .offset({ y: 100 })
          .geometryTransition("picture", { follow: false })
          .transition(TransitionEffect.OPACITY)
      } else {
        // geometryTransition此处绑定的是容器,那么容器内的子组件需设为相对布局跟随父容器变化,
        // 套多层容器为了说明相对布局约束传递
        Column() {
          Column() {
            Image($r('app.media.icon'))
              .width('100%').height('100%')
          }.width('100%').height('100%')
        }
        .width(80)
        .height(80)
        // geometryTransition会同步圆角,但仅限于geometryTransition绑定处,此处绑定的是容器
        // 则对容器本身有圆角同步而不会操作容器内部子组件的borderRadius
        .borderRadius(20)
        .clip(true)
        .geometryTransition("picture")
        // transition保证组件离场不被立即析构,可设置其他转场效果
        .transition(TransitionEffect.OPACITY)
      }
    }
    .onClick(() => {
      animateTo({ duration: 1000 }, () => {
        this.isShow = !this.isShow;
      })
    })
  }
}
示例12:设置组件进行位移动画时的运动路径
该示例主要演示如何设置组件进行位移动画时的运动路径。
// xxx.ets
@Entry
@Component
struct MotionPathExample {
  @State toggle: boolean = true;


  build() {
    Column() {
      Button('click me').margin(50)
        .motionPath({
          path: 'Mstart.x start.y L300 200 L300 500 Lend.x end.y',
          from: 0.0,
          to: 1.0,
          rotatable: true
        }) // 执行动画:从起点移动到(300,200),再到(300,500),再到终点
        .onClick(() => {
          animateTo({ duration: 4000, curve: Curve.Linear }, () => {
            this.toggle = !this.toggle // 通过this.toggle变化组件的位置
          })
        })
    }.width('100%').height('100%').alignItems(this.toggle ? HorizontalAlign.Start : HorizontalAlign.Center)
  }
}
示例 13:该示例主要演示如何设置组件进行位移动画时的运动路径。
typescript
// xxx.ets
@Entry
@Component
struct MotionPathExample {
  @State toggle: boolean = true;


  build() {
    Column() {
      Button('click me').margin(50)
        .motionPath({
          path: 'Mstart.x start.y L300 200 L300 500 Lend.x end.y',
          from: 0.0,
          to: 1.0,
          rotatable: true
        }) // 执行动画:从起点移动到(300,200),再到(300,500),再到终点
        .onClick(() => {
          animateTo({ duration: 4000, curve: Curve.Linear }, () => {
            this.toggle = !this.toggle // 通过this.toggle变化组件的位置
          })
        })
    }.width('100%').height('100%').alignItems(this.toggle ? HorizontalAlign.Start : HorizontalAlign.Center)
  }
}
示例14(圆形初始化粒子)
描述粒子动画基础用法,通过圆形初始化粒子。
typescript
// xxx.ets
@Entry
@Component
struct ParticleExample {
  build() {
    Stack() {
      Text()
        .width(300).height(300).backgroundColor(Color.Black)
      Particle({
        particles: [
          {
            emitter: {
              particle: {
                type: ParticleType.POINT, //粒子类型
                config: {
                  radius: 10//圆点半径
                },
                count: 500, //粒子总数
                lifetime: 10000, //粒子生命周期,单位ms
                lifetimeRange: 100//粒子生命周期取值范围,单位ms
              },
              emitRate: 10, //每秒发射粒子数
              position: [0, 0],
              shape: ParticleEmitterShape.RECTANGLE//发射器形状
            },
            color: {
              range: [Color.Red, Color.Yellow], //初始颜色范围
              updater: {
                type: ParticleUpdater.CURVE, //变化方式为曲线变化
                config: [
                  {
                    from: Color.White, //变化起始值
                    to: Color.Pink, //变化终点值
                    startMillis: 0, //开始时间
                    endMillis: 3000, //结束时间
                    curve: Curve.EaseIn//变化曲线
                  },
                  {
                    from: Color.Pink,
                    to: Color.Orange,
                    startMillis: 3000,
                    endMillis: 5000,
                    curve: Curve.EaseIn
                  },
                  {
                    from: Color.Orange,
                    to: Color.Pink,
                    startMillis: 5000,
                    endMillis: 8000,
                    curve: Curve.EaseIn
                  },
                ]
              }
            },
            opacity: {
              range: [0.0, 1.0], //粒子透明度的初始值从【0.0到1.0】随机产生
              updater: {
                type: ParticleUpdater.CURVE,
                config: [
                  {
                    from: 0.0,
                    to: 1.0,
                    startMillis: 0,
                    endMillis: 3000,
                    curve: Curve.EaseIn
                  },
                  {
                    from: 1.0,
                    to: 0.0,
                    startMillis: 5000,
                    endMillis: 10000,
                    curve: Curve.EaseIn
                  }
                ]
              }
            },
            scale: {
              range: [0.0, 0.0],
              updater: {
                type: ParticleUpdater.CURVE,
                config: [
                  {
                    from: 0.0,
                    to: 0.5,
                    startMillis: 0,
                    endMillis: 3000,
                    curve: Curve.EaseIn
                  }
                ]
              }
            },
            acceleration: {
              //加速度的配置,从大小和方向两个维度变化,speed表示加速度大小,angle表示加速度方向
              speed: {
                range: [3, 9],
                updater: {
                  type: ParticleUpdater.RANDOM, //Speed的变化方式是随机变化
                  config: [1, 20]
                }
              },
              angle: {
                range: [90, 90]
              }
            }


          }
        ]
      }).width(300).height(300)
    }.width("100%").height("100%").align(Alignment.Center)
  }
}
}
示例15(图片初始化粒子)
描述粒子动画基础用法,通过图片初始化粒子。
@Entry
@Component
struct ParticleExample {
@State
myCount: number = 100
flag: boolean = false;
build() {
Column() {
Stack() {
Particle({
particles: [
{
emitter: {
particle: {
type: ParticleType.IMAGE,
config: {
src: $r("app.media.book"),
size: [10, 10]
},
count: this.myCount,
lifetime: 10000,
lifetimeRange: 100
},
emitRate: 3,
shape: ParticleEmitterShape.CIRCLE
},
color: {
range: [Color.White, Color.White]
},
opacity: {
range: [1.0, 1.0],
updater: {
type: ParticleUpdater.CURVE,
config: [
{
from: 0,
to: 1.0,
startMillis: 0,
endMillis: 6000
},
{
from: 1.0,
to: .0,
startMillis: 6000,
endMillis: 10000
}
]
}
},
scale: {
range: [0.1, 1.0],
updater: {
type: ParticleUpdater.CURVE,
config: [
{
from: 0,
to: 1.5,
startMillis: 0,
endMillis: 8000,
curve: Curve.EaseIn
}
]
}
},
acceleration: {
speed: {
range: [3, 9],
updater: {
type: ParticleUpdater.CURVE,
config: [
{
from: 10,
to: 20,
startMillis: 0,
endMillis: 3000,
curve: Curve.EaseIn
},
{
from: 10,
to: 2,
startMillis: 3000,
endMillis: 8000,
curve: Curve.EaseIn
}
]
}
},
angle: {
range: [0, 180],
updater: {
type: ParticleUpdater.CURVE,
config: [{
from: 1,
to: 2,
startMillis: 0,
endMillis: 1000,
curve: Curve.EaseIn
},
{
from: 50,
to: -50,
startMillis: 1000,
endMillis: 3000,
curve: Curve.EaseIn
},
{
from: 3,
to: 5,
startMillis: 3000,
endMillis: 8000,
curve: Curve.EaseIn
}
]
}
}
},
spin: {
range: [0.1, 1.0],
updater: {
type: ParticleUpdater.CURVE,
config: [
{
from: 0,
to: 360,
startMillis: 0,
endMillis: 8000,
curve: Curve.EaseIn
}
]
}
},
}
, {
emitter: {
particle: {
type: ParticleType.IMAGE,
config: {
src: $r('app.media.heart'),
size: [10, 10]
},
count: this.myCount,
lifetime: 10000,
lifetimeRange: 100
},
emitRate: 3,
shape: ParticleEmitterShape.CIRCLE
},
color: {
range: [Color.White, Color.White]
},
opacity: {
range: [1.0, 1.0],
updater: {
type: ParticleUpdater.CURVE,
config: [
{
from: 0,
to: 1.0,
startMillis: 0,
endMillis: 6000
},
{
from: 1.0,
to: .0,
startMillis: 6000,
endMillis: 10000
}
]
}
},
scale: {
range: [0.1, 1.0],
updater: {
type: ParticleUpdater.CURVE,
config: [
{
from: 0,
to: 2.0,
startMillis: 0,
endMillis: 10000,
curve: Curve.EaseIn
}
]
}
},
acceleration: {
speed: {
range: [3, 9],
updater: {
type: ParticleUpdater.CURVE,
config: [
{
from: 10,
to: 20,
startMillis: 0,
endMillis: 3000,
curve: Curve.EaseIn
},
{
from: 10,
to: 2,
startMillis: 3000,
endMillis: 8000,
curve: Curve.EaseIn
}
]
}
},
angle: {
range: [0, 180],
updater: {
type: ParticleUpdater.CURVE,
config: [{
from: 1,
to: 2,
startMillis: 0,
endMillis: 1000,
curve: Curve.EaseIn
},
{
from: 50,
to: -50,
startMillis: 0,
endMillis: 3000,
curve: Curve.EaseIn
},
{
from: 3,
to: 5,
startMillis: 3000,
endMillis: 10000,
curve: Curve.EaseIn
}
]
}
}
},
spin: {
range: [0.1, 1.0],
updater: {
type: ParticleUpdater.CURVE,
config: [
{
from: 0,
to: 360,
startMillis: 0,
endMillis: 10000,
curve: Curve.EaseIn
}
]
}
},
}, {
emitter: {
particle: {
type: ParticleType.IMAGE,
config: {
src: $r('app.media.sun'),
size: [10, 10]
},
count: this.myCount,
lifetime: 10000,
lifetimeRange: 100
},
emitRate: 3,
shape: ParticleEmitterShape.CIRCLE
},
color: {
range: [Color.White, Color.White]
},
opacity: {
range: [1.0, 1.0],
updater: {
type: ParticleUpdater.CURVE,
config: [
{
from: 0,
to: 1.0,
startMillis: 0,
endMillis: 6000
},
{
from: 1.0,
to: .0,
startMillis: 6000,
endMillis: 10000
}
]
}
},
scale: {
range: [0.1, 1.0],
updater: {
type: ParticleUpdater.CURVE,
config: [
{
from: 0,
to: 2.0,
startMillis: 0,
endMillis: 10000,
curve: Curve.EaseIn
}
]
}
},
acceleration: {
speed: {
range: [3, 9],
updater: {
type: ParticleUpdater.CURVE,
config: [
{
from: 10,
to: 20,
startMillis: 0,
endMillis: 3000,
curve: Curve.EaseIn
},
{
from: 10,
to: 2,
startMillis: 3000,
endMillis: 8000,
curve: Curve.EaseIn
}
]
}
},
angle: {
range: [0, 180],
updater: {
type: ParticleUpdater.CURVE,
config: [{
from: 1,
to: 2,
startMillis: 0,
endMillis: 1000,
curve: Curve.EaseIn
},
{
from: 50,
to: -50,
startMillis: 1000,
endMillis: 3000,
curve: Curve.EaseIn
},
{
from: 3,
to: 5,
startMillis: 3000,
endMillis: 8000,
curve: Curve.EaseIn
}
]
}
}
},
spin: {
range: [0.1, 1.0],
updater: {
type: ParticleUpdater.CURVE,
config: [
{
from: 0,
to: 360,
startMillis: 0,
endMillis: 10000,
curve: Curve.EaseIn
}
]
}
},
}
]
}).width(300).height(300)
}.width(500).height(500).align(Alignment.Center)
}.width("100%").height("100%")
}
}

示例16(粒子扰动场的干扰下运动轨迹发生变化)
该示例主要演示如何通过粒子扰动场的干扰下来实现运动轨迹发生变化的效果。
@Entry
@Component
struct ParticleExample {
  build() {
    Stack() {
      Text()
        .width(300).height(300).backgroundColor(Color.Black)
      Particle({
        particles: [
          {
            emitter: {
              particle: {
                type: ParticleType.POINT, //粒子类型
                config: {
                  radius: 10//圆点半径
                },
                count: 500, //粒子总数
                lifetime: 10000//粒子生命周期,单位ms
              },
              emitRate: 10, //每秒发射粒子数
              position: [0, 0],
              shape: ParticleEmitterShape.RECTANGLE//发射器形状
            },
            color: {
              range: [Color.Red, Color.Yellow], //初始颜色范围
              updater: {
                type: ParticleUpdater.CURVE, //变化方式为曲线变化
                config: [
                  {
                    from: Color.White, //变化起始值
                    to: Color.Pink, //变化终点值
                    startMillis: 0, //开始时间
                    endMillis: 3000, //结束时间
                    curve: Curve.EaseIn//变化曲线
                  },
                  {
                    from: Color.Pink,
                    to: Color.Orange,
                    startMillis: 3000,
                    endMillis: 5000,
                    curve: Curve.EaseIn
                  },
                  {
                    from: Color.Orange,
                    to: Color.Pink,
                    startMillis: 5000,
                    endMillis: 8000,
                    curve: Curve.EaseIn
                  },
                ]
              }
            },
            opacity: {
              range: [0.0, 1.0], //粒子透明度的初始值从[0.0,1.0]随机产生
              updater: {
                type: ParticleUpdater.CURVE,
                config: [
                  {
                    from: 0.0,
                    to: 1.0,
                    startMillis: 0,
                    endMillis: 3000,
                    curve: Curve.EaseIn
                  },
                  {
                    from: 1.0,
                    to: 0.0,
                    startMillis: 5000,
                    endMillis: 10000,
                    curve: Curve.EaseIn
                  }
                ]
              }
            },
            scale: {
              range: [0.0, 0.0],
              updater: {
                type: ParticleUpdater.CURVE,
                config: [
                  {
                    from: 0.0,
                    to: 0.5,
                    startMillis: 0,
                    endMillis: 3000,
                    curve: Curve.EaseIn
                  }
                ]
              }
            },
            acceleration: {
              //加速度的配置,从大小和方向两个维度变化,speed表示加速度大小,angle表示加速度方向
              speed: {
                range: [3, 9],
                updater: {
                  type: ParticleUpdater.RANDOM,
                  config: [1, 20]
                }
              },
              angle: {
                range: [90, 90]
              }
            }


          }
        ]
      }).width(300).height(300).disturbanceFields([{
        strength: 10,
        shape: DisturbanceFieldShape.RECT,
        size: { width: 100, height: 100 },
        position: { x: 100, y: 100 },
        feather: 15,
        noiseScale: 10,
        noiseFrequency: 15,
        noiseAmplitude: 5
      }])
    }.width("100%").height("100%").align(Alignment.Center)
  }
}
示例17(调整粒子发射器位置)
通过emitter()调整粒子发射器的位置。
@Entry
@Component
struct ParticleExample {
  @State emitterProperties: Array<EmitterProperty> = [
    {
      index: 0,
      emitRate: 100,
      position: { x: 60, y: 80 },
      size: { width: 200, height: 200 }
    }
  ]


  build() {
    Stack() {
      Text()
        .width(300).height(300).backgroundColor(Color.Black)
      Particle({
        particles: [
          {
            emitter: {
              particle: {
                type: ParticleType.POINT, // 粒子类型
                config: {
                  radius: 5// 圆点半径
                },
                count: 400, // 粒子总数
                lifetime: -1// 粒子的生命周期,-1表示粒子生命周期无限大
              },
              emitRate: 10, // 每秒发射粒子数
              position: [0, 0], // 粒子发射位置
              shape: ParticleEmitterShape.CIRCLE// 发射器形状
            },
            color: {
              range: [Color.Red, Color.Yellow], // 初始颜色范围
              updater: {
                type: ParticleUpdater.CURVE, // 变化方式为曲线变化
                config: [
                  {
                    from: Color.White,
                    to: Color.Pink,
                    startMillis: 0,
                    endMillis: 3000,
                    curve: Curve.EaseIn
                  },
                  {
                    from: Color.Pink,
                    to: Color.Orange,
                    startMillis: 3000,
                    endMillis: 5000,
                    curve: Curve.EaseIn
                  },
                  {
                    from: Color.Orange,
                    to: Color.Pink,
                    startMillis: 5000,
                    endMillis: 8000,
                    curve: Curve.EaseIn
                  },
                ]
              }
            },
          },
        ]
      })
        .width(300)
        .height(300)
        .emitter(this.emitterProperties)
    }.width("100%").height("100%").align(Alignment.Center)
  }
}
示例 18:显式动画立即下发( AnimateToImmediately目前还不能跨平台使用)
// xxx.ets
@Entry
@Component
struct AnimateToImmediatelyExample {
  @State widthSize: number = 250;
  @State heightSize: number = 100;
  @State opacitySize: number = 0;
  private flag: boolean = true;


  build() {
    Column() {
      Column()
      .width(this.widthSize)
      .height(this.heightSize)
      .backgroundColor(Color.Green)
      .opacity(this.opacitySize)
      Button('change size')
        .margin(30)
        .onClick(() => {
          if (this.flag) {
            animateToImmediately({
              delay: 0,
              duration: 1000
            }, () => {
              this.opacitySize = 1;
            })
            animateTo({
              delay: 1000,
              duration: 1000
            }, () => {
              this.widthSize = 150;
              this.heightSize = 60;
            })
          } else {
            animateToImmediately({
              delay: 0,
              duration: 1000
            }, () => {
              this.widthSize = 250;
              this.heightSize = 100;
            })
            animateTo({
              delay: 1000,
              duration: 1000
            }, () => {
              this.opacitySize = 0;
            })
          }
          this.flag = !this.flag;
        })
    }.width('100%').margin({ top: 5 })
  }
}
四、关键限制
- 属性生效顺序:需将目标属性(如
width)写在animation接口之前,否则动画不生效。 - 构造器属性无效:组件构造器中的属性(如
Column({ space: this.space })中的space)无法通过动画修改。 - 多次调用覆盖:若同一组件多次调用
animation,后调用的配置会覆盖前一次的设置。
五、相关资源
- 官方文档:HarmonyOS属性动画开发指南
- 扩展学习:显式动画(
animateTo)可实现更复杂的动画控制,需结合状态管理使用。
如需进一步了解特定属性或高级用法,请提供具体场景,我将补充说明。
