Java多线程实现之Callable接口深度解析
- 一、Callable接口概述
- 1.1 接口定义
- 1.2 与Runnable接口的对比
- 1.3 Future接口与FutureTask类
- 二、Callable接口的基本使用方法
- 2.1 传统方式实现Callable接口
- 2.2 使用Lambda表达式简化Callable实现
- 2.3 使用FutureTask类执行Callable任务
- 三、Callable接口的高级应用
- 3.1 批量执行Callable任务
- 3.2 带超时的任务执行
- 3.3 处理任务异常
- 四、Callable接口的实战案例
- 4.1 并行计算
- 4.2 多数据源并行查询
- 4.3 多任务竞赛
- 五、Callable接口的注意事项
- 5.1 线程池的选择
- 5.2 异常处理
- 5.3 内存泄漏风险
- 5.4 性能考虑
- 总结
Runnable接口是我们在Java中实现多线程任务的常用方式,然而Runnable的run()方法没有返回值,这在需要获取线程执行结果的场景下显得力不从心。Java 5引入的Callable接口和Future机制解决了这个问题,允许线程任务返回结果并处理异常。本文我将详细介绍Callable接口的定义、与Runnable接口的对比,以及如何使用Future和FutureTask获取任务结果,帮你全面掌握Callable接口多线程的处理与使用。
一、Callable接口概述
1.1 接口定义
Callable接口位于java.util.concurrent包下,是一个函数式接口,其定义如下:
@FunctionalInterface
public interface Callable<V> {
    V call() throws Exception;
}
与Runnable接口相比,Callable接口有以下特点:
- 有返回值:
call()方法的返回值类型由泛型V指定 - 可抛出异常:
call()方法可以抛出任何异常,包括受检异常
1.2 与Runnable接口的对比
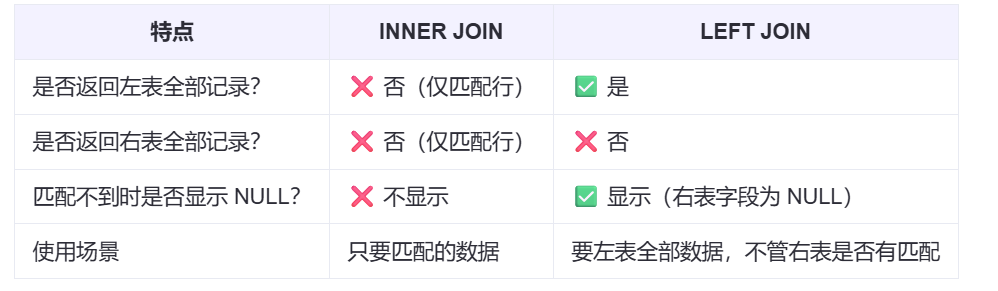
| 特性 | Runnable | Callable |
|---|---|---|
| 接口方法 | void run() | V call() throws Exception |
| 返回值 | 无 | 有(泛型指定) |
| 异常处理 | 不能抛出受检异常 | 可以抛出任何异常 |
| 使用场景 | 简单的无返回值任务 | 需要返回结果或处理异常的任务 |
1.3 Future接口与FutureTask类
为了获取Callable任务的执行结果,Java提供了Future接口:
public interface Future<V> {
    boolean cancel(boolean mayInterruptIfRunning);
    boolean isCancelled();
    boolean isDone();
    V get() throws InterruptedException, ExecutionException;
    V get(long timeout, TimeUnit unit) throws InterruptedException, ExecutionException, TimeoutException;
}
Future接口提供了以下主要方法:
get():获取任务执行结果,如果任务未完成则会阻塞get(long timeout, TimeUnit unit):带超时的结果获取cancel(boolean mayInterruptIfRunning):取消任务执行isDone():判断任务是否已完成isCancelled():判断任务是否已被取消
FutureTask类是Future接口的一个实现,同时也实现了Runnable接口,因此可以作为任务提交给线程或线程池执行:
public class FutureTask<V> implements RunnableFuture<V> {
    // ...
}

public interface RunnableFuture<V> extends Runnable, Future<V> {
    void run();
}
二、Callable接口的基本使用方法
2.1 传统方式实现Callable接口
import java.util.concurrent.*;

class MyCallable implements Callable<Integer> {
    @Override
    public Integer call() throws Exception {
        // 模拟耗时计算
        Thread.sleep(2000);
        return 1 + 2 + 3 + 4 + 5;
    }
}

public class CallableExample {
    public static void main(String[] args) throws ExecutionException, InterruptedException {
        // 创建Callable任务
        Callable<Integer> callable = new MyCallable();

        // 创建线程池
        ExecutorService executor = Executors.newSingleThreadExecutor();

        // 提交任务并获取Future
        Future<Integer> future = executor.submit(callable);

        System.out.println("主线程继续执行其他任务");

        // 获取任务结果(如果任务未完成,get()方法会阻塞)
        Integer result = future.get();
        System.out.println("任务结果: " + result);

        // 关闭线程池
        executor.shutdown();
    }
}
2.2 使用Lambda表达式简化Callable实现
import java.util.concurrent.*;

public class LambdaCallableExample {
    public static void main(String[] args) throws ExecutionException, InterruptedException {
        // 使用Lambda表达式创建Callable任务
        Callable<String> callable = () -> {
            Thread.sleep(1500);
            return "Hello from Callable!";
        };

        // 创建线程池
        ExecutorService executor = Executors.newFixedThreadPool(2);

        // 提交任务并获取Future
        Future<String> future = executor.submit(callable);

        // 检查任务是否完成
        if (!future.isDone()) {
            System.out.println("任务尚未完成,继续做其他事情...");
        }

        // 获取任务结果
        String result = future.get();
        System.out.println("任务结果: " + result);

        // 关闭线程池
        executor.shutdown();
    }
}
2.3 使用FutureTask类执行Callable任务
import java.util.concurrent.*;

public class FutureTaskExample {
    public static void main(String[] args) throws ExecutionException, InterruptedException {
        // 创建Callable任务
        Callable<Integer> callable = () -> {
            Thread.sleep(1000);
            return 100;
        };

        // 创建FutureTask
        FutureTask<Integer> futureTask = new FutureTask<>(callable);

        // 创建线程并执行FutureTask
        Thread thread = new Thread(futureTask);
        thread.start();

        System.out.println("主线程继续执行");

        // 获取任务结果
        Integer result = futureTask.get();
        System.out.println("任务结果: " + result);
    }
}
三、Callable接口的高级应用
3.1 批量执行Callable任务
import java.util.ArrayList;
import java.util.List;
import java.util.concurrent.*;

public class BatchCallableExample {
    public static void main(String[] args) throws InterruptedException, ExecutionException {
        // 创建线程池
        ExecutorService executor = Executors.newFixedThreadPool(3);

        // 创建多个Callable任务
        List<Callable<Integer>> tasks = new ArrayList<>();
        for (int i = 1; i <= 5; i++) {
            final int taskId = i;
            tasks.add(() -> {
                Thread.sleep(1000);
                return taskId * 10;
            });
        }

        // 批量提交任务并获取结果
        List<Future<Integer>> futures = executor.invokeAll(tasks);

        // 处理结果
        for (Future<Integer> future : futures) {
            System.out.println("任务结果: " + future.get());
        }

        // 关闭线程池
        executor.shutdown();
    }
}
3.2 带超时的任务执行
import java.util.concurrent.*;

public class TimeoutCallableExample {
    public static void main(String[] args) {
        // 创建线程池
        ExecutorService executor = Executors.newSingleThreadExecutor();

        // 创建Callable任务
        Callable<String> callable = () -> {
            Thread.sleep(3000); // 模拟耗时操作
            return "任务完成";
        };

        // 提交任务并获取Future
        Future<String> future = executor.submit(callable);

        try {
            // 设置超时时间为2秒
            String result = future.get(2, TimeUnit.SECONDS);
            System.out.println("任务结果: " + result);
        } catch (TimeoutException e) {
            System.out.println("任务超时,取消任务");
            future.cancel(true);
        } catch (InterruptedException | ExecutionException e) {
            e.printStackTrace();
        } finally {
            // 关闭线程池
            executor.shutdown();
        }
    }
}
3.3 处理任务异常
import java.util.concurrent.*;

public class ExceptionHandlingExample {
    public static void main(String[] args) {
        // 创建线程池
        ExecutorService executor = Executors.newSingleThreadExecutor();

        // 创建可能抛出异常的Callable任务
        Callable<Integer> callable = () -> {
            throw new RuntimeException("任务执行异常");
        };

        // 提交任务并获取Future
        Future<Integer> future = executor.submit(callable);

        try {
            // 获取任务结果
            Integer result = future.get();
            System.out.println("任务结果: " + result);
        } catch (InterruptedException e) {
            System.out.println("线程被中断: " + e.getMessage());
        } catch (ExecutionException e) {
            // 获取实际抛出的异常
            Throwable cause = e.getCause();
            System.out.println("任务执行异常: " + cause.getMessage());
        } finally {
            // 关闭线程池
            executor.shutdown();
        }
    }
}
四、Callable接口的实战案例
4.1 并行计算
import java.util.ArrayList;
import java.util.List;
import java.util.concurrent.*;

class Calculator implements Callable<Integer> {
    private int start;
    private int end;

    public Calculator(int start, int end) {
        this.start = start;
        this.end = end;
    }

    @Override
    public Integer call() throws Exception {
        int sum = 0;
        for (int i = start; i <= end; i++) {
            sum += i;
        }
        return sum;
    }
}

public class ParallelCalculation {
    public static void main(String[] args) throws InterruptedException, ExecutionException {
        int totalNumbers = 1000;
        int threadCount = 4;
        int numbersPerThread = totalNumbers / threadCount;

        // 创建线程池
        ExecutorService executor = Executors.newFixedThreadPool(threadCount);

        // 创建多个计算任务
        List<Callable<Integer>> tasks = new ArrayList<>();
        for (int i = 0; i < threadCount; i++) {
            int start = i * numbersPerThread + 1;
            int end = (i == threadCount - 1) ? totalNumbers : (i + 1) * numbersPerThread;
            tasks.add(new Calculator(start, end));
        }

        // 执行所有任务并获取结果
        List<Future<Integer>> futures = executor.invokeAll(tasks);

        // 汇总结果
        int totalSum = 0;
        for (Future<Integer> future : futures) {
            totalSum += future.get();
        }

        System.out.println("1到" + totalNumbers + "的总和: " + totalSum);

        // 关闭线程池
        executor.shutdown();
    }
}
4.2 多数据源并行查询
import java.util.concurrent.*;

class DataSourceQuery implements Callable<String> {
    private String dataSourceName;

    public DataSourceQuery(String dataSourceName) {
        this.dataSourceName = dataSourceName;
    }

    @Override
    public String call() throws Exception {
        // 模拟从不同数据源查询数据
        System.out.println("正在从" + dataSourceName + "查询数据...");
        Thread.sleep((long) (Math.random() * 3000));
        return dataSourceName + "的数据";
    }
}

public class ParallelDataQuery {
    public static void main(String[] args) throws InterruptedException, ExecutionException {
        // 创建线程池
        ExecutorService executor = Executors.newFixedThreadPool(3);

        // 创建多个数据源查询任务
        List<Callable<String>> tasks = new ArrayList<>();
        tasks.add(new DataSourceQuery("MySQL数据库"));
        tasks.add(new DataSourceQuery("Redis缓存"));
        tasks.add(new DataSourceQuery("Elasticsearch"));

        // 执行所有任务并获取结果
        long startTime = System.currentTimeMillis();
        List<Future<String>> futures = executor.invokeAll(tasks);
        long endTime = System.currentTimeMillis();

        // 处理结果
        for (Future<String> future : futures) {
            System.out.println(future.get());
        }

        System.out.println("所有查询完成,耗时: " + (endTime - startTime) + "毫秒");

        // 关闭线程池
        executor.shutdown();
    }
}
4.3 多任务竞赛
import java.util.concurrent.*;

class RaceTask implements Callable<String> {
    private String taskName;
    private long delay;

    public RaceTask(String taskName, long delay) {
        this.taskName = taskName;
        this.delay = delay;
    }

    @Override
    public String call() throws Exception {
        System.out.println(taskName + "开始执行");
        Thread.sleep(delay);
        System.out.println(taskName + "执行完成");
        return taskName;
    }
}

public class TaskRaceExample {
    public static void main(String[] args) throws InterruptedException, ExecutionException {
        // 创建线程池
        ExecutorService executor = Executors.newFixedThreadPool(3);

        // 创建多个竞赛任务
        List<Callable<String>> tasks = new ArrayList<>();
        tasks.add(new RaceTask("任务A", 2000));
        tasks.add(new RaceTask("任务B", 1500));
        tasks.add(new RaceTask("任务C", 3000));

        // 执行任务,获取最先完成的任务结果
        String winner = executor.invokeAny(tasks);
        System.out.println("获胜者: " + winner);

        // 关闭线程池
        executor.shutdown();
    }
}
五、Callable接口的注意事项
5.1 线程池的选择
- FixedThreadPool:固定大小的线程池,适合已知并发线程数的场景
- CachedThreadPool:可缓存的线程池,适合短期异步任务
- SingleThreadExecutor:单线程执行器,适合需要顺序执行任务的场景
- ScheduledThreadPool:定时任务线程池,适合需要定时执行的任务
5.2 异常处理
call()方法可以抛出任何异常,这些异常会被封装在ExecutionException中,通过Future.get()方法获取结果时需要处理- 建议在
call()方法内部进行适当的异常处理,避免将异常直接抛出
5.3 内存泄漏风险
- 如果
Future对象不再使用,但任务仍在执行,可能会导致内存泄漏 - 确保及时调用
Future.cancel()或ExecutorService.shutdown()方法释放资源
5.4 性能考虑
- 对于简单的无返回值任务,使用
Runnable更合适 - 只有在确实需要返回值或处理异常时,才使用
Callable - 合理配置线程池大小,避免创建过多线程导致性能下降
总结
Callable接口和Future机制为Java多线程编程提供了强大的结果返回和异常处理能力,是构建复杂多线程应用的重要工具。通过实现Callable接口,可以创建具有返回值的线程任务,并通过Future对象获取任务执行结果,处理可能出现的异常。同时,我们在使用过程中需要注意线程池选择、异常处理和性能考虑等问题,根据具体场景合理选择Runnable和Callable,并结合线程池等高级API,充分发挥Java多线程编程的优势。
若这篇内容帮到你,动动手指支持下!关注不迷路,干货持续输出!
ヾ(´∀ ˋ)ノヾ(´∀ ˋ)ノヾ(´∀ ˋ)ノヾ(´∀ ˋ)ノヾ(´∀ ˋ)ノ