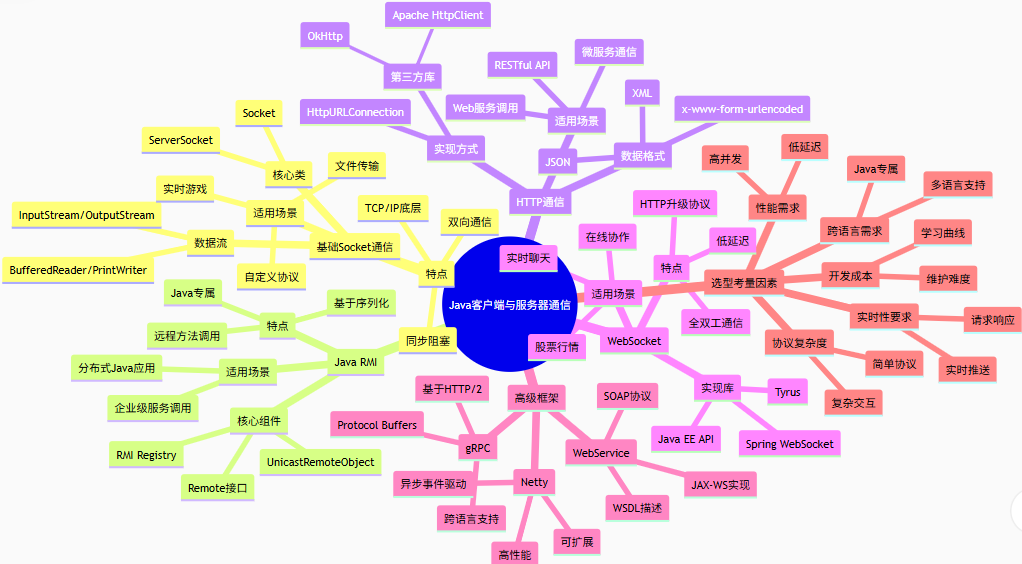
Java客户端与服务器通信
Java提供了多种方式来实现客户端与服务器之间的通信,下面我将介绍几种常见的方法:
1. 基于Socket的基本通信
服务器端代码
import java.io.*;
import java.net.*;

public class SimpleServer {
    public static void main(String[] args) {
        try {
            ServerSocket serverSocket = new ServerSocket(8080);
            System.out.println("服务器启动,等待客户端连接...");

            Socket clientSocket = serverSocket.accept();
            System.out.println("客户端已连接: " + clientSocket.getInetAddress());

            // 获取输入输出流
            BufferedReader in = new BufferedReader(
                new InputStreamReader(clientSocket.getInputStream()));
            PrintWriter out = new PrintWriter(clientSocket.getOutputStream(), true);

            // 通信循环
            String inputLine;
            while ((inputLine = in.readLine()) != null) {
                System.out.println("收到客户端消息: " + inputLine);
                out.println("服务器回复: " + inputLine);
            }

            // 关闭连接
            in.close();
            out.close();
            clientSocket.close();
            serverSocket.close();
        } catch (IOException e) {
            e.printStackTrace();
        }
    }
}
客户端代码
import java.io.*;
import java.net.*;

public class SimpleClient {
    public static void main(String[] args) {
        try {
            Socket socket = new Socket("localhost", 8080);

            // 获取输入输出流
            PrintWriter out = new PrintWriter(socket.getOutputStream(), true);
            BufferedReader in = new BufferedReader(
                new InputStreamReader(socket.getInputStream()));

            // 发送消息
            out.println("Hello, Server!");

            // 接收回复
            String response = in.readLine();
            System.out.println("服务器回复: " + response);

            // 关闭连接
            out.close();
            in.close();
            socket.close();
        } catch (IOException e) {
            e.printStackTrace();
        }
    }
}
2. 使用Java RMI (远程方法调用)
RMI允许一个Java程序调用另一个Java虚拟机上对象的方法。
定义远程接口
import java.rmi.Remote;
import java.rmi.RemoteException;

public interface RemoteService extends Remote {
    String sayHello(String name) throws RemoteException;
}
实现远程服务
import java.rmi.*;
import java.rmi.server.*;

public class RemoteServiceImpl extends UnicastRemoteObject implements RemoteService {
    public RemoteServiceImpl() throws RemoteException {
        super();
    }

    public String sayHello(String name) throws RemoteException {
        return "Hello, " + name + "!";
    }
}
服务器端代码
import java.rmi.registry.*;

public class RMIServer {
    public static void main(String[] args) {
        try {
            RemoteService service = new RemoteServiceImpl();
            LocateRegistry.createRegistry(1099);
            Naming.rebind("RemoteService", service);
            System.out.println("RMI服务已启动...");
        } catch (Exception e) {
            e.printStackTrace();
        }
    }
}
客户端代码
import java.rmi.*;

public class RMIClient {
    public static void main(String[] args) {
        try {
            RemoteService service = (RemoteService) Naming.lookup("rmi://localhost/RemoteService");
            String response = service.sayHello("Client");
            System.out.println("服务器回复: " + response);
        } catch (Exception e) {
            e.printStackTrace();
        }
    }
}
3. 使用HTTP通信 (HttpURLConnection)
客户端HTTP请求示例
import java.io.*;
import java.net.*;

public class HttpClientExample {
    public static void main(String[] args) {
        try {
            URL url = new URL("http://example.com/api");
            HttpURLConnection connection = (HttpURLConnection) url.openConnection();

            // 设置请求方法
            connection.setRequestMethod("GET");

            // 获取响应
            int responseCode = connection.getResponseCode();
            System.out.println("响应代码: " + responseCode);

            BufferedReader in = new BufferedReader(
                new InputStreamReader(connection.getInputStream()));
            String inputLine;
            StringBuilder response = new StringBuilder();

            while ((inputLine = in.readLine()) != null) {
                response.append(inputLine);
            }
            in.close();

            System.out.println("响应内容: " + response.toString());
        } catch (Exception e) {
            e.printStackTrace();
        }
    }
}
4. 使用第三方库 - Apache HttpClient
import org.apache.http.client.methods.*;
import org.apache.http.impl.client.*;
import org.apache.http.util.EntityUtils;

public class ApacheHttpClientExample {
    public static void main(String[] args) {
        try (CloseableHttpClient httpClient = HttpClients.createDefault()) {
            HttpGet request = new HttpGet("http://example.com/api");

            try (CloseableHttpResponse response = httpClient.execute(request)) {
                System.out.println("状态码: " + response.getStatusLine().getStatusCode());
                String result = EntityUtils.toString(response.getEntity());
                System.out.println("响应内容: " + result);
            }
        } catch (Exception e) {
            e.printStackTrace();
        }
    }
}
5. WebSocket通信
服务器端 (使用Java EE或Spring)
import javax.websocket.*;
import javax.websocket.server.*;

@ServerEndpoint("/websocket")
public class WebSocketServer {
    @OnOpen
    public void onOpen(Session session) {
        System.out.println("客户端连接: " + session.getId());
    }

    @OnMessage
    public void onMessage(String message, Session session) {
        System.out.println("收到消息: " + message);
        try {
            session.getBasicRemote().sendText("服务器回复: " + message);
        } catch (IOException e) {
            e.printStackTrace();
        }
    }

    @OnClose
    public void onClose(Session session) {
        System.out.println("客户端断开: " + session.getId());
    }
}
客户端 (使用Java API)
import javax.websocket.*;

@ClientEndpoint
public class WebSocketClient {
    @OnOpen
    public void onOpen(Session session) {
        System.out.println("连接已建立");
        try {
            session.getBasicRemote().sendText("Hello, Server!");
        } catch (IOException e) {
            e.printStackTrace();
        }
    }

    @OnMessage
    public void onMessage(String message) {
        System.out.println("收到服务器消息: " + message);
    }

    public static void main(String[] args) {
        WebSocketContainer container = ContainerProvider.getWebSocketContainer();
        try {
            container.connectToServer(WebSocketClient.class,
                URI.create("ws://localhost:8080/websocket"));
            Thread.sleep(5000); // 保持连接一段时间
        } catch (Exception e) {
            e.printStackTrace();
        }
    }
}
选择建议
-
简单通信:使用Socket或HttpURLConnection
-
分布式应用:考虑RMI或RPC框架
-
Web服务:使用HTTP客户端库
-
实时双向通信:WebSocket是更好的选择

![浏览器工作原理05 [#] 渲染流程(上):HTML、CSS和JavaScript是如何变成页面的](https://i-blog.csdnimg.cn/img_convert/153ad1bb6b680aa8c2dd89296bc0d7e1.png)


![[BIOS]VSCode zx-6000 编译问题](https://i-blog.csdnimg.cn/direct/df5a0400ddb443dca9127f184ea49883.png)
![[GitHub] 优秀开源项目](https://i-blog.csdnimg.cn/direct/714d53e2fd994c53b78d3f68926f3b40.png)