文章目录
- 说明
- 一 LangChain Chat Model
- 1.1 少量示例提示(Few-Shot Prompting)
- 1.2 Few-Shot示例代码
- 1.3 示例选择器(Eample selectors)
- 1.4 ExampleSelector 类型
- 1.5 ExampleSelector案例代码
- 1.6 LangServe工具
- 1.7 LangServe安装
- 1.8 langchain项目结构
- 1.9 LangServe使用步骤
- 二 消息历史(Message History)
- 2.1 Message History 的核心组件
- 2.2 Message History 的使用方式
- 三 MessagesPlaceholder
- 3.1 MessagesPlaceholder简介
- MessagesPlaceholder使用示例
- 3.2 MessagesPlaceholder完整示例
- 四 基于BaseChatMessageHistory和RunnableWithMessageHistory的上下文存储
- 4.1 方法简介
- 4.2 代码逻辑图解
- 4.3 工作流程解析
- 4.4 关键代码解析
- 4.5 完整代码展示
- 4.6 执行结果分析
- 4.7 基于Redis消息持久化案例
- 五 追踪token使用情况(Track token usgae)
- 5.1 使用响应元数据信息
- 5.2 使用回调
- 5.3 客户端链token统计
- 六 缓存模型响应
- 6.1 缓存类型
- 6.2 设置和清楚缓存
- 6.3 注意事项
- 6.4 完整案例
- 6.4.1 使用内存缓存
- 6.4.2 使用Sqlite缓存
说明
- 示例代码中采用LangFuse作为监控平台,如不需要可以删除相关代码!
一 LangChain Chat Model
- Prompt templates:Few shot、Example selector
1.1 少量示例提示(Few-Shot Prompting)
- Few-Shot Prompting 是通过少量示例引导大模型理解任务的技巧。Few-Shot 提示是 LangChain 中解锁模型潜力的关键工具。通过精心设计的示例,开发者可以更高效地构建复杂任务。记住:少即是多,质量比数量更重要!
Few-Shot 的优势
- 降低训练成本:无需大规模标注数据,仅需少量示例即可激活模型潜力。
- 灵活适配场景:适用于问答、文本生成、分类等任务(如:
<|start|> 问题:... <|end|>)。 - 增强可解释性:通过示例直观展示模型的推理过程(如:
<|start|> 步骤1: ... <|end|>)。
1.2 Few-Shot示例代码
- 例如:
示例
问题:将英文翻译为中文 示例1: Hello → 你好 示例2: Goodbye → 再见目标:让模型学习“Hello→你好”这类模式,从而完成新任务。
import os
from langchain_openai import ChatOpenAI
from langchain_core.prompts import PromptTemplate,FewShotPromptTemplate
from langchain_core.output_parsers import StrOutputParser
from langfuse.callback import CallbackHandler as LangfuseCallbackHandler

# 设置环境变量
os.environ["OPENAI_API_KEY"] = "hk-xxx"
os.environ["OPENAI_API_BASE"] = "https://api.openai-hk.com/v1"

# 配置 Langfuse 回调处理器
langfuse_handler = LangfuseCallbackHandler(
    public_key="pk-lf-xxx",
    secret_key="sk-lf-xxx",
    host="http://192.168.1.21:3000"
)

# 定义示例
examples = [
    {"input": "夜来风雨声,花落知多少。", "output": "After one night of wind and showers, How many are the fallen flowers."},
    {"input": "愿君多采撷,此物最相思。", "output": "Gather them till full is your hand; They would revive fond memories."},
    {"input": "无边落木萧萧下,不尽长江滚滚来。", "output": "The boundless forest sheds its leaves shower by shower;The endless river rolls its waves hour after hour."}
]

example=PromptTemplate.from_template("输入:{input} → 输出:{output}")

# 定义 Prompt 模板
prompt = FewShotPromptTemplate(
    examples=examples,
    example_prompt=example,
    prefix="请根据以下示例完成翻译:",# 前缀
    suffix="输入:{input} → 输出:", # 后缀
    input_variables=["input"]
)


# 创建模型和解析器
model = ChatOpenAI(model="gpt-4")
parser = StrOutputParser()

# 构建链
chain = prompt | model | parser

# 输入数据
input_data = {"input": "无人扶我青云志,我自踏雪至山巅。"}

print(prompt)

# 启动流式处理
print("流式输出:")
async for chunk in chain.astream(input_data, config={"callbacks": [langfuse_handler]}):
        print(chunk, end="", flush=True)
1.3 示例选择器(Eample selectors)
- 在 LangChain 中,示例选择器(Example Selector) 是一种用于动态选择 Few-Shot Prompting 所需示例的机制。它可以根据输入内容从预定义的示例库中挑选最相关的几个例子,从而提升模型理解任务的能力。
1.4 ExampleSelector 类型
-
SemanticSimilarityExampleSelector
- 根据输入与示例之间的语义相似性来选择最匹配的示例。
- 使用向量数据库或嵌入模型计算相似度。
- 适合输入内容变化大、需要上下文相关匹配的任务。
-
MaxMarginalRelevanceExampleSelector
- 在语义相似性的基础上加入多样性控制,避免重复选取相似示例。
- 适用于需要多个不同风格/角度示例的情况。
-
LengthBasedExampleSelector
- 根据输入长度选择合适数量的示例,防止提示过长。
- 适用于对 token 数量敏感的场景。
-
NgramOverlapExampleSelector
- 根据 n-gram 的重叠程度选择示例。
- 更关注词汇层面的匹配。
1.5 ExampleSelector案例代码
- 基于语义相似度的示例选择器的“中文成语解释生成”任务。输入一个中文成语,输出其英文释义 + 用法举例。
pip install -U langchain-huggingface faiss-cpu
# 将模型下载到本地调用
from transformers import AutoModelForCausalLM, AutoTokenizer

# 将模型和分词工具下载到本地,并指定保存路径
model_name="uer/sbert-base-chinese-nli"
cache_dir="./model/uer/sbert-base-chinese-nli"

# 下载模型
AutoModelForCausalLM.from_pretrained(model_name,cache_dir=cache_dir)

# 下载分词工具
AutoTokenizer.from_pretrained(model_name,cache_dir=cache_dir)

print(f"模型分词器已下载到:{cache_dir}")
import os

import asyncio
from langchain_openai import ChatOpenAI
from langchain_core.prompts import PromptTemplate, FewShotPromptTemplate
from langchain_core.example_selectors import SemanticSimilarityExampleSelector
from langchain_huggingface import HuggingFaceEmbeddings
from langchain_community.vectorstores import FAISS
from langchain_core.output_parsers import StrOutputParser
from langfuse.callback import CallbackHandler as LangfuseCallbackHandler
from sentence_transformers import SentenceTransformer
# 设置环境变量
os.environ["OPENAI_API_KEY"] = "hk-7fsepe100000672008d091fa9e6c6d17087dd30032e4f84a"
os.environ["OPENAI_API_BASE"] = "https://api.openai-hk.com/v1"

# 配置 Langfuse 回调处理器
langfuse_handler = LangfuseCallbackHandler(
    public_key="pk-lf-da90da21-f213-4a08-b5ae-a9305b41c8e9",
    secret_key="sk-lf-0a68d56e-4b4c-4f0b-946c-cd4401079601",
    host="http://192.168.1.21:3000"
)

# 定义示例数据(中文成语 → 英文解释+例句)
examples = [
    {"input": "画蛇添足", "output": "To do something unnecessary that spoils the effect. E.g., He added a long introduction to his speech, which was like drawing legs on a snake."},
    {"input": "守株待兔", "output": "To wait passively for luck instead of working actively. E.g., She didn't apply for other jobs, just waiting for offers to come — it's like guarding a stump hoping for another rabbit."},
    {"input": "井底之蛙", "output": "A person with narrow views or limited knowledge. E.g., He knows nothing about modern technology; he's just a frog at the bottom of a well."},
    {"input": "亡羊补牢", "output": "It's never too late to mend the fold after a sheep is lost. E.g., Although he failed the exam, he started studying hard — better late than never."}
]

# 创建 Prompt 模板
example_prompt = PromptTemplate.from_template("成语:{input}\n解释:{output}")

# 使用本地 HuggingFace 嵌入模型
try:
    embeddings = HuggingFaceEmbeddings(model_name="./model/uer/sbert-base-chinese-nli/models--uer--sbert-base-chinese-nli/snapshots/2081897a182fdc33ea6e840f0eb38959b63ec0d3")
    print("模型加载成功!")
except Exception as e:
    print("模型加载失败:", str(e))

# 初始化示例选择器
example_selector = SemanticSimilarityExampleSelector.from_examples(
    examples,
    embeddings,      #  本地模型
    FAISS,         # 使用 FAISS 作为向量存储
    k=2            # 每次选择最相似的 2 个示例
)

# 构建 FewShotPromptTemplate
prompt = FewShotPromptTemplate(
    example_selector=example_selector,
    example_prompt=example_prompt,
    prefix="请根据以下示例解释下列成语并提供英文例句:",
    suffix="成语:{input}\n解释:",
    input_variables=["input"]
)

# 创建模型和解析器
model = ChatOpenAI(model="gpt-3.5-turbo")
parser = StrOutputParser()

# 构建链
chain = prompt | model | parser

# 输入数据
input_data = {"input": "掩耳盗铃"}

print(prompt.format(input="掩耳盗铃"))

# 启动流式处理
async def main():
    # 启动流式处理
    print("\n流式输出:")
    async for chunk in chain.astream(input_data, config={"callbacks": [langfuse_handler]}):
        print(chunk, end="", flush=True)
# 运行异步主函数
if __name__ == "__main__":
    asyncio.run(main())
- 运行结果示例
模型加载成功!
请根据以下示例解释下列成语并提供英文例句:

成语:画蛇添足
解释:To do something unnecessary that spoils the effect. E.g., He added a long introduction to his speech, which was like drawing legs on a snake.

成语:井底之蛙
解释:A person with narrow views or limited knowledge. E.g., He knows nothing about modern technology; he's just a frog at the bottom of a well.

成语:掩耳盗铃
解释:

流式输出:
成语:掩耳盗铃
解释:To deliberately ignore the truth or deceive oneself, especially in a situation where the truth is obvious. E.g., Trying to cover up the mistake without admitting it is like covering your ears while stealing a bell; you're only fooling yourself.
1.6 LangServe工具
- LangServe 是 LangChain 提供的一个工具集,用于将 LangChain 构建的应用部署为可访问的 REST API 服务。通过 LangServe,你可以轻松地将你的链(Chain)、提示模板(Prompt Template)、模型(Model)等组件暴露为 HTTP 接口,从而实现前后端分离或跨平台调用。
- LangServe 是 LangChain 中非常强大的部署工具,结合 FastAPI 可以快速构建高性能、可扩展的语言模型服务。适用于需要将 LLM 应用集成到 Web 应用、移动端或其他系统中的场景。
- 🧰 核心功能
- 将 LangChain 链部署为 REST API
- 支持同步和异步请求处理
- 支持中间件、身份验证、CORS 等常见 Web 功能
- 基于 FastAPI 构建,易于扩展和集成
1.7 LangServe安装
- 安装客户端和服务器:
pip install --upgrade "langserve[all]"- 客户端项目:
pip install --upgrade "langserve[client]" - 服务端项目:
pip install --upgrade "langserve[server]"
- 客户端项目:
- 使用LangChain CLI,快速创建或启动项目
pip install -U langchain-cli
 Usage: langchain [OPTIONS] COMMAND [ARGS]...

╭─ Options ────────────────────────────────────────────────────────────────────────────────────────────────────────────╮
│ --version  -v        Print the current CLI version.                                                                  │
│ --help               Show this message and exit.                                                                     │
╰──────────────────────────────────────────────────────────────────────────────────────────────────────────────────────╯
╭─ Commands ───────────────────────────────────────────────────────────────────────────────────────────────────────────╮
│ migrate       Migrate langchain to the most recent version.                                                          │
│ serve         Start the LangServe app, whether it's a template or an app.                                            │
│ template      Develop installable templates.                                                                         │
│ app           Manage LangChain apps                                                                                  │
│ integration   Develop integration packages for LangChain.                                                            │
╰──────────────────────────────────────────────────────────────────────────────────────────────────────────────────────╯
- 使用langchain cli命令创建新应用
langchain app new langServer_stu
(pytorch_stu) PS D:\code\deeplearning_view_tools> langchain app new langServer_stu
What package would you like to add? (leave blank to skip):
Success! Created a new LangChain app under "./langServer_stu"!
Next, enter your new app directory by running:
    cd ./langServer_stu
Then add templates with commands like:
    langchain app add extraction-openai-functions
    langchain app add git+ssh://git@github.com/efriis/simple-pirate.git
- 在
add_routers中定义可运行对象。编辑server.py
import os
from fastapi import FastAPI
from fastapi.responses import RedirectResponse
from langchain_openai import ChatOpenAI
from langserve import add_routes

# 创建一个简单的 Runnable 实例(这里以一个示例链为例)
from langchain.chains import LLMChain
from langchain.prompts import PromptTemplate

# 设置环境变量
os.environ["OPENAI_API_KEY"] = "hk-xxx"
os.environ["OPENAI_API_BASE"] = "https://api.openai-hk.com/v1"

llm = ChatOpenAI(model="gpt-4")
prompt = PromptTemplate.from_template("你好,请讲一个有趣的话")
chain = LLMChain(llm=llm, prompt=prompt)

app = FastAPI()

@app.get("/")
async def redirect_root_to_docs():
    return RedirectResponse("/docs")


# Edit this to add the chain you want to add
add_routes(app, chain)

if __name__ == "__main__":
    import uvicorn

    uvicorn.run(app, host="localhost", port=8001)
- 使用
poetry添加第三方包[windows],建议执行代码时魔法上网。pip install pipx pipx ensurepath pipx install poetry poetry add langchain poetry add langchain-openai
- 可能遇到的报错和解决方法
Because no versions of langchain match >0.3.25,<0.4.0 and langchain (0.3.25) depends on pydantic (>=2.7.4,<3.0.0), langchain (>=0.3.25,<0.4.0) requires pydantic (>=2.7.4,<3.0.0). So, because langserver-stu depends on both pydantic (<2) and langchain (^0.3.25), version solving failed.pydantic = "^2.7.4"
- 启动应用
poetry run langchain serve --port=8001
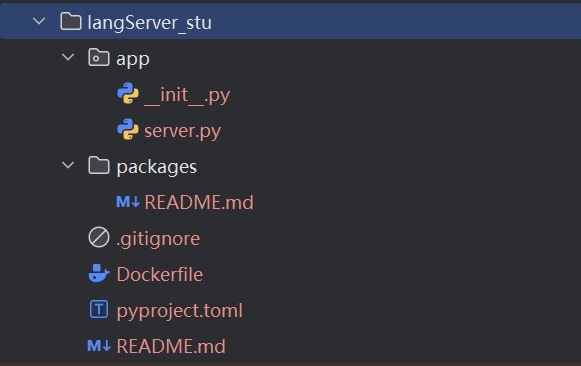
1.8 langchain项目结构
langServer_stu(根目录):项目的根目录,包含了整个项目的顶级文件和子目录。app目录:通常用于存放应用程序的核心代码。
__init__.py:- 作用:标志着
app是一个 Python 包,可以被导入。 - 内容:可能包含包的初始化代码,或者为空。
- 作用:标志着
server.py:- 作用:可能是项目的主服务文件,定义了服务的启动逻辑、路由等。
- 内容:通常包含服务的入口点,如 Flask、FastAPI 等 Web 框架的实例化和路由定义。
packages目录:存放项目中使用的第三方包或自定义包的相关信息。
README.md:- 作用:提供关于
packages目录的说明文档。 - 内容:通常包含目录的用途、安装指南、使用方法等。
- 作用:提供关于
.gitignore文件:Git 版本控制系统配置文件,指定哪些文件或目录不应被 Git 跟踪。列出不需要纳入版本控制的文件模式,如编译生成的文件、环境配置文件等。Dockerfile文件:定义了如何构建 Docker 镜像,用于容器化部署项目。包含一系列指令,描述了镜像的构建步骤,如基础镜像选择、依赖安装、工作目录设置、命令执行等。pyproject.toml文件:Python 项目的配置文件,通常用于定义项目的元数据、依赖关系、构建系统等。
- 内容:
- 项目元数据:如名称、版本、作者等。
- 依赖关系:项目运行和开发所需的依赖包及其版本。
- 构建系统:指定使用的构建工具(如 Poetry、Flit 等)。
README.md文件(根目录):项目的主说明文档,提供项目的基本信息和使用指南。通常包括项目简介、安装步骤、使用方法、贡献指南等。
app目录:存放应用核心代码。packages目录:管理项目包相关的信息。.gitignore:配置 Git 忽略规则。Dockerfile:定义 Docker 镜像构建。pyproject.toml:Python 项目配置。README.md:项目说明文档。
1.9 LangServe使用步骤
- 安装依赖
pip install langchain langserve fastapi uvicorn
- 创建 LangChain 链(例如翻译链)+启动 LangServe 服务
import os

from fastapi import FastAPI
from langchain_core.prompts import ChatPromptTemplate
from langchain_openai import ChatOpenAI
from langchain_core.output_parsers import StrOutputParser
from langfuse.callback import CallbackHandler as LangfuseCallbackHandler
from langserve import add_routes

# 设置环境变量
os.environ["OPENAI_API_KEY"] = "hk-xxx"
os.environ["OPENAI_API_BASE"] = "https://api.openai-hk.com/v1"

# 配置 Langfuse 回调处理器
langfuse_handler = LangfuseCallbackHandler(
    public_key="pk-lf-xxx",
    secret_key="sk-lf-xx",
    host="http://192.168.1.21:3000"
)

# 设置 OpenAI 模型
model = ChatOpenAI(model="gpt-3.5-turbo")

# 定义提示模板
prompt = ChatPromptTemplate.from_messages([
    ("system", "你是一个专业的翻译官,请将以下内容翻译成英文:"),
    ("user", "{input}")
])

# 创建链(不绑定 callbacks)
translation_chain = prompt | model | StrOutputParser()

app = FastAPI(
    title="LangChain Translation Server",
    version="1.0",
    description="A simple server for translating text using LangChain"
)

# 添加路由,并在 config 中注入回调处理器
add_routes(
    app,
    translation_chain.with_config({"callbacks": [langfuse_handler]}),
    path="/translate"
)

if __name__ == "__main__":
    import uvicorn
    uvicorn.run(app, host="localhost", port=8000)
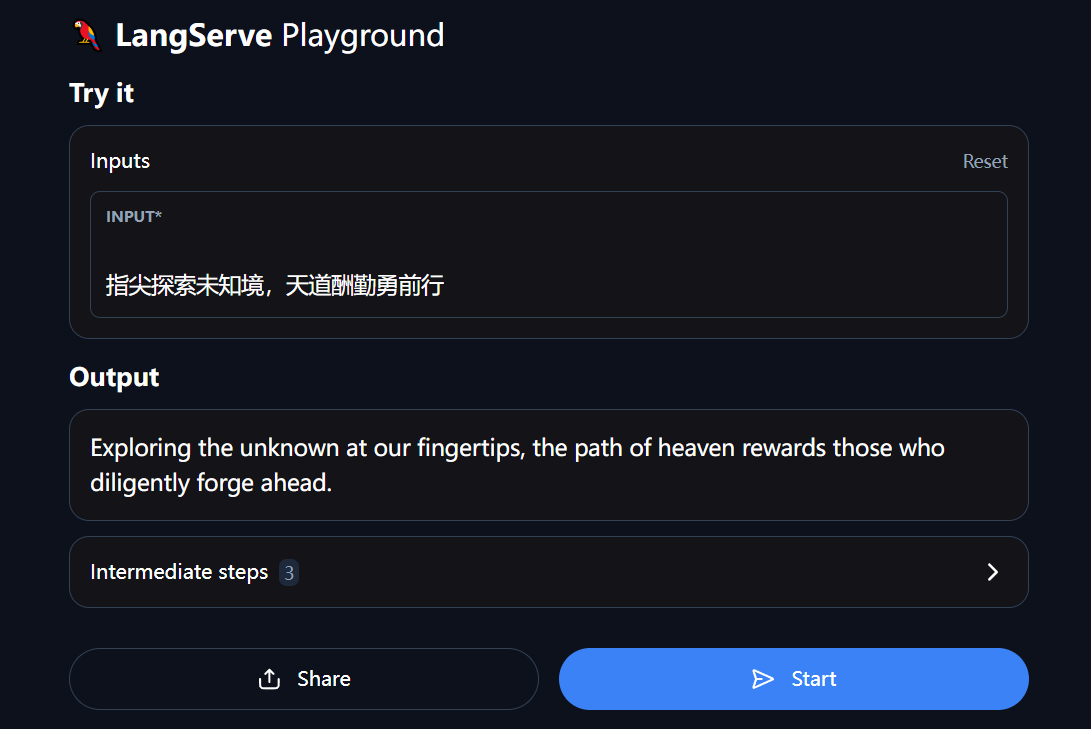
- 运行服务,服务启动后,访问
http://localhost:8000/translate/playground/。
二 消息历史(Message History)
- LangChain 是一个用于构建语言模型应用的框架,其中
Message History(消息历史)是其重要组成部分,主要用于记录和管理对话过程中的交互信息。
应用场景
- 聊天机器人:维护用户与机器人的多轮对话。
- 任务规划:记录用户逐步提供的信息,完成复杂任务。
- 个性化推荐:根据用户的对话历史提供个性化建议。## 1. Message History 的作用
- 记录对话历史:保存用户与模型之间的多轮对话内容。
- 上下文维护:确保模型在生成回复时能够参考之前的对话内容,从而提供更连贯、有上下文的响应。
- 状态管理:支持会话级别的状态管理,适用于需要长期记忆的应用场景。
2.1 Message History 的核心组件
- BaseMessage:定义了消息的基本结构,是一个抽象类。
- 每个消息通常包含以下属性:
content: 消息的内容(字符串或字典)。role: 发送者角色(如 “user”、“assistant”、“system” 等)。name: 可选字段,表示发送者的名称。
- HumanMessage / AIMessage / SystemMessage:是
BaseMessage的具体子类,分别表示用户、AI 和系统发出的消息。
- 示例:
from langchain.schema import HumanMessage, AIMessage

human_message = HumanMessage(content="你好,你能帮我做什么?")
ai_message = AIMessage(content="我可以帮助你回答问题、提供建议等。")
- ChatMessageHistory:提供了一个简单的内存存储机制,用于保存对话历史。支持添加和获取消息。
- 示例:
from langchain.memory import ChatMessageHistory

history = ChatMessageHistory()
history.add_user_message("你好")
history.add_ai_message("你好!有什么可以帮助你的吗?")
print(history.messages)
2.2 Message History 的使用方式
- 结合 Memory 使用
- LangChain 提供了多种内存类型(如
ConversationBufferMemory),可以将消息历史集成到链中。示例:from langchain.memory import ConversationBufferMemory from langchain.chains import LLMChain from langchain.prompts import PromptTemplate from langchain.llms import OpenAI llm = OpenAI(model_name="text-davinci-003") prompt = PromptTemplate.from_template("根据以下对话历史,请回答用户的问题:{history}\n用户:{input}") memory = ConversationBufferMemory() chain = LLMChain(llm=llm, prompt=prompt, memory=memory) # 第一次调用 response = chain.run("你好") print(response) # 输出 AI 的回复 # 第二次调用 response = chain.run("你能告诉我更多关于你的功能吗?") print(response) # AI 会基于之前的对话历史进行回复
- 持久化存储:默认情况下,
ChatMessageHistory是内存中的实现,适合短期使用。如果需要长期保存消息历史,可以通过自定义实现将消息存储到数据库或文件中。
三 MessagesPlaceholder
3.1 MessagesPlaceholder简介
- 作用
- 占位符机制:在定义
ChatPromptTemplate时,使用MessagesPlaceholder表示某个位置将被一组BaseMessage对象填充。 - 支持对话历史的动态注入,使得模型可以基于完整的上下文进行推理。
- 基本用法
from langchain_core.prompts import MessagesPlaceholder

MessagesPlaceholder(variable_name="history")
- 其中
"history"是变量名,在后续调用链(Runnable)时,需传入对应的history字段作为消息列表。
典型应用场景
- 多轮对话系统(聊天机器人)
- 上下文感知的翻译或问答系统
- 需要记忆用户行为的应用(如客服助手)
| 注意点 | 说明 |
|---|---|
| 输入格式 | history 必须是 BaseMessage 类型的列表,例如 HumanMessage, AIMessage 等 |
| 变量命名 | variable_name 必须与调用时字典中的 key 一致 |
| 顺序重要 | 在 from_messages 列表中,占位符的位置决定了消息插入的顺序 |
| 配合 Memory 使用更佳 | 常与 ChatMessageHistory 或其他内存组件配合,自动维护历史记录 |
MessagesPlaceholder使用示例
prompt = ChatPromptTemplate.from_messages(
    [
        ("system", "You are a helpful assistant that translates {input_language} to {output_language}."),
        MessagesPlaceholder(variable_name="history"),  # 占位符
        ("human", "{text}")
    ]
)
- 调用方式(假设已定义好 history 和 runnable):
response = runnable.invoke({
    "input_language": "中文",
    "output_language": "英文",
    "history": [HumanMessage(content="你好"), AIMessage(content="Hello")],
    "text": "再见"
})
- 此时,
history中的消息会被展开插入到模板中的对应位置。
3.2 MessagesPlaceholder完整示例
import os
from langchain_core.messages import HumanMessage, AIMessage
from langchain_core.prompts import ChatPromptTemplate, MessagesPlaceholder
from langchain_openai import ChatOpenAI
# 设置环境变量
os.environ["OPENAI_API_KEY"] = "hk-xxx"
os.environ["OPENAI_API_BASE"] = "https://api.openai-hk.com/v1"

# 定义 Prompt 模板
prompt = ChatPromptTemplate.from_messages([
    ("system", "You are a helpful assistant."),
    MessagesPlaceholder(variable_name="history"),
    ("human", "{text}")
])

# 初始化模型
model = ChatOpenAI(model="gpt-3.5-turbo")

# 构建 Runnable 链
runnable = prompt | model

# 准备输入数据
history = [
    HumanMessage(content="你好"),
    AIMessage(content="你好!有什么可以帮助你的吗?")
]

# 调用链
response = runnable.invoke({"history": history, "text": "如何学习 Python?"})
print(response.content)
四 基于BaseChatMessageHistory和RunnableWithMessageHistory的上下文存储
4.1 方法简介
- BaseChatMessageHistory:在 LangChain 中
RunnableWithMessageHistory可以来管理多用户、多会话的对话历史。这非常适合构建具有上下文感知能力的聊天机器人或助手应用。
- RunnableWithMessageHistory:是一个封装了“消息历史”的可运行对象(Runnable),允许你在调用链时自动注入和更新对话历史。支持多用户、多会话场景下的状态管理。
4.2 代码逻辑图解
4.3 工作流程解析
- 用户调用
with_message_history.invoke(...)时,传入configurable字段(如 user_id 和 conversation_id)。 get_session_history函数根据这两个字段从store中取出对应的ChatMessageHistory。- 当前输入内容会被构造成一个
HumanMessage并添加到该会话的历史中。 - 模型生成回复后,回复内容作为
AIMessage添加进历史。 - 下次调用时,历史消息将被插入到提示模板中,实现上下文连续对话。
4.4 关键代码解析
ChatPromptTemplate+MessagesPlaceholder
prompt = ChatPromptTemplate.from_messages([
    ("system", "You are a helpful assistant."),
    MessagesPlaceholder(variable_name="history"),
    ("human", "{input}")
])
MessagesPlaceholder("history")表示一个占位符,将来会被实际的消息历史替换。- 在模板中使用
{input}变量来接收当前输入内容。
RunnableWithMessageHistory
with_message_history = RunnableWithMessageHistory(
    runnable,
    get_session_history,
    history_messages_key="history",
    history_factory_config=[...]
)
runnable: 要包装的链式结构(如 prompt | model)。get_session_history: 用于获取指定用户和会话的历史记录。history_messages_key: 指定在输入字典中哪个键对应消息历史(与MessagesPlaceholder名称一致)。history_factory_config: 配置哪些字段是可配置的(如 user_id 和 conversation_id)。
get_session_history
store = {}

def get_session_history(user_id: str, conversation_id: str) -> BaseChatMessageHistory:
    if (user_id, conversation_id) not in store:
        store[(user_id, conversation_id)] = ChatMessageHistory()
    return store[(user_id, conversation_id)]
- 这是一个工厂函数,用于根据
user_id和conversation_id获取对应的ChatMessageHistory实例。 - 使用内存中的
dict存储历史,适合演示,生产环境建议使用数据库(如 Redis、PostgreSQL 等)。
ConfigurableFieldSpec
history_factory_config=[
    ConfigurableFieldSpec(
        id="user_id",
        name="user_id",
        annotation=str,
        description="The user id of the current user",
        default="",
        is_shared=True
    ),
    ConfigurableFieldSpec(
        id="conversation_id",
        name="conversation_id",
        annotation=str,
        description="The conversation id of the current conversation",
        default="",
        is_shared=True
    ),
]
- 声明哪些字段是可配置的(configurable fields)。
is_shared=True表示这些字段可以在多个 Runnables 之间共享。
4.5 完整代码展示
import os
from langchain_core.prompts import ChatPromptTemplate, MessagesPlaceholder
from langchain_openai import ChatOpenAI
from langchain_core.chat_history import BaseChatMessageHistory
from langchain.memory import ChatMessageHistory
from langchain_core.runnables.history import RunnableWithMessageHistory
from langchain_core.runnables import ConfigurableFieldSpec
from langfuse.callback import CallbackHandler as LangfuseCallbackHandler
# 设置环境变量
os.environ["OPENAI_API_KEY"] = "hk-xxx"
os.environ["OPENAI_API_BASE"] = "https://api.openai-hk.com/v1"

# 配置 Langfuse 回调处理器
langfuse_handler = LangfuseCallbackHandler(
    public_key="pk-lf-xxx",
    secret_key="sk-lf-xxx",
    host="http://ip:3000"
)

# 定义 Prompt 模板
prompt = ChatPromptTemplate.from_messages([
    ("system", "You are a helpful assistant."),
    MessagesPlaceholder(variable_name="history"),
    ("human", "{input}")
])

# 初始化模型
model = ChatOpenAI(model="gpt-4")
# 构建 Runnable 链
runnable = prompt | model

store={}

def get_session_history(user_id: str,conversation_id: str)->BaseChatMessageHistory:
    if(user_id,conversation_id) not in store:
        store[(user_id,conversation_id)]=ChatMessageHistory()
    return  store[(user_id,conversation_id)]

with_message_history=RunnableWithMessageHistory(
    runnable,
    get_session_history,
    history_messages_key="history",
    history_factory_config=[
        ConfigurableFieldSpec(
            id="user_id",
            name="user_id",
            annotation=str,
            description="The user id of the current user",
            default="",
            is_shared=True
        ),
        ConfigurableFieldSpec(
            id="conversation_id",
            name="conversation_id",
            annotation=str,
            description="The conversation id of the current conversation",
            default="",
            is_shared=True
        ),
    ]
)

response=with_message_history.invoke(
    {"ability":"math","input":"余弦是什么意思?"},
    config={"configurable":{"user_id":"666","conversation_id":"1"},"callbacks": [langfuse_handler]}
)
print(response.content)

response=with_message_history.invoke(
    {"ability":"math","input":"什么来着?"},
    config={"configurable":{"user_id":"666","conversation_id":"1"},"callbacks": [langfuse_handler]}
)
print(response.content)

response=with_message_history.invoke(
    {"ability":"math","input":"什么来着?"},
    config={"configurable":{"user_id":"666","conversation_id":"2"},"callbacks": [langfuse_handler]}
)
print(response.content)
4.6 执行结果分析
执行结果:
- 在数学中,余弦是一种三角函数,标记为cos。在一个直角三角形中,余弦是斜边(斜边是与直角相对的边)的长度和邻边(与指定角度相邻的边,不是斜边)的长度的比。也可以在单位圆中定义余弦,其中它是指一个角度的x坐标。
- 余弦,数学上的一个概念,常被简写为cos。在一个直角三角形里,余弦值是指直角三角形的邻边(直角旁边的边)长度与斜边长度的比值。如果在单位圆(半径为1)里定义,余弦是指一个角在坐标系中的x坐标。换句话说,如果在二维平面坐标系统中有一个角,它与x轴的夹角的余弦值就是这个角顶点的x坐标值。
- 您可能需要提供更多信息,才能让我明白您的问题。您是想要问关于什么的问题呢?
- 根据执行结果可知,同一会话id的结果具备上下文记忆能力。
4.7 基于Redis消息持久化案例
- 使用内存中的
ChatMessageHistory以及使用RedisChatMessageHistory进行持久化存储。
- 安装redis
pip install --upgrade --quiet redis
- 完整代码
import os
from langchain_core.prompts import ChatPromptTemplate, MessagesPlaceholder
from langchain_community.chat_message_histories import RedisChatMessageHistory
from langchain_openai import ChatOpenAI
from langchain_core.chat_history import BaseChatMessageHistory
from langchain.memory import ChatMessageHistory
from langchain_core.runnables.history import RunnableWithMessageHistory
from langchain_core.runnables import ConfigurableFieldSpec
from langfuse.callback import CallbackHandler as LangfuseCallbackHandler
# 设置环境变量
os.environ["OPENAI_API_KEY"] = "hk-xxx"
os.environ["OPENAI_API_BASE"] = "https://api.openai-hk.com/v1"

# 配置 Langfuse 回调处理器
langfuse_handler = LangfuseCallbackHandler(
    public_key="pk-lf-xxx",
    secret_key="sk-lf-xxx",
    host="http://192.168.1.21:3000"
)

# 定义 Prompt 模板
prompt = ChatPromptTemplate.from_messages([
    ("system", "You are a helpful assistant."),
    MessagesPlaceholder(variable_name="history"),
    ("human", "{input}")
])

# 初始化模型
model = ChatOpenAI(model="gpt-4")
# 构建 Runnable 链
runnable = prompt | model

store={}
# REDIS_URL="redis://userName:password@ip:port/0"
REDIS_URL="redis://:redis@192.168.1.18:6379/0"

def get_session_history(user_id: str,conversation_id: str)->BaseChatMessageHistory:
    if(user_id,conversation_id) not in store:
        store[(user_id,conversation_id)]=RedisChatMessageHistory(session_id=f"{user_id}:{conversation_id}",url=REDIS_URL)
    return  store[(user_id,conversation_id)]

with_message_history=RunnableWithMessageHistory(
    runnable,
    get_session_history,
    history_messages_key="history",
    history_factory_config=[
        ConfigurableFieldSpec(
            id="user_id",
            name="user_id",
            annotation=str,
            description="The user id of the current user",
            default="",
            is_shared=True
        ),
        ConfigurableFieldSpec(
            id="conversation_id",
            name="conversation_id",
            annotation=str,
            description="The conversation id of the current conversation",
            default="",
            is_shared=True
        ),
    ]
)

response=with_message_history.invoke(
    {"ability":"math","input":"余弦是什么意思?"},
    config={"configurable":{"user_id":"666","conversation_id":"1"},"callbacks": [langfuse_handler]}
)
print(response.content)

response=with_message_history.invoke(
    {"ability":"math","input":"什么来着?"},
    config={"configurable":{"user_id":"666","conversation_id":"1"},"callbacks": [langfuse_handler]}
)
print(response.content)

response=with_message_history.invoke(
    {"ability":"math","input":"什么来着?"},
    config={"configurable":{"user_id":"666","conversation_id":"2"},"callbacks": [langfuse_handler]}
)
print(response.content)
五 追踪token使用情况(Track token usgae)
追踪 token 使用情况是非常重要的,因为这有助于控制成本、优化性能以及监控系统的资源消耗。
5.1 使用响应元数据信息
- 基于使用AIMessage.reponse_metadata提供相关信息可以查看token消耗。
import os
from langchain_core.messages import SystemMessage, HumanMessage
from langchain_openai import ChatOpenAI


# 配置 API 易环境
os.environ["OPENAI_API_KEY"] = "hk-xxx"  # 从API易后台获取
os.environ["OPENAI_API_BASE"] = "https://api.openai-hk.com/v1"  # API易基础URL

# 创建一个大语言模型,model指定了大语言模型的种类
model = ChatOpenAI(model="gpt-4")

# 定义传递给模型的消息队列
messages = [
    SystemMessage(content="把下面的语句翻译为英文。"),
    HumanMessage(content="无人扶我青云志,我自踏雪至山巅"),
]

# 打印模型的输出结果
print(model.invoke(messages).response_metadata)
{
  "token_usage": {
    "completion_tokens": 23,
    "prompt_tokens": 50,
    "total_tokens": 73,
    "completion_tokens_details": {
      "accepted_prediction_tokens": 0,
      "audio_tokens": 0,
      "reasoning_tokens": 0,
      "rejected_prediction_tokens": 0
    },
    "prompt_tokens_details": {
      "audio_tokens": 0,
      "cached_tokens": 0
    },
    "input_tokens": 0,
    "input_tokens_details": null,
    "output_tokens": 0
  },
  "model_name": "gpt-4",
  "system_fingerprint": null,
  "id": "chatcmpl-BcvA0Knm1O8qm0637vteByRuJaUel",
  "service_tier": null,
  "finish_reason": "stop",
  "logprobs": null
}
5.2 使用回调
- deepseek或chatgpt都支持相关回调。
import os
from langchain_core.messages import SystemMessage, HumanMessage
from langchain_openai import ChatOpenAI
from langchain_community.callbacks.manager import get_openai_callback

# 配置 API 易环境
os.environ["OPENAI_API_KEY"] = "hk-xxx"  # 从API易后台获取
os.environ["OPENAI_API_BASE"] = "https://api.openai-hk.com/v1"  # API易基础URL

# 创建一个大语言模型,model指定了大语言模型的种类
model = ChatOpenAI(model="deepseek-v3")

# 定义传递给模型的消息队列
messages = [
    SystemMessage(content="把下面的语句翻译为英文。"),
    HumanMessage(content="无人扶我青云志,我自踏雪至山巅"),
]

with get_openai_callback() as cb:
    model.invoke(messages)
    print(cb)
Tokens Used: 42
	Prompt Tokens: 23
		Prompt Tokens Cached: 0
	Completion Tokens: 19
		Reasoning Tokens: 0
Successful Requests: 1
Total Cost (USD): $0.0
5.3 客户端链token统计
import os
from langchain.agents import create_tool_calling_agent, AgentExecutor
from langchain_community.agent_toolkits.load_tools import load_tools
from langchain_core.prompts import ChatPromptTemplate
from langchain_openai import ChatOpenAI
from langchain_community.callbacks.manager import get_openai_callback

# 配置 API 易环境
os.environ["OPENAI_API_KEY"] = "hk-7fsepe100000672008d091fa9e6c6d17087dd30032e4f84a"  # 从API易后台获取
os.environ["OPENAI_API_BASE"] = "https://api.openai-hk.com/v1"  # API易基础URL

# 创建一个大语言模型,model指定了大语言模型的种类
model = ChatOpenAI(model="deepseek-v3")

# 定义 Prompt 模板
prompt = ChatPromptTemplate.from_messages([
    ("system", "You are a helpful assistant."),
    ("human", "{input}"),
    ("placeholder", "{agent_scratchpad}")
])

tools=load_tools(["wikipedia"])

agent=create_tool_calling_agent(model,tools,prompt)
agent_exe=AgentExecutor(
    agent=agent,
    tools=tools,
    verbose=True,
)

with  get_openai_callback() as cb:
    res=agent_exe.invoke(
        {
            "input": "蜂鸟的学名是什么?什么鸟飞的最慢?",
        }
    )
    print(f"总令牌数:{cb.total_tokens}")
    print(f"提示令牌:{cb.prompt_tokens}")
    print(f"完成令牌:{cb.completion_tokens}")
    print(f"总成本(美元):${cb.total_cost}")
> Entering new AgentExecutor chain...
Invoking: `wikipedia` with `{'query': '蜂鸟'}`

No good Wikipedia Search Result was found蜂鸟的学名是**Trochilidae**,属于蜂鸟科。关于飞得最慢的鸟,目前科学界普遍认为**几维鸟(Kiwi)**是飞行能力最差的鸟之一,它们几乎不会飞,主要在地面活动。而另一种飞得很慢的鸟是**美洲丘鹬(American Woodcock)**,它们的飞行速度较慢,大约为每小时8公里左右。

> Finished chain.
总令牌数:795
提示令牌:660
完成令牌:135
总成本(美元):$0.0
六 缓存模型响应
- 在 LangChain 中,
set_llm_cache是一个用于设置 LLM(语言模型)缓存的函数。它的主要作用是为了解决重复调用相同提示(prompt)时减少计算成本和提高效率的问题。通过缓存机制,LangChain 可以将之前调用的结果保存下来,当相同的请求再次出现时,直接从缓存中读取结果,而不需要重新调用模型。该函数作用如下:- 提高性能:避免对相同的提示多次调用模型,节省时间和资源。
- 减少费用:如果使用的是按调用次数计费的模型(如 OpenAI API),可以显著降低费用。
- 支持调试:方便开发者在调试过程中快速获取已有的结果,而不必等待新的模型响应。
6.1 缓存类型
LangChain 提供了多种缓存实现方式,常见的包括:
- In-memory Cache (
InMemoryCache): 将缓存数据存储在内存中,适用于短期运行的任务或单次会话。 - SQLite Cache (
SQLiteCache): 使用 SQLite 数据库存储缓存,适合需要持久化存储的场景。 - Redis Cache (
RedisCache): 利用 Redis 进行分布式缓存,适用于多实例部署或长期缓存需求。
6.2 设置和清楚缓存
from langchain.cache import InMemoryCache, SQLiteCache, RedisCache
from langchain.llms import OpenAI

# 设置内存缓存
langchain.set_llm_cache(InMemoryCache())

# 或者使用 SQLite 缓存
langchain.set_llm_cache(SQLiteCache(database_path=".langchain.db"))

# 或者使用 Redis 缓存(需要先安装 redis 模块)
langchain.set_llm_cache(RedisCache(redis_url="redis://localhost:6379"))
- 清除所有缓存内容,可以使用以下代码:
langchain.llm_cache.clear()
6.3 注意事项
- 缓存键通常基于提示(prompt)生成,因此对于不同的提示,即使语义相似,也会被视为不同的缓存项。
- 如果你希望自定义缓存键生成逻辑,可以通过继承
BaseLLMCache并重写相关方法来实现。 - 在生产环境中,建议使用持久化的缓存方案(如 SQLite 或 Redis),以便在服务重启后仍然保留缓存数据。
6.4 完整案例
6.4.1 使用内存缓存
import os
import time

from langchain.globals import set_llm_cache
from langchain_core.caches import InMemoryCache
from langchain_openai import ChatOpenAI

# 配置 API 易环境
os.environ["OPENAI_API_KEY"] = "hk-xxx"  # 从API易后台获取
os.environ["OPENAI_API_BASE"] = "https://api.openai-hk.com/v1"  # API易基础URL

# 创建一个大语言模型,model指定了大语言模型的种类
model = ChatOpenAI(model="deepseek-v3")

set_llm_cache(InMemoryCache())

def measure_invoke_time(llm,  prompt):
    # 记录开始时间
    start_wall_time = time.time()
    start_cpu_times = os.times()
    # 调用LLM
    response = llm.invoke(prompt)
    # 记录结束时间
    end_wall_time = time.time()
    end_cpu_times = os.times()
    # 计算经过的时间
    wall_time = end_wall_time - start_wall_time
    user_time = end_cpu_times.user - start_cpu_times.user
    sys_time = end_cpu_times.system - start_cpu_times.system
    total_cpu_time = user_time + sys_time
    return response, wall_time, user_time, sys_time, total_cpu_time

res, wall_time1, user_time1, sys_time1, total_cpu_time1 = measure_invoke_time(model, "讲一个有趣的笑话")
print("第一次调用响应:",res.content)
print(f"第一次调用用户时间:{user_time1*1000:.0f}ms",)
print(f"第一次调用系统时间:{sys_time1*1000:.0f}ms",)
print(f"第一次调用总CPU时间:{total_cpu_time1*1000:.0f}ms",)
print(f"第一次调用耗时:{wall_time1*1000:.0f}ms",)

print("=== ===")

res, wall_time2, user_time2, sys_time2, total_cpu_time2 = measure_invoke_time(model, "讲一个有趣的笑话")
print("第二次调用响应:",res.content)
print(f"第二次调用用户时间:{user_time2*1000:.0f}ms",)
print(f"第二次调用系统时间:{sys_time2*1000:.0f}ms",)
print(f"第二次调用总CPU时间:{total_cpu_time2*1000:.0f}ms",)
print(f"第二次调用耗时:{wall_time2*1000:.0f}ms",)
在这个例子中,第一次调用会触发模型推理,第二次调用则直接从缓存中返回结果。
第一次调用响应: 好的,这里有一个关于程序员的冷笑话:
---
**顾客**:服务员,我的汤里有一只苍蝇!
**程序员顾客**:别担心,那只是个“小bug”……(然后淡定地把苍蝇挑出来,继续喝汤)
**服务员**(惊恐):不不不,我马上给您换一份!
**程序员顾客**:不用了,我已经“处理异常”了。
(沉默两秒后,隔壁桌的测试工程师突然把汤打翻在地)
**测试工程师**:现在才叫“重现故障”——你汤里明明有两只苍蝇!
---

希望这个“技术版”笑话能让你会心一笑~ 😄
第一次调用用户时间:47ms
第一次调用系统时间:78ms
第一次调用总CPU时间:125ms
第一次调用耗时:8908ms
=== ===
第二次调用响应: 好的,这里有一个关于程序员的冷笑话:
...
---

希望这个“技术版”笑话能让你会心一笑~ 😄
第二次调用用户时间:0ms
第二次调用系统时间:0ms
第二次调用总CPU时间:0ms
第二次调用耗时:0ms
6.4.2 使用Sqlite缓存
import os
import time

from langchain.globals import set_llm_cache
from langchain_community.cache import SQLiteCache
from langchain_openai import ChatOpenAI


# 配置 API 易环境
os.environ["OPENAI_API_KEY"] = "hk-xxx"  # 从API易后台获取
os.environ["OPENAI_API_BASE"] = "https://api.openai-hk.com/v1"  # API易基础URL

# 创建一个大语言模型,model指定了大语言模型的种类
model = ChatOpenAI(model="deepseek-v3")
# 主要更换此行代码
set_llm_cache(SQLiteCache(database_path=".lnagchain.db"))

def measure_invoke_time(llm,  prompt):
    # 记录开始时间
    start_wall_time = time.time()
    start_cpu_times = os.times()
    # 调用LLM
    response = llm.invoke(prompt)
    # 记录结束时间
    end_wall_time = time.time()
    end_cpu_times = os.times()
    # 计算经过的时间
    wall_time = end_wall_time - start_wall_time
    user_time = end_cpu_times.user - start_cpu_times.user
    sys_time = end_cpu_times.system - start_cpu_times.system
    total_cpu_time = user_time + sys_time
    return response, wall_time, user_time, sys_time, total_cpu_time

res, wall_time1, user_time1, sys_time1, total_cpu_time1 = measure_invoke_time(model, "讲一个有趣的笑话")
print("第一次调用响应:",res.content)
print(f"第一次调用用户时间:{user_time1*1000:.0f}ms",)
print(f"第一次调用系统时间:{sys_time1*1000:.0f}ms",)
print(f"第一次调用总CPU时间:{total_cpu_time1*1000:.0f}ms",)
print(f"第一次调用耗时:{wall_time1*1000:.0f}ms",)

print("=== ===")

res, wall_time2, user_time2, sys_time2, total_cpu_time2 = measure_invoke_time(model, "讲一个有趣的笑话")
print("第二次调用响应:",res.content)
print(f"第二次调用用户时间:{user_time2*1000:.0f}ms",)
print(f"第二次调用系统时间:{sys_time2*1000:.0f}ms",)
print(f"第二次调用总CPU时间:{total_cpu_time2*1000:.0f}ms",)
print(f"第二次调用耗时:{wall_time2*1000:.0f}ms",)