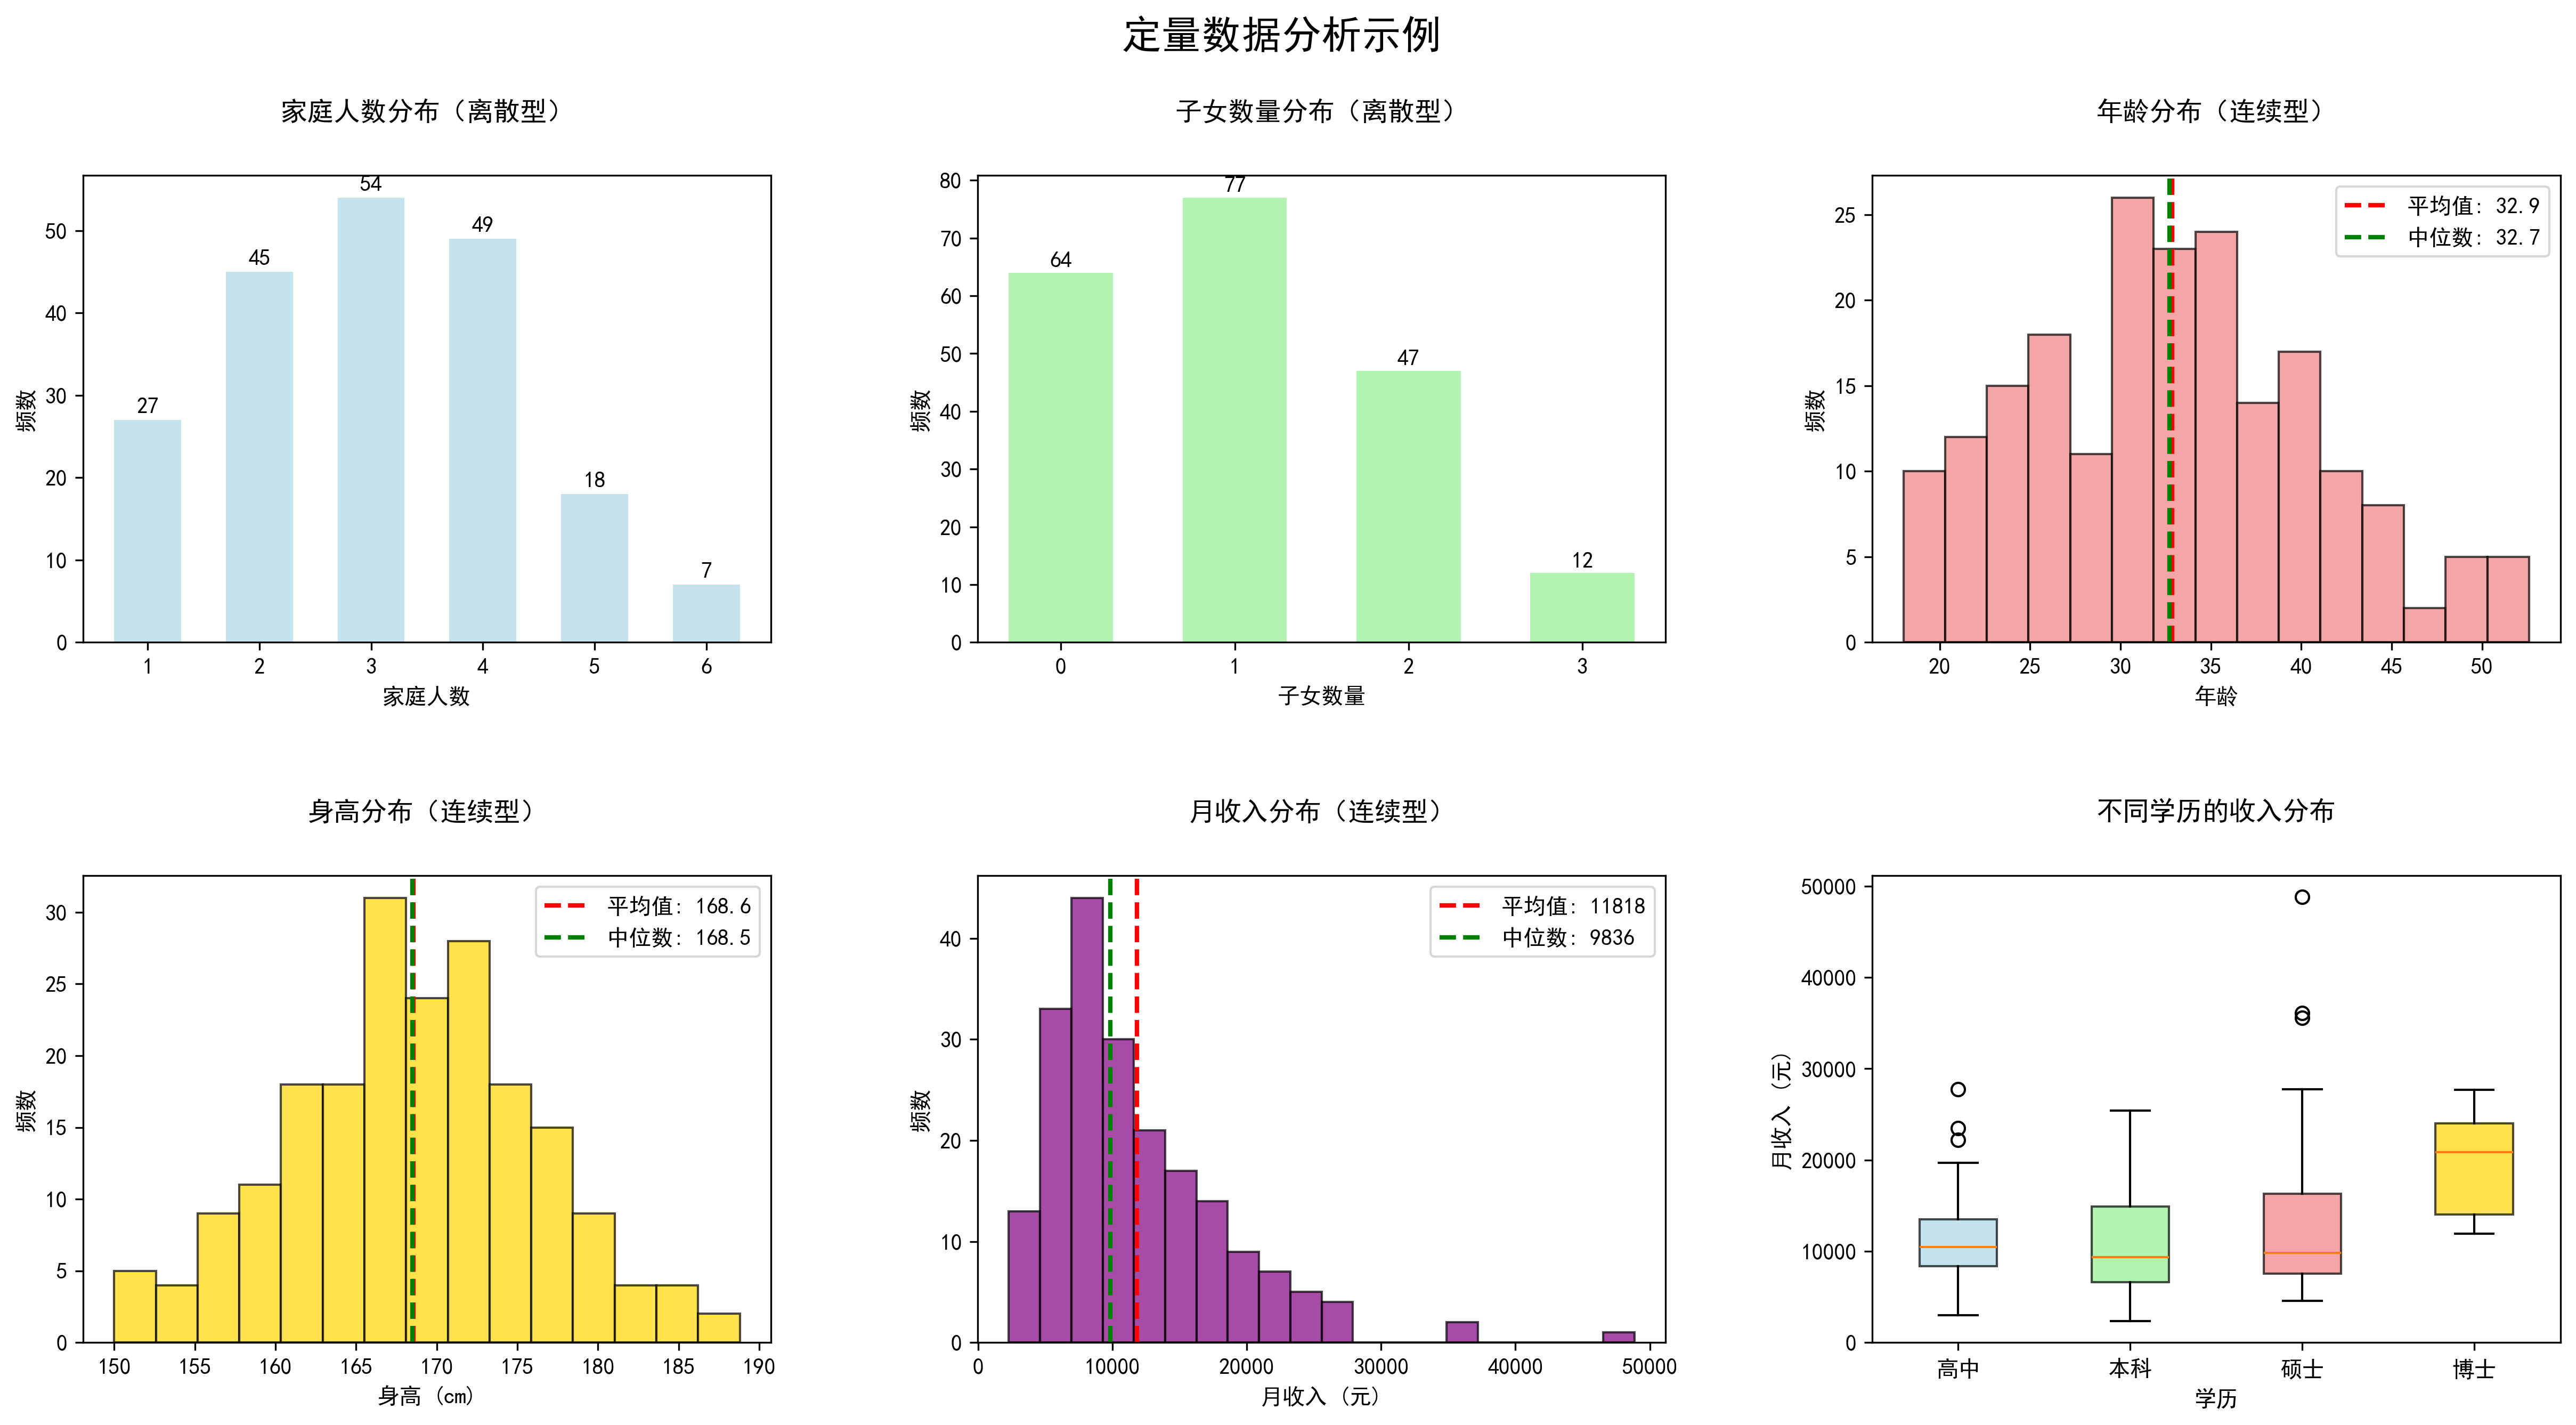
背景
BrowserView 是继 Webview 后推出来的高性能多视图管理工具,与 Webview 最大的区别是,Webview 是一个 DOM 节点,依附于主渲染进程的附属进程,Webview 节点的崩溃会导致主渲染进程的连锁反应,会引起软件的崩溃。
而 BrowserView 可以理解为比主渲染窗口更简洁的窗口,砍掉了一些窗口没必要的功能,只保留渲染视窗,且这个视窗是独立于主渲染进程的,但其所处层次和相对位置,取决于其追加进来的主渲染窗口。
代码分支
electron-demo: electron 22 初始代码开发和讲解 - Gitee.com
思想启发
什么叫代理?代理何时会用?在这个场景中就出现了一种必然概念,被代理者并不能直接参与当前操作中的环节,但是它又时时刻刻参与到操作中来,此时,采用代理的方式,将必要参数实时传递给被代理者,就达到了无缝增强的概念,例如,一个谋士非常厉害,但因犯了罪不能当官,若想继续实现自己才能,则需要一个当官的能实时与他实时通信,保持执行策略的通畅,当官的和谋士就是必不可缺的一对组合。
-
被代理者无法直接融入到操作环境中来,但是被代理者的表现方式又与操作环境密不可分
BrowserView 与 Webview 的差异比较
BrowserView相比WebView有几个显著优势:
性能更好 BrowserView使用独立的渲染进程,不需要像WebView那样在主窗口中嵌入,避免了额外的渲染开销。WebView本质上是一个DOM元素,会增加主窗口的渲染负担。
更灵活的布局控制 BrowserView可以通过setBounds()方法精确控制位置和大小,支持动态调整。而WebView受限于CSS布局,在复杂场景下布局控制较为受限。
更好的进程隔离 BrowserView运行在完全独立的渲染进程中,崩溃时不会影响主窗口。WebView虽然也有进程隔离,但与主窗口的耦合度更高。
资源消耗更低 BrowserView不需要额外的DOM操作和CSS渲染,内存占用通常更小。特别是在需要多个Web视图的场景下,差异更明显。
更现代的API设计 BrowserView的API更加简洁和现代化,避免了WebView中的一些历史包袱和兼容性问题。
更好的安全性 由于完全独立的进程和更严格的沙箱机制,BrowserView在安全性方面表现更好。
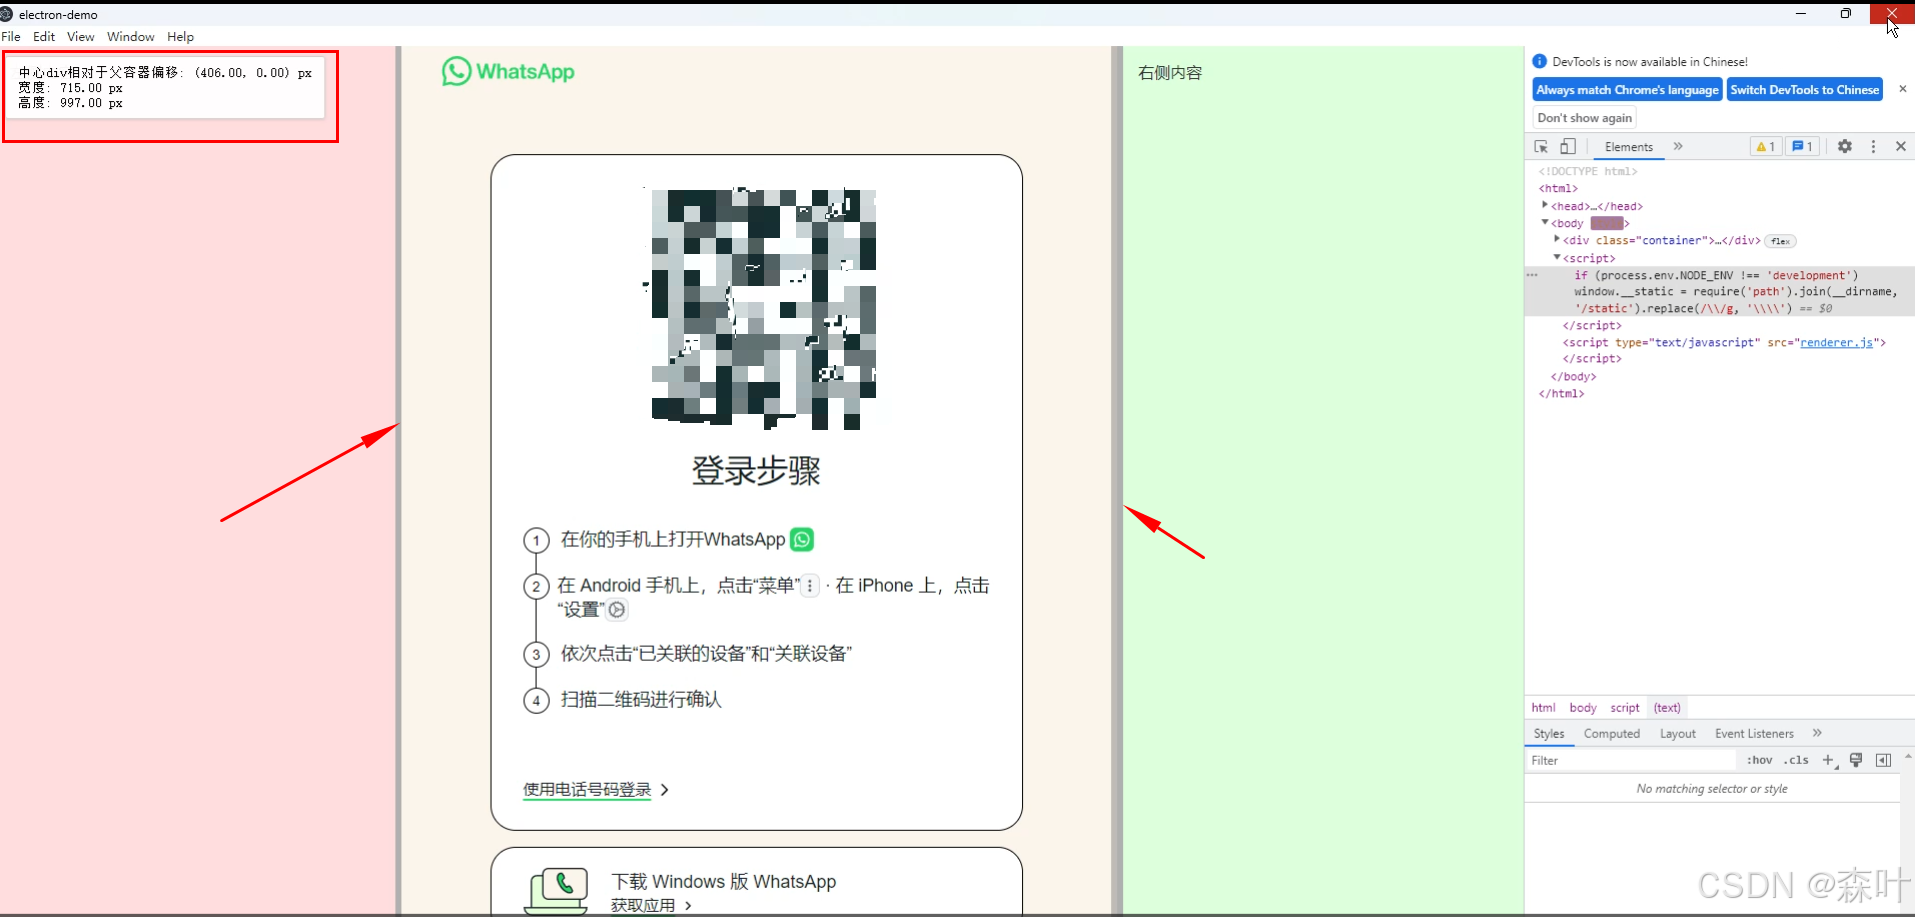
最麻烦的 BrowserView 定位问题
BrowserView 有很多优势,但是作为独立的渲染单位,定位和宽高完全适配就成了很大的问题,但是从源码 Franz 中我们得到了启发,那就是代理机制,让一个 div 占据这个区域,采用响应式布局时,监听该 div 的相对主窗口的定位和宽高变化,然后再将这个参数,实时发送给 BrowserView,BrowserView 就可以实现实时定位了
实现效果录屏
实现代码
main/index.js 代码 和 renderer/App.vue 代码
最核心的就是 ResizeObserver 对象,可以实时监听中间的 div 的偏移和宽高,父容器偏移那个是 0,0,不应该有那块逻辑,AI 生成的,我也懒得删,没有影响
主渲染使用Vue脚手架开发的,所以给的Vue脚手架下的组件代码App.vue
// main 主进程代码

const { app, BrowserWindow, BrowserView, ipcMain } = require('electron');
const path = require('path');

let mainWindow;
let browserView;

const winURL = process.env.NODE_ENV === 'development'
    ? `http://localhost:9080`
    : `file://${__dirname}/index.html`

function createWindow() {
    mainWindow = new BrowserWindow({
        width: 1000,
        height: 600,
        webPreferences: {
            preload: path.join(__dirname, 'renderer.js'),
            nodeIntegration: true,
            contextIsolation: false, // 简化示例,禁用上下文隔离
        },
    });

    mainWindow.loadURL(winURL);

    browserView = new BrowserView();
    mainWindow.setBrowserView(browserView);
    browserView.setBounds({ x: 200, y: 0, width: 600, height: 600 }); // 初始值
    browserView.webContents.loadURL('https://web.whatsapp.com');

    ipcMain.on('update-center-div', (event, { x, y, width, height }) => {
        console.log(`Received center div bounds: x=${x}, y=${y}, width=${width}, height=${height}`);
        browserView.setBounds({
            x: Math.round(x),
            y: Math.round(y),
            width: Math.round(width),
            height: Math.round(height),
        });
    });

    mainWindow.on('closed', () => {
        mainWindow = null;
        browserView = null;
    });
}

app.on('ready', createWindow);

app.on('window-all-closed', () => {
    if (process.platform !== 'darwin') {
        app.quit();
    }
});

app.on('activate', () => {
    if (mainWindow === null) {
        createWindow();
    }
});
App.vue 全部代码
// renderer 进程的 App.vue 代码
<template>
  <div class="container">
    <div id="left" class="panel" ref="leftPanel" :style="{ width: leftWidthStyle }">
      <div class="content">左侧内容</div>
    </div>
    <div class="resize-handle" @mousedown="startDragging('left', $event)"></div>
    <div id="center" class="panel" ref="center">
    </div>
    <div class="resize-handle" @mousedown="startDragging('right', $event)"></div>
    <div id="right" class="panel" ref="rightPanel" :style="{ width: rightWidthStyle }">
      <div class="content">右侧内容</div>
    </div>
    <div id="info" v-if="width > 0 || height > 0">
      中心div相对于父容器偏移: ({{ offsetX.toFixed(2) }}, {{ offsetY.toFixed(2) }}) px<br>
      宽度: {{ width.toFixed(2) }} px<br>
      高度: {{ height.toFixed(2) }} px
    </div>
  </div>
</template>

<script>
// Assuming ipcRenderer is correctly set up (e.g., via preload script or nodeIntegration:true)
const { ipcRenderer } = require('electron'); // Or window.electronAPI if using contextBridge

export default {
  name: 'App',
  data() {
    return {
      // Use null or a specific initial value like 'auto' if you prefer,
      // then handle it in computed. Here, 0 will mean 'auto' initially.
      actualLeftWidth: 0, // Store the numeric width in pixels
      actualRightWidth: 0, // Store the numeric width in pixels

      isDragging: null,    // 'left' or 'right'
      startX: 0,           // Mouse X position at drag start
      startPanelDragWidth: 0, // Width of the panel being dragged at drag start

      offsetX: 0,
      offsetY: 0,
      width: 0,
      height: 0,
      resizeObserver: null,
    };
  },
  computed: {
    leftWidthStyle() {
      // If actualLeftWidth is 0, treat it as 'auto' to let content define it initially.
      // Otherwise, use the pixel value.
      return this.actualLeftWidth > 0 ? `${this.actualLeftWidth}px` : 'auto';
    },
    rightWidthStyle() {
      return this.actualRightWidth > 0 ? `${this.actualRightWidth}px` : 'auto';
    }
  },
  methods: {
    initializePanelWidths() {
      // $nextTick ensures the DOM is updated and refs are available.
      this.$nextTick(() => {
        if (this.$refs.leftPanel) {
          // If 'auto' (actualLeftWidth is 0), set actualLeftWidth to its rendered content width.
          if (this.actualLeftWidth === 0) {
            this.actualLeftWidth = this.$refs.leftPanel.clientWidth;
          }
        } else {
          console.warn("Ref 'leftPanel' not found during initialization.");
        }

        if (this.$refs.rightPanel) {
          if (this.actualRightWidth === 0) {
            this.actualRightWidth = this.$refs.rightPanel.clientWidth;
          }
        } else {
          console.warn("Ref 'rightPanel' not found during initialization.");
        }
        // Update center div info after initial widths are potentially set
        this.updateCenterDivInfo();
      });
    },

    startDragging(side, event) {
      if (!event) return;
      this.isDragging = side;
      this.startX = event.clientX;

      let targetPanelRef;
      if (side === 'left') {
        targetPanelRef = this.$refs.leftPanel;
        if (!targetPanelRef) {
          console.error("Left panel ref not found for dragging.");
          return;
        }
        // Get the current rendered width as the starting point for dragging
        this.startPanelDragWidth = targetPanelRef.clientWidth;
        // If the panel's width was 'auto' (actualLeftWidth is 0),
        // set actualLeftWidth to its current clientWidth so drag calculations have a numeric base.
        if (this.actualLeftWidth === 0) this.actualLeftWidth = this.startPanelDragWidth;

      } else if (side === 'right') {
        targetPanelRef = this.$refs.rightPanel;
        if (!targetPanelRef) {
          console.error("Right panel ref not found for dragging.");
          return;
        }
        this.startPanelDragWidth = targetPanelRef.clientWidth;
        if (this.actualRightWidth === 0) this.actualRightWidth = this.startPanelDragWidth;
      }

      document.addEventListener('mousemove', this.onMouseMove);
      document.addEventListener('mouseup', this.stopDragging);
      document.body.style.userSelect = 'none'; // Prevent text selection globally
    },

    onMouseMove(event) {
      if (!this.isDragging) return;
      event.preventDefault();

      const deltaX = event.clientX - this.startX;
      let newWidth;

      if (this.isDragging === 'left') {
        newWidth = this.startPanelDragWidth + deltaX;
        this.actualLeftWidth = Math.max(50, Math.min(newWidth, 400)); // Apply constraints
      } else if (this.isDragging === 'right') {
        newWidth = this.startPanelDragWidth - deltaX; // Subtract delta for right panel
        this.actualRightWidth = Math.max(50, Math.min(newWidth, 400));
      }
      // The ResizeObserver on #center will trigger updateCenterDivInfo
    },

    stopDragging() {
      if (!this.isDragging) return;
      this.isDragging = null;
      document.removeEventListener('mousemove', this.onMouseMove);
      document.removeEventListener('mouseup', this.stopDragging);
      document.body.style.userSelect = ''; // Re-enable text selection
    },

    updateCenterDivInfo() {
      const centerEl = this.$refs.center;
      if (centerEl && centerEl.parentElement) {
        const rect = centerEl.getBoundingClientRect();
        const parentRect = centerEl.parentElement.getBoundingClientRect();

        this.offsetX = rect.left - parentRect.left;
        this.offsetY = rect.top - parentRect.top;
        this.width = rect.width;
        this.height = rect.height; // This will be 100% of parent due to CSS if parent has height

        if (ipcRenderer && typeof ipcRenderer.send === 'function') {
          ipcRenderer.send('update-center-div', {
            x: this.offsetX,
            y: this.offsetY,
            width: this.width,
            height: this.height,
          });
        }
      }
    },
  },
  mounted() {
    this.initializePanelWidths(); // This will use $nextTick

    if (this.$refs.center) {
      this.resizeObserver = new ResizeObserver(() => {
        this.updateCenterDivInfo();
      });
      this.resizeObserver.observe(this.$refs.center);
    } else {
      // Fallback if center ref isn't immediately available (less likely for direct refs)
      this.$nextTick(() => {
        if (this.$refs.center) {
          this.resizeObserver = new ResizeObserver(() => {
            this.updateCenterDivInfo();
          });
          this.resizeObserver.observe(this.$refs.center);
          this.updateCenterDivInfo(); // Call once if observer set up late
        } else {
          console.error("Center panel ref ('center') not found on mount for ResizeObserver.");
        }
      });
    }
    window.addEventListener('resize', this.updateCenterDivInfo);
  },
  beforeDestroy() {
    window.removeEventListener('resize', this.updateCenterDivInfo);
    if (this.resizeObserver) {
      if (this.$refs.center) { // Check if ref still exists before unobserving
        this.resizeObserver.unobserve(this.$refs.center);
      }
      this.resizeObserver.disconnect();
    }
    // Clean up global listeners if component is destroyed mid-drag
    document.removeEventListener('mousemove', this.onMouseMove);
    document.removeEventListener('mouseup', this.stopDragging);
    document.body.style.userSelect = '';
  },
};
</script>

<style>
/* For 100% height to work all the way up */
html, body, #app { /* Assuming #app is your Vue mount point */
  height: 100%;
  margin: 0;
  padding: 0;
  overflow: hidden; /* Often good for the root to prevent unexpected scrollbars */
}

.container {
  display: flex;
  width: 100%;
  height: 100%; /* Will fill its parent (e.g., #app) */
  position: relative; /* For #info positioning */
  background-color: #f0f0f0; /* Light grey background for the container itself */
}

.panel {
  height: 100%; /* Panels will fill the .container's height */
  overflow: auto; /* Add scrollbars if content overflows */
  box-sizing: border-box; /* Includes padding and border in the element's total width and height */
}

#left {
  background: #ffdddd; /* Lighter Red */
  /* width: auto; initially, will be set by content or actualLeftWidth */
}

#center {
  flex: 1; /* Takes up remaining space */
  background: #e0e0e0; /* Light grey for center, instead of transparent */
  min-width: 50px; /* Prevent center from collapsing too much */
  display: flex; /* If you want to align content within the center panel */
  flex-direction: column;
  /* border-left: 1px solid #ccc;
  border-right: 1px solid #ccc; */
}

#right {
  background: #ddffdd; /* Lighter Green */
  /* width: auto; initially, will be set by content or actualRightWidth */
}

.resize-handle {
  width: 6px; /* Slightly wider for easier grabbing */
  background: #b0b0b0; /* Darker grey for handle */
  cursor: ew-resize;
  flex-shrink: 0; /* Prevent handles from shrinking if container space is tight */
  user-select: none; /* Prevent text selection on the handle itself */
  z-index: 10;
  display: flex; /* To center an icon or visual cue if you add one */
  align-items: center;
  justify-content: center;
}
/* Optional: add a visual indicator to the handle */
/* .resize-handle::before {
  content: '⋮';
  color: #fff;
  font-size: 12px;
  line-height: 0;
} */


#info {
  position: absolute;
  top: 10px;
  left: 10px;
  background: rgba(255, 255, 255, 0.95);
  padding: 8px 12px;
  font-size: 13px;
  border-radius: 3px;
  z-index: 1000;
  border: 1px solid #d0d0d0;
  box-shadow: 0 1px 3px rgba(0,0,0,0.1);
  font-family: monospace;
}

.content {
  padding: 15px; /* More padding */
  white-space: nowrap; /* This makes clientWidth reflect this content */
  min-height: 50px; /* Example */
  color: #333;
}
</style>