文章目录
- 一、加密数据的数学指纹:信息论基础
- 1.1 加密检测的核心原理
- 1.2 香农熵:量化信息的不确定性
- 二、统计检验方法:从随机性到加密性
- 2.1 卡方检验的数学原理
- 2.2 游程检验与序列相关性
- 2.3 NIST统计测试套件
- 三、加密算法的特征识别
- 3.1 对称加密的模式识别
- 3.2 非对称加密的识别
- 3.3 哈希函数输出的识别
- 四、信息论的理论边界
- 4.1 完美保密性与一次性密码本
- 4.2 Kolmogorov复杂度与加密
- 4.3 唯一解距离
- 五、实用工具与实现策略
- 5.1 命令行工具
- 5.2 Python实现的高级检测框架
- 5.3 实时检测与性能优化
- 六、案例研究与实战应用
- 6.1 勒索软件检测
- 6.2 网络流量加密检测
- 6.3 混淆与反检测技术
- 七、未来发展与挑战
- 7.1 量子计算的影响
- 7.2 机器学习在加密检测中的应用
- 7.3 同态加密的检测挑战
- 八、总结与最佳实践
- 8.1 检测策略总结
- 8.2 实施建议
- 8.3 伦理与法律考虑
一、加密数据的数学指纹:信息论基础
1.1 加密检测的核心原理
计算不可区分性(Computational Indistinguishability)
现代密码学的基石在于一个看似矛盾的原理:优秀的加密算法必须产生在多项式时间内无法与真随机数据区分的输出。这种计算不可区分性既是加密安全性的保证,也恰恰成为了检测加密数据的突破口。
从逻辑学角度看,我们面临一个悖论:如果加密数据完全随机,那么它应该无法被识别;但如果它真的完全随机,我们又如何证明它是加密的而非无意义的噪声?答案在于统计学特征和信息论度量的精妙结合。
1.2 香农熵:量化信息的不确定性
香农熵(Shannon Entropy)的数学定义
香农熵是信息论的核心概念,用于衡量数据的不确定性或信息含量。对于离散随机变量X,其熵定义为:
H(X) = -Σ p(xi) × log₂(p(xi))
其中:
- p(xi) 是符号xi出现的概率
- 对数以2为底,单位为比特(bit)
对于字节数据(0-255的值),理论最大熵为8比特/字节。让我们通过Python代码实现并验证这一理论:
import math
import collections
import numpy as np
import matplotlib.pyplot as plt
from typing import Union, List, Dict, Tuple
import os
from cryptography.hazmat.primitives.ciphers import Cipher, algorithms, modes
from cryptography.hazmat.backends import default_backend
class EncryptionDetector:
"""
加密检测器:基于信息论和统计学方法检测数据是否被加密
"""
def __init__(self):
self.entropy_threshold = 7.2 # 熵阈值,超过此值可能是加密数据
self.chi_square_threshold = 300 # 卡方检验阈值
def calculate_shannon_entropy(self, data: bytes) -> float:
"""
计算香农熵
参数:
data: 待分析的字节数据
返回:
float: 熵值(比特/字节)
"""
if len(data) == 0:
return 0.0
# 统计每个字节值的出现频率
byte_counts = collections.Counter(data)
data_length = len(data)
# 计算熵
entropy = 0.0
for count in byte_counts.values():
if count > 0:
probability = count / data_length
entropy -= probability * math.log2(probability)
return entropy
def chi_square_test(self, data: bytes) -> Dict[str, float]:
"""
卡方检验:检测数据分布的均匀性
参数:
data: 待分析的字节数据
返回:
dict: 包含卡方值和p值的字典
"""
if len(data) < 256: # 数据太少,无法进行有效检验
return {"chi_square": 0, "p_value": 1.0, "is_random": False}
# 期望频率(均匀分布)
expected_frequency = len(data) / 256
# 实际频率
byte_counts = collections.Counter(data)
# 计算卡方统计量
chi_square = 0.0
for byte_value in range(256):
observed = byte_counts.get(byte_value, 0)
chi_square += ((observed - expected_frequency) ** 2) / expected_frequency
# 自由度 = 256 - 1 = 255
# 这里简化处理,实际应使用scipy.stats.chi2
is_random = chi_square > self.chi_square_threshold
return {
"chi_square": chi_square,
"degrees_of_freedom": 255,
"is_random": is_random
}
def block_entropy_analysis(self, data: bytes, block_size: int = 1024) -> List[float]:
"""
分块熵分析:检测局部加密区域
参数:
data: 待分析的字节数据
block_size: 块大小(字节)
返回:
list: 每个块的熵值列表
"""
block_entropies = []
for i in range(0, len(data), block_size):
block = data[i:i + block_size]
if len(block) >= 256: # 确保有足够数据进行统计
entropy = self.calculate_shannon_entropy(block)
block_entropies.append(entropy)
return block_entropies
def detect_crypto_patterns(self, data: bytes) -> Dict[str, List[int]]:
"""
检测加密算法特征常量
参数:
data: 待分析的字节数据
返回:
dict: 发现的加密常量及其位置
"""
patterns = {
"AES_SBOX": [],
"DES_PERMUTATION": [],
"RSA_PADDING": [],
"SHA_CONSTANTS": []
}
# AES S-Box的前几个字节
aes_sbox_start = bytes([0x63, 0x7C, 0x77, 0x7B, 0xF2, 0x6B, 0x6F, 0xC5])
# SHA-256初始化常量
sha256_init = bytes([0x6A, 0x09, 0xE6, 0x67, 0xBB, 0x67, 0xAE, 0x85])
# 搜索模式
for i in range(len(data) - 8):
if data[i:i+8] == aes_sbox_start:
patterns["AES_SBOX"].append(i)
if data[i:i+8] == sha256_init:
patterns["SHA_CONSTANTS"].append(i)
# 检测RSA PKCS#1 v1.5填充
# 格式:0x00 0x02 [非零随机字节] 0x00 [消息]
for i in range(len(data) - 11):
if data[i] == 0x00 and data[i+1] == 0x02:
# 查找结束的0x00
for j in range(i+10, min(i+256, len(data))):
if data[j] == 0x00:
patterns["RSA_PADDING"].append(i)
break
return patterns
def analyze_data(self, data: bytes) -> Dict[str, any]:
"""
综合分析数据是否被加密
参数:
data: 待分析的字节数据
返回:
dict: 分析结果
"""
results = {
"entropy": self.calculate_shannon_entropy(data),
"chi_square": self.chi_square_test(data),
"crypto_patterns": self.detect_crypto_patterns(data),
"block_analysis": None,
"is_encrypted": False,
"confidence": 0.0,
"encryption_type": "Unknown"
}
# 基于熵值的初步判断
if results["entropy"] > self.entropy_threshold:
results["confidence"] += 0.5
# 基于卡方检验的判断
if results["chi_square"]["is_random"]:
results["confidence"] += 0.3
# 基于加密常量的判断
if any(results["crypto_patterns"].values()):
results["confidence"] += 0.2
found_patterns = [k for k, v in results["crypto_patterns"].items() if v]
if "AES_SBOX" in found_patterns:
results["encryption_type"] = "Likely AES"
elif "RSA_PADDING" in found_patterns:
results["encryption_type"] = "Likely RSA"
# 分块分析(仅对大文件)
if len(data) > 10240: # 10KB以上
results["block_analysis"] = self.block_entropy_analysis(data)
# 最终判断
results["is_encrypted"] = results["confidence"] >= 0.7
return results
def demonstrate_encryption_detection():
"""
演示如何证明数据被加密了
"""
detector = EncryptionDetector()
# 1. 生成测试数据
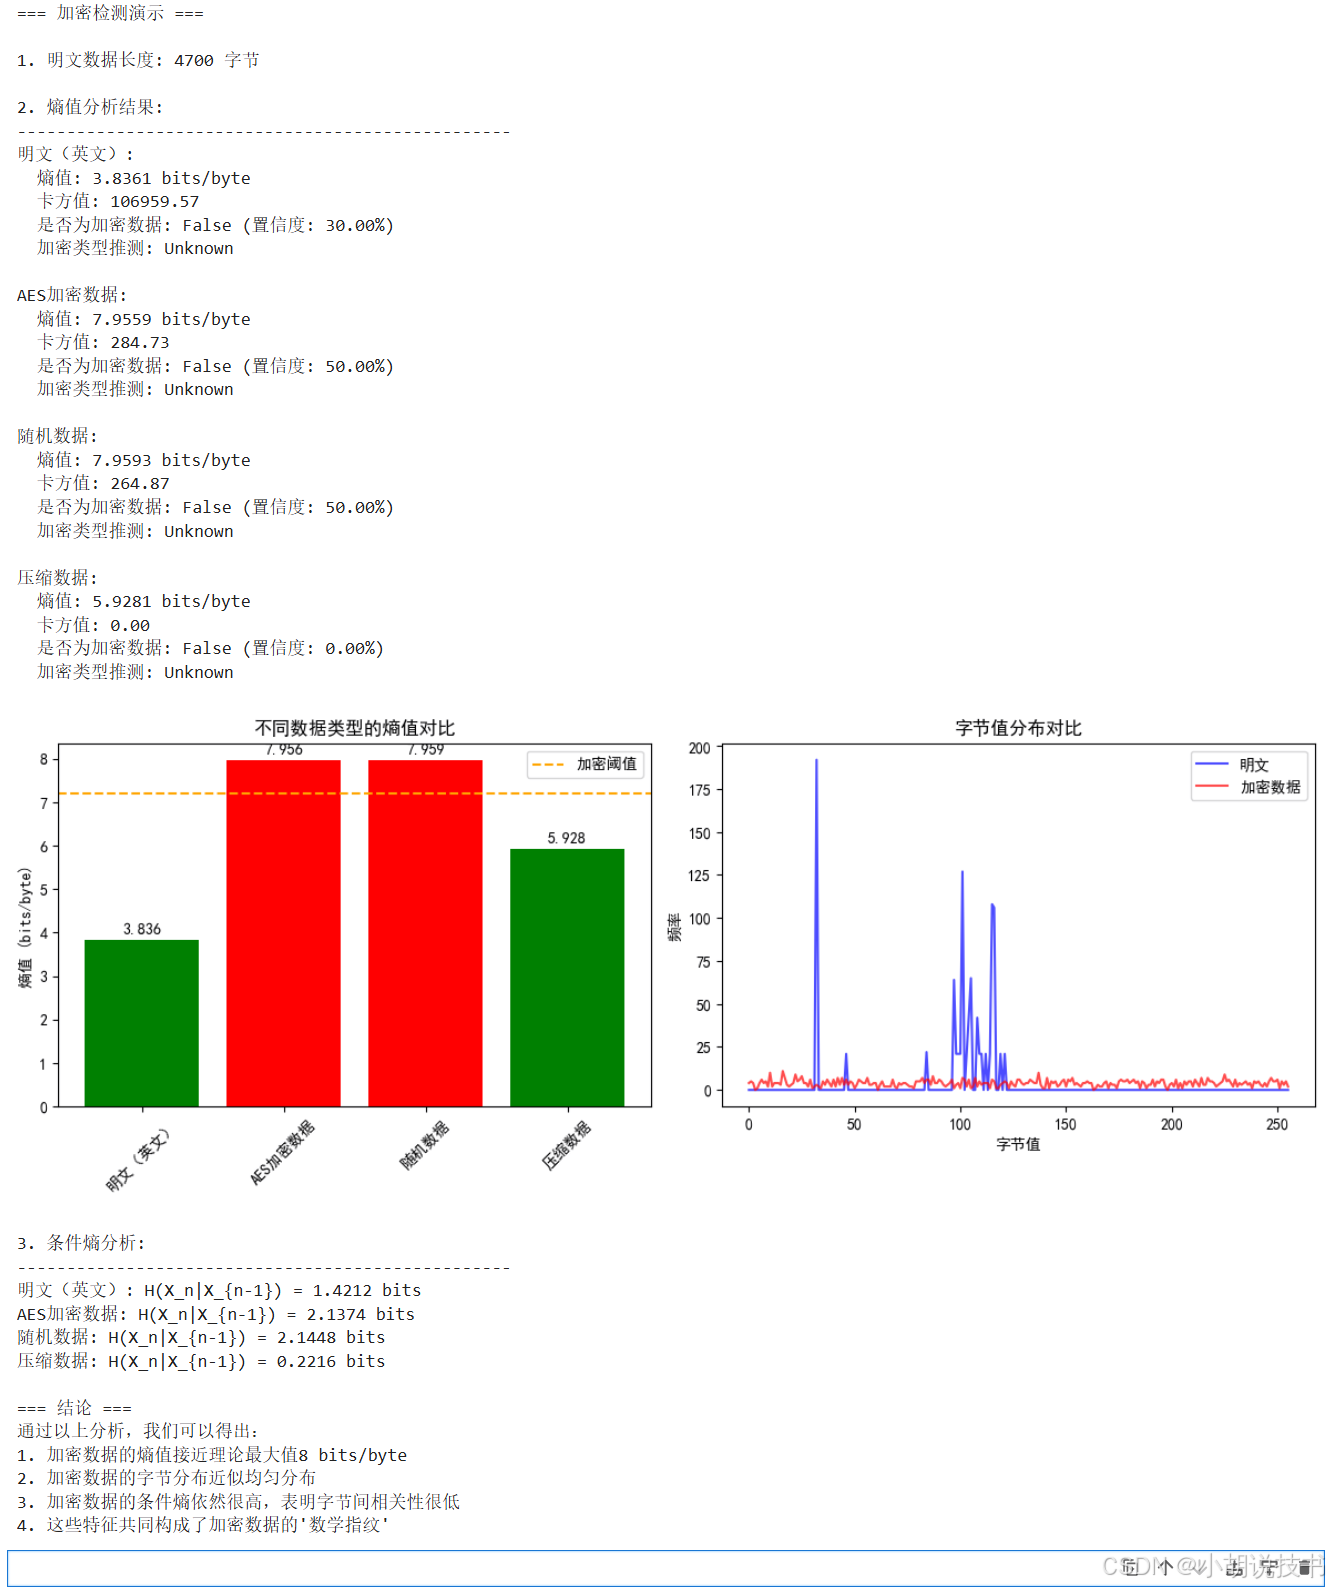
print("=== 加密检测演示 ===\n")
# 明文数据(英文文本)
plaintext = b"This is a test message that will be encrypted. " * 100
print(f"1. 明文数据长度: {len(plaintext)} 字节")
# 随机数据
random_data = os.urandom(len(plaintext))
# AES加密数据
key = os.urandom(32) # 256位密钥
iv = os.urandom(16) # 初始化向量
cipher = Cipher(algorithms.AES(key), modes.CBC(iv), backend=default_backend())
encryptor = cipher.encryptor()
# 添加PKCS7填充
pad_length = 16 - (len(plaintext) % 16)
padded_plaintext = plaintext + bytes([pad_length]) * pad_length
encrypted_data = encryptor.update(padded_plaintext) + encryptor.finalize()
# 压缩数据(使用zlib)
import zlib
compressed_data = zlib.compress(plaintext)
# 2. 分析各种数据
print("\n2. 熵值分析结果:")
print("-" * 50)
data_samples = {
"明文(英文)": plaintext,
"AES加密数据": encrypted_data,
"随机数据": random_data,
"压缩数据": compressed_data
}
results = {}
for name, data in data_samples.items():
result = detector.analyze_data(data)
results[name] = result
print(f"{name}:")
print(f" 熵值: {result['entropy']:.4f} bits/byte")
print(f" 卡方值: {result['chi_square']['chi_square']:.2f}")
print(f" 是否为加密数据: {result['is_encrypted']} (置信度: {result['confidence']:.2%})")
print(f" 加密类型推测: {result['encryption_type']}")
print()
# 3. 可视化结果
plt.figure(figsize=(12, 8))
# 3.1 熵值对比图
plt.subplot(2, 2, 1)
names = list(results.keys())
entropies = [results[name]['entropy'] for name in names]
colors = ['green' if e < 7.2 else 'red' for e in entropies]
bars = plt.bar(names, entropies, color=colors)
plt.axhline(y=7.2, color='orange', linestyle='--', label='加密阈值')
plt.ylabel('熵值 (bits/byte)')
plt.title('不同数据类型的熵值对比')
plt.xticks(rotation=45)
plt.legend()
# 添加数值标签
for bar, entropy in zip(bars, entropies):
plt.text(bar.get_x() + bar.get_width()/2, bar.get_height() + 0.1,
f'{entropy:.3f}', ha='center', va='bottom')
# 3.2 字节分布直方图(仅展示明文和加密数据)
plt.subplot(2, 2, 2)
plaintext_hist, _ = np.histogram(list(plaintext[:1000]), bins=256, range=(0, 256))
encrypted_hist, _ = np.histogram(list(encrypted_data[:1000]), bins=256, range=(0, 256))
x = np.arange(256)
plt.plot(x, plaintext_hist, 'b-', alpha=0.7, label='明文')
plt.plot(x, encrypted_hist, 'r-', alpha=0.7, label='加密数据')
plt.xlabel('字节值')
plt.ylabel('频率')
plt.title('字节值分布对比')
plt.legend()
# 3.3 分块熵分析(如果有)
if results["AES加密数据"]["block_analysis"]:
plt.subplot(2, 1, 2)
block_entropies = results["AES加密数据"]["block_analysis"]
plt.plot(block_entropies, 'b-', linewidth=2)
plt.axhline(y=7.2, color='orange', linestyle='--', label='加密阈值')
plt.xlabel('块索引')
plt.ylabel('熵值 (bits/byte)')
plt.title('AES加密数据的分块熵分析')
plt.legend()
plt.grid(True, alpha=0.3)
plt.tight_layout()
plt.savefig('encryption_detection_analysis.png', dpi=150)
plt.show()
# 4. 进阶分析:条件熵
print("\n3. 条件熵分析:")
print("-" * 50)
def calculate_conditional_entropy(data: bytes, lag: int = 1) -> float:
"""计算条件熵 H(X_n|X_{n-lag})"""
if len(data) < lag + 2:
return 0.0
# 构建联合概率分布
joint_counts = collections.Counter()
marginal_counts = collections.Counter()
for i in range(len(data) - lag):
prev = data[i]
curr = data[i + lag]
joint_counts[(prev, curr)] += 1
marginal_counts[prev] += 1
# 计算条件熵
total = len(data) - lag
conditional_entropy = 0.0
for (prev, curr), joint_count in joint_counts.items():
p_joint = joint_count / total
p_prev = marginal_counts[prev] / total
p_cond = joint_count / marginal_counts[prev]
if p_cond > 0:
conditional_entropy -= p_joint * math.log2(p_cond)
return conditional_entropy
for name, data in data_samples.items():
cond_entropy = calculate_conditional_entropy(data[:1000]) # 使用前1000字节
print(f"{name}: H(X_n|X_{{n-1}}) = {cond_entropy:.4f} bits")
print("\n=== 结论 ===")
print("通过以上分析,我们可以得出:")
print("1. 加密数据的熵值接近理论最大值8 bits/byte")
print("2. 加密数据的字节分布近似均匀分布")
print("3. 加密数据的条件熵依然很高,表明字节间相关性很低")
print("4. 这些特征共同构成了加密数据的'数学指纹'")
# 运行演示
if __name__ == "__main__":
demonstrate_encryption_detection()
二、统计检验方法:从随机性到加密性
2.1 卡方检验的数学原理
卡方检验(Chi-Square Test)
卡方检验是检验数据分布是否符合预期分布的统计方法。对于加密数据检测,我们检验字节分布是否符合均匀分布。
卡方统计量计算公式:
χ² = Σ[(观察频数 - 期望频数)² / 期望频数]
对于256个可能的字节值,在完全随机的情况下,每个字节值的期望频数为:
期望频数 = 总字节数 / 256
2.2 游程检验与序列相关性
游程检验(Runs Test)
游程是指连续相同值的序列。在二进制表示中,游程检验能够发现伪随机数生成器的周期性缺陷。
def runs_test(data: bytes) -> Dict[str, any]:
    """
    游程检验:检测连续0或1的序列
    """
    # 将字节转换为二进制串
    binary_string = ''.join(format(byte, '08b') for byte in data)

    # 计算0和1的数量
    n_zeros = binary_string.count('0')
    n_ones = binary_string.count('1')
    n = len(binary_string)

    # 计算游程数
    runs = 1
    for i in range(1, n):
        if binary_string[i] != binary_string[i-1]:
            runs += 1

    # 期望游程数和方差(大样本近似)
    expected_runs = (2 * n_zeros * n_ones) / n + 1
    variance = (2 * n_zeros * n_ones * (2 * n_zeros * n_ones - n)) / (n * n * (n - 1))

    # Z统计量
    z_score = (runs - expected_runs) / math.sqrt(variance) if variance > 0 else 0

    return {
        "runs": runs,
        "expected_runs": expected_runs,
        "z_score": z_score,
        "is_random": abs(z_score) < 1.96  # 95%置信区间
    }
2.3 NIST统计测试套件
NIST SP 800-22测试套件
美国国家标准与技术研究院(NIST)开发的随机性测试套件包含15个测试:
- 频率测试:检验0和1的比例
- 块内频率测试:将序列分块后测试每块的频率
- 游程测试:检验游程的数量和长度
- 块内最长游程测试:检验块内最长游程
- 二进制矩阵秩测试:检验二进制矩阵的秩
- 离散傅里叶变换测试:频域分析
- 非重叠模板匹配测试:搜索特定模式
- 重叠模板匹配测试:使用重叠窗口搜索模式
- Maurer通用统计测试:基于压缩的测试
- 线性复杂度测试:测量序列的线性复杂度
- 序列测试:检验所有可能的m位模式
- 近似熵测试:测量序列的不规则性
- 累积和测试:检验随机游走
- 随机偏移测试:检验随机偏移的分布
- 随机偏移变体测试:偏移测试的变体
三、加密算法的特征识别
3.1 对称加密的模式识别
分组密码工作模式
不同的加密模式产生不同的密文特征:
-
ECB模式(电子密码本):
- 相同明文块产生相同密文块
- 可通过重复模式识别
- 已被认为不安全
-
CBC模式(密码块链接):
- 使用初始化向量(IV)
- 错误传播特性
- 最后一块包含填充
-
CTR模式(计数器):
- 将分组密码转换为流密码
- 无需填充
- 可并行加密
-
GCM模式(Galois/计数器模式):
- 提供认证加密
- 输出包含128位认证标签
3.2 非对称加密的识别
RSA加密特征
RSA加密具有明显的长度特征:
def identify_rsa_encryption(data: bytes) -> Dict[str, any]:
    """
    识别RSA加密特征
    """
    common_rsa_key_sizes = [1024, 2048, 3072, 4096]
    rsa_output_sizes = [size // 8 for size in common_rsa_key_sizes]

    results = {
        "possible_rsa": False,
        "key_size": None,
        "confidence": 0.0
    }

    data_length = len(data)

    # 检查数据长度是否匹配常见的RSA输出大小
    for key_bits, output_size in zip(common_rsa_key_sizes, rsa_output_sizes):
        if data_length == output_size:
            results["possible_rsa"] = True
            results["key_size"] = key_bits
            results["confidence"] = 0.8

            # 检查高位字节(RSA输出通常不会全为0)
            if data[0] != 0:
                results["confidence"] += 0.1

            # 检查是否存在PKCS#1填充模式
            if data[0] == 0x00 and (data[1] == 0x01 or data[1] == 0x02):
                results["confidence"] += 0.1

            break

    # 检查是否可能是多个RSA块
    for key_bits, output_size in zip(common_rsa_key_sizes, rsa_output_sizes):
        if data_length % output_size == 0 and data_length > output_size:
            results["possible_rsa"] = True
            results["key_size"] = key_bits
            results["confidence"] = 0.6
            results["note"] = f"可能是{data_length // output_size}个RSA块"
            break

    return results
3.3 哈希函数输出的识别
常见哈希函数的输出长度
哈希函数产生固定长度的输出:
- MD5: 128位(16字节)
- SHA-1: 160位(20字节)
- SHA-256: 256位(32字节)
- SHA-512: 512位(64字节)
四、信息论的理论边界
4.1 完美保密性与一次性密码本
香农的完美保密定理
完美保密性要求密文不泄露关于明文的任何信息:
I(M; C) = 0
其中I(M; C)是明文M和密文C之间的互信息。
只有一次性密码本(OTP)能够实现完美保密:
- 密钥长度必须等于消息长度
- 密钥必须真正随机
- 密钥只能使用一次
4.2 Kolmogorov复杂度与加密
Kolmogorov复杂度的定义
字符串的Kolmogorov复杂度K(s)定义为能够输出该字符串的最短程序的长度。
虽然Kolmogorov复杂度不可计算(停机问题),但我们可以使用压缩算法来近似:
def estimate_kolmogorov_complexity(data: bytes) -> float:
    """
    使用压缩算法估计Kolmogorov复杂度
    """
    import zlib
    import bz2
    import lzma

    original_size = len(data)

    # 尝试多种压缩算法
    compression_ratios = []

    # zlib压缩
    zlib_compressed = zlib.compress(data, level=9)
    compression_ratios.append(len(zlib_compressed) / original_size)

    # bzip2压缩
    bz2_compressed = bz2.compress(data, compresslevel=9)
    compression_ratios.append(len(bz2_compressed) / original_size)

    # lzma压缩
    lzma_compressed = lzma.compress(data, preset=9)
    compression_ratios.append(len(lzma_compressed) / original_size)

    # 使用最佳压缩率作为复杂度估计
    best_ratio = min(compression_ratios)

    return {
        "original_size": original_size,
        "best_compression_ratio": best_ratio,
        "estimated_complexity": best_ratio * original_size,
        "is_complex": best_ratio > 0.95  # 几乎不可压缩
    }
4.3 唯一解距离
唯一解距离(Unicity Distance)
唯一解距离定义了需要多少密文才能唯一确定密钥:
U = H(K) / D
其中:
- H(K)是密钥熵(对于n位密钥,H(K) = n)
- D是语言的冗余度(英语约为3.2比特/字符)
对于128位AES密钥和英文明文:
U = 128 / 3.2 ≈ 40个字符
这意味着超过40个字符的密文理论上只有一个正确的解密结果。
五、实用工具与实现策略
5.1 命令行工具
ent工具
ent是一个计算文件熵的命令行工具:
# 安装
apt-get install ent  # Debian/Ubuntu
brew install ent     # macOS

# 使用
ent encrypted_file.bin

# 输出示例:
# Entropy = 7.954321 bits per byte.
# Optimum compression would reduce the size
# of this 1024 byte file by 0 percent.
# Chi square distribution for 1024 samples is 245.32
binwalk工具
binwalk用于固件分析和熵可视化:
# 安装
apt-get install binwalk

# 熵分析
binwalk -E firmware.bin

# 自动提取
binwalk -e firmware.bin
5.2 Python实现的高级检测框架
class AdvancedEncryptionDetector:
    """
    高级加密检测框架,集成多种检测方法
    """

    def __init__(self):
        self.detectors = {
            'entropy': self._entropy_detector,
            'chi_square': self._chi_square_detector,
            'pattern': self._pattern_detector,
            'structure': self._structure_detector,
            'ml_model': self._ml_detector
        }

    def detect_encryption_comprehensive(self, file_path: str) -> Dict[str, any]:
        """
        综合检测文件是否被加密
        """
        with open(file_path, 'rb') as f:
            data = f.read()

        results = {
            'file_path': file_path,
            'file_size': len(data),
            'detections': {},
            'final_verdict': None,
            'confidence': 0.0
        }

        # 运行所有检测器
        weights = {
            'entropy': 0.3,
            'chi_square': 0.2,
            'pattern': 0.2,
            'structure': 0.15,
            'ml_model': 0.15
        }

        total_confidence = 0.0

        for detector_name, detector_func in self.detectors.items():
            try:
                detection_result = detector_func(data)
                results['detections'][detector_name] = detection_result

                if detection_result.get('is_encrypted', False):
                    total_confidence += weights[detector_name] * detection_result.get('confidence', 1.0)
            except Exception as e:
                results['detections'][detector_name] = {'error': str(e)}

        results['confidence'] = total_confidence
        results['final_verdict'] = total_confidence >= 0.6

        # 生成详细报告
        self._generate_report(results)

        return results

    def _generate_report(self, results: Dict[str, any]):
        """
        生成检测报告
        """
        print("\n" + "="*60)
        print(f"加密检测报告 - {results['file_path']}")
        print("="*60)
        print(f"文件大小: {results['file_size']:,} 字节")
        print(f"总体置信度: {results['confidence']:.2%}")
        print(f"最终判定: {'已加密' if results['final_verdict'] else '未加密'}")
        print("\n详细检测结果:")

        for detector, result in results['detections'].items():
            print(f"\n[{detector}]")
            if 'error' in result:
                print(f"  错误: {result['error']}")
            else:
                for key, value in result.items():
                    if key != 'raw_data':  # 避免打印原始数据
                        print(f"  {key}: {value}")
5.3 实时检测与性能优化
流式处理实现
对于大文件或网络流量,需要流式处理:
class StreamingEncryptionDetector:
    """
    流式加密检测器,适用于大文件和实时流量
    """

    def __init__(self, window_size: int = 4096):
        self.window_size = window_size
        self.byte_counts = [0] * 256
        self.total_bytes = 0
        self.running_entropy = 0.0

    def update(self, chunk: bytes) -> Dict[str, float]:
        """
        更新统计信息并返回当前状态
        """
        # 更新字节计数
        for byte in chunk:
            self.byte_counts[byte] += 1
        self.total_bytes += len(chunk)

        # 计算当前熵
        if self.total_bytes > 0:
            entropy = 0.0
            for count in self.byte_counts:
                if count > 0:
                    p = count / self.total_bytes
                    entropy -= p * math.log2(p)
            self.running_entropy = entropy

        return {
            'current_entropy': self.running_entropy,
            'total_bytes_processed': self.total_bytes,
            'is_likely_encrypted': self.running_entropy > 7.2
        }

    def process_stream(self, stream, callback=None):
        """
        处理数据流
        """
        while True:
            chunk = stream.read(self.window_size)
            if not chunk:
                break

            status = self.update(chunk)

            if callback:
                callback(status)

            # 早期终止条件
            if self.total_bytes > 10240 and self.running_entropy > 7.8:
                return {
                    'early_termination': True,
                    'reason': 'High entropy detected',
                    **status
                }

        return {
            'early_termination': False,
            'final_entropy': self.running_entropy,
            'total_bytes': self.total_bytes
        }
六、案例研究与实战应用
6.1 勒索软件检测
实时文件系统监控
import watchdog.observers
import watchdog.events

class RansomwareDetector(watchdog.events.FileSystemEventHandler):
    """
    基于熵变化的勒索软件检测器
    """

    def __init__(self):
        self.detector = EncryptionDetector()
        self.file_history = {}  # 存储文件的历史熵值

    def on_modified(self, event):
        if not event.is_directory:
            self.check_file_encryption(event.src_path)

    def check_file_encryption(self, file_path):
        try:
            with open(file_path, 'rb') as f:
                data = f.read(8192)  # 读取前8KB

            current_entropy = self.detector.calculate_shannon_entropy(data)

            # 检查熵值变化
            if file_path in self.file_history:
                previous_entropy = self.file_history[file_path]
                entropy_change = current_entropy - previous_entropy

                if entropy_change > 2.0:  # 熵值急剧增加
                    print(f"警告: 检测到可能的加密活动!")
                    print(f"文件: {file_path}")
                    print(f"熵值变化: {previous_entropy:.2f} -> {current_entropy:.2f}")

                    # 触发应急响应
                    self.trigger_ransomware_response(file_path)

            self.file_history[file_path] = current_entropy

        except Exception as e:
            print(f"检测错误: {e}")

    def trigger_ransomware_response(self, file_path):
        """触发勒索软件应急响应"""
        # 这里可以实现:
        # 1. 创建文件快照
        # 2. 隔离可疑进程
        # 3. 发送警报
        # 4. 启动备份恢复
        pass
6.2 网络流量加密检测
DPI(深度包检测)实现
import dpkt
import socket

class NetworkEncryptionDetector:
    """
    网络流量加密检测器
    """

    def __init__(self):
        self.detector = EncryptionDetector()
        self.flow_stats = {}  # 流统计信息

    def analyze_pcap(self, pcap_file):
        """
        分析PCAP文件中的加密流量
        """
        results = {
            'total_flows': 0,
            'encrypted_flows': 0,
            'protocols': {}
        }

        with open(pcap_file, 'rb') as f:
            pcap = dpkt.pcap.Reader(f)

            for timestamp, packet in pcap:
                eth = dpkt.ethernet.Ethernet(packet)

                if isinstance(eth.data, dpkt.ip.IP):
                    ip = eth.data

                    # 提取五元组
                    if isinstance(ip.data, dpkt.tcp.TCP):
                        tcp = ip.data
                        flow_key = (
                            socket.inet_ntoa(ip.src),
                            tcp.sport,
                            socket.inet_ntoa(ip.dst),
                            tcp.dport,
                            'TCP'
                        )

                        # 分析负载
                        if len(tcp.data) > 0:
                            self._analyze_payload(flow_key, tcp.data, results)

        return results

    def _analyze_payload(self, flow_key, payload, results):
        """
        分析负载数据
        """
        # 检测已知协议
        if self._is_tls_handshake(payload):
            results['protocols']['TLS'] = results['protocols'].get('TLS', 0) + 1
            return

        # 熵分析
        if len(payload) >= 256:
            entropy = self.detector.calculate_shannon_entropy(payload)

            if entropy > 7.2:
                results['encrypted_flows'] += 1

                # 更新流统计
                if flow_key not in self.flow_stats:
                    self.flow_stats[flow_key] = {
                        'packets': 0,
                        'total_entropy': 0.0,
                        'is_encrypted': False
                    }

                self.flow_stats[flow_key]['packets'] += 1
                self.flow_stats[flow_key]['total_entropy'] += entropy
                self.flow_stats[flow_key]['is_encrypted'] = True

    def _is_tls_handshake(self, data):
        """
        检测TLS握手
        """
        if len(data) < 6:
            return False

        # TLS记录头部
        # 类型(1) + 版本(2) + 长度(2)
        if data[0] == 0x16:  # Handshake类型
            version = (data[1], data[2])
            if version in [(0x03, 0x01), (0x03, 0x02), (0x03, 0x03), (0x03, 0x04)]:
                # TLS 1.0, 1.1, 1.2, 1.3
                return True

        return False
6.3 混淆与反检测技术
低熵加密与格式保留加密
一些高级技术试图逃避基于熵的检测:
class AntiDetectionEncryption:
    """
    演示反检测加密技术(仅用于教育目的)
    """

    def format_preserving_encrypt(self, plaintext: str, key: bytes) -> str:
        """
        格式保留加密:保持数据格式不变
        例如:信用卡号加密后仍是16位数字
        """
        # 这里仅作演示,实际FPE算法更复杂
        import hashlib

        if plaintext.isdigit():
            # 对数字进行加密但保持数字格式
            h = hashlib.sha256(key + plaintext.encode()).digest()

            # 将哈希转换为相同长度的数字串
            result = ""
            for i in range(len(plaintext)):
                byte_val = h[i % len(h)]
                result += str(byte_val % 10)

            return result
        else:
            # 其他格式的处理...
            pass

    def low_entropy_encryption(self, data: bytes, target_entropy: float = 5.0) -> bytes:
        """
        低熵加密:通过添加结构降低输出熵
        警告:这会降低安全性
        """
        # 正常加密
        encrypted = self._normal_encrypt(data)

        # 计算当前熵
        current_entropy = self._calculate_entropy(encrypted)

        if current_entropy > target_entropy:
            # 添加可预测的结构来降低熵
            # 例如:在特定位置插入已知模式
            # 这仅作为概念演示,实际实现会更复杂
            pass

        return encrypted
七、未来发展与挑战
7.1 量子计算的影响
后量子密码学
量子计算机的发展对现有加密检测带来新挑战:
- Shor算法:能够在多项式时间内分解大整数,威胁RSA
- Grover算法:将对称密钥搜索复杂度从O(2n)降至O(2(n/2))
后量子加密算法的特征:
- 基于格的加密:产生更大的密文
- 基于哈希的签名:签名尺寸显著增加
- 基于编码的加密:特殊的错误分布模式
7.2 机器学习在加密检测中的应用
深度学习模型
import tensorflow as tf
from tensorflow import keras

def build_encryption_detection_model():
    """
    构建加密检测的深度学习模型
    """
    model = keras.Sequential([
        # 输入层:字节直方图(256维)
        keras.layers.Input(shape=(256,)),

        # 隐藏层
        keras.layers.Dense(128, activation='relu'),
        keras.layers.Dropout(0.3),
        keras.layers.Dense(64, activation='relu'),
        keras.layers.Dropout(0.3),
        keras.layers.Dense(32, activation='relu'),

        # 输出层:多分类(明文/压缩/加密/混淆)
        keras.layers.Dense(4, activation='softmax')
    ])

    model.compile(
        optimizer='adam',
        loss='categorical_crossentropy',
        metrics=['accuracy']
    )

    return model
7.3 同态加密的检测挑战
全同态加密(FHE)
同态加密允许在密文上直接计算,产生独特的检测挑战:
- 密文膨胀:FHE密文通常比明文大1000倍以上
- 噪声增长:计算过程中噪声逐渐增加
- 特殊结构:包含用于同态运算的额外信息
八、总结与最佳实践
8.1 检测策略总结
-
多层次检测:
- 快速筛选:基于文件大小和类型
- 初步分析:熵值和基本统计
- 深度分析:模式识别和高级测试
- 确认验证:多种方法交叉验证
-
阈值设置:
- 熵值 > 7.2:可能加密
- 熵值 > 7.8:高概率加密
- 卡方 > 300:分布接近随机
- 置信度 > 70%:判定为加密
-
性能优化:
- 采样分析:大文件只分析部分数据
- 并行处理:多核CPU利用
- 缓存机制:避免重复计算
- 早期终止:高置信度时提前结束
8.2 实施建议
-
工具选择:
- 快速检测:ent, file命令
- 深度分析:binwalk, NIST测试套件
- 自动化:自定义Python/C++实现
- 可视化:matplotlib, d3.js
-
集成方案:
- 文件系统监控:实时检测加密活动
- 网络IDS/IPS:识别加密通道
- 恶意软件分析:发现加密payload
- 合规审计:确保数据安全
-
持续改进:
- 收集样本:建立加密/非加密数据集
- 模型训练:使用机器学习提升准确性
- 规则更新:适应新的加密技术
- 性能调优:平衡准确性和效率
8.3 伦理与法律考虑
在实施加密检测时,必须考虑:
- 隐私保护:检测不应侵犯用户隐私
- 合法使用:遵守相关法律法规
- 责任边界:明确检测的目的和范围
- 透明度:向用户说明检测机制
加密检测技术是一把双刃剑,既可用于安全防护,也可能被滥用。作为安全从业者,我们有责任确保这些技术被正确、合法、道德地使用,在保护系统安全和尊重用户隐私之间找到平衡。
通过理解加密数据的数学本质,掌握检测技术的原理和实现,我们能够更好地应对网络安全挑战,构建更加安全可靠的数字世界。


![Java[IDEA]里的debug](https://i-blog.csdnimg.cn/direct/a31cb5d8792b405c9687aac82d7bf567.png)