目录
1、介绍
2、执行流程
1、运行run方法
2、初始化SpringApplication对象
1、确定容器类型
3、加载所有的初始化器
4、加载Spring上下文监听器
5、设置程序运行的主类
3、进入run方法
1、开启计时器
2、Headless模式配置
3、获取并启用监听器
4、准备环境
1、设置应用程序参数
2、准备环境变量
3、忽略bean信息
5、创建上下文
1、应用程序类型的上下文
2、实例化异常报告器
6、准备上下文环境
1、实例化单例的beanName生成器
2、执行初始化方法
3、将启动参数注册到容器中
7、刷新上下文
1、自动装配和容器启动
2、刷新上下文后置处理
8、结束计时器
9、发布上下文
1、准备就绪事件
2、执行自定义的run方法
1、框架介绍
更多了解Springboot的自动装配可参考:谈谈对Springboot框架的理解-CSDN博客
1、约定大于配置
Springboot是依赖于spring的,除了拥有spring的全部功能以外,Springboot无需繁琐的xml配置(约定大于配置),有application.properties/yml配置文件,还有static静态配置目录,这取决于它自身强大的自动装配功能;
2、开箱即用
并且自身已嵌入Tomcat、Jetty等web容器,集成了springmvc,使得springboot可以直接运行,不需要额外的容器。
关于springboot的jar包可以启动,为什么普通classes/lib/jar包不能运行的,可参考:Springboot项目jar包启动原理及类型_spring jar包-CSDN博客
3、便于集成
依赖于强大的@EnableAutoConfiguration注解,通过SpringFactoriesLoader机制(SPI机制)去读取META-INF/spring.factories文件。里面存放了key为org.springframework.boot.autoconfigure.EnableAutoConfiguration的实现。有mq、redis、servlet、jdbc、log4j等实现类。在自动装配的过程中通过@ConditionalOnClass等注解来进行过滤。
4、指标检测actuator
提供了一些大型项目中常见的非功能性特性,如嵌入式服务器、安全、指标,健康检测、外部配置等。
5、简化了maven配置
通过spring-boot-starter-parent这个基础pom,里面封装了常用的依赖。
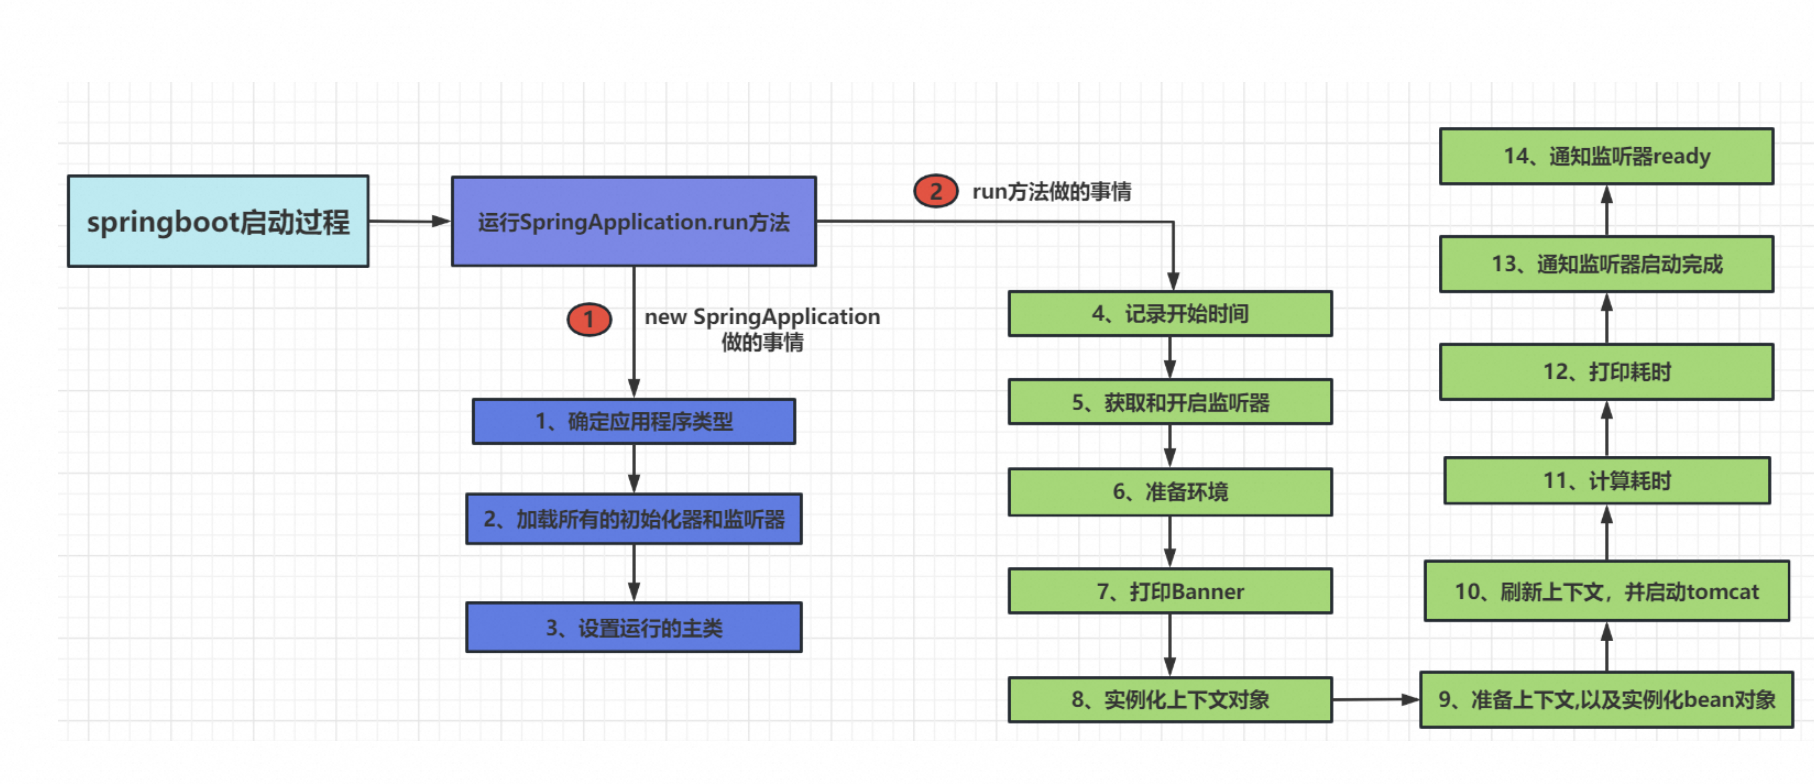
2、执行流程
如下图为简化版的所示:
1、运行run方法
通过源码可参考:
package *;
import org.springframework.beans.factory.config.ConfigurableListableBeanFactory;
import org.springframework.boot.SpringApplication;
import org.springframework.boot.autoconfigure.SpringBootApplication;
import org.springframework.context.ConfigurableApplicationContext;

@SpringBootApplication
public class App  {

    public static void main(String[] args) {
        // 启动springboot
        ConfigurableApplicationContext run = SpringApplication.run(App.class, args);
    }

}
通过run方法,会 new 一个SpringApplication 对象,创建这个对象的构造函数做了一些准备工作。
如下所示:
public static ConfigurableApplicationContext run(Class<?> primarySource, String... args) {
		return run(new Class<?>[] { primarySource }, args);
}
在这里可以看到返回值为ConfigurableApplicationContext(extends ApplicationContext, Lifecycle, Closeable)。
这个ApplicationContext可以参考:Spring的核心模块原理介绍_spring 原理-CSDN博客
1、primarySource
而primarySource,在 Spring Boot 启动时,指定应用的主配置类,(通常是带有
@SpringBootApplication 的类),也可以去用于 自定义启动逻辑 或 模块化项目 中。
如下所示:
public class Application {
    public static void main(String[] args) {
        SpringApplication app = new SpringApplication();
        // 设置主配置类
        app.setPrimarySources(Collections.singletonList(MyApplication.class));
        app.run(args);
    }
}
2、@Primary
是spring的注解。多数据源配置中的 primary 属性。
在配置数据源时,@Primary 注解常用于标记主数据源。
例如:
@Configuration
public class DataSourceConfig {

    @Bean
    @Primary
    @ConfigurationProperties(prefix = "spring.datasource.primary")
    public DataSource primaryDataSource() {
        return DataSourceBuilder.create().build();
    }

    @Bean
    @ConfigurationProperties(prefix = "spring.datasource.secondary")
    public DataSource secondaryDataSource() {
        return DataSourceBuilder.create().build();
    }
}
因为两者比较相似,因此可以参考区别:

2、初始化SpringApplication对象
以下就是在new SpringApplication对象时进行的一系列操作。

1、确定容器类型
在构造方法内,首先会通过 WebApplicationType.deduceFromClasspath(); 方法判断当前应用程序的容器,默认使用的是Servlet 容器,除了servlet之外,还有NONE 和 REACTIVE (响应式编程)。
如下图所示:
public SpringApplication(ResourceLoader resourceLoader, Class<?>... primarySources) {
		this.resourceLoader = resourceLoader;
		Assert.notNull(primarySources, "PrimarySources must not be null");
		this.primarySources = new LinkedHashSet<>(Arrays.asList(primarySources));
        //加载应用程序启动的容器的类型
		this.webApplicationType = WebApplicationType.deduceFromClasspath();
		setInitializers((Collection) getSpringFactoriesInstances(ApplicationContextInitializer.class));
		setListeners((Collection) getSpringFactoriesInstances(ApplicationListener.class));
		this.mainApplicationClass = deduceMainApplicationClass();
}


static WebApplicationType deduceFromClasspath() {
		if (ClassUtils.isPresent(WEBFLUX_INDICATOR_CLASS, null) && !ClassUtils.isPresent(WEBMVC_INDICATOR_CLASS, null)
				&& !ClassUtils.isPresent(JERSEY_INDICATOR_CLASS, null)) {
			return WebApplicationType.REACTIVE;
		}
		for (String className : SERVLET_INDICATOR_CLASSES) {
			if (!ClassUtils.isPresent(className, null)) {
				return WebApplicationType.NONE;
			}
		}
		return WebApplicationType.SERVLET;
}
这块关于容器的类型区别为:

3、加载所有的初始化器
如下所示:
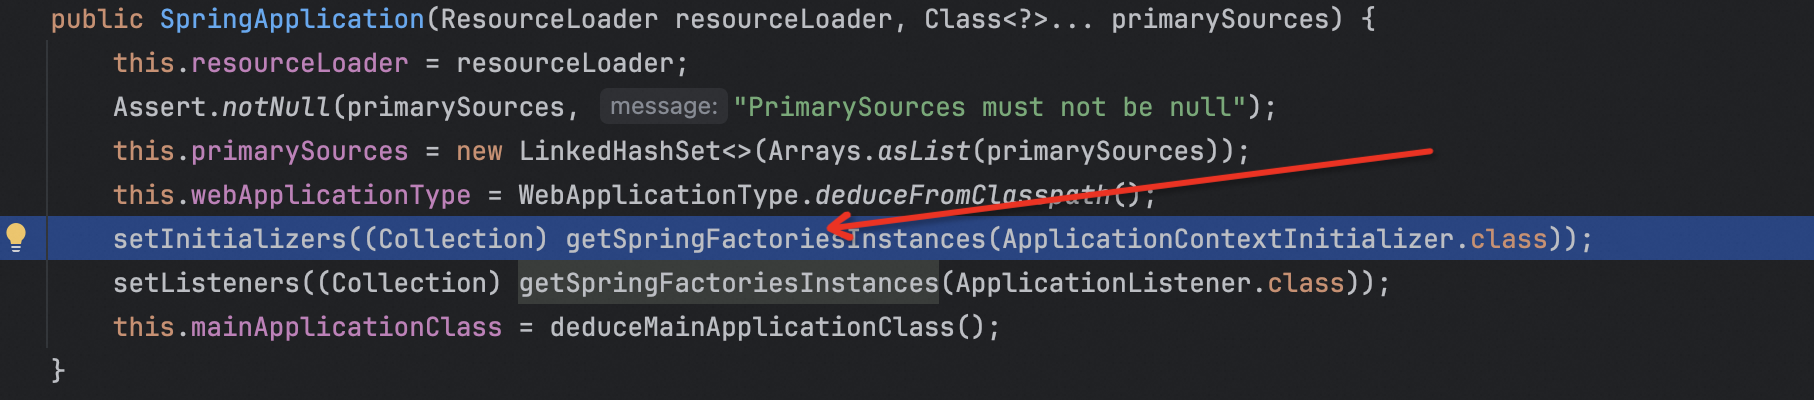
在设置初始化器的时候,传参为SpringFactoriesLoader.loadFactoryNames()。此处就是之前实现自动装配过程中读取/META-INF/spring.factories文件的配置类。
private <T> Collection<T> getSpringFactoriesInstances(Class<T> type) {
		return getSpringFactoriesInstances(type, new Class<?>[] {});
	}

	private <T> Collection<T> getSpringFactoriesInstances(Class<T> type, Class<?>[] parameterTypes, Object... args) {
		ClassLoader classLoader = getClassLoader();
		// Use names and ensure unique to protect against duplicates
		Set<String> names = new LinkedHashSet<>(SpringFactoriesLoader.loadFactoryNames(type, classLoader));
		List<T> instances = createSpringFactoriesInstances(type, parameterTypes, classLoader, args, names);
		AnnotationAwareOrderComparator.sort(instances);
		return instances;
	}
不过此时的class<T> type传入的类型为ApplicationContextInitializer.class,因此需要去spring.factories里面找到key为org.springframework.context.ApplicationContextInitializer的属性。
如下所示:
# Application Context Initializers
org.springframework.context.ApplicationContextInitializer=\
org.springframework.boot.context.ConfigurationWarningsApplicationContextInitializer,\
org.springframework.boot.context.ContextIdApplicationContextInitializer,\
org.springframework.boot.context.config.DelegatingApplicationContextInitializer,\
org.springframework.boot.rsocket.context.RSocketPortInfoApplicationContextInitializer,\
org.springframework.boot.web.context.ServerPortInfoApplicationContextInitializer
1、自定义的初始化器
只需要实现 ApplicationContextInitializer接口既可MyApplicationContextInitializer.java。
如下:
package com.spring.application;
import org.springframework.context.ApplicationContextInitializer;
import org.springframework.context.ConfigurableApplicationContext;
/**
* 自定义的初始化器
*/
public class MyApplicationContextInitializer implements ApplicationContextInitializer<ConfigurableApplicationContext> {
@Override
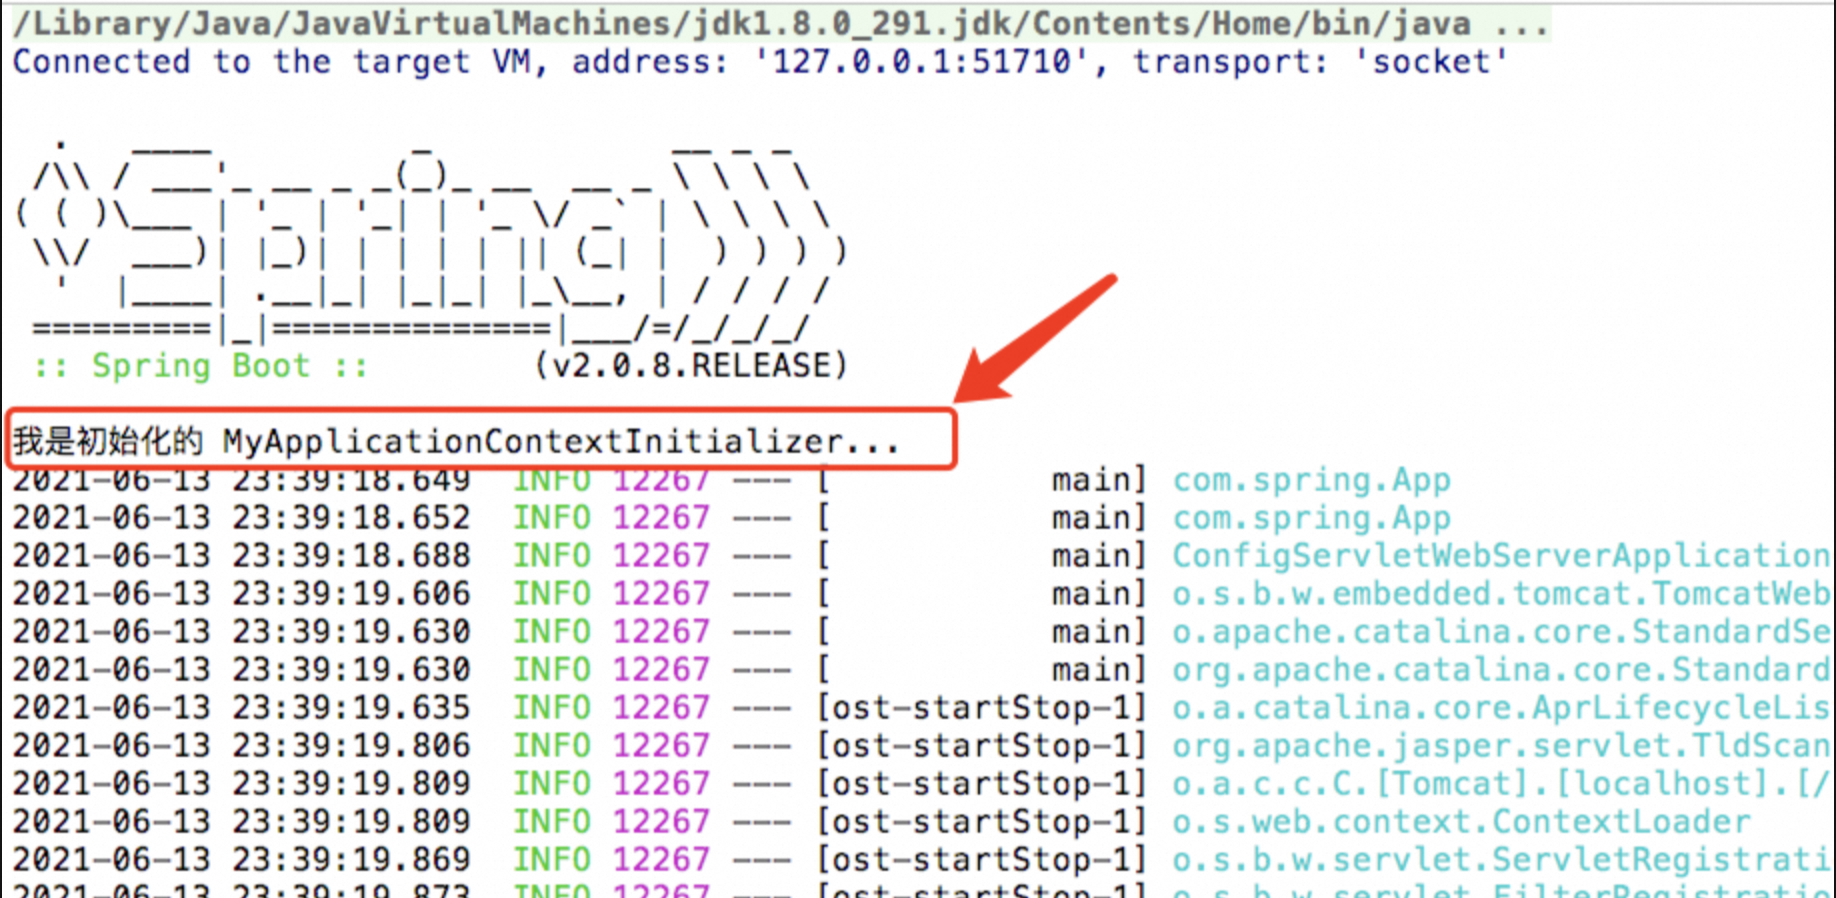
public void initialize(ConfigurableApplicationContext configurableApplicationContext) {
System.out.println("我是初始化的 MyApplicationContextInitializer...");
}
}
在工程的resources目录下添加 META-INF/spring.factories 配置文件。
内容如下,将自定义的初始化器注册进去:
org.springframework.context.ApplicationContextInitializer=\
com.spring.application.MyApplicationContextInitializer
启动服务后,就可以在控制台看到打印的信息,在这里我们可以很直观的看到它的执行顺序,是在打印banner的后面执行的;
4、加载Spring上下文监听器
作用:监听 Spring 应用上下文的 通用事件(如应用启动完成、关闭等)。
回到上面SpringApplication的构造函数里面来,完成初始化器后,进行监听器的加载,同样的使用spi机制。

在spring.factories文件里面找到ApplicationListener类的实现。
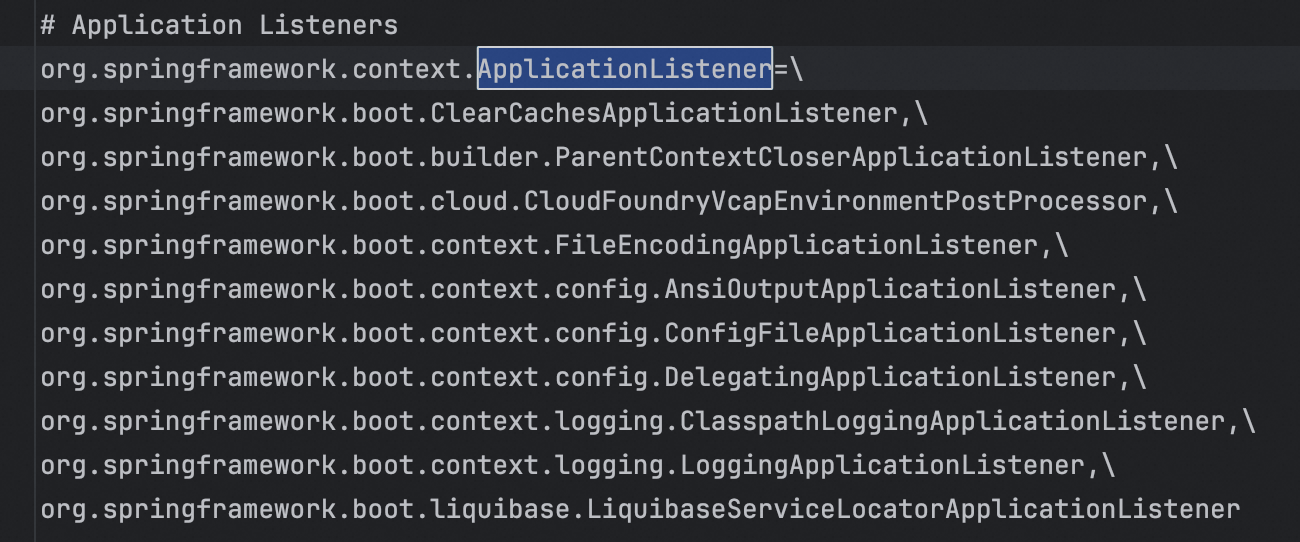
⚠️注意:
在springboot项目里面,可以发现关于SpringFactoriesLoader.LoadFactoryName这个机制的地方较多,因此可以重点掌握下。
举例:
public class MyApplicationListener implements ApplicationListener<ContextRefreshedEvent> {

    @Override
    public void onApplicationEvent(ContextRefreshedEvent event) {
        System.out.println("应用上下文刷新完成");
    }
}
5、设置程序运行的主类
继续回到刚才构造函数里面:
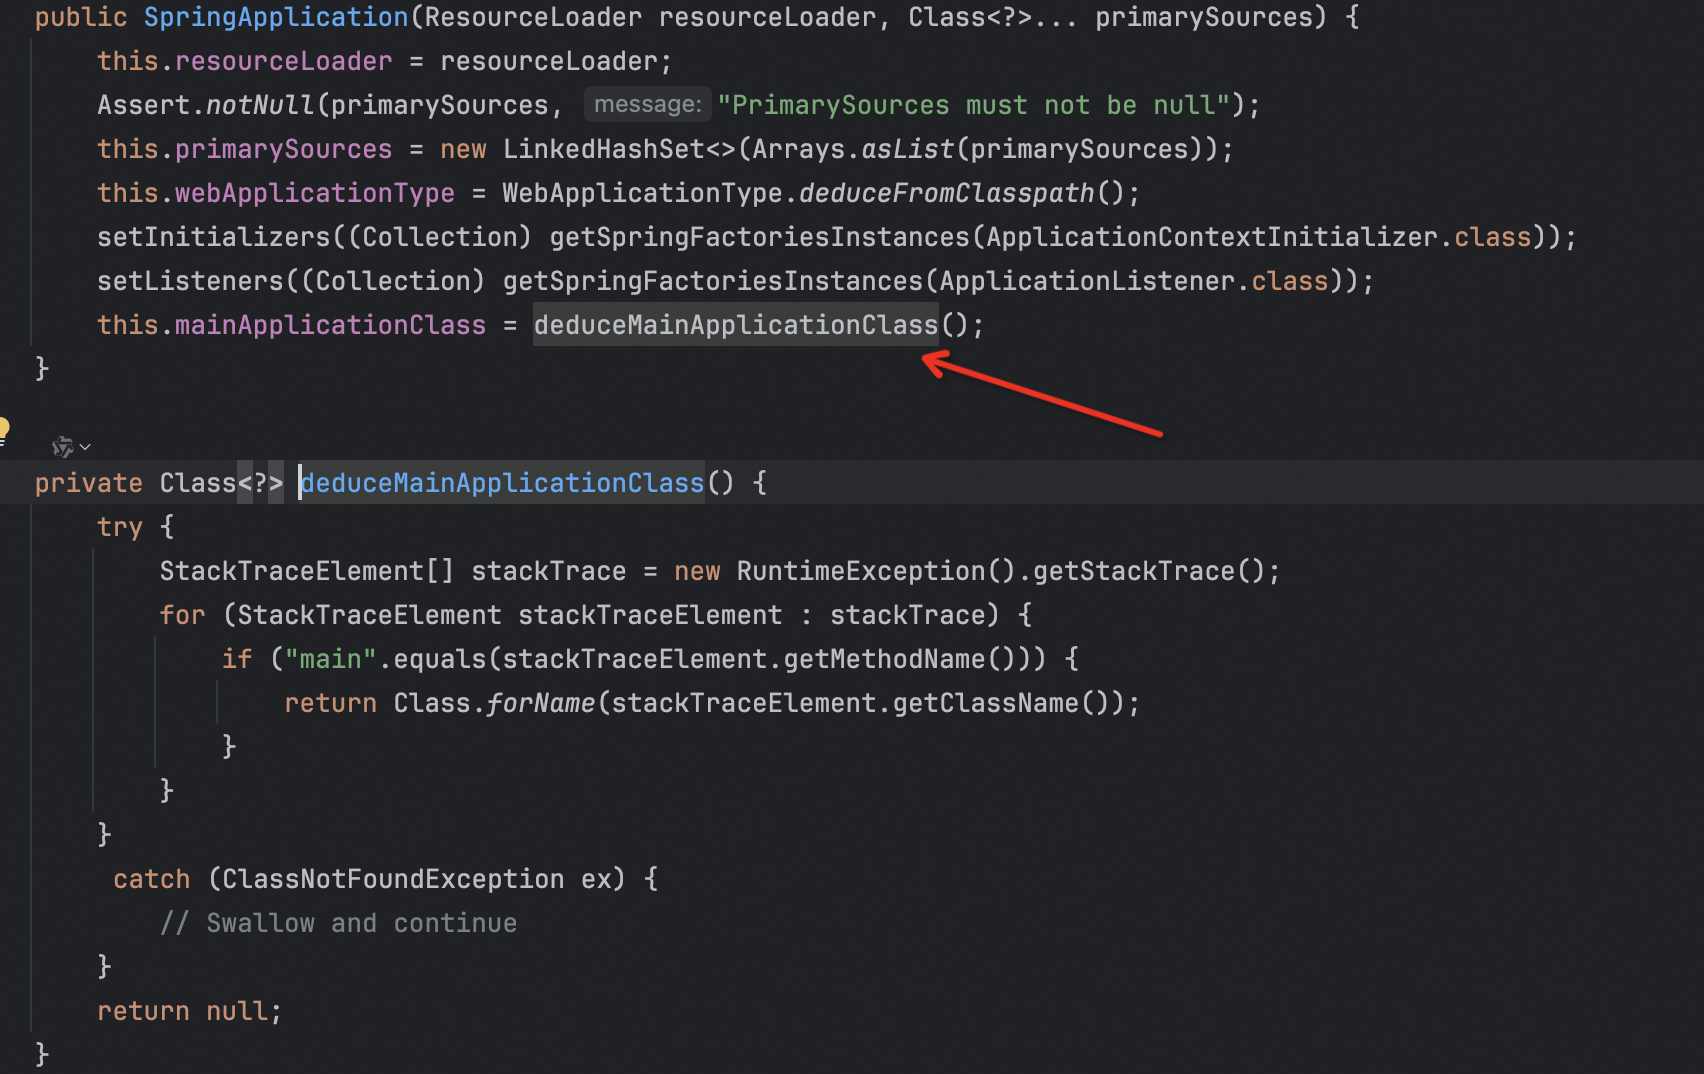
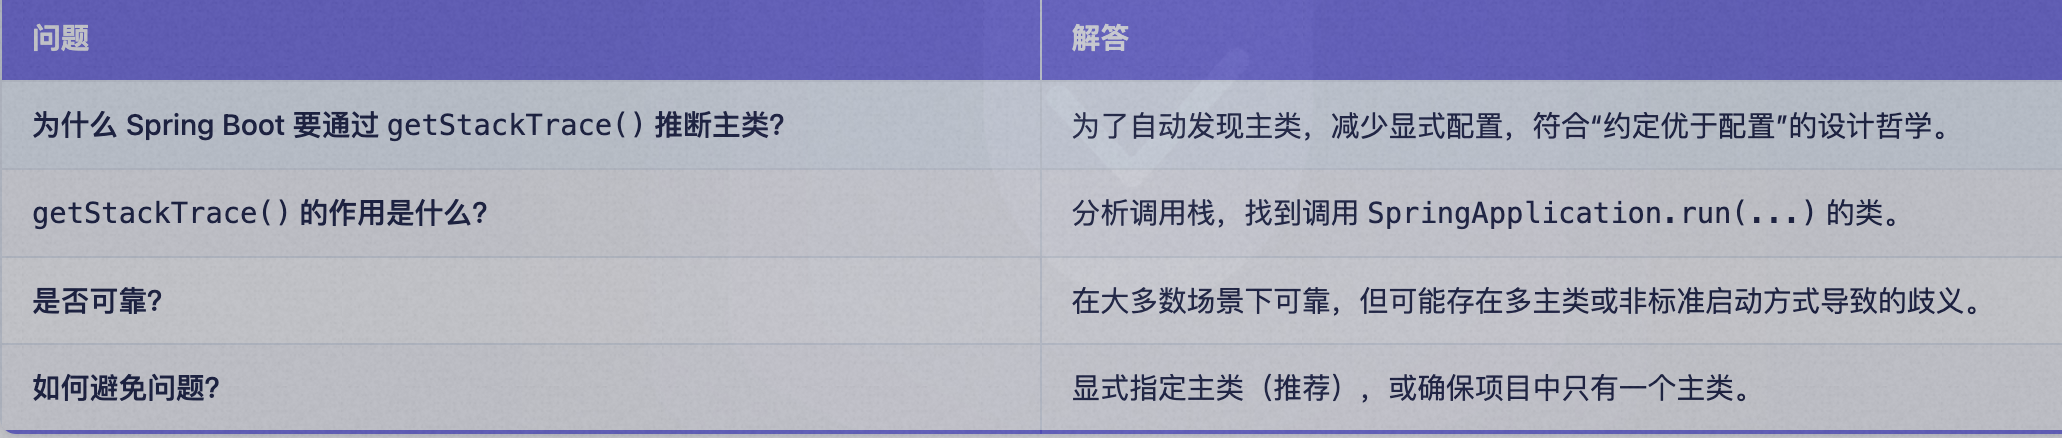
deduceMainApplicationClass(); 这个方法仅仅是找到main方法所在的类,为后面的扫包作准备。在这里可以看到一个getStackTrace()方法。
如下:
  public StackTraceElement[] getStackTrace() {
        return getOurStackTrace().clone();
  }

    private synchronized StackTraceElement[] getOurStackTrace() {
        // Initialize stack trace field with information from
        // backtrace if this is the first call to this method
        if (stackTrace == UNASSIGNED_STACK ||
            (stackTrace == null && backtrace != null) /* Out of protocol state */)                     {
            int depth = getStackTraceDepth();
            stackTrace = new StackTraceElement[depth];
            for (int i=0; i < depth; i++)
                stackTrace[i] = getStackTraceElement(i);
        } else if (stackTrace == null) {
            return UNASSIGNED_STACK;
        }
        return stackTrace;
}- 如果开发者显式调用 SpringApplication.run
(MyApplication.class,args),Spring Boot 可以直接使用传入的 MyApplication.class 作为主类。 - 但如果开发者省略了显式传参(例如在 IDE 中直接运行),Spring Boot 需要自动找到主类。此时,getStackTrace
()成为一种可靠的手段。
下面就是getStackTrace方法的作用:
到达这一步的话,关于new SpringApplication对象就完成了。

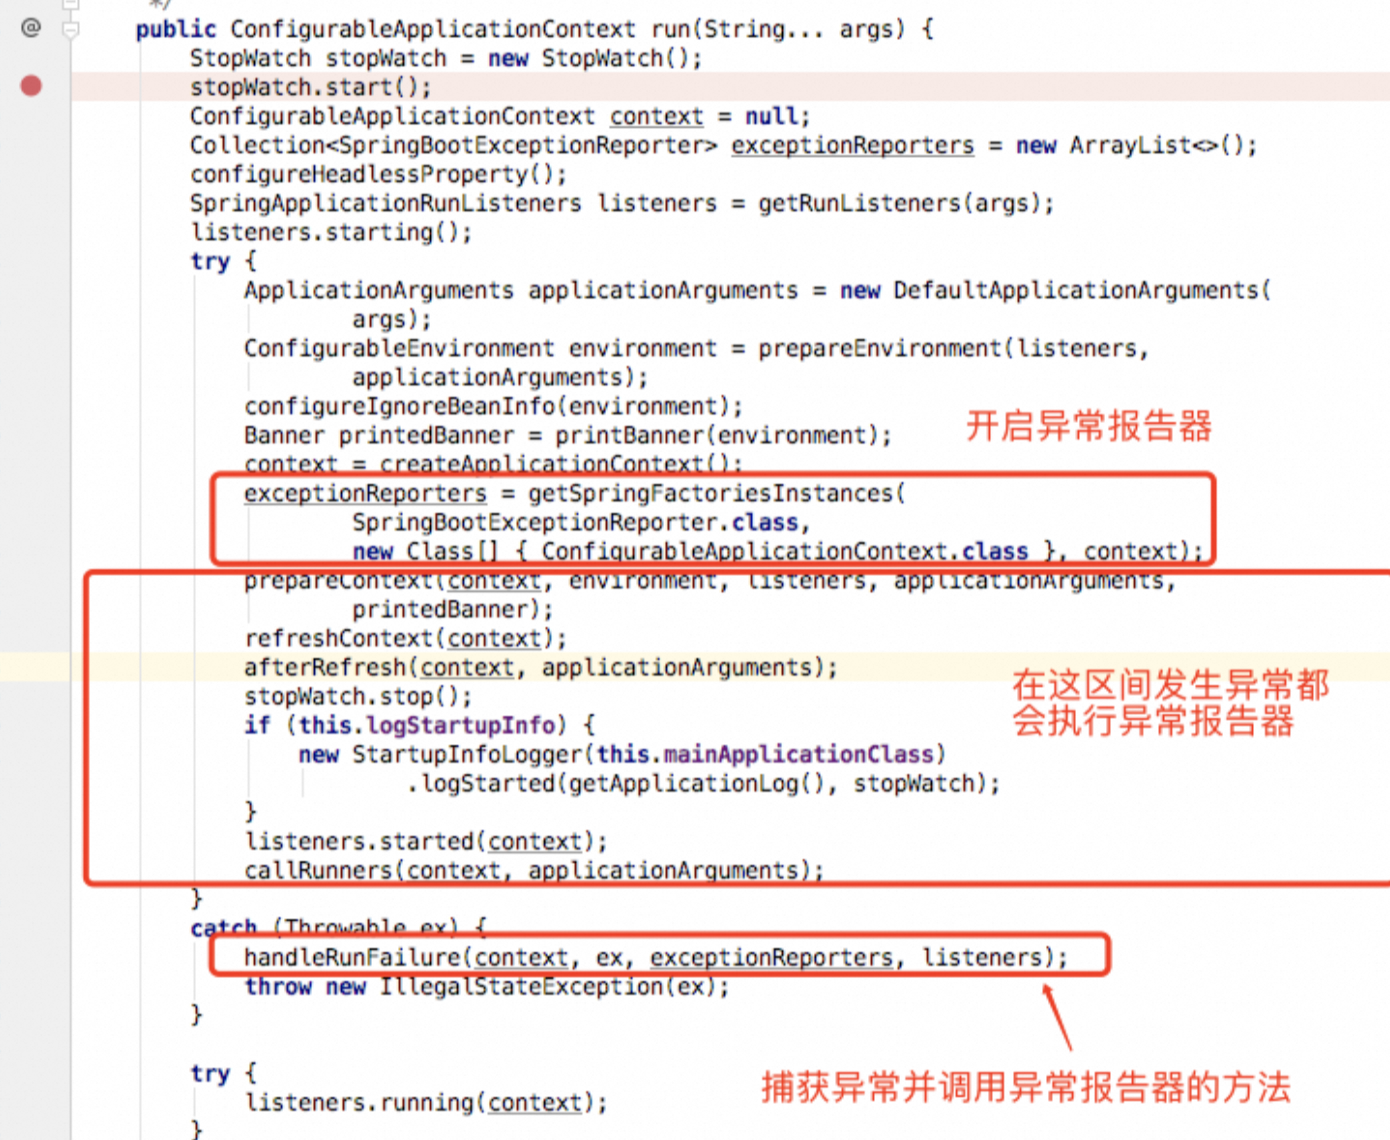
3、进入run方法
接下来就是调用run方法。
1、开启计时器
计算Springboot启动需要花费多长时间。
2、Headless模式配置
当开启计时器后,下一步会看到 configureHeadlessProperty()方法,通过进一步查看:
private boolean headless = true;

private static final String SYSTEM_PROPERTY_JAVA_AWT_HEADLESS = "java.awt.headless";


private void configureHeadlessProperty() {
		System.setProperty(SYSTEM_PROPERTY_JAVA_AWT_HEADLESS,
				System.getProperty(SYSTEM_PROPERTY_JAVA_AWT_HEADLESS, Boolean.toString(this.headless)));
}
是一个用于 配置图形环境(Headless 模式) 的方法。它的核心作用是确保 Java 应用程序在 无图形界面(Headless)环境(如服务器、命令行工具等)中运行时,能够正确处理与图形界面相关的操作(如 Swing、AWT 等),避免因缺少图形环境导致的异常。
具体细节如下所示:

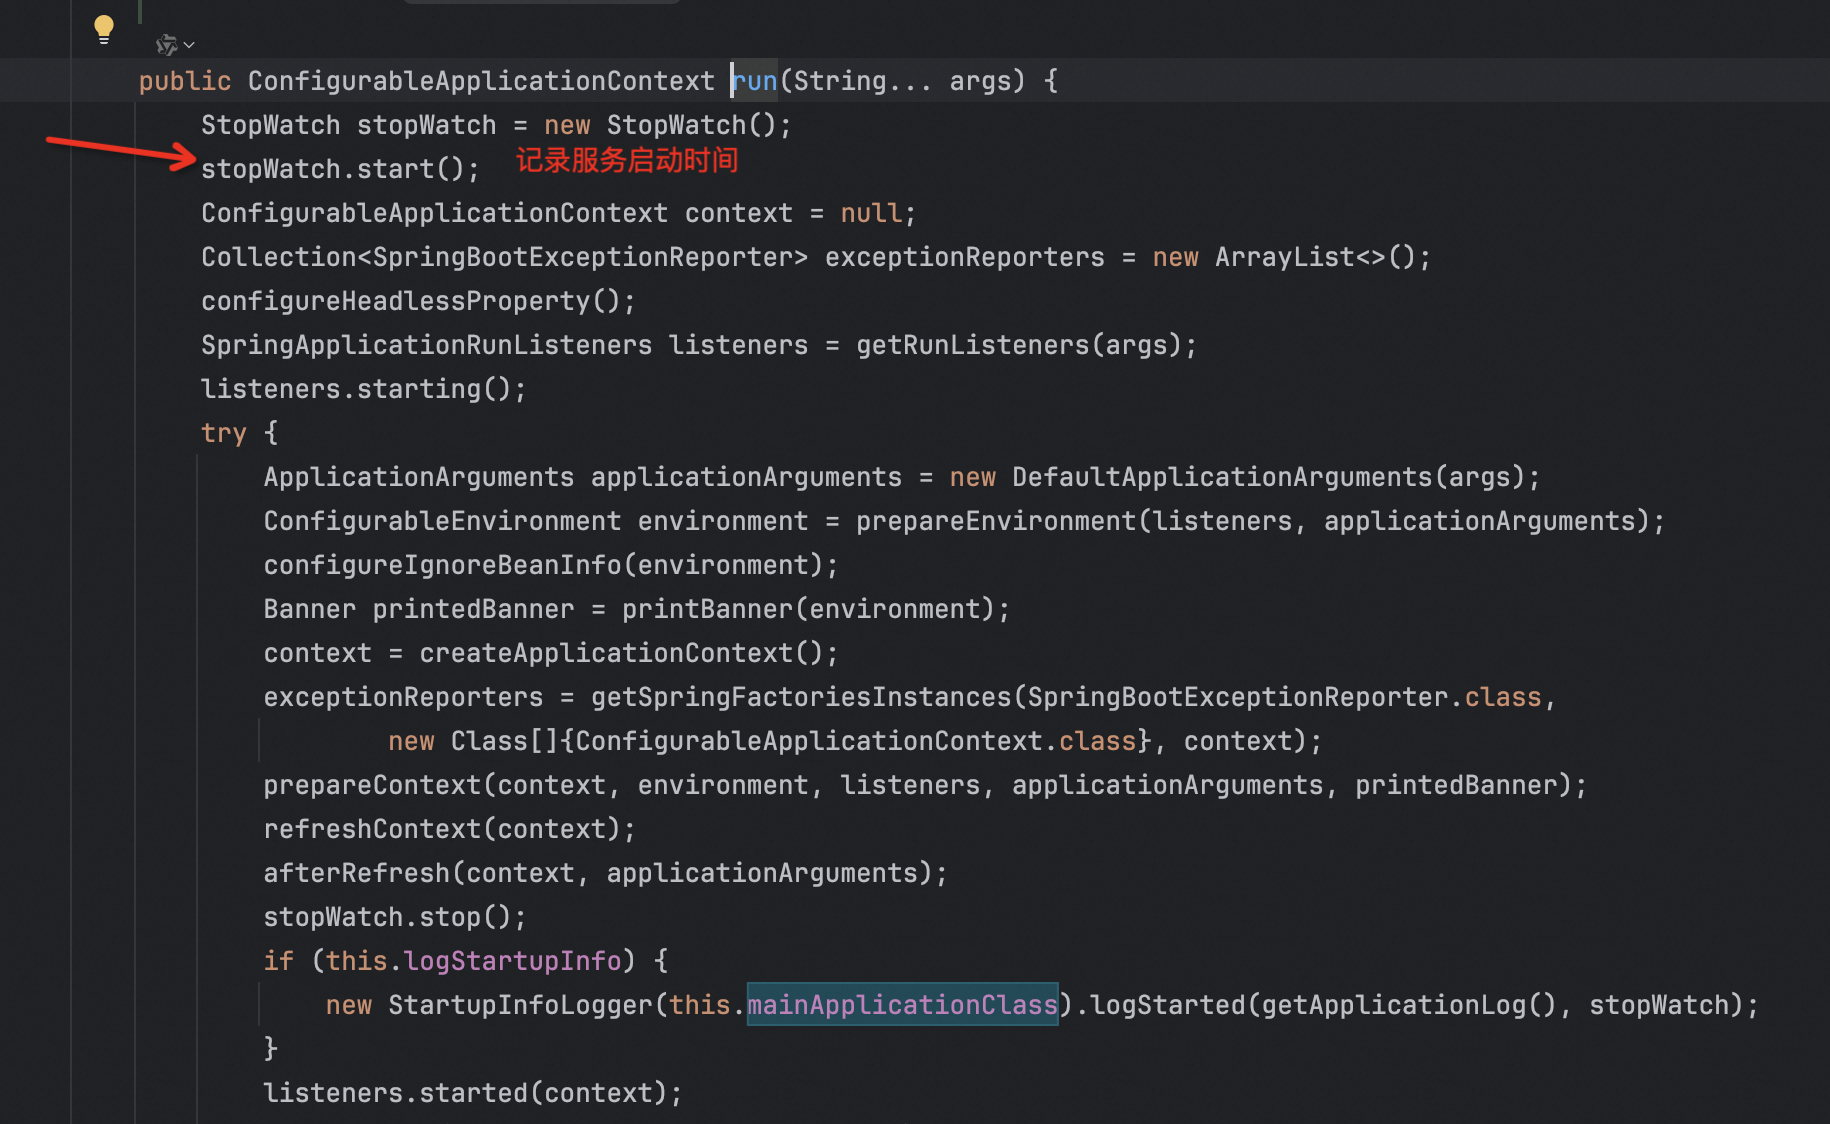
3、获取并启用监听器
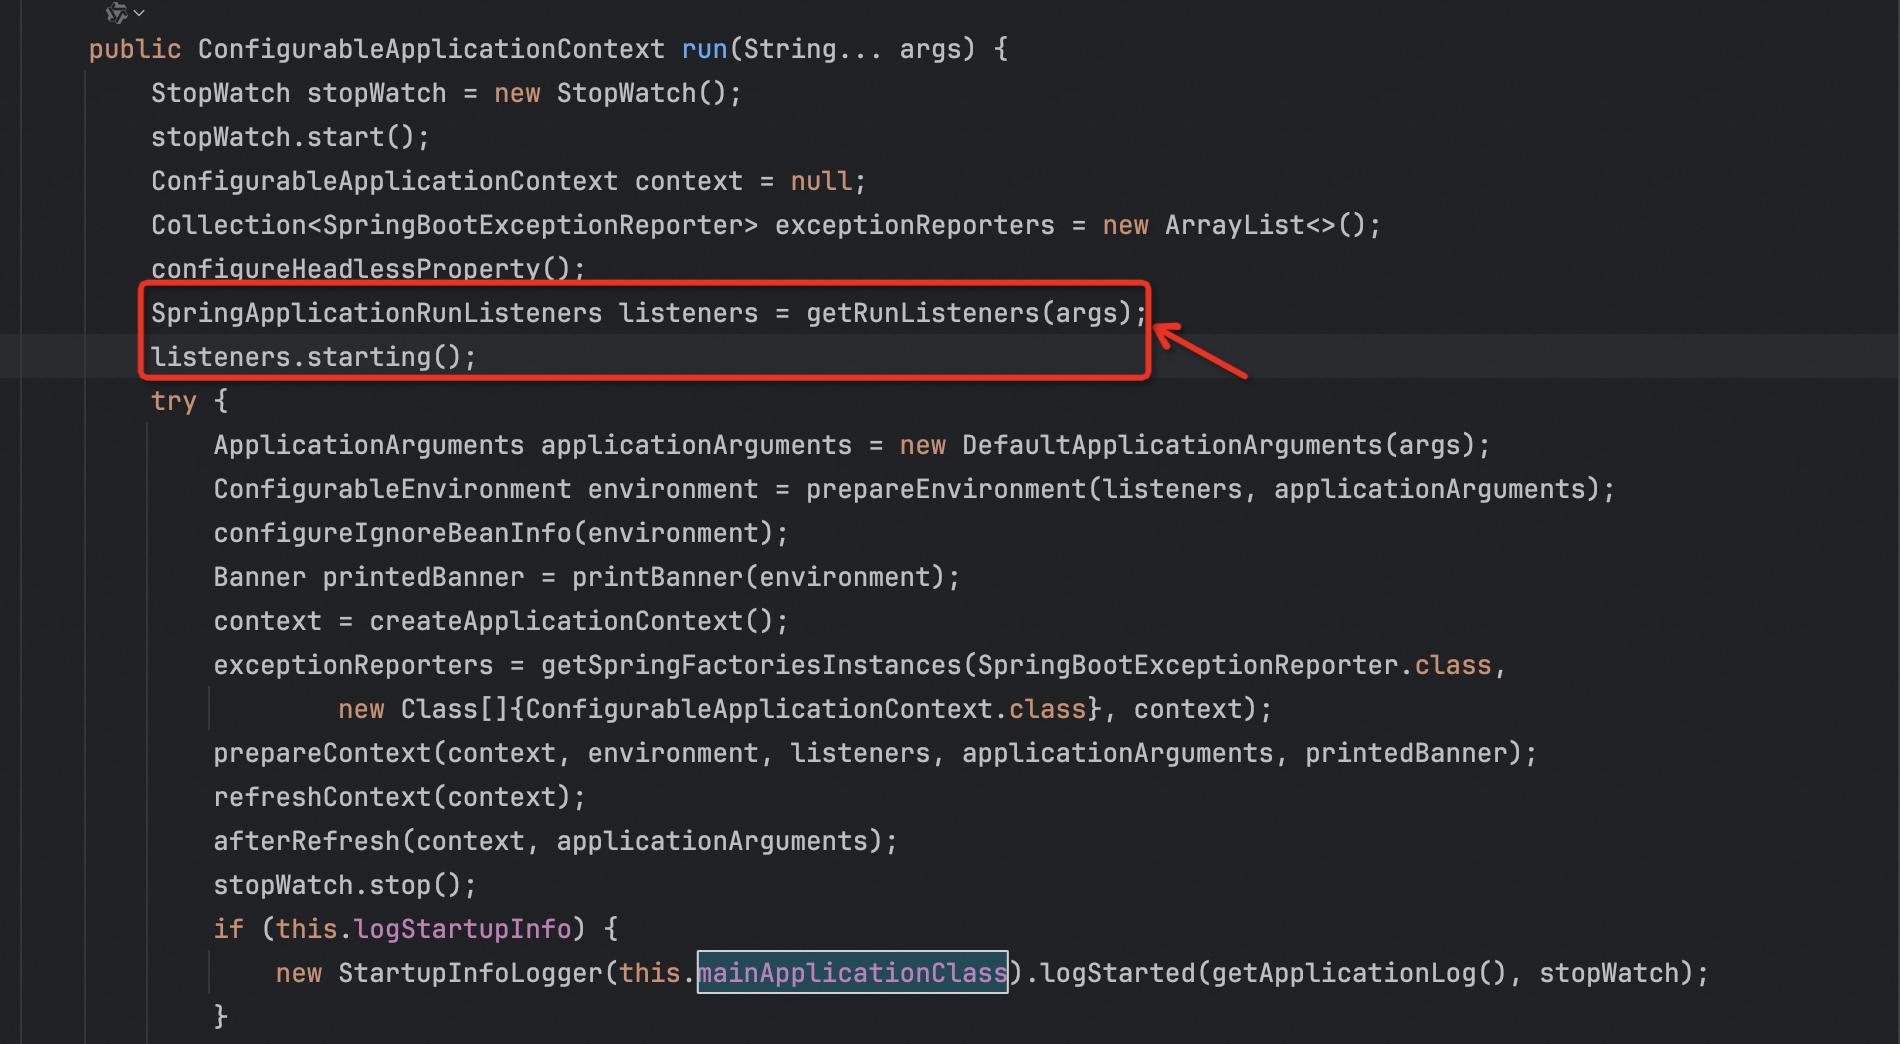
定义:用于监听 Spring Boot 应用的启动过程中的关键事件,启动阶段专用监听器集合。
作用:需要在 Spring Boot 启动的 特定阶段 插入逻辑(如初始化日志、记录启动耗时等)。
如下图所示:
这一步 通过监听器来实现初始化的的基本操作。
这一步做了2件事情
1、创建所有 SpringBoot 运行监听器并发布应用启动事件

# Run Listeners
org.springframework.boot.SpringApplicationRunListener=\
org.springframework.boot.context.event.EventPublishingRunListener
2、启用监听器
这一步的监听器和之前的new SpringApplication对象的时候setListeners((Collection) getSpringFactoriesInstances(ApplicationListener.class)); 有什么区别?
如下图所示:
举例:
public class MySpringApplicationRunListener implements SpringApplicationRunListener {

    public MySpringApplicationRunListener(SpringApplication application, String[] args) {
        // 构造函数
    }

    @Override
    public void starting() {
        System.out.println("Spring Boot 启动开始");
    }

    @Override
    public void environmentPrepared(ConfigurableEnvironment environment) {
        System.out.println("环境对象准备完成");
    }

    // 其他方法...
}
4、准备环境
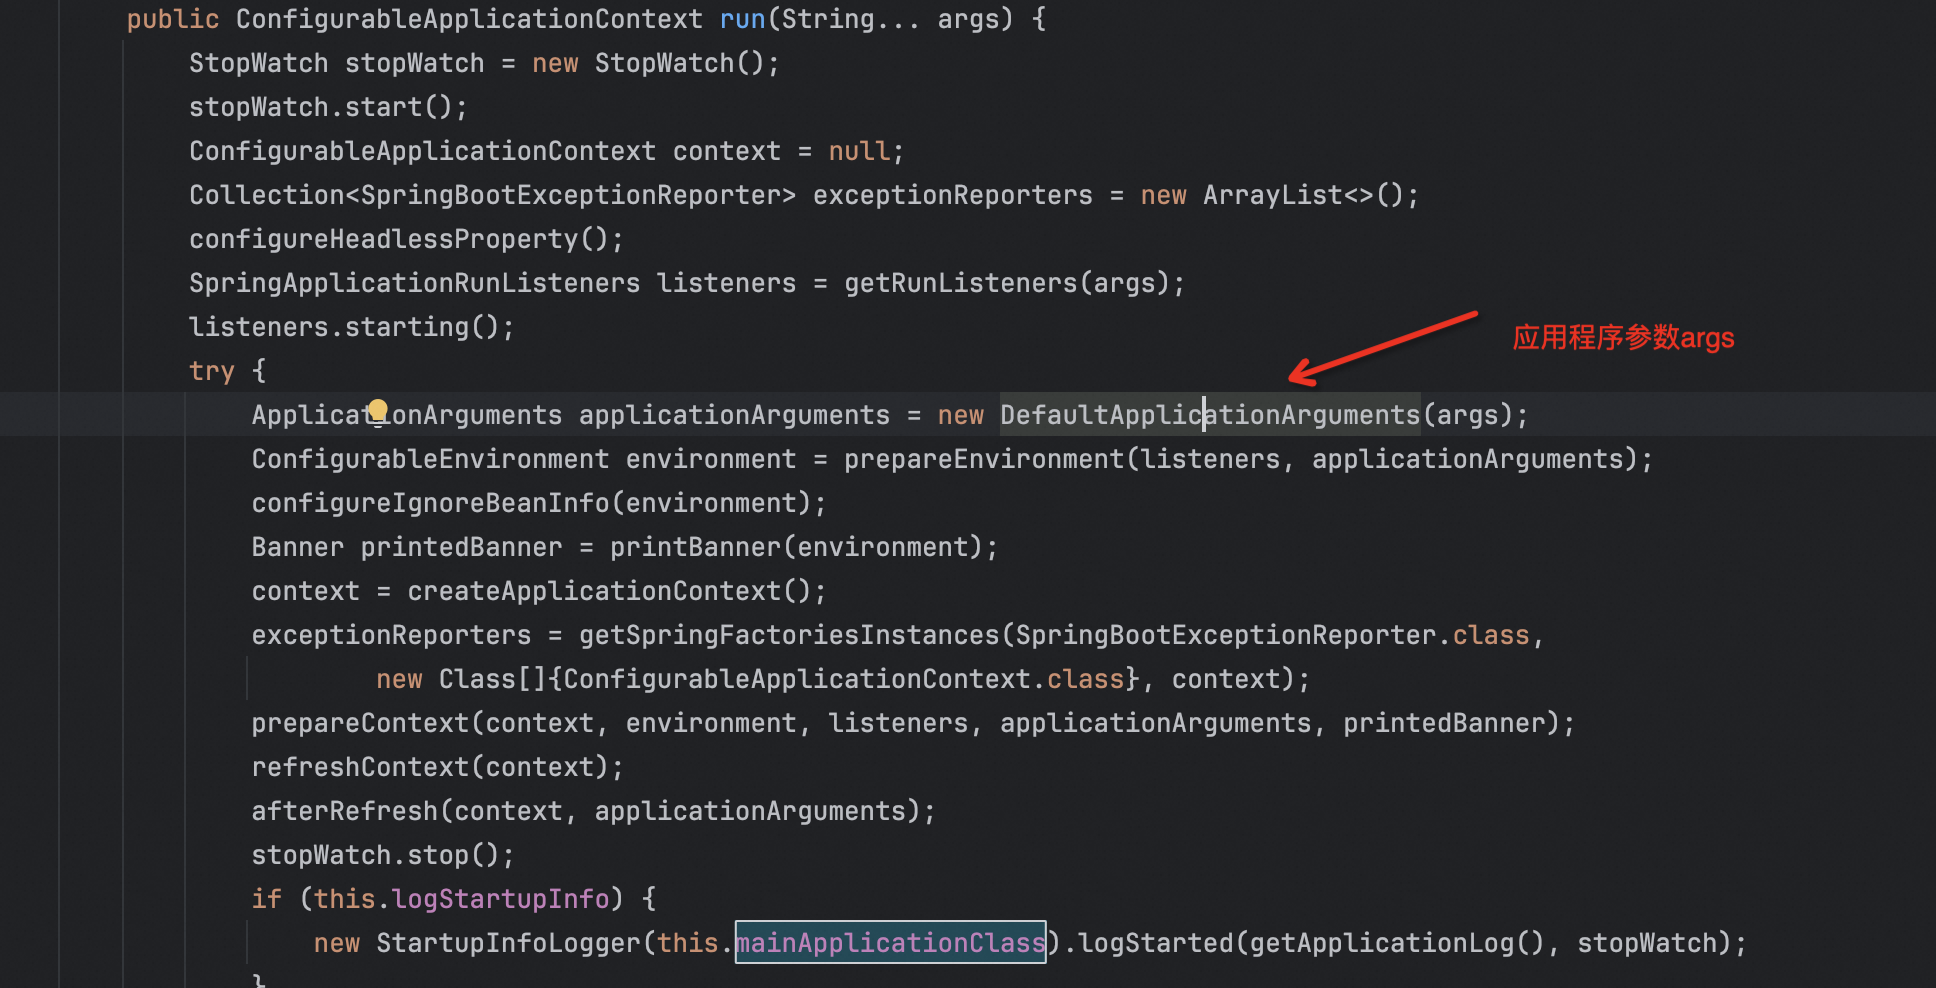
1、设置应用程序参数
将执行run方法时传入的参数封装成一个对象。
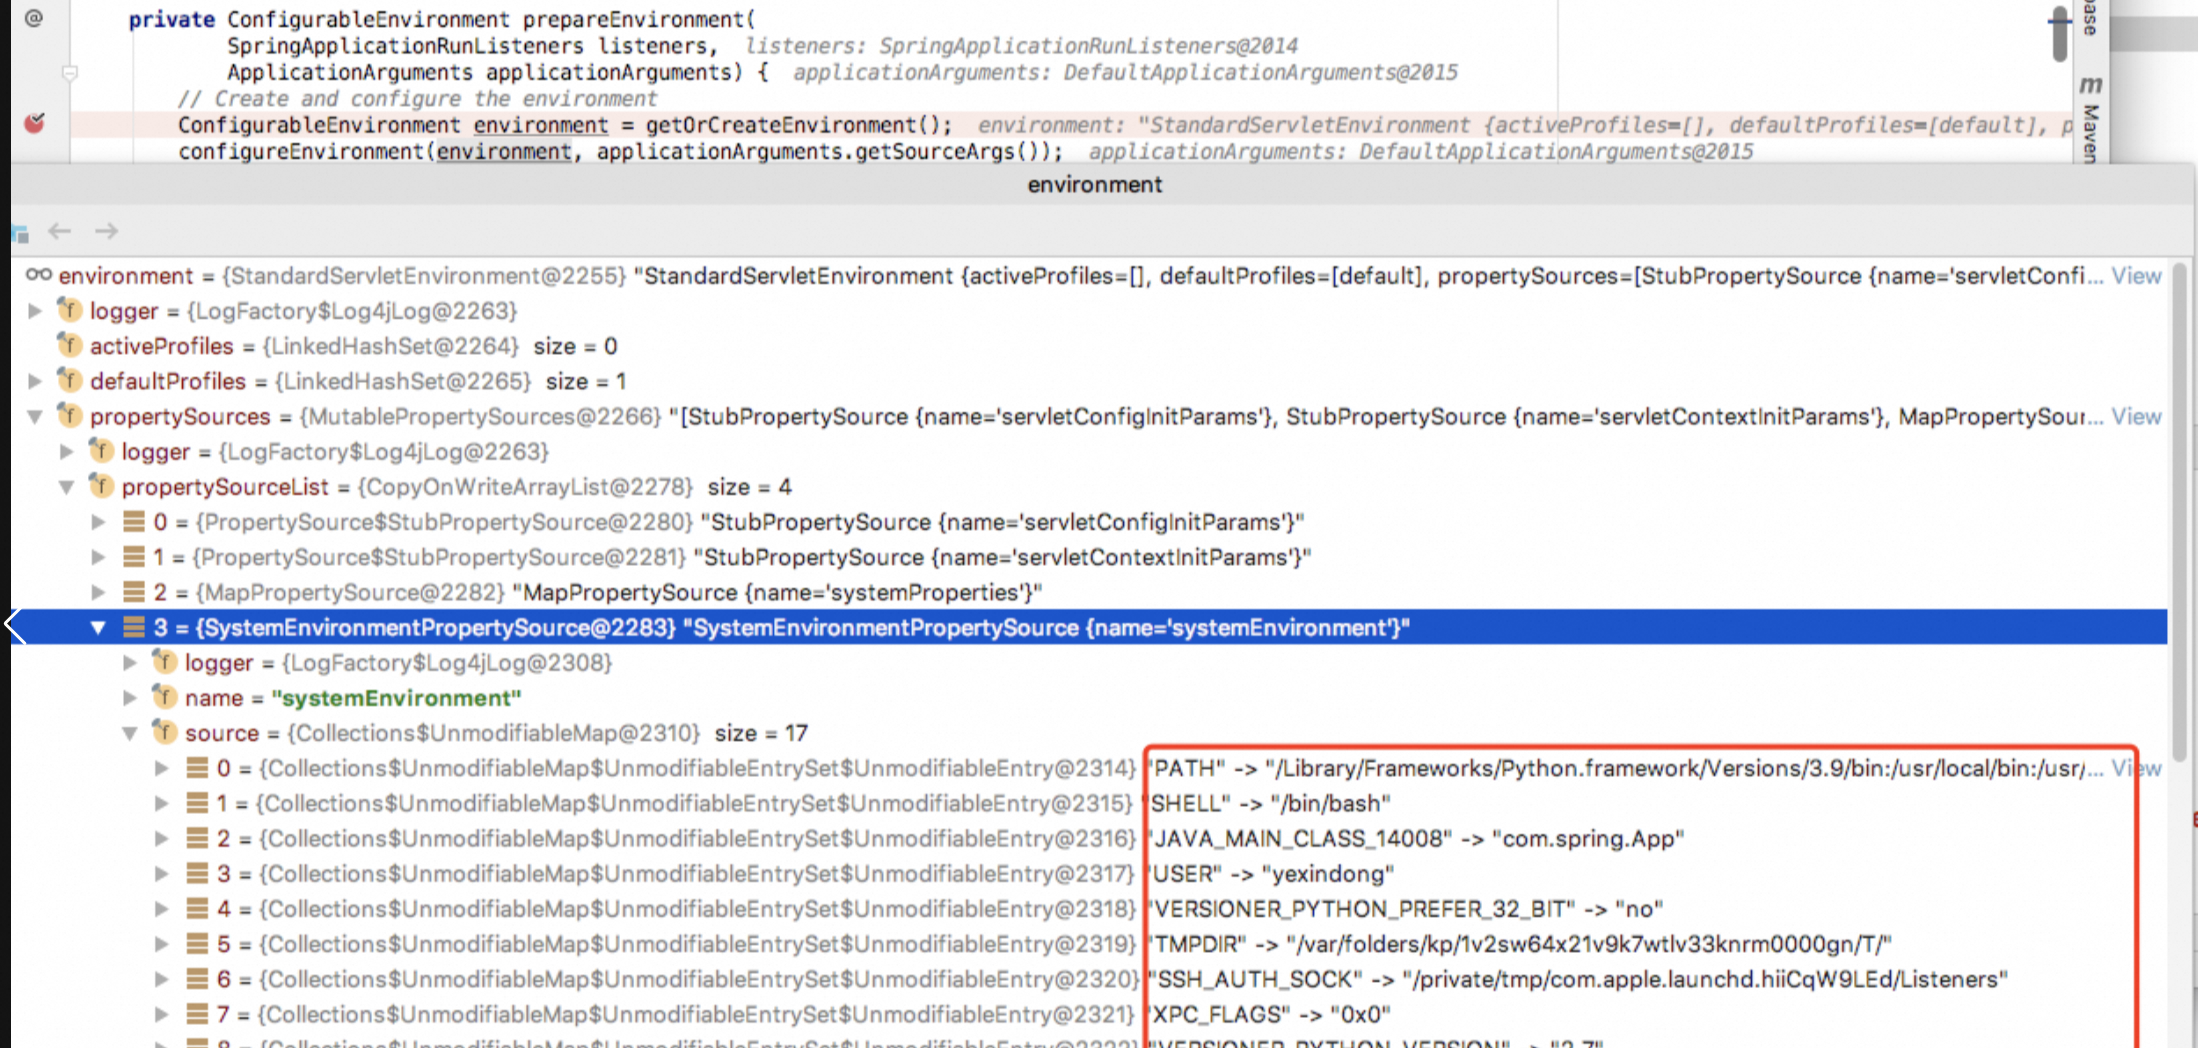
2、准备环境变量
包含系统属性和用户配置的属性,执行的代码块在 prepareEnvironment 方法内。
并且将Springboot的监听器和applicationArgs对象传入。
private ConfigurableEnvironment prepareEnvironment(SpringApplicationRunListeners listeners,
			ApplicationArguments applicationArguments) {
		// Create and configure the environment
		ConfigurableEnvironment environment = getOrCreateEnvironment();
		configureEnvironment(environment, applicationArguments.getSourceArgs());
		ConfigurationPropertySources.attach(environment);
		listeners.environmentPrepared(environment);
		bindToSpringApplication(environment);
		if (!this.isCustomEnvironment) {
			environment = new EnvironmentConverter(getClassLoader()).convertEnvironmentIfNecessary(environment,
					deduceEnvironmentClass());
		}
		ConfigurationPropertySources.attach(environment);
		return environment;
	}
打了断点之后可以看到,它将maven和系统的环境变量都加载进来了。
3、忽略bean信息
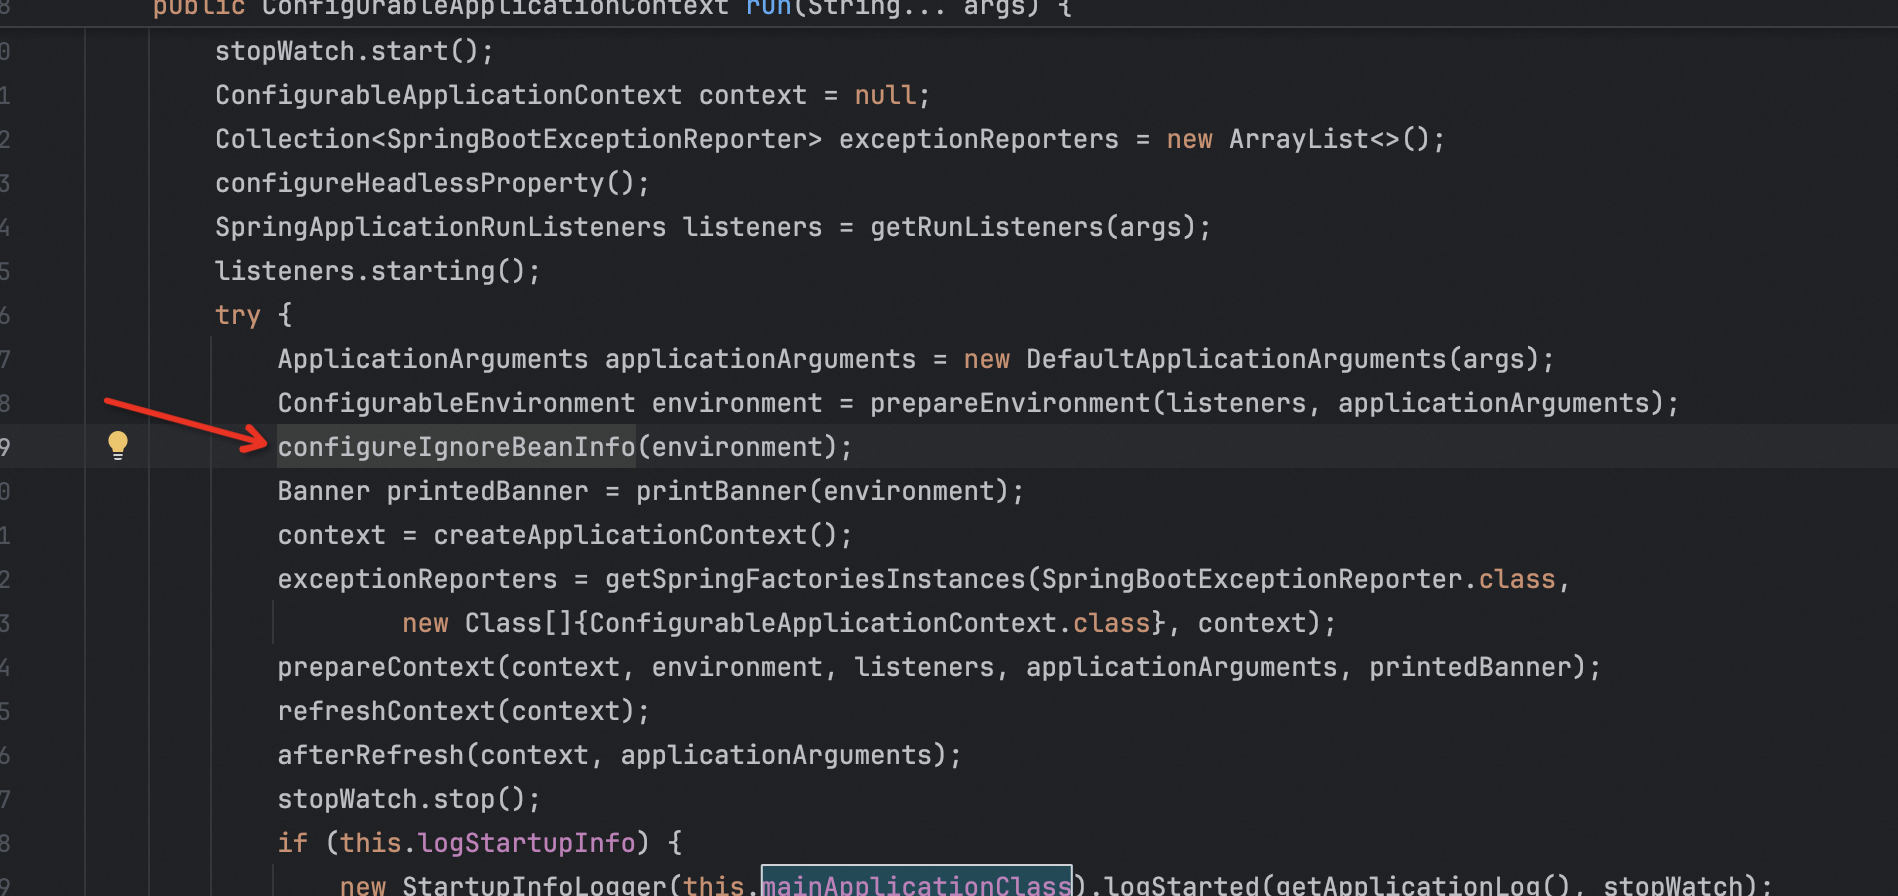
//忽略bean信息
private void configureIgnoreBeanInfo(ConfigurableEnvironment environment) {
		if (System.getProperty(CachedIntrospectionResults.IGNORE_BEANINFO_PROPERTY_NAME) == null) {
			Boolean ignore = environment.getProperty("spring.beaninfo.ignore", Boolean.class, Boolean.TRUE);
			System.setProperty(CachedIntrospectionResults.IGNORE_BEANINFO_PROPERTY_NAME, ignore.toString());
		}
	}
这个方法configureIgnoreBeanInfo() 是将 spring.beaninfo.ignore 的默认值值设为true,意思是跳过beanInfo的搜索,其设置默认值的原理和headless模式一样;
也可以在配置文件中添加以下配置来设为false
spring.beaninfo.ignore=false
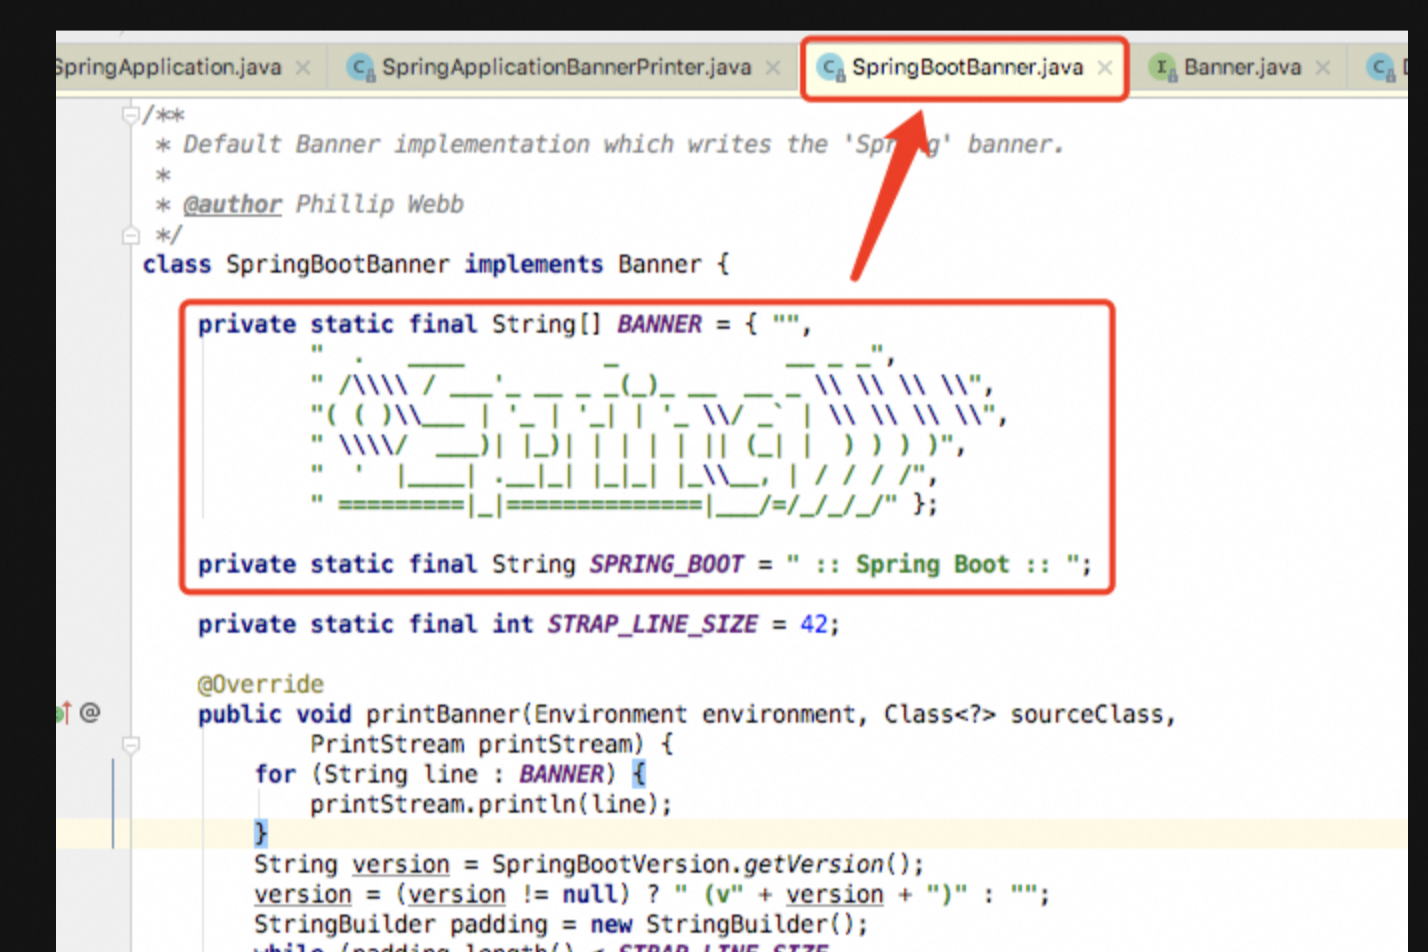
4、打印 banner 信息
继续跟随代码往下看:
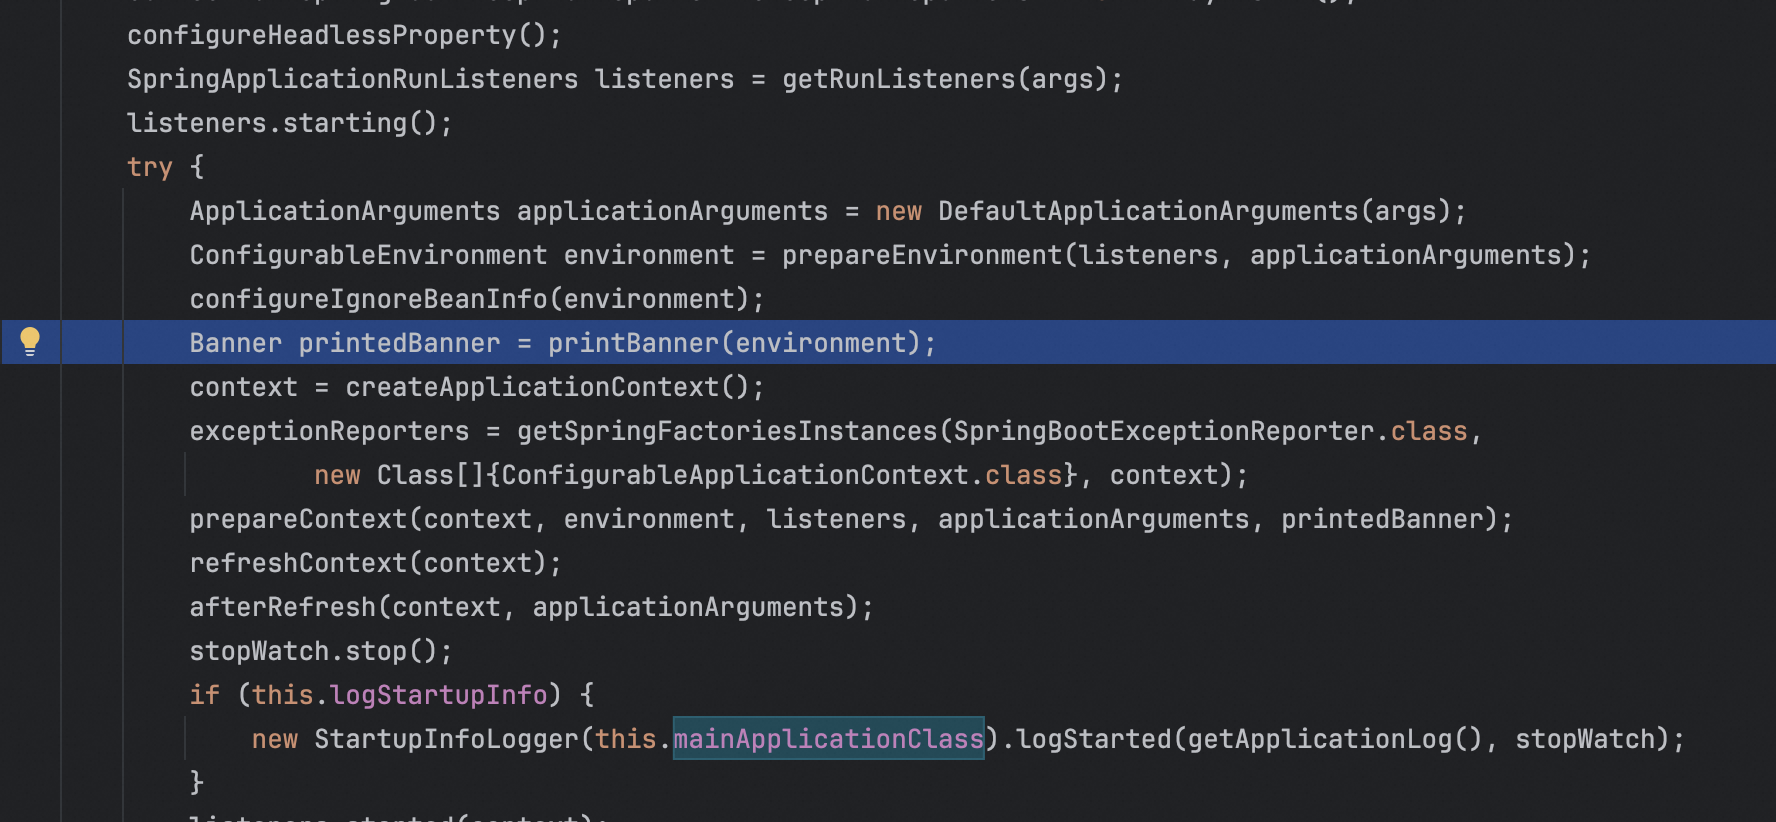
显而易见,这个流程就是用来打印控制台那个很大的spring的banner的.

在 SpringBootBanner.java 里面打印的,这个类实现了Banner 接口,
而且banner信息是直接在代码里面固定的;
1、自定义banner
需要在resources目录下添加一个 banner.txt 的文件即可,txt文件内容如下:
                 _           _
                (_)         | |
 _   _  _____  ___ _ __   __| | ___  _ __   __ _
| | | |/ _ \ \/ / | '_ \ / _` |/ _ \| '_ \ / _` |
| |_| |  __/>  <| | | | | (_| | (_) | | | | (_| |
 \__, |\___/_/\_\_|_| |_|\__,_|\___/|_| |_|\__, |
  __/ |                                     __/ |
 |___/                                     |___/
:: spring::
只需要加一个文件即可,其他什么都不用做,然后直接启动springboot,就可以看到效果了。
5、创建上下文
1、应用程序类型的上下文
继续追随代码:
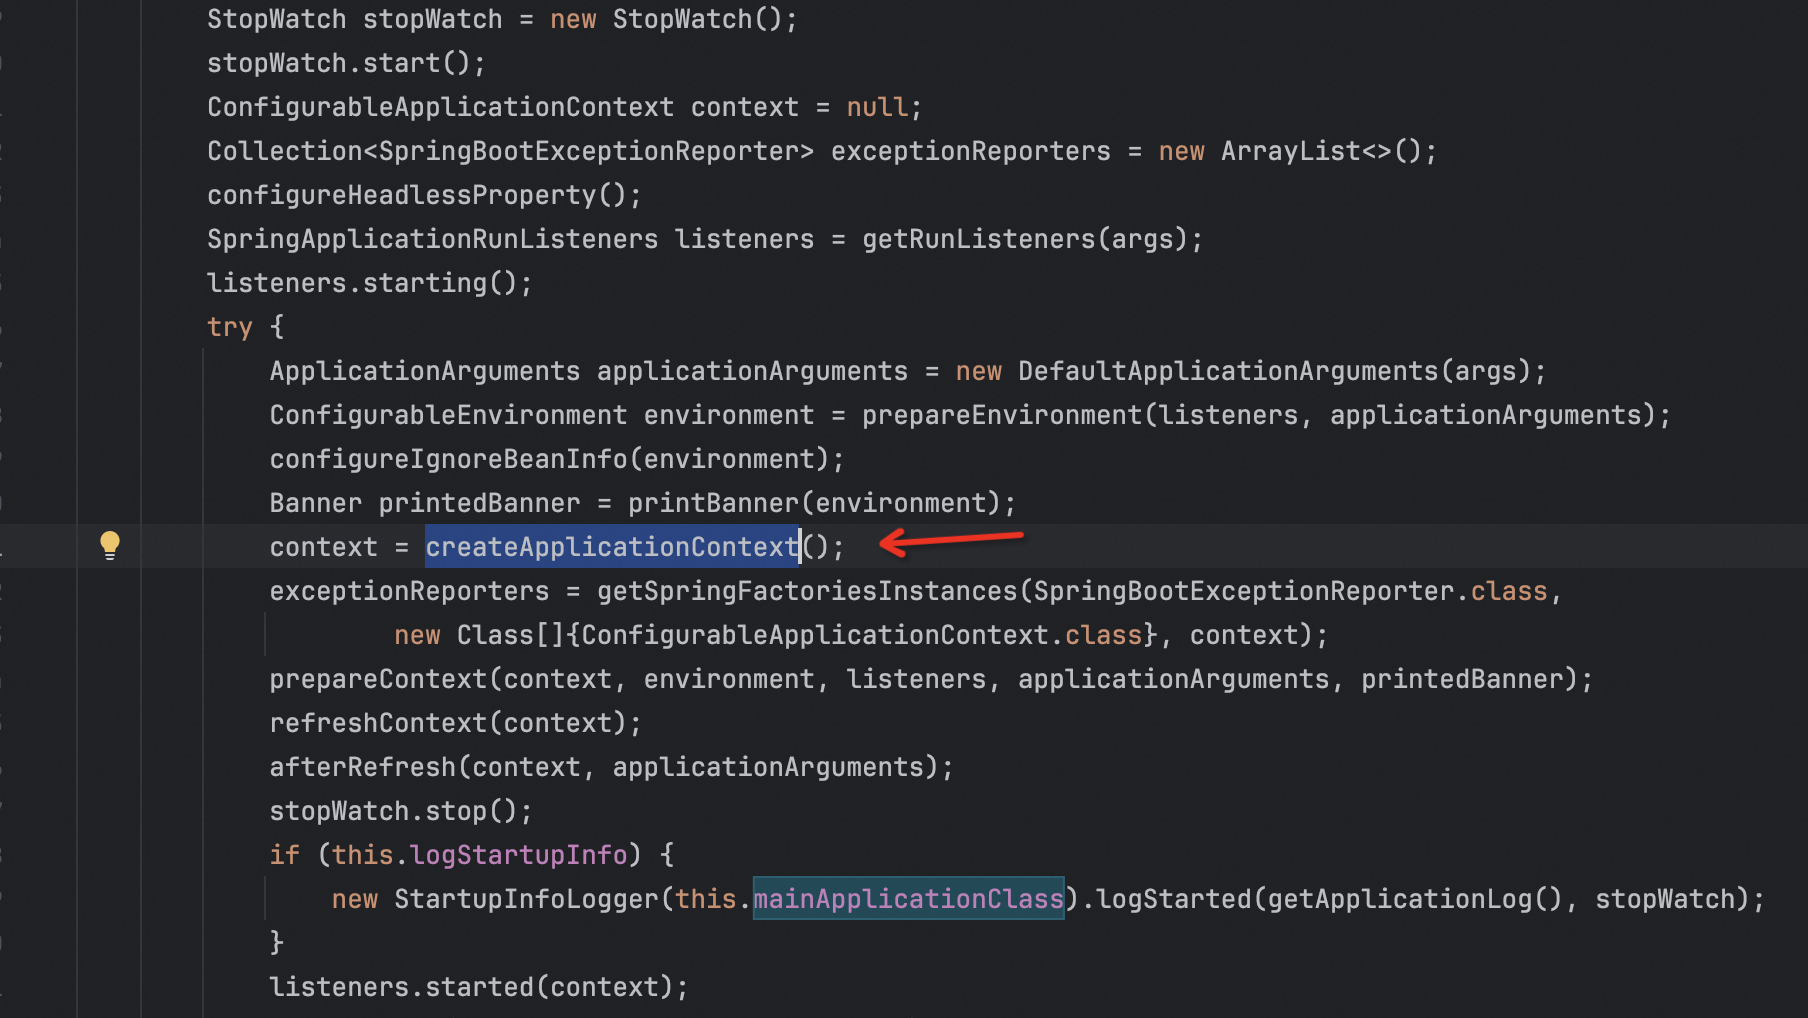
可以看到createApplicationContext的实现:
protected ConfigurableApplicationContext createApplicationContext() {
		Class<?> contextClass = this.applicationContextClass;
		if (contextClass == null) {
			try {
				switch (this.webApplicationType) {
				case SERVLET:
					contextClass = Class.forName(DEFAULT_SERVLET_WEB_CONTEXT_CLASS);
					break;
				case REACTIVE:
					contextClass = Class.forName(DEFAULT_REACTIVE_WEB_CONTEXT_CLASS);
					break;
				default:
					contextClass = Class.forName(DEFAULT_CONTEXT_CLASS);
				}
			}
			catch (ClassNotFoundException ex) {
				throw new IllegalStateException(
						"Unable create a default ApplicationContext, please specify an ApplicationContextClass", ex);
			}
		}
		return (ConfigurableApplicationContext) BeanUtils.instantiateClass(contextClass);
	}
2、实例化异常报告器
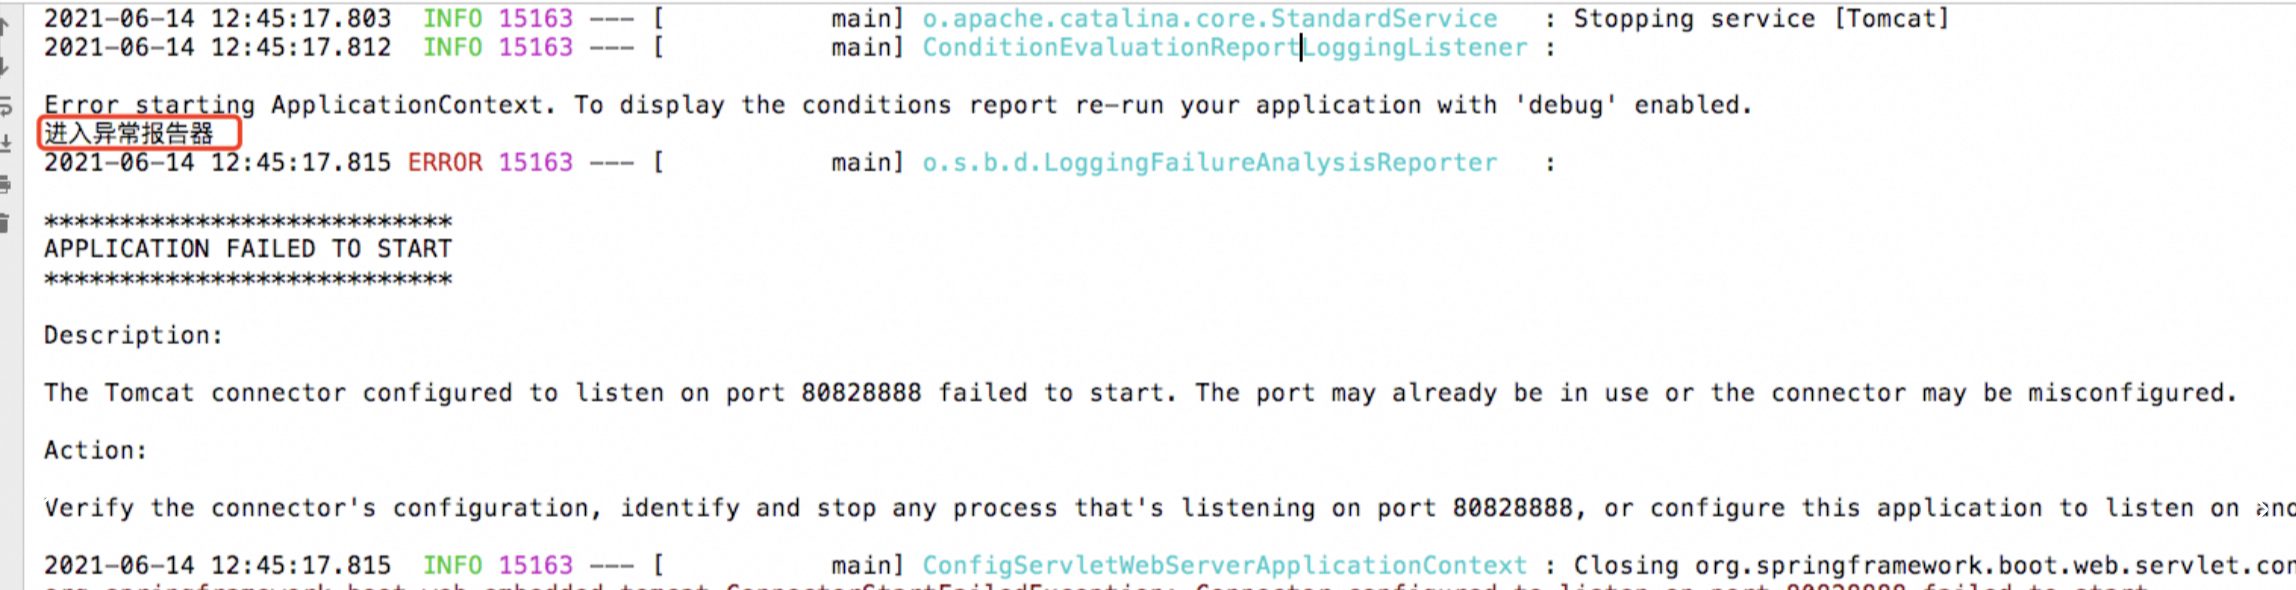
异常报告器是用来捕捉全局异常使用的,SpringBootExceptionReporter.class。
当springboot应用程序在发生异常时,异常报告器会将其捕捉并做相应处理,在spring.factories 文件里配置了默认的异常报告器。
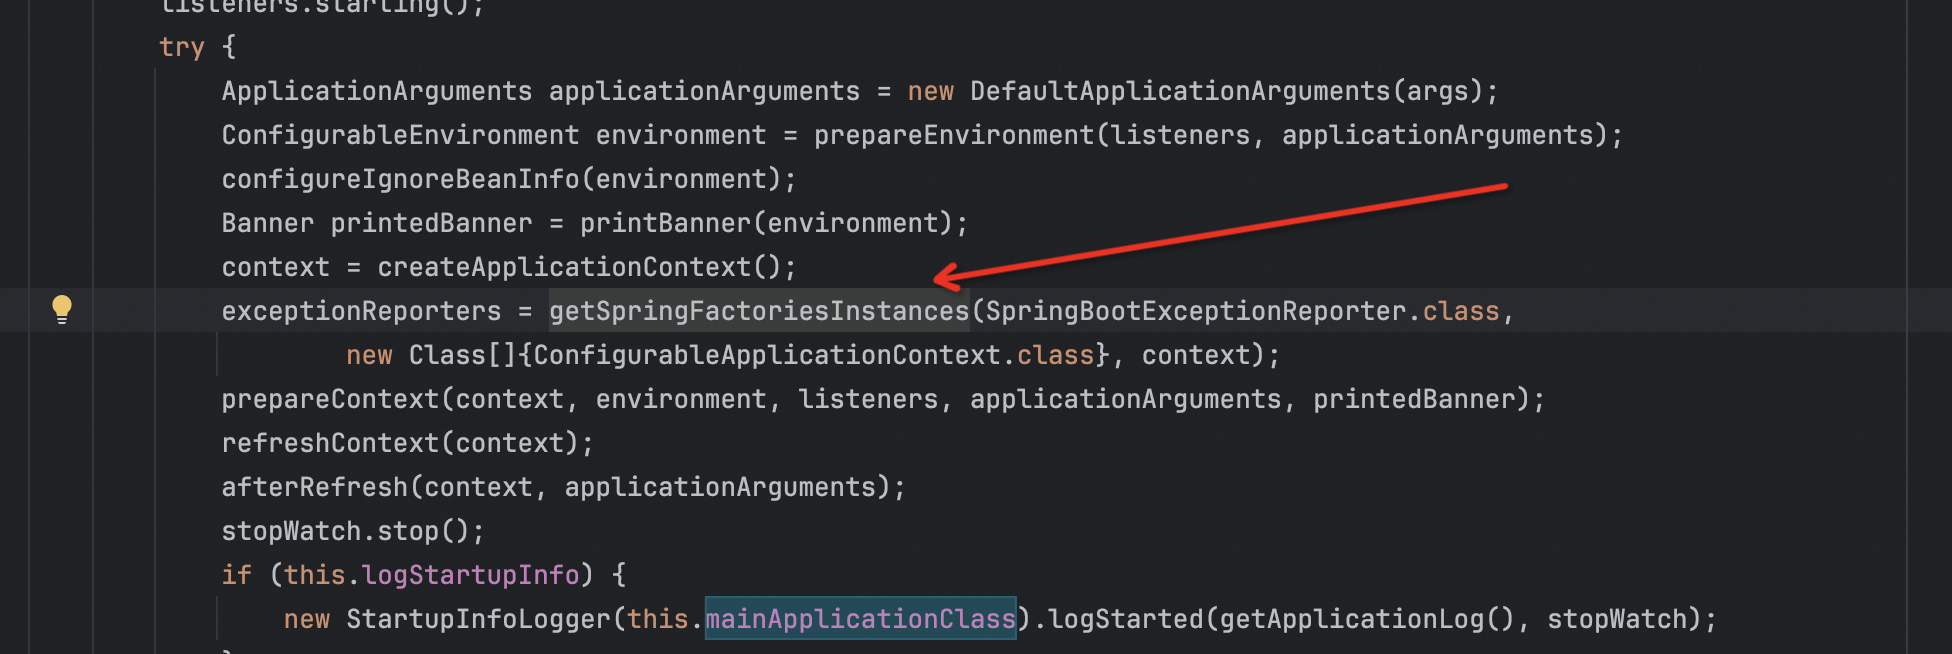
这个异常报告器只会捕获启动过程抛出的异常,如果是在启动完成后,在用户请求时报错,异常报告器不会捕获请求中出现的异常。
1、自定义异常报告器
MyExceptionReporter.java 继承 SpringBootExceptionReporter 接口
package com.spring.application;

import org.springframework.boot.SpringBootExceptionReporter;
import org.springframework.context.ConfigurableApplicationContext;

public class MyExceptionReporter implements SpringBootExceptionReporter {


    private ConfigurableApplicationContext context;
    // 必须要有一个有参的构造函数,否则启动会报错
    MyExceptionReporter(ConfigurableApplicationContext context) {
        this.context = context;
    }

    @Override
    public boolean reportException(Throwable failure) {
        System.out.println("进入异常报告器");
        failure.printStackTrace();
        // 返回false会打印详细springboot错误信息,返回true则只打印异常信息
        return false;
    }
}
在 spring.factories 文件中注册异常报告器
# Error Reporters 异常报告器
org.springframework.boot.SpringBootExceptionReporter=\
com.spring.application.MyExceptionReporter
接着我们在application.yml 中 把端口号设置为一个很大的值,这样肯定会报错,
server:
  port: 80828888
6、准备上下文环境
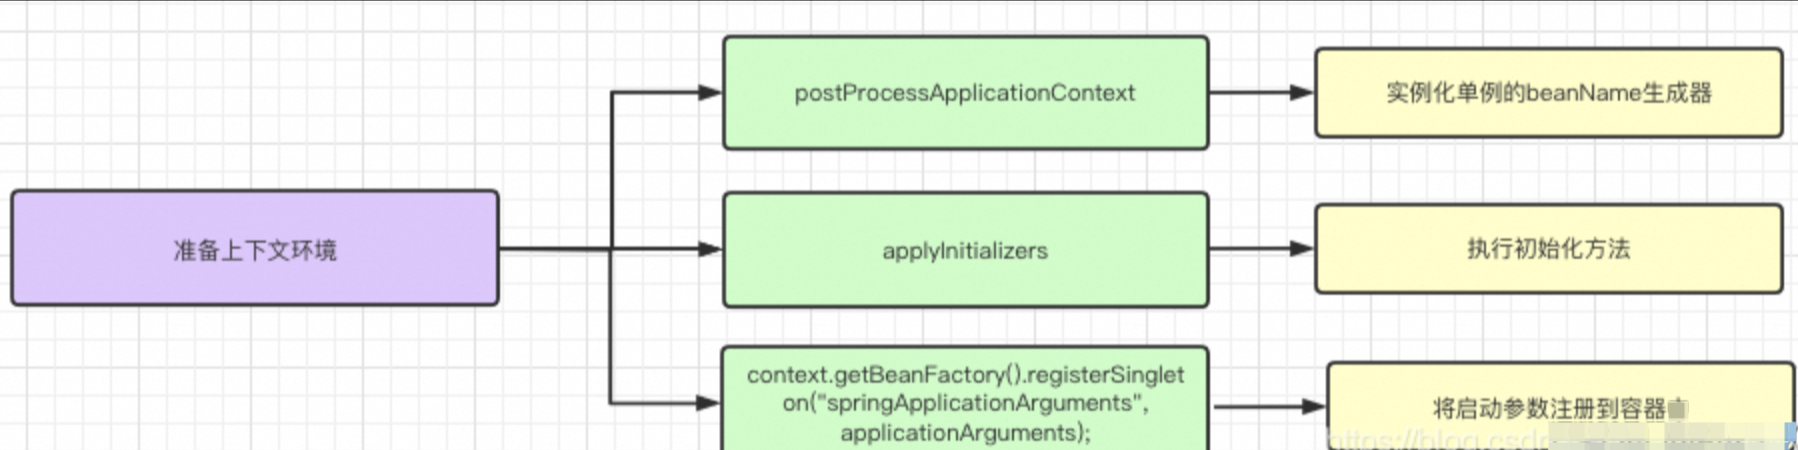
这里准备的上下文环境是为了下一步刷新做准备的,里面还做了一些额外的事情;
	private void prepareContext(ConfigurableApplicationContext context, ConfigurableEnvironment environment,
			SpringApplicationRunListeners listeners, ApplicationArguments applicationArguments, Banner printedBanner) {
		context.setEnvironment(environment);
        //1、实例化单例beanName的生成器
		postProcessApplicationContext(context);
        //2、执行初始化方法
		applyInitializers(context);
		listeners.contextPrepared(context);
		if (this.logStartupInfo) {
			logStartupInfo(context.getParent() == null);
			logStartupProfileInfo(context);
		}
		// Add boot specific singleton beans
		ConfigurableListableBeanFactory beanFactory = context.getBeanFactory();
        //3、将启动参数注入到容器中
		beanFactory.registerSingleton("springApplicationArguments", applicationArguments);
		if (printedBanner != null) {
			beanFactory.registerSingleton("springBootBanner", printedBanner);
		}
		if (beanFactory instanceof DefaultListableBeanFactory) {
			((DefaultListableBeanFactory) beanFactory)
					.setAllowBeanDefinitionOverriding(this.allowBeanDefinitionOverriding);
		}
		if (this.lazyInitialization) {
			context.addBeanFactoryPostProcessor(new LazyInitializationBeanFactoryPostProcessor());
		}
		// Load the sources
		Set<Object> sources = getAllSources();
		Assert.notEmpty(sources, "Sources must not be empty");
		load(context, sources.toArray(new Object[0]));
		listeners.contextLoaded(context);
	}
1、实例化单例的beanName生成器
在 postProcessApplicationContext(context); 方法里面。使用单例模式创建 了BeanNameGenerator 对象,其实就是beanName生成器,用来生成bean对象的名称。
如下图所示:
protected void postProcessApplicationContext(ConfigurableApplicationContext context) {
		if (this.beanNameGenerator != null) {
			context.getBeanFactory().registerSingleton(AnnotationConfigUtils.CONFIGURATION_BEAN_NAME_GENERATOR,
					this.beanNameGenerator);
		}
		if (this.resourceLoader != null) {
			if (context instanceof GenericApplicationContext) {
				((GenericApplicationContext) context).setResourceLoader(this.resourceLoader);
			}
			if (context instanceof DefaultResourceLoader) {
				((DefaultResourceLoader) context).setClassLoader(this.resourceLoader.getClassLoader());
			}
		}
		if (this.addConversionService) {
			context.getBeanFactory().setConversionService(ApplicationConversionService.getSharedInstance());
		}
	}
2、执行初始化方法
拿到加载出来的所有初始化器(实现了ApplicationContextInitializer 接口的类),在这里回进行统一的解析。
protected void applyInitializers(ConfigurableApplicationContext context) {
		for (ApplicationContextInitializer initializer : getInitializers()) {
			Class<?> requiredType = GenericTypeResolver.resolveTypeArgument(initializer.getClass(),
					ApplicationContextInitializer.class);
			Assert.isInstanceOf(requiredType, context, "Unable to call initializer.");
			initializer.initialize(context);
		}
	}
3、将启动参数注册到容器中
将启动参数以单例的模式注册到容器中,参数的beanName 为 :springApplicationArguments。
ConfigurableListableBeanFactory beanFactory = context.getBeanFactory();
beanFactory.registerSingleton("springApplicationArguments", applicationArguments);
7、刷新上下文
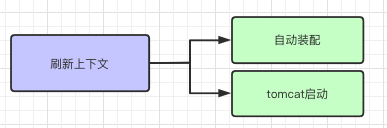
1、自动装配和容器启动
刷新上下文已经是spring的范畴了,自动装配和启动 tomcat就是在这个方法里面完成的。
2、刷新上下文后置处理
afterRefresh 方法是启动后的一些处理,留给用户扩展使用,目前这个方法里面是空的,
代码示例:
protected void afterRefresh(ConfigurableApplicationContext context, ApplicationArguments args) {
	}
8、结束计时器
到这一步,springboot其实就已经完成了,计时器会打印启动springboot的时长。
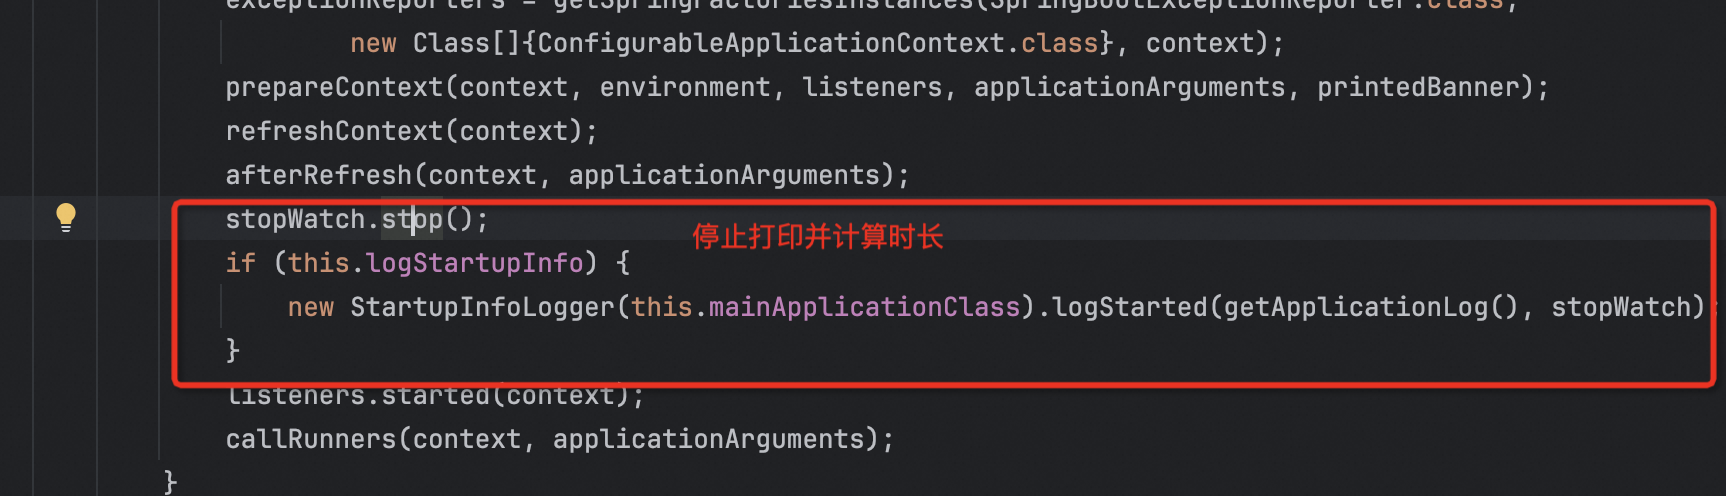
在控制台看到启动还是挺快的,不到2秒就启动完成了;

9、发布上下文
1、准备就绪事件
告诉应用程序,已经准备好了,可以开始工作了。

2、执行自定义的run方法
这是一个扩展功能,callRunners(context, applicationArguments) 可以在启动完成后执行自定义的run方法;有2中方式可以实现:
- 实现 ApplicationRunner 接口
- 实现 CommandLineRunner 接口
package com.spring.init;

import org.springframework.boot.ApplicationArguments;
import org.springframework.boot.ApplicationRunner;
import org.springframework.boot.CommandLineRunner;
import org.springframework.stereotype.Component;

/**
 * 自定义run方法的2种方式
 */
@Component
public class MyRunner implements ApplicationRunner, CommandLineRunner {

    @Override
    public void run(ApplicationArguments args) throws Exception {
        System.out.println(" 我是自定义的run方法1,实现 ApplicationRunner 接口既可运行"        );
    }

    @Override
    public void run(String... args) throws Exception {
        System.out.println(" 我是自定义的run方法2,实现 CommandLineRunner 接口既可运行"        );
    }
}
如下:

3、流程汇总
经过上面的各种的细节拆分,这边进行一个总结:
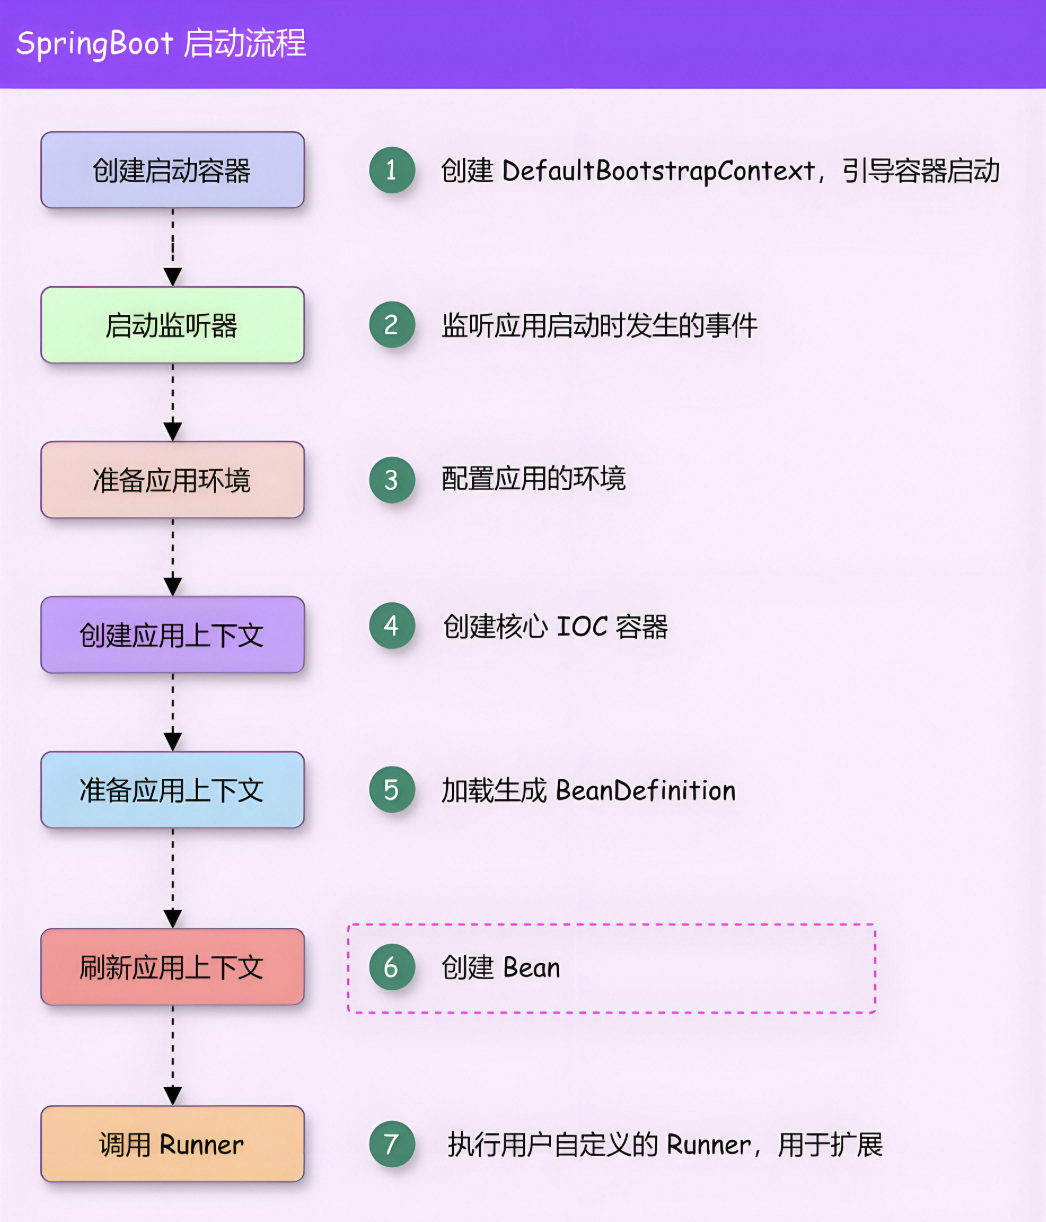
可以看到由7步组成。
参考文章:
1、9千字长文带你了解SpringBoot启动过程--史上最详细 SpringBoot启动流程-图文并茂-CSDN博客


![[解决conda创建新的虚拟环境没用python的问题]](https://i-blog.csdnimg.cn/direct/8a1fe22c2c0a44d7b72b83618a29c20c.png)