使用 Cookie 实现认证跳转功能的实践与解析
在 Web 开发中,用户身份认证是一个基础而关键的功能点。本文将通过一个简单的前后端示例系统,介绍如何基于 Cookie 实现 Token 保存与自动跳转认证的功能,并结合 Cookie 与 Header 的区别、使用场景、安全性等维度做全面分析。
一、Cookie 和 Header 的区别
| 项目 | Cookie | Header |
|---|---|---|
| 定义 | 存储在浏览器中的字段,用于保持用户状态 | HTTP 请求/响应的元数据,描述请求数据信息 |
| 默认行为 | 每次同域同路径请求时自动被浏览器附加到请求中 | 需要开发者手动在请求中配置 |
| 存储 | 可持久存储在本地浏览器 | 每次请求时重新传送 |
| 与 JS 的关系 | 如果设置 HttpOnly ,JS 无法读取 | JS 可以自由操作 Header |
| 通用场景 | 登录状态保持,身份声明 | JWT Token、代理等信息传递 |
总结:
Cookie 更适合于 Web 应用自动附带的状态保持,Header 则适用于前后端分离、接口授权等场景。
此外,如果系统是前后端分离或移动端调用 API,推荐使用 Header + Bearer Token 的方式;而传统 Web 系统则更偏好基于 Cookie 的方案,方便浏览器自动携带状态。
二、功能需求简述
当前系统需求并非完整用户系统登录,而是一个基于输入 Token 的快速标记机制,满足以下目标:
-
前端提供 Token(如 email)
-
后端生成对应的 JWT 并存入浏览器 Cookie
-
后续访问页面时:
- 自动读取 Cookie 中的 JWT
- 后端解析 JWT,确认身份合法则自动跳转
- 前端弹出提示当前用户 Token 和解析出的信息
三、项目结构说明
本项目基于 Spring Boot 构建,包含前后端组件,结构如下:
MyTestJava
├── src/
│   └── main/
│       ├── java/
│       │   └── org.example/
│       │       ├── Main.java                     // SpringBoot 启动类
│       │       ├── controller/
│       │       │   └── TokenEntryController.java // 控制器:处理接口请求
│       │       └── util/
│       │           └── JwtUtils.java             // 工具类:生成/解析 JWT
│       └── resources/
│           ├── static/
│           │   └── index.html                    // 前端页面
│           └── application.properties            // 配置文件
├── pom.xml                                       // Maven 配置
说明:
JwtUtils:JWT 的封装生成器,负责 create / parseTokenEntryController:接口控制器,处理前端发送的 token 保存请求和验证请求index.html:纯前端展示页面,包含输入框与登录判断逻辑application.properties:可配置端口、秘钥等
四、代码实现分析
📖 JWT 工具类 JwtUtils
@Component
public class JwtUtils {
    private static final String SECRET = "cT9gHD9Myp&Jz@3E*U2a%Ld!Fg#xZvPf";
    private static final Key KEY = Keys.hmacShaKeyFor(SECRET.getBytes(StandardCharsets.UTF_8));
    private static final long EXPIRATION = 30 * 24 * 60 * 60 * 1000L; // 30天

    public String createToken(String email) {
        return Jwts.builder()
                .setSubject(email)
                .setIssuedAt(new Date())
                .setExpiration(new Date(System.currentTimeMillis() + EXPIRATION))
                .signWith(KEY)
                .compact();
    }

    public String parseToken(String token) {
        try {
            return Jwts.parserBuilder()
                    .setSigningKey(KEY)
                    .build()
                    .parseClaimsJws(token)
                    .getBody()
                    .getSubject();
        } catch (JwtException e) {
            return null;
        }
    }
}
说明:
SECRET是服务端自定义加密密钥,推荐保存在配置文件中;- 可使用
Keys.secretKeyFor(SignatureAlgorithm.HS256)动态生成,但不适合生产,因为服务重启后旧 token 将无法解析。
📋 Controller: TokenEntryController
@RestController
@RequestMapping("/api")
public class TokenEntryController {

    @Autowired
    private JwtUtils jwtUtils;

    @PostMapping("/token")
    public ResponseEntity<Map<String, Object>> saveToken(@RequestBody Map<String, String> payload,
                                                         HttpServletResponse response) {
        String email = payload.get("token");
        String token = jwtUtils.createToken(email);

        Cookie cookie = new Cookie("login_token", token);
        cookie.setHttpOnly(true);
        cookie.setPath("/");
        cookie.setMaxAge(30 * 24 * 60 * 60);
        response.addCookie(cookie);

        return ResponseEntity.ok(Map.of(
                "status", "success",
                "redirectUrl", "https://www.baidu.com"
        ));
    }

    @GetMapping("/entry")
    public ResponseEntity<Map<String, Object>> checkToken(@CookieValue(value = "login_token", required = false) String token) {
        String email = jwtUtils.parseToken(token);
        if (email != null) {
            return ResponseEntity.ok(Map.of(
                    "status", "success",
                    "email", email,
                    "redirectUrl", "https://www.baidu.com"
            ));
        } else {
            return ResponseEntity.ok(Map.of("status", "fail"));
        }
    }
}
📄 前端 HTML 逻辑
index.html 使用原生 JavaScript 与 Spring Boot 后端交互。
<input type="text" id="tokenInput" placeholder="请输入 Email" />
<button onclick="sendToken()">发送</button>

<script>
function sendToken() {
    const token = document.getElementById("tokenInput").value;
    fetch("/api/token", {
        method: "POST",
        headers: { "Content-Type": "application/json" },
        body: JSON.stringify({ token })
    })
    .then(res => res.json())
    .then(data => {
        if (data.status === "success") {
            window.location.href = data.redirectUrl;
        }
    });
}

window.onload = function () {
    fetch("/api/entry")
        .then(res => res.json())
        .then(body => {
            if (body.status === "success") {
                const token = getCookie("login_token");
                alert("已登录\nToken: " + token + "\nEmail: " + body.email);
                window.location.href = body.redirectUrl;
            }
        });
};

function getCookie(name) {
    const match = document.cookie.match(new RegExp('(^| )' + name + '=([^;]+)'));
    return match ? decodeURIComponent(match[2]) : null;
}
</script>
五、总结
- Cookie 和 Header 各有优势,要根据场景选择
- 使用 Cookie 可以自动附加身份信息,适合 Web 项目
- JWT 分布系统轻量、无状态、可扩展
- 固定 KEY 应该保存在配置文件中,而非随机生成
- 浏览器无法读取
HttpOnlyCookie,确保安全性;如需前端读 token,请将HttpOnly = false
附录:完整文件(可自行补全代码)
Spring Boot 项目目录结构参考
src/main/java/org/example/
├── controller/
│   └── LoginController.java      # 登录与验证码相关接口
├── model/
│   └── User.java                 # 用户模型类
├── service/
│   └── UserService.java          # 登录逻辑与验证码缓存管理
├── util/
│   └── EmailSender.java          # 邮件发送工具类
└── Main.java                     # SpringBoot 启动类

src/main/resources/
├── static/index.html             # 前端测试页面
└── application.properties        # 邮件 + Redis + DB 配置项
pom.xml ✅
<?xml version="1.0" encoding="UTF-8"?>
<project xmlns="http://maven.apache.org/POM/4.0.0"
         xmlns:xsi="http://www.w3.org/2001/XMLSchema-instance"
         xsi:schemaLocation="http://maven.apache.org/POM/4.0.0 http://maven.apache.org/xsd/maven-4.0.0.xsd">
    <modelVersion>4.0.0</modelVersion>

    <groupId>org.example</groupId>
    <artifactId>MyTestJava</artifactId>
    <version>1.0-SNAPSHOT</version>
    <packaging>jar</packaging>

    <properties>
        <maven.compiler.source>17</maven.compiler.source>
        <maven.compiler.target>17</maven.compiler.target>
        <project.build.sourceEncoding>UTF-8</project.build.sourceEncoding>
    </properties>

    <!-- Spring Boot 父项目 -->
    <parent>
        <groupId>org.springframework.boot</groupId>
        <artifactId>spring-boot-starter-parent</artifactId>
        <version>3.4.3</version>
        <relativePath/>
    </parent>

    <dependencies>
        <!-- Spring Boot Web 模块(包含内嵌 Tomcat) -->
        <dependency>
            <groupId>org.springframework.boot</groupId>
            <artifactId>spring-boot-starter-web</artifactId>
        </dependency>

        <!-- Spring Boot 开发工具模块 -->
        <dependency>
            <groupId>org.springframework.boot</groupId>
            <artifactId>spring-boot-devtools</artifactId>
            <scope>runtime</scope>
        </dependency>

        <!-- JWT 核心 API -->
        <dependency>
            <groupId>io.jsonwebtoken</groupId>
            <artifactId>jjwt-api</artifactId>
            <version>0.11.5</version>
        </dependency>

        <!-- JWT 实现类 -->
        <dependency>
            <groupId>io.jsonwebtoken</groupId>
            <artifactId>jjwt-impl</artifactId>
            <version>0.11.5</version>
            <scope>runtime</scope>
        </dependency>

        <!-- JWT 序列化/反序列化 -->
        <dependency>
            <groupId>io.jsonwebtoken</groupId>
            <artifactId>jjwt-jackson</artifactId>
            <version>0.11.5</version>
            <scope>runtime</scope>
        </dependency>

        <!-- Jakarta Servlet -->
        <dependency>
            <groupId>jakarta.servlet</groupId>
            <artifactId>jakarta.servlet-api</artifactId>
            <version>6.0.0</version>
            <scope>provided</scope>
        </dependency>
    </dependencies>

    <build>
        <plugins>
            <plugin>
                <groupId>org.springframework.boot</groupId>
                <artifactId>spring-boot-maven-plugin</artifactId>
            </plugin>
        </plugins>
    </build>
</project>
index.html ✅
<!DOCTYPE html>
<html lang="zh">
<head>
<meta charset="UTF-8">
<title>Token 验证</title>
<style>
body {
background-color: #f0f2f5;
font-family: "Segoe UI", Tahoma, Geneva, Verdana, sans-serif;
display: flex;
justify-content: center;
align-items: center;
height: 100vh;
margin: 0;
}
.container {
background-color: white;
padding: 30px 40px;
border-radius: 12px;
box-shadow: 0 4px 10px rgba(0, 0, 0, 0.1);
text-align: center;
}
.input-group {
display: flex;
align-items: center;
justify-content: center;
gap: 10px;
}
input[type="text"] {
padding: 10px;
width: 220px;
font-size: 16px;
border: 1px solid #ccc;
border-radius: 6px;
}
button {
padding: 10px 20px;
font-size: 16px;
background-color: #1890ff;
color: white;
border: none;
border-radius: 6px;
cursor: pointer;
transition: background-color 0.3s ease;
}
button:hover {
background-color: #40a9ff;
}
</style>
</head>
<body>
<div class="container">
<div class="input-group">
<label for="token-input">
<input type="text" id="token-input" placeholder="输入 Token" />
</label>
<button onclick="sendToken()">发送</button>
</div>
</div>
<script>
function sendToken() {
const token = document.getElementById("token-input").value;
fetch("/api/token", {
method: "POST",
headers: {
"Content-Type": "application/json"
},
body: JSON.stringify({ token })
})
.then(response => response.json())
.then(data => {
if (data.status === "success") {
window.location.href = data.redirectUrl;
} else {
alert("Token 无效");
}
});
}
// 页面加载后自动访问 entry 进行判断
window.onload = function () {
fetch("/api/entry", { method: "GET" })
.then(response => {
if (!response.ok) return null;
return response.json();
})
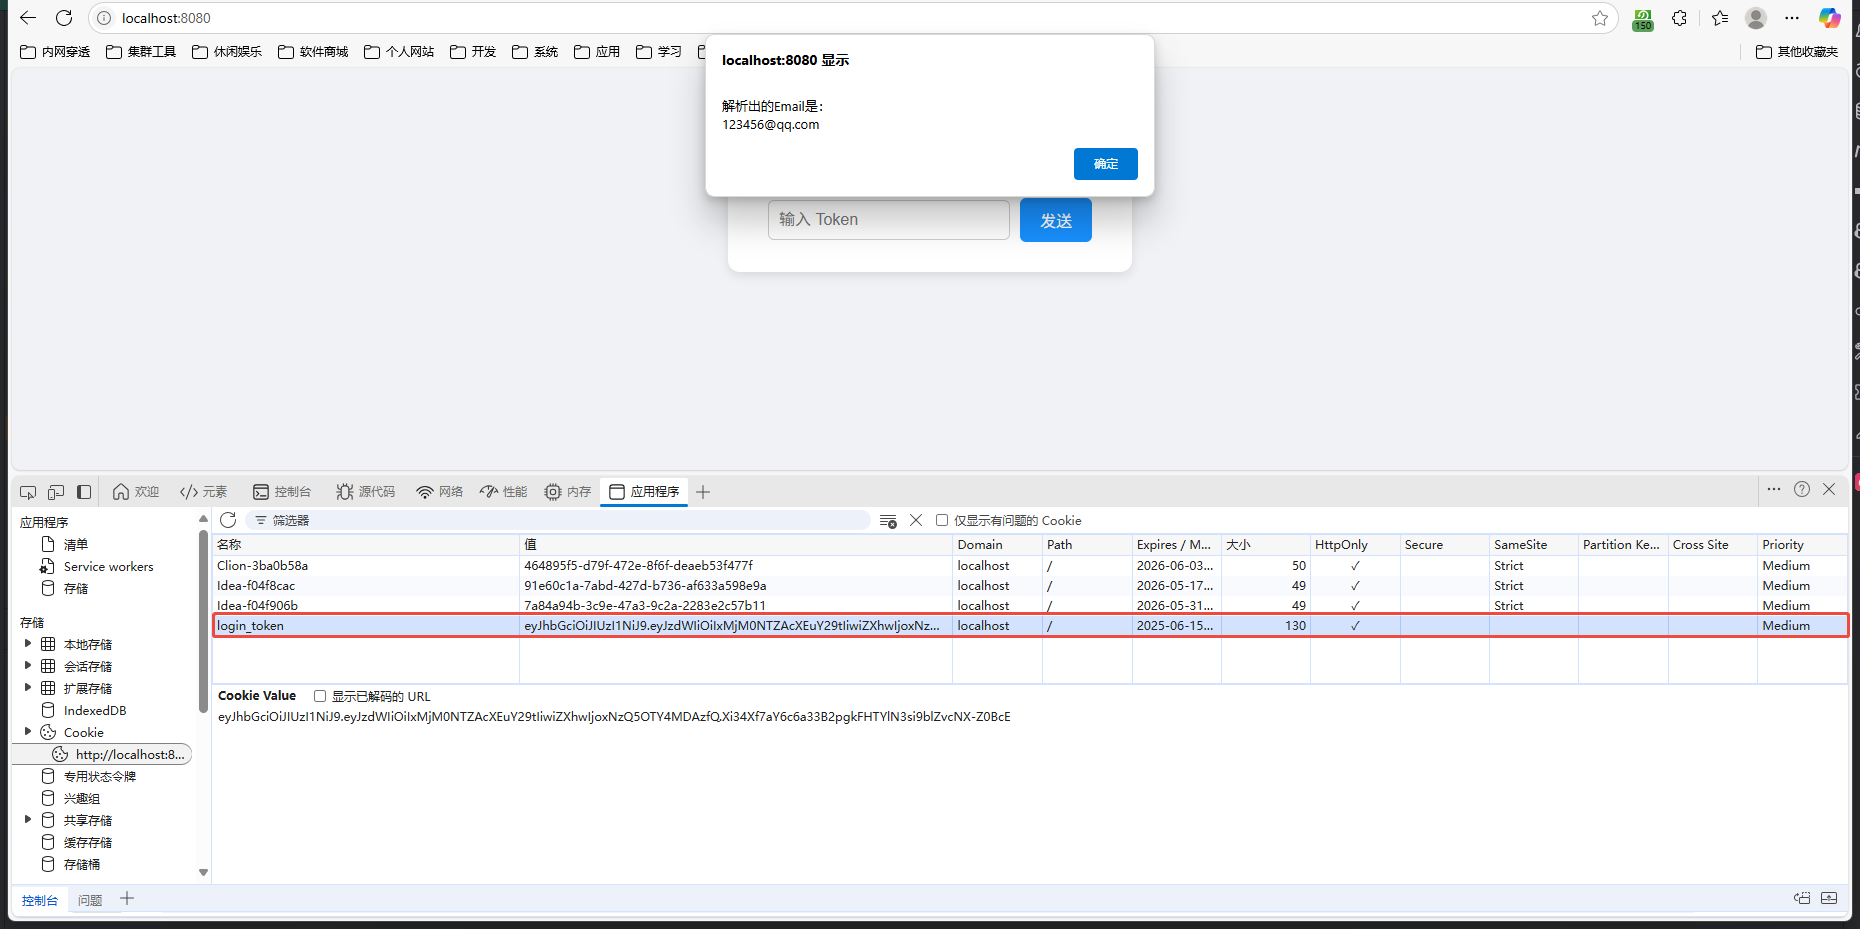
.then(body => {
if (body && body.status === "success") {
alert("\n解析出的Email是:\n" + body.email);
window.location.href = body.redirectUrl;
}
})
.catch(err => {
console.error("检查登录状态异常:", err);
});
};
</script>
</body>
</html>
Main.java ✅
package org.example;

import org.springframework.boot.SpringApplication;
import org.springframework.boot.autoconfigure.SpringBootApplication;

/**
 * ==================================================
 * This class ${NAME} is responsible for [功能描述].
 *
 * @author darker
 * @version 1.0
 * ==================================================
 */

@SpringBootApplication
public class Main {
    public static void main(String[] args) {
        SpringApplication.run(Main.class, args);
    }
}
JwtUtils.java ✅
package org.example.util;

import io.jsonwebtoken.*;
import io.jsonwebtoken.security.Keys;
import org.springframework.stereotype.Component;

import java.nio.charset.StandardCharsets;
import java.security.Key;
import java.util.Date;

/**
 * ==================================================
 * This class JwtUtils is responsible for [功能描述].
 *
 * @author darker
 * @version 1.0
 * ==================================================
 */

@Component
public class JwtUtils {
    private static final String SECRET = "cT9gHD9Myp&Jz@3E*U2a%Ld!Fg#xZvPf";
    private static final Key KEY = Keys.hmacShaKeyFor(SECRET.getBytes(StandardCharsets.UTF_8));
    private static final long EXPIRATION = 30 * 24 * 60 * 60 * 1000L; // 30天

    public String createToken(String email) {
        return Jwts.builder()
                .setSubject(email)
                .setExpiration(new Date(System.currentTimeMillis() + EXPIRATION))
                .signWith(KEY)
                .compact();
    }

    public String parseToken(String token) {
        try {
            return Jwts.parserBuilder()
                    .setSigningKey(KEY)
                    .build()
                    .parseClaimsJws(token)
                    .getBody()
                    .getSubject();
        } catch (JwtException e) {
            return null; // 无效/过期
        }
    }
}
TokenEntryController.java ✅
package org.example.controller;

import jakarta.servlet.http.Cookie;
import jakarta.servlet.http.HttpServletResponse;
import org.example.util.JwtUtils;
import org.springframework.beans.factory.annotation.Autowired;
import org.springframework.http.ResponseEntity;
import org.springframework.web.bind.annotation.*;

import java.util.HashMap;
import java.util.Map;

/**
 * ==================================================
 * This class TokenEntryController is responsible for [功能描述].
 *
 * @author draker
 * @version 1.0
 * ==================================================
 */

@RestController
@RequestMapping("/api")
public class TokenEntryController {

    @Autowired
    private JwtUtils jwtUtils;

    /**
     * 创建 Token 并写入 Cookie
     */
    @PostMapping("/token")
    public ResponseEntity<Map<String, Object>> createToken(@RequestBody Map<String, String> payload,
                                                           HttpServletResponse response) {
        String identity = payload.get("token"); // 可以是 email、userId 等

        Map<String, Object> result = new HashMap<>();
        if (identity == null || identity.isEmpty()) {
            result.put("status", "fail");
            return ResponseEntity.badRequest().body(result);
        }

        String token = jwtUtils.createToken(identity);

        Cookie cookie = new Cookie("login_token", token);
        cookie.setPath("/");
        cookie.setHttpOnly(true);
        cookie.setMaxAge(30 * 24 * 60 * 60); // 30 天
        response.addCookie(cookie);

        result.put("status", "success");
        result.put("redirectUrl", "https://www.baidu.com");
        return ResponseEntity.ok(result);
    }

    /**
     * 检查 Cookie 中的 Token 并验证跳转
     */
    @GetMapping("/entry")
    public ResponseEntity<Map<String, Object>> checkToken(@CookieValue(value = "login_token", required = false) String token) {
        Map<String, Object> result = new HashMap<>();

        if (token != null) {
            String email = jwtUtils.parseToken(token);
            if (email != null) {
                result.put("status", "success");
                result.put("email", email);
                result.put("redirectUrl", "https://www.baidu.com");
                return ResponseEntity.ok(result);
            }
        }

        result.put("status", "fail");
        return ResponseEntity.ok(result);
    }
}
希望本文对 Cookie 和 Header 在实际进程中的使用有所启发,也为基于 Spring Boot 实现轻量登录认证提供思路。