一、纯前端验证码
场景
防止机器人或脚本高频提交,需用户完成验证后才能触发请求。
Vue 前端实现
<template>
  <div>
    <button @click="showCaptcha">提交订单</button>
    <div v-if="captchaVisible">
      <img :src="captchaImage" alt="验证码" />
      <input v-model="captchaInput" placeholder="输入验证码" />
      <button @click="verifyCaptcha">验证</button>
    </div>
  </div>
</template>

<script>
export default {
  data() {
    return {
      captchaVisible: false,
      captchaImage: "",
      captchaInput: "",
      captchaKey: "", // 后端生成的验证码唯一标识
    };
  },
  methods: {
    async showCaptcha() {
      // 向后端请求验证码
      const res = await this.$axios.get("/api/captcha/generate");
      this.captchaImage = res.data.image;
      this.captchaKey = res.data.key;
      this.captchaVisible = true;
    },
    async verifyCaptcha() {
      // 提交验证码到后端校验
      const res = await this.$axios.post("/api/captcha/verify", {
        key: this.captchaKey,
        code: this.captchaInput,
      });
      if (res.data.success) {
        this.captchaVisible = false;
        this.submitOrder(); // 验证通过后执行实际提交
      }
    },
    submitOrder() {
      // 实际业务请求
      this.$axios.post("/api/order/create");
    },
  },
};
</script>
C# 后端实现
[ApiController]
[Route("api/captcha")]
public class CaptchaController : ControllerBase
{
    private static Dictionary<string, string> _captchas = new Dictionary<string, string>();

    [HttpGet("generate")]
    public IActionResult GenerateCaptcha()
    {
        // 生成随机验证码(示例简化,实际需生成图片)
        var code = new Random().Next(1000, 9999).ToString();
        var key = Guid.NewGuid().ToString();
        _captchas[key] = code;

        return Ok(new
        {
            key = key,
            image = $"data:image/png;base64,{GenerateBase64Image(code)}" // 生成图片的Base64
        });
    }

    [HttpPost("verify")]
    public IActionResult VerifyCaptcha([FromBody] VerifyRequest request)
    {
        if (_captchas.TryGetValue(request.Key, out var validCode) && validCode == request.Code)
        {
            _captchas.Remove(request.Key);
            return Ok(new { success = true });
        }
        return Ok(new { success = false });
    }
}
二、禁用按钮
场景
防止用户重复点击提交按钮,前端临时禁用按钮。
Vue 前端实现
<template>
  <button
    @click="handleSubmit"
    :disabled="isSubmitting"
  >
    {{ isSubmitting ? '提交中...' : '提交订单' }}
  </button>
</template>

<script>
export default {
  data() {
    return {
      isSubmitting: false,
    };
  },
  methods: {
    async handleSubmit() {
      if (this.isSubmitting) return;

      this.isSubmitting = true;
      try {
        await this.$axios.post("/api/order/create");
      } finally {
        this.isSubmitting = false;
      }
    },
  },
};
</script>
三、调用限制(后端频率限制)
场景
限制客户端在固定时间窗口内对同一接口的调用次数。
C# 后端实现(基于内存缓存)
[ApiController]
[Route("api/order")]
public class OrderController : ControllerBase
{
    private static MemoryCache _requestCache = new MemoryCache(new MemoryCacheOptions());

    [HttpPost("create")]
    public IActionResult CreateOrder([FromBody] OrderRequest request)
    {
        var clientIp = HttpContext.Connection.RemoteIpAddress.ToString();
        var cacheKey = $"rate_limit_{clientIp}";

        // 检查请求频率(示例:10秒内最多3次)
        if (_requestCache.TryGetValue(cacheKey, out int count) && count >= 3)
        {
            return StatusCode(429, "请求过于频繁,请稍后再试");
        }

        // 更新计数器
        _requestCache.Set(cacheKey, count + 1, TimeSpan.FromSeconds(10));

        // 实际业务逻辑
        return Ok(new { success = true });
    }
}
四、假排队(前端模拟排队)
场景
通过前端动画或提示缓解用户等待焦虑,实际请求仍按正常流程处理。
Vue 前端实现
vue
<template>
  <div>
    <button @click="mockQueue">立即抢购</button>
    <div v-if="isInQueue">
      <p>排队中,前方还有 {{ queuePosition }} 人...</p>
      <div class="loading-animation"></div>
    </div>
  </div>
</template>

<script>
export default {
  data() {
    return {
      isInQueue: false,
      queuePosition: 0,
    };
  },
  methods: {
    async mockQueue() {
      if (this.isInQueue) return;

      this.isInQueue = true;
      this.queuePosition = Math.floor(Math.random() * 10) + 1; // 模拟随机队列位置

      // 模拟排队等待(实际请求在后台发送)
      await new Promise(resolve => setTimeout(resolve, 2000));

      try {
        await this.$axios.post("/api/purchase");
        this.isInQueue = false;
      } catch (error) {
        this.isInQueue = false;
      }
    },
  },
};
</script>

<style>
.loading-animation {
  width: 20px;
  height: 20px;
  border: 2px solid #ccc;
  border-top-color: #333;
  border-radius: 50%;
  animation: spin 1s linear infinite;
}

@keyframes spin {
  to { transform: rotate(360deg); }
}
</style>
总结与对比
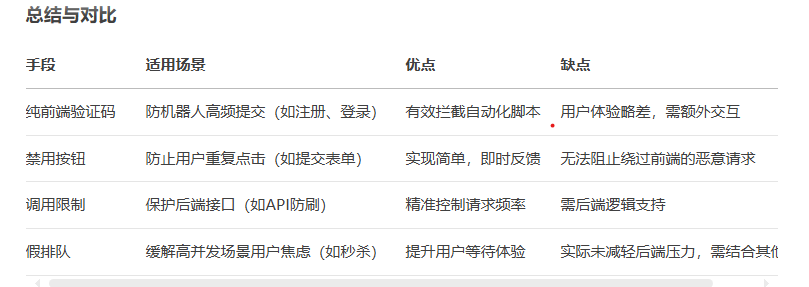
实际建议:
组合使用:验证码 + 后端限流可有效防御自动化攻击。
用户体验优先:禁用按钮和假排队适合提升用户感知。
监控与告警:结合日志监控异常请求模式(如Nginx或ELK)。