1.前言
最近在看华为的CANN框架,发现了一些很有意思的开源算法(本文所有的代码都出自华为开源git发布的代码),华为最近出了AI PRO开发板,想着现在开发板上用用(不想重新配置环境了,麻烦还累),看着代码有onnx的模型,就先用onnx实现,后续可能推出rknn的推理吧,谁知道呢。具体细节也不想写,无脑用就行。
2.代码准备
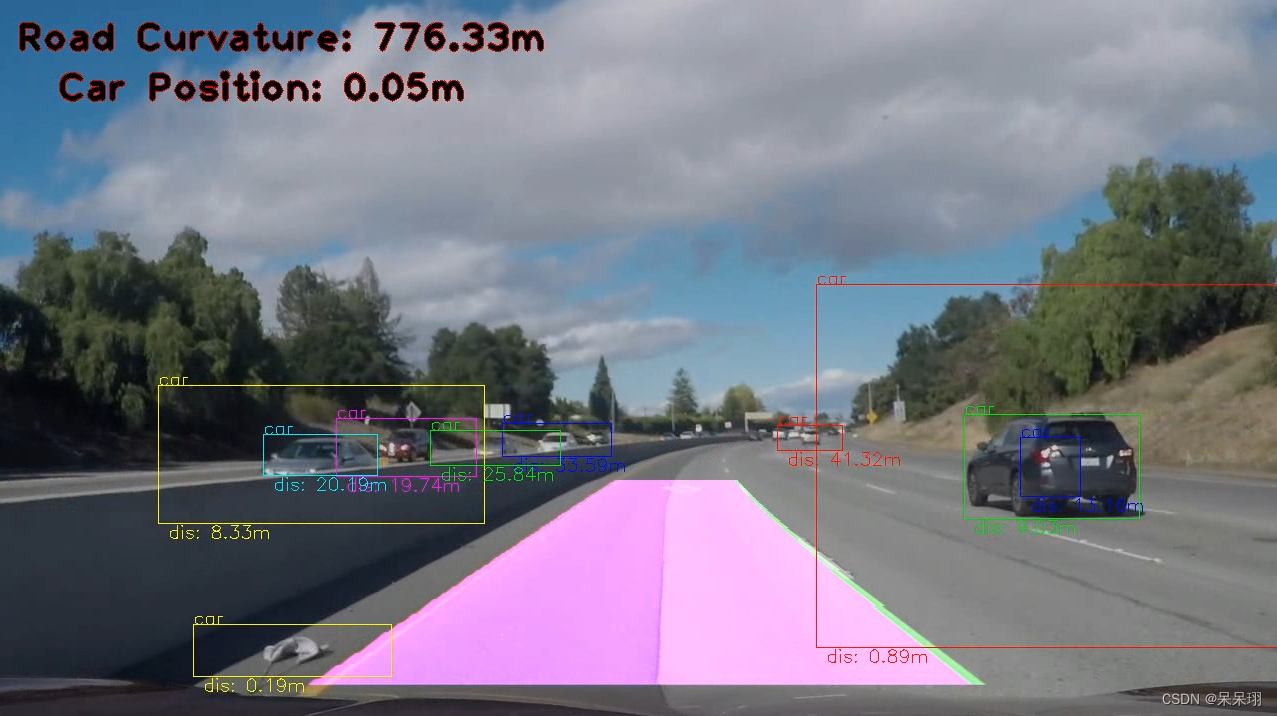
代码是一个视频处理的程序,主要功能是使用YOLOv4模型进行目标检测,并结合车道检测,最后输出处理后的视频。
2.1 主要步骤
- 导入必要的库:导入了一系列常用的计算机视觉库,如OpenCV、numpy等,以及自定义的LaneFinder模块。
- 定义了一些常量和全局变量:包括类别标签、模型输入输出的尺寸、类别数量、锚点等。
- 定义了预处理函数preprocess:将输入的帧图像进行缩放和填充,使其符合模型的输入尺寸,并进行归一化处理。
- 定义了一些辅助函数:如计算两个框的重叠区域、计算IoU、应用非极大值抑制(NMS)等。
- 定义了模型输出解码函数decode_bbox:将模型输出的特征图转换为检测框的坐标和类别概率。
- 定义了后处理函数post_process:根据模型输出的结果进行NMS处理,并将检测结果转换为可读的格式。
- 定义了一些辅助函数:包括将标签转换为可读格式、处理帧图像等。
- 主函数main:读取视频帧,调用前述函数进行目标检测和车道检测,最后将结果写入输出视频文件中。
2.2 JSON配置
文件包含了相机校准矩阵、畸变系数、透视变换矩阵以及其他参数。
-
cam_matrix(相机矩阵):相机内参矩阵,是用来描述相机的内部参数的一个3x3矩阵。其中包括了相机的焦距(fx、fy)、主点(cx、cy)等信息。在这个配置中,焦距分别为1156.94047、1152.13881,主点坐标为(665.948814, 388.784788)。
-
dist_coeffs(畸变系数):相机的畸变系数,通常由径向畸变系数和切向畸变系数构成。这里包含了五个系数,分别是[-0.237638057, -0.0854041989, -0.000790999421, -0.000115882426, 0.105726054]。
-
perspective_transform(透视变换矩阵):透视变换矩阵,用于将图像转换到鸟瞰图(俯视图)。该矩阵是一个3x3的矩阵,其中包含了变换的缩放、旋转和平移信息。
-
pixels_per_meter(每米对应的像素数):这个参数表示在鸟瞰图中,每米对应的像素数。在水平方向上为46.56770571051312像素/m,在垂直方向上为33.06512376601635像素/m。
-
WARPED_SIZE(鸟瞰图尺寸):进行透视变换后的图像尺寸,宽度为500像素,高度为600像素。
-
ORIGINAL_SIZE(原始图像尺寸):原始图像的尺寸,宽度为1280像素,高度为720像素。
2.3 车道线检测
LaneFinder.py是一个用于检测车道线的算法。以下是代码中各个函数的功能:
get_center_shift(coeffs, img_size, pixels_per_meter): 计算车道线中心的偏移量。get_curvature(coeffs, img_size, pixels_per_meter): 计算车道线的曲率。LaneLineFinder: 一个类,用于检测车道线中的单条车道线。LaneFinder: 一个类,用于检测整个车道。它包括了左右两条车道线的检测。undistort(img): 对图像进行畸变校正。warp(img): 对图像进行透视变换,使车道线在图像中呈现平行。unwarp(img): 对透视变换后的图像进行逆变换,使车道线回到原始视角。equalize_lines(alpha): 对检测到的左右车道线进行均衡处理,使它们保持一定的间隔。find_lane(img, distorted=True, reset=False): 在图像中寻找车道线,包括畸变校正、透视变换、颜色过滤和车道线检测等步骤。draw_lane_weighted(img, thickness=5, alpha=0.8, beta=1, gamma=0): 在原始图像上绘制检测到的车道线,并添加曲率和车辆位置信息。process_image(img, reset=False): 对输入的图像进行处理,并返回带有检测到的车道线的图像。set_img_size(img_size): 设置图像的大小。
这些函数共同构成了一个车道线检测算法,可以在道路图像中准确地检测出车道线并估计车辆的位置和行驶曲率。
2.4 主函数代码
import sys
import os
import json
import numpy as np
import cv2 as cv
from PIL import Image
import LaneFinder
import onnxruntime as rt

labels = ["person",
        "bicycle", "car", "motorbike", "aeroplane",
        "bus", "train", "truck", "boat", "traffic light",
        "fire hydrant", "stop sign", "parking meter", "bench",
        "bird", "cat", "dog", "horse", "sheep", "cow", "elephant",
        "bear", "zebra", "giraffe", "backpack", "umbrella", "handbag",
        "tie", "suitcase", "frisbee", "skis", "snowboard", "sports ball",
        "kite", "baseball bat", "baseball glove", "skateboard", "surfboard",
        "tennis racket", "bottle", "wine glass", "cup", "fork", "knife", "spoon",
        "bowl", "banana", "apple", "sandwich", "orange", "broccoli", "carrot", "hot dog",
        "pizza", "donut", "cake", "chair", "sofa", "potted plant", "bed", "dining table",
        "toilet", "TV monitor", "laptop", "mouse", "remote", "keyboard", "cell phone",
        "microwave", "oven", "toaster", "sink", "refrigerator", "book", "clock", "vase",
        "scissors", "teddy bear", "hair drier", "toothbrush"]

OUTPUT_DIR = '../out/'
MODEL_WIDTH = 608
MODEL_HEIGHT = 608
class_num = 80
stride_list = [32, 16, 8]
anchors_3 = np.array([[12, 16], [19, 36], [40, 28]]) / stride_list[2]
anchors_2 = np.array([[36, 75], [76, 55], [72, 146]]) / stride_list[1]
anchors_1 = np.array([[142, 110], [192, 243], [459, 401]]) / stride_list[0]
anchor_list = [anchors_1, anchors_2, anchors_3]
iou_threshold = 0.3
colors = [(255, 0, 0), (0, 255, 0), (0, 0, 255), (0, 255, 255), (255, 0, 255), (255, 255, 0)]

def preprocess(frame):
    image = Image.fromarray(cv.cvtColor(frame, cv.COLOR_BGR2RGB))
    img_h = image.size[1]
    img_w = image.size[0]
    net_h = MODEL_HEIGHT
    net_w = MODEL_WIDTH

    scale = min(float(net_w) / float(img_w), float(net_h) / float(img_h))
    new_w = int(img_w * scale)
    new_h = int(img_h * scale)

    shift_x = (net_w - new_w) // 2
    shift_y = (net_h - new_h) // 2
    shift_x_ratio = (net_w - new_w) / 2.0 / net_w
    shift_y_ratio = (net_h - new_h) / 2.0 / net_h

    image_ = image.resize((new_w, new_h))
    new_image = np.zeros((net_h, net_w, 3), np.uint8)
    new_image[shift_y: new_h + shift_y, shift_x: new_w + shift_x, :] = np.array(image_)
    new_image = new_image.astype(np.float32)
    new_image = new_image / 255
    print('new_image.shape', new_image.shape)
    new_image = new_image.transpose(2, 0, 1).copy().reshape(1, 3, 608, 608)
    return new_image, image

def overlap(x1, x2, x3, x4):
    left = max(x1, x3)
    right = min(x2, x4)
    return right - left

def cal_iou(box, truth):
    w = overlap(box[0], box[2], truth[0], truth[2])
    h = overlap(box[1], box[3], truth[1], truth[3])
    if w <= 0 or h <= 0:
        return 0
    inter_area = w * h
    union_area = (box[2] - box[0]) * (box[3] - box[1]) + (truth[2] - truth[0]) * (truth[3] - truth[1]) - inter_area
    return inter_area * 1.0 / union_area

def apply_nms(all_boxes, thres):
    res = []

    for cls in range(class_num):
        cls_bboxes = all_boxes[cls]
        sorted_boxes = sorted(cls_bboxes, key=lambda d: d[5])[::-1]
        p = dict()
        for i in range(len(sorted_boxes)):
            if i in p:
                continue
            truth = sorted_boxes[i]
            for j in range(i + 1, len(sorted_boxes)):
                if j in p:
                    continue
                box = sorted_boxes[j]
                iou = cal_iou(box, truth)
                if iou >= thres:
                    p[j] = 1
        for i in range(len(sorted_boxes)):
            if i not in p:
                res.append(sorted_boxes[i])
    return res

def _sigmoid(x):
    return 1.0 / (1 + np.exp(-x))


def decode_bbox(conv_output, anchors, img_w, img_h, x_scale, y_scale, shift_x_ratio, shift_y_ratio):
    print('conv_output.shape', conv_output.shape)
    _, _, h, w = conv_output.shape
    conv_output = conv_output.transpose(0, 2, 3, 1)
    pred = conv_output.reshape((h * w, 3, 5 + class_num))
    pred[..., 4:] = _sigmoid(pred[..., 4:])
    pred[..., 0] = (_sigmoid(pred[..., 0]) + np.tile(range(w), (3, h)).transpose((1, 0))) / w
    pred[..., 1] = (_sigmoid(pred[..., 1]) + np.tile(np.repeat(range(h), w), (3, 1)).transpose((1, 0))) / h
    pred[..., 2] = np.exp(pred[..., 2]) * anchors[:, 0:1].transpose((1, 0)) / w
    pred[..., 3] = np.exp(pred[..., 3]) * anchors[:, 1:2].transpose((1, 0)) / h

    bbox = np.zeros((h * w, 3, 4))
    bbox[..., 0] = np.maximum((pred[..., 0] - pred[..., 2] / 2.0 - shift_x_ratio) * x_scale * img_w, 0)  # x_min
    bbox[..., 1] = np.maximum((pred[..., 1] - pred[..., 3] / 2.0 - shift_y_ratio) * y_scale * img_h, 0)  # y_min
    bbox[..., 2] = np.minimum((pred[..., 0] + pred[..., 2] / 2.0 - shift_x_ratio) * x_scale * img_w, img_w)  # x_max
    bbox[..., 3] = np.minimum((pred[..., 1] + pred[..., 3] / 2.0 - shift_y_ratio) * y_scale * img_h, img_h)  # y_max
    pred[..., :4] = bbox
    pred = pred.reshape((-1, 5 + class_num))
    pred[:, 4] = pred[:, 4] * pred[:, 5:].max(1)
    pred[:, 5] = np.argmax(pred[:, 5:], axis=-1)
    pred = pred[pred[:, 4] >= 0.2]
    print('pred[:, 5]', pred[:, 5])
    print('pred[:, 5] shape', pred[:, 5].shape)

    all_boxes = [[] for ix in range(class_num)]
    for ix in range(pred.shape[0]):
        box = [int(pred[ix, iy]) for iy in range(4)]
        box.append(int(pred[ix, 5]))
        box.append(pred[ix, 4])
        all_boxes[box[4] - 1].append(box)
    return all_boxes

def convert_labels(label_list):
    if isinstance(label_list, np.ndarray):
        label_list = label_list.tolist()
        label_names = [labels[int(index)] for index in label_list]
    return label_names


def post_process(infer_output, origin_img):
    print("post process")
    result_return = dict()
    img_h = origin_img.size[1]
    img_w = origin_img.size[0]
    scale = min(float(MODEL_WIDTH) / float(img_w), float(MODEL_HEIGHT) / float(img_h))
    new_w = int(img_w * scale)
    new_h = int(img_h * scale)
    shift_x_ratio = (MODEL_WIDTH - new_w) / 2.0 / MODEL_WIDTH
    shift_y_ratio = (MODEL_HEIGHT - new_h) / 2.0 / MODEL_HEIGHT
    class_number = len(labels)
    num_channel = 3 * (class_number + 5)
    x_scale = MODEL_WIDTH / float(new_w)
    y_scale = MODEL_HEIGHT / float(new_h)
    all_boxes = [[] for ix in range(class_number)]
    # print(infer_output[0].shape)
    # print(infer_output[1].shape)
    # print(infer_output[2].shape)
    for ix in range(3):
        pred = infer_output[ix]
        print('pred.shape', pred.shape)
        anchors = anchor_list[ix]
        boxes = decode_bbox(pred, anchors, img_w, img_h, x_scale, y_scale, shift_x_ratio, shift_y_ratio)
        all_boxes = [all_boxes[iy] + boxes[iy] for iy in range(class_number)]
        print("all_box:", all_boxes)
    res = apply_nms(all_boxes, iou_threshold)
    print("res:", res)
    if not res:
        result_return['detection_classes'] = []
        result_return['detection_boxes'] = []
        result_return['detection_scores'] = []
        return result_return
    else:
        new_res = np.array(res)
        picked_boxes = new_res[:, 0:4]
        picked_boxes = picked_boxes[:, [1, 0, 3, 2]]
        picked_classes = convert_labels(new_res[:, 4])
        picked_score = new_res[:, 5]
        result_return['detection_classes'] = picked_classes
        result_return['detection_boxes'] = picked_boxes.tolist()
        result_return['detection_scores'] = picked_score.tolist()
        return result_return

def preprocess_frame(bgr_img):
    bgr_img = bgr_img[:, :, ::-1]
    image = bgr_img
    image = LaneFinder.Image.fromarray(image.astype('uint8'), 'RGB')
    fframe = np.array(image)
    fframe = lf.process_image(fframe, False)
    frame = LaneFinder.Image.fromarray(fframe)
    framecv = cv.cvtColor(np.asarray(frame), cv.COLOR_RGB2BGR)
    return framecv

def calculate_position(bbox, transform_matrix, warped_size, pix_per_meter):
    if len(bbox) == 0:
        print('Nothing')
    else:
        point = np.array((bbox[1] / 2 + bbox[3] / 2, bbox[2])).reshape(1, 1, -1)
        pos = cv.perspectiveTransform(point, transform_matrix).reshape(-1, 1)
        return np.array((warped_size[1] - pos[1]) / pix_per_meter[1])

def main():
    if (len(sys.argv) != 2):
        print("Please input video path")
        exit(1)
    frame_count = 0
    sess = rt.InferenceSession('../model/yolov4_bs.onnx')
    #open video
    video_path = sys.argv[1]
    print("open video ", video_path)
    cap = cv.VideoCapture(video_path)
    fps = cap.get(cv.CAP_PROP_FPS)
    Width = int(cap.get(cv.CAP_PROP_FRAME_WIDTH))
    Height = int(cap.get(cv.CAP_PROP_FRAME_HEIGHT))

    lf.set_img_size((Width, Height))

    #create output directory
    if not os.path.exists(OUTPUT_DIR):
        os.mkdir(OUTPUT_DIR)
    output_Video = os.path.basename(video_path)
    output_Video = os.path.join(OUTPUT_DIR, output_Video)

    fourcc = cv.VideoWriter_fourcc(*'mp4v')  # DIVX, XVID, MJPG, X264, WMV1, WMV2
    outVideo = cv.VideoWriter(output_Video, fourcc, fps, (Width, Height))

    # 模型的输入和输出节点名,可以通过netron查看
    input_name = 'input'
    outputs_name = ['feature_map_1', 'feature_map_2', 'feature_map_3']
    # Read until video is completed
    while (cap.isOpened()):
        ret, frame = cap.read()
        if ret == True:
            #preprocess
            data, orig = preprocess(frame)
            result_list = sess.run(outputs_name, {input_name: data})
            result_return = post_process(result_list, orig)
            frame_with_lane = preprocess_frame(frame)

            distance = np.zeros(shape=(len(result_return['detection_classes']), 1))
            for i in range(len(result_return['detection_classes'])):
                box = result_return['detection_boxes'][i]
                class_name = result_return['detection_classes'][i]
                # confidence = result_return['detection_scores'][i]
                distance[i] = calculate_position(bbox=box, transform_matrix=perspective_transform,
                            warped_size=WARPED_SIZE, pix_per_meter=pixels_per_meter)
                label_dis = '{} {:.2f}m'.format('dis:', distance[i][0])
                cv.putText(frame_with_lane, label_dis, (int(box[1]) + 10, int(box[2]) + 15),
                            cv.FONT_ITALIC, 0.6, colors[i % 6], 1)

                cv.rectangle(frame_with_lane, (int(box[1]), int(box[0])), (int(box[3]), int(box[2])), colors[i % 6])
                p3 = (max(int(box[1]), 15), max(int(box[0]), 15))
                out_label = class_name
                cv.putText(frame_with_lane, out_label, p3, cv.FONT_ITALIC, 0.6, colors[i % 6], 1)

            outVideo.write(frame_with_lane)
            print("FINISH PROCESSING FRAME: ", frame_count)
            frame_count += 1
        else:
            break
    cap.release()
    outVideo.release()
    print("Execute end")


if __name__ == '__main__':
    path = './configure.json'
    config_file = open(path, "rb")
    fileJson = json.load(config_file)
    cam_matrix = fileJson[0]["cam_matrix"]
    dist_coeffs = fileJson[0]["dist_coeffs"]
    perspective_transform = fileJson[0]["perspective_transform"]
    pixels_per_meter = fileJson[0]["pixels_per_meter"]
    WARPED_SIZE = fileJson[0]["WARPED_SIZE"]
    ORIGINAL_SIZE = fileJson[0]["ORIGINAL_SIZE"]

    cam_matrix = np.array(cam_matrix)
    dist_coeffs = np.array(dist_coeffs)
    perspective_transform = np.array(perspective_transform)
    pixels_per_meter = tuple(pixels_per_meter)
    WARPED_SIZE = tuple(WARPED_SIZE)
    ORIGINAL_SIZE = tuple(ORIGINAL_SIZE)

    lf = LaneFinder.LaneFinder(ORIGINAL_SIZE, WARPED_SIZE, cam_matrix, dist_coeffs,
                    perspective_transform, pixels_per_meter)
    main()
3.结果视频
4. 结尾
代码可以去资源下载,就这样吧