最近在做汽车相关的项目,然后要根据最新发布的新国标接入,我们这边之前没有做过的,我是第一个,好惨啊。远程调试不通,后来还专门到现场进行了测试,来到刚刚转正没几天就开始出差了,命太苦了。
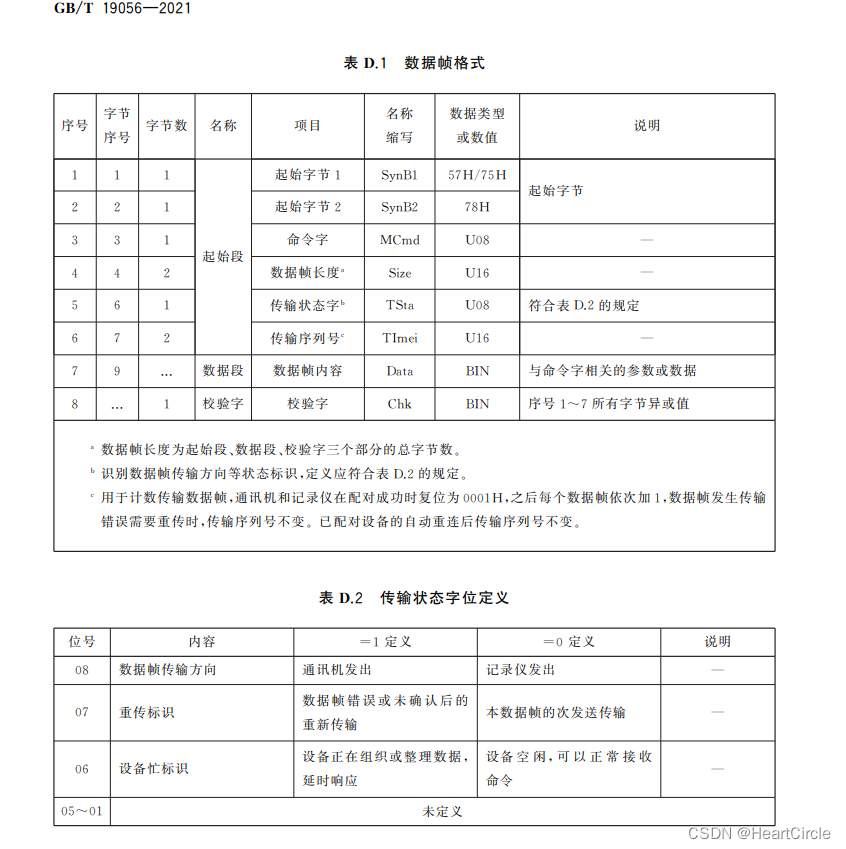
1. 言归正传,先看一下协议说明:
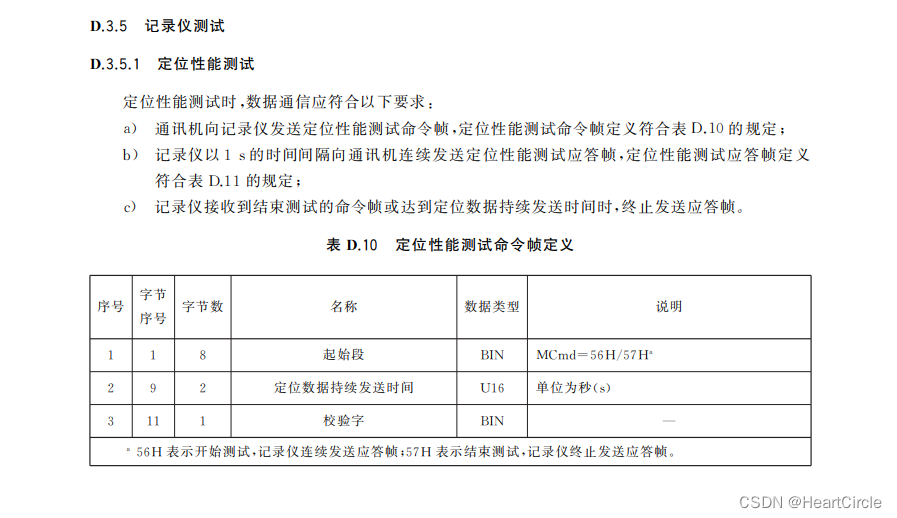
我之前没看懂什么叫起始段,然后走了很多弯路,然后在现场问了一个其他公司的老手之后才发现原来前面有定义的:
其实只要认真看文档,加上构建buffer的知识其实还是很好写出来的,但我两者都不具备,所以就走了很多弯路下面直接上代码。第一个注意点是我们Android设备是作为蓝牙监听方,那么就需要有一个监听的uuid,这个uuid在车管所那边是固定的:00001101-0000-1000-8000-00805F9B34FB,这个你问他们,也不会告诉你的,因为对方开发测试程序的人就不在。
2. 源代码
2.1 创建蓝牙服务器
调用:
acceptThread = new AcceptThread("00001101-0000-1000-8000-00805F9B34FB");
        acceptThread.start();
/**
* 蓝牙监听线程
*/
private class AcceptThread extends Thread {
private BluetoothServerSocket mmServerSocket = null;
public AcceptThread(String uuid) {
BluetoothServerSocket tmp = null;
try {
PLog.i("AcceptThread uuid = " + uuid);
// 创建一个蓝牙服务器
mmServerSocket = mBluetoothAdapter.listenUsingRfcommWithServiceRecord("VDRXXXXXXXX", UUID.fromString(uuid));
PLog.i("AcceptThread mmServerSocket = " + mmServerSocket);
} catch (Exception e) {
Log.e(TAG, "Socket's listen() method failed", e);
}
}
public void run() {
BluetoothSocket bluetoothSocket = null;
while (true) {
try {
// 接受客户端的连接请求
bluetoothSocket = mmServerSocket.accept();
PLog.i("AcceptThread bluetoothSocket = " + bluetoothSocket);
} catch (Exception e) {
Log.e(TAG, "Socket's accept() method failed", e);
break;
}
if (bluetoothSocket != null) {
PLog.i("AcceptThread accept success");
// 开启接收线程
socketThread = new MyBluetoothService.ConnectedThread(bluetoothSocket, MainActivity.this);
socketThread.start();
// 关闭服务
try {
mmServerSocket.close();
} catch (IOException e) {
e.printStackTrace();
}
break;
}
}
}
// Closes the connect socket and causes the thread to finish.
public void cancel() {
try {
mmServerSocket.close();
} catch (IOException e) {
Log.e(TAG, "Could not close the connect socket", e);
}
}
}2.2 接收线程
初始化:
public ConnectedThread(BluetoothSocket socket, GpsInfoCallBack gpsInfoCallBack) {
            PLog.i("ConnectedThread start");
            this.gpsInfoCallBack = gpsInfoCallBack;
            mmSocket = socket;
            // Get the input and output streams; using temp objects because
            // member streams are final.
            try {
                mmInStream = socket.getInputStream();
            } catch (IOException e) {
                Log.e(TAG, "Error occurred when creating input stream", e);
            }
            try {
                mmOutStream = socket.getOutputStream();
            } catch (IOException e) {
                Log.e(TAG, "Error occurred when creating output stream", e);
            }

            PLog.i("ConnectedThread mmInStream =" + mmInStream + ", mmOutStream = " + mmOutStream);
        }
run方法:
public void run() {
            // 读取数据
            mmBuffer = new byte[1024];
            int numBytes; // bytes returned from read()

            // Keep listening to the InputStream until an exception occurs.
            while (true) {
                try {
                    // Read from the InputStream.
                    numBytes = mmInStream.read(mmBuffer);
                    if (numBytes == -1) {
                        continue;
                    }
                    byte[] start_bytes = new byte[8];
                    byte[] data_bytes = new byte[2];
                    byte[] check_bytes = new byte[1];

                    PLog.i("ConnectedThread 接收到数据 numBytes = " + numBytes + ", mmBuffer = "
                            + CommUtils.bytesToHexString(mmBuffer));
                    System.arraycopy(mmBuffer, 0, start_bytes, 0, 8);
                    System.arraycopy(mmBuffer, 8, data_bytes, 0, 2);
                    System.arraycopy(mmBuffer, 10, check_bytes, 0, 1);

                    String startStr = CommUtils.bytesToHexString(start_bytes);

                    int dataLength = CommUtils.bytesToShortBigEndian(data_bytes);

                    String checkStr = CommUtils.bytesToHexString(check_bytes);
                    PLog.i("ConnectedThread startStr = " + startStr + ", dataLength = "
                            + dataLength + ", checkStr = " + checkStr);

                    if (startStr.startsWith("757856")) {
                        PLog.i("ConnectedThread 开始测试");
                        // 表示开始测试
                        startTimerTask();
                    } else if (startStr.startsWith("757857")) {
                        // 表示结束测试
                        PLog.i("ConnectedThread 结束测试");
                        cancel();
                    }
                } catch (Exception e) {
                    e.printStackTrace();
                    PLog.w("ConnectedThread read data error = ", e);
                    break;
                }
            }
        }
2.3 数据回传
        private void startTimerTask() {
            timerTask = new TimerTask() {
                @Override
                public void run() {
                    String data = gpsInfoCallBack.getCallback();
                    PLog.i("ConnectedThread data = " + data);
                    if (TextUtils.isEmpty(data)) {
                        PLog.i("ConnectedThread 数据 is empty");
                        return;
                    }
                    String[] splitArray = data.split("\\|");
                    if (splitArray.length < 2) {
                        PLog.i("ConnectedThread 数据不符合规则");
                        return;
                    }
                    String GGA = splitArray[0];
                    String RMC = splitArray[1];

                    byte[] sendData = buildSendData3(GGA, RMC);
                    String sendDataHex = CommUtils.bytesToHexString(sendData);

                    PLog.i("ConnectedThread sendDataHex = " + sendDataHex);

                    write(sendData);
                    PLog.i("ConnectedThread senddata success ");
                }
            };
            timer.schedule(timerTask, 0, 1000);
        }
2.4 数据构建
这里有一点需要注意参数gga和rmc需要完成的数据帧,不需要对数据做处理:
eg:
$GNGGA,021620.994,3135.0893,N,12013.6337,E,0,0,,26.8,M,6.8,M,,*5A
$GNRMC,021621.494,A,3135.0889,N,12013.6337,E,0.791,2.88,111122,,,A*4F
至于每个数据代表什么,网上有很多资料的,这里就不一一赘述了。
private byte[] buildSendData3(String gga, String rmc) {
            // 起始段
            byte[] sendBuff = new byte[1024];
            System.arraycopy(mmBuffer, 0, sendBuff, 0, sendBuff.length);
            // 起始字节 记录仪 57 78
            System.arraycopy(CommUtils.hexToBytes("57"), 0, sendBuff, 0, 1);
            System.arraycopy(CommUtils.hexToBytes("78"), 0, sendBuff, 1, 1);

            // 命令字
            System.arraycopy(CommUtils.hexToBytes("D6"), 0, sendBuff, 2, 1);

            // 数据长度放最后计算

            // 传输状态字 80-通讯机发出 c0--通讯机重传  00--记录仪正常发出 40--记录仪重传
            System.arraycopy(CommUtils.hexToBytes("00"), 0, sendBuff, 5, 1);
            // 计算序列号
            byte[] ack_bytes = new byte[2];
            System.arraycopy(mmBuffer, 6, ack_bytes, 0, 2);
            String ackHex = CommUtils.bytesToHexString(ack_bytes);
            int ack = CommUtils.hex2Int(ackHex);
            int newAck = ack + 1;
            PLog.i("buildSendData3 newAck = " + newAck);
            String newHexAck = CommUtils.numToHex16(newAck);
            // 传输序列号 匹配成功后为 01,之后每个数据 + 1
            System.arraycopy(CommUtils.hexToBytes(newHexAck), 0, sendBuff, 6, 2);

            // 数据段
            String ggaHex = CommUtils.str2HexStr(gga);
            byte[] ggaBytes = CommUtils.hexToBytes(ggaHex);
            int ggaLength = ggaBytes.length;
            String rmcHex = CommUtils.str2HexStr(rmc);
            byte[] rmcBytes = CommUtils.hexToBytes(rmcHex);
            int rmcLength = rmcBytes.length;

            SimpleDateFormat format_nomalHH = new SimpleDateFormat("yy-MM-dd HH:mm:ss", Locale.getDefault());
            String date = format_nomalHH.format(new Date());
            String[] temp = date.split(" ");
            String year = temp[0].split("-")[0];
            String month = temp[0].split("-")[1];
            String day = temp[0].split("-")[2];
            String hour = temp[1].split(":")[0];
            String minute = temp[1].split(":")[1];
            String second = temp[1].split(":")[2];
            // 1. 时间
            System.arraycopy(BCDUtils.StrToBCDBytes(year), 0, sendBuff, 8, 1);
            System.arraycopy(BCDUtils.StrToBCDBytes(month), 0, sendBuff, 9, 1);
            System.arraycopy(BCDUtils.StrToBCDBytes(day), 0, sendBuff, 10, 1);
            System.arraycopy(BCDUtils.StrToBCDBytes(hour), 0, sendBuff, 11, 1);
            System.arraycopy(BCDUtils.StrToBCDBytes(minute), 0, sendBuff, 12, 1);
            System.arraycopy(BCDUtils.StrToBCDBytes(second), 0, sendBuff, 13, 1);
            // 2. GGA 数据长度
            String ggaLengthHex = CommUtils.numToHex16(ggaLength);
            System.arraycopy(CommUtils.hexToBytes(ggaLengthHex), 0, sendBuff, 14, 2);
            // 3. RMC数据长度
            String rmcLengthHex = CommUtils.numToHex16(rmcLength);
            System.arraycopy(CommUtils.hexToBytes(rmcLengthHex), 0, sendBuff, 16, 2);

            PLog.i("buildSendData3 ggaLengthHex = " + ggaLengthHex + ", ggaLength = " + ggaLength);
            PLog.i("buildSendData3 rmcLengthHex = " + rmcLengthHex + ", rmcLength = " + rmcLength);
            // 4. GGA 数据 ascii
            System.arraycopy(ggaBytes, 0, sendBuff, 18, ggaLength);
            // 5. RMC 数据 ascii
            System.arraycopy(rmcBytes, 0, sendBuff, 18 + ggaLength, rmcLength);

            int start = 18 + ggaLength + rmcLength;
            PLog.i("buildSendData3 start = " + start);

            int totalDatalength = start + 1;
            // 数据帧长度-为起始段(8)、数据段、校验字(1)三个部分的总字节数。
            String dataLengthHex = CommUtils.numToHex16(totalDatalength);
            PLog.i("buildSendData3 dataLenth = " + totalDatalength + ", datalengthHex = " + dataLengthHex);
            System.arraycopy(CommUtils.hexToBytes(dataLengthHex), 0, sendBuff, 3, 2);

            // 校验字 最后一位
            byte[] checkByte = new byte[1];
            checkByte[0] = (byte) (sendBuff[0] ^ sendBuff[1]);
            for (int i = 2; i < start; i++) {
                checkByte[0] = (byte) (checkByte[0] ^ sendBuff[i]);
            }
            String chekHexStr = CommUtils.bytesToHexString(checkByte);
            PLog.i("buildSendData3 chekHexStr = " + chekHexStr);
            System.arraycopy(CommUtils.hexToBytes(chekHexStr), 0, sendBuff, start, 1);
            return sendBuff;
        }
主要它有些是16进制的数据,需要转成二进制去写入,这个转换如果有问题,你拼接的在对对方也是无响应的,因为对方的设备是按照固定的数据格式接收的,有问题的数据,一律不接收。
3. 工具类
最后把这个工具类放上,可以供给大家作参考,觉得可以的,可以支持一下博主,感谢。
package com.example.testgpsproject;


import java.io.ByteArrayOutputStream;

public class CommUtils {

    /**
     * 将日期转成6字节的bcd
     *
     * @param asc
     * @return
     */
    public static byte[] str2Bcd(String asc) {
        int len = asc.length();
        int mod = len % 2;

        if (mod != 0) {
            asc = "0" + asc;
            len = asc.length();
        }

        byte abt[] = new byte[len];
        if (len >= 2) {
            len = len / 2;
        }

        byte bbt[] = new byte[len];
        abt = asc.getBytes();
        int j, k;

        for (int p = 0; p < asc.length() / 2; p++) {
            if ((abt[2 * p] >= '0') && (abt[2 * p] <= '9')) {
                j = abt[2 * p] - '0';
            } else if ((abt[2 * p] >= 'a') && (abt[2 * p] <= 'z')) {
                j = abt[2 * p] - 'a' + 0x0a;
            } else {
                j = abt[2 * p] - 'A' + 0x0a;
            }

            if ((abt[2 * p + 1] >= '0') && (abt[2 * p + 1] <= '9')) {
                k = abt[2 * p + 1] - '0';
            } else if ((abt[2 * p + 1] >= 'a') && (abt[2 * p + 1] <= 'z')) {
                k = abt[2 * p + 1] - 'a' + 0x0a;
            } else {
                k = abt[2 * p + 1] - 'A' + 0x0a;
            }

            int a = (j << 4) + k;
            byte b = (byte) a;
            bbt[p] = b;
        }
        return bbt;
    }

    /**
     * string 转16进制字符串
     *
     * @param str
     * @return
     */
    public static String str2HexStr(String str) {
        char[] chars = "0123456789abcdef".toCharArray();
        StringBuilder sb = new StringBuilder("");
        byte[] bs = str.getBytes();
        int bit;
        for (int i = 0; i < bs.length; i++) {
            bit = (bs[i] & 0x0f0) >> 4;
            sb.append(chars[bit]);
            bit = bs[i] & 0x0f;
            sb.append(chars[bit]);
            // sb.append(' ');
        }
        return sb.toString().trim();
    }

    /**
     * 16进制字符串 转成 普通字符串
     *
     * @param hexStr
     * @return
     */
    public static String hexStr2Str(String hexStr) {
        String str = "0123456789abcdef";
        char[] hexs = hexStr.toCharArray();
        byte[] bytes = new byte[hexStr.length() / 2];
        int n;
        for (int i = 0; i < bytes.length; i++) {
            n = str.indexOf(hexs[2 * i]) * 16;
            n += str.indexOf(hexs[2 * i + 1]);
            bytes[i] = (byte) (n & 0xff);
        }
        return new String(bytes);
    }


    /*小端,低字节在后*/
    public static short bytesToShortLittleEndian(byte[] bytes) {
        // byte数组中序号小的在右边
        return (short) (bytes[0] & 0xFF | (bytes[1] & 0xFF) << 8);
    }

    /**
     * 16进制转10进制
     *
     * @param hexstr
     * @return
     */
    public static int hex2Int(String hexstr) {
        return Integer.parseInt(hexstr, 16);
    }

    // 数字转16进制 2个字节表示
    public static String numToHex16(int b) {
        return String.format("%04x", b);
    }

    /*大端,高字节在后*/
    public static short bytesToShortBigEndian(byte[] bytes) {
        // byte数组中序号大的在右边
        return (short) (bytes[1] & 0xFF | (bytes[0] & 0xFF) << 8);
    }

    public static byte[] hexToBytes(String hex) {
        hex = hex.length() % 2 != 0 ? "0" + hex : hex;

        byte[] b = new byte[hex.length() / 2];
        for (int i = 0; i < b.length; i++) {
            int index = i * 2;
            int v = Integer.parseInt(hex.substring(index, index + 2), 16);
            b[i] = (byte) v;
        }
        return b;
    }

    public static String bytesToHexString(byte... src) {
        StringBuilder stringBuilder = new StringBuilder();
        if (src == null || src.length <= 0) {
            return null;
        }
        for (int i = 0; i < src.length; i++) {
            int v = src[i] & 0xFF;
            String hv = Integer.toHexString(v);
            if (hv.length() < 2) {
                stringBuilder.append(0);
            }
            stringBuilder.append(hv);
        }
        return stringBuilder.toString();
    }

    /**
     * 通过16进制字符串计算出校验字段的值
     *
     * @param hexStr 序号1-7的16进制字符串
     * @return
     */
    public static String getCheckHex(String hexStr) {
        byte[] sendBuff = CommUtils.hexToBytes(hexStr);
        PLog.i("getCheckHex length = " + sendBuff.length);
        byte[] checkByte = new byte[1];
        checkByte[0] = (byte) (sendBuff[0] ^ sendBuff[1]);
        for (int i = 2; i < sendBuff.length; i++) {
            checkByte[0] = (byte) (checkByte[0] ^ sendBuff[i]);
        }

        String chekStr = CommUtils.bytesToHexString(checkByte);
        return chekStr;
    }
}
4. 总结:
其实文档已经说的很清楚了,但是数据的组装,以及网上没有相关的资料,我是扒了它的不分源码才找到头绪的,记录一下。
![前沿系列--Transform架构[架构分析+代码实现]](https://img-blog.csdnimg.cn/d125a74c23b74b8cb7eed41f1781ec49.png)


![[FireshellCTF2020]Caas](https://img-blog.csdnimg.cn/a8cca0273f514933a612d556de0ac0eb.png)