Spring Security基础使用
定义
官方文档:https://docs.spring.io/spring-security/reference/index.html
security结合servelt:https://docs.spring.io/spring-security/reference/5.6/servlet/getting-started.html
Security 官方示例项目:https://github.com/spring-projects/spring-security-samples/tree/5.6.x
Spring Security是一个能够为基于Spring的企业应用系统提供声明式的安全访问控制解决方案的安全框架。Spring Security 主要实现了Authentication(认证,解决who are you? ) 和 Access Control(访问控制,也就是what are you allowed to do?,也称为Authorization)。Spring Security在架构上将认证与授权分离,并提供了扩展点。
认证 :用户认证就是判断一个用户的身份是否合法的过程,用户去访问系统资源时系统要求验证用户的身份信息,身份合法方可继续访问,不合法则拒绝访问。常见的用户身份认证方式有:用户名密码登录,二维码登录,手机短信登录,指纹认证等方式。
授权: 授权是用户认证通过根据用户的权限来控制用户访问资源的过程,拥有资源的访问权限则正常访问,没有权限则拒绝访问。
SpringSecurity是一个提供身份验证、授权和防止常见攻击的框架。凭借对保护命令式和反应式应用程序的一流支持,它是保护基于Spring的应用程序的事实标准。
SpringSecurity 可以针对 servlet and reactive. ,显然我reactive我还不会,这里就针对serrvlet了解一下
然后本文大致讲一下基础使用,和部分源码流程(主要用于辅助理解)
Spring Security和Shiro比较
在 Java 生态中,目前有 Spring Security 和 Apache Shiro 两个安全框架,可以完成认证和授权的功能。
- Spring Security
- Apache Shiro:一个功能强大且易于使用的Java安全框架,提供了认证,授权,加密,和会话管理。
相同点:
1:认证功能
2:授权功能
3:加密功能
4:会话管理
5:缓存支持
6:rememberMe功能…
不同点:
优点:
1:Spring Security基于Spring开发,项目中如果使用Spring作为基础,配合Spring Security做权限更加方便,而Shiro需要和Spring进行整合开发
2:Spring Security功能比Shiro更加丰富些,例如安全防护
3:Spring Security社区资源比Shiro丰富
缺点:
1:Shiro的配置和使用比较简单,Spring Security上手复杂
2:Shiro依赖性低,不需要任何框架和容器,可以独立运行,而Spring Security依赖于Spring容器
总之先随便了解一个
Spring Security 模块
官方文档:https://docs.spring.io/spring-security/reference/5.6.8/modules.html
以下仅做参考,具体查看那官方文旦,更全面
- 核心模块 - spring-security-core.jar:包含核心验证和访问控制类和接口,远程支持的基本配置API,是基本模块
- 远程调用 - spring-security-remoting.jar:提供与 Spring Remoting 集成
- 网页 - spring-security-web.jar:包括网站安全的模块,提供网站认证服务和基于URL访问控制
- 配置 - spring-security-config.jar:包含安全命令空间解析代码,若使用XML进行配置则需要
- LDAP - spring-security-ldap.jar:LDAP 验证和配置,若需要LDAP验证和管理LDAP用户实体
- ACL访问控制表 - spring-security-acl.jar:ACL(Access Control List)专门领域对象的实现
- CAS - spring-security-cas.jar:CAS(Central Authentication Service)客户端继承,若想用CAS的SSO服务器网页验证
- OpenID - spring-security-openid.jar:OpenID网页验证支持
- Test - spring-security-test.jar:支持Spring Security的测试
Spring Security使用
多种方式设置用户名密码
1、快速开始
依赖
        <!-- 实现对 Spring Security 的自动化配置 -->
        <dependency>
            <groupId>org.springframework.boot</groupId>
            <artifactId>spring-boot-starter-security</artifactId>
        </dependency>
编写一个controller
…,随意啦,这里不贴代码了
测试
然后如果通过postman访问,服务端报错,响应401(表示没有认证)
org.springframework.security.access.AccessDeniedException: Access is denied
通过浏览器访问就会跳转到一个内置的登录界面
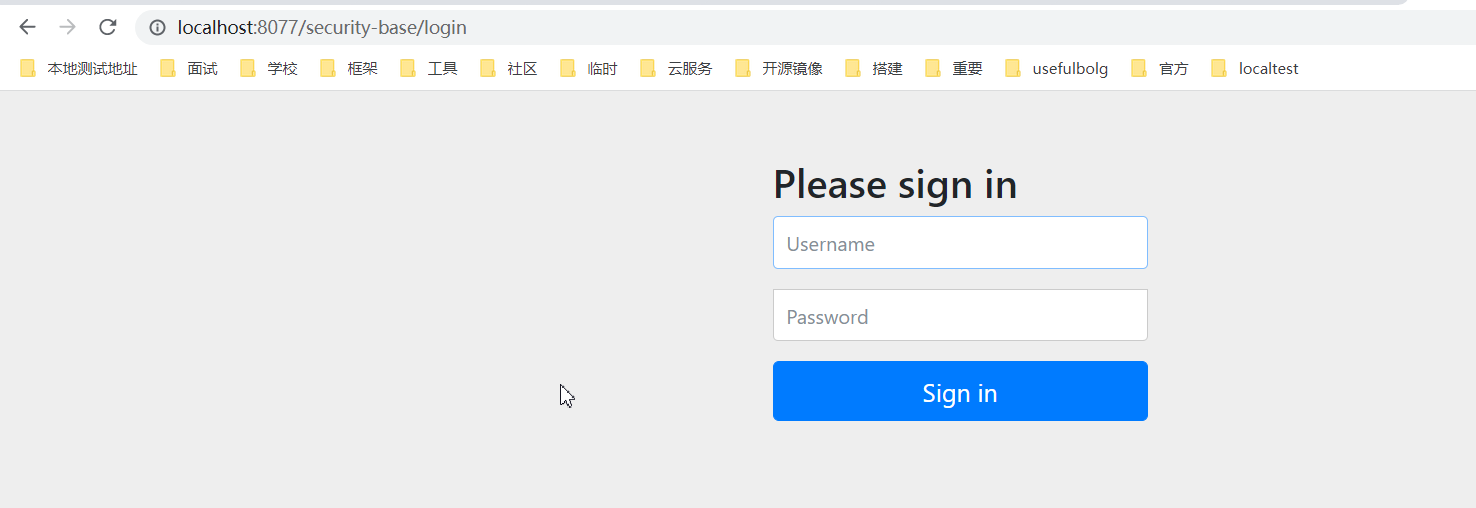
控制台日志在启动时会打印访问的密码,而默认的登录用户是user
Using generated security password: d5b4810b-7716-4fb3-8a85-537ee4181af0

This generated password is for development use only. Your security configuration must be updated before running your application in production.
测试原理1
1、日志中你可以看到密码是UserDetailsServiceAutoConfiguration这个自动配置类打印出来的,
2、这个配置类为我们创建了一个(基于内存的用户信息管理对象),
3、然后这个对象初始化的时候使用了SecurityProperties中的静态内部类user对象,这个User类的name属性默认是user,passwoed默认属性是通过uuid生成
4、InMemoryUserDetailsManager在配置类中初始化时会打印这个默认生成的密码
2、基于配置文件中设置的用户名密码访问
配置
spring:
  # Spring Security 配置项,对应 SecurityProperties 配置类
  security:
    # 配置默认的 InMemoryUserDetailsManager 的用户账号与密码。
    user:
      name: sry # 账号
      password: 123456 # 密码
测试
就是这么配置之后就可以通过我们设置的用户名和密码登录成功
测试原理2
请先查看本文测试原理1
1、SecurityProperties上面有注解,会读取我们的配置项,根据配置项来初始化我们的User
@ConfigurationProperties(prefix = "spring.security")
2、初始化自然会调用其setPassWord方法,这个方法中设置了User的属性passwordGenerated,这个属性默认是true,
3、UserDetailsServiceAutoConfiguration初始化InMemoryUserDetailsManager时,InMemoryUserDetailsManager会根据User的属性passwordGenerated来判断是否打印初始密码
3、实现UserDetailsService接口
代码
@Service
public class UserDetailsServiceImpl implements UserDetailsService {

    @Override
    public UserDetails loadUserByUsername(String username) throws UsernameNotFoundException {
        ArrayList<String> roles = new ArrayList<>();
        UserDetails userDetails = User.withUsername("fox")
                .password("{noop}123456").roles(StringUtils.toStringArray(roles)).build();

        return userDetails;
    }
}
测试原理3
1、UserDetailsServiceAutoConfiguration创建了默认的 InMemoryUserDetailsManager(基于内存的用户管理对象),InMemoryUserDetailsManager继承自UserDetailsService,所以我们可以自行继承UserDetailsService来实现我们自己的获取用户信息的管理类
2、UserDetailsServiceAutoConfiguration上包含了注解,所以你懂得,如果我们自行实现了UserDetailsService,那么UserDetailsServiceAutoConfiguration配置类将不会再生效
@ConditionalOnMissingBean(
		value = { AuthenticationManager.class, AuthenticationProvider.class, UserDetailsService.class,
				AuthenticationManagerResolver.class },
3、所以我们这么搞了之后,配置文件中配置用户名密码就无效了
4.WebSecurityConfigurerAdapter
WebSecurityConfigurerAdapter是Sercurity的配置类,可以配置很多设置,这里演示配置用户密码
代码
@Configuration
public class WebSecurityConfig extends WebSecurityConfigurerAdapter {

    @Resource
    private UserDetailsServiceImpl userDetailsService;

    @Override
    protected void configure(AuthenticationManagerBuilder auth) throws Exception {
        String password = passwordEncoder().encode("123456");
        auth
            // 使用基于内存的 InMemoryUserDetailsManager
            .inMemoryAuthentication()
            //使用 PasswordEncoder 密码编码器
            //.passwordEncoder(passwordEncoder())
            // 配置用户
            .withUser("fox").password(password).roles("admin")
            // 配置其他用户
            .and()
            .withUser("fox2").password(password).roles("user");

        // 或者你也可以直接指定我们自己实现的userDetailsService
//        auth.userDetailsService(userDetailsService);

    }

    @Bean
    public PasswordEncoder passwordEncoder(){
        //return NoOpPasswordEncoder.getInstance();
        return new BCryptPasswordEncoder();
    }
}
测试
配置类中设置的userDetailsService(用户信息获取类)的优先级更高,我们自己实现的userDetailsService实现已经不生效了
如果有多个userDetailsService实现,可以使用 auth.userDetailsService(userDetailsService);进行指定
WebSecurityConfigurerAdapter配置类生效原理4
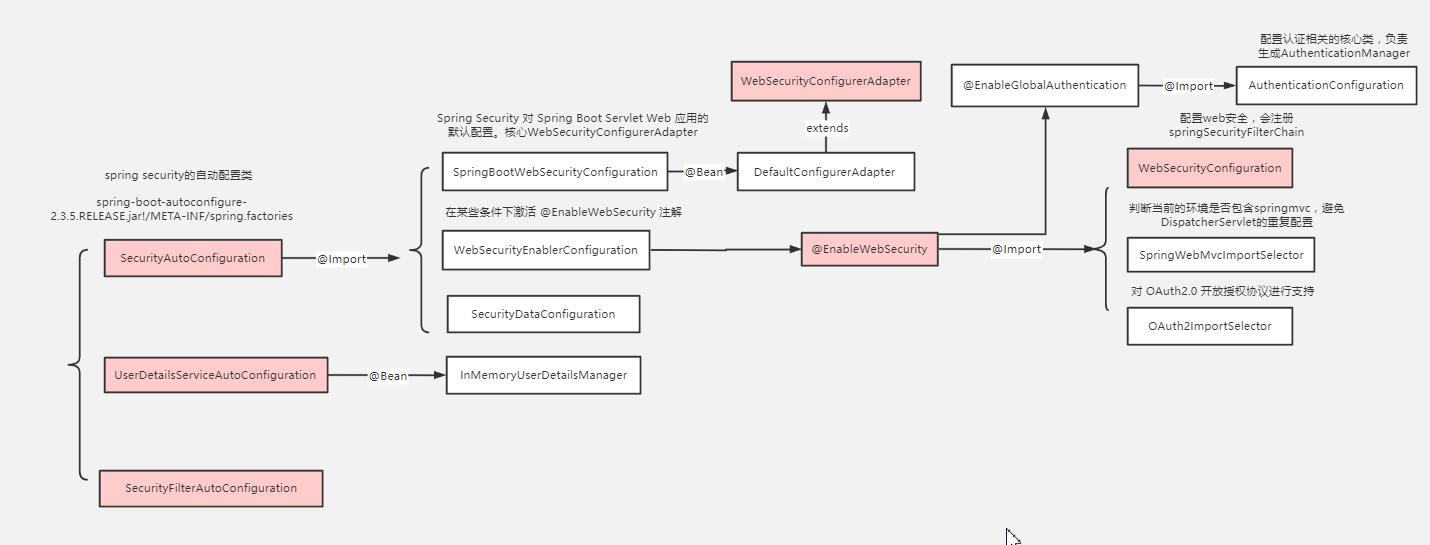
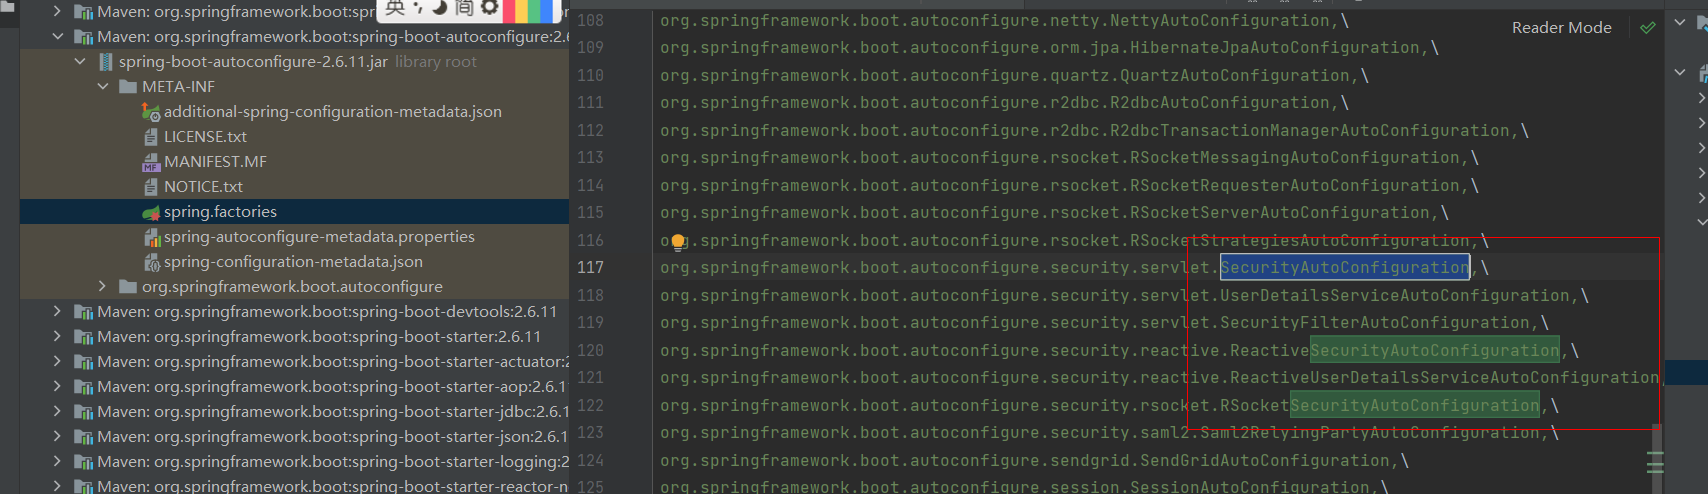
1、@SpringBootApplication中包含了@EnableAutoConfiguration注解,这个注解中包含了Import(AutoConfigurationImportSelector.class),AutoConfigurationImportSelector会为我们加载依赖引入的包中/META-INF/spring.factories,
2、spring-boot-autoconfigure-2.3.5.RELEASE.jar!/META-INF/spring.factories 中包含了 SecurityAutoConfiguration,所以我们启动后会扫描这个配置类,一般spring-boot-starter-xx 都会有对应的配置类,命名一般都是XXAutoConfiguration
3、SecurityAutoConfiguration配置类中又导入了SpringBootWebSecurityConfiguration和WebSecurityEnablerConfiguration
@Configuration(proxyBeanMethods = false)
@ConditionalOnClass(DefaultAuthenticationEventPublisher.class)
@EnableConfigurationProperties(SecurityProperties.class)
@Import({ SpringBootWebSecurityConfiguration.class, WebSecurityEnablerConfiguration.class,
		SecurityDataConfiguration.class, ErrorPageSecurityFilterConfiguration.class })
public class SecurityAutoConfiguration {
4、关键来了,SpringBootWebSecurityConfiguration会生成一个默认的WebSecurityConfigurerAdapter,但上面有@ConditionalOnMissingBean(WebSecurityConfigurerAdapter.class),说明最终注入到容器中的还是我们自行实现的WebSecurityConfigurerAdapter
@Configuration(proxyBeanMethods = false)
@ConditionalOnDefaultWebSecurity
@ConditionalOnWebApplication(type = Type.SERVLET)
class SpringBootWebSecurityConfiguration {

	@Bean
	@Order(SecurityProperties.BASIC_AUTH_ORDER)
	SecurityFilterChain defaultSecurityFilterChain(HttpSecurity http) throws Exception {
		http.authorizeRequests().anyRequest().authenticated().and().formLogin().and().httpBasic();
		return http.build();
	}

}
@Target({ ElementType.TYPE, ElementType.METHOD })
@Retention(RetentionPolicy.RUNTIME)
@Documented
@Conditional(DefaultWebSecurityCondition.class)
public @interface ConditionalOnDefaultWebSecurity {

}
class DefaultWebSecurityCondition extends AllNestedConditions {

	DefaultWebSecurityCondition() {
		super(ConfigurationPhase.REGISTER_BEAN);
	}

	@ConditionalOnClass({ SecurityFilterChain.class, HttpSecurity.class })
	static class Classes {

	}

	@ConditionalOnMissingBean({ WebSecurityConfigurerAdapter.class, SecurityFilterChain.class })
	static class Beans {

	}

}
5、我们自行实现的WebSecurityConfigurerAdapter又是怎么生效的内WebSecurityEnablerConfiguration中@EnableWebSecurity
@Configuration(proxyBeanMethods = false)
@ConditionalOnBean(WebSecurityConfigurerAdapter.class)
@ConditionalOnMissingBean(name = BeanIds.SPRING_SECURITY_FILTER_CHAIN)
@ConditionalOnWebApplication(type = ConditionalOnWebApplication.Type.SERVLET)
@EnableWebSecurity
public class WebSecurityEnablerConfiguration {
6、@EnableWebSecurity中的@EnableGlobalAuthentication又包含了AuthenticationConfiguration
@EnableGlobalAuthentication
@Configuration
public @interface EnableWebSecurity {
@Import(AuthenticationConfiguration.class)
@Configuration
public @interface EnableGlobalAuthentication {

}
7、AuthenticationConfiguration这个类中包含了大量Security配置的初始化,但是我没找到哪里用了WebSecurityConfigurerAdapter的配置,后续再说吧
PasswordEncoder设置
官方文档
编码器使用示例
UserDetails userDetails = User.withUsername("fox")
        .password("{noop}123456").roles(StringUtils.toStringArray(roles)).build();
    @Autowired
    PasswordEncoder passwordEncoder;
    @Override
    public UserDetails loadUserByUsername(String username) throws UsernameNotFoundException {
        String pw = passwordEncoder.encode("123456");
UserDetails userDetails = User.withUsername("fox")
        .password(pw).roles(StringUtils.toStringArray(roles)).build();
    }
spring security支持多种密码编码器,使用方式同上,仅做演示,一般我们如果使用了某种加密方式,存在数据库的应该就是对应加密方式的密文了。
支持哪些编码器
我们可以在PasswordEncoderFactories中查看到具体支持哪些编码器
	public static PasswordEncoder createDelegatingPasswordEncoder() {
		String encodingId = "bcrypt";
		Map<String, PasswordEncoder> encoders = new HashMap<>();
		encoders.put(encodingId, new BCryptPasswordEncoder());
		encoders.put("ldap", new org.springframework.security.crypto.password.LdapShaPasswordEncoder());
		encoders.put("MD4", new org.springframework.security.crypto.password.Md4PasswordEncoder());
		encoders.put("MD5", new org.springframework.security.crypto.password.MessageDigestPasswordEncoder("MD5"));
		encoders.put("noop", org.springframework.security.crypto.password.NoOpPasswordEncoder.getInstance());
		encoders.put("pbkdf2", new Pbkdf2PasswordEncoder());
		encoders.put("scrypt", new SCryptPasswordEncoder());
		encoders.put("SHA-1", new org.springframework.security.crypto.password.MessageDigestPasswordEncoder("SHA-1"));
		encoders.put("SHA-256",
				new org.springframework.security.crypto.password.MessageDigestPasswordEncoder("SHA-256"));
		encoders.put("sha256", new org.springframework.security.crypto.password.StandardPasswordEncoder());
		encoders.put("argon2", new Argon2PasswordEncoder());
		return new DelegatingPasswordEncoder(encodingId, encoders);
	}
配置默认的编码器
我们密码使用了那种编码器,那么我们secrity也要使用对应的编码器才能通过,在我们示例1中,security默认使用的是{noop}编码器,也就是不加密,而sercurity推荐使用BCryptPasswordEncoder
配置的方式如下
随意找个配置类注入编码器对象即可,为了统一管理,最好统一放在WebSecurityConfigurerAdapter下
@Configuration
public class WebSecurityConfig2 extends WebSecurityConfigurerAdapter {

    @Bean
    public PasswordEncoder passwordEncoder(){
        return new BCryptPasswordEncoder();
    }
}
BCryptPasswordEncoder是一种单向加密机制,相同的密码经过加密可以得到不同的密文。
需要说明的,security设置编码器后输入的密码还是明文
实现数据库认证
表构建
总之就是在我们自行实现UserDetailsService或获取用户信息,角色,权限等数据
主要 是创建用户表,用户和角色关联表,角色表,角色和权限关联表,权限表
CREATE TABLE `tb_user` (
  `id` bigint(20) NOT NULL AUTO_INCREMENT,
  `username` varchar(50) NOT NULL COMMENT '用户名',
  `password` varchar(64) NOT NULL COMMENT '密码,加密存储',
  `phone` varchar(20) DEFAULT NULL COMMENT '注册手机号',
  `email` varchar(50) DEFAULT NULL COMMENT '注册邮箱',
  `created` datetime NOT NULL,
  `updated` datetime NOT NULL,
  PRIMARY KEY (`id`),
  UNIQUE KEY `username` (`username`) USING BTREE,
  UNIQUE KEY `phone` (`phone`) USING BTREE,
  UNIQUE KEY `email` (`email`) USING BTREE
) ENGINE=InnoDB AUTO_INCREMENT=38 DEFAULT CHARSET=utf8 COMMENT='用户表';
insert  into `tb_user`(`id`,`username`,`password`,`phone`,`email`,`created`,`updated`) values
(37,'sry','$2a$10$9ZhDOBp.sRKat4l14ygu/.LscxrMUcDAfeVOEPiYwbcRkoB09gCmi','158xxxxxxx','xxxxxxx@gmail.com','2019-04-04 23:21:27','2019-04-04 23:21:29');

CREATE TABLE `tb_role` (
  `id` bigint(20) NOT NULL AUTO_INCREMENT,
  `parent_id` bigint(20) DEFAULT NULL COMMENT '父角色',
  `name` varchar(64) NOT NULL COMMENT '角色名称',
  `enname` varchar(64) NOT NULL COMMENT '角色英文名称',
  `description` varchar(200) DEFAULT NULL COMMENT '备注',
  `created` datetime NOT NULL,
  `updated` datetime NOT NULL,
  PRIMARY KEY (`id`)
) ENGINE=InnoDB AUTO_INCREMENT=38 DEFAULT CHARSET=utf8 COMMENT='角色表';
insert  into `tb_role`(`id`,`parent_id`,`name`,`enname`,`description`,`created`,`updated`) values
(37,0,'超级管理员','fox',NULL,'2019-04-04 23:22:03','2019-04-04 23:22:05');


CREATE TABLE `tb_user_role` (
  `id` bigint(20) NOT NULL AUTO_INCREMENT,
  `user_id` bigint(20) NOT NULL COMMENT '用户 ID',
  `role_id` bigint(20) NOT NULL COMMENT '角色 ID',
  PRIMARY KEY (`id`)
) ENGINE=InnoDB AUTO_INCREMENT=38 DEFAULT CHARSET=utf8 COMMENT='用户角色表';
insert  into `tb_user_role`(`id`,`user_id`,`role_id`) values
(37,37,37);

CREATE TABLE `tb_permission` (
  `id` bigint(20) NOT NULL AUTO_INCREMENT,
  `parent_id` bigint(20) DEFAULT NULL COMMENT '父权限',
  `name` varchar(64) NOT NULL COMMENT '权限名称',
  `enname` varchar(64) NOT NULL COMMENT '权限英文名称',
  `url` varchar(255) NOT NULL COMMENT '授权路径',
  `description` varchar(200) DEFAULT NULL COMMENT '备注',
  `created` datetime NOT NULL,
  `updated` datetime NOT NULL,
  PRIMARY KEY (`id`)
) ENGINE=InnoDB AUTO_INCREMENT=44 DEFAULT CHARSET=utf8 COMMENT='权限表';
insert  into `tb_permission`(`id`,`parent_id`,`name`,`enname`,`url`,`description`,`created`,`updated`) values
(37,0,'系统管理','System','/',NULL,'2019-04-04 23:22:54','2019-04-04 23:22:56'),
(38,37,'用户管理','SystemUser','/users/',NULL,'2019-04-04 23:25:31','2019-04-04 23:25:33'),
(39,38,'查看用户','SystemUserView','',NULL,'2019-04-04 15:30:30','2019-04-04 15:30:43'),
(40,38,'新增用户','SystemUserInsert','',NULL,'2019-04-04 15:30:31','2019-04-04 15:30:44'),
(41,38,'编辑用户','SystemUserUpdate','',NULL,'2019-04-04 15:30:32','2019-04-04 15:30:45'),
(42,38,'删除用户','SystemUserDelete','',NULL,'2019-04-04 15:30:48','2019-04-04 15:30:45'),
(44,37,'内容管理','SystemContent','/contents/',NULL,'2019-04-06 18:23:58','2019-04-06 18:24:00'),
(45,44,'查看内容','SystemContentView','/contents/view/**',NULL,'2019-04-06 23:49:39','2019-04-06 23:49:41'),
(46,44,'新增内容','SystemContentInsert','/contents/insert/**',NULL,'2019-04-06 23:51:00','2019-04-06 23:51:02'),
(47,44,'编辑内容','SystemContentUpdate','/contents/update/**',NULL,'2019-04-06 23:51:04','2019-04-06 23:51:06'),
(48,44,'删除内容','SystemContentDelete','/contents/delete/**',NULL,'2019-04-06 23:51:08','2019-04-06 23:51:10');

CREATE TABLE `tb_role_permission` (
  `id` bigint(20) NOT NULL AUTO_INCREMENT,
  `role_id` bigint(20) NOT NULL COMMENT '角色 ID',
  `permission_id` bigint(20) NOT NULL COMMENT '权限 ID',
  PRIMARY KEY (`id`)
) ENGINE=InnoDB AUTO_INCREMENT=43 DEFAULT CHARSET=utf8 COMMENT='角色权限表';
insert  into `tb_role_permission`(`id`,`role_id`,`permission_id`) values
(37,37,37),
(38,37,38),
(39,37,39),
(40,37,40),
(41,37,41),
(42,37,42),
(43,37,44),
(44,37,45),
(45,37,46),
(46,37,47),
(47,37,48);
配置和依赖
省略。。
代码
总之就是在UserDetailsService实现里写从数据库获取用户信息的逻辑
@Service
public class UserServiceImpl implements UserDetailsService {

    @Autowired
    private UserMapper userMapper;
    @Autowired
    private PermissionMapper permissionMapper;

    public User getByUsername(String username) {
        return userMapper.getByUsername(username);
    }

    @Override
    public UserDetails loadUserByUsername(String username) throws UsernameNotFoundException {
        System.out.println("自定义登录逻辑");
        //从mysql查询用户
        User user = getByUsername(username);
        List<GrantedAuthority> authorities = new ArrayList<>();
        if(user!=null){
            List<Permission> permissions = permissionMapper.selectByUserId(user.getId());
            //设置权限
            permissions.forEach(permission -> {
                if (permission!=null && !StringUtils.hasText(permission.getEnname())){
                    GrantedAuthority grantedAuthority = new SimpleGrantedAuthority(permission.getEnname());
                    authorities.add(grantedAuthority);
                }
            });
            // 封装成UserDetails的实现类
            UserDetails userDetails = org.springframework.security.core.userdetails.User.withUsername(user.getUsername())
                    .password(user.getPassword()).authorities(authorities).build();
            return userDetails;
        }else {
            throw new UsernameNotFoundException("用户名不存在");
        }

    }
}
存在多个UserDetailsService实现,单独指定
@Configuration
public class WebSecurityConfig2 extends WebSecurityConfigurerAdapter {

    @Bean
    public PasswordEncoder passwordEncoder(){
        return new BCryptPasswordEncoder();
    }

    @Resource
    private UserServiceImpl userService;

    @Override
    protected void configure(AuthenticationManagerBuilder auth) throws Exception {
        auth.userDetailsService(userService);
    }
}
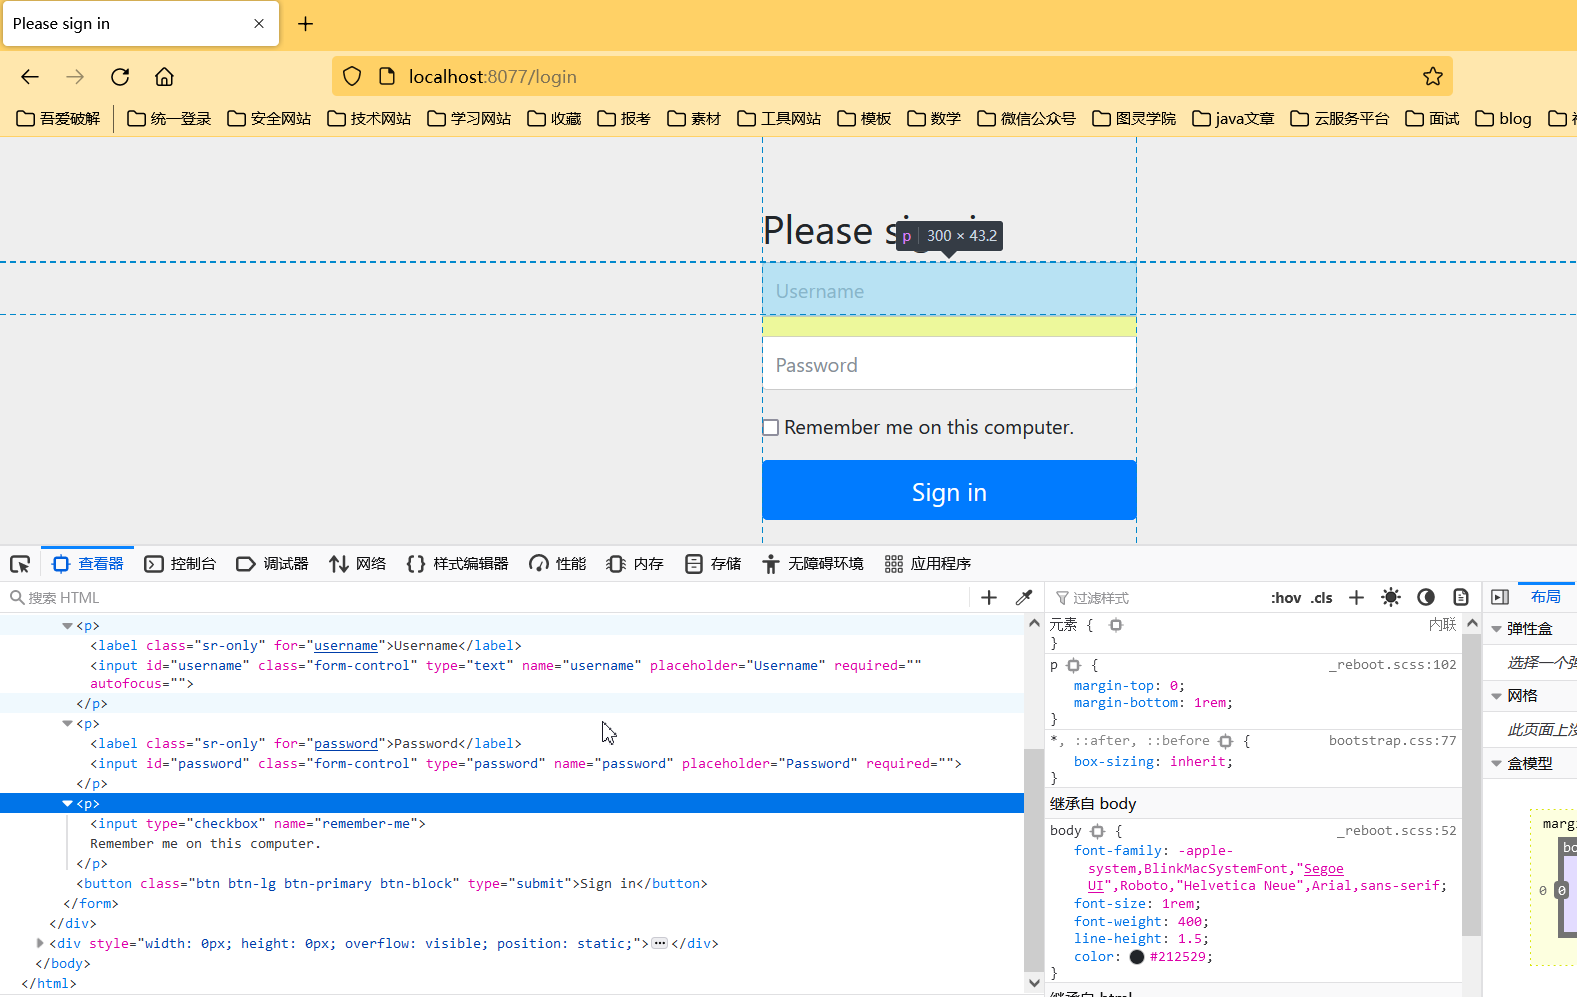
自定义登录相关页面
默认登录页面通过DefaultLoginPageGeneratingFilter#generateLoginPageHtml生成
编写登录页面
<!DOCTYPE html>
<html lang="en">
<head>
    <meta charset="UTF-8">
    <title>Title</title>
</head>
<body>
    <form action="/user/login" method="post">
        用户名:<input type="text" name="username"/><br/>
        密码: <input type="password" name="password"/><br/>
        <input type="submit" value="提交"/>
    </form>
</body>
</html>
配置
    @Override
    protected void configure(HttpSecurity http) throws Exception {
        //认证相关页面和接口配置
        http.formLogin()  //表单提交
                .loginPage("/login.html") //自定义登录页面
                .loginProcessingUrl("/user/login")  //登录访问路径,必须和表单提交接口一样
                .defaultSuccessUrl("/admin/index");   //认证成功之后跳转的路径,默认是跳转项目根路径,没有这个路径就404,当然404之前登录还是成功的

        // 授权
        http.authorizeRequests()
                //设置哪些路径可以直接访问,不需要认证
                .antMatchers("/user/login","/login.html").permitAll()
                .anyRequest().authenticated();  //需要认证
        //关闭csrf防护
         http.csrf().disable();

    }
认证成功和失败后转发地址,仅仅做记录
        http.formLogin()
            .successForwardUrl("/tomain");
            .failureForwardUrl("/toerrer");
配置说明
有些配置见名之意,就不细说了,注释很清楚
loginProcessingUrl
这个配置是指定登录接口的访问路径,如果是自定义登录界面,表单提交的地址需要和此地址匹配
然后就是这个并不需要你写登录接口,具体请看本文 认证流程 第一步,总之就是AbstractAuthenticationProcessingFilter#doFilter中会判断是不是这个路径,然后从这个路径的请求中获取认证参数进行接下来的处理
CSRF
什么是CSRF
CSRF(Cross-site request forgery)跨站请求伪造,也被称为“OneClick Attack” 或者 Session Riding。通过伪造用户请求访问受信任站点的非法请求访问。
跨域:只要网络协议,ip 地址,端口中任何一个不相同就是跨域请求。
跨域在浏览器端限制的,但是我们可以告诉浏览器端我们允许跨域,这里假设你打开了某个不安全的网站,同时你打开了支付宝的支付界面(假设哈),不安全的网站引导你点击某个图片或者链接,或者纯粹就是打开了后台就会跑脚本,然后这个链接或者脚本是访问支付宝的某个接口,由于在浏览器你已经登录,那么第三方网站访问支付宝接口就像你本人访问一样,然后你信息就暴露了
上述流程是基于你是通过cookie来保存你的sessionId (JSESSIONID),然后你服务端又是通过sessionId来确认请求者身份的
CSRF怎么防护
- 验证 HTTP Referer 字段
- 在请求地址中添加 token 并验证
- 在 HTTP 头中自定义属性并验证
Referer是Http请请求头的一部分,从百度跳转其他网页,这个是浏览器为我们附加的,而不安全的网站不通过浏览器就没法利用浏览器的cookie机制
Referer: https://www.baidu.com/link?url=i2tk5htJZ-MW1xYpBULweJdYCihg588Jbs3fNNTm-U3PY5rasRwkR4P8y85WskjmOK-nJ6_H0ORsg-dsGH8vpa&wd=&eqid=a3938c58000593f600000002637b49cc
就是用户访问时请求头或者请求参数中附加一个令牌,要求浏览器端请求时附带这个令牌,没有这个令牌就拒绝访问
CSRF在Sercurity中实现
从 Spring Security4开始CSRF防护默认开启,默认会拦截请求,进行CSRF处理。CSRF为了保证不是其
他第三方网站访问,要求访问时携带参数名为 _csrf 值为token(token 在服务端产生,在渲染请求页面时
埋入页面)的内容,如果token和服务端的token匹配成功,则正常访问。
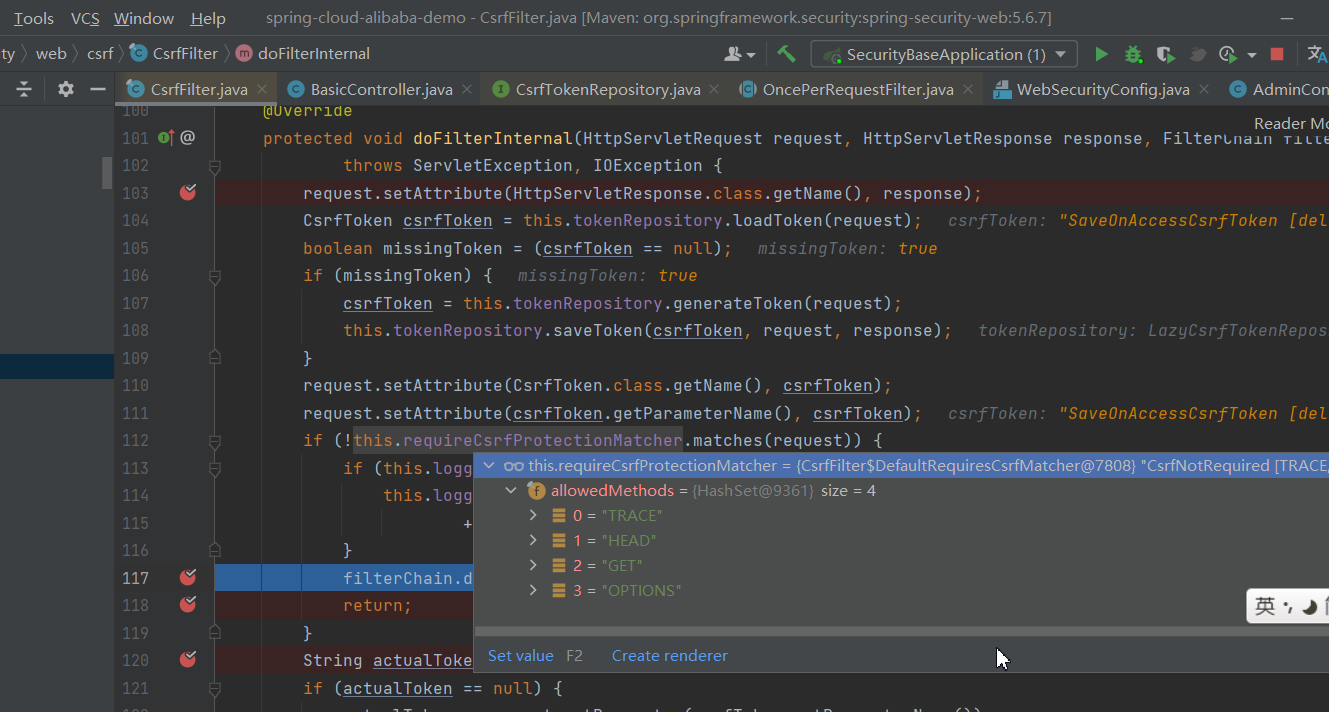
security默认生成的表单中是隐含了_csrf 这个值的,security会在CsrfFilter这个过滤器中验证_csrf 的值
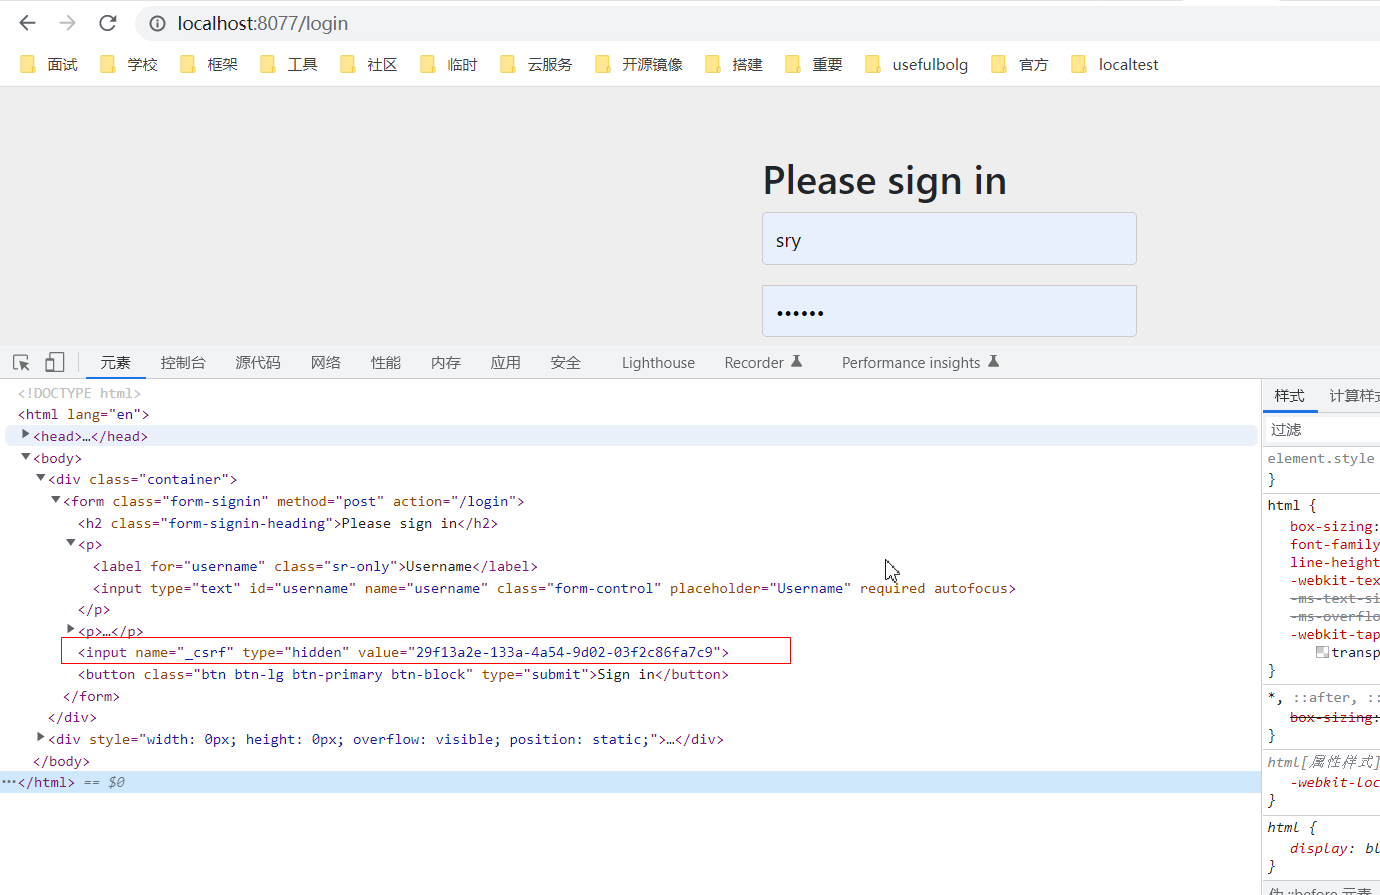
然后我发现登录后,我的请求不附带这个_csrf也可以访问,这个是因为CsrfFilter中对于特定类型的请求如Get请求是允许不附带_csrf这个值访问的,这块应该是可以进行配置的,比如配置_csrf为其他的提交参数,配置get也需要验证,具体怎么配,待定
不想关闭csrf处理
如果我们不想关闭csrf的防护,首先我们登录界面就需要和Security自动生成的登录界面一样,附加一个_Csrf的提交参数
<!DOCTYPE html>
<html xmlns="http://www.w3.org/1999/xhtml"
      xmlns:th="http://www.thymeleaf.org">
<head>
    <meta charset="UTF-8">
    <title>Title</title>
</head>
<body>
<form action="/login" method="post">
    <input type="hidden" th:value="${_csrf.token}" name="_csrf" th:if="${_csrf}"/>
    用户名:<input type="text" name="username"/><br/>
    密码: <input type="password" name="password"/><br/>
    <input type="submit" value="提交"/>
</form>
</body>
</html>
前后端分离csrf处理
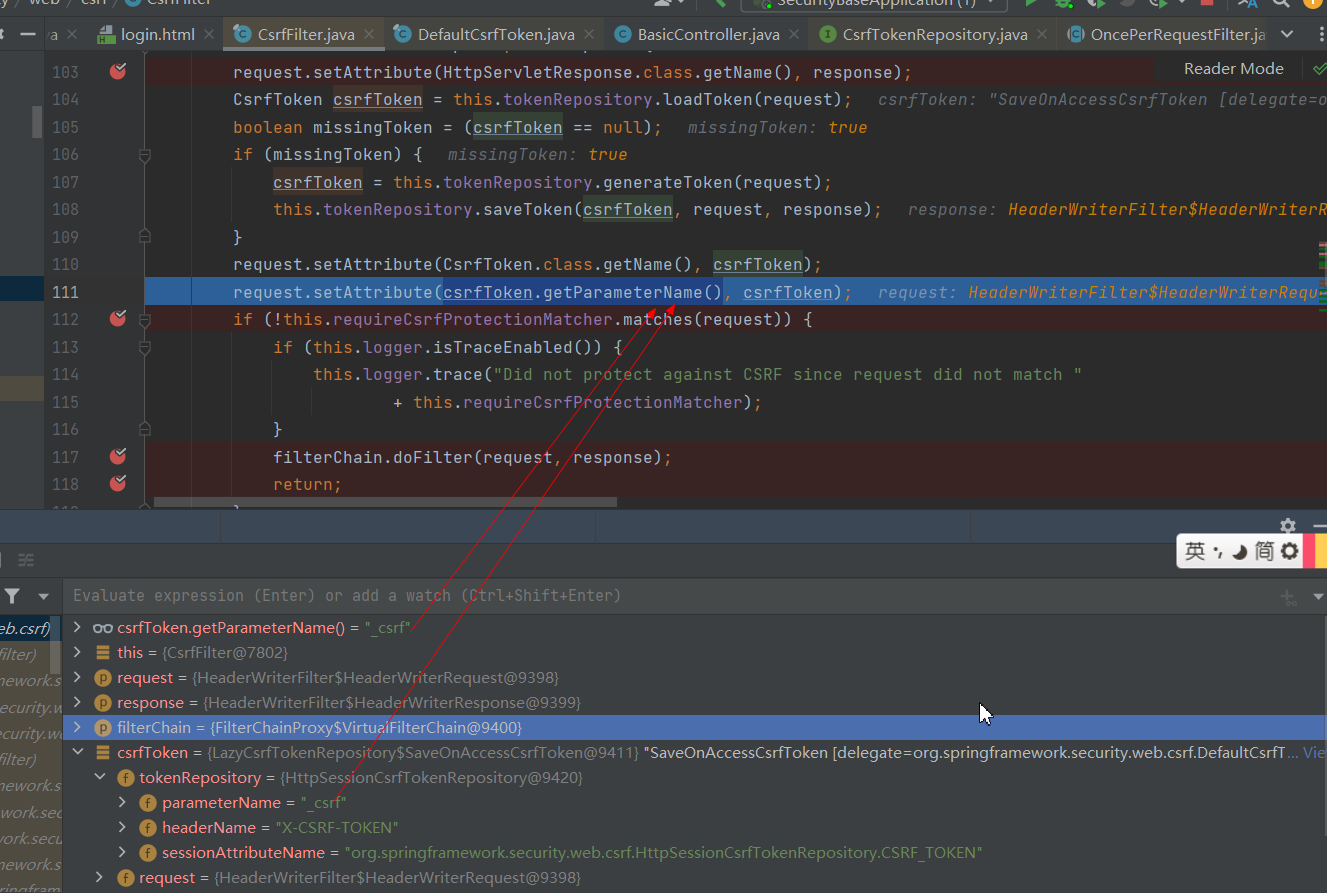
首先我们的CsrfFilter中如果发现请求中没有_csrf,那么是会为我们生成一个放入请求中,
		request.setAttribute(CsrfToken.class.getName(), csrfToken);
		request.setAttribute(csrfToken.getParameterName(), csrfToken);
处理如下
我们配置一个接口不被csrf过滤器拦截,然后通过这个接口获取token,前端请求时将这个token放在请求头或请求参数中即可,注意放在请求头中请求头的key应该是X-CSRF-TOKEN
    @Override
    protected void configure(HttpSecurity http) throws Exception {
        http.authorizeRequests()
              // 网络防护忽略请求
                .csrf().ignoringAntMatchers("/user/login")
    }
// 在登录成功处理器中保存这个token
CsrfToken csrfToken = (CsrfToken) request.getAttribute(CsrfToken.class.getName());
测试
1、首先如果你访问的是其他接口,然后没有权限,跳转登录界面登录成功后是会再次访问原来的接口
2、如果是直接访问登录界面,登录成功后会进入默认的欢迎页
登录参数修改
默认的参数是username password,源码参考认证流程第2步
http.formLogin() //表单提交
                .usernameParameter("userName")
                .passwordParameter("passWord")
自定义登录成功和失败处理器
配置
    @Override
    protected void configure(HttpSecurity http) throws Exception {
        //认证相关页面和接口配置
        http.formLogin()  //表单提交
            .successHandler(new MyAuthenticationSuccessHandler("/main.html"))
            .failureHandler(new MyAuthenticationFailHandler("/error.html"));

        // 授权
        http.authorizeRequests()
                //设置哪些路径可以直接访问,不需要认证
                .antMatchers("/login","/error.html").permitAll()
                .anyRequest().authenticated();  //需要认证
        //关闭csrf防护
         http.csrf().disable();

    }
成功处理器
public class MyAuthenticationSuccessHandler implements AuthenticationSuccessHandler {
private String redirectUrl;
public MyAuthenticationSuccessHandler(String redirectUrl) {
this.redirectUrl = redirectUrl;
}
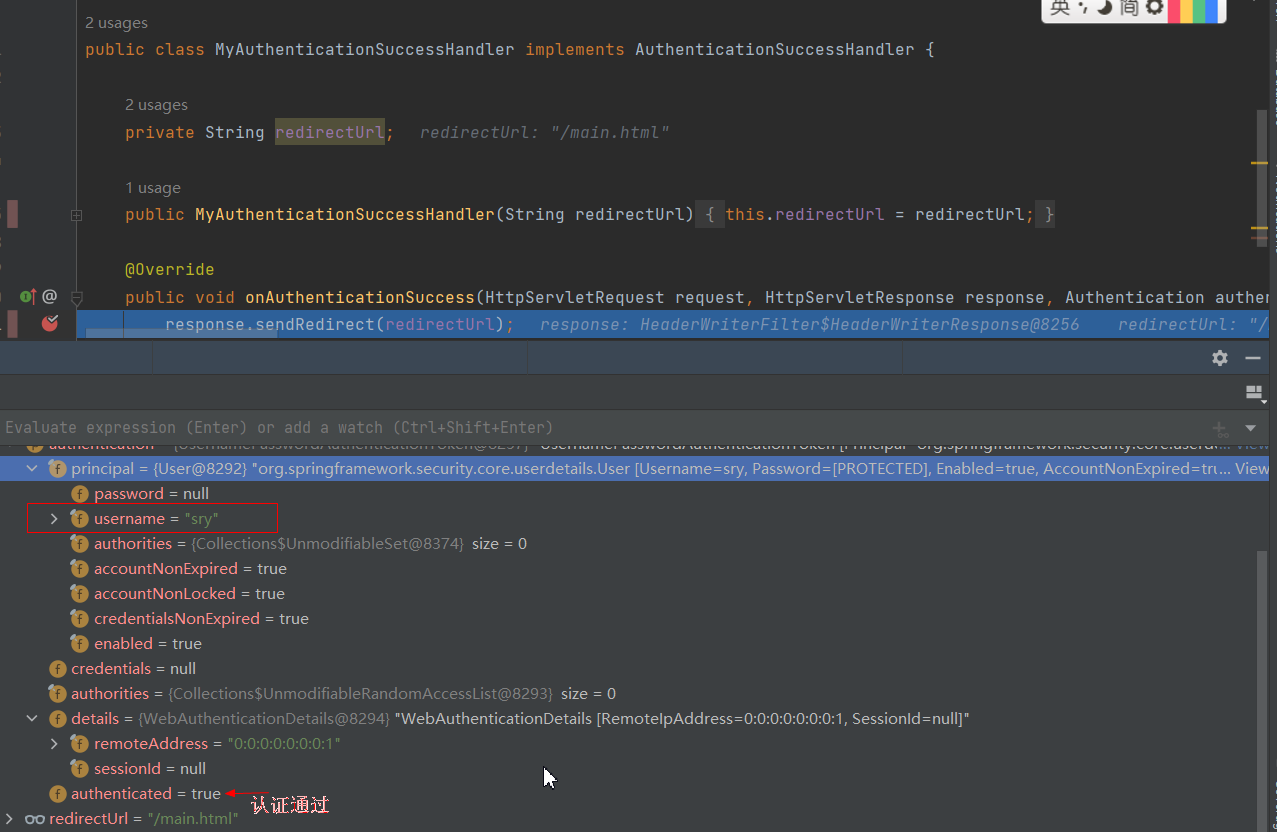
@Override
public void onAuthenticationSuccess(HttpServletRequest request, HttpServletResponse response, Authentication authentication) throws IOException, ServletException {
response.sendRedirect(redirectUrl);
}
}
失败处理器
public class MyAuthenticationFailHandler implements AuthenticationFailureHandler {

    private String redirectUrl;

    public MyAuthenticationFailHandler(String redirectUrl) {
        this.redirectUrl = redirectUrl;
    }

    @Override
    public void onAuthenticationFailure(HttpServletRequest request, HttpServletResponse response, AuthenticationException exception) throws IOException, ServletException {
        response.sendRedirect(redirectUrl);
    }
}
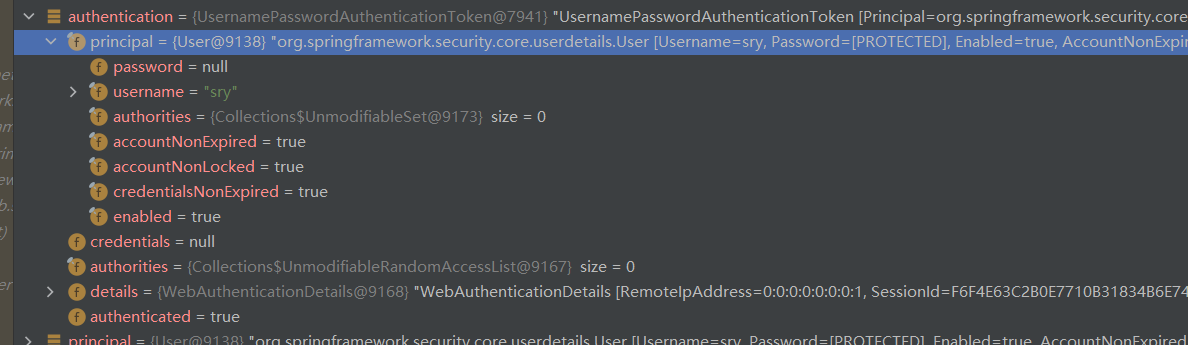
认证对象信息
处理其中我们可以获取到认证对象
会话管理
用户认证通过后,为了避免用户的每次操作都进行认证可将用户的信息保存在会话中。spring security提供会话管理,认证通过后将身份信息放入SecurityContextHolder上下文,SecurityContext与当前线程进行绑定,方便获取用户身份。
用户信息获取
    /**
     * 登录成功后默认访问项目根路径
     * */
    @GetMapping("/")
    public String index() {
        // 获取当前登录的用户信息
        Authentication authentication = SecurityContextHolder.getContext().getAuthentication();
        if(!authentication.isAuthenticated()){
            return null;
        }
        Object principal = authentication.getPrincipal();
        String username = null;
        if (principal instanceof UserDetails) {
            username =((UserDetails)principal).getUsername();
        } else {
            username = principal.toString();
        }
        log.info(username);
        return "index.html";
    }
用户信息获取获取原理5
参考认证流程第一步,登录成成功后,我们在这么一段代码中设置了sessionid和我们的认证对象的绑定关系
// 应该是这一段,进去了有一部分代码看不明白
this.sessionStrategy.onAuthentication(authenticationResult, request, response);
登录成功后我们后续访问会进过SecurityContextPersistenceFilter,然后就会根据sessionId获取我们的认证对象
		HttpRequestResponseHolder holder = new HttpRequestResponseHolder(request, response);
		SecurityContext contextBeforeChainExecution = this.repo.loadContext(holder);
		try {
			SecurityContextHolder.setContext(contextBeforeChainExecution);
SecurityContextHolder关联了会话策略,默认是ThreadLocalSecurityContextHolderStrategy,也就是说我们认证对象是存在一个ThreadLocal当中
会话控制
我们可以通过以下选项准确控制会话何时创建以及Spring Security如何与之交互:
| 机制 | 描述 |
|---|---|
| always | 如果session不存在总是需要创建 |
| ifRequired | 如果需要就创建一个session(默认)登录时 |
| never | Spring Security 将不会创建session,但是如果应用中其他地方创建了session,那么Spring Security将会使用它 |
| stateless | Spring Security将绝对不会创建session,也不使用session。并且它会暗示不使用cookie,所以每个请求都需要重新进行身份验证。这种无状态架构适用于REST API及其无状态认证机制。 |
@Override
protected void configure(HttpSecurity http) throws Exception {
    http.sessionManagement()
    .sessionCreationPolicy(SessionCreationPolicy.IF_REQUIRED)
}
会话并发控制
仅做记录,未测试
用户在这个手机登录后,他又在另一个手机登录相同账户,对于之前登录的账户是否需要被挤兑,或者说在第二次登录时限制它登录,更或者像腾讯视频VIP账号一样,最多只能五个人同时登录,第六个人限制登录。
- maximumSessions:最大会话数量,设置为1表示一个用户只能有一个会话
- expiredSessionStrategy:会话过期策略
http.sessionManagement()
                .invalidSessionUrl("/session/invalid")
                .maximumSessions(1)
                .expiredSessionStrategy(new MyExpiredSessionStrategy());
public class MyExpiredSessionStrategy implements SessionInformationExpiredStrategy {
    @Override
    public void onExpiredSessionDetected(SessionInformationExpiredEvent event) throws IOException, ServletException {
        HttpServletResponse response = event.getResponse();
        response.setContentType("application/json;charset=UTF-8");
        response.getWriter().write("您已被挤兑下线!");
    }
}
测试
- 使用chrome浏览器,先登录,再访问http://localhost:8080/admin/index
- 使用ie浏览器,再登录,再访问http://localhost:8080/admin/index
- 使用chrome浏览器,重新访问http://localhost:8080/admin/index,会执行expiredSessionStrategy,页面上显示”您已被挤兑下线!“
阻止用户第二次登录
sessionManagement也可以配置 maxSessionsPreventsLogin:boolean值,当达到maximumSessions设置的最大会话个数时阻止登录。
http.sessionManagement()
                .invalidSessionUrl("/session/invalid")
                .maximumSessions(1)
                .expiredSessionStrategy(new MyExpiredSessionStrategy())
                .maxSessionsPreventsLogin(true);
集群session
仅做记录,未测试
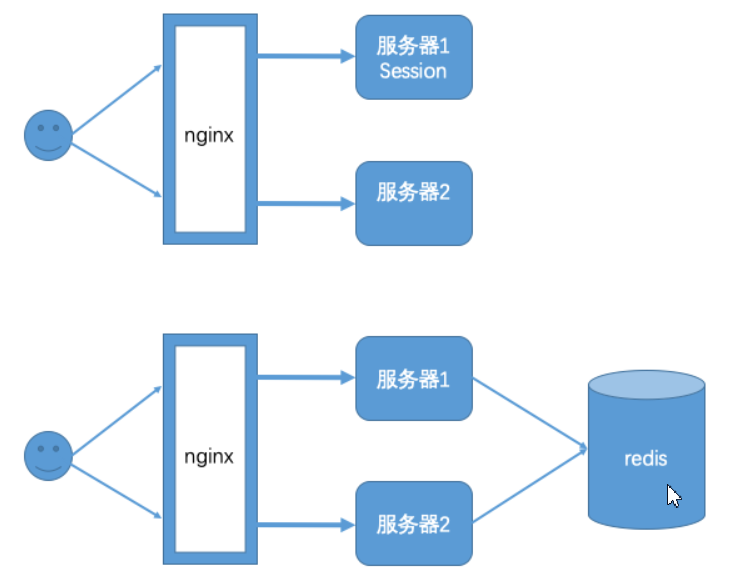
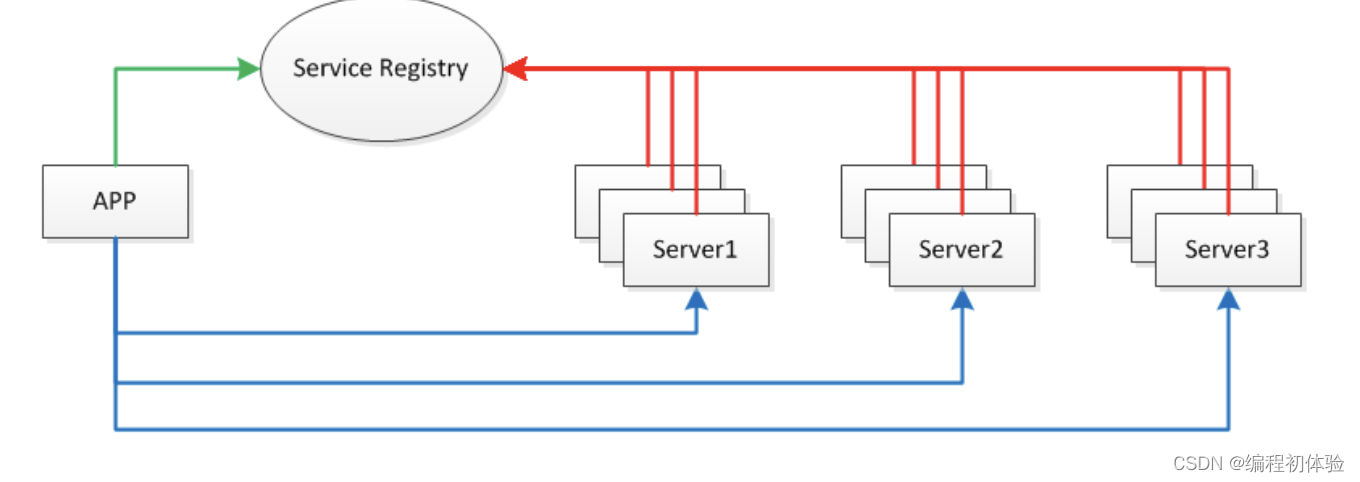
实际场景中一个服务会至少有两台服务器在提供服务,在服务器前面会有一个nginx做负载均衡,用户访问nginx,nginx再决定去访问哪一台服务器。当一台服务宕机了之后,另一台服务器也可以继续提供服务,保证服务不中断。如果我们将session保存在Web容器(比如tomcat)中,如果一个用户第一次访问被分配到服务器1上面需要登录,当某些访问突然被分配到服务器二上,因为服务器二上没有用户在服务器一上登录的会话session信息,服务器二还会再次让用户登录,用户已经登录了还让登录就感觉不正常了。解决这个问题的思路是用户登录的会话信息不能再保存到Web服务器中,而是保存到一个单独的库(redis、mongodb、mysql等)中,所有服务器都访问同一个库,都从同一个库来获取用户的session信息,如用户在服务器一上登录,将会话信息保存到库中,用户的下次请求被分配到服务器二,服务器二从库中检查session是否已经存在,如果存在就不用再登录了,可以直接访问服务了。
引入spring session依赖
<dependency>
    <groupId>org.springframework.session</groupId>
    <artifactId>spring-session-data-redis</artifactId>
</dependency>

<dependency>
    <groupId>redis.clients</groupId>
    <artifactId>jedis</artifactId>
    <version>3.1.0</version>
</dependency>
修改application.yaml
spring:
  session:
    store-type: redis
  redis:
    host: localhost
    port: 6379

server:
  port: 8080
  servlet:
    session:
      timeout: 600
测试
启动两个服务8080,8081 ,其中一个登录后访问http://localhost:8080/admin/index,另外一个不需要登录就可以访问
缺点:
Spring Session + Redis实现分布式Session共享 有个非常大的缺陷, 无法实现跨域名共享session , 只能在单台服务器上共享session , 因为是依赖cookie做的 , cookie 无法跨域。 Spring Session一般是用于多台服务器负载均衡时共享Session的,都是同一个域名,不会跨域。
安全会话cookie
我们可以使用httpOnly和secure标签来保护我们的会话cookie:
- httpOnly:如果为true,那么浏览器脚本将无法访问cookie
- secure:如果为true,则cookie将仅通过HTTPS连接发送
spring boot配置文件:
server.servlet.session.cookie.http‐only=true
server.servlet.session.cookie.secure=true
RememberMe实现
Spring Security 中 Remember Me 为“记住我”功能,用户只需要在登录时添加 remember-me复选框,取值为true。Spring Security 会自动把用户信息存储到数据源中,以后就可以不登录进行访问。
RememberMe配置
@Autowired
public DataSource dataSource;

public PersistentTokenRepository persistentTokenRepository(){
    JdbcTokenRepositoryImpl jdbcTokenRepository = new JdbcTokenRepositoryImpl();
    //设置数据源
    jdbcTokenRepository.setDataSource(dataSource);
    return jdbcTokenRepository;
}

@Override
protected void configure(HttpSecurity http) throws Exception {

//记住我
http.rememberMe()
    .tokenRepository(persistentTokenRepository())//设置持久化仓库
    .tokenValiditySeconds(3600) //超时时间,单位s 默认两周
    .userDetailsService(userService);  //设置自定义登录逻辑
}
创建表persistent_logins
官方文档
create table persistent_logins (
	username varchar(64) not null,
	series varchar(64) primary key,
	token varchar(64) not null,
	last_used timestamp not null
)
登录界面实现
如果自行实现,参考默认登录界面即可
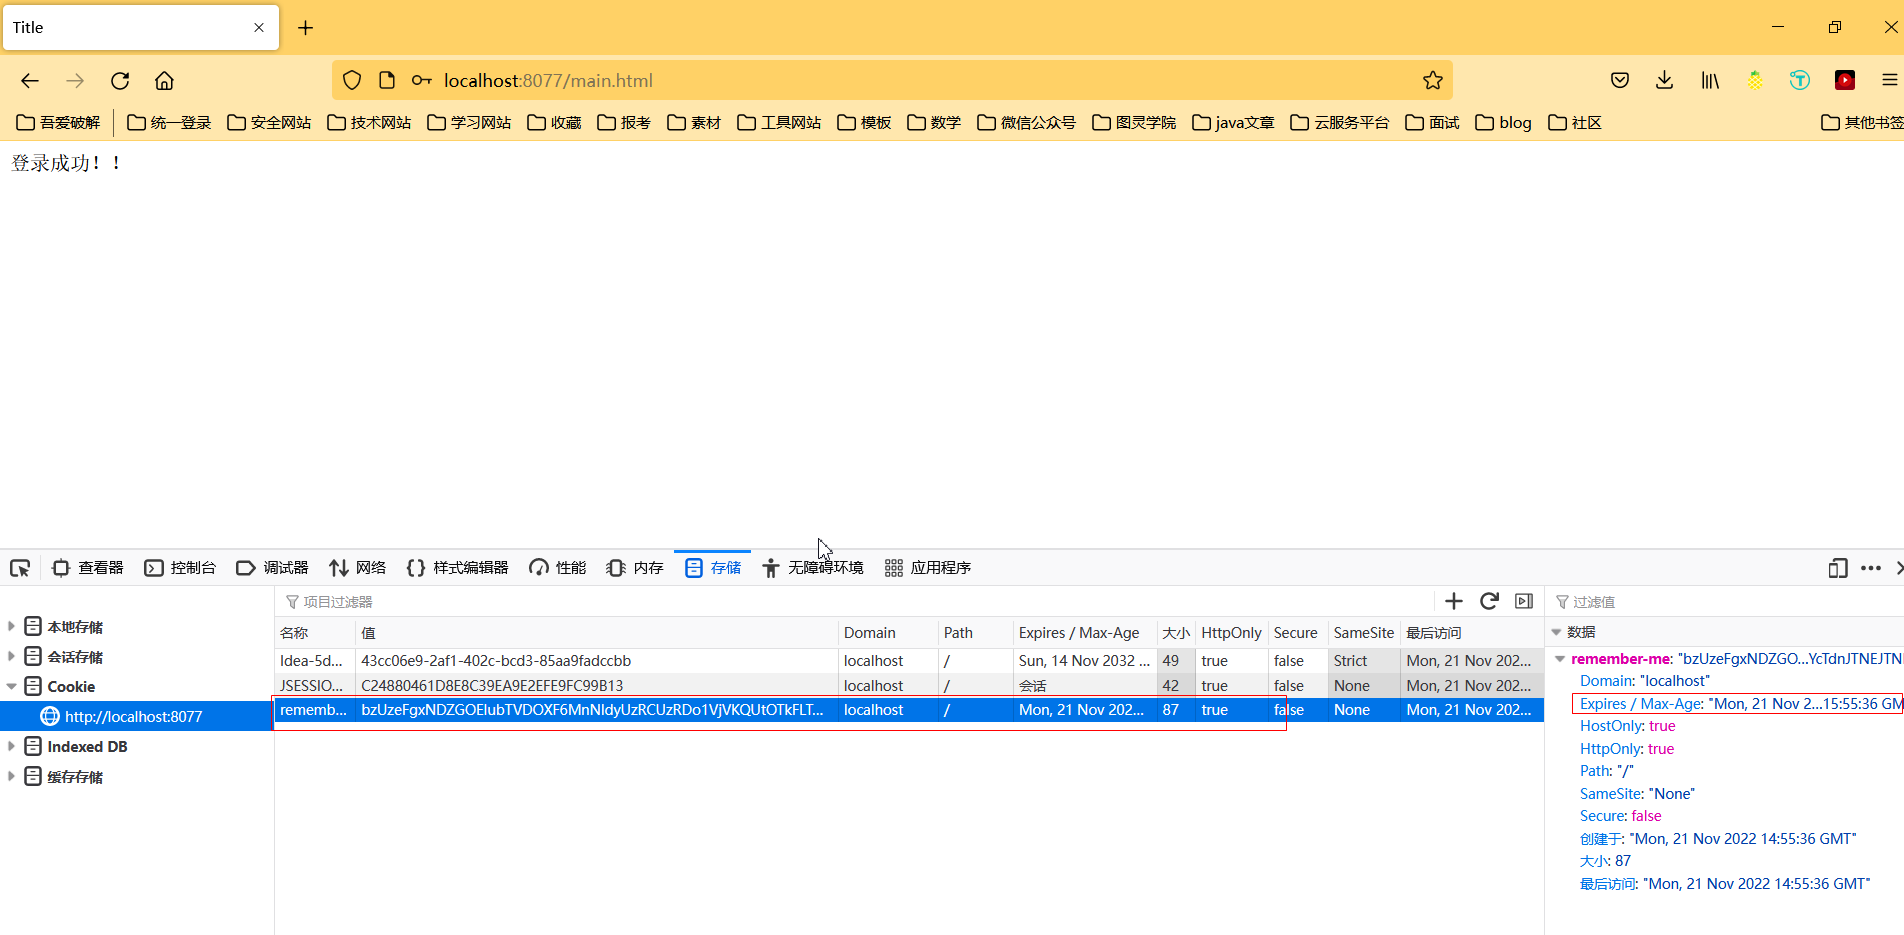
测试
登录后关闭浏览器,再次打开浏览器访问http://localhost:8077/main.html,发现不用重新登录了
原理6
首先这个机制是通过cookie实现的,cookie设置了超时时间后,就不会在关闭浏览器后失效,如图,然后就是RememberMeAuthenticationFilter中会有一下从数据库获取用户信息,从而不用登录的逻辑,
退出登录
默认的退出登录路径
public final class LogoutConfigurer<H extends HttpSecurityBuilder<H>> extends
AbstractHttpConfigurer<LogoutConfigurer<H>, H> {
private List<LogoutHandler> logoutHandlers = new ArrayList<>();
private SecurityContextLogoutHandler contextLogoutHandler = new SecurityContextLogoutHandler();
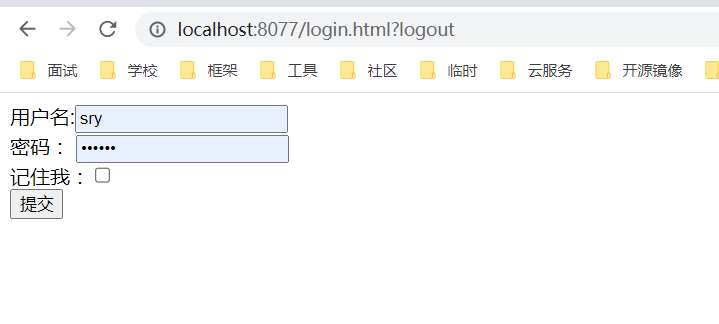
private String logoutSuccessUrl = "/login?logout";
private LogoutSuccessHandler logoutSuccessHandler;
private String logoutUrl = "/logout";
修改默认的登出配置
http.logout()
.logoutUrl("/logout") // 同样的,你不需要写这个接口,只是一个路径配置而已,security匹配到了这个路径就会进行登出的相关操作
.logoutSuccessUrl("/login.html");
退出登录原理7
LogoutFilter中
			// 清楚session相关操作
			this.handler.logout(request, response, auth);
			// 登出成功后跳转相关操作
			this.logoutSuccessHandler.onLogoutSuccess(request, response, auth);
httpBasic
https://baijiahao.baidu.com/s?id=1650164072428116018&wfr=spider&for=pc
认证流程
官方登录认证流程:https://docs.spring.io/spring-security/reference/5.6/servlet/authentication/architecture.html#servlet-authentication-authentication
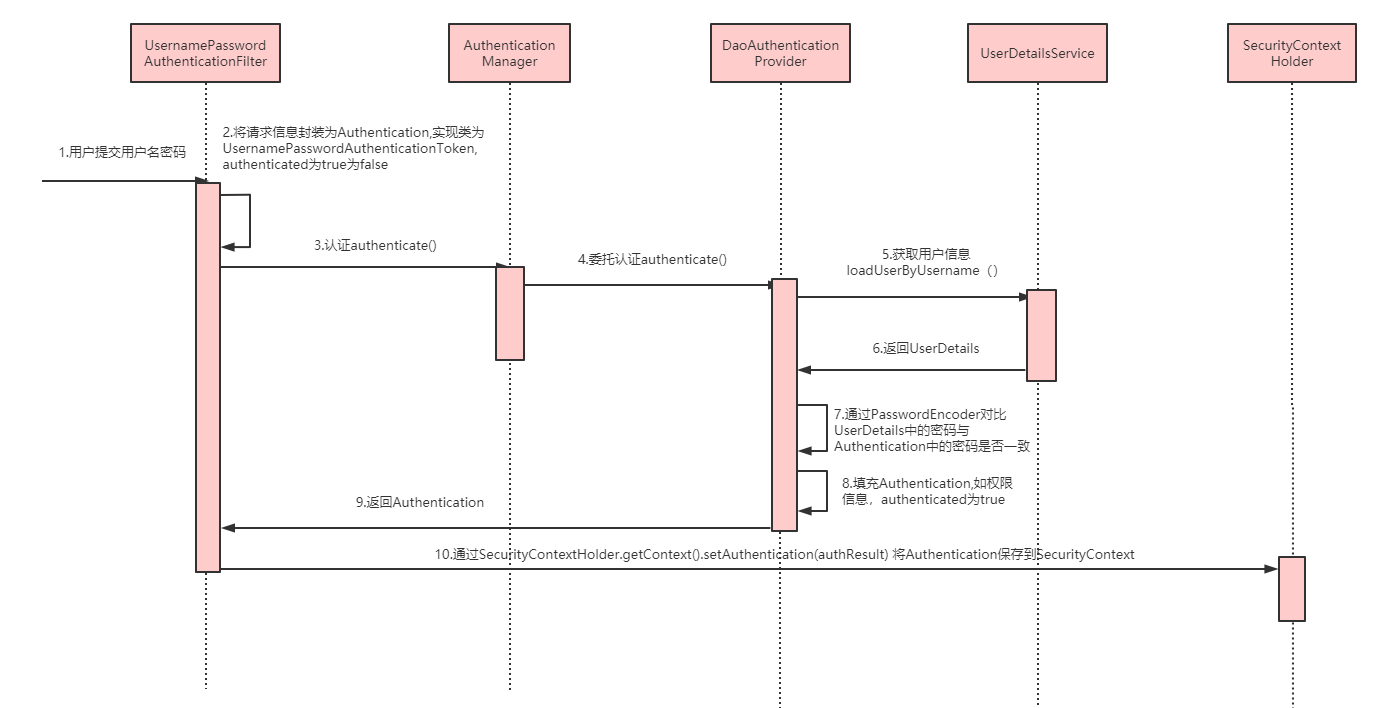
1、用户提交密码,然后进入Security过滤器,这里从UsernamePasswordAuthenticationFilter开始,请求先进入UsernamePasswordAuthenticationFilter的父类AbstractAuthenticationProcessingFilter#doFilter中,
		// (1)判断这个请求是不是登录请求
		if (!requiresAuthentication(request, response)) {
			chain.doFilter(request, response);
			return;
		}
		......
        // 然后就会调用这个方法进行认证,而这个是在UsernamePasswordAuthenticationFilter中实现的
	   Authentication authenticationResult = attemptAuthentication(request, response);
......
    // 根据session策略,设置sessionId
    this.sessionStrategy.onAuthentication(authenticationResult, request, response);
if (this.continueChainBeforeSuccessfulAuthentication) {
    chain.doFilter(request, response);
}
// 成功后将用户信息存入SecurityContext(全局上下文是存在ThreadLocal<SecurityContext>)中,总之你之后可以获取到security上下文,然后获取用户信息
successfulAuthentication(request, response, chain, authenticationResult);
2、UsernamePasswordAuthenticationFilter#attemptAuthentication会判断是否post请求,将获取的用户名密码组装成UsernamePasswordAuthenticationToken对象,然后进行认证
//	public static final String SPRING_SECURITY_FORM_USERNAME_KEY = "username";
//	public static final String SPRING_SECURITY_FORM_PASSWORD_KEY = "password";
//	private String usernameParameter = SPRING_SECURITY_FORM_USERNAME_KEY;
//	private String passwordParameter = SPRING_SECURITY_FORM_PASSWORD_KEY;
// 然后就会在这个方法总获取登录的用户名密码,否是明文。默认是获取username和password
String username = obtainUsername(request);
.....
// 组装用户信息
UsernamePasswordAuthenticationToken authRequest = new UsernamePasswordAuthenticationToken(username, password);

// 具体的认证方法
return this.getAuthenticationManager().authenticate(authRequest);
3、AuthenticationManager有许多实现,默认的情况写这里走的是ProviderManager#authenticate认证方法,然后遍历认证管理器中的认证提供者列表AuthenticationProvider,
		for (AuthenticationProvider provider : getProviders()) {
			......
            // 最终情况这里使用的是DaoAuthenticationProvider
			try {
				result = provider.authenticate(authentication);
				if (result != null) {
					copyDetails(authentication, result);
					break;
				}
			}
			.........
		}
4、这里先回调用DaoAuthenticationProvider的父类AbstractUserDetailsAuthenticationProvider#authenticate
	@Override
	public Authentication authenticate(Authentication authentication) throws AuthenticationException {
		......
                    // 这里会加载用户,具体实现在DaoAuthenticationProvider中
				user = retrieveUser(username, (UsernamePasswordAuthenticationToken)

        ......
            // 认证前检查
			this.preAuthenticationChecks.check(user);
            // 通过配置的PasswordEncoder判断密码是否输入正确的逻辑,
			additionalAuthenticationChecks(user, (UsernamePasswordAuthenticationToken) authentication);
         // 认证成功后,创建一个UsernamePasswordAuthenticationToken对象,其中存放了用户信息,还有是否认证成功的信息,这个是否认证成功的信息其他过滤器会用到
		return createSuccessAuthentication(principalToReturn, authentication, user);
	}
5、具体实现在DaoAuthenticationProvider的retrieveUser中通过UserDetailsService去获取用户,然后这就到了我们自行实现的UserDetailsService实现类中,
	@Override
	protected final UserDetails retrieveUser(String username, UsernamePasswordAuthenticationToken authentication)
			throws AuthenticationException {
......
    // 获取用户的逻辑
			UserDetails loadedUser = this.getUserDetailsService().loadUserByUsername(username);
......
	}
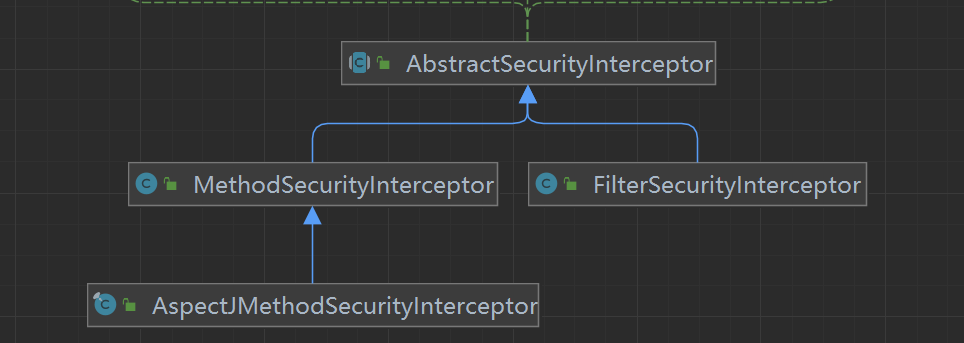
用户授权(访问控制)
授权的方式包括 web授权和方法授权,web授权是通过 url拦截进行授权,方法授权是通过 方法拦截进行授权。他
们都会调用accessDecisionManager进行授权决策,若为web授权则拦截器为FilterSecurityInterceptor;若为方
法授权则拦截器为MethodSecurityInterceptor。如果同时通过web授权和方法授权则先执行web授权,再执行方
法授权,最后决策通过,则允许访问资源,否则将禁止访问。
web授权
官方示例:https://docs.spring.io/spring-security/reference/5.8/servlet/authorization/authorize-http-requests.html
Spring Security可以通过 http.authorizeRequests() 对web请求进行授权保护 ,Spring Security使用标准Filter建立了对web请求的拦截,最终实现对资源的授权访问。
http.authorizeRequests()
            //设置哪些路径可以直接访问,不需要认证
            .antMatchers("/user/login","/login.html").permitAll()
            .anyRequest().authenticated();  //需要认证才能访问
访问控制的url匹配
在配置类中http.authorizeRequests() 主要是对url进行控制。配置顺序会影响之后授权的效果,越是具体的应该放在前面,越是笼统的应该放到后面。
anyRequest()
表示匹配所有的请求。一般情况下此方法都会使用,设置全部内容都需要进行认证,会放在最后。
.anyRequest().authenticated()
antMatchers
方法定义如下:
public C antMatchers(String... antPatterns)
参数是不定向参数,每个参数是一个 ant 表达式,用于匹配 URL规则。
ANT通配符有三种:
| 通配符 | 说明 |
|---|---|
| ? | 匹配任何单字符 |
| * | 匹配0或者任意数量的字符 |
| ** | 匹配0或者更多的目录 |
在实际项目中经常需要放行所有静态资源:
// 放行 js和css 目录下所有的文件
.antMatchers("/js/**","/css/**").permitAll()
// 只要是.js 文件都放行
.antMatchers("/**/*.js").permitAll()
regexMatchers()
使用正则表达式进行匹配。
//所有以.js 结尾的文件都被放行
.regexMatchers( ".+[.]js").permitAll()
无论是 antMatchers() 还是 regexMatchers() 都具有两个参数的方法,其中第一个参数都是HttpMethod ,表示请求方式,当设置了 HttpMethod 后表示只有设定的特定的请求方式才执行对应的权限设置。
.antMatchers(HttpMethod.POST,"/admin/demo").permitAll()
.regexMatchers(HttpMethod.GET,".+[.]jpg").permitAll()
mvcMatchers()
适用于配置了 servletPath 的情况。 servletPath 就是所有的 URL 的统一前缀。在 SpringBoot 整合SpringMVC 的项目中可以在application.properties 中添加下面内容设置 ServletPath。
spring.mvc.servlet.path=/web
在 Spring Security 的配置类中配置 .servletPath() 是 mvcMatchers()返回值特有的方法,antMatchers()和 regexMatchers()没有这个方法。在 servletPath() 中配置了 servletPath 后,mvcMatchers()直接写 SpringMVC 中@RequestMapping()中设置的路径即可。
.mvcMatchers("/admin/demo").servletPath("/web").permitAll()
如果不习惯使用 mvcMatchers()也可以使用 antMatchers(),下面代码和上面代码是等效的:
.antMatchers("/web/admin/demo").permitAll()
RequestMatcher接口
RequestMatcher是Spring Security Web的一个概念模型接口,用于抽象建模对HttpServletRequest请求的匹配器这一概念。Spring Security内置提供了一些RequestMatcher实现类:
| 实现类 | 介绍 |
|---|---|
AnyRequestMatcher | 匹配任何请求 |
AntPathRequestMatcher | 使用ant风格的路径匹配模板匹配请求 |
ELRequestMatcher | 使用EL表达式匹配请求 |
IpAddressMatcher | 基于IP地址匹配请求,支持IPv4和IPv6 |
MediaTypeRequestMatcher | 基于MediaType匹配请求 |
RegexRequestMatcher | 基于正则表达式匹配请求 |
RequestHeaderRequestMatcher | 基于头部值比较匹配请求 |
AndRequestMatcher | and组合多个RequestMatcher |
OrRequestMatcher | or组合多个RequestMatcher |
NegatedRequestMatcher | not操作一个RequestMatcher |
MvcRequestMatcher | 使用Spring MVC的HandlerMappingIntrospector匹配请求 |
内置的访问控制
-
【常用】
#permitAll()方法,所有用户可访问。 -
【常用】
#denyAll()方法,所有用户不可访问。 -
【常用】
#authenticated()方法,登录用户可访问。 -
#anonymous()方法,无需登录,即匿名用户可访问。 -
#rememberMe()方法,通过 remember me登录的用户可访问。 -
#fullyAuthenticated()方法,非 remember me 登录的用户可访问。 -
#hasIpAddress(String ipaddressExpression)方法,来自指定 IP 表达式的用户可访问。 -
【常用】
#hasRole(String role)方法, 拥有指定角色的用户可访问,角色将被增加 “ROLE_” 前缀。 -
【常用】
#hasAnyRole(String... roles)方法,拥有指定任一角色的用户可访问。 -
【常用】
#hasAuthority(String authority)方法,拥有指定权限(authority)的用户可访问。 -
【常用】
#hasAuthority(String... authorities)方法,拥有指定任一权限(authority)的用户可访问。 -
【最牛】
#access(String attribute)方法,当 Spring EL 表达式的执行结果为true时,可以访问。
基于权限的访问控制
除了之前讲解的内置权限控制。Spring Security 中还支持很多其他权限控制。这些方法一般都用于用户已经被认证后,判断用户是否具有特定的要求。
hasAuthority(String)
判断用户是否具有特定的权限,用户的权限是在自定义登录逻辑中创建 User 对象时指定的。权限名称大小写敏感
return new User("fox", pw, AuthorityUtils.commaSeparatedStringToAuthorityList("admin,user"));//admin,user就是用户的权限
或
    @Override
    public UserDetails loadUserByUsername(String username) {
        ArrayList<String> roles = new ArrayList<>();

        UserDetails userDetails = User.withUsername("sry").password(passwordEncoder.encode("123456"))
                .authorities("admin","user").build();
        return userDetails;
    }
在配置类中通过 hasAuthority(“admin”)设置具有 admin 权限时才能访问。
.antMatchers("/admin/demo").hasAuthority("admin")
否则报403错误
hasAnyAuthority(String …)
如果用户具备给定权限中某一个,就允许访问。
.antMatchers("/admin/demo").hasAnyAuthority("admin","System")
基于角色的访问控制
hasRole(String)
如果用户具备给定角色就允许访问,否则出现 403。参数取值来源于自定义登录逻辑 UserDetailsService 实现类中创建 User 对象时给 User 赋予的授权。
在给用户赋予角色时角色需要以: ROLE_开头 ,后面添加角色名称。例如:ROLE_admin 其中 admin是角
色名,ROLE_是固定的字符开头。
return new User("fox", pw, AuthorityUtils.commaSeparatedStringToAuthorityList("ROLE_admin,user"));//给用户赋予admin角色
或
这样不用加ROLE_
    @Override
    public UserDetails loadUserByUsername(String username) throws UsernameNotFoundException {
        ArrayList<String> roles = new ArrayList<>();
        String[] rolesStr = StringUtils.toStringArray(roles);
        BCryptPasswordEncoder passwordEncoder = new BCryptPasswordEncoder();
        UserDetails userDetails = User.withUsername("sry").password(passwordEncoder.encode("123456"))
                .roles("admin","user").build();
        return userDetails;
    }
使用 hasRole()时参数也只写admin 即可,否则启动报错。
.antMatchers("/admin/demo").hasRole("admin")
hasAnyRole(String …)
如果用户具备给定角色的任意一个,就允许被访问 。
基于IP限制访问
hasIpAddress(String)
如果请求是指定的 IP 就运行访问。
可以通过 request.getRemoteAddr() 获取 ip 地址。需要注意的是在本机进行测试时 localhost 和 127.0.0.1 输出的 ip地址是不一样的。
//  localhost --> getRemoteAddr:  0:0:0:0:0:0:0:1
.antMatchers("/admin/demo").hasIpAddress("127.0.0.1")
自定义403处理方案
使用 Spring Security 时经常会看见 403(无权限)。Spring Security 支持自定义权限受限处理,需要实现 AccessDeniedHandler接口
public class MyAccessDeniedHandler implements AccessDeniedHandler {
    @Override
    public void handle(HttpServletRequest request, HttpServletResponse response, AccessDeniedException accessDeniedException) throws IOException, ServletException {
        response.setStatus(HttpServletResponse.SC_FORBIDDEN);
        response.setHeader("Content-Type", "application/json;charset=utf-8");
        PrintWriter out = response.getWriter();
        out.write("{\"status\":\"error\",\"msg\":\"权限不足,请联系管理员!\"}");
        out.flush();
        out.close();
    }
}
在配置类中设置访问受限后交个MyAccessDeniedHandler处理
http.exceptionHandling()
     .accessDeniedHandler(new MyAccessDeniedHandler());
基于表达式的访问控制
access(表达式)
之前学习的登录用户权限判断实际上底层实现都是调用access(表达式)
https://docs.spring.io/spring-security/site/docs/5.2.7.RELEASE/reference/htmlsingle/#tech-intro-access-control
表达式根对象的基类是SecurityExpressionRoot,提供了一些在web和方法安全性中都可用的通用表达式。
可以通过 access() 实现和之前学习的权限控制完成相同的功能。
.antMatchers("/user/login","/login.html").access("permitAll")
.antMatchers("/admin/demo").access("hasAuthority('System')")
自定义方法
判断登录用户是否具有访问当前 URL 的权限。
@Component
public class MySecurityExpression implements MySecurityExpressionOperations{
    @Override
    public boolean hasPermission(HttpServletRequest request, Authentication authentication) {
        // 获取主体
        Object obj = authentication.getPrincipal();
        if (obj instanceof UserDetails){
            UserDetails userDetails = (UserDetails) obj;
            //
            String name = request.getParameter("name");
            //获取权限
            Collection<? extends GrantedAuthority> authorities = userDetails.getAuthorities();
            //判断name值是否在权限中
            return authorities.contains(new SimpleGrantedAuthority(name));
        }
        return false;
    }
}
在 access 中通过bean的beanName.方法(参数)的形式进行调用:
.anyRequest().access("@mySecurityExpression.hasPermission(request,authentication)")
方法授权
基于注解的访问控制
Spring Security在方法的权限控制上支持三种类型的注解,JSR-250注解、@Secured注解和支持表达式的注解。这三种注解默认都是没有启用的,需要通过@EnableGlobalMethodSecurity来进行启用。
这些注解可以写到 Service 接口或方法上,也可以写到 Controller或 Controller 的方法上。通常情况下都是写在控制器方法上的,控制接口URL是否允许被访问。
JSR-250注解
@RolesAllowed
表示访问对应方法时所应该具有的角色。其可以标注在类上,也可以标注在方法上,当标注在类上时表示其中所有方法的执行都需要对应的角色,当标注在方法上表示执行该方法时所需要的角色,当方法和类上都使用了@RolesAllowed进行标注,则方法上的@RolesAllowed将覆盖类上的@RolesAllowed,即方法上@RolesAllowed将对当前方法起作用。@RolesAllowed的值是由角色名称组成的数组。
@PermitAll
表示允许所有的角色进行访问,也就是说不进行权限控制。@PermitAll可以标注在方法上也可以标注在类上,当标注在方法上时则只对对应方法不进行权限控制,而标注在类上时表示对类里面所有的方法都不进行权限控制。(1)当@PermitAll标注在类上,而@RolesAllowed标注在方法上时则按照@RolesAllowed将覆盖@PermitAll,即需要@RolesAllowed对应的角色才能访问。
(2)当@RolesAllowed标注在类上,而@PermitAll标注在方法上时则对应的方法也是不进行权限控制的。
(3)当在类和方法上同时使用了@PermitAll和@RolesAllowed时先定义的将发生作用(这个没多大的实际意义,实际应用中不会有这样的定义)。
@DenyAll
是和PermitAll相反的,表示无论什么角色都不能访问。@DenyAll只能定义在方法上。你可能会有疑问使用@DenyAll标注的方法无论拥有什么权限都不能访问,那还定义它干啥呢?使用@DenyAll定义的方法只是在我们的权限控制中不能访问,脱离了权限控制还是可以访问的。
开启注解
在启动类或者在配置类上添加 @EnableGlobalMethodSecurity(jsr250Enabled = true)
@EnableGlobalMethodSecurity(jsr250Enabled = true)
public class SecurityConfig extends WebSecurityConfigurerAdapter {
在controller方法上添加@RolesAllowed注解
@RolesAllowed({"ROLE_USER", "ROLE_ADMIN"})
//@PermitAll
@GetMapping("/demo")
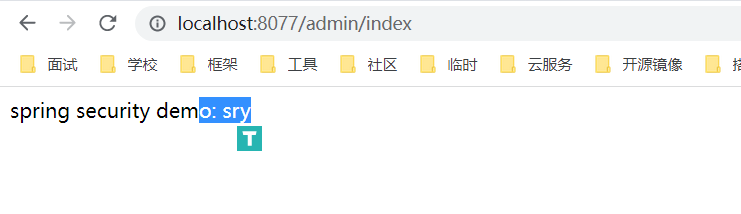
public String demo() {
return "spring security demo";
}
由于url的访问控制是优先于方法的访问控制,测试时注意配置类中配置
@Secured注解
@Secured是由Spring Security定义的用来支持方法权限控制的注解。它的使用也是需要启用对应的支持才会生效的。@Secured 是专门用于判断是否具有角色的,能写在方法或类上。参数要以 ROLE_开头。
开启注解
在启动类或者在配置类上添加 @EnableGlobalMethodSecurity(securedEnabled = true)
@EnableGlobalMethodSecurity(securedEnabled = true)
public class SecurityConfig extends WebSecurityConfigurerAdapter {
在controller方法上添加@Secured 注解
@Secured("ROLE_ADMIN")
@GetMapping("/demo")
public String demo() {
    return "spring security demo";
}
支持表达式的注解
Spring Security中定义了四个支持使用表达式的注解,分别是@PreAuthorize、@PostAuthorize、@PreFilter和@PostFilter。其中前两者可以用来在方法调用前或者调用后进行权限检查,后两者可以用来对集合类型的参数或者返回值进行过滤。
@EnableGlobalMethodSecurity(prePostEnabled = true)
public class SecurityConfig extends WebSecurityConfigurerAdapter {
使用@PreAuthorize和@PostAuthorize进行访问控制
@PreAuthorize可以用来控制一个方法是否能够被调用,执行之前先判断权限,大多情况下都是使用这个注解。
//@PreAuthorize("hasRole('ROLE_ADMIN')")
//@PreAuthorize("hasRole('ROLE_USER') or hasRole('ROLE_ADMIN')")
//限制只能查询Id小于10的用户
@PreAuthorize("#id<10")
@RequestMapping("/findById")
public User findById(long id) {
    User user = new User();
    user.setId(id);
    return user;
}


// 限制只能查询自己的信息
@PreAuthorize("principal.username.equals(#username)")
@RequestMapping("/findByName")
public User findByName(String username) {
    User user = new User();
    user.setUsername(username);
    return user;
}

//限制只能新增用户名称为abc的用户
@PreAuthorize("#user.username.equals('abc')")
@RequestMapping("/add")
public User add(User user) {
    return user;
}
@PostAuthorize可以在方法调用完之后进行权限检查
// 在方法find()调用完成后进行权限检查,如果返回值的id是偶数则表示校验通过,否则表示校验失败,将抛出AccessDeniedException
@PostAuthorize("returnObject.id%2==0")
public User find(int id) {
    User user = new User();
    user.setId(id);
    return user;
}
使用@PreFilter和@PostFilter进行过滤
使用@PreFilter和@PostFilter可以对集合类型的参数或返回值进行过滤。使用@PreFilter和@PostFilter时,Spring Security将移除使对应表达式的结果为false的元素。
@PostFilter("filterObject.id%2==0")
public List<User> findAll() {
    List<User> userList = new ArrayList<User>();
    User user;
    for (int i=0; i<10; i++) {
        user = new User();
        user.setId(i);
        userList.add(user);
    }
    return userList;
}

@PreFilter(filterTarget="ids", value="filterObject%2==0")
public void delete(List<Integer> ids, List<String> usernames) {

}
授权流程
基于Filter
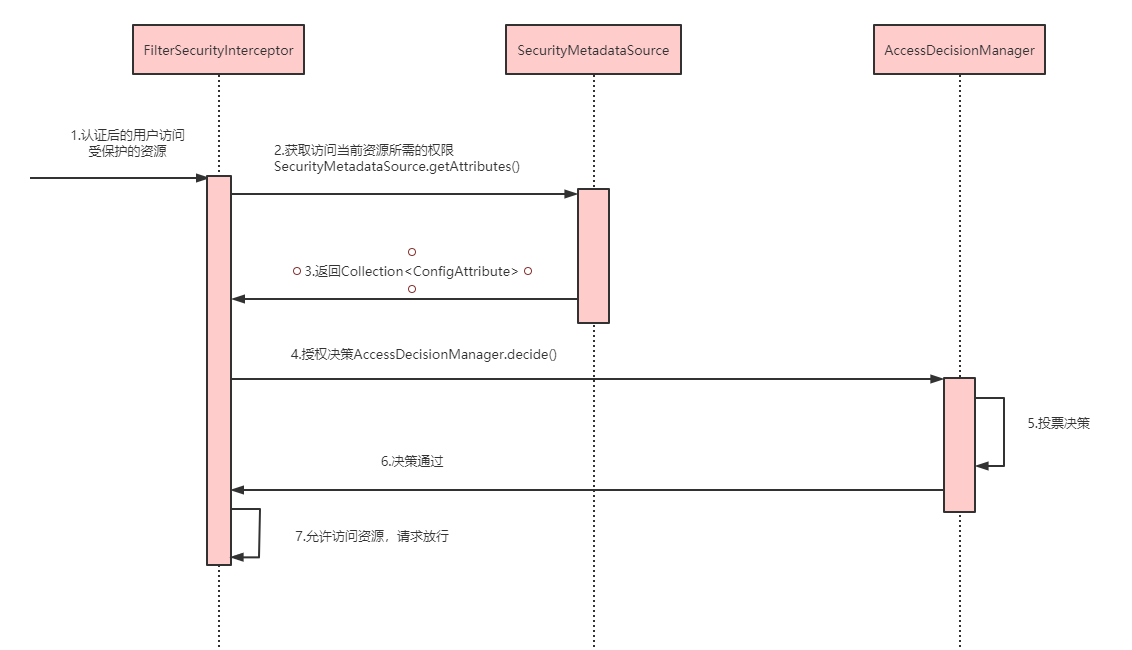
-
拦截请求,已认证用户访问受保护的web资源将被SecurityFilterChain中的 FilterSecurityInterceptor 的子
类拦截。 -
获取资源访问策略,FilterSecurityInterceptor会从 SecurityMetadataSource 的子类
DefaultFilterInvocationSecurityMetadataSource 获取要访问当前资源所需要的权限Collection 。SecurityMetadataSource其实就是读取访问策略的抽象,而读取的内容,其实就是我们配置的访问规则 -
最后,FilterSecurityInterceptor会调用 AccessDecisionManager 进行授权决策,若决策通过,则允许访问资
源,否则将禁止访问。
基于AOP
//MethodSecurityInterceptor#invoke
public Object invoke(MethodInvocation mi) throws Throwable {
    InterceptorStatusToken token = super.beforeInvocation(mi);

    Object result;
    try {
        result = mi.proceed();
    }
    finally {
        super.finallyInvocation(token);
    }
    return super.afterInvocation(token, result);
}
实现原理分析
核心配置
配置生效原理
请查看本文原理4部分,当然我就分析了一部分
除了 SecurityAutoConfiguration 之外,还有UserDetailsServiceAutoConfiguration,SecurityFilterAutoConfiguration ,你应该可以在SecurityFilterAutoConfiguration 中找到过滤器链执行生效的代码
配置项
WebSecurityConfigurerAdapter中我们可以选择自己想要修改的内容,来进行重写
HttpSecurity
安全过滤器链配置
@Configuration
public class CustomWebSecurityConfig extends WebSecurityConfigurerAdapter {

    @Override
    protected void configure(HttpSecurity http) throws Exception {
        http
            .authorizeRequests()
                .antMatchers("/resources/**", "/signup", "/about").permitAll()
                .antMatchers("/admin/**").hasRole("ADMIN")
                .antMatchers("/db/**").access("hasRole('ADMIN') and hasRole('DBA')")
                .anyRequest().authenticated()
                .and()
            .formLogin()
                .usernameParameter("username")
                .passwordParameter("password")
                .failureForwardUrl("/login?error")
                .loginPage("/login")
                .permitAll()
                .and()
            .logout()
                .logoutUrl("/logout")
                .logoutSuccessUrl("/index")
                .permitAll()
                .and()
            .httpBasic()
                .disable();
    }
}
- authorizeRequests()配置路径拦截,表明路径访问所对应的权限,角色,认证信息。
- formLogin()对应表单认证相关的配置
- logout()对应了注销相关的配置
- httpBasic()可以配置basic登录
所有的http相关配置可以通过查看HttpSecurity的主要方法获取。
| 方法 | 说明 |
|---|---|
| openidLogin() | 用于基于 OpenId 的验证 |
| headers() | 将安全标头添加到响应,比如说简单的 XSS 保护 |
| cors() | 配置跨域资源共享( CORS ) |
| sessionManagement() | 允许配置会话管理 |
| portMapper() | 允许配置一个PortMapper(HttpSecurity#(getSharedObject(class))),其他提供SecurityConfigurer的对象使用 PortMapper 从 HTTP 重定向到 HTTPS 或者从 HTTPS 重定向到 HTTP。默认情况下,Spring Security使用一个PortMapperImpl映射 HTTP 端口8080到 HTTPS 端口8443,HTTP 端口80到 HTTPS 端口443 |
| jee() | 配置基于容器的预认证。 在这种情况下,认证由Servlet容器管理 |
| x509() | 配置基于x509的认证 |
| rememberMe | 允许配置“记住我”的验证 |
| authorizeRequests() | 允许基于使用HttpServletRequest限制访问 |
| requestCache() | 允许配置请求缓存 |
| exceptionHandling() | 允许配置错误处理 |
| securityContext() | 在HttpServletRequests之间的SecurityContextHolder上设置SecurityContext的管理。 当使用WebSecurityConfigurerAdapter时,这将自动应用 |
| servletApi() | 将HttpServletRequest方法与在其上找到的值集成到SecurityContext中。 当使用WebSecurityConfigurerAdapter时,这将自动应用 |
| csrf() | 添加 CSRF 支持,使用WebSecurityConfigurerAdapter时,默认启用 |
| logout() | 添加退出登录支持。当使用WebSecurityConfigurerAdapter时,这将自动应用。默认情况是,访问URL”/ logout”,使HTTP Session无效来清除用户,清除已配置的任何#rememberMe()身份验证,清除SecurityContextHolder,然后重定向到”/login?success” |
| anonymous() | 允许配置匿名用户的表示方法。 当与WebSecurityConfigurerAdapter结合使用时,这将自动应用。 默认情况下,匿名用户将使用org.springframework.security.authentication.AnonymousAuthenticationToken表示,并包含角色 “ROLE_ANONYMOUS” |
| formLogin() | 指定支持基于表单的身份验证。如果未指定FormLoginConfigurer#loginPage(String),则将生成默认登录页面 |
| oauth2Login() | 根据外部OAuth 2.0或OpenID Connect 1.0提供程序配置身份验证 |
| requiresChannel() | 配置通道安全。为了使该配置有用,必须提供至少一个到所需信道的映射 |
| httpBasic() | 配置 Http Basic 验证 |
| addFilterBefore() | 在指定的Filter类之前添加过滤器 |
| addFilterAt() | 在指定的Filter类的位置添加过滤器 |
| addFilterAfter() | 在指定的Filter类的之后添加过滤器 |
| and() | 连接以上策略的连接器,用来组合安全策略。实际上就是"而且"的意思 |
WebSecurity
核心过滤器配置
WebSecurity 基于Servlet Filter 用来配置 springSecurityFilterChain,而springSecurityFilterChain 又被委托给了 Spring Security 核心过滤器DelegatingFilterProxy 。我们一般不会过多来自定义 WebSecurity , 使用较多的使其ignoring() 方法用来忽略 Spring Security 对静态资源的控制。
public void configure(WebSecurity web) throws Exception {
    web
        .ignoring()
        .antMatchers("/resources/**");
}
AuthenticationManagerBuilder
认证管理器配置
@Override
protected void configure(AuthenticationManagerBuilder auth) throws Exception {
    auth
        .inMemoryAuthentication()
        .withUser("admin").password("admin").roles("USER");
}
全局配置, 使用@Autowired注入的AuthenticationManagerBuilder是全局的身份认证器,作用域可以跨越多个WebSecurityConfigurerAdapter。
@Autowired
public void configureGlobal(AuthenticationManagerBuilder auth) throws Exception {
    auth
        .inMemoryAuthentication()
        .withUser("admin").password("admin").roles("USER");
}
FilterChain
官方文档:https://docs.spring.io/spring-security/reference/5.6/servlet/architecture.html
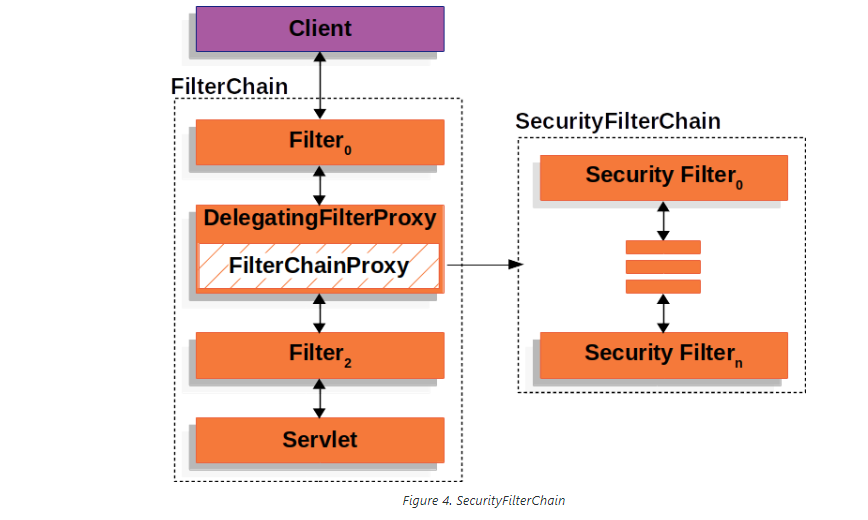

上面记录的认证和授权流程已经涉及到了许多的过滤器,比如处理认证的UsernamePasswordAuthenticationFilter和LogoutFilter等等,总之Security将我们认证和授权的相关操作都集中在过滤器中,进入过滤器的流程如下
1、首先DelegatingFilterProxy是继承GenericFilterBean(这个应该是spring扩展的),而GenericFilterBean又javax.servlet.Filter,多以tomcat在接收到请求后会执行我们的DelegatingFilterProxy这个过滤器,然后 DelegatingFilterProxy就是一个对于servlet filter的代理,用这个类的好处主要是通过Spring容器来管理servlet filter的生命周期
DelegatingFilterProxy extends GenericFilterBean
2、FilterChainProxy extends GenericFilterBean,总之DelegatingFilterProxy执行以下代码后会进入我们的FilterChainProxy 的doFilter方法中,而FilterChainProxy 就security实现的过滤器
delegate.doFilter(request, response, filterChain);
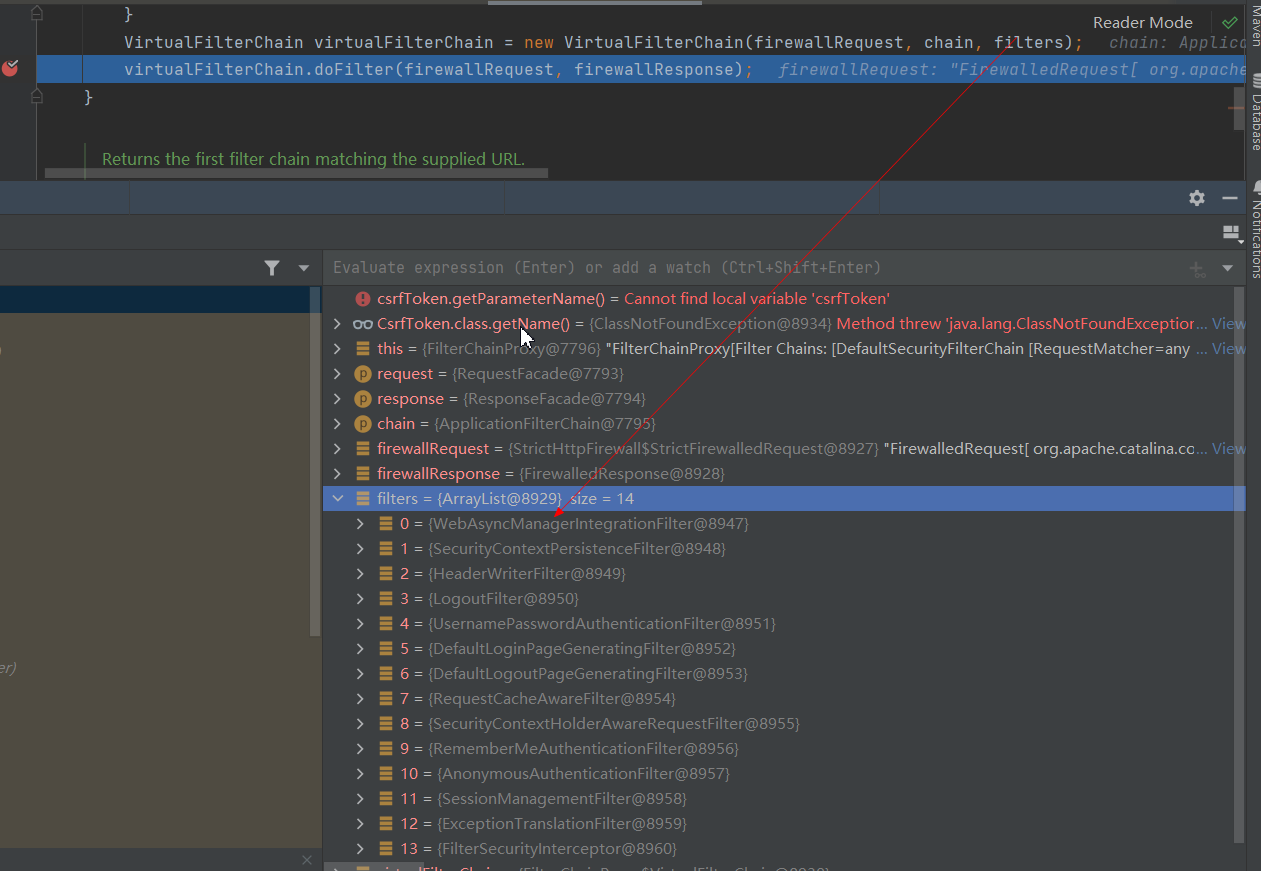
3、然后FilterChainProxy 的doFilterInternal中就会具体进入我们security的过滤器中
		// 获取的应该是security的过滤器
		List<Filter> filters = getFilters(firewallRequest);

		VirtualFilterChain virtualFilterChain = new VirtualFilterChain(firewallRequest, chain, filters);
		virtualFilterChain.doFilter(firewallRequest, firewallResponse);
过滤器链的执行顺序
Below is a comprehensive list of Spring Security Filter ordering:
- ChannelProcessingFilter
- WebAsyncManagerIntegrationFilter
- SecurityContextPersistenceFilter 保存更新清除SecurityContext,如果认证是通过session存储,这里就可以拿到已经认证过的认证对象
- HeaderWriterFilter
- CorsFilter:允许跨域策略的验证
- CsrfFilter :跨站请求伪造防护,默认是验证请求头或请求参数_csrf
- LogoutFilter : 拦截对登出请求的访问,然后进行登出,默认是拦截/logout
- OAuth2AuthorizationRequestRedirectFilter
- Saml2WebSsoAuthenticationRequestFilter
- X509AuthenticationFilter
- AbstractPreAuthenticatedProcessingFilter
- CasAuthenticationFilter
- OAuth2LoginAuthenticationFilter
- Saml2WebSsoAuthenticationFilter
UsernamePasswordAuthenticationFilter: 用户名密码登录- OpenIDAuthenticationFilter
- DefaultLoginPageGeneratingFilter : 登录界面生成
- DefaultLogoutPageGeneratingFilter
- ConcurrentSessionFilter:如果是session控制的登录,这里可以控制同一个用户最多允许几个会话
DigestAuthenticationFilter: 对登录用户名密码的一种签名处理,- BearerTokenAuthenticationFilter : 默认是请求头Authorization 请求头中以Bearer 开头的token,占时我只知道这个oauth2 场景汇中客户端访问 资源服务器时,资源服务器会在这里进行认证
BasicAuthenticationFilter: 配置开启后,通过这个处理base64加密的用户名密码- RequestCacheAwareFilter
- SecurityContextHolderAwareRequestFilter
- JaasApiIntegrationFilter
- RememberMeAuthenticationFilter
- AnonymousAuthenticationFilter
- OAuth2AuthorizationCodeGrantFilter
- SessionManagementFilter
ExceptionTranslationFilter:异常转换筛选器允许将拒绝访问的异常和身份验证异常转换为HTTP响应。FilterSecurityInterceptor:是否经过认证,是否有权限访问- SwitchUserFilter
其他
不管是认证流程,还是配置生效的流程,都没有了解的很清楚,特别是配置生效逻辑,不过SpringSecurity大致流程明白了,其他的以后再说
关联信息
- 关联的主题:
- 上一篇:
- 下一篇:
- image: 20221021/1
- 转载自:


![[附源码]Python计算机毕业设计SSM基于旅游服务平台(程序+LW)](https://img-blog.csdnimg.cn/9065ba7b472b4fd88ff50972910f3388.png)