ARM平台搭建Python环境
- 写在最前
- 常见问题
- 1. 主机(Ubuntu)安装Python3.8.10
- 1.1 安装前的准备
- 1.2 Ubuntu安装Python3.8.10
- 1.3 Ubuntu配置Python3.8.10
- 2. 宿主机(AMR)安装Python3.8.10
- 2.1 主机安装交叉编译工具
- 2.2 交叉编译zlib库
- 2.3 交叉编译Python3.8.10
- 2.2.1 交叉编译Python3.8.10
- 2.2.2 ARM开发板配置Python3.8.10
- 2.3 针对编译和配置过程中可能存在的报错问题及解决
- 2.3.1 configure: error: readelf for the host is required for cross builds问题
- 2.3.2 Error: The source directory (..) is not clean
- 2.3.3 error: the control flow of function ‘push’ does not match its profile data (counter ‘arcs’)
- 2.3.4 fatal error: ffi.h: No such file or directory
- 2.3.5 undefined symbol: ffi_prep_cif
- 2.3.6 subprocess.CalledProcessError: Command '('lsb_release', '-a')' returned non-zero exit status 1.
写在最前
- 本文平台为Ubuntu18.04,在搭建Python环境前,主机需要具备的环境有:
gcc和make工具,以及联网环境(下载有关lib-dev依赖项) - 交叉编译工具为
aarch64-linux-gnu
常见问题
Q:Ubuntu 18.04默认安装了Python3.6.9,那么在搭建Python环境时候,默认的Python是否会对我们造成影响呢?
A:笔者安装了好几次,其实在安装过程中,自带的Python是不会对安装造成影响的,但是安装好之后,把系统自带的与Python3.6.9的软连接删除之后,会存在错误情况,例如:Linux No module named ‘CommandNotFound‘,所以最好多版本Python并存,但是不删除系统的Python环境
Q:使用
sudo apt-get remove python3删除系统的python再安装是不是会好一点呢?
A:这样可能造成更严重的错误,参考有:Ubuntu卸载python(慎重)
Q:ARM上安装Python必须在宿主机上有该版本的Python环境吗?
A:应该是需要的吧?有博客提到,如果主机没有Python环境,可能会出现checking for python interpreter for cross build... configure: error: python3.8 interpreter not found的错误:交叉编译Python-3.8.3
Q:为啥我安装的好的Python缺少ctypes、pip等包?
A:可能是在配置Python安装包时候,主机没有联网下下来哪些依赖项目,其实如果依赖项是完整的,在源码makePython时候都不会出现报错,如:fatal error: ffi.h: No such file or directory这一类的错误
Q:我怎么知道需要哪些依赖项呢?
A:其实这个可以参考:Python Developer’s Guide
Q:交叉编译3.8版本的Python主机环境的python必须叫python3.8吗?
A:个人感觉是的,因为在交叉编译时候,存在一个check的过程,内容包括:checking for python3.8... python3.8 和 checking for python interpreter for cross build... python3.8,所以软连接的python3.8.10应当叫python3.8
Q:交叉编译的版本zlib和openssl模块必须安装吗?
A:交叉编译版本,如果不安装zlib是没有办法启动pip工具的如下所示,openssl可以根据需求决定root@bot:~/pyenv/python3/lib/python3.8/site-packages# python3.8 -m pip list Traceback (most recent call last): File "/home/root/pyenv/python3/lib/python3.8/runpy.py", line 194, in _run_module_as_main return _run_code(code, main_globals, None, File "/home/root/pyenv/python3/lib/python3.8/runpy.py", line 87, in _run_code exec(code, run_globals) File "/home/root/pyenv/python3/lib/python3.8/site-packages/pip/__main__.py", line 29, in <module> from pip._internal.cli.main import main as _main File "/home/root/pyenv/python3/lib/python3.8/site-packages/pip/_internal/cli/main.py", line 9, in <module> from pip._internal.cli.autocompletion import autocomplete File "/home/root/pyenv/python3/lib/python3.8/site-packages/pip/_internal/cli/autocompletion.py", line 10, in <module> from pip._internal.cli.main_parser import create_main_parser File "/home/root/pyenv/python3/lib/python3.8/site-packages/pip/_internal/cli/main_parser.py", line 8, in <module> from pip._internal.cli import cmdoptions File "/home/root/pyenv/python3/lib/python3.8/site-packages/pip/_internal/cli/cmdoptions.py", line 23, in <module> from pip._internal.cli.parser import ConfigOptionParser File "/home/root/pyenv/python3/lib/python3.8/site-packages/pip/_internal/cli/parser.py", line 12, in <module> from pip._internal.configuration import Configuration, ConfigurationError File "/home/root/pyenv/python3/lib/python3.8/site-packages/pip/_internal/configuration.py", line 21, in <module> from pip._internal.exceptions import ( File "/home/root/pyenv/python3/lib/python3.8/site-packages/pip/_internal/exceptions.py", line 8, in <module> from pip._vendor.requests.models import Request, Response File "/home/root/pyenv/python3/lib/python3.8/site-packages/pip/_vendor/requests/__init__.py", line 43, in <module> from pip._vendor import urllib3 File "/home/root/pyenv/python3/lib/python3.8/site-packages/pip/_vendor/urllib3/__init__.py", line 13, in <module> from .connectionpool import HTTPConnectionPool, HTTPSConnectionPool, connection_from_url File "/home/root/pyenv/python3/lib/python3.8/site-packages/pip/_vendor/urllib3/connectionpool.py", line 40, in <module> from .response import HTTPResponse File "/home/root/pyenv/python3/lib/python3.8/site-packages/pip/_vendor/urllib3/response.py", line 5, in <module> import zlib ModuleNotFoundError: No module named 'zlib' root@bot:~/pyenv/python3/lib/python3.8/site-packages#
1. 主机(Ubuntu)安装Python3.8.10
参考资料
Ubuntu安装Python3
1.1 安装前的准备
-
- 下载Python源码:Python Source Releases,打开页面用浏览器工具找到对应版本,随便下载一个tar压缩包即可

-
- Ubuntu环境准备好依赖项:
sudo apt-get install zlib1g-dev libbz2-dev libssl-dev libncurses5-dev libsqlite3-dev libreadline-dev tk-dev libgdbm-dev libdb-dev libpcap-dev xz-utils libexpat1-dev liblzma-dev libffi-dev libc6-dev
- Ubuntu环境准备好依赖项:
-
- 本文安装位置:本文在Ubuntu的用户(pcv)文件夹下创建了一个installPackage文件夹
/home/pcv/installPackage用来存放Python源码,最后安装时候,将Python安装在usr/local/python3.8文件夹里,这二者含义相当于windows安装的.exe位置和安装位置:
- 本文安装位置:本文在Ubuntu的用户(pcv)文件夹下创建了一个installPackage文件夹

至此可以检查是否准备好了安装的条件
- Ubuntu环境
- python3.8.10源码
- gcc工具(
gcc -v查看得到:gcc version 7.5.0 (Ubuntu 7.5.0-3ubuntu1~18.04))- make工具(
make --version查看得到:GNU Make 4.1 Built for x86_64-pc-linux-gnu)- lib-dev都已经安装完成
- 明白了自己Python安装目录和源文件目录区别
- 理解了自己安装目录的位置和本文目录位置可能不一样~
1.2 Ubuntu安装Python3.8.10
-
- 解压源文件:
tar -xvf Python-3.8.10.tar.xz,没有权限记得添加权限sudo chmod 777 Python-3.8.10.tar.xz
- 解压源文件:
-
- 进入到源文件目录
cd Python-3.8.10,并配置安装位置和安装方式:./configure --prefix=/usr/local/python3.8 --enable-optimizations
- 进入到源文件目录
pcv@pc:~/installPackage$ tar -xvf Python-3.8.10.tar.xz
pcv@pc:~/installPackage$ cd Python-3.8.10/
pcv@pc:~/installPackage$ ls
aclocal.m4          Doc         Mac              PC             setup.py
CODE_OF_CONDUCT.md  Grammar     Makefile.pre.in  PCbuild        Tools
config.guess        Include     Misc             Programs
config.sub          install-sh  Modules          pyconfig.h.in
configure           Lib         Objects          Python
configure.ac        LICENSE     Parser           README.rst
pcv@pc:~/installPackage/Python-3.8.10$ ./configure --prefix=/usr/local/python3.8 --enable-optimizations
./configure命令表示当前文件夹下的configure配置--prefix=/usr/local/python3.8命令表示安装位置--enable-optimizations比较耗时但是比较完整的安装Python方式,据说低版本的gcc会在make指令之后提示make[1]: Leaving directory xxx信息,但是不影响make install
-
- 在一段check后即可编译源文件:
make,怕权限不够可以sudo make,这一步耗时很长,如果依赖项不够完整会出现某个.h文件fault的提示,编译成功之后会出现makefile文件
- 在一段check后即可编译源文件:
pcv@pc:~/installPackage/Python-3.8.10$ make
.....
gcc -pthread -c -Wno-unused-result -Wsign-compare -DNDEBUG -g -fwrapv -O3 -Wall    -std=c99 -Wextra -Wno-unused-result -Wno-unused-parameter -Wno-missing-field-initializers -Werror=implicit-function-declaration -fprofile-use -fprofile-correction -I./Include/internal  -I. -I./Include    -DPy_BUILD_CORE -o Programs/_testembed.o ./Programs/_testembed.c
gcc -pthread     -Xlinker -export-dynamic -o Programs/_testembed Programs/_testembed.o libpython3.8.a -lcrypt -lpthread -ldl  -lutil -lm   -lm
make[1]: Leaving directory '/home/pcv/installPackage/Python-3.8.10'
pcv@pc:~/installPackage/Python-3.8.10$ ls
aclocal.m4          config.log     configure.ac  install-sh      Mac              Misc     PC                 pybuilddir.txt  Python            README.rst
build               config.status  Doc           Lib             Makefile         Modules  PCbuild            pyconfig.h      python-config     setup.py
CODE_OF_CONDUCT.md  config.sub     Grammar       libpython3.8.a  Makefile.pre     Objects  profile-run-stamp  pyconfig.h.in   python-config.py  Tools
config.guess        configure      Include       LICENSE         Makefile.pre.in  Parser   Programs           python          python-gdb.py
-
- 安装Python:
make install权限不够则之间sudo make install,完整的安装会提示最后把pip和setuptool也安装好了
- 安装Python:
pcv@pc:~/installPackage/Python-3.8.10$ sudo make install
......
Looking in links: /tmp/tmp26hrxmp2
Processing /tmp/tmp26hrxmp2/setuptools-56.0.0-py3-none-any.whl
Processing /tmp/tmp26hrxmp2/pip-21.1.1-py3-none-any.whl
Installing collected packages: setuptools, pip
  WARNING: The scripts pip3 and pip3.8 are installed in '/usr/local/python3.8/bin' which is not on PATH.
  Consider adding this directory to PATH or, if you prefer to suppress this warning, use --no-warn-script-location.
Successfully installed pip-21.1.1 setuptools-56.0.0
WARNING: Running pip as root will break packages and permissions. You should install packages reliably by using venv: https://pip.pypa.io/warnings/venv
1.3 Ubuntu配置Python3.8.10
-
- 安装完成之后,在安装目录
/usr/local/python3.8目录下有Python3.8.10的二进制可执行文件,此时通过软连接连接之后,即可使用该版本的Python软件
- 安装完成之后,在安装目录
pcv@pc:~/installPackage/Python-3.8.10$ cd /usr/local/python3.8/
pcv@pc:/usr/local/python3.8$ ls
bin  include  lib  share
pcv@pc:/usr/local/python3.8$
-
- 软连接:
sudo ln -s /usr/local/python3.8/bin/python3.8 /usr/bin/python3.8和sudo ln -s /usr/local/python3.8/bin/python3.8-config /usr/bin/python3.8-config
- 软连接:
-
- 后续通过命令
python3.8使用python3.8.10软件,通过命令python3.8 -m pip xxx使用python3.8.10的pip工具
- 后续通过命令
pcv@pc:~/installPackage/Python-3.8.10$ sudo ln -s /usr/local/python3.8/bin/python3.8 /usr/bin/python3.8
pcv@pc:~/installPackage/Python-3.8.10$ python3.8
Python 3.8.10 (default, Dec 14 2022, 18:25:35)
[GCC 7.5.0] on linux
Type "help", "copyright", "credits" or "license" for more information.
>>>
[4]+  Stopped                 python3.8
pcv@pc:~/installPackage/Python-3.8.10$ sudo ln -s /usr/local/python3.8/bin/python3.8-config /usr/bin/python3.8-config
pcv@pc:~/installPackage/Python-3.8.10$ python3.8 -m pip list
Package    Version
---------- -------
pip        21.1.1
setuptools 56.0.0
^Z
[5]+  Stopped                 python3.8 -m pip list
pcv@pc:~/installPackage/Python-3.8.10$
2. 宿主机(AMR)安装Python3.8.10
参考资料
交叉编译详解
交叉编译工具链–aarch64安装流程
交叉编译Python-3.6.0到aarch64/aarch32 —— 支持sqlite3
python及第三方库交叉编译
2.1 主机安装交叉编译工具
-
- 下载交叉编译工具
aarch-linux-gnu-,Linaro Releases,有意思的是这个后缀是gnu而不是gun,笔者这里选择的是109M的gnu.tar.xz,高版本的交叉编译从GNU-A Downloads选择下载
- 下载交叉编译工具

-
- 解压aarch64-linux-gnu-:主要是记住文件的位置,因为后续需要直接把aarch64-linux-gnu-工具添加到环境变量当中:本文的位置为
/home/用户/aarch_gcc,采用了mv命令替换名字,
- 解压aarch64-linux-gnu-:主要是记住文件的位置,因为后续需要直接把aarch64-linux-gnu-工具添加到环境变量当中:本文的位置为
pcv@pc:~$ tar -xf gcc-linaro-7.5.0-2019.12-x86_64_aarch64-linux-gnu.tar gcc-linaro-7.5.0-2019.12-x86_64_aarch64-linux-gnu/
pcv@pc:~$ ls
Desktop    Downloads                                          gcc-linaro-7.5.0-2019.12-x86_64_aarch64-linux-gnu.tar  Music     Public  Templates
Documents  gcc-linaro-7.5.0-2019.12-x86_64_aarch64-linux-gnu  installPackage                                         Pictures  share   Videos
pcv@pc:~$ rm gcc-linaro-7.5.0-2019.12-x86_64_aarch64-linux-gnu.tar
pcv@pc:~$ mv gcc-linaro-7.5.0-2019.12-x86_64_aarch64-linux-gnu/ aarch_gcc
pcv@pc:~$ ls
aarch_gcc  Desktop  Documents  Downloads  installPackage  Music  Pictures  Public  share  Templates  Videos
pcv@pc:~$ cd aarch_gcc/bin/
pcv@pc:~/aarch_gcc/bin$ pwd
/home/pcv/aarch_gcc/bin
-
- 将aarch64-linux-gnu- 工具添加到环境变量:
sudo echo "PATH=/home/pcv/aarch_gcc/bin:$PATH" >> ~/.bashrc,并激活环境变量:source ~/.bashrc,至此输入命令aarch64-linux-gnu-gcc --version查看是否安装完全
- 将aarch64-linux-gnu- 工具添加到环境变量:
pcv@pc:~/aarch_gcc/bin$ sudo echo "PATH=/home/pcv/aarch_gcc/bin:$PATH" >> ~/.bashrc
pcv@pc:~/aarch_gcc/bin$ source ~/.bashrc
pcv@pc:~/aarch_gcc/bin$ aarch64-linux-gnu-gcc --version
aarch64-linux-gnu-gcc (Linaro GCC 7.5-2019.12) 7.5.0
Copyright (C) 2017 Free Software Foundation, Inc.
This is free software; see the source for copying conditions.  There is NO
warranty; not even for MERCHANTABILITY or FITNESS FOR A PARTICULAR PURPOSE.
-
- 如果想通过交叉工具编译C文件,则命令为:
aarch64-linux-gnu-gcc test.c -o test
- 如果想通过交叉工具编译C文件,则命令为:
2.2 交叉编译zlib库
-
- 下载Zlib库:zlib 官网,目前最新版本应该为1.2.13及以上,选择源文件下载:

2.3 交叉编译Python3.8.10
交叉编译前面可以检查是否准备好了安装的条件
- Ubuntu环境存在python3.8的变量(终端输入python3.8会有版本提示信息)
- python3.8.10源码
- zlib源码
- aarch64-linux-gnu-工具
- make工具(
make --version查看得到:GNU Make 4.1 Built for x86_64-pc-linux-gnu)- lib-dev都已经安装完成
- 同样明白了目录的含义
以下命令,均是能够正常运行之后的命令
2.2.1 交叉编译Python3.8.10
-
- 进入Python3.8.10源文件目录,新建一个交叉编译的文件夹,如本文的
aarch_build,如果不新建交叉编译的文件夹,会导致在源文件中make失败,见2.3.2
- 进入Python3.8.10源文件目录,新建一个交叉编译的文件夹,如本文的
pcv@pc:~/installPackage$ cd Python-3.8.10/
pcv@pc:~/installPackage/Python-3.8.10$ ls
aclocal.m4          config.log     configure.ac  install-sh      Mac              Misc     PC                 pybuilddir.txt  Python            README.rst
build               config.status  Doc           Lib             Makefile         Modules  PCbuild            pyconfig.h      python-config     setup.py
CODE_OF_CONDUCT.md  config.sub     Grammar       libpython3.8.a  Makefile.pre     Objects  profile-run-stamp  pyconfig.h.in   python-config.py  Tools
config.guess        configure      Include       LICENSE         Makefile.pre.in  Parser   Programs           python          python-gdb.py
pcv@pc:~/installPackage/Python-3.8.10$ mkdir aarch_build
pcv@pc:~/installPackage/Python-3.8.10$ cd aarch_build/
pcv@pc:~/installPackage/Python-3.8.10/aarch_build$ ls
pcv@pc:~/installPackage/Python-3.8.10/aarch_build$
-
- 添加配置信息:
CC=aarch64-linux-gnu-gcc CXX=aarch-linux-gnu-g++ LD=aarch64-linux-gnu-ld READELF=aarch64-linux-gnu-readelf ../configure --prefix=/home/pc/Desktop/python3 --build=aarch64-linux-gnu --host=aarch64-linux --target=aarch64-linux-gnu --enable-shared --enable-ipv6 --with-system-ffi ac_cv_file__dev_ptmx=0 ac_cv_file__dev_ptc=0 --enable-optimizations
- 添加配置信息:
pcv@pc:~/installPackage/Python-3.8.10/aarch_build$ CC=aarch64-linux-gnu-gcc CXX=aarch-linux-gnu-g++ LD=aarch64-linux-gnu-ld READELF=aarch64-linux-gnu-readelf ../configure --prefix=/home/pc/Desktop/python3 --build=aarch64-linux-gnu --host=aarch64-linux --target=aarch64-linux-gnu --enable-shared --enable-ipv6 --with-system-ffi ac_cv_file__dev_ptmx=0 ac_cv_file__dev_ptc=0 --enable-optimizations
checking build system type... aarch64-unknown-linux-gnu
checking host system type... aarch64-unknown-linux-gnu
checking for python3.8... python3.8
checking for python interpreter for cross build... python3.8
checking for --enable-universalsdk... no
checking for --with-universal-archs... no
checking MACHDEP... "linux"
... ...
checking for sys/mman.h... (cached) yes
checking for shm_open... yes
checking for shm_unlink... yes
checking for aarch64-linux-pkg-config... /usr/bin/pkg-config
checking whether compiling and linking against OpenSSL works... no
checking for --with-ssl-default-suites... python
configure: creating ./config.status
config.status: creating Makefile.pre
config.status: creating Misc/python.pc
config.status: creating Misc/python-embed.pc
config.status: creating Misc/python-config.sh
config.status: creating Modules/ld_so_aix
config.status: creating pyconfig.h
creating Modules/Setup.local
creating Makefile
-
- 清理旧的编译目录然后在交叉编译文件夹下进行交叉编译:因为之前我们在源文件下进行过针对Ubuntu18.04的Python3.8.10编译,,而交叉编译的配置信息中的
../configure也是针对源文件的配置,此时需要跳转到该源文件位置清理编译环境,sudo make clean,否则会出现Error: The source directory (..) is not clean,然后在交叉编译的目录aarch_build下执行make命令
- 清理旧的编译目录然后在交叉编译文件夹下进行交叉编译:因为之前我们在源文件下进行过针对Ubuntu18.04的Python3.8.10编译,,而交叉编译的配置信息中的
pcv@pc:~/installPackage/Python-3.8.10/aarch_build$ cd ..
pcv@pc:~/installPackage/Python-3.8.10$ sudo make clean
find . -depth -name '__pycache__' -exec rm -rf {} ';'
find . -name '*.py[co]' -exec rm -f {} ';'
find . -name '*.[oa]' -exec rm -f {} ';'
find . -name '*.s[ol]' -exec rm -f {} ';'
find . -name '*.so.[0-9]*.[0-9]*' -exec rm -f {} ';'
find build -name 'fficonfig.h' -exec rm -f {} ';' || true
find build -name '*.py' -exec rm -f {} ';' || true
find build -name '*.py[co]' -exec rm -f {} ';' || true
rm -f pybuilddir.txt
rm -f Lib/lib2to3/*Grammar*.pickle
rm -f Programs/_testembed Programs/_freeze_importlib
find build -type f -a ! -name '*.gc??' -exec rm -f {} ';'
rm -f Include/pydtrace_probes.h
rm -f profile-gen-stamp
pcv@pc:~/installPackage/Python-3.8.10$ cd aarch_build/
pcv@pc:~/installPackage/Python-3.8.10/aarch_build$ make
Rebuilding with profile guided optimizations:
rm -f profile-clean-stamp
make build_all CFLAGS_NODIST=" -fprofile-use -fprofile-correction" LDFLAGS_NODIST=""
make[1]: Entering directory '/home/pcv/installPackage/Python-3.8.10/aarch_build'
aarch64-linux-gnu-gcc -c -Wno-unused-result -Wsign-compare -DNDEBUG -g -fwrapv -O3 -Wall    -std=c99 -Wextra -Wno-unused-result -Wno-unused-parameter -Wno-missing-field-initializers -Werror=implicit-function-declaration -fprofile-use -fprofile-correction -I../Include/internal -IObjects -IInclude -IPython -I. -I../Include   -fPIC -DPy_BUILD_CORE -o Programs/python.o ../Programs/python.c
aarch64-linux-gnu-gcc -c -Wno-unused-result -Wsign-compare -DNDEBUG -g -fwrapv -O3 -Wall    -std=c99 -Wextra -Wno-unused-result -Wno-unused-parameter -Wno-missing-field-initializers -Werror=implicit-function-declaration -fprofile-use -fprofile-correction -I../Include/internal -IObjects -IInclude -IPython -I. -I../Include   -fPIC -DPy_BUILD_CORE -o Parser/acceler.o ../Parser/acceler.c
... ...
aarch64-linux-gnu-gcc -c -Wno-unused-result -Wsign-compare -DNDEBUG -g -fwrapv -O3 -Wall    -std=c99 -Wextra -Wno-unused-result -Wno-unused-parameter -Wno-missing-field-initializers -Werror=implicit-function-declaration -fprofile-use -fprofile-correction -I../Include/internal -IObjects -IInclude -IPython -I. -I../Include   -fPIC -DPy_BUILD_CORE -o Programs/_testembed.o ../Programs/_testembed.c
aarch64-linux-gnu-gcc     -Xlinker -export-dynamic -o Programs/_testembed Programs/_testembed.o -L. -lpython3.8 -lcrypt -lpthread -ldl  -lpthread -lutil -lm   -lm
sed -e "s,@EXENAME@,/home/pc/Desktop/python3/bin/python3.8," < ../Misc/python-config.in >python-config.py
LC_ALL=C sed -e 's,\$(\([A-Za-z0-9_]*\)),\$\{\1\},g' < Misc/python-config.sh >python-config
make[1]: Leaving directory '/home/pcv/installPackage/Python-3.8.10/aarch_build'
pcv@pc:~/installPackage/Python-3.8.10/aarch_build$
2.2.2 ARM开发板配置Python3.8.10
2.3 针对编译和配置过程中可能存在的报错问题及解决
2.3.1 configure: error: readelf for the host is required for cross builds问题
- 错误内容:
checking for aarch64-linux-ar... no
checking for aarch64-linux-aal... no
checking for ar... ar
configure: WARNING: using cross tools not prefixed with host triplet
checking for aarch64-linux-readelf... no
checking for readelf... readelf
configure: error: readelf for the host is required for cross builds
- 解决办法:参考:Python3交叉编译至arm-linux,但是本文设置软连接无效,于是直接在环境中指定
READELF=aarch64-linux-gnu-readelf
2.3.2 Error: The source directory (…) is not clean
- 错误内容:
pcv@pc:~/installPackage/Python-3.8.10/aarch_build$ make
Rebuilding with profile guided optimizations:
rm -f profile-clean-stamp
make build_all CFLAGS_NODIST=" -fprofile-use -fprofile-correction" LDFLAGS_NODIST=""
make[1]: Entering directory '/home/pcv/installPackage/Python-3.8.10/aarch_build'
Error: The source directory (..) is not clean
Building Python out of the source tree (in /home/pcv/installPackage/Python-3.8.10/aarch_build) requires a clean source tree (/home/pcv/installPackage/Python-3.8.10/aarch_build/..)
Try to run: make -C ".." clean
Makefile:470: recipe for target 'check-clean-src' failed
make[1]: *** [check-clean-src] Error 1
make[1]: Leaving directory '/home/pcv/installPackage/Python-3.8.10/aarch_build'
Makefile:522: recipe for target 'profile-opt' failed
make: *** [profile-opt] Error
- 解决办法:其原因是因为在源文件中的make没有清理一下,在源文件目录下,运行
sudo make clean即可
pcv@pc:~/installPackage/Python-3.8.10/aarch_build$ cd ..
pcv@pc:~/installPackage/Python-3.8.10$ sudo make clean
find . -depth -name '__pycache__' -exec rm -rf {} ';'
find . -name '*.py[co]' -exec rm -f {} ';'
find . -name '*.[oa]' -exec rm -f {} ';'
find . -name '*.s[ol]' -exec rm -f {} ';'
find . -name '*.so.[0-9]*.[0-9]*' -exec rm -f {} ';'
find build -name 'fficonfig.h' -exec rm -f {} ';' || true
find build -name '*.py' -exec rm -f {} ';' || true
find build -name '*.py[co]' -exec rm -f {} ';' || true
rm -f pybuilddir.txt
rm -f Lib/lib2to3/*Grammar*.pickle
rm -f Programs/_testembed Programs/_freeze_importlib
find build -type f -a ! -name '*.gc??' -exec rm -f {} ';'
rm -f Include/pydtrace_probes.h
rm -f profile-gen-stamp
pcv@pc:~/installPackage/Python-3.8.10$
2.3.3 error: the control flow of function ‘push’ does not match its profile data (counter ‘arcs’)
- 错误内容:
pcv@pc:~/installPackage/Python-3.8.10$ make
aarch64-linux-gnu-gcc -c -Wno-unused-result -Wsign-compare -DNDEBUG -g -fwrapv -O3 -Wall    -std=c99 -Wextra -Wno-unused-result -Wno-unused-parameter -Wno-missing-field-initializers -Werror=implicit-function-declaration -fprofile-use -fprofile-correction -I./Include/internal  -I. -I./Include   -fPIC -DPy_BUILD_CORE -o Parser/parser.o Parser/parser.c
Parser/parser.c: In function ‘push’:
Parser/parser.c:348:1: error: the control flow of function ‘push’ does not match its profile data (counter ‘arcs’) [-Werror=coverage-mismatch]
 }
 ^
Parser/parser.c:348:1: error: the control flow of function ‘push’ does not match its profile data (counter ‘time_profiler’) [-Werror=coverage-mismatch]
cc1: some warnings being treated as errors
Makefile:1730: recipe for target 'Parser/parser.o' failed
make[1]: *** [Parser/parser.o] Error 1
make[1]: Leaving directory '/home/pcv/installPackage/Python-3.8.10'
Makefile:522: recipe for target 'profile-opt' failed
make: *** [profile-opt] Error 2
- 解决办法:这是因为在源文件中进行配置和
make,解决办法则在源文件外新建build目录为交叉编译使用
2.3.4 fatal error: ffi.h: No such file or directory
- 错误内容:
pcv@pc:~/installPackage/Python-3.8.10/aarch_build$ make
... .f
aarch64-linux-gnu-gcc -fPIC -Wno-unused-result -Wsign-compare -DNDEBUG -g -fwrapv -O3 -Wall -std=c99 -Wextra -Wno-unused-result -Wno-unused-parameter -Wno-missing-field-initializers -Werror=implicit-function-declaration -fprofile-use -fprofile-correction -I../Include/internal -I../Include -IObjects -IPython -I. -I/home/pcv/aarch_gcc/bin/../aarch64-linux-gnu/libc/usr/include -I/home/pcv/installPackage/Python-3.8.10/Include -I/home/pcv/installPackage/Python-3.8.10/aarch_build -c /home/pcv/installPackage/Python-3.8.10/Modules/_ctypes/_ctypes.c -o build/temp.linux-aarch64-3.8/home/pcv/installPackage/Python-3.8.10/Modules/_ctypes/_ctypes.o
/home/pcv/installPackage/Python-3.8.10/Modules/_ctypes/_ctypes.c:107:10: fatal error: ffi.h: No such file or directory
 #include <ffi.h>
          ^~~~~~~
compilation terminated.

Python build finished successfully!
The necessary bits to build these optional modules were not found:
_bz2                  _curses               _curses_panel
_dbm                  _gdbm                 _hashlib
_lzma                 _sqlite3              _ssl
_tkinter              _uuid                 readline
zlib
To find the necessary bits, look in setup.py in detect_modules() for the module's name.


The following modules found by detect_modules() in setup.py, have been
built by the Makefile instead, as configured by the Setup files:
_abc                  atexit                pwd
time


Failed to build these modules:
_ctypes


Could not build the ssl module!
Python requires an OpenSSL 1.0.2 or 1.1 compatible libssl with X509_VERIFY_PARAM_set1_host().
LibreSSL 2.6.4 and earlier do not provide the necessary APIs, https://github.com/libressl-portable/portable/issues/381

running build_scripts
copying and adjusting /home/pcv/installPackage/Python-3.8.10/Tools/scripts/pydoc3 -> build/scripts-3.8
- 参考内容:
Python安装报错:”ModuleNotFoundError:No module named _ctypes“ 的解决方案
Python-3.8.12/Modules/_ctypes/_ctypes.c:107:17: 致命错误:ffi.h:没有那个文件或目录
fatal error: ffi.h: No such file or directory问题的解决
Linux安装python3.8时,编译过程中报错Could not build the ssl module!
- 问题原因:事实上我们在最开始配置环境时候就已经安装好了这些依赖项,关键失败在于:
aarch64-linux-gnu-gcc编译时候出现问题,如下所示,创建一个包含ffi.h的c文件编译测试,交叉编译发生报错,但是为什么存在依赖项还是会交叉编译出错,这个可能是和Python版本兼容性不好有关系吧
#include "stdio.h"
#include "ffi.h"

int main()
{
    printf("hello\n");
    return 0;
}
pcv@pc:~/installPackage/devTest$ gcc test.c -o gccTest
pcv@pc:~/installPackage/devTest$ ./gccTest
hello
pcv@pc:~/installPackage/devTest$ aarch64-linux-gnu-gcc test.c -o aarchTest
test.c:2:10: fatal error: ffi.h: No such file or directory
 #include "ffi.h"
          ^~~~~~~
compilation terminated.
pcv@pc:~/installPackage/devTest$ ls
gccTest  test.c
-
- 交叉编译安装
libffi-dev:下载 libffi源文件,最新版本已经更新到了3.4及以上,这里下载的是3.4.4版本,其他版本下载地址:Index of /sites/sourceware.org/pub/libffi/
- 交叉编译安装
交叉编译前面可以检查是否准备好了安装的条件
- 准备好交叉编译aarch64-linux-gnu-工具
- libffi源码和编译位置(本文在
/home/pcv/installPackage/devTest/libffiEnv/路径下进行安装)- 知道交叉编译工具的环境路径(配置时加入
PATH的路径,本文在/home/pcv/aarch_gcc下)- make工具(
make --version查看得到:GNU Make 4.1 Built for x86_64-pc-linux-gnu)
-
- 解压libffi源码:
sudo tar -xf libffi-3.4.4.tar.gz,然后进入源文件目录cd libffi-3.4.4/
- 解压libffi源码:
pcv@pc:~/installPackage/devTest/libffiEnv$ sudo chmod 777 libffi-3.4.4.tar.gz
pcv@pc:~/installPackage/devTest/libffiEnv$ tar -xf libffi-3.4.4.tar.gz
pcv@pc:~/installPackage/devTest/libffiEnv$ ls
libffi-3.4.4  libffi-3.4.4.tar.gz
pcv@pc:~/installPackage/devTest/libffiEnv$ cd libffi-3.4.4/
pcv@pc:~/installPackage/devTest/libffiEnv/libffi-3.4.4$ ls
acinclude.m4   compile       configure.ac    fficonfig.h.in                         libffi.map.in     libtool-version     m4              man         README.md
aclocal.m4     config.guess  configure.host  generate-darwin-source-and-headers.py  libffi.pc.in      LICENSE             Makefile.am     missing     src
ChangeLog      config.sub    depcomp         include                                libffi.xcodeproj  LICENSE-BUILDTOOLS  Makefile.in     msvc_build  testsuite
ChangeLog.old  configure     doc             install-sh                             libtool-ldflags   ltmain.sh           make_sunver.pl  msvcc.sh
pcv@pc:~/installPackage/devTest/libffiEnv/libffi-3.4.4$
-
- 新建交叉编译文件目录,并填写配置文件:新建交叉编译目录
mkdir aarch_bulid,进入交叉编译目录cd aarch_bulid,然后设置配置信息CC=aarch64-linux-gnu-gcc ../configure --host=aarch64-linux --build=aarch64-linux-gnu --target=aarch64-linux-gnu --enable-shared --prefix=/home/pcv/installPackage/devTest/libffiEnv/libffi
- 新建交叉编译文件目录,并填写配置文件:新建交叉编译目录
pcv@pc:~/installPackage/devTest/libffiEnv/libffi-3.4.4/aarch_build$ CC=aarch64-linux-gnu-gcc ../configure --host=aarch64-linux --build=aarch64-linux-gnu --target=aarch64-linux-gnu --enable-shared --prefix=/home/pcv/installPackage/devTest/libffiEnv/libffi
checking build system type... aarch64-unknown-linux-gnu
checking host system type... aarch64-unknown-linux-gnu
checking target system type... aarch64-unknown-linux-gnu
checking for gsed... sed
checking for a BSD-compatible install... /usr/bin/install -c
checking whether build environment is sane... yes
checking for aarch64-linux-strip... no
checking for strip... strip
configure: WARNING: using cross tools not prefixed with host triplet
checking for a race-free mkdir -p... /bin/mkdir -p
checking for gawk... no
checking for mawk... mawk
... ...
checking for __attribute__((visibility("hidden")))... yes
checking for shared libgcc... yes
configure: versioning on shared library symbols is gnu
checking that generated files are newer than configure... done
configure: creating ./config.status
config.status: creating include/Makefile
config.status: creating include/ffi.h
config.status: creating Makefile
config.status: creating testsuite/Makefile
config.status: creating man/Makefile
config.status: creating doc/Makefile
config.status: creating libffi.pc
config.status: creating fficonfig.h
config.status: executing buildir commands
config.status: skipping top_srcdir/Makefile - not created
config.status: executing depfiles commands
config.status: executing libtool commands
config.status: executing include commands
config.status: executing src commands
-
- 执行编译和安装命令:输入
make进行编译,编译完成之后进行安装sudo make install
- 执行编译和安装命令:输入
make  all-recursive
make[1]: Entering directory '/home/pcv/installPackage/devTest/libffiEnv/libffi-3.4.4/aarch_build'
Making all in include
make[2]: Entering directory '/home/pcv/installPackage/devTest/libffiEnv/libffi-3.4.4/aarch_build/include'
make[2]: Nothing to be done for 'all'.
make[2]: Leaving directory '/home/pcv/installPackage/devTest/libffiEnv/libffi-3.4.4/aarch_build/include'
Making all in testsuite
make[2]: Entering directory '/home/pcv/installPackage/devTest/libffiEnv/libffi-3.4.4/aarch_build/testsuite'
make[2]: Nothing to be done for 'all'.
make[2]: Leaving directory '/home/pcv/installPackage/devTest/libffiEnv/libffi-3.4.4/aarch_build/testsuite'
Making all in man
make[2]: Entering directory '/home/pcv/installPackage/devTest/libffiEnv/libffi-3.4.4/aarch_build/man'
make[2]: Nothing to be done for 'all'.
make[2]: Leaving directory '/home/pcv/installPackage/devTest/libffiEnv/libffi-3.4.4/aarch_build/man'
Making all in doc
make[2]: Entering directory '/home/pcv/installPackage/devTest/libffiEnv/libffi-3.4.4/aarch_build/doc'
make[2]: Nothing to be done for 'all'.
make[2]: Leaving directory '/home/pcv/installPackage/devTest/libffiEnv/libffi-3.4.4/aarch_build/doc'
make[2]: Entering directory '/home/pcv/installPackage/devTest/libffiEnv/libffi-3.4.4/aarch_build'
depbase=`echo src/prep_cif.lo | sed 's|[^/]*$|.deps/&|;s|\.lo$||'`;\
/bin/bash ./libtool  --tag=CC   --mode=compile aarch64-linux-gnu-gcc -DHAVE_CONFIG_H -I. -I..  -I. -I../include -Iinclude -I../src   -Wall  -O3 -fomit-frame-pointer -fstrict-aliasing -ffast-math -fexceptions -MT src/prep_cif.lo -MD -MP -MF $depbase.Tpo -c -o src/prep_cif.lo ../src/prep_cif.c &&\
mv -f $depbase.Tpo $depbase.Plo
libtool: compile:  aarch64-linux-gnu-gcc -DHAVE_CONFIG_H -I. -I.. -I. -I../include -Iinclude -I../src -Wall -O3 -fomit-frame-pointer -fstrict-aliasing -ffast-math -fexceptions -MT src/prep_cif.lo -MD -MP -MF src/.deps/prep_cif.Tpo -c ../src/prep_cif.c  -fPIC -DPIC -o src/.libs/prep_cif.o
libtool: compile:  aarch64-linux-gnu-gcc -DHAVE_CONFIG_H -I. -I.. -I. -I../include -Iinclude -I../src -Wall -O3 -fomit-frame-pointer -fstrict-aliasing -ffast-math -fexceptions -MT src/prep_cif.lo -MD -MP -MF src/.deps/prep_cif.Tpo -c ../src/prep_cif.c -o src/prep_cif.o >/dev/null 2>&1
depbase=`echo src/types.lo | sed 's|[^/]*$|.deps/&|;s|\.lo$||'`;\
/bin/bash ./libtool  --tag=CC   --mode=compile aarch64-linux-gnu-gcc -DHAVE_CONFIG_H -I. -I..  -I. -I../include -Iinclude -I../src   -Wall  -O3 -fomit-frame-pointer -fstrict-aliasing -ffast-math -fexceptions -MT src/types.lo -MD -MP -MF $depbase.Tpo -c -o src/types.lo ../src/types.c &&\
mv -f $depbase.Tpo $depbase.Plo
... ...
libtool: link: aarch64-linux-gnu-gcc -shared  -fPIC -DPIC  src/.libs/prep_cif.o src/.libs/types.o src/.libs/raw_api.o src/.libs/java_raw_api.o src/.libs/closures.o src/.libs/tramp.o src/aarch64/.libs/ffi.o src/aarch64/.libs/sysv.o    -O3 -Wl,--version-script -Wl,libffi.map   -Wl,-soname -Wl,libffi.so.8 -o .libs/libffi.so.8.1.2
libtool: link: (cd ".libs" && rm -f "libffi.so.8" && ln -s "libffi.so.8.1.2" "libffi.so.8")
libtool: link: (cd ".libs" && rm -f "libffi.so" && ln -s "libffi.so.8.1.2" "libffi.so")
libtool: link: ar cr .libs/libffi.a  src/prep_cif.o src/types.o src/raw_api.o src/java_raw_api.o src/closures.o src/tramp.o src/aarch64/ffi.o src/aarch64/sysv.o
libtool: link: ranlib .libs/libffi.a
libtool: link: ( cd ".libs" && rm -f "libffi.la" && ln -s "../libffi.la" "libffi.la" )
make[2]: Leaving directory '/home/pcv/installPackage/devTest/libffiEnv/libffi-3.4.4/aarch_build'
make[1]: Leaving directory '/home/pcv/installPackage/devTest/libffiEnv/libffi-3.4.4/aarch_build'
pcv@pc:~/installPackage/devTest/libffiEnv/libffi-3.4.4/aarch_build$ sudo make install
Making install in include
make[1]: Entering directory '/home/pcv/installPackage/devTest/libffiEnv/libffi-3.4.4/aarch_build/include'
make[2]: Entering directory '/home/pcv/installPackage/devTest/libffiEnv/libffi-3.4.4/aarch_build/include'
make[2]: Nothing to be done for 'install-exec-am'.
 /bin/mkdir -p '/home/pcv/installPackage/devTest/libffiEnv/libffi/include'
 /usr/bin/install -c -m 644 ffi.h ffitarget.h '/home/pcv/installPackage/devTest/libffiEnv/libffi/include'
make[2]: Leaving directory '/home/pcv/installPackage/devTest/libffiEnv/libffi-3.4.4/aarch_build/include'
make[1]: Leaving directory '/home/pcv/installPackage/devTest/libffiEnv/libffi-3.4.4/aarch_build/include'
Making install in testsuite
make[1]: Entering directory '/home/pcv/installPackage/devTest/libffiEnv/libffi-3.4.4/aarch_build/testsuite'
make[2]: Entering directory '/home/pcv/installPackage/devTest/libffiEnv/libffi-3.4.4/aarch_build/testsuite'
... ...
----------------------------------------------------------------------
Libraries have been installed in:
   /home/pcv/installPackage/devTest/libffiEnv/libffi/lib/../lib64

If you ever happen to want to link against installed libraries
in a given directory, LIBDIR, you must either use libtool, and
specify the full pathname of the library, or use the '-LLIBDIR'
flag during linking and do at least one of the following:
   - add LIBDIR to the 'LD_LIBRARY_PATH' environment variable
     during execution
   - add LIBDIR to the 'LD_RUN_PATH' environment variable
     during linking
   - use the '-Wl,-rpath -Wl,LIBDIR' linker flag
   - have your system administrator add LIBDIR to '/etc/ld.so.conf'

See any operating system documentation about shared libraries for
more information, such as the ld(1) and ld.so(8) manual pages.
----------------------------------------------------------------------
 /bin/mkdir -p '/home/pcv/installPackage/devTest/libffiEnv/libffi/lib/pkgconfig'
 /usr/bin/install -c -m 644 libffi.pc '/home/pcv/installPackage/devTest/libffiEnv/libffi/lib/pkgconfig'
make[2]: Leaving directory '/home/pcv/installPackage/devTest/libffiEnv/libffi-3.4.4/aarch_build'
make[1]: Leaving directory '/home/pcv/installPackage/devTest/libffiEnv/libffi-3.4.4/aarch_build'
-
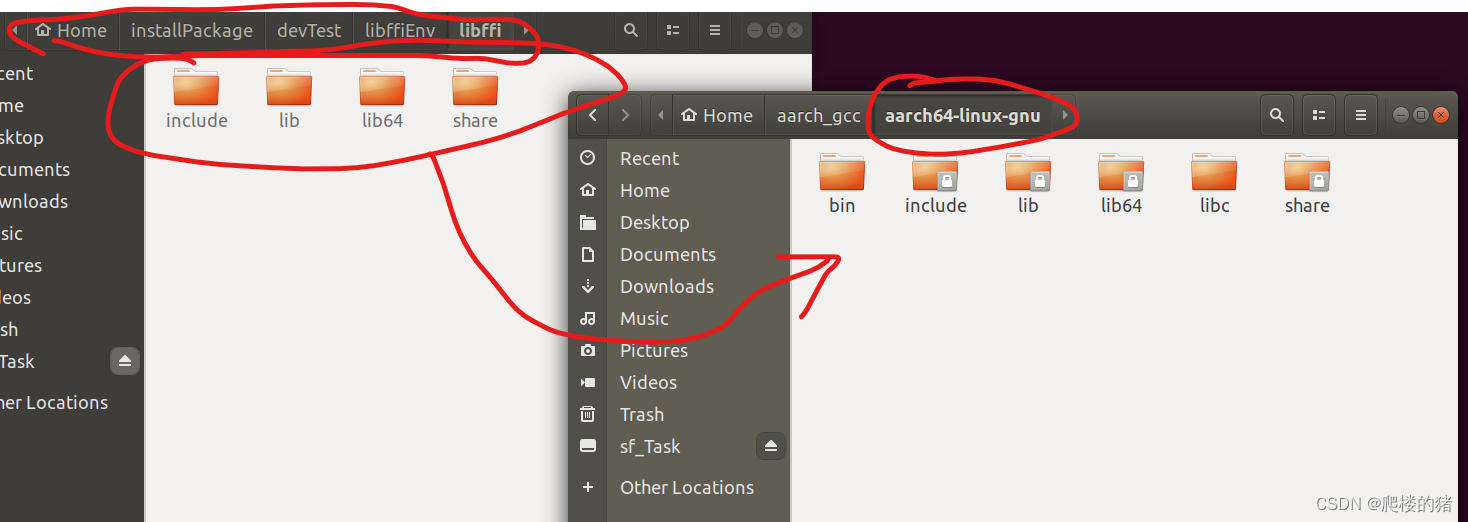
- 将交叉编译好的libffi添加到交叉工具环境中:打开交叉工具的目录下的aarch64-linux-gnu文件夹,目录为
/home/pcv/aarch_gcc/aarch64-linux-gnu,(之前环境变量填的位置bin与该aarch64-linux-gnu为同一级,不是这个文件夹的bin位置),可以看到,libdiff目录下有类似的文件结构,直接复制来合并到一起:sudo cp -rfp /home/pcv/installPackage/devTest/libffiEnv/libffi/* /home/pcv/aarch_gcc/aarch64-linux-gnu/
- 将交叉编译好的libffi添加到交叉工具环境中:打开交叉工具的目录下的aarch64-linux-gnu文件夹,目录为
-
- 验证成功:此时在编译之前包含
ffi.h头文件的c,aarch64-linux-gnu-gcc test.c -o aarchTest,会发现不再提示错误,即可开始编译Python源码
- 验证成功:此时在编译之前包含
2.3.5 undefined symbol: ffi_prep_cif
root@bot:~/pyenv/python3/bin# python3.8
Python 3.8.10 (default, Dec 14 2022, 21:15:17)
[GCC 7.5.0] on linux
Type "help", "copyright", "credits" or "license" for more information.
>>> import ctypes
Traceback (most recent call last):
  File "<stdin>", line 1, in <module>
  File "/home/root/pyenv/python3/lib/python3.8/ctypes/__init__.py", line 7, in <module>
    from _ctypes import Union, Structure, Array
ImportError: /home/root/pyenv/python3/lib/python3.8/lib-dynload/_ctypes.cpython-38-aarch64-linux-gnu.so: undefined symbol: ffi_prep_cif
aarch64-linux-gnu-gcc -fPIC -Wno-unused-result -Wsign-compare -DNDEBUG -g -fwrapv -O3 -Wall -std=c99 -Wextra -Wno-unused-result -Wno-unused-parameter -Wno-missing-field-initializers -Werror=implicit-function-declaration -fprofile-use -fprofile-correction -I../Include/internal -I../Include -IObjects -IPython -I. -I/home/pcv/aarch_gcc/bin/../aarch64-linux-gnu/libc/usr/include -I/home/pcv/installPackage/Python-3.8.10/Include -I/home/pcv/installPackage/Python-3.8.10/aarch_build -c /home/pcv/installPackage/Python-3.8.10/Modules/_ctypes/callbacks.c -o build/temp.linux-aarch64-3.8/home/pcv/installPackage/Python-3.8.10/Modules/_ctypes/callbacks.o
/home/pcv/installPackage/Python-3.8.10/Modules/_ctypes/callbacks.c: In function ‘_ctypes_alloc_callback’:
/home/pcv/installPackage/Python-3.8.10/Modules/_ctypes/callbacks.c:433:9: warning: ‘ffi_prep_closure’ is deprecated: use ffi_prep_closure_loc instead [-Wdeprecated-declarations]
         result = ffi_prep_closure(p->pcl_write, &p->cif, closure_fcn, p);
         ^~~~~~
In file included from /home/pcv/installPackage/Python-3.8.10/Modules/_ctypes/callbacks.c:6:0:
/home/pcv/aarch_gcc/aarch64-linux-gnu/include/ffi.h:375:1: note: declared here
 ffi_prep_closure (ffi_closure*,
 ^~~~~~~~~~~~~~~~
2.3.6 subprocess.CalledProcessError: Command ‘(‘lsb_release’, ‘-a’)’ returned non-zero exit status 1.
aarch_build/build/lib.linux-aarch64-3.8:../Lib _PYTHON_SYSCONFIGDATA_NAME=_sysconfigdata__linux_aarch64-linux-gnu python3.8 -m ensurepip \
		$ensurepip --root=/ ; \
fi
ERROR: Exception:
Traceback (most recent call last):
  File "/tmp/tmpt_xijb0r/pip-21.1.1-py3-none-any.whl/pip/_internal/cli/base_command.py", line 180, in _main
    status = self.run(options, args)
  File "/tmp/tmpt_xijb0r/pip-21.1.1-py3-none-any.whl/pip/_internal/cli/req_command.py", line 204, in wrapper
    return func(self, options, args)
  File "/tmp/tmpt_xijb0r/pip-21.1.1-py3-none-any.whl/pip/_internal/commands/install.py", line 269, in run
    session = self.get_default_session(options)
  File "/tmp/tmpt_xijb0r/pip-21.1.1-py3-none-any.whl/pip/_internal/cli/req_command.py", line 77, in get_default_session
    self._session = self.enter_context(self._build_session(options))
  File "/tmp/tmpt_xijb0r/pip-21.1.1-py3-none-any.whl/pip/_internal/cli/req_command.py", line 87, in _build_session
    session = PipSession(
  File "/tmp/tmpt_xijb0r/pip-21.1.1-py3-none-any.whl/pip/_internal/network/session.py", line 275, in __init__
    self.headers["User-Agent"] = user_agent()
  File "/tmp/tmpt_xijb0r/pip-21.1.1-py3-none-any.whl/pip/_internal/network/session.py", line 132, in user_agent
    linux_distribution = distro.linux_distribution()  # type: ignore
  File "/tmp/tmpt_xijb0r/pip-21.1.1-py3-none-any.whl/pip/_vendor/distro.py", line 125, in linux_distribution
    return _distro.linux_distribution(full_distribution_name)
  File "/tmp/tmpt_xijb0r/pip-21.1.1-py3-none-any.whl/pip/_vendor/distro.py", line 681, in linux_distribution
    self.version(),
  File "/tmp/tmpt_xijb0r/pip-21.1.1-py3-none-any.whl/pip/_vendor/distro.py", line 741, in version
    self.lsb_release_attr('release'),
  File "/tmp/tmpt_xijb0r/pip-21.1.1-py3-none-any.whl/pip/_vendor/distro.py", line 903, in lsb_release_attr
    return self._lsb_release_info.get(attribute, '')
  File "/tmp/tmpt_xijb0r/pip-21.1.1-py3-none-any.whl/pip/_vendor/distro.py", line 556, in __get__
    ret = obj.__dict__[self._fname] = self._f(obj)
  File "/tmp/tmpt_xijb0r/pip-21.1.1-py3-none-any.whl/pip/_vendor/distro.py", line 1014, in _lsb_release_info
    stdout = subprocess.check_output(cmd, stderr=devnull)
  File "/home/pcv/installPackage/Python-3.8.10/Lib/subprocess.py", line 415, in check_output
    return run(*popenargs, stdout=PIPE, timeout=timeout, check=True,
  File "/home/pcv/installPackage/Python-3.8.10/Lib/subprocess.py", line 516, in run
    raise CalledProcessError(retcode, process.args,
subprocess.CalledProcessError: Command '('lsb_release', '-a')' returned non-zero exit status 1.
Traceback (most recent call last):
  File "/home/pcv/installPackage/Python-3.8.10/Lib/runpy.py", line 194, in _run_module_as_main
    return _run_code(code, main_globals, None,
pcv@pc:~/installPackage/Python-3.8.10/aarch_build$ sudo rm -rf /usr/bin/lsb_release
有意思的内容:
Pre-release Python Installation:There was a time when is no official python installer was available for win/arm64 devices. However, packages for python 3.9 and above were available in Nuget and also could be compiled from sources as well. Please see the instructions below, if you interested about this process,翻译的意思是:曾经有一段时间,没有官方的python安装程序可用于win/arm64设备。但是,Python 3.9 及更高版本的包在 Nuget (Nuget是一个.NET平台下的开源的项目,是Visual Studio的扩展。)中可用,也可以从源代码编译。如果您对此过程感兴趣,请参阅以下说明。