在追求高性能的分布式系统中,RPC 框架的底层网络能力和数据传输效率起着决定性作用。经过几轮迭代优化,我完成了第四版本的 RPC 框架。相比以往版本,这一版本的最大亮点在于 重写了底层网络框架 和 实现了发送端的数据聚集机制,这使得框架在高并发、高吞吐场景下表现更稳定、更高效。本文将重点介绍这两个新功能的设计动机、技术选型与实现细节。
代码仓库:https://github.com/karatttt/MyRPC
版本四新增功能
重写 Go 原生 net 库
背景:
先说说go原生net的处理逻辑是:
每个 fd 对应⼀个 goroutine,业务⽅对 conn 发起主动的读写,底层使⽤⾮阻塞 IO,当事件未就绪,将 fd 注册(epoll_ctl)进 epoll fd,通过把 goroutine 设置(park)成 GWaiting 状态。当有就绪事件后,唤醒(ready) 对应 goroutine 成 GRunnable 状态------go会在调度goroutine时候执行epoll_wait系统调用,检查是否有状态发生改变的fd,有的话就把他取出,唤醒对应的goroutine去处理
在前三个版本中,我使用了 Go 原生的 net 库作为 RPC 的通信基础。虽然 Go 的网络抽象简单易用,但在构建高性能、低延迟的服务端系统时,它逐渐暴露出如下限制:
- 每一个连接必须需要一个协程,需要在协程中完成编解码和序列化反序列化的操作,连接关闭或者网络错误无法即时感知销毁协程(go的调度模型使得连接和协程是一一对应的,因为非阻塞的Read实际上交由用户调用,而调用的时机也同样在该协程中发生)
- gonet原生网络库是ET模式,这意味着当可读事件发生时,需要一次性的从缓冲区中读出所有的数据,因为如果没有读完,事件不会在下一次的epollwait中唤醒(除非新数据到达该缓冲区),无法再次读取。而这个循环读取同样也需要在用户协程中处理
受 netpoll 和 tnet 等优秀项目的启发,我决定基于 epoll(Linux)实现一套更底层、更灵活的网络事件驱动模型,实际上以上两个项目,并结合目前的RPC实现完整功能
实现思路:
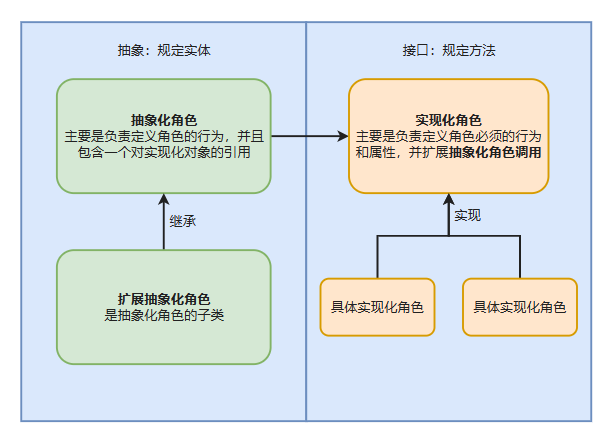
对于第一个问题,可以借鉴netty的做法,分为Reactor线程和subReactor线程,他们都是poller线程,通过epoll_wait来监听事件循环,但是reactor线程只负责监听新连接,subReactor负责IO读写,并将业务处理交由线程池管理。
我们可以采集类似的做法,设置多个poller协程,并且让IO读写(编解码和序列化流程)交由poller线程处理,实际上的业务逻辑交由协程池处理,这样的总的协程数量就是poller数量 + 协程池的协程数量
对于第二个问题,实际上前面的版本采取了长连接的做法来避免连接的频繁建立和关闭,也就是服务端对每一个连接的readFrame是循环进行的(ET模式需要循环读完数据),直到一定时间未收到数据关闭这个连接。但是对于多客户端的情况,我们仍然会出现大量的连接,且每一个连接都需要阻塞直到到达最大空闲时间才主动关闭,就会导致连接过多(协程过多),我们希望使用LT模式,在读取完一帧之后并通过业务协程池异步处理业务逻辑后,主动释放协程,执行其他的协程
实际上目前的netpoll和tnet实现了类似的机制,但是他们都是提供了一个零拷贝接口由业务方调用,当融入RPC系统(往往需要反序列化的场景)后,零拷贝后的在缓冲区的数据,还会因为反序列化而进行到用户态的拷贝,所以上面的零拷贝实际上适合的场景时proxy / 转发场景,或者只关心字节数据的场景。所以我去除了零拷贝的设计,直接融入当前的RPC系统
PollerManager
type manager struct {
	polls    []Poll
	numLoops int32
	pickIdx  int32
}

// Init 初始化并创建 poll 数组
func (m *manager) InitManager(numPolls int) error {
	fmt.Printf("Initializing poll manager with %d pollers\n", numPolls)
	if numPolls < 1 {
		numPolls = 1
	}
	atomic.StoreInt32(&m.numLoops, int32(numPolls))
	m.polls = make([]Poll, numPolls)
	for i := 0; i < numPolls; i++ {
		poll, err := NewDefaultPoll()
		if err != nil {
			fmt.Printf("Failed to create poller %d: %v\n", i, err)
			return err
		}
		m.polls[i] = poll
		go poll.Wait()
	}
	return nil

}
- 首先初始化一个pollerManager,来初始化多个可能的poller协程(最少一个),并且调用poll.wait开启事件循环
poller相关操作
// Control implements Poll.
func (p *defaultPoll) Control(operator *FDOperator, event PollEvent) error {
	fd := operator.FD
	var op int
	var evt syscall.EpollEvent
	p.setOperator(unsafe.Pointer(&evt.Fd), operator)
	switch event {
	case PollReadable: // server accept a new connection and wait read
		op, evt.Events = syscall.EPOLL_CTL_ADD, syscall.EPOLLIN|syscall.EPOLLRDHUP|syscall.EPOLLERR
	case PollWritable: // client create a new connection and wait connect finished
		op, evt.Events = syscall.EPOLL_CTL_ADD, EPOLLET|syscall.EPOLLOUT|syscall.EPOLLRDHUP|syscall.EPOLLERR
	case PollDetach: // deregister
		p.delOperator(operator)
		op, evt.Events = syscall.EPOLL_CTL_DEL, syscall.EPOLLIN|syscall.EPOLLOUT|syscall.EPOLLRDHUP|syscall.EPOLLERR
	case PollR2RW: // connection wait read/write
		op, evt.Events = syscall.EPOLL_CTL_MOD, syscall.EPOLLIN|syscall.EPOLLOUT|syscall.EPOLLRDHUP|syscall.EPOLLERR
	case PollRW2R: // connection wait read
		op, evt.Events = syscall.EPOLL_CTL_MOD, syscall.EPOLLIN|syscall.EPOLLRDHUP|syscall.EPOLLERR
	}
	evt.Fd = int32(fd)
	return EpollCtl(p.fd, op, fd, &evt)
}

func (p *defaultPoll) Wait() error {
	events := make([]syscall.EpollEvent, 128)
	for {
		n, err := syscall.EpollWait(p.fd, events, -1)
		if err != nil {
			if err == syscall.EINTR {
				continue
			}
			return err
		}
		for i := 0; i < n; i++ {
			fd := int(events[i].Fd)
			op := p.operators[fd]
			if op == nil {
				continue
			}
			evt := events[i].Events
			if evt&(syscall.EPOLLIN|syscall.EPOLLPRI) != 0 && op.OnRead != nil {
				_ = op.OnRead(op.Conn)
				if op.Type == ConnectionType {
					// 关闭该事件,避免LT模式持续onRead
					_ = p.Control(op, PollDetach)
				}
			}
			if evt&(syscall.EPOLLOUT) != 0 && op.OnWrite != nil {
				_ = op.OnWrite(op)
			}
		}
	}
}
- 为了方便后面理解,这里先放出poller的相关操作,control就是注册事件,wait就是进行事件循环,这里的wait,对于可读事件,直接调用传入的OnRead,如果是已存在连接的数据可读,进行事件的关闭(不然这个实际上已经读完的连接就会一直被唤醒。。。)
eventLoop
// Serve implements EventLoop.
func (evl *eventLoop) Serve(ln net.Listener) error {
	evl.Lock()
	evl.ln = ln
	fd, err := getListenerFD(ln)
	if err != nil {
		return err
	}
	operator := FDOperator{
		FD:     int(fd),
		OnRead: evl.ListenerOnRead,
        Type: ListenerType, // 标记为监听器类型
	}
	operator.poll = pollmanager.Pick()
	err = operator.Control(PollReadable)
	evl.Unlock()

	return err
}

// 每一个事件循环中一定有listen连接的事件,当事件就绪的时候就调用这个函数
func (evl *eventLoop) ListenerOnRead(conn net.Conn) error {
	conn, err := evl.ln.Accept()
	if err != nil {
		// 非阻塞下 accept 没有新连接时返回
		if ne, ok := err.(net.Error); ok && ne.Temporary() {
			// 临时错误,继续等待
			return nil
		}
		fmt.Println("Accept error:", err)
		return err
	}
	fmt.Printf("Accepted new connection: %s\n", conn.RemoteAddr())
	// 选择 poller
	poller := pollmanager.Pick()
	if poller == nil {
		fmt.Println("No available poller")
		conn.Close()

	}
	// 获取FD
	rawConn, ok := conn.(syscall.Conn)
	if !ok {
		// 不是 syscall.Conn,不能获取 fd
	}
	var fd int
	sysRawConn, err := rawConn.SyscallConn()
	if err != nil {
		fmt.Println("Error getting syscall connection:", err)
	} else {
		err = sysRawConn.Control(func(f uintptr) {
			fd = int(f)
		})
		if err != nil {
			fmt.Println("Error getting file descriptor:", err)
		}
	}
	// 初始化连接
	OpConn := connection.InitConn(conn)
	fmt.Printf("Initialized connection with FD: %d\n", fd)
	// 创建 FDOperator 并注册到 poller
	newOp := &FDOperator{
        poll  : poller,
		Conn:   OpConn,
		FD:     fd,
		OnRead: evl.opts.onRequest, // 这里传入业务处理函数
        Type: ConnectionType, // 标记为连接类型
	}
	if err := poller.Control(newOp, PollReadable); err != nil {
		fmt.Println("Error registering connection:", err)
		conn.Close()
	}
	fmt.Printf("Registered new connection with FD: %d\n", fd)
	return nil
}
- 开启了poller的wait,就要为其分配事件,也就是初始化这个eventLoop,这个server只需要执行一次,注册一个listener监听连接,并且定制一个OnRead()
- 这个OnRead实际上就是accept一个连接,然后为这个连接注册一个可读事件(Control)
ServerTransport
启动server时,也需要一点改动,融入这个新的网络框架
// serveTCP 处理 TCP 连接
func (t *serverTransport) serveTCP(ctx context.Context, ln net.Listener) error {
	//初始化事件循环
	eventLoop, err := poller.NewEventLoop(t.OnRequest)
	if err != nil {
		return fmt.Errorf("failed to create event loop: %w", err)
	}
	err = eventLoop.Serve(ln)
	if err != nil {
		return fmt.Errorf("failed to serve: %w", err)
	}
	return nil
}

// handleConnection 处理单个连接
func (t *serverTransport) OnRequest(conn net.Conn) error {
	// 设置连接超时
	idleTimeout := 30 * time.Second
	if t.opts != nil && t.opts.IdleTimeout > 0 {
		idleTimeout = t.opts.IdleTimeout
	}

	// 设置读取超时
	conn.SetReadDeadline(time.Now().Add(idleTimeout))

	// 处理连接
	fmt.Printf("New connection from %s\n", conn.RemoteAddr())

	frame, err := codec.ReadFrame(conn)
	if err != nil {
		// 2. 如果读取帧失败,如客户端断开连接,则关闭连接
		if err == io.EOF {
			fmt.Printf("Client %s disconnected normally\n", conn.RemoteAddr())
			return err
		}
		// 3. 如果连接超时,超过设置的idletime,关闭连接
		if e, ok := err.(net.Error); ok && e.Timeout() {
			fmt.Printf("Connection from %s timed out after %v\n", conn.RemoteAddr(), idleTimeout)
			return err
		}
		// 4. 处理强制关闭的情况
		if strings.Contains(err.Error(), "forcibly closed") {
			fmt.Printf("Client %s forcibly closed the connection\n", conn.RemoteAddr())
			return err
		}
		fmt.Printf("Read error from %s: %v\n", conn.RemoteAddr(), err)
		return err
	}

	// 重置读取超时
	conn.SetReadDeadline(time.Now().Add(idleTimeout))

	// 使用协程池处理请求,适用于多路复用模式
	frameCopy := frame // 创建副本避免闭包问题
	err = t.pool.Submit(func() {
		// 处理请求
		response, err := t.ConnHandler.Handle(context.Background(), frameCopy)
		if err != nil {
			fmt.Printf("Handle error for %s: %v\n", conn.RemoteAddr(), err)
			return
		}

		// 发送响应
		conn = conn.(netxConn.Connection) // 确保conn实现了Connection接口,调用聚集发包的接口
		if _, err := conn.Write(response); err != nil {
			fmt.Printf("Write response error for %s: %v\n", conn.RemoteAddr(), err)
		}
	})

	if err != nil {
		fmt.Printf("Submit task to pool error for %s: %v\n", conn.RemoteAddr(), err)
		// 协程池提交失败,直接处理
		response, err := t.ConnHandler.Handle(context.Background(), frame)
		if err != nil {
			fmt.Printf("Handle error for %s: %v\n", conn.RemoteAddr(), err)
		}
		if _, err := conn.Write(response); err != nil {
			fmt.Printf("Write response error for %s: %v\n", conn.RemoteAddr(), err)
			return err
		}
	}
	return nil
}
- 可以看到serveTCP的适合启动一个事件循环,并传入一个OnRequest(作为事件就绪的时候的OnRead),当连接可读的时候调用这个方法
- 这个OnRequest在一开始通过codec.ReadFrame(conn)读取一个帧,这里只需要关心一个帧的原因是采取了LT模式,后续的没有读完的帧自然会再次唤醒,并且如果这里循环获取了,一个是循环停止的界限不好控制(什么时候才算数据读完?实际上的go的ioRead对于用户层面是阻塞,但底层通过 运行时调度器 + 多线程(GMP) 实现了“伪非阻塞”,也就是可能当Read() 一个永远没有数据的连接,那么这个 goroutine 会一直阻塞挂起(休眠状态),不会主动退出、不会被销毁,),还有一个是会阻塞该poller协程,影响到其他事件的处理。
- 需要注意的是,业务处理必须要用协程池处理,避免阻塞poller协程
- 这样就实现了让poller线程处理IO,并且通过LT模式减少连接的优化
批量发包
背景
其实在io读写中,还有一个消耗性能的就是频繁的系统调用,涉及到两态数据间的拷贝。比如服务端回包的时候,每一次的回包都是一次系统调用,这里就是可以优化的地方。
所以可以通过批量的形式,来减少系统调用,也就是用一个缓冲区来实现发包的聚集效应,当实际发生系统调用时,将缓冲区的所有数据一并发出,而不是每一次有数据就发生系统调用。
实现思路:
为什么收包的时候不批量呢?前面的OnRequest中的IoRead实际上也是一次系统调用,如果这里要实现聚集效应批量收包,也就是每一次epoll唤醒后,先将数据存到缓冲区中(这里可以用零拷贝),然后这里OnRead来挖缓冲区(只涉及到一次系统调用),但是这样带来的问题是,需要在OnRead中解决半包粘包问题,且要为每一个连接单独提供一个这样的缓冲区(实际上这个形式的缓冲区是有的,也就是linkBuffer,大家感兴趣可以去看看它的实现,但是它的主要功能还是为了提供零拷贝接口,只是为了批量收包而引入这个数据结构有点多余了。。。而且这个带来的收益只是单个连接维度下的收包聚集,从而系统调用次数的减少,假如一个连接只有一次的数据传输,实际上还是每一次事件就绪就需要一次系统拷贝)
对于发包的时候的聚集,我们就可以在整个系统维度下,多个连接将包放到一个并发安全的队列中,交由poller线程的写事件来决定什么时候写出,所以需要实现一个线程安全的队列,以及批量发包的接口
func (r *Ring[T]) commit(seq uint32, val T) {
	item := &r.data[seq&r.mask]
	for {
		getSeq := atomic.LoadUint32(&item.getSeq)
		putSeq := atomic.LoadUint32(&item.putSeq)
		// Waiting for data to be ready for writing. Due to the separation of
		// obtaining the right to use the sequence number and reading and writing
		// data operations, there is a short period of time that the old data has
		// not been read, wait for the read operation to complete and set getSeq.
		if seq == putSeq && getSeq == putSeq {
			break
		}
		runtime.Gosched()
	}
	// Complete the write operation and set putSeq to the next expected write sequence number.
	item.value = val
	atomic.AddUint32(&item.putSeq, r.capacity)
}

func (r *Ring[T]) consume(seq uint32) T {
	item := &r.data[seq&r.mask]
	for {
		getSeq := atomic.LoadUint32(&item.getSeq)
		putSeq := atomic.LoadUint32(&item.putSeq)
		// Waiting for data to be ready to read. Due to the separation of
		// obtaining the right to use the sequence number and reading and writing
		// data operations, there is a short period of time that the writing data has
		// not been written yet, wait for the writing operation to complete and set putSeq.
		if seq == getSeq && getSeq == (putSeq-r.capacity) {
			break
		}
		runtime.Gosched()
	}
	// Complete the read operation and set getSeq to the next expected read sequence number.
	val := item.value
	var zero T
	item.value = zero
	atomic.AddUint32(&item.getSeq, r.capacity)
	return val
}
- 以上的这个ringBuffer的借鉴了tent的实现,但是实际上它和LMAX Disruptor的思想是一致的,都是实现了无锁化的并发安全队列,主要是以上的两个put和get的逻辑
- 举一个例子:
每个槽位的 putSeq 和 getSeq 都初始化为槽位的下标:
slot[0]: putSeq=0, getSeq=0
slot[1]: putSeq=1, getSeq=1
slot[2]: putSeq=2, getSeq=2
slot[3]: putSeq=3, getSeq=3
第一次 Put(写入):
写入线程获得 seq=1,即它准备写入 slot[1]:
- 写入 slot[1].value = val
然后执行:slot[1].putSeq += capacity → slot[1].putSeq = 1 + 4 = 5
现在:
slot[1]: putSeq=5, getSeq=1
表示这个槽位已经写入完成,等待消费者读取。
第一次 Get(读取):
读取线程获得 seq=1,即从 slot[1] 读数据:
- 消费成功后,执行:slot[1].getSeq += capacity → slot[1].getSeq = 1 + 4 = 5
现在:
slot[1]: putSeq=5, getSeq=5
说明这一轮(第1轮)读写都结束了,可以被下一轮复用。
第二轮 Put:
写入线程再次获得 seq=5(因为 tail 不断递增),这时还是映射到 slot[1],因为:
slotIndex = seq & (capacity - 1) = 5 & 3 = 1
此时:
- 它要判断:seq == putSeq && getSeq == putSeq,才能继续写
- 此时 putSeq=5,getSeq=5,满足条件
说明这个槽位已经被消费完了,可以再次复用来写入!也就是说,这个序号的作用是为了分配到该槽位时,保证数据不被覆盖,读和写都是安全的。
Buffer批量发包
func (b *Buffer) start() {
	initBufs := make(net.Buffers, 0, maxWritevBuffers)
	vals := make([][]byte, 0, maxWritevBuffers)
	bufs := initBufs

	defer b.opts.handler(b)
	for {
		if err := b.getOrWait(&vals); err != nil {
			b.err = err
			break
		}

		for _, v := range vals {
			bufs = append(bufs, v)
		}
		vals = vals[:0]

		if _, err := bufs.WriteTo(b.w); err != nil {
			b.err = err
			break
		}
		// Reset bufs to the initial position to prevent `append` from generating new memory allocations.
		bufs = initBufs
	}
}

func (b *Buffer) writeOrWait(p []byte) (int, error) {
	for {
		// The buffer queue stops receiving packets and returns directly.
		if b.isQueueStopped {
			return 0, b.err
		}
		// Write the buffer queue successfully, wake up the sending goroutine.
		if err := b.queue.Put(p); err == nil {
			b.wakeUp()
			return len(p), nil
		}
		// The queue is full, send the package directly.
		if err := b.writeDirectly(); err != nil {
			return 0, err
		}
	}
}
func (b *Buffer) getOrWait(values *[][]byte) error {
	for {
		// Check whether to be notified to close the outgoing goroutine.
		select {
		case <-b.done:
			return ErrAskQuit
		case err := <-b.errCh:
			return err
		default:
		}
		// Bulk receive packets from the cache queue.
		size, _ := b.queue.Gets(values)
		if size > 0 {
			return nil
		}

		// Fast Path: Due to the poor performance of using select
		// to wake up the goroutine, it is preferred here to use Gosched()
		// to delay checking the queue, improving the hit rate and
		// the efficiency of obtaining packets in batches, thereby reducing
		// the probability of using select to wake up the goroutine.
		runtime.Gosched()
		if !b.queue.IsEmpty() {
			continue
		}
		// Slow Path: There are still no packets after the delayed check queue,
		// indicating that the system is relatively idle. goroutine uses
		// the select mechanism to wait for wakeup. The advantage of hibernation
		// is to reduce CPU idling loss when the system is idle.
		select {
		case <-b.done:
			return ErrAskQuit
		case err := <-b.errCh:
			return err
		case <-b.wakeupCh:
		}
	}
}
- 实现批量发包,只需要一开始对于这块全局的buffer进行一个start,循环看队列有没有数据,有的话全量取出并write
- 写的时候,调用writeOrWait这个接口,数据进ringBuffer就可以了
测试
server:
![![[Pasted image 20250602165304.png]]](https://i-blog.csdnimg.cn/direct/bff3f4bde25542abba19b9482eb6bab2.png)
client:
![![[Pasted image 20250602165322.png]]](https://i-blog.csdnimg.cn/direct/92c99d7ee0f340089d72d707b1436f42.png)
总结
目前RPC先做到这了,以后还有什么优化或者有意思的再补充版本吧