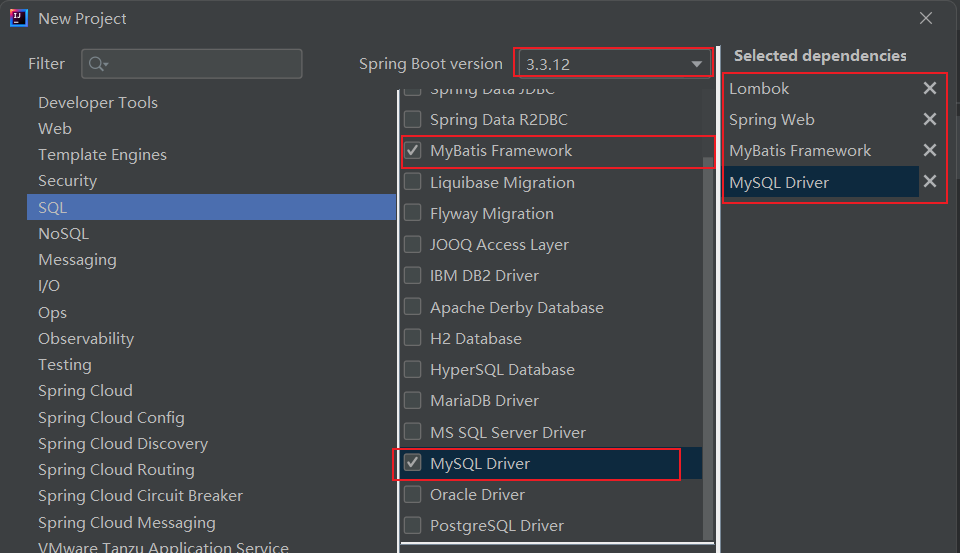
一、创建Mybatis的项目
Mybatis 是⼀个持久层框架, 具体的数据存储和数据操作还是在MySQL中操作的, 所以需要添加MySQL驱动
1.添加依赖
或者 手动添加依赖
        <!--Mybatis 依赖包-->
        <dependency>
            <groupId>org.mybatis.spring.boot</groupId>
            <artifactId>mybatis-spring-boot-starter</artifactId>
            <version>3.0.4</version>
        </dependency>
        <!--mysql驱动包-->
        <dependency>
            <groupId>com.mysql</groupId>
            <artifactId>mysql-connector-j</artifactId>
            <scope>runtime</scope>
        </dependency>
项⽬⼯程创建完成后,⾃动在pom.xml⽂件中,导⼊Mybatis依赖和MySQL驱动依赖
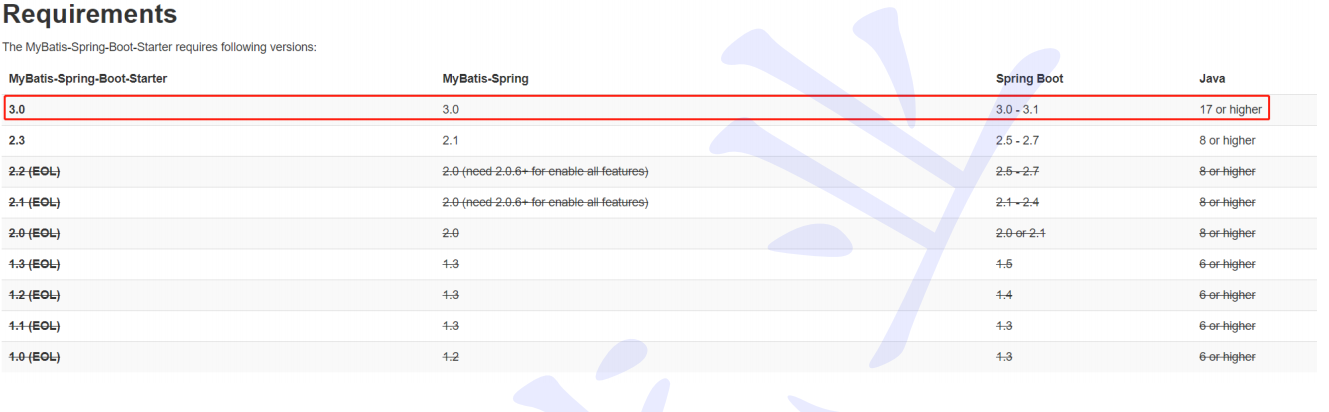
版本会随着SpringBoot 版本发⽣变化
SpringBoot 3.X对⽤MyBatis版本为3.X
对应关系参考:Introduction – mybatis-spring-boot-autoconfigure
2.配置常见的数据库信息
这是常见关于Mybatis的配置信息,大家可以自取
csdn暂时还不支持yml文件,这是 yml 文件:
spring:
  datasource:                      # 配置数据库名
    url: jdbc:mysql://127.0.0.1:3306/mybatis_test?characterEncoding=utf8&useSSL=false
    username: root  #数据库用户
    password: root  #密码
    driver-class-name: com.mysql.cj.jdbc.Driver


# 设置 Mybatis 的 xml 保存路径
mybatis:
  mapper-locations: classpath:mapper/*Mapper.xml
  configuration: # 配置打印 MyBatis 执行的 SQL
    log-impl: org.apache.ibatis.logging.stdout.StdOutImpl
    map-underscore-to-camel-case: true  #自动驼峰转换
前提是有这样的一个数据库
那么这里提供一个数据库:
-- 创建数据库
DROP DATABASE IF EXISTS mybatis_test;

CREATE DATABASE mybatis_test DEFAULT CHARACTER SET utf8mb4;

-- 使用数据数据
USE mybatis_test;

-- 创建表[用户表]
DROP TABLE IF EXISTS user_info;
CREATE TABLE `user_info` (
        `id` INT ( 11 ) NOT NULL AUTO_INCREMENT,
        `username` VARCHAR ( 127 ) NOT NULL,
        `password` VARCHAR ( 127 ) NOT NULL,
        `age` TINYINT ( 4 ) NOT NULL,
        `gender` TINYINT ( 4 ) DEFAULT '0' COMMENT '1-男 2-女 0-默认',
        `phone` VARCHAR ( 15 ) DEFAULT NULL,
        `delete_flag` TINYINT ( 4 ) DEFAULT 0 COMMENT '0-正常, 1-删除',
        `create_time` DATETIME DEFAULT now(),
        `update_time` DATETIME DEFAULT now() ON UPDATE now(),
        PRIMARY KEY ( `id` )
) ENGINE = INNODB DEFAULT CHARSET = utf8mb4;

-- 添加用户信息
INSERT INTO mybatis_test.user_info( username, `password`, age, gender, phone )
VALUES ( 'admin', 'admin', 18, 1, '18612340001' );
INSERT INTO mybatis_test.user_info( username, `password`, age, gender, phone )
VALUES ( 'zhangsan', 'zhangsan', 18, 1, '18612340002' );
INSERT INTO mybatis_test.user_info( username, `password`, age, gender, phone )
VALUES ( 'lisi', 'lisi', 18, 1, '18612340003' );
INSERT INTO mybatis_test.user_info( username, `password`, age, gender, phone )
VALUES ( 'wangwu', 'wangwu', 18, 1, '18612340004' );


-- 创建文章表
DROP TABLE IF EXISTS article_info;

CREATE TABLE article_info (
        id INT PRIMARY KEY auto_increment,
        title VARCHAR ( 100 ) NOT NULL,
        content TEXT NOT NULL,
        uid INT NOT NULL,
        delete_flag TINYINT ( 4 ) DEFAULT 0 COMMENT '0-正常, 1-删除',
        create_time DATETIME DEFAULT now(),
        update_time DATETIME DEFAULT now()
) DEFAULT charset 'utf8mb4';

-- 插入测试数据
INSERT INTO article_info ( title, content, uid ) VALUES ( 'Java', 'Java正文', 1 );
这样一个表

3.写对应的对象
一般写在model文件夹下
@Data
public class UserInfo {

    private Integer id;
    private String username;
    private String password;
    private Integer age;
    private Integer gender;
    private String phone;
    //数据库用下划线连接单词,java直接用小驼峰
    private Integer deleteFlag;
    private Date createTime;
    private Date updateTime;

}
4.写持久层代码
一般写在mapper文件夹下,或者Dao
@Mapper
public interface UserInfoMapper {
//查询所有用户的信息
@Select("select * from user_info")
List<UserInfo> selectAll();
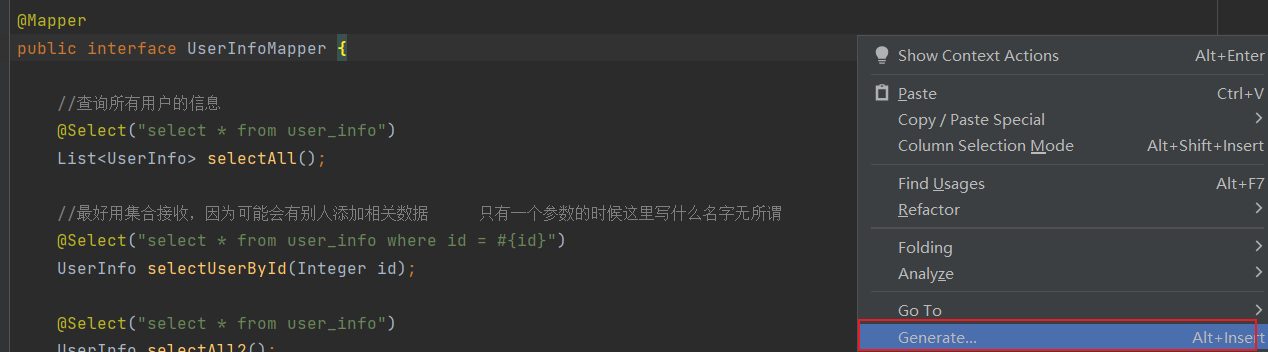
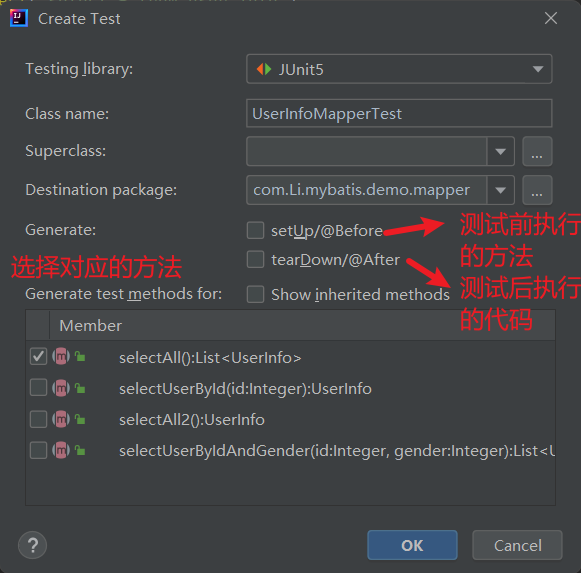
}5.单元测试
在对应的mapper接口下,右击
@SpringBootTest
class UserInfoMapperTest {
@Autowired
private UserInfoMapper userInfoMapper;
@Test
void selectAll() {
userInfoMapper.selectAll().forEach(x -> System.out.println(x));
//等同于
// List<UserInfo> userInfos = userInfoMapper.selectAll();
// for (UserInfo userInfo : userInfos) {
// System.out.println(userInfo);
// }
}
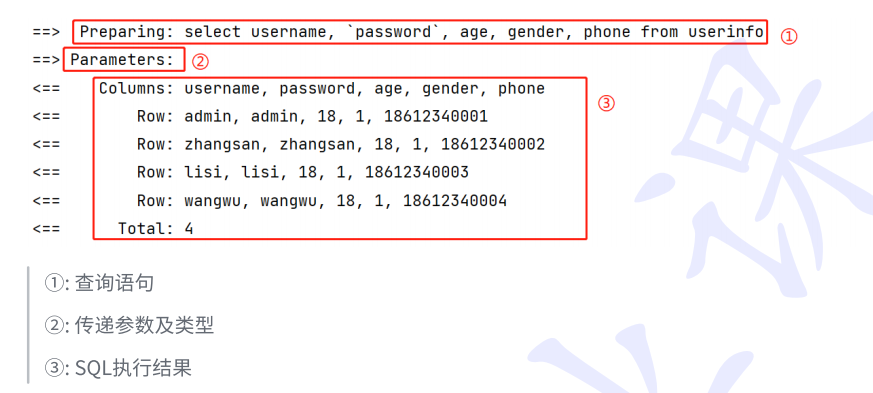
}结果:

二、Mybatis的基本操作
1.日志打印
2.传递单个参数
通过 #{……} 传递 参数
@Mapper
public interface UserInfoMapper {

    //                 只有一个参数的时候这里写什么名字无所谓
    @Select("select * from user_info where id = #{id}")
    UserInfo selectUserById(Integer id);
}
单元测试:
@SpringBootTest
class UserInfoMapperTest {

    @Autowired
    private UserInfoMapper userInfoMapper;

    @Test
    void selectUserById() {
        System.out.println(userInfoMapper.selectUserById(2));
    }
}
结果:

3.传递多个参数
3种方法
方法1:
标签 和 方法 中的名字一样
方法2:
它给方法的每个形参取了别名,例如第一个param1 第二个 param2
方法3:
使用@Param("……"),和 标签中的 #{……}对应
@Mapper
public interface UserInfoMapper {

    //    @Select("select * from user_info where id = #{id} and gender = #{gender}")   方法1    推荐
    //    @Select("select * from user_info where id = #{param2} and gender = #{param1}")  方法2   不推荐
    //    @Select("select * from user_info where id = #{id2} and gender = #{gender2}")  错误
    //
    @Select("select * from user_info where id = #{id2} and gender = #{gender2}") // 方法3   推荐
    List<UserInfo> selectUserByIdAndGender(@Param("id2") Integer id,@Param("gender2") Integer gender);

}
单元测试:
@SpringBootTest
class UserInfoMapperTest {

    @Autowired
    private UserInfoMapper userInfoMapper;

    @Test
    void selectUserByIdAndGender() {
        List<UserInfo> userInfos = userInfoMapper.selectUserByIdAndGender(3, 1);
        System.out.println(userInfos);
    }
}
结果:

返回的参数可以是对象,也可以是集合类:
当我们知道数据库中对应的参数只有一个时,可以用类接收,但是最好用集合,万一他人增加了符号相同条件的数据,一个类就装不下。

4.查(Select)
查询之前已经都写到了,就不再写了。
发现这样的一个问题:
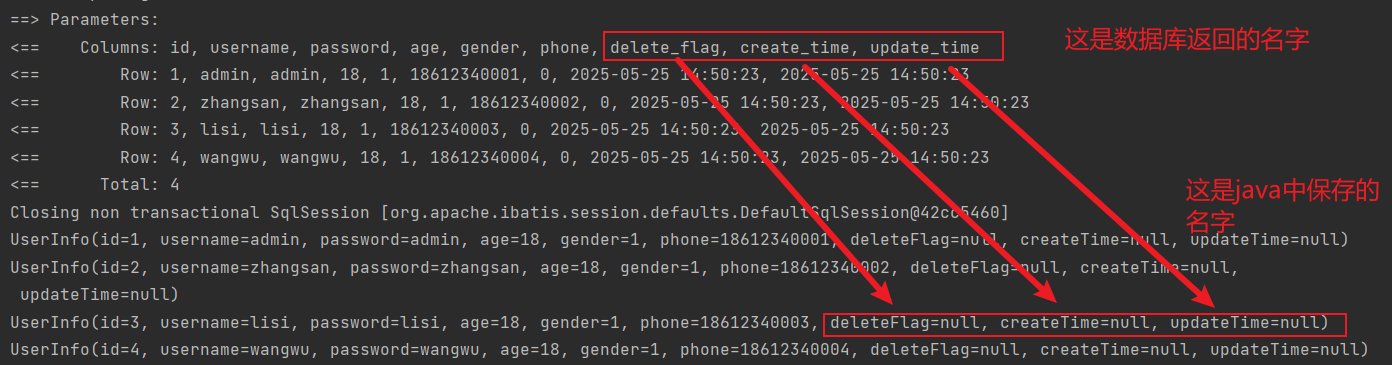
数据库的规范是单词之间用下划线分割,java的变量规范是小驼峰命名。这就导致了属性对应不上导致为null
解决办法,我先讲最推荐的:
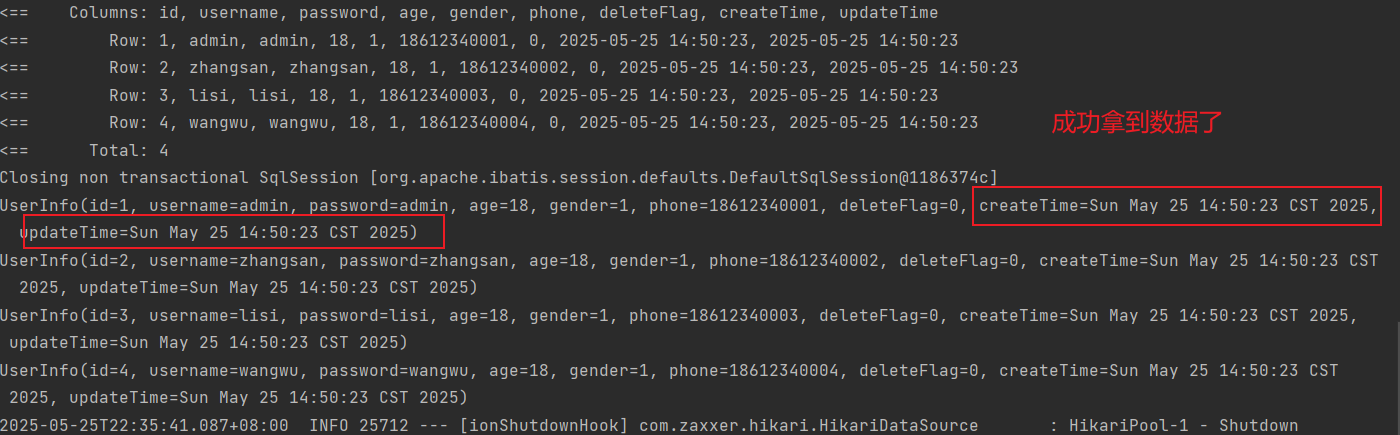
4.1 开启驼峰命名
在yml或者properties文件中设置:
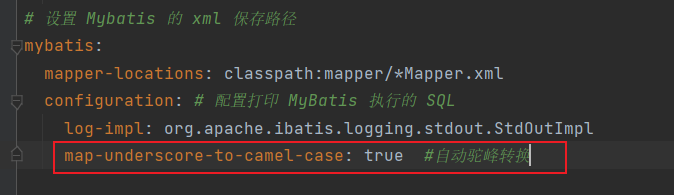
# 设置 Mybatis 的 xml 保存路径
mybatis:
  mapper-locations: classpath:mapper/*Mapper.xml
  configuration: # 配置打印 MyBatis 执行的 SQL
    log-impl: org.apache.ibatis.logging.stdout.StdOutImpl
    map-underscore-to-camel-case: true  #自动驼峰转换
4.2 起别名
@Mapper
public interface UserInfoMapper {

    @Select("select id, username, password, age, gender, phone, delete_flag as deleteFlag, " +
            "create_time as createTime, update_time as updateTime from user_info")
    List<UserInfo> selectAll2();

}
即便是不用起别名也不建议用 select * , 就应该用到哪一列写哪一列,即便是所有的列都需要也这么写,因为更加规范。
4.3 结构映射
4.3.1 @Results 和 @Result
@Mapper
public interface UserInfoMapper {

//    @Select("select id, username, password, age, gender, phone, delete_flag as deleteFlag, " +
//            "create_time as createTime, update_time as updateTime from user_info")
    @Results({
        @Result(column = "delete_flag", property = "deleteFlag"),
        @Result(column = "create_time", property = "createTime"),
        @Result(column = "update_time", property = "updateTime")
    })
    @Select("select id, username, password, age, gender, phone, delete_flag, create_time, update_time from user_info")
    List<UserInfo> selectAll2();
}
这样比起别名麻烦呀,那么真实用法是这样:
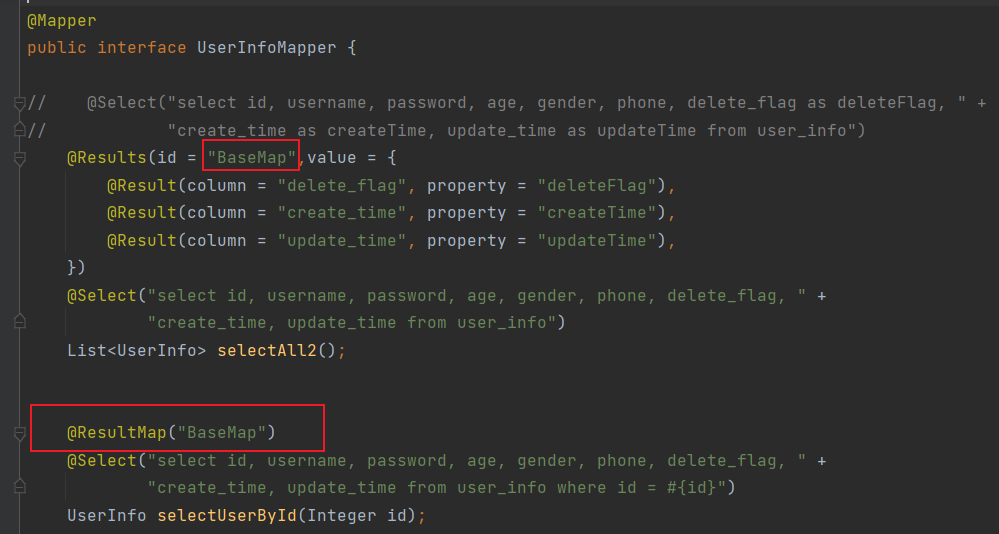
4.3.2 @ResultMap

5.增(Insert)
5.1传递对象
方法一:
@Mapper
public interface UserInfoMapper {

    @Insert("insert into user_info (username, `password`, age, gender) values (#{username},#{password},#{age},#{gender})")
    Integer insertUser(UserInfo userInfo);

}
Mapper层
@SpringBootTest
class UserInfoMapperTest {

    @Autowired
    private UserInfoMapper userInfoMapper;

    @Test
    void insertUser() {
        UserInfo userInfo = new UserInfo();
        userInfo.setUsername("张三");
        userInfo.setPassword("123445");
        userInfo.setAge(19);
        userInfo.setGender(0);

        userInfoMapper.insertUser(userInfo);
    }

}
成功:

方法二:
@Mapper
public interface UserInfoMapper {

    @Insert("insert into user_info (username, `password`, age, gender)" +
            "values (#{userInfo.username},#{userInfo.password},#{userInfo.age},#{userInfo.gender})")
    Integer insertUserByParam(@Param("userInfo") UserInfo userInfo);
}
@SpringBootTest
class UserInfoMapperTest {
@Autowired
private UserInfoMapper userInfoMapper;
@Test
void insertUserByParam() {
UserInfo userInfo = new UserInfo();
userInfo.setUsername("李四");
userInfo.setPassword("jaba213");
userInfo.setAge(19);
userInfo.setGender(0);
userInfoMapper.insertUser(userInfo);
}
}
6.删(Delete)
删除的时候一般使用id删除
假设我们现在是pdd的员工,我们下单了一个商品但是还没有付钱,那么此时我们就需要拿到这个订单的id,如果在10分钟内不付钱,我们就删除这个订单。
那么我们就需要在插入之后拿到id,可以用这个注解:
6.1 @Options
@Mapper
public interface UserInfoMapper {

    @Delete("delete from user_info where id = #{id}")
    Integer delete(Integer id);

    @Options(useGeneratedKeys = true, keyProperty = "id")
    @Insert("insert into user_info (username, `password`, age, gender)" +
            "values (#{userInfo.username},#{userInfo.password},#{userInfo.age},#{userInfo.gender})")
    Integer insertUserByParam(@Param("userInfo") UserInfo userInfo);

}
单元测试:
@SpringBootTest
class UserInfoMapperTest {
@Autowired
private UserInfoMapper userInfoMapper;
@Test
void insertUserByParam() {
UserInfo userInfo = new UserInfo();
userInfo.setUsername("wangmaz");
userInfo.setPassword("54231");
userInfo.setAge(19);
userInfo.setGender(0);
//返回影响的行数
Integer result = userInfoMapper.insertUserByParam(userInfo);
// 通过getId()获取
System.out.println("执行结果" + result + " ,id : " + userInfo.getId());
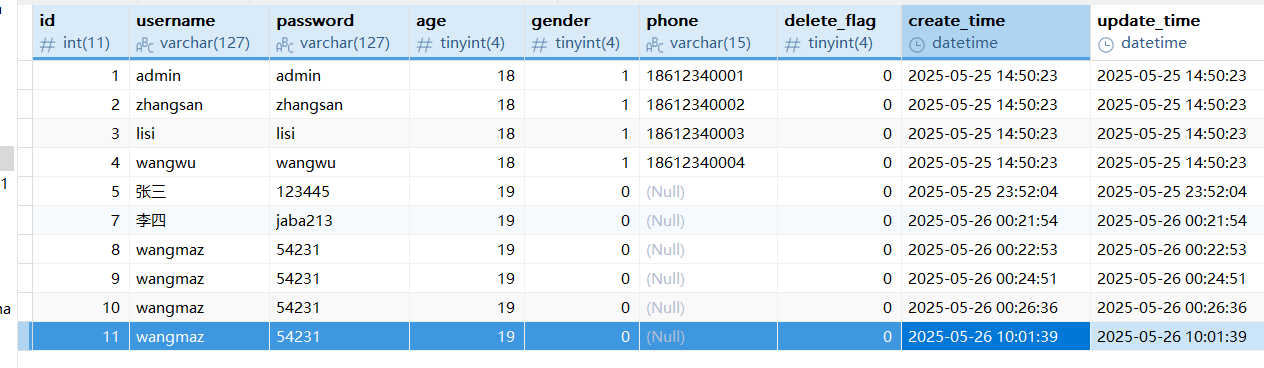
}结果:

那么拿到数据你想用这个id干什么自己处理就好了
普通的删除:
@Mapper
public interface UserInfoMapper {

    @Delete("delete from user_info where id = #{id}")
    Integer delete(Integer id);

}
单元测试:
@SpringBootTest
class UserInfoMapperTest {
@Autowired
private UserInfoMapper userInfoMapper;
@Test
void delete() {
// 删除id为11的数据
userInfoMapper.delete(11);
}
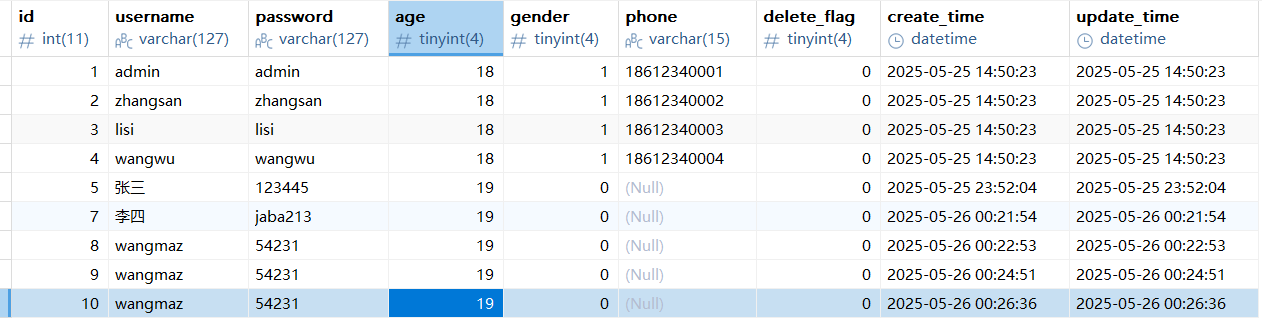
}运行前:
运行后:

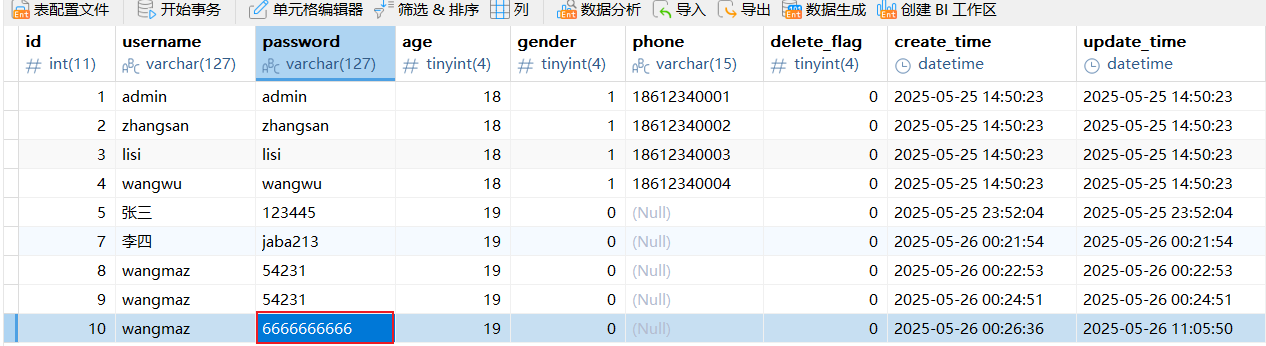
7.改(Update)
@Mapper
public interface UserInfoMapper {


    @Update("update user_info set password = #{password} where id = #{id}")
    Integer update(Integer id, String password);
}
@Mapper
public interface UserInfoMapper {
@Update("update user_info set password = #{password} where id = #{id}")
Integer update(Integer id, String password);
}修改前:
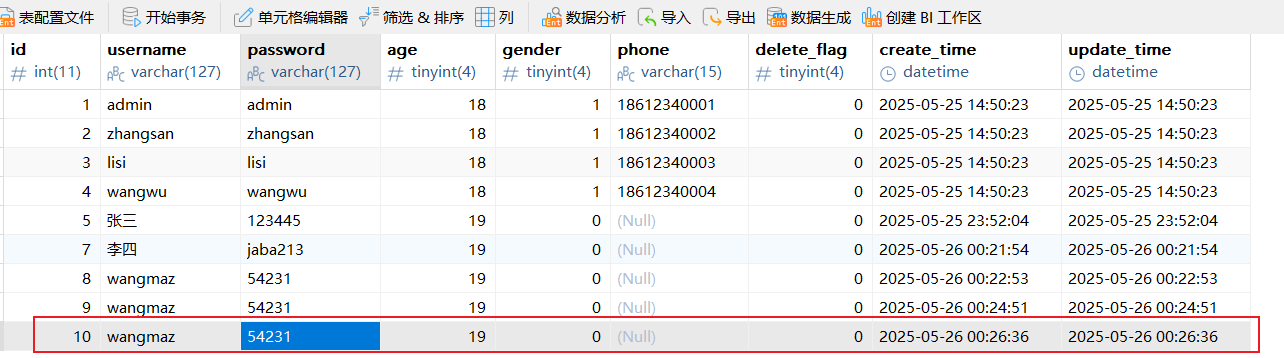
修改后 :
三、报错信息
看到这样的报错“密码错误”,直接去看配置信息

数据库返回结构太多,方法定义的返回结果不匹配

标签参数和方法参数不匹配