深入理解设计模式之适配器模式
1. 适配器模式概述
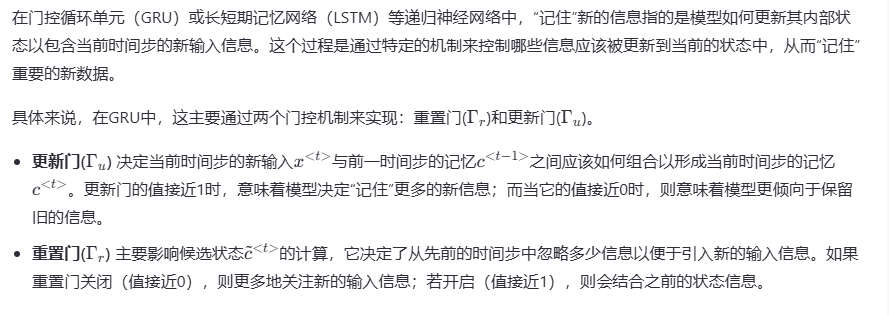
适配器模式(Adapter Pattern)是一种结构型设计模式,它允许将一个类的接口转换为客户端所期望的另一个接口。适配器模式使得原本由于接口不兼容而不能一起工作的类能够协同工作,扮演了"转换器"的角色。
2. 适配器模式的核心组成
- 目标接口(Target): 客户端所期望的接口
- 适配者(Adaptee): 需要被适配的类或接口
- 适配器(Adapter): 将适配者接口转换为目标接口的类
3. 适配器模式的类型
3.1 对象适配器
通过组合方式实现,适配器持有适配者的实例。
3.2 类适配器
通过继承方式实现,适配器同时继承适配者和实现目标接口。
4. 适配器模式实现
4.1 对象适配器实现
// 目标接口
interface MediaPlayer {
    void play(String audioType, String fileName);
}

// 适配者接口
interface AdvancedMediaPlayer {
    void playVlc(String fileName);
    void playMp4(String fileName);
}

// 具体适配者实现
class VlcPlayer implements AdvancedMediaPlayer {
    @Override
    public void playVlc(String fileName) {
        System.out.println("Playing vlc file: " + fileName);
    }

    @Override
    public void playMp4(String fileName) {
        // 不做任何事
    }
}

class Mp4Player implements AdvancedMediaPlayer {
    @Override
    public void playVlc(String fileName) {
        // 不做任何事
    }

    @Override
    public void playMp4(String fileName) {
        System.out.println("Playing mp4 file: " + fileName);
    }
}

// 适配器
class MediaAdapter implements MediaPlayer {
    private AdvancedMediaPlayer advancedMusicPlayer;

    public MediaAdapter(String audioType) {
        if (audioType.equalsIgnoreCase("vlc")) {
            advancedMusicPlayer = new VlcPlayer();
        } else if (audioType.equalsIgnoreCase("mp4")) {
            advancedMusicPlayer = new Mp4Player();
        }
    }

    @Override
    public void play(String audioType, String fileName) {
        if (audioType.equalsIgnoreCase("vlc")) {
            advancedMusicPlayer.playVlc(fileName);
        } else if (audioType.equalsIgnoreCase("mp4")) {
            advancedMusicPlayer.playMp4(fileName);
        }
    }
}

// 客户端
class AudioPlayer implements MediaPlayer {
    private MediaAdapter mediaAdapter;

    @Override
    public void play(String audioType, String fileName) {
        // 播放mp3格式音频文件的内置支持
        if (audioType.equalsIgnoreCase("mp3")) {
            System.out.println("Playing mp3 file: " + fileName);
        }
        // 通过适配器播放其他格式
        else if (audioType.equalsIgnoreCase("vlc") || audioType.equalsIgnoreCase("mp4")) {
            mediaAdapter = new MediaAdapter(audioType);
            mediaAdapter.play(audioType, fileName);
        } else {
            System.out.println("Invalid media. " + audioType + " format not supported");
        }
    }
}

// 测试类
public class AdapterPatternDemo {
    public static void main(String[] args) {
        AudioPlayer audioPlayer = new AudioPlayer();

        audioPlayer.play("mp3", "beyond_the_horizon.mp3");
        audioPlayer.play("mp4", "alone.mp4");
        audioPlayer.play("vlc", "far_far_away.vlc");
        audioPlayer.play("avi", "mind_me.avi");
    }
}
4.2 类适配器实现
// 目标接口
interface Target {
    void request();
}

// 适配者类
class Adaptee {
    public void specificRequest() {
        System.out.println("Specific request from Adaptee");
    }
}

// 类适配器
class ClassAdapter extends Adaptee implements Target {
    @Override
    public void request() {
        specificRequest(); // 调用父类方法
    }
}

// 测试类
public class ClassAdapterDemo {
    public static void main(String[] args) {
        Target target = new ClassAdapter();
        target.request();
    }
}
5. 真实世界适配器模式示例
5.1 旧系统集成案例
// 旧支付系统接口
class LegacyPaymentSystem {
    public void processPayment(String amount, String account) {
        System.out.println("Legacy payment processed: " + amount + " from account: " + account);
    }
}

// 新支付接口
interface ModernPaymentGateway {
    void processPayment(Payment payment);
}

// 支付数据传输对象
class Payment {
    private double amount;
    private String accountId;
    private String currency;

    public Payment(double amount, String accountId, String currency) {
        this.amount = amount;
        this.accountId = accountId;
        this.currency = currency;
    }

    public double getAmount() {
        return amount;
    }

    public String getAccountId() {
        return accountId;
    }

    public String getCurrency() {
        return currency;
    }
}

// 支付系统适配器
class PaymentSystemAdapter implements ModernPaymentGateway {
    private LegacyPaymentSystem legacySystem;

    public PaymentSystemAdapter() {
        this.legacySystem = new LegacyPaymentSystem();
    }

    @Override
    public void processPayment(Payment payment) {
        // 转换和适配
        String amount = payment.getAmount() + " " + payment.getCurrency();
        legacySystem.processPayment(amount, payment.getAccountId());
    }
}

// 客户端代码
public class PaymentSystemDemo {
    public static void main(String[] args) {
        // 创建新的支付请求
        Payment payment = new Payment(100.50, "ACC123456", "USD");

        // 使用适配器处理支付
        ModernPaymentGateway paymentGateway = new PaymentSystemAdapter();
        paymentGateway.processPayment(payment);
    }
}
5.2 第三方库集成案例
// 第三方图表库接口
class ThirdPartyChartLibrary {
    public void displayChart(String data, String type, int width, int height) {
        System.out.println("Displaying " + type + " chart with data: " + data);
        System.out.println("Dimensions: " + width + "x" + height);
    }
}

// 应用程序预期的图表接口
interface AppChartInterface {
    void drawChart(ChartData data);
}

// 图表数据
class ChartData {
    private String dataPoints;
    private ChartType type;
    private Dimension size;

    public ChartData(String dataPoints, ChartType type, Dimension size) {
        this.dataPoints = dataPoints;
        this.type = type;
        this.size = size;
    }

    public String getDataPoints() {
        return dataPoints;
    }

    public ChartType getType() {
        return type;
    }

    public Dimension getSize() {
        return size;
    }
}

// 图表类型枚举
enum ChartType {
    BAR, LINE, PIE
}

// 尺寸类
class Dimension {
    private int width;
    private int height;

    public Dimension(int width, int height) {
        this.width = width;
        this.height = height;
    }

    public int getWidth() {
        return width;
    }

    public int getHeight() {
        return height;
    }
}

// 图表库适配器
class ChartLibraryAdapter implements AppChartInterface {
    private ThirdPartyChartLibrary chartLibrary;

    public ChartLibraryAdapter() {
        this.chartLibrary = new ThirdPartyChartLibrary();
    }

    @Override
    public void drawChart(ChartData data) {
        // 转换数据格式
        String chartType = data.getType().toString().toLowerCase();
        chartLibrary.displayChart(
            data.getDataPoints(),
            chartType,
            data.getSize().getWidth(),
            data.getSize().getHeight()
        );
    }
}

// 客户端代码
public class ChartAdapterDemo {
    public static void main(String[] args) {
        // 创建图表数据
        ChartData barChartData = new ChartData(
            "10,25,30,40,50",
            ChartType.BAR,
            new Dimension(800, 400)
        );

        // 使用适配器绘制图表
        AppChartInterface chartInterface = new ChartLibraryAdapter();
        chartInterface.drawChart(barChartData);
    }
}
6. 双向适配器模式
// 接口A
interface SystemA {
    void operationA();
}

// 接口B
interface SystemB {
    void operationB();
}

// 系统A实现
class ConcreteSystemA implements SystemA {
    @Override
    public void operationA() {
        System.out.println("System A: performing operation A");
    }
}

// 系统B实现
class ConcreteSystemB implements SystemB {
    @Override
    public void operationB() {
        System.out.println("System B: performing operation B");
    }
}

// 双向适配器
class TwoWayAdapter implements SystemA, SystemB {
    private SystemA systemA;
    private SystemB systemB;

    public TwoWayAdapter(SystemA systemA, SystemB systemB) {
        this.systemA = systemA;
        this.systemB = systemB;
    }

    @Override
    public void operationA() {
        System.out.println("Adapter: redirecting operationA to operationB");
        systemB.operationB();
    }

    @Override
    public void operationB() {
        System.out.println("Adapter: redirecting operationB to operationA");
        systemA.operationA();
    }
}

// 测试双向适配器
public class TwoWayAdapterDemo {
    public static void main(String[] args) {
        SystemA systemA = new ConcreteSystemA();
        SystemB systemB = new ConcreteSystemB();

        // 创建双向适配器
        TwoWayAdapter adapter = new TwoWayAdapter(systemA, systemB);

        // 通过适配器调用SystemA的功能
        System.out.println("Client uses SystemA interface:");
        adapter.operationA();

        // 通过适配器调用SystemB的功能
        System.out.println("\nClient uses SystemB interface:");
        adapter.operationB();
    }
}
7. Java标准库中的适配器模式
Java标准库中有多处使用了适配器模式:
import java.io.*;
import java.util.*;

public class JavaAdapterExamples {
    public static void main(String[] args) {
        // 示例1: InputStreamReader作为适配器
        // InputStream(适配者) -> Reader(目标接口)
        try {
            InputStream is = new FileInputStream("file.txt");
            Reader reader = new InputStreamReader(is, "UTF-8");

            int data = reader.read();
            while(data != -1) {
                System.out.print((char) data);
                data = reader.read();
            }

            reader.close();
        } catch (Exception e) {
            e.printStackTrace();
        }

        // 示例2: Arrays.asList()作为适配器
        // 数组(适配者) -> List(目标接口)
        String[] namesArray = {"John", "Jane", "Adam"};
        List<String> namesList = Arrays.asList(namesArray);

        // 使用List接口的方法
        System.out.println(namesList.get(1));
        System.out.println(namesList.contains("Jane"));

        // 示例3: Collections.enumeration()作为适配器
        // Collection(适配者) -> Enumeration(目标接口)
        List<String> list = new ArrayList<>();
        list.add("Item 1");
        list.add("Item 2");

        Enumeration<String> enumeration = Collections.enumeration(list);
        while(enumeration.hasMoreElements()) {
            System.out.println(enumeration.nextElement());
        }
    }
}
8. 适配器模式的优缺点
优点
- 解耦合: 客户端与被适配者解耦,通过目标接口进行交互
- 复用性: 可以复用现有的类,即使接口不匹配
- 灵活性: 可以在不修改原有代码的情况下使用已有功能
- 开闭原则: 符合"开闭原则",不修改原有代码而扩展功能
缺点
- 复杂性: 引入额外的类,增加系统复杂度
- 性能开销: 可能引入额外的间接调用,影响性能
- 可读性: 过多的适配器会使系统难以理解
9. 适配器模式的适用场景
- 集成遗留系统: 当需要集成旧系统或第三方库时
- 接口不兼容: 当现有接口与客户端期望的接口不兼容时
- 类库迁移: 当迁移到新的类库但不想修改现有代码时
- 多态接口: 当需要统一多个类的接口时
10. 适配器模式与其他模式的比较
| 模式 | 适配器模式 | 桥接模式 | 装饰器模式 | 代理模式 |
|---|---|---|---|---|
| 意图 | 使不兼容接口兼容 | 将抽象与实现分离 | 动态添加功能 | 控制对象访问 |
| 结构 | 转换接口 | 分离层次结构 | 包装对象 | 包装对象 |
| 侧重点 | 接口转换 | 接口与实现分离 | 功能扩展 | 访问控制 |
11. 总结
适配器模式是一种强大的结构型设计模式,用于解决接口不兼容问题。它在系统集成、类库迁移和接口统一等场景中非常有用。通过将一个类的接口转换为客户端期望的另一个接口,适配器让原本不兼容的类能够协同工作。
适配器模式的两种主要实现方式——对象适配器和类适配器,为不同场景提供了灵活的解决方案。在实际开发中,对象适配器因其更高的灵活性和更低的耦合度而被更广泛使用。
适当使用适配器模式可以大大提高代码的可维护性和可扩展性,特别是在处理遗留系统和第三方库集成时。但也应注意避免过度使用适配器,以免增加系统的复杂性。