目录
- 1. Leeds Sports Pose数据集下载
- 2. 数据集处理
- 2.1 获取标签
- 2.2 将图像文件和标签文件处理成YOLO能使用的格式
- 3. 用YOLOv8进行训练
- 3.1 训练
- 3.2 预测
1. Leeds Sports Pose数据集下载
从kaggle官网下载这个数据集,地址为link,下载好的数据集文件如下:
| |——archive
|——images 这个文件夹中放了2000张运动图像
|——visualized 这个文件夹放的是带关键点的图像
|——joints.mat 存放的是关键点标签
|——README.txt 存放对数据集的介绍
2. 数据集处理
2.1 获取标签
原图像的关键点标签以joints.mat格式存放,用python脚本对其进行解析,这里注意每张图像的大小不同,因此不同图像的宽高不同要注意。 解析代码如下,注意更换里面的图像路径。
import os
import cv2
import numpy as np
import scipy.io as sio

# 加载 joints.mat 文件
mat_path = "joints.mat"
data = sio.loadmat(mat_path)

# 查看所有键
print(data.keys())

# 获取 joints 数据 (假设其结构为 (3, num_keypoints, num_samples))
joints = data['joints']

# 路径配置
output_dir = r"LSP\labels"
image_dir = r"LSP\images"  # 图像目录路径
os.makedirs(output_dir, exist_ok=True)

# 解析 joints 数据
num_samples = joints.shape[2]

for idx in range(num_samples):
    # 构建图像路径
    image_path = os.path.join(image_dir, f"im{idx + 1:04d}.jpg")

    # 检查图像是否存在
    if not os.path.exists(image_path):
        print(f"图像 {image_path} 不存在,跳过该样本。")
        continue

    # 获取当前样本的关键点数据
    keypoints = joints[:, :, idx]
    x_coords = keypoints[0, :]
    y_coords = keypoints[1, :]
    visibility = keypoints[2, :]

    # 读取图像获取实际尺寸
    img = cv2.imread(image_path)
    if img is None:
        print(f"无法读取图像 {image_path},跳过该样本。")
        continue

    img_height, img_width = img.shape[:2]

    # 归一化关键点坐标
    x_coords /= img_width
    y_coords /= img_height

    # 计算边界框
    x_min, x_max = np.min(x_coords), np.max(x_coords)
    y_min, y_max = np.min(y_coords), np.max(y_coords)
    bbox_width = x_max - x_min
    bbox_height = y_max - y_min
    x_center = x_min + bbox_width / 2
    y_center = y_min + bbox_height / 2

    # 构建标签行:class_id x_center y_center width height x1 y1 x2 y2 ...
    label = f"0 {x_center:.6f} {y_center:.6f} {bbox_width:.6f} {bbox_height:.6f} "
    label += " ".join([f"{x:.6f} {y:.6f}" for x, y in zip(x_coords, y_coords)])
    label += "\n"

    # 保存标签文件
    label_path = os.path.join(output_dir, f"im{idx + 1:04d}.txt")
    with open(label_path, "w") as f:
        f.write(label)

print(f"所有关键点数据已转换为 YOLOv8 格式,保存至 {output_dir}")
获取的关键点标签如下图:
对应的图像如下图:

2.2 将图像文件和标签文件处理成YOLO能使用的格式
我是按照8比2将数据集分成训练集和测试集,划分代码如下:
import os
import random
import shutil

# 数据集路径

images_path = r"LSP\images"
labels_path = r"LSP\labels"

# 输出路径
train_img_dir = os.path.join(images_path, "train")
val_img_dir = os.path.join(images_path, "val")
train_lbl_dir = os.path.join(labels_path, "train")
val_lbl_dir = os.path.join(labels_path, "val")

# 创建输出文件夹
os.makedirs(train_img_dir, exist_ok=True)
os.makedirs(val_img_dir, exist_ok=True)
os.makedirs(train_lbl_dir, exist_ok=True)
os.makedirs(val_lbl_dir, exist_ok=True)

# 获取所有图像文件名(不带扩展名)
image_files = sorted([f.split('.')[0] for f in os.listdir(images_path) if f.endswith('.jpg')])

# 设置划分比例
train_ratio = 0.8
val_ratio = 0.2

# 随机打乱文件列表
random.shuffle(image_files)

# 划分数据集
train_count = int(len(image_files) * train_ratio)
train_files = image_files[:train_count]
val_files = image_files[train_count:]

def move_files(file_list, img_dir, lbl_dir):
    for filename in file_list:
        img_src = os.path.join(images_path, f"{filename}.jpg")
        lbl_src = os.path.join(labels_path, f"{filename}.txt")

        img_dst = os.path.join(img_dir, f"{filename}.jpg")
        lbl_dst = os.path.join(lbl_dir, f"{filename}.txt")

        if os.path.exists(img_src) and os.path.exists(lbl_src):
            shutil.move(img_src, img_dst)
            shutil.move(lbl_src, lbl_dst)

# 移动文件
move_files(train_files, train_img_dir, train_lbl_dir)
move_files(val_files, val_img_dir, val_lbl_dir)

print(f"数据集划分完成:\n  训练集:{len(train_files)} 张\n  验证集:{len(val_files)} 张")
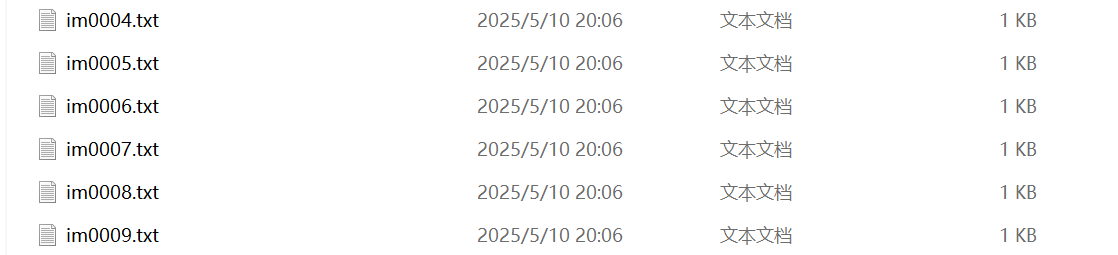
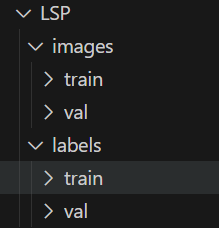
划分后的文件格式图:
| | |——LSP 文件名
| |——images
|——train 训练数据
|——val 测试数据
| |——val
|——train 训练标签
|——val 测试标签
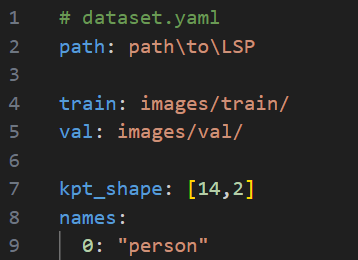
数据集的yaml格式如下:
3. 用YOLOv8进行训练
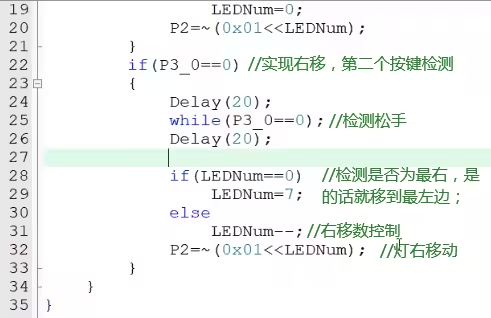
3.1 训练
下面是我进行训练的代码
# Ultralytics YOLO 🚀, AGPL-3.0 license

from copy import copy

from ultralytics.models import yolo
from ultralytics.nn.tasks import PoseModel
from ultralytics.utils import DEFAULT_CFG, LOGGER
from ultralytics.utils.plotting import plot_images, plot_results


class PoseTrainer(yolo.detect.DetectionTrainer):
    """
    A class extending the DetectionTrainer class for training based on a pose model.

    Example:
        ```python
        from ultralytics.models.yolo.pose import PoseTrainer

        args = dict(model='yolov8n-pose.pt', data='coco8-pose.yaml', epochs=3)
        trainer = PoseTrainer(overrides=args)
        trainer.train()
        ```
    """

    def __init__(self, cfg=DEFAULT_CFG, overrides=None, _callbacks=None):
        """Initialize a PoseTrainer object with specified configurations and overrides."""
        if overrides is None:
            overrides = {}
        overrides["task"] = "pose"
        super().__init__(cfg, overrides, _callbacks)

        if isinstance(self.args.device, str) and self.args.device.lower() == "mps":
            LOGGER.warning(
                "WARNING ⚠️ Apple MPS known Pose bug. Recommend 'device=cpu' for Pose models. "
                "See https://github.com/ultralytics/ultralytics/issues/4031."
            )

    def get_model(self, cfg=None, weights=None, verbose=True):
        """Get pose estimation model with specified configuration and weights."""
        model = PoseModel(cfg, ch=3, nc=self.data["nc"], data_kpt_shape=self.data["kpt_shape"], verbose=verbose)
        if weights:
            model.load(weights)

        return model

    def set_model_attributes(self):
        """Sets keypoints shape attribute of PoseModel."""
        super().set_model_attributes()
        self.model.kpt_shape = self.data["kpt_shape"]

    def get_validator(self):
        """Returns an instance of the PoseValidator class for validation."""
        self.loss_names = "box_loss", "pose_loss", "kobj_loss", "cls_loss", "dfl_loss"
        return yolo.pose.PoseValidator(
            self.test_loader, save_dir=self.save_dir, args=copy(self.args), _callbacks=self.callbacks
        )

    def plot_training_samples(self, batch, ni):
        """Plot a batch of training samples with annotated class labels, bounding boxes, and keypoints."""
        images = batch["img"]
        kpts = batch["keypoints"]
        cls = batch["cls"].squeeze(-1)
        bboxes = batch["bboxes"]
        paths = batch["im_file"]
        batch_idx = batch["batch_idx"]
        plot_images(
            images,
            batch_idx,
            cls,
            bboxes,
            kpts=kpts,
            paths=paths,
            fname=self.save_dir / f"train_batch{ni}.jpg",
            on_plot=self.on_plot,
        )

    def plot_metrics(self):
        """Plots training/val metrics."""
        plot_results(file=self.csv, pose=True, on_plot=self.on_plot)  # save results.png


if __name__ == "__main__":
    args = dict(model=r'E:\postgraduate\bolt_lossen_project\ultralytics-8.1.0\yolov8n-pose.pt', epochs= 100, mode='train')
    trains = PoseTrainer(overrides=args)
    trains.train()

    #predictor.predict_cli()
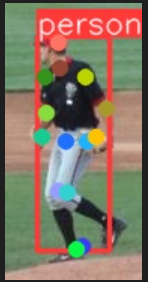
3.2 预测
预测代码:
# Ultralytics YOLO 🚀, AGPL-3.0 license

from ultralytics.engine.results import Results
from ultralytics.models.yolo.detect.predict import DetectionPredictor
from ultralytics.utils import DEFAULT_CFG, LOGGER, ops
import cv2


class PosePredictor(DetectionPredictor):
    """
    A class extending the DetectionPredictor class for prediction based on a pose model.

    Example:
        ```python
        from ultralytics.utils import ASSETS
        from ultralytics.models.yolo.pose import PosePredictor

        args = dict(model='yolov8n-pose.pt', source=ASSETS)
        predictor = PosePredictor(overrides=args)
        predictor.predict_cli()
        ```
    """

    def __init__(self, cfg=DEFAULT_CFG, overrides=None, _callbacks=None):
        """Initializes PosePredictor, sets task to 'pose' and logs a warning for using 'mps' as device."""
        super().__init__(cfg, overrides, _callbacks)
        self.args.task = "pose"
        if isinstance(self.args.device, str) and self.args.device.lower() == "mps":
            LOGGER.warning(
                "WARNING ⚠️ Apple MPS known Pose bug. Recommend 'device=cpu' for Pose models. "
                "See https://github.com/ultralytics/ultralytics/issues/4031."
            )

    def postprocess(self, preds, img, orig_imgs):
        """Return detection results for a given input image or list of images."""
        preds = ops.non_max_suppression(
            preds,
            self.args.conf,
            self.args.iou,
            agnostic=self.args.agnostic_nms,
            max_det=self.args.max_det,
            classes=self.args.classes,
            nc=len(self.model.names),
        )

        if not isinstance(orig_imgs, list):  # input images are a torch.Tensor, not a list
            orig_imgs = ops.convert_torch2numpy_batch(orig_imgs)

        results = []
        for i, pred in enumerate(preds):
            orig_img = orig_imgs[i]
            pred[:, :4] = ops.scale_boxes(img.shape[2:], pred[:, :4], orig_img.shape).round()
            pred_kpts = pred[:, 6:].view(len(pred), *self.model.kpt_shape) if len(pred) else pred[:, 6:]
            pred_kpts = ops.scale_coords(img.shape[2:], pred_kpts, orig_img.shape)
            img_path = self.batch[0][i]
            results.append(
                Results(orig_img, path=img_path, names=self.model.names, boxes=pred[:, :6], keypoints=pred_kpts)
            )
        return results

if __name__ == "__main__":
    img = r'E:\postgraduate\bolt_lossen_project\ultralytics-8.1.0\archive\LSP\images\train\im0089.jpg'
    args = dict(model=r'E:\postgraduate\bolt_lossen_project\ultralytics-8.1.0\runs\pose\train\weights\best.pt', source=img, task = 'pose')
    predictor = PosePredictor(overrides=args)
    predictor.predict_cli()
预测结果图: