【人工智能学习之动作识别TSM训练与部署】
- 基于MMAction2动作识别项目的开发
- 一、MMAction2的安装
- 二、数据集制作
- 三、模型训练
- 1. 配置文件准备
- 2. 关键参数修改
- 3. 启动训练
- 4. 启动成功
- ONNX模型部署方案
- 一、环境准备
- 二、执行转换命令
基于MMAction2动作识别项目的开发
一、MMAction2的安装
MMAction2 适用于 Linux、Windows 和 MacOS。
需要 Python 3.7+,CUDA 10.2+ 和 PyTorch 1.8+。
——————————————华丽的分割线—————————————————
第一步:从官方网站下载并安装 Miniconda。
第二步: 创建一个 conda 环境并激活它。
conda create --name openmmlab python=3.8 -y
conda activate openmmlab
第三步: 安装 PyTorch,按照官方说明进行操作。
第四步: 使用 MIM 安装依赖(其中MMDetection和 MMPose是可选的,非必须安装),注意MMCV需要根据前几步的版本进行选择安装版本。版本选择
pip install -U openmim
mim install mmengine
mim install mmcv
mim install mmdet
mim install mmpose
第五步:从源代码构建 MMAction2。
git clone https://github.com/open-mmlab/mmaction2.git
cd mmaction2
pip install -v -e .
# "-v" 表示输出更多安装相关的信息
# "-e" 表示以可编辑形式安装,这样可以在不重新安装的情况下,让本地修改直接生效。
第六步:验证 MMAction2 是否安装正确。
1.下载配置文件和权重文件
mim download mmaction2 --config tsn_imagenet-pretrained-r50_8xb32-1x1x8-100e_kinetics400-rgb --dest .
2.验证推理演示
# demo.mp4 和 label_map_k400.txt 都来自于 Kinetics-400
python demo/demo.py tsn_imagenet-pretrained-r50_8xb32-1x1x8-100e_kinetics400-rgb.py \
    tsn_imagenet-pretrained-r50_8xb32-1x1x8-100e_kinetics400-rgb_20220906-2692d16c.pth \
    demo/demo.mp4 tools/data/kinetics/label_map_k400.txt
如果在终端看到前5个标签及其对应的分数则已经安装成功。
二、数据集制作
-
RawFrameDataset格式的原始帧注释
-
数据目录结构:
dataset_root/ ├── rawframes/ │ ├── train/ │ │ ├── video1/ │ │ │ ├── img_00001.jpg │ │ │ └── ... │ └── val/ ├── annotations/ │ ├── train.txt │ └── val.txt -
标注文件格式示例:
video1 150 0
video2 180 1
原始帧数据集的注释是一个包含多行的文本文件,每一行表示一个视频的 frame_directory(相对路径)、视频的 total_frames 和视频的 label,用空格分隔。以上是一个示例。
这里分享我的俩个脚本,用于抽帧和标注:
抽帧脚本:import os import cv2 def extract_frames(video_path, output_dir): cap = cv2.VideoCapture(video_path) if not cap.isOpened(): print(f"无法打开视频文件: {video_path}") return frame_count = 0 while True: ret, frame = cap.read() if not ret: break frame_name = f"img_{frame_count + 1:05d}.jpg" frame_path = os.path.join(output_dir, frame_name) cv2.imwrite(frame_path, frame) frame_count += 1 cap.release() def process_videos(root_dir): for sub_dir in os.listdir(root_dir): sub_dir_path = os.path.join(root_dir, sub_dir) if os.path.isdir(sub_dir_path): for video_file in os.listdir(sub_dir_path): if video_file.endswith('.mp4'): video_path = os.path.join(sub_dir_path, video_file) video_name = os.path.splitext(video_file)[0] output_dir = os.path.join(sub_dir_path, video_name) if not os.path.exists(output_dir): os.makedirs(output_dir) extract_frames(video_path, output_dir) if __name__ == "__main__": root_directory = r'C:\WorkFiles\company_server_SSH\fight\TSM\dataset\dataset' # 这里可以修改为你的一级目录路径 process_videos(root_directory)标注脚本:
import os


def count_images_and_save(root_dir, output_file):
    results = []
    for root, dirs, files in os.walk(root_dir):
        # 若当前目录没有子目录,就认定为末级目录
        if not dirs:
            jpg_files = [f for f in files if f.lower().endswith('.jpg')]
            image_count = len(jpg_files)
            # 把上级目录名当作标签
            label = os.path.basename(os.path.dirname(root))
            # 仅保留从 train 开始的相对路径
            relative_path = os.path.relpath(root, start=os.path.dirname(root_dir))
            results.append(f"{relative_path} {image_count} {label}")

    with open(output_file, 'w') as f:
        for line in results:
            f.write(line + '\n')


if __name__ == "__main__":
    root_directory = r'C:\WorkFiles\company_server_SSH\fight\TSM\dataset\dataset\images\val'  # 替换成你的根目录
    output_txt_file = 'val_videofolder.txt'  # 替换成你想要的输出文件名
    count_images_and_save(root_directory, output_txt_file)
    print(f"结果已保存到 {output_txt_file}")
-
-
VideoDataset格式的视频注释
-
数据目录结构:
dataset_root/ ├── videos/ │ ├── video1.mp4 │ └── video2.avi ├── annotations/ │ ├── train.txt │ └── val.txt -
执行格式转换:
python tools/data/build_rawframes.py [原始视频路径] [输出路径] --ext mp4 -
标注文件格式示例:
some/path/000.mp4 1
some/path/001.mp4 1
some/path/002.mp4 2
视频数据集的注释是一个包含多行的文本文件,每一行表示一个样本视频,包括 filepath(相对路径)和 label,用空格分隔。以上是一个示例。
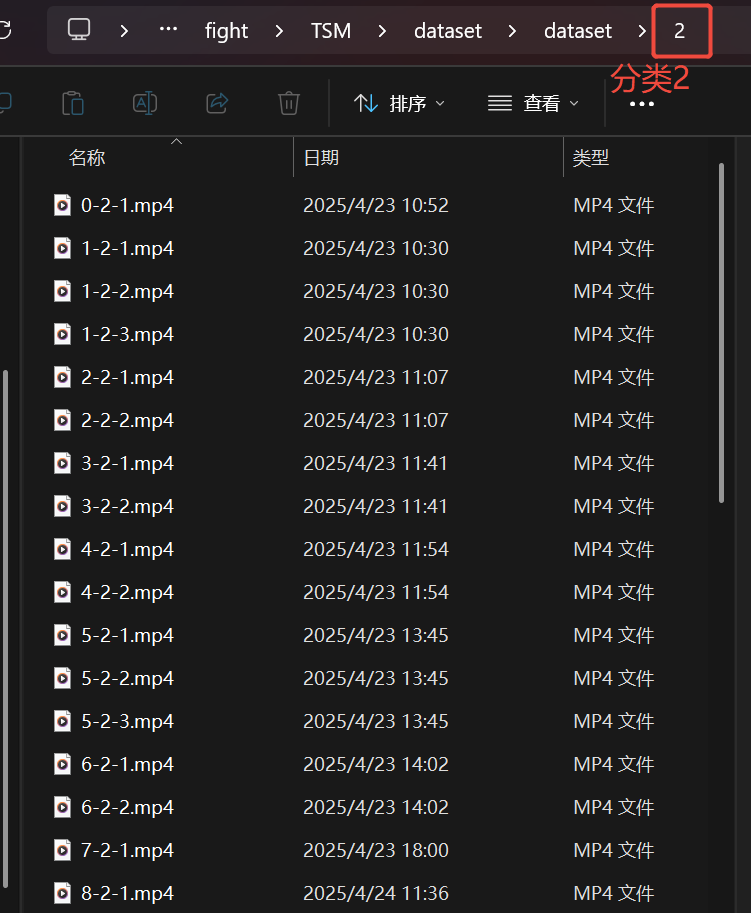
通常,我会将相同分类的视频放在同一个文件夹中,并将分类序号作为文件夹名称,通过脚本直接生成标注文件。
具体操作如下:
脚本如下:import os def generate_video_labels(root_dir, output_file): with open(output_file, 'w') as f: for root, dirs, files in os.walk(root_dir): for file in files: if file.lower().endswith(('.mp4', '.avi', '.mov', '.mkv')): label = os.path.basename(root) file_path = os.path.join(root, file) relative_path = os.path.relpath(file_path, root_dir) f.write(f"{relative_path} {label}\n") if __name__ == "__main__": root_directory = r'C:\WorkFiles\dataset\fight\dataset' output_txt = 'video_labels.txt' generate_video_labels(root_directory, output_txt)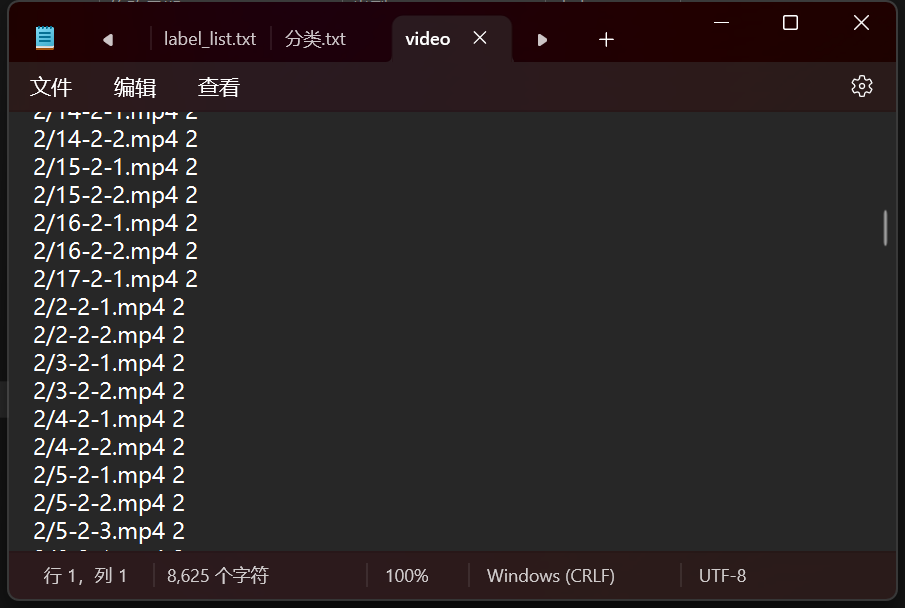
-
三、模型训练
1. 配置文件准备
本项目选择的是TSM模型,读者可以根据自己的需求选择其他模型。
先复制一份构建模型训练的配置文件,并将其重命名。这里我们复制到configs目录下以免后面找不到。
cp mmaction2/configs/recognition/tsm/tsm_r50_1x1x8_50e_kinetics400_rgb.py configs/my_tsm.py
2. 关键参数修改
打开我们的配置文件,首先需要修改我们的数据集配置:
# 数据集配置
# dataset settings
 data_root = '/home/OpenMMLAB/mmaction2/fight/dataset/'
 data_root_val = '/home/OpenMMLAB/mmaction2/fight/dataset/'
 ann_file_train = '/home/OpenMMLAB/mmaction2/fight/dataset/video_labels_train.txt'
 ann_file_val = '/home/OpenMMLAB/mmaction2/fight/dataset/video_labels_val.txt'
其次,我们还需要对模型进行修改分类输出:
# model settings
		model = dict(
		    cls_head=dict(
		        type='TSMHead',
		        num_classes=6  # 将 400 修改为 101
		        ))
其他的训练策略看个人情况,我没有做训练器等其他方面的修改。
3. 启动训练
接下来通过命令启动训练:
python tools/train.py configs/my_tsm.py \
    --seed=0 \
    --deterministic \
    --validate \
    --work-dir work_dirs/my_tsm
脚本完整用法:
python tools/train.py ${CONFIG_FILE} [ARGS]
| 参数 | 描述 |
|---|---|
| CONFIG_FILE | 配置文件的路径。 |
| –work-dir WORK_DIR | 保存日志和权重的目标文件夹。默认为与配置文件相同名称的文件夹,位于 ./work_dirs 下。 |
| –resume [RESUME] | 恢复训练。如果指定了路径,则从该路径恢复,如果未指定,则尝试从最新的权重自动恢复。 |
| –amp | 启用自动混合精度训练。 |
| –no-validate | 不建议使用。在训练期间禁用权重评估。 |
| –auto-scale-lr | 根据实际批次大小和原始批次大小自动缩放学习率。 |
| –seed | 随机种子。 |
| –diff-rank-seed | 是否为不同的 rank 设置不同的种子。 |
| –deterministic | 是否为 CUDNN 后端设置确定性选项。 |
| –cfg-options CFG_OPTIONS | 覆盖使用的配置中的某些设置,xxx=yyy 格式的键值对将合并到配置文件中。如果要覆盖的值是一个列表,则应采用 key=“[a,b]” 或 key=a,b 的形式。该参数还允许嵌套的列表/元组值,例如 key=“[(a,b),(c,d)]”。请注意,引号是必需的,且不允许有空格。 |
| –launcher {none,pytorch,slurm,mpi} | 作业启动器的选项。默认为 none。 |
注意:默认情况下,MMAction2 更倾向于使用 GPU 而不是 CPU 进行训练。如果您想在 CPU 上训练模型,请清空 CUDA_VISIBLE_DEVICES 或将其设置为 -1 以使 GPU 对程序不可见。
CUDA_VISIBLE_DEVICES=-1 python tools/train.py ${CONFIG_FILE} [ARGS]
当然,也可以使用多卡训练,官方提供了一个 shell 脚本使用torch.distributed.launch 来启动多个 GPU 的训练任务。
bash tools/dist_train.sh ${CONFIG} ${GPUS} [PY_ARGS]
| 参数 | 描述 |
|---|---|
| CONFIG_FILE | 配置文件的路径。 |
| GPUS | 要使用的 GPU 数量。 |
| [PYARGS] | tools/train.py 的其他可选参数。 |
4. 启动成功
开始输出loss则标志模型开始训练了。
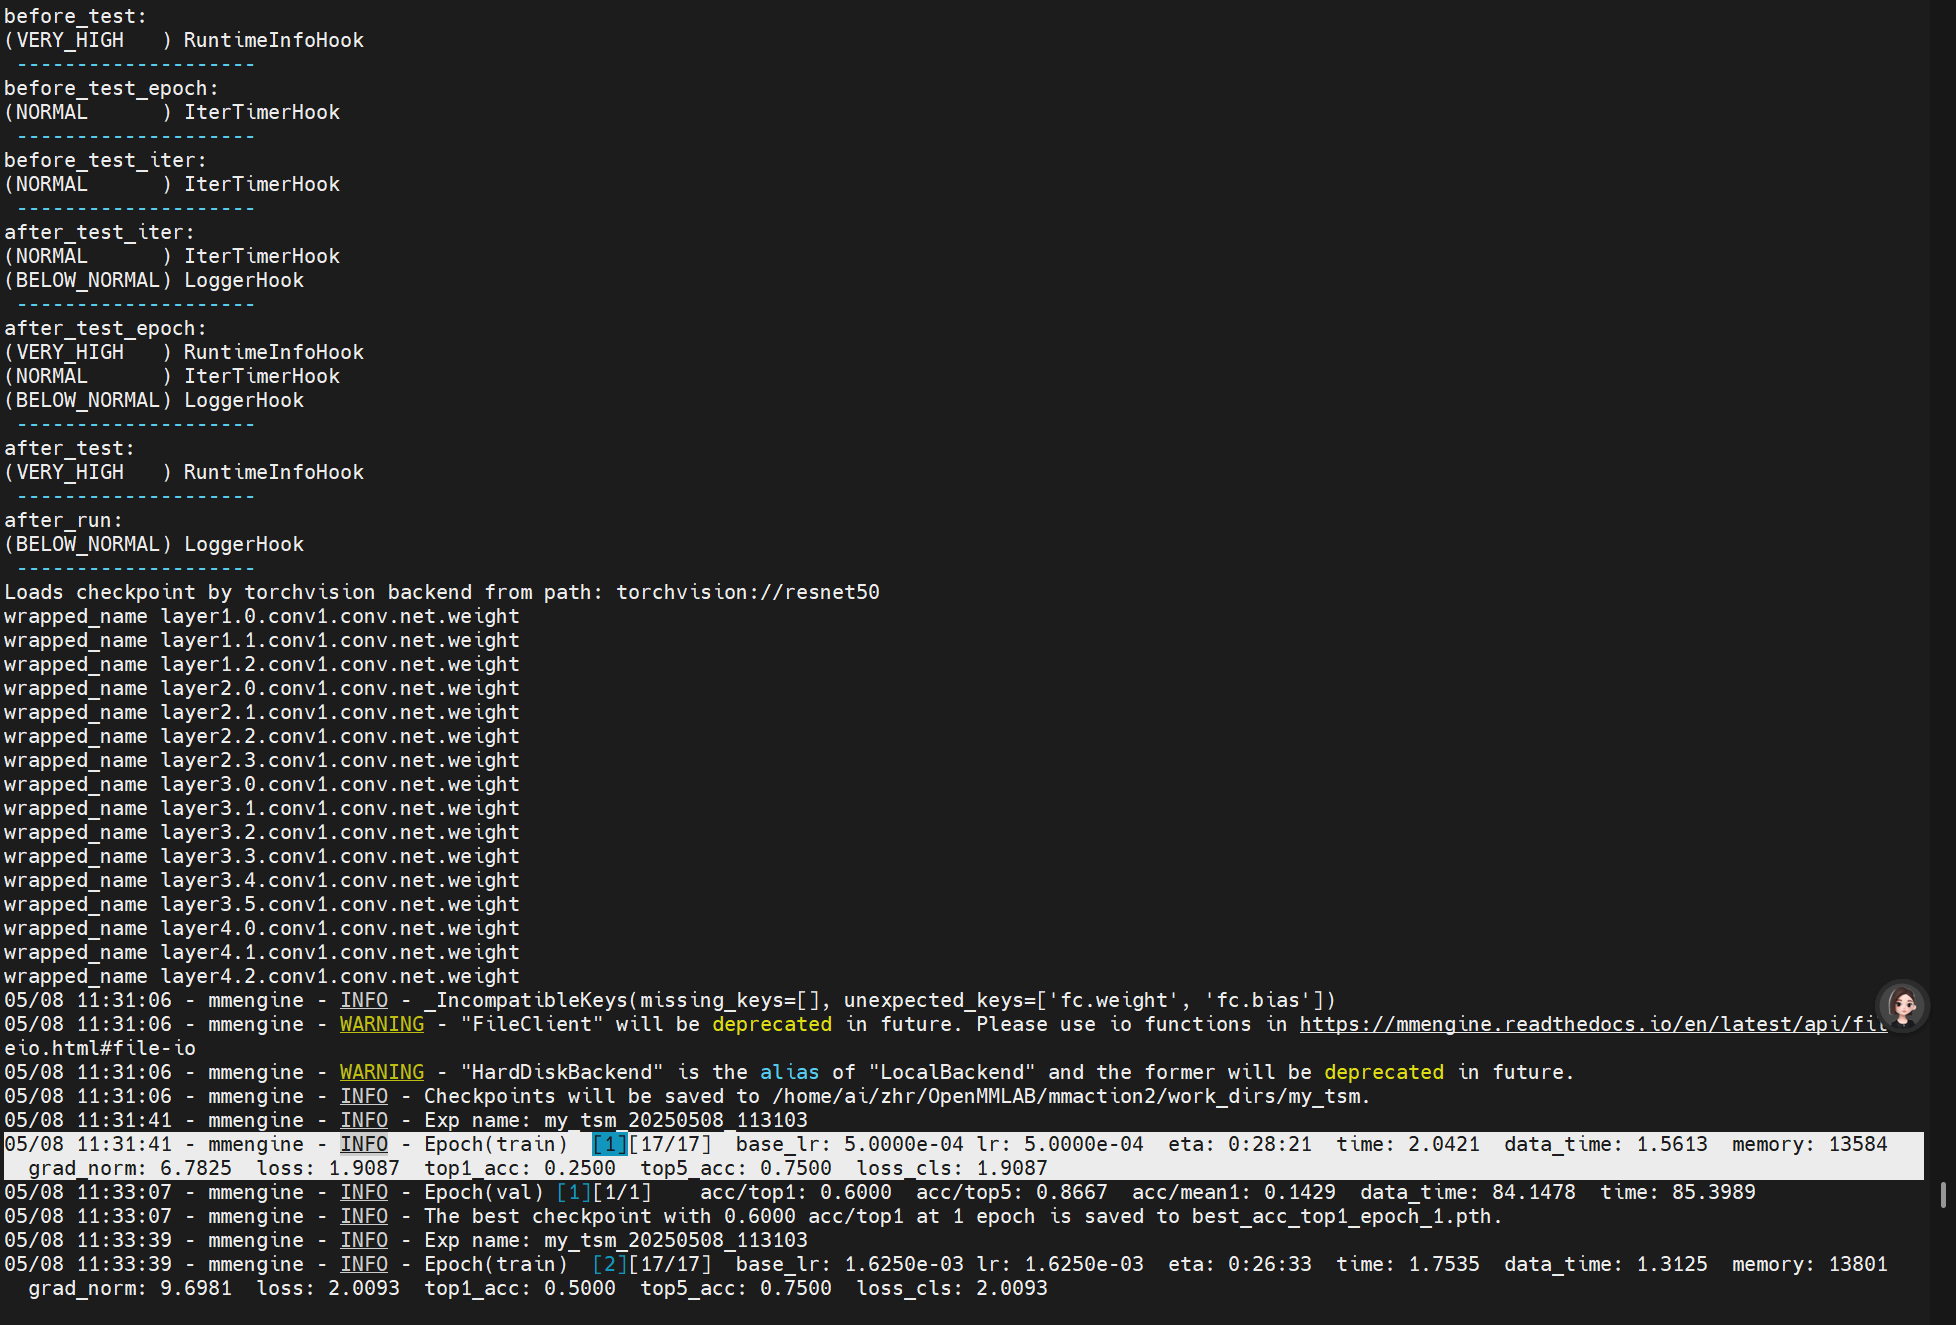
最后训练完成会得到:
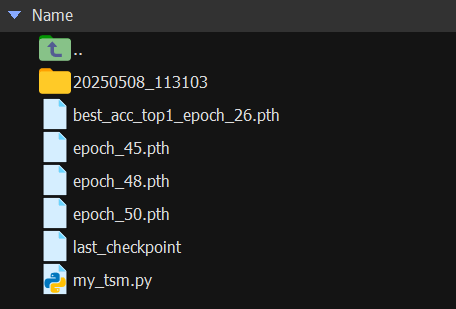
top1达到best并不意味着top5也是best。
我们根据自己的需求选择其中表现最好的即可。
ONNX模型部署方案
一、环境准备
先决条件
为了进行端到端的模型部署,MMDeploy 需要 Python 3.6+ 和 PyTorch 1.8+。
——————————————华丽的分割线—————————————————
第一步:从官方网站下载并安装 Miniconda。
第二步:创建 conda 环境并激活它,也可以直接使用我们之前创建的openmmlab
第三步:按照官方说明安装 PyTorch(如果没装的话)
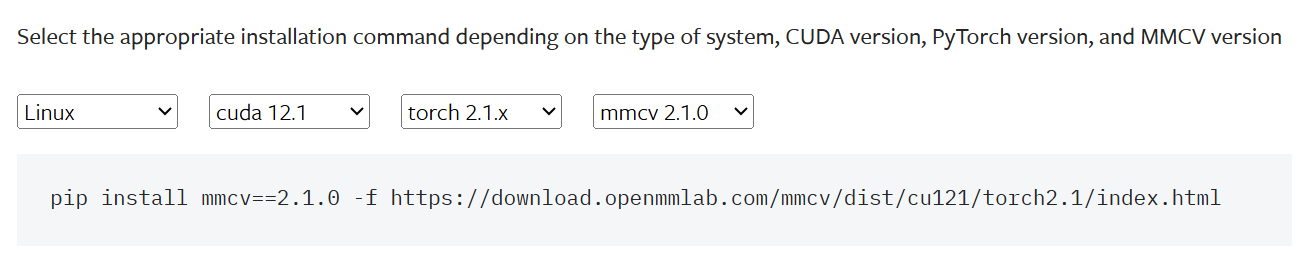
第四步:安装mmcv和mmengine,如果是之前创建的环境在已有mmengine和mmcv的基础上,我们只需要安装mmdeploy即可。
第五步:下载Github最新版MMDeploy
git clone https://github.com/open-mmlab/mmdeploy.git --recursive
cd mmdeploy
第六步:根据需求安装对应依赖,engine或onnx,这里我安装的onnx部署环境
# 1. install MMDeploy model converter
pip install mmdeploy==1.3.1

# 2. install MMDeploy sdk inference
# you can install one to install according whether you need gpu inference
# 2.1 support onnxruntime
pip install mmdeploy-runtime==1.3.1
# 2.2 support onnxruntime-gpu, tensorrt
pip install mmdeploy-runtime-gpu==1.3.1

# 3. install inference engine
# 3.1 install TensorRT
# !!! If you want to convert a tensorrt model or inference with tensorrt,
# download TensorRT-8.2.3.0 CUDA 11.x tar package from NVIDIA, and extract it to the current directory
pip install TensorRT-8.2.3.0/python/tensorrt-8.2.3.0-cp38-none-linux_x86_64.whl
pip install pycuda
export TENSORRT_DIR=$(pwd)/TensorRT-8.2.3.0
export LD_LIBRARY_PATH=${TENSORRT_DIR}/lib:$LD_LIBRARY_PATH
# !!! Moreover, download cuDNN 8.2.1 CUDA 11.x tar package from NVIDIA, and extract it to the current directory
export CUDNN_DIR=$(pwd)/cuda
export LD_LIBRARY_PATH=$CUDNN_DIR/lib64:$LD_LIBRARY_PATH

# 3.2 install ONNX Runtime
# you can install one to install according whether you need gpu inference
# 3.2.1 onnxruntime
wget https://github.com/microsoft/onnxruntime/releases/download/v1.8.1/onnxruntime-linux-x64-1.8.1.tgz
tar -zxvf onnxruntime-linux-x64-1.8.1.tgz
export ONNXRUNTIME_DIR=$(pwd)/onnxruntime-linux-x64-1.8.1
export LD_LIBRARY_PATH=$ONNXRUNTIME_DIR/lib:$LD_LIBRARY_PATH
# 3.2.2 onnxruntime-gpu
pip install onnxruntime-gpu==1.8.1
wget https://github.com/microsoft/onnxruntime/releases/download/v1.8.1/onnxruntime-linux-x64-gpu-1.8.1.tgz
tar -zxvf onnxruntime-linux-x64-gpu-1.8.1.tgz
export ONNXRUNTIME_DIR=$(pwd)/onnxruntime-linux-x64-gpu-1.8.1
export LD_LIBRARY_PATH=$ONNXRUNTIME_DIR/lib:$LD_LIBRARY_PATH
二、执行转换命令
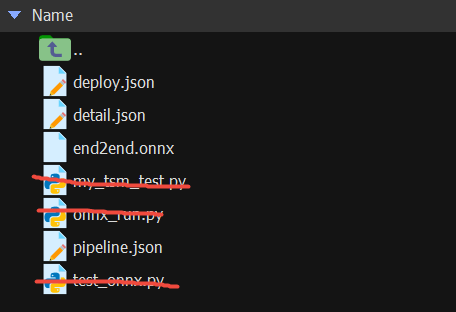
通过命令我们就得到了着四个文件,分别为onnx和三个json:


![[AI Tools] Dify 工具插件上传指南:如何将插件发布到官方市场](https://i-blog.csdnimg.cn/direct/a93f3c91c1f2400680854c4279fa4386.png)