OAuth2
登录历程
- basic 用户名:密码
- session cookie
- token
- jwt
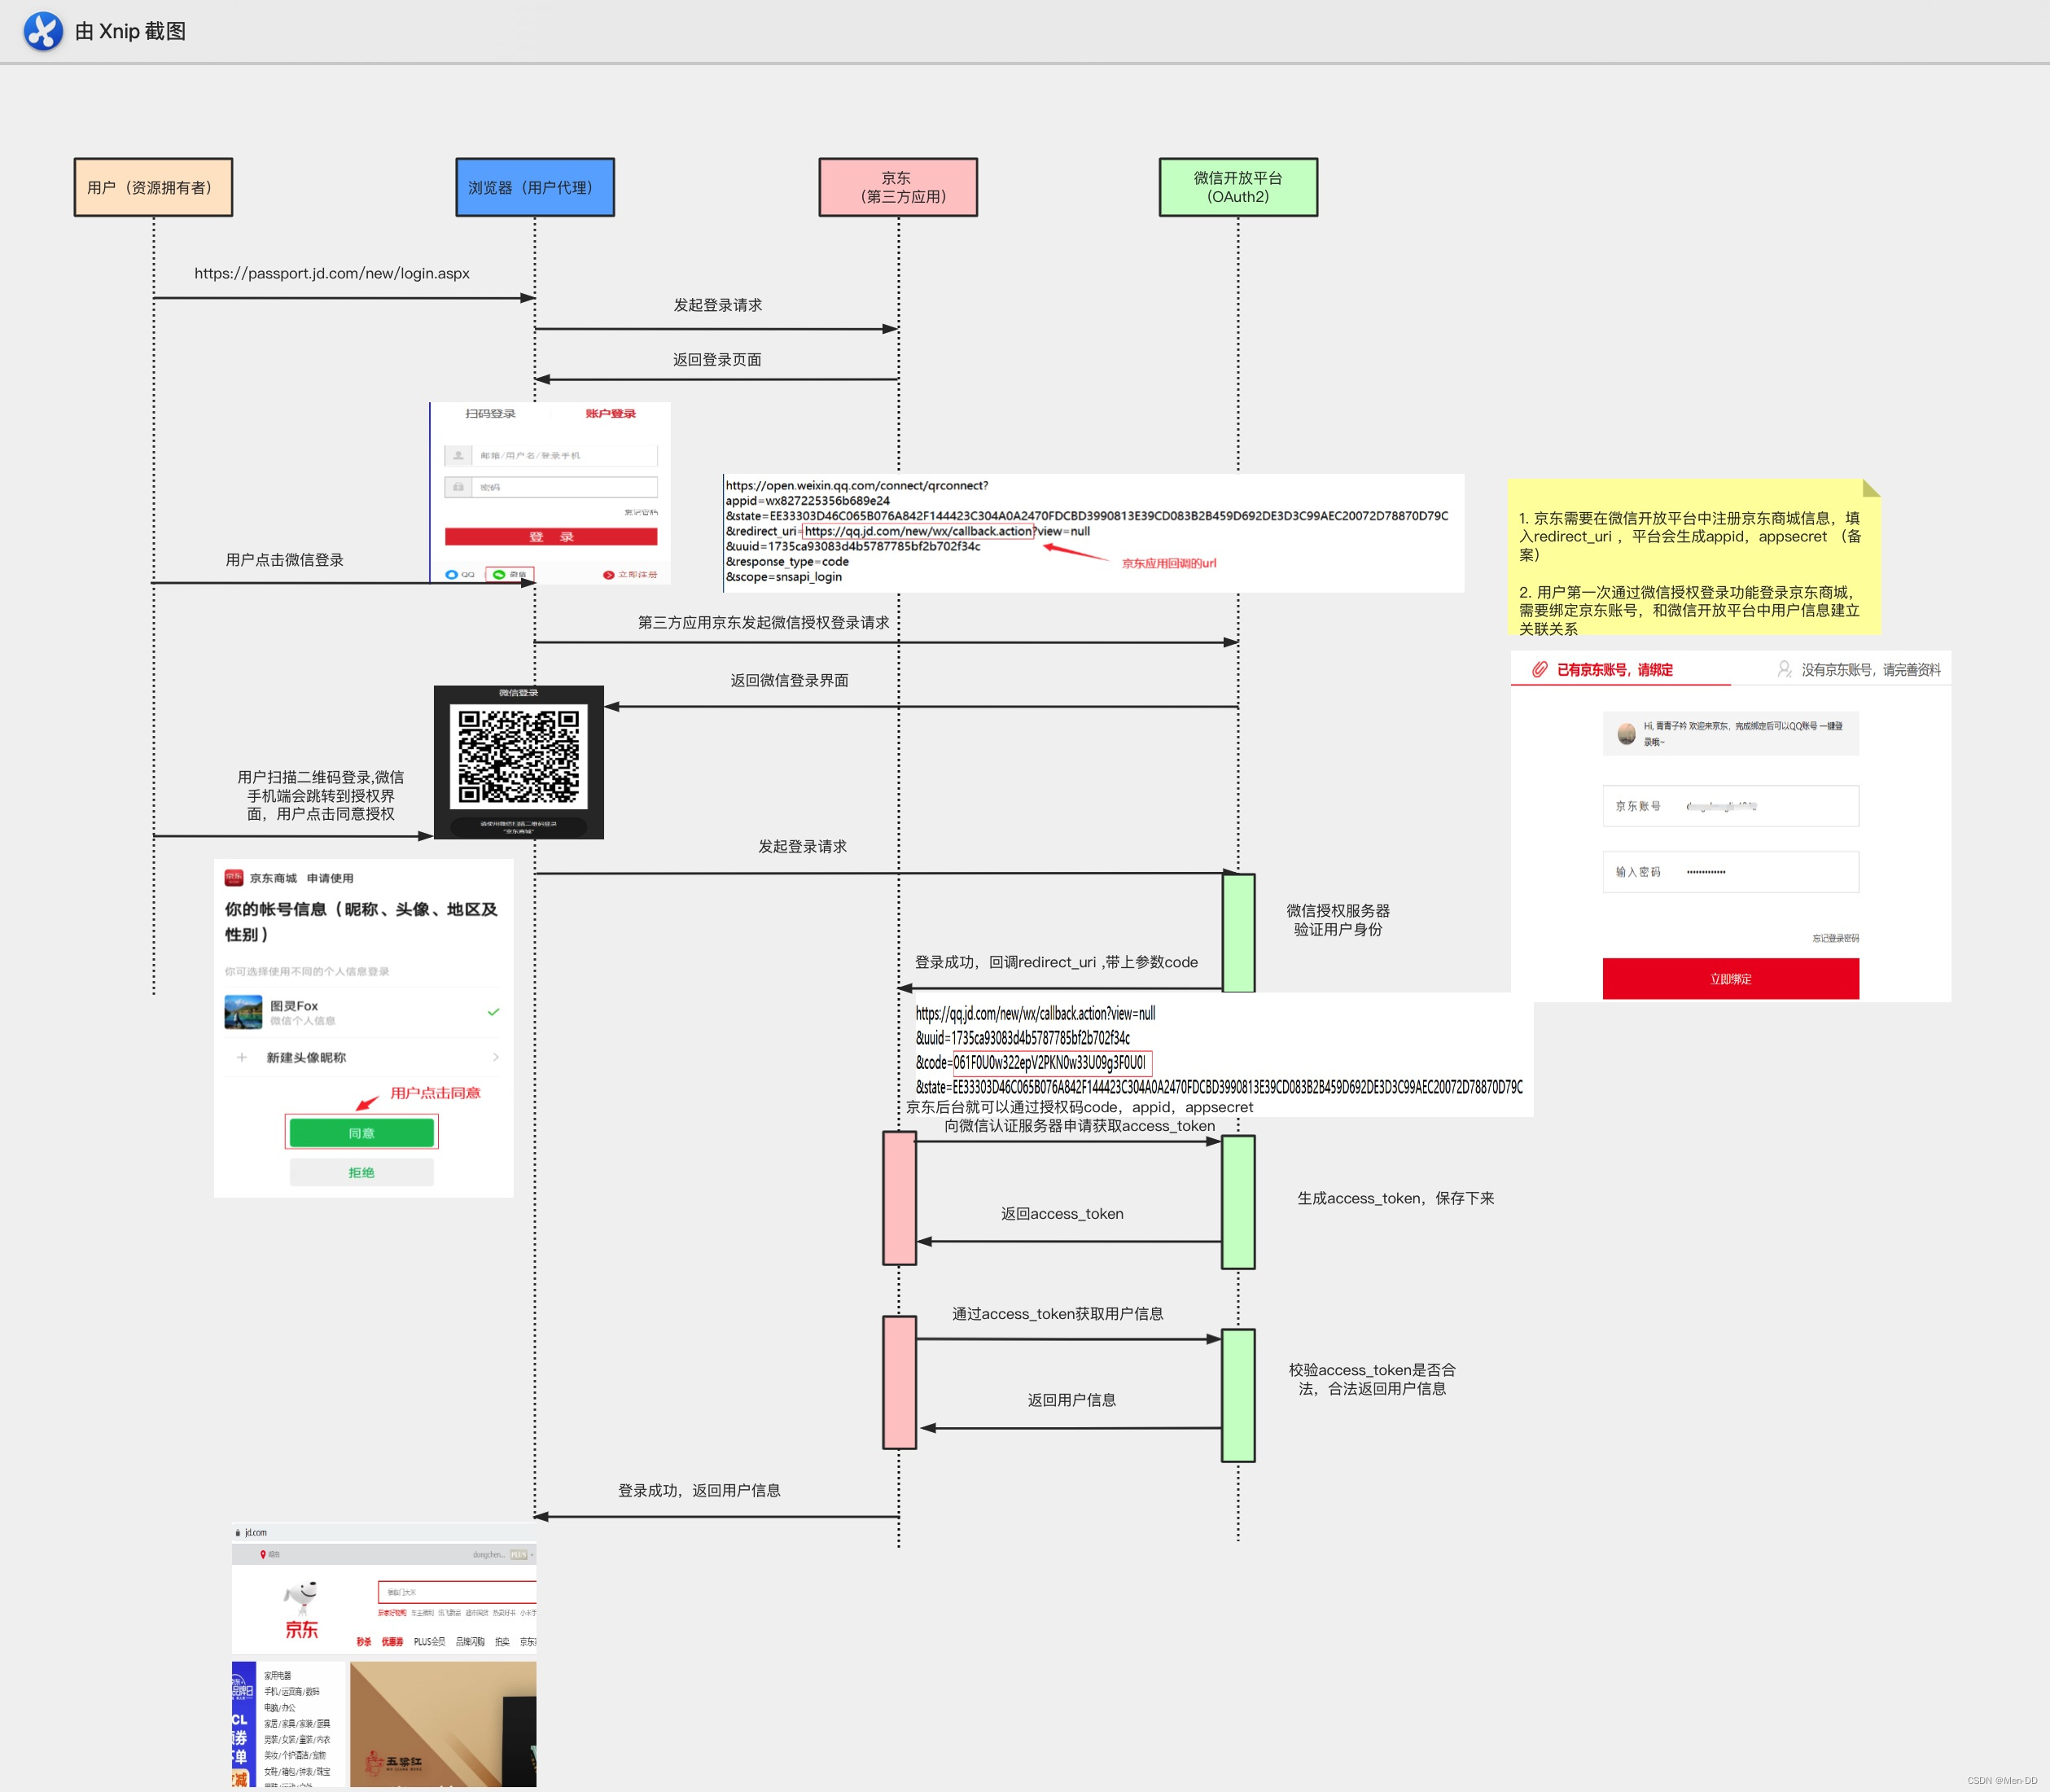
登录流程分析:
https://www.processon.com/view/link/60a32e7a079129157118740f
微信开发平台文档:
https://developers.weixin.qq.com/doc/oplatform/Mobile_App/WeChat_Login/Development_Guide.html
令牌(token)与密码(password)差异
(1)令牌是短期的,到期会自动失效,用户自己无法修改。密码一般长期有效,用户不修改,就不会发生变化。
(2)令牌可以被数据所有者撤销,会立即失效。密码一般不允许被他人撤销。
(3)令牌有权限范围(scope)。对于网络服务来说,只读令牌就比读写令牌更安全。密码一般是完整权限。
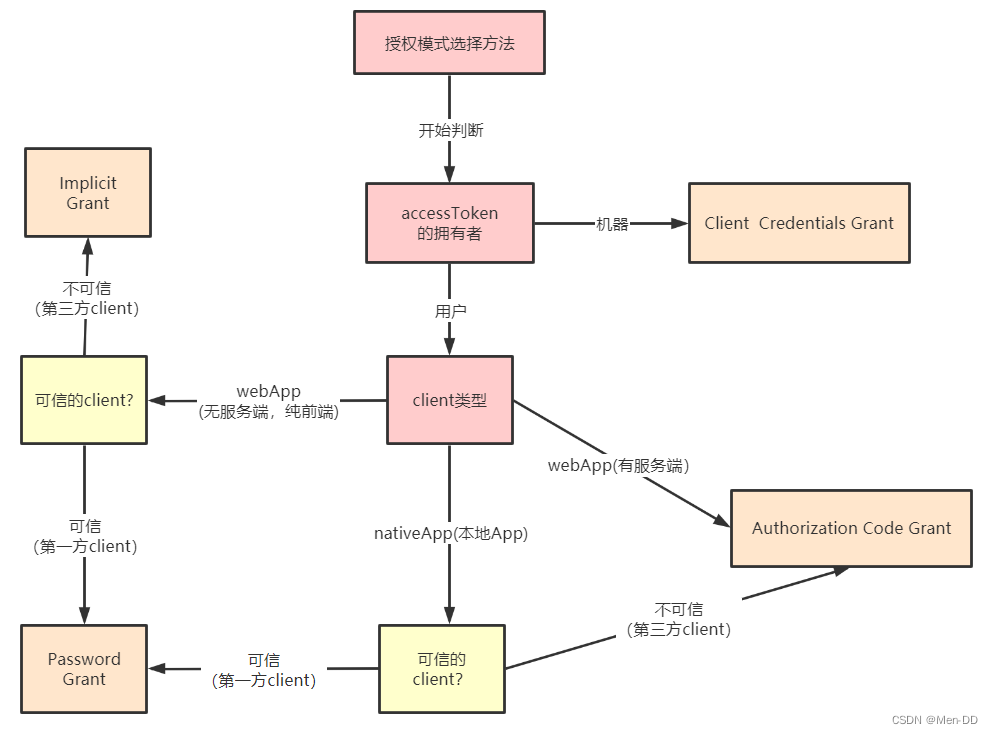
客户端授权模式
客户端必须得到用户的授权(authorization grant),才能获得令牌(access token)。OAuth 2.0 对于如何颁发令牌的细节,规定得非常详细。具体来说,一共分成四种授权类型(authorization grant),即四种颁发令牌的方式,适用于不同的互联网场景。
- 授权码模式(authorization code)
- 密码模式(resource owner password credentials)
- 简化(隐式)模式(implicit)
- 客户端模式(client credentials)
不管哪一种授权方式,第三方应用申请令牌之前,都必须先到系统备案,说明自己的身份,然后会拿到两个身份识别码:客户端 ID(client ID)和客户端密钥(client secret)。这是为了防止令牌被滥用,没有备案过的第三方应用,是不会拿到令牌的。
授权码模式
授权码(authorization code)方式,指的是第三方应用先申请一个授权码,然后再用该码获取令牌。
这种方式是最常用的流程,安全性也最高,它适用于那些有后端的 Web 应用。授权码通过前端传送,令牌则是储存在后端,而且所有与资源服务器的通信都在后端完成。这样的前后端分离,可以避免令牌泄漏。
适用场景:目前市面上主流的第三方验证都是采用这种模式
它的步骤如下:
- 用户访问客户端,后者将前者导向授权服务器。
- 用户选择是否给予客户端授权。
- 假设用户给予授权,授权服务器将用户导向客户端事先指定的"重定向URI"(redirection URI),同时附上一个授权码。
- 客户端收到授权码,附上早先的"重定向URI",向授权服务器申请令牌。这一步是在客户端的后台的服务器上完成的,对用户不可见。
- 授权服务器核对了授权码和重定向URI,确认无误后,向客户端发送访问令牌(access token)和更新令牌(refresh token)。
用户 — JD – 微信
- A网站提供一个链接,用户点击后就会跳转到 B 网站,授权用户数据给 A 网站使用。下面就是 A 网站跳转 B 网站的一个示意链接。
https://b.com/oauth/authorize?
  response_type=code&            #表示授权类型,必选项,此处的值固定为"code"
  client_id=CLIENT_ID&           #表示客户端的ID,必选项
  redirect_uri=CALLBACK_URL&     #表示重定向URI,可选项
  scope=read&                    #表示申请的权限范围,可选项
  state=STATE                    #表示客户端的当前状态,可以指定任意值,授权服务器会原封不动地返回这个值。
- 用户跳转后,B 网站会要求用户登录,然后询问是否同意给予 A 网站授权。用户表示同意,这时 B 网站就会跳回redirect_uri参数指定的网址。跳转时,会传回一个授权码,就像下面这样。
https://a.com/callback?code=AUTHORIZATION_CODE #code参数就是授权码
- A 网站拿到授权码以后,就可以在后端,向 B 网站请求令牌。 用户不可见,服务端行为
https://b.com/oauth/token?
  client_id=CLIENT_ID&
  client_secret=CLIENT_SECRET&    # client_id和client_secret用来让 B 确认 A 的身份,client_secret参数是保密的,因此只能在后端发请求
  grant_type=authorization_code&   # 采用的授权方式是授权码
  code=AUTHORIZATION_CODE&          # 上一步拿到的授权码
  redirect_uri=CALLBACK_URL        # 令牌颁发后的回调网址
- B 网站收到请求以后,就会颁发令牌, A 网站收到响应
{
    "access_token": "3d80af21-a204-45e9-9bb1-5f9237aad88b", # 令牌
    "token_type": "bearer",
    "refresh_token": "c016714f-d376-417c-bea1-4d82f37c5b74",
    "expires_in": 3599,
    "scope": "all"
}
简化(隐式)模式
有些 Web 应用是纯前端应用,没有后端。这时就不能用上面的方式了,必须将令牌储存在前端。RFC 6749 就规定了第二种方式,允许直接向前端颁发令牌,这种方式没有授权码这个中间步骤,所以称为(授权码)“隐藏式”(implicit)
适用场景:纯前端应用,没有后端
- A 网站提供一个链接,要求用户跳转到 B 网站,授权用户数据给 A 网站使用。
https://b.com/oauth/authorize?
  response_type=token&          # response_type参数为token,表示要求直接返回令牌
  client_id=CLIENT_ID&
  redirect_uri=CALLBACK_URL&
  scope=read

http://localhost:8080/oauth/authorize?client_id=client&response_type=token&scope=all&redirect_uri=http://www.baidu.com
- 用户跳转到 B 网站,登录后同意给予 A 网站授权。这时,B 网站就会跳回redirect_uri参数指定的跳转网址,并且把令牌作为 URL 参数,传给 A 网站。
https://a.com/callback#token=ACCESS_TOKEN     #token参数就是令牌,A 网站直接在前端拿到令牌。

https://www.baidu.com/#access_token=5c9273d1-55ad-4bc8-b928-ec037549a571&token_type=bearer&expires_in=3599
密码模式
如果你高度信任某个应用,RFC 6749 也允许用户把用户名和密码,直接告诉该应用。该应用就使用你的密码,申请令牌,这种方式称为"密码式"(password)。
适用场景:自家公司搭建的授权服务器
- A 网站要求用户提供 B 网站的用户名和密码,拿到以后,A 就直接向 B 请求令牌。整个过程中,客户端不得保存用户的密码。
 https://oauth.b.com/token?
   grant_type=password&       # 授权方式是"密码式"
   username=USERNAME&
   password=PASSWORD&
   client_id=CLIENT_ID
   client_secret=client_secret

http://localhost:8080/oauth/token?username=mx&password=123456&grant_type=password&client_id=client&client_secret=123123&scope=all
- B 网站验证身份通过后,直接给出令牌。注意,这时不需要跳转,而是把令牌放在 JSON 数据里面,作为 HTTP 回应,A 因此拿到令牌。
{
	access_token: "5c9273d1-55ad-4bc8-b928-ec037549a571",
	token_type: "bearer",
	refresh_token: "c016714f-d376-417c-bea1-4d82f37c5b74",
	expires_in: 3069,
	scope: "all",
}
客户端模式
客户端模式(Client Credentials Grant)指客户端以自己的名义,而不是以用户的名义,向"服务提供商"进行授权。
适用于没有前端的命令行应用,即在命令行下请求令牌。一般用来提供给我们完全信任的服务器端服务。
- A 应用在命令行向 B 发出请求。
https://oauth.b.com/token?
  grant_type=client_credentials&
  client_id=CLIENT_ID&
  client_secret=CLIENT_SECRET

http://localhost:8080/oauth/token?grant_type=client_credentials&scope=all&client_id=client&client_secret=123123
- B 网站验证通过以后,直接返回令牌。
{
	access_token: "c052012f-d260-49b2-b78d-774f44963914",
	token_type: "bearer",
	expires_in: 3599,
	scope: "all",
}
令牌的使用
A 网站拿到令牌以后,就可以向 B 网站的 API 请求数据了
Header 加 Authorization
curl -H "Authorization: Bearer ACCESS_TOKEN" "https://api.b.com"
也可以通过添加请求参数access_token请求数据
http://localhost:8080/user/getCurrentUser?access_token=3d80af21-a204-45e9-9bb1-5f9237aad88b
更新令牌
令牌的有效期到了,如果让用户重新走一遍上面的流程,再申请一个新的令牌,很可能体验不好,而且也没有必要。OAuth 2.0 允许用户自动更新令牌。
具体方法是,B 网站颁发令牌的时候,一次性颁发两个令牌,一个用于获取数据,另一个用于获取新的令牌(refresh token 字段)。令牌到期前,用户使用 refresh token 发一个请求,去更新令牌。
https://b.com/oauth/token?
  grant_type=refresh_token&    # grant_type参数为refresh_token表示要求更新令牌
  client_id=CLIENT_ID&
  client_secret=CLIENT_SECRET&
  refresh_token=REFRESH_TOKEN    # 用于更新令牌的令牌

http://localhost:8080/oauth/token?grant_type=refresh_token&client_id=client&client_secret=123123&refresh_token=c016714f-d376-417c-bea1-4d82f37c5b74
{
	access_token: "ac892fe7-8890-414f-8497-e85c3e6d7e49",
	token_type: "bearer",
	refresh_token: "cf749209-3ed7-48cf-a4e3-2e0de33624e8",
	expires_in: 3599,
	scope: "all",
}
Spring Security OAuth2
将OAuth2和Spring Security集成,就可以得到一套完整的安全解决方案。我们可以通过Spring Security OAuth2构建一个授权服务器来验证用户身份以提供access_token,并使用这个access_token来从资源服务器请求数据。
- 认证(Authentication) :用户认证就是判断一个用户的身份是否合法的过程,用户去访问系统资源时系统要求验证用户的身份信息,身份合法方可继续访问,不合法则拒绝访问。常见的用户身份认证方式有:用户名密码登录,二维码登录,手机短信登录,指纹认证等方式。
- 授权(Authorization): 授权是用户认证通过根据用户的权限来控制用户访问资源的过程,拥有资源的访问权限则正常访问,没有权限则拒绝访问。
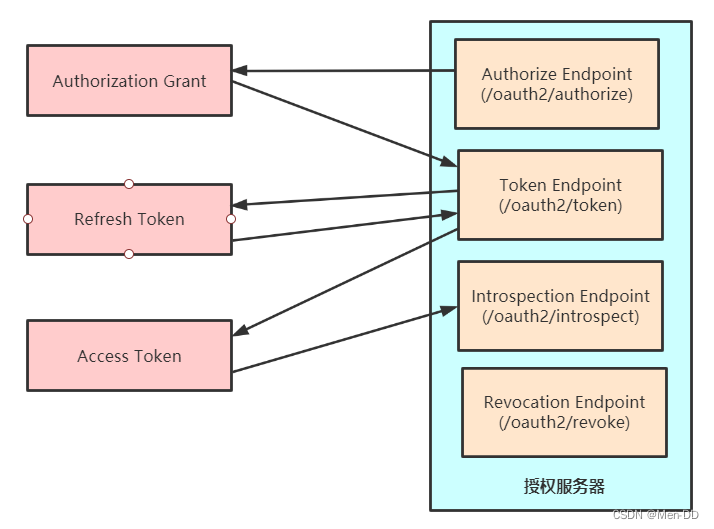
- Authorization Endpoint :授权端点,进行授权
- Token Endpoint :令牌端点,经过授权拿到对应的Token
- Introspection Endpoint :校验端点,校验Token的合法性
- Revocation Endpoint :撤销端点,撤销授权
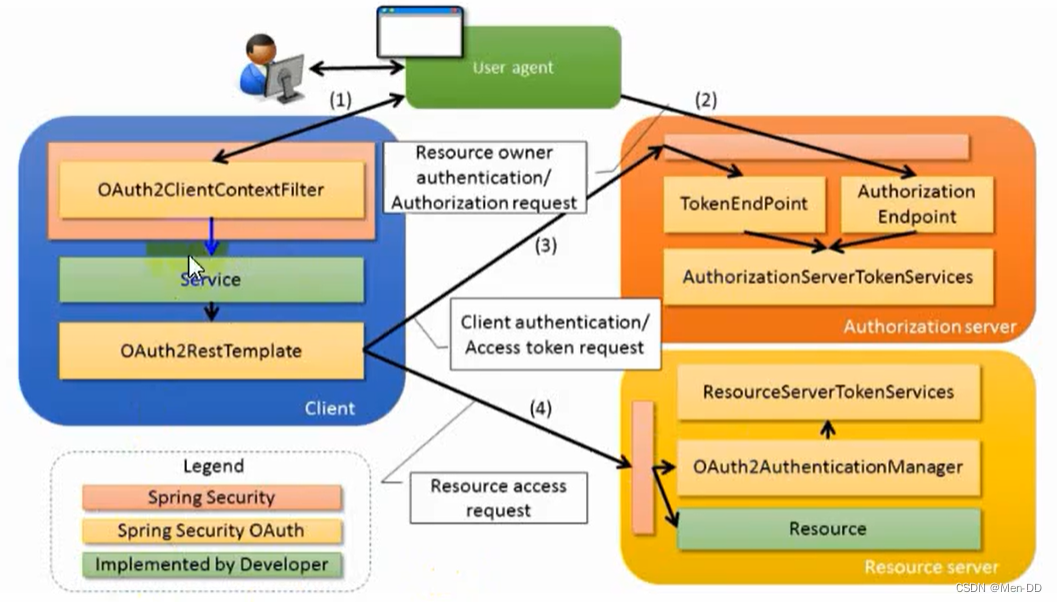
流程:
- 用户访问,此时没有Token。Oauth2RestTemplate会报错,这个报错信息会被Oauth2ClientContextFilter捕获并重定向到授权服务器。
- 授权服务器通过Authorization Endpoint(/oauth/authorize)进行授权,并通过AuthorizationServerTokenServices生成授权码并返回给客户端。
- 客户端拿到授权码去授权服务器通过Token Endpoint(/oauth/token)调用AuthorizationServerTokenServices生成Token并返回给客户端
- 客户端拿到Token去资源服务器访问资源,一般会通过Oauth2AuthenticationManager调用ResourceServerTokenServices进行校验。校验通过可以获取资源。
实战
<dependency>
	<groupId>org.springframework.boot</groupId>
	<artifactId>spring-boot-starter-security</artifactId>
</dependency>

<dependency>
    <groupId>org.springframework.security.oauth</groupId>
    <artifactId>spring-security-oauth2</artifactId>
    <version>2.3.4.RELEASE</version>
</dependency>
或者 引入spring cloud oauth2依赖
 <dependencyManagement>
     <dependencies>
         <dependency>
             <groupId>org.springframework.cloud</groupId>
             <artifactId>spring-cloud-dependencies</artifactId>
             <version>${spring-cloud.version}</version>
             <type>pom</type>
             <scope>import</scope>
         </dependency>
     </dependencies>
 </dependencyManagement>

 <dependencies>
     <dependency>
		<groupId>org.springframework.cloud</groupId>
		<artifactId>spring-cloud-starter-oauth2</artifactId>
     </dependency>
 </dependencies>
配置 spring security
@Configuration
public class WebSecurityConfig extends WebSecurityConfigurerAdapter {

    @Bean
    public PasswordEncoder passwordEncoder() {
        return new BCryptPasswordEncoder();
    }

    @Autowired
    private UserService userService;

    @Override
    protected void configure(AuthenticationManagerBuilder auth) throws Exception {
//        super.configure(auth);
        //获取用户信息
        auth.userDetailsService(userService);
    }

    @Override
    protected void configure(HttpSecurity http) throws Exception {
//        super.configure(http);

        http.formLogin().permitAll()
                .and().authorizeRequests()
                .antMatchers("/oauth/**").permitAll()
                .antMatchers("/order/**").permitAll()
                .anyRequest().authenticated()
                .and().logout().permitAll()
                .and().csrf().disable();
    }

    @Bean
    @Override
    public AuthenticationManager authenticationManagerBean() throws Exception {
        return super.authenticationManagerBean();
    }
}
UserService
@Service
public class UserService implements UserDetailsService {

    @Autowired
    @Lazy
    private PasswordEncoder passwordEncoder;

    @Override
    public UserDetails loadUserByUsername(String username) throws UsernameNotFoundException {
        String password = passwordEncoder.encode("123456");
        return new User("mx", password, AuthorityUtils.commaSeparatedStringToAuthorityList("admin"));
    }
}
UserController
@RestController
@RequestMapping("/user")
public class UserController {

    @RequestMapping("/getCurrentUser")
    public Object getCurrentUser(Authentication authentication) {
        return authentication.getPrincipal();
    }
}
配置授权服务器
资源服务
@Configuration
@EnableResourceServer
public class ResourceServiceConfig extends ResourceServerConfigurerAdapter {

    @Override
    public void configure(HttpSecurity http) throws Exception {
//        super.configure(http);
        http.authorizeRequests()
                .anyRequest().authenticated()
                .and().requestMatchers().antMatchers("/user/**");
    }
}
认证服务
@Configuration // 授权模式 简单模式 密码模式 客户端模式
@EnableAuthorizationServer
public class AuthorizationServerConfig extends AuthorizationServerConfigurerAdapter {

    @Autowired
    private PasswordEncoder passwordEncoder;

    @Autowired
    private AuthenticationManager authenticationManagerBean;

//    @Autowired
//    private TokenStore redisTokenStore;

    @Autowired
    private UserService userService;

    // 密码模式 刷新令牌
    @Override
    public void configure(AuthorizationServerEndpointsConfigurer endpoints) throws Exception {
//        super.configure(endpoints);
        endpoints.authenticationManager(authenticationManagerBean) //使用密码模式需要配置
//                .tokenStore(redisTokenStore) //指定token存储到redis
                .reuseRefreshTokens(false) //refresh_token是否重复使用
                .userDetailsService(userService) //刷新令牌授权包含对用户信息的检查
                .allowedTokenEndpointRequestMethods(HttpMethod.GET, HttpMethod.POST); //支持GET,POST请求
    }

    @Override
    public void configure(AuthorizationServerSecurityConfigurer security) throws Exception {
//        super.configure(security);
        //允许表单认证
        security.allowFormAuthenticationForClients();
    }

    @Override
    public void configure(ClientDetailsServiceConfigurer clients) throws Exception {
//        super.configure(clients);

        /**
         * 授权码模式
         * http://localhost:8080/oauth/authorize?response_type=code&client_id=client&redirect_uri=http://www.baidu.com&scope=all
         *
         * implicit: 简化模式
         * http://localhost:8080/oauth/authorize?client_id=client&response_type=token&scope=all&redirect_uri=http://www.baidu.com
         *
         * password模式
         *  http://localhost:8080/oauth/token?username=mx&password=123456&grant_type=password&client_id=client&client_secret=123123&scope=all
         *
         *  客户端模式
         *  http://localhost:8080/oauth/token?grant_type=client_credentials&scope=all&client_id=client&client_secret=123123
         *
         *  刷新令牌
         *  http://localhost:8080/oauth/token?grant_type=refresh_token&client_id=client&client_secret=123123&refresh_token=[refresh_token值]
         */

        clients.inMemory()
                //配置client_id
                .withClient("client")
                //配置client-secret
                .secret(passwordEncoder.encode("123123"))
                //配置访问token的有效期
                .accessTokenValiditySeconds(3600)
                //配置刷新token的有效期
                .refreshTokenValiditySeconds(864000)
                //配置redirect_uri,用于授权成功后跳转
                .redirectUris("http://www.baidu.com")
                //配置申请的权限范围
                .scopes("all")
                //配置grant_type,表示授权类型
                /**
                 * 配置grant_type,表示授权类型
                 * authorization_code: 授权码模式
                 * implicit: 简化模式
                 * password: 密码模式
                 * client_credentials: 客户端模式
                 * refresh_token: 更新令牌
                 */
                .authorizedGrantTypes("authorization_code","implicit","password","client_credentials","refresh_token");
    }

}
基于redis存储Token
pom.xml
<dependency>
    <groupId>org.springframework.boot</groupId>
    <artifactId>spring-boot-starter-data-redis</artifactId>
</dependency>
<dependency>
    <groupId>org.apache.commons</groupId>
    <artifactId>commons-pool2</artifactId>
</dependency>
application.yml
spring:
  redis:
    host: 127.0.0.1
    database: 0
config.java
@Configuration
public class RedisConfig {
    @Autowired
    private RedisConnectionFactory redisConnectionFactory;
    @Bean
    public TokenStore tokenStore(){
        return new RedisTokenStore(redisConnectionFactory);
    }
}
use
@Autowired
private TokenStore tokenStore;

@Override
public void configure(AuthorizationServerEndpointsConfigurer endpoints) throws Exception {
    endpoints.authenticationManager(authenticationManagerBean) //使用密码模式需要配置
        .tokenStore(tokenStore)  //指定token存储到redis
        .reuseRefreshTokens(false)  //refresh_token是否重复使用
        .userDetailsService(userService) //刷新令牌授权包含对用户信息的检查
        .allowedTokenEndpointRequestMethods(HttpMethod.GET,HttpMethod.POST); //支持GET,POST请求
}
单点登录(Single Sign On)
用户只需要登录一次就可以访问权限范围内的所有应用子系统
单点登录常见实现方式
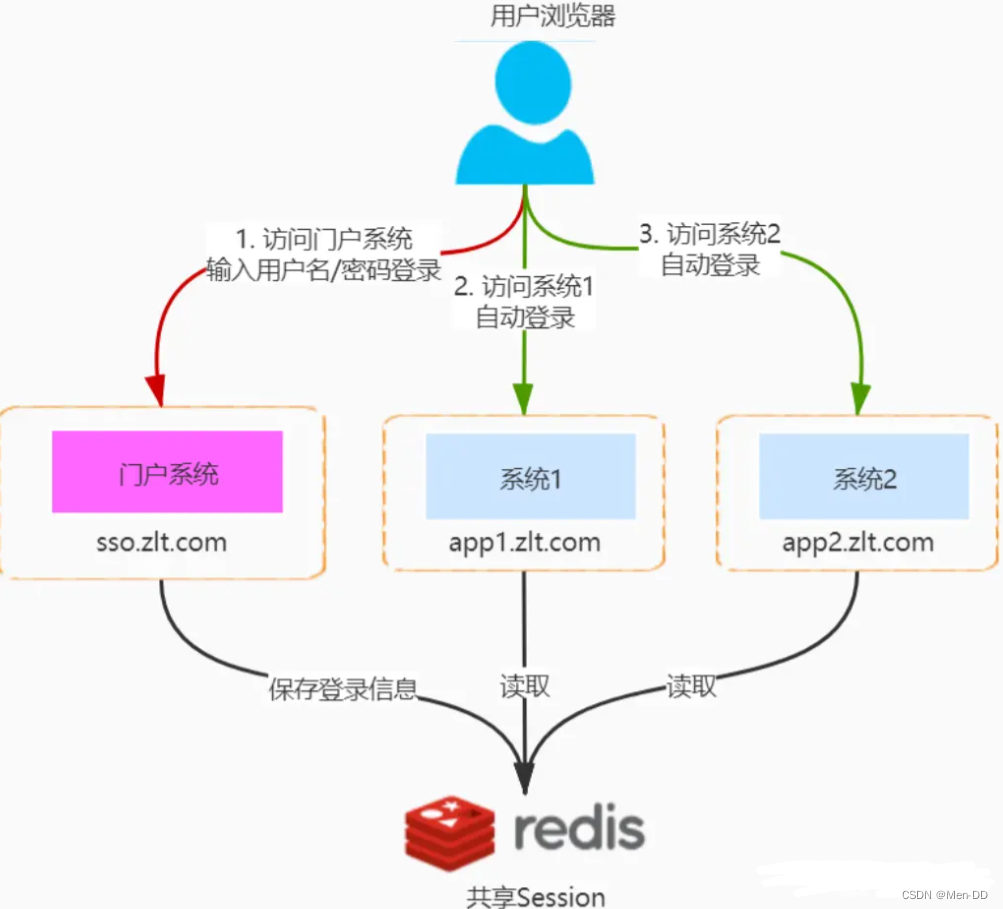
同域单点登录
适用场景:都是企业自己的系统,所有系统都使用同一个一级域名通过不同的二级域名来区分
核心原理:
- 门户系统设置 Cookie 的 domain 为一级域名也就是 zlt.com,这样就可以共享门户的 Cookie 给所有的使用该域名(xxx.zlt.com)的系统
- 使用 Spring Session 等技术让所有系统共享 Session
- 这样只要门户系统登录之后无论跳转应用1或者应用2,都能通过门户 Cookie 中的 sessionId 读取到 Session 中的登录信息实现单点登录
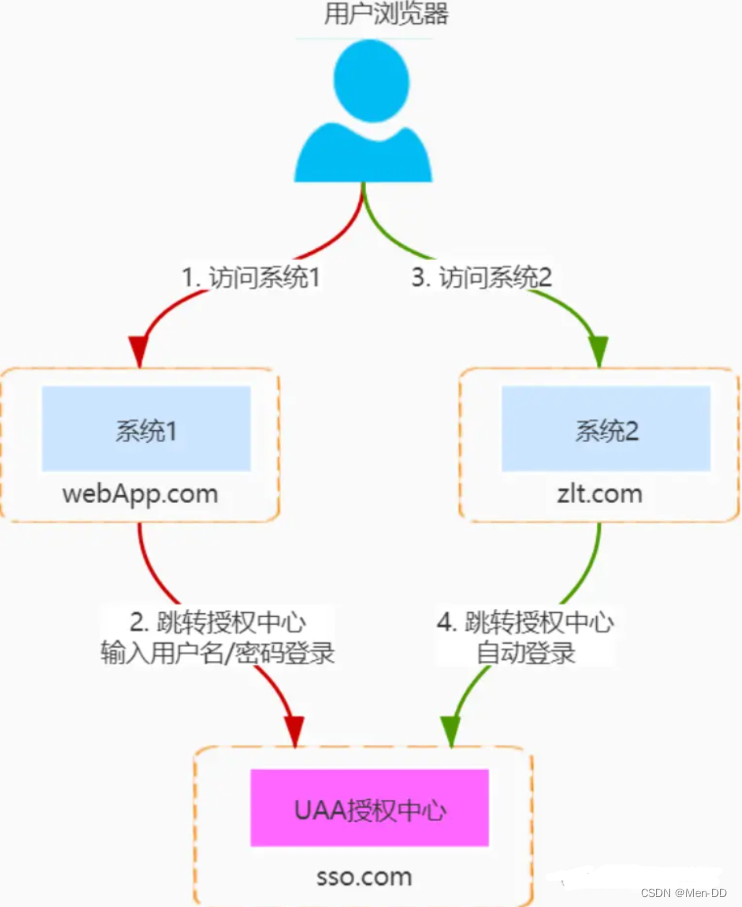
跨域单点登录
通过一个单独的授权服务(UAA)来做统一登录,并基于共享UAA的 Cookie 来实现单点登录
核心原理:
- 访问系统1判断未登录,则跳转到UAA系统请求授权
- 在UAA系统域名 sso.com 下的登录地址中输入用户名/密码完成登录
- 登录成功后UAA系统把登录信息保存到 Session 中,并在浏览器写入域为 sso.com 的 Cookie
- 访问系统2判断未登录,则跳转到UAA系统请求授权
- 由于是跳转到UAA系统的域名 sso.com 下,所以能通过浏览器中UAA的 Cookie 读取到 Session 中之前的登录信息完成单点登录
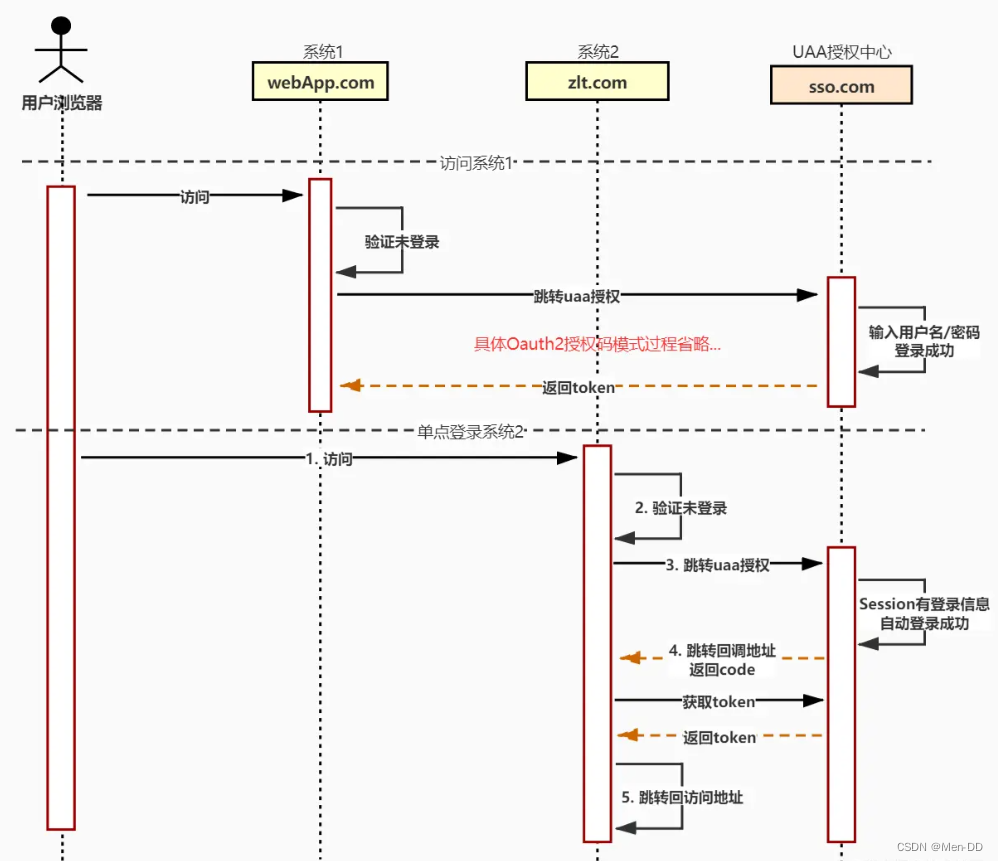
基于Oauth2跨域单点登录
实战
pom.xml
    <dependencies>

        <dependency>
            <groupId>org.springframework.boot</groupId>
            <artifactId>spring-boot-starter-web</artifactId>
        </dependency>

        <dependency>
            <groupId>org.springframework.cloud</groupId>
            <artifactId>spring-cloud-starter-oauth2</artifactId>
        </dependency>

        <dependency>
            <groupId>org.springframework.boot</groupId>
            <artifactId>spring-boot-starter-jdbc</artifactId>
        </dependency>

        <dependency>
            <groupId>mysql</groupId>
            <artifactId>mysql-connector-java</artifactId>
        </dependency>

        <dependency>
            <groupId>org.mybatis.spring.boot</groupId>
            <artifactId>mybatis-spring-boot-starter</artifactId>
            <version>2.2.2</version>
        </dependency>

        <dependency>
            <groupId>org.projectlombok</groupId>
            <artifactId>lombok</artifactId>
        </dependency>
    </dependencies>
授权服务
application.yml
server:
  port: 8080

spring:
  application:
    name: oauth2-jdbc-demo

  datasource:
    type: com.zaxxer.hikari.HikariDataSource
    driver-class-name: com.mysql.cj.jdbc.Driver
    url: jdbc:mysql://mysql.localhost.com:3306/oauth2-test?useUnicode=true&characterEncoding=utf-8&useSSL=false&serverTimezone=UTC
    username: root
    password: root
    hikari:
      minimum-idle: 5
      idle-timeout: 600000
      maximum-pool-size: 10
      auto-commit: true
      pool-name: MyHikariCP
      max-lifetime: 1800000
      connection-timeout: 30000
      connection-test-query: SELECT 1
WebSecurityConfig.java
@Configuration
@EnableWebSecurity
@EnableGlobalMethodSecurity(prePostEnabled = true, securedEnabled = true, jsr250Enabled = true)
public class WebSecurityConfig extends WebSecurityConfigurerAdapter {
    @Override
    protected void configure(AuthenticationManagerBuilder auth) throws Exception {
//        String password = passwordEncoder().encode("123456");
//        auth.inMemoryAuthentication()
//                .withUser("admin").password(password).roles("ADMIN")
//                .and()
//                .withUser("mx").password(password).roles("USER");
        auth.userDetailsService(userDetailsService());
    }
    @Override
    public void configure(WebSecurity web) throws Exception {
        web.ignoring().antMatchers("/oauth/check_token"); // 将 check_token 暴露出去,否则资源服务器访问时报 403 错误
    }
    @Bean
    @Override
    protected UserDetailsService userDetailsService() {
        return new UserServiceImpl();
    }
    @Bean
    public PasswordEncoder passwordEncoder() {
        return new BCryptPasswordEncoder();
    }
    @Bean
    @Override
    public AuthenticationManager authenticationManagerBean() throws Exception {
        return super.authenticationManagerBean();
    }
}
AuthorizationServerConfig.java
@Configuration
@EnableAuthorizationServer
public class AuthorizationServerConfig extends AuthorizationServerConfigurerAdapter {

    @Autowired
    private DataSource dataSource;

    @Autowired
    private UserDetailsService userDetailsService;

    @Autowired
    private AuthenticationManager authenticationManagerBean;

    @Bean
    public TokenStore tokenStore(){
        return new JdbcTokenStore(dataSource);
    }

    @Bean
    public ClientDetailsService jdbcClientDetailsService(){
        return new JdbcClientDetailsService(dataSource);//读取oauth_client_details表
    }


//    @Autowired
//    private PasswordEncoder passwordEncoder;

    /**
     * 授权码模式
     * http://localhost:8080/oauth/authorize?response_type=code&client_id=client&redirect_uri=http://www.baidu.com&scope=all
     *
     * implicit: 简化模式
     * http://localhost:8080/oauth/authorize?client_id=client&response_type=token&scope=all&redirect_uri=http://www.baidu.com
     *
     * password模式
     *  http://localhost:8080/oauth/token?username=mx&password=123456&grant_type=password&client_id=client&client_secret=123123&scope=all
     *
     *  客户端模式
     *  http://localhost:8080/oauth/token?grant_type=client_credentials&scope=all&client_id=client&client_secret=123123
     *
     *  刷新令牌
     *  http://localhost:8080/oauth/token?grant_type=refresh_token&client_id=client&client_secret=123123&refresh_token=[refresh_token值]
     */
    @Override
    public void configure(ClientDetailsServiceConfigurer clients) throws Exception {
//        clients.inMemory()
//                .withClient("client")
//                .secret(passwordEncoder.encode("123123"))
//                .authorizedGrantTypes("authorization_code")
//                .scopes("app")
//                .redirectUris("http://www.baidu.com");

        clients.withClientDetails(jdbcClientDetailsService());
    }

    @Override
    public void configure(AuthorizationServerEndpointsConfigurer endpoints) throws Exception {
        endpoints.authenticationManager(authenticationManagerBean) //使用密码模式需要配置
                .tokenStore(tokenStore())  //指定token存储到redis
                .reuseRefreshTokens(false)  //refresh_token是否重复使用
                .userDetailsService(userDetailsService) //刷新令牌授权包含对用户信息的检查
                .allowedTokenEndpointRequestMethods(HttpMethod.GET,HttpMethod.POST); //支持GET,POST请求
    }

    @Override
    public void configure(AuthorizationServerSecurityConfigurer security) throws Exception {
        //允许表单认证
        security.allowFormAuthenticationForClients()
                // 配置校验token需要带入clientId 和clientSeret配置
                .checkTokenAccess("isAuthenticated()");
    }
}
资源服务
application.yml
spring:
  application:
    name: oauth2-resource-demo

  datasource:
    type: com.zaxxer.hikari.HikariDataSource
    driver-class-name: com.mysql.cj.jdbc.Driver
    url: jdbc:mysql://mysql.localhost.com:3306/oauth2-test?useUnicode=true&characterEncoding=utf-8&useSSL=false&serverTimezone=UTC
    username: root
    password: root
    hikari:
      minimum-idle: 5
      idle-timeout: 600000
      maximum-pool-size: 10
      auto-commit: true
      pool-name: MyHikariCP
      max-lifetime: 1800000
      connection-timeout: 30000
      connection-test-query: SELECT 1

security:
  oauth2:
    client:
      client-id: client
      client-secret: 123123
      access-token-uri: http://localhost:8080/oauth/token
      user-authorization-uri: http://localhost:8080/oauth/authorize
    resource:
      token-info-uri: http://localhost:8080/oauth/check_token
      id: ${spring.application.name}

server:
  port: 8088
ResourceServerConfig.java
@Configuration
@EnableResourceServer
@EnableGlobalMethodSecurity(prePostEnabled = true, securedEnabled = true, jsr250Enabled = true)
public class ResourceServerConfig extends ResourceServerConfigurerAdapter {

    @Value("${spring.application.name}")
    private String appName;

    @Override
    public void configure(HttpSecurity http) throws Exception {
        http
            .exceptionHandling()
            .and()
            .sessionManagement().sessionCreationPolicy(SessionCreationPolicy.STATELESS)
            .and().authorizeRequests()
            .antMatchers("/contents/").hasAuthority("SystemContent")
            .antMatchers("/contents/view/**").hasAuthority("SystemContentView")
            .antMatchers("/contents/insert/**").hasAuthority("SystemContentInsert")
            .antMatchers("/contents/update/**").hasAuthority("SystemContentUpdate")
            .antMatchers("/contents/delete/**").hasAuthority("SystemContentDelete");
    }

    @Override
    public void configure(ResourceServerSecurityConfigurer resources) throws Exception {
        resources.resourceId(appName);
        super.configure(resources);
    }
}
客户端服务
server:
  port: 8082
  servlet:
    session:
      cookie:
        name: OAUTH2-SSO-CLIENT-DEMO-SESSION-${server.port} #防止Cookie冲突,冲突会导致登录验证不通过

security: #与授权服务器对应的配置
  oauth2:
    client:
      client-id: client
      client-secret: 123123
      user-authorization-uri: http://localhost:8080/oauth/authorize
      access-token-uri: http://localhost:8080/oauth/token
    resource:
      token-info-uri: http://localhost:8080/oauth/check_token
@EnableOAuth2Sso
@SpringBootApplication
@EnableOAuth2Sso
public class OAuth2ClientDemoApplication {

    public static void main(String[] args) {
        SpringApplication.run(OAuth2ClientDemoApplication.class, args);
    }
}
Oauth2整合网关实现微服务单点登录
网关在认证授权体系里主要负责两件事
- 作为OAuth2.0的资源服务器角色,实现接入方权限拦截。
- 令牌解析并转发当前登录用户信息(明文token)给微服务
微服务拿到明文token(明文token中包含登录用户的身份和权限信息)后也需要做两件事:
- 用户授权拦截(看当前用户是否有权访问该资源)
- 将用户信息存储进当前线程上下文(有利于后续业务逻辑随时获取当前用户信息)

Gateway AuthenticationFilter 认证过滤器
@Component
@Order(0)
public class AuthenticationFilter implements GlobalFilter, InitializingBean {

    @Autowired
    private RestTemplate restTemplate;

    private static Set<String> shouldSkipUrl = new LinkedHashSet<>();

    @Override
    public void afterPropertiesSet() throws Exception {
        // 不拦截认证的请求
        shouldSkipUrl.add("/oauth/token");
        shouldSkipUrl.add("/oauth/check_token");
        shouldSkipUrl.add("/user/getCurrentUser");
    }

    @Override
    public Mono<Void> filter(ServerWebExchange exchange, GatewayFilterChain chain) {

        String requestPath = exchange.getRequest().getURI().getPath();

        //不需要认证的url
        if(shouldSkip(requestPath)) {
            return chain.filter(exchange);
        }

        //获取请求头
        String authHeader = exchange.getRequest().getHeaders().getFirst("Authorization");

        //请求头为空
        if(StringUtils.isEmpty(authHeader)) {
            throw new RuntimeException("请求头为空");
        }

        TokenInfo tokenInfo=null;
        try {
            //获取token信息
            tokenInfo = getTokenInfo(authHeader);
        }catch (Exception e) {
            throw new RuntimeException("校验令牌异常");
        }
        // tokenInfo
        exchange.getAttributes().put("tokenInfo",tokenInfo);
        return chain.filter(exchange);
    }

    private boolean shouldSkip(String reqPath) {

        for(String skipPath:shouldSkipUrl) {
            if(reqPath.contains(skipPath)) {
                return true;
            }
        }
        return false;
    }

    private TokenInfo getTokenInfo(String authHeader) {
        // 往授权服务发请求 /oauth/check_token
        // 获取token的值
        String token = StringUtils.substringAfter(authHeader, "bearer ");

        HttpHeaders headers = new HttpHeaders();
        headers.setContentType(MediaType.APPLICATION_FORM_URLENCODED);
        //必须 basicAuth clienId clientSecret
        headers.setBasicAuth(MDA.clientId, MDA.clientSecret);

        MultiValueMap<String, String> params = new LinkedMultiValueMap<>();
        params.add("token", token);

        HttpEntity<MultiValueMap<String, String>> entity = new HttpEntity<>(params, headers);


        ResponseEntity<TokenInfo> response = restTemplate.exchange(MDA.checkTokenUrl, HttpMethod.POST, entity, TokenInfo.class);

        return response.getBody();
    }
}
Gateway AuthorizationFilter 鉴权过滤器
@Component
@Order(1)
public class AuthorizationFilter implements GlobalFilter, InitializingBean {
    private static Set<String> shouldSkipUrl = new LinkedHashSet<>();
    @Override
    public void afterPropertiesSet() throws Exception {
        // 不拦截认证的请求
        shouldSkipUrl.add("/oauth/token");
        shouldSkipUrl.add("/oauth/check_token");
        shouldSkipUrl.add("/user/getCurrentUser");
    }

    @Override
    public Mono<Void> filter(ServerWebExchange exchange, GatewayFilterChain chain) {
        String requestPath = exchange.getRequest().getURI().getPath();
        //不需要认证的url
        if(shouldSkip(requestPath)) {
            return chain.filter(exchange);
        }
        TokenInfo tokenInfo = exchange.getAttribute("tokenInfo");
        if(!tokenInfo.isActive()) {
            throw new RuntimeException("token过期");
        }
        hasPremisson(tokenInfo,requestPath);
        return chain.filter(exchange);
    }

    private boolean shouldSkip(String reqPath) {

        for(String skipPath:shouldSkipUrl) {
            if(reqPath.contains(skipPath)) {
                return true;
            }
        }
        return false;
    }

    private boolean hasPremisson(TokenInfo tokenInfo,String currentUrl) {
        boolean hasPremisson = false;
        //登录用户的权限集合判断
        List<String> premessionList = Arrays.asList(tokenInfo.getAuthorities());
        for (String url: premessionList) {
            if(currentUrl.contains(url)) {
                hasPremisson = true;
                break;
            }
        }
        if(!hasPremisson){
            throw new RuntimeException("没有权限");
        }
        return hasPremisson;
    }
}
辅助类
/**
 * 常量类
 */
public class MDA {

    public static final String clientId = "gateway-server";

    public static final String clientSecret = "123123";

    public static final String checkTokenUrl = "http://oauth2-jdbc-demo/oauth/check_token";

}

@Data
public class TokenInfo {

	private boolean active;

	private String client_id;

	private String[] scope;

	private String username;

	private String[] aud;

	private Date exp;

	private String[] authorities;

}

@Configuration
public class RibbonConfig {

    @LoadBalanced
    @Bean
    public RestTemplate restTemplate() {
        return new RestTemplate();
    }
}
JWT (JSON Web Token)
OAuth 2.0是当前业界标准的授权协议,它的核心是若干个针对不同场景的令牌颁发和管理流程;而JWT是一种轻量级、自包含的令牌,可用于在微服务间安全地传递用户信息
官网: https://jwt.io/
标准: https://tools.ietf.org/html/rfc7519
JWT令牌的优点:
- jwt基于json,非常方便解析。
- 可以在令牌中自定义丰富的内容,易扩展。
- 通过非对称加密算法及数字签名技术,JWT防止篡改,安全性高。
- 资源服务使用JWT可不依赖授权服务即可完成授权。
JWT令牌的缺点:
- JWT令牌较长,占存储空间比较大。
JWT组成
一个JWT实际上就是一个字符串,它由三部分组成,头部(header)、载荷(payload)与签名(signature)
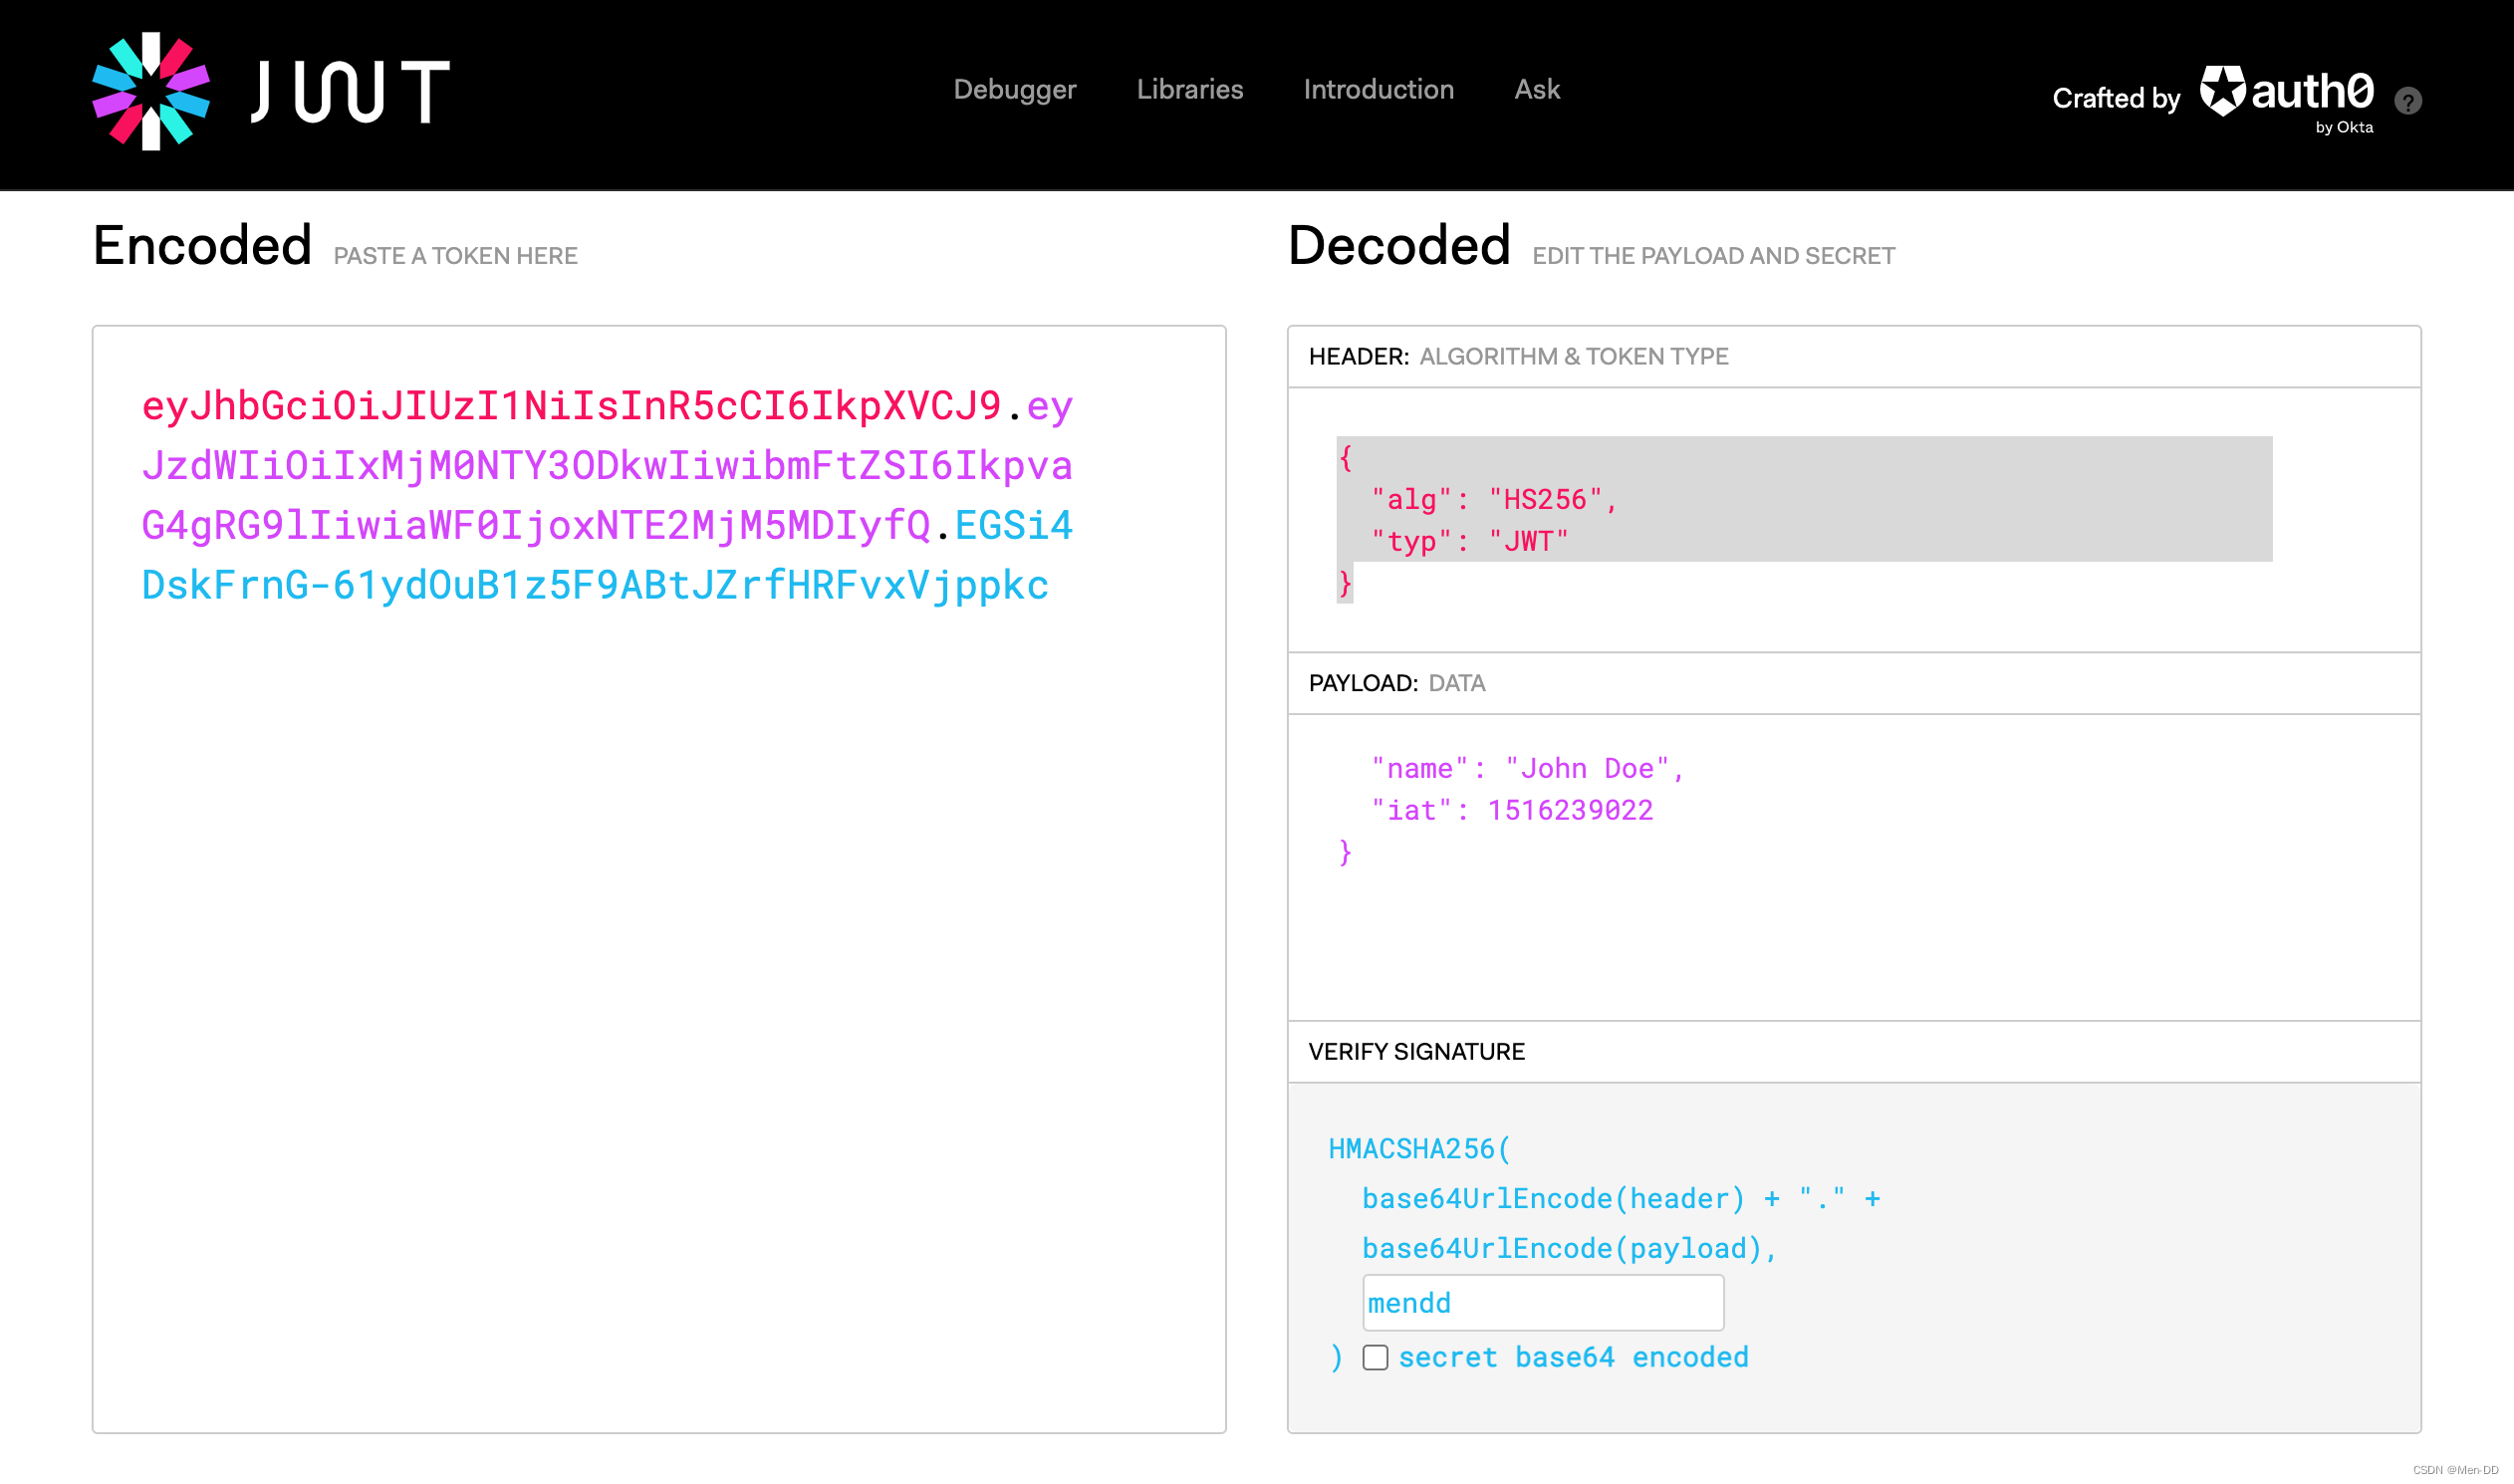
头部(header)
头部用于描述关于该JWT的最基本的信息:类型(即JWT)以及签名所用的算法(如HMACSHA256或RSA)等。
这也可以被表示成一个JSON对象:
{
  "alg": "HS256",
  "typ": "JWT"
}
然后将头部进行base64加密(该加密是可以对称解密的),构成了第一部分:
eyJhbGciOiJIUzI1NiIsInR5cCI6IkpXVCJ9
载荷(payload)
第二部分是载荷,就是存放有效信息的地方。这个名字像是特指飞机上承载的货品,这些有效信息包含三个部分:
- 标准中注册的声明(建议但不强制使用)
- iss: jwt签发者
- sub: jwt所面向的用户
- aud: 接收jwt的一方
- exp: jwt的过期时间,这个过期时间必须要大于签发时间
- nbf: 定义在什么时间之前,该jwt都是不可用的.
- iat: jwt的签发时间
- jti: jwt的唯一身份标识,主要用来作为一次性token,从而回避重放攻击。
-
公共的声明
公共的声明可以添加任何的信息,一般添加用户的相关信息或其他业务需要的必要信息.但不建议添加敏感信息,因为该部分在客户端可解密. -
私有的声明
私有声明是提供者和消费者所共同定义的声明,一般不建议存放敏感信息,因为base64是对称解密的,意味着该部分信息可以归类为明文信息。
定义一个payload:
{
  "sub": "1234567890",
  "name": "John Doe",
  "iat": 1516239022
}
然后将其进行base64加密,得到Jwt的第二部分:
eyJzdWIiOiIxMjM0NTY3ODkwIiwibmFtZSI6IkpvaG4gRG9lIiwiaWF0IjoxNTE2MjM5MDIyfQ
签名(signature)
jwt的第三部分是一个签证信息,这个签证信息由三部分组成:
- header (base64后的)
- payload (base64后的)
- secret(盐,一定要保密)
这个部分需要base64加密后的header和base64加密后的payload使用.连接组成的字符串,然后通过header中声明的加密方式进行加盐secret组合加密,然后就构成了jwt的第三部分:
var encodedString = base64UrlEncode(header) + '.' + base64UrlEncode(payload);

var signature = HMACSHA256(encodedString, 'mendd'); // EGSi4DskFrnG-61ydOuB1z5F9ABtJZrfHRFvxVjppkc
将这三部分用.连接成一个完整的字符串,构成了最终的jwt:
eyJhbGciOiJIUzI1NiIsInR5cCI6IkpXVCJ9.eyJzdWIiOiIxMjM0NTY3ODkwIiwibmFtZSI6IkpvaG4gRG9lIiwiaWF0IjoxNTE2MjM5MDIyfQ.EGSi4DskFrnG-61ydOuB1z5F9ABtJZrfHRFvxVjppkc
注意:secret是保存在服务器端的,jwt的签发生成也是在服务器端的,secret就是用来进行jwt的签发和jwt的验证,所以,它就是你服务端的私钥,在任何场景都不应该流露出去。一旦客户端得知这个secret, 那就意味着客户端是可以自我签发jwt了。
如何应用
一般是在请求头里加入Authorization,并加上Bearer标注:
{
  headers: {
    'Authorization': 'Bearer ' + token
  }
}
验证
 <!--JWT依赖-->
<dependency>
    <groupId>io.jsonwebtoken</groupId>
    <artifactId>jjwt</artifactId>
    <version>0.9.1</version>
</dependency>
- 创建token
- token的验证解析
- token过期校验
- 自定义claims
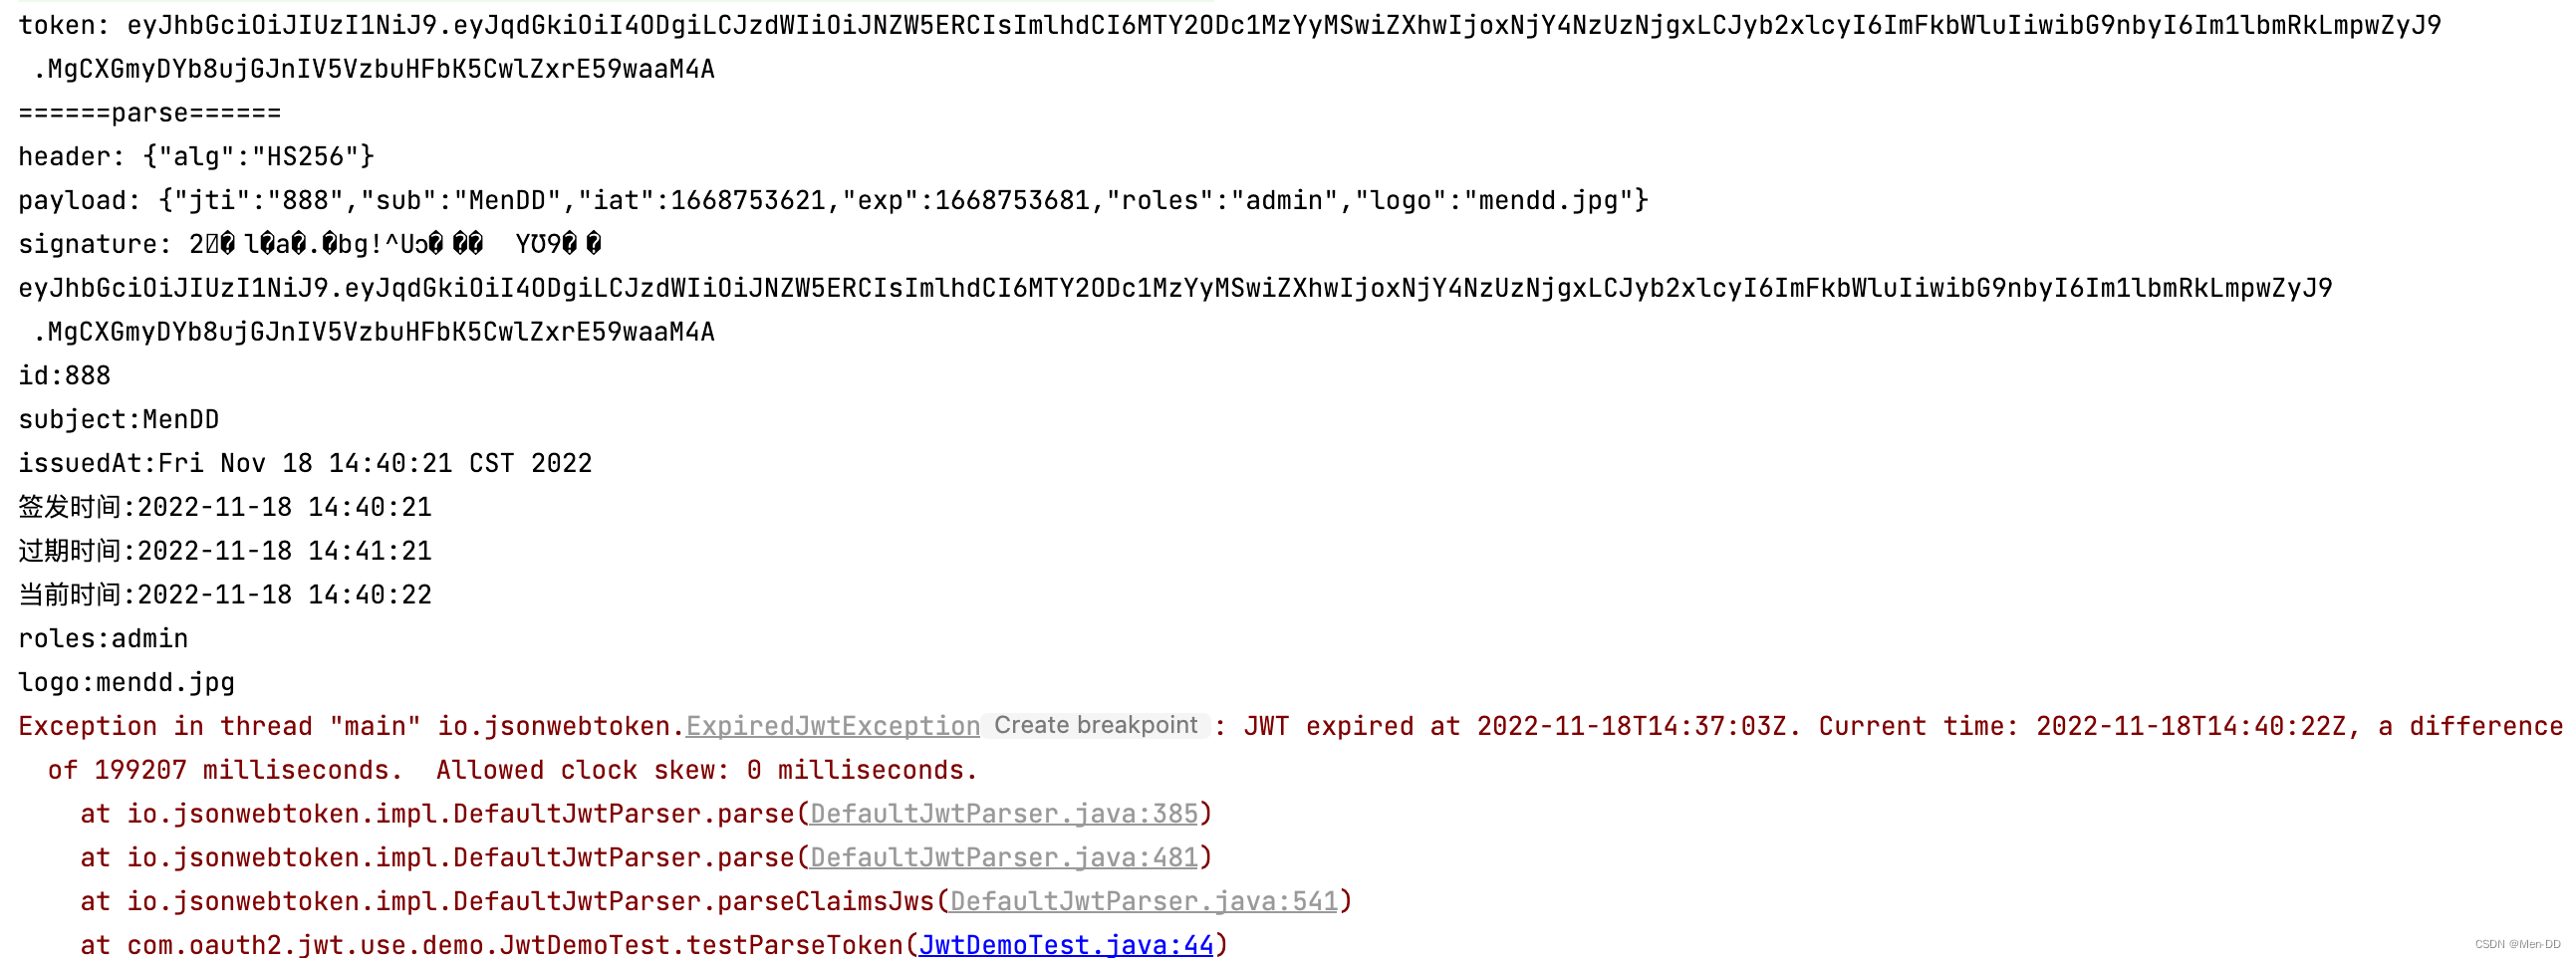
public class JwtDemoTest {

    private static final String SECRET_KEY = "123123";

    public static String testToken() {
        JwtBuilder jwtBuilder = Jwts.builder()
                .setId("888") //声明的标识{"jti":"888"}
                .setSubject("MenDD") //主体,用户{"sub":"Mendd"}
                .setIssuedAt(new Date()) //创建日期{"ita":"xxxxxx"}
                .setExpiration(new Date(System.currentTimeMillis()+60*1000)) //设置过期时间   1分钟
//                .addClaims(map) //直接传入map
                .claim("roles", "admin")
                .claim("logo", "mendd.jpg")
                .signWith(SignatureAlgorithm.HS256, SECRET_KEY);//签名手段,参数1:算法,参数2:盐

        String token = jwtBuilder.compact();
        System.out.println("token: " + token);

        System.out.println("======parse======");
        String[] split = token.split("\\.");
        System.out.println("header: " + Base64Codec.BASE64.decodeToString(split[0]));
        System.out.println("payload: " + Base64Codec.BASE64.decodeToString(split[1]));
        //无法解密
        System.out.println("signature: " + Base64Codec.BASE64.decodeToString(split[2]));
        return token;
    }


    public static void testParseToken(String token){
        Claims claims = Jwts.parser()
                .setSigningKey(SECRET_KEY)
                .parseClaimsJws(token)
                .getBody();

        System.out.println("id:"+claims.getId());
        System.out.println("subject:"+claims.getSubject());
        System.out.println("issuedAt:"+claims.getIssuedAt());

        DateFormat sf =new SimpleDateFormat("yyyy-MM-dd HH:mm:ss");
        System.out.println("签发时间:"+sf.format(claims.getIssuedAt()));
        System.out.println("过期时间:"+sf.format(claims.getExpiration()));
        System.out.println("当前时间:"+sf.format(new Date()));

        System.out.println("roles:"+claims.get("roles"));
        System.out.println("logo:"+claims.get("logo"));
    }

    public static void main(String[] args) {
        String token = testToken();
        System.out.println(token);
        String extToken = "eyJhbGciOiJIUzI1NiJ9.eyJqdGkiOiI4ODgiLCJzdWIiOiJNZW5ERCIsImlhdCI6MTY2ODc1MzM2MywiZXhwIjoxNjY4NzUzNDIzLCJyb2xlcyI6ImFkbWluIiwibG9nbyI6Im1lbmRkLmpwZyJ9.F5o7yPI64ZSAI7OVp5BNPSu62u8aHaQmfcBdLhlpONQ";
        testParseToken(token);
        testParseToken(extToken);
    }
}
Spring Security Oauth2整合JWT
<dependency>
    <groupId>org.springframework.security</groupId>
    <artifactId>spring-security-jwt</artifactId>
    <version>1.0.9.RELEASE</version>
</dependency>

<!--JWT依赖-->
<dependency>
    <groupId>io.jsonwebtoken</groupId>
    <artifactId>jjwt</artifactId>
    <version>0.9.1</version>
</dependency>
@Configuration
public class JwtTokenStoreConfig {
    @Bean
    public TokenStore jwtTokenStore(){
        return new JwtTokenStore(jwtAccessTokenConverter());
    }

    @Bean
    public JwtAccessTokenConverter jwtAccessTokenConverter(){
        JwtAccessTokenConverter accessTokenConverter = new
                JwtAccessTokenConverter();
        //配置JWT使用的秘钥
        accessTokenConverter.setSigningKey("123123");
        return accessTokenConverter;
    }

    @Bean
    public JwtTokenEnhancer jwtTokenEnhancer() {
        return new JwtTokenEnhancer();
    }
}
在授权服务器配置中指定令牌的存储策略为JWT
@Configuration
@EnableAuthorizationServer
public class AuthorizationServerConfig2 extends AuthorizationServerConfigurerAdapter {

    @Autowired
    private PasswordEncoder passwordEncoder;

    @Autowired
    private AuthenticationManager authenticationManagerBean;

    @Autowired
    private UserService userService;

    @Autowired
    @Qualifier("jwtTokenStore")
    private TokenStore tokenStore;

    @Autowired
    private JwtAccessTokenConverter jwtAccessTokenConverter;

    @Autowired
    private JwtTokenEnhancer jwtTokenEnhancer;

    @Override
    public void configure(AuthorizationServerEndpointsConfigurer endpoints) throws Exception {
        //配置JWT的内容增强器
        TokenEnhancerChain enhancerChain = new TokenEnhancerChain();
        List<TokenEnhancer> delegates = new ArrayList<>();
        delegates.add(jwtTokenEnhancer);
        delegates.add(jwtAccessTokenConverter);
        enhancerChain.setTokenEnhancers(delegates);
        endpoints.authenticationManager(authenticationManagerBean) //使用密码模式需要配置
                .tokenStore(tokenStore)  //配置存储令牌策略
                .accessTokenConverter(jwtAccessTokenConverter)
                .tokenEnhancer(enhancerChain) //配置tokenEnhancer
                .reuseRefreshTokens(false)  //refresh_token是否重复使用
                .userDetailsService(userService) //刷新令牌授权包含对用户信息的检查
                .allowedTokenEndpointRequestMethods(HttpMethod.GET,HttpMethod.POST); //支持GET,POST请求
    }

    @Override
    public void configure(AuthorizationServerSecurityConfigurer security) throws Exception {
        //允许表单认证
        security.allowFormAuthenticationForClients();
    }

    @Override
    public void configure(ClientDetailsServiceConfigurer clients) throws Exception {

        /**
         *授权码模式
         *http://localhost:8080/oauth/authorize?response_type=code&client_id=client&redirect_uri=http://www.baidu.com&scope=all
         *http://localhost:8080/oauth/authorize?response_type=code&client_id=client
         *
         * password模式
         *  http://localhost:8080/oauth/token?username=mx&password=123456&grant_type=password&client_id=client&client_secret=123123&scope=all
         *
         *
         *
         *  刷新令牌
         *  http://localhost:8080/oauth/token?grant_type=refresh_token&client_id=client&client_secret=123123&refresh_token=[refresh_token值]
         */

        clients.inMemory()
                //配置client_id
                .withClient("client")
                //配置client-secret
                .secret(passwordEncoder.encode("123123"))
                //配置访问token的有效期
                .accessTokenValiditySeconds(3600)
                //配置刷新token的有效期
                .refreshTokenValiditySeconds(864000)
                //配置redirect_uri,用于授权成功后跳转
                .redirectUris("http://www.baidu.com")
                //配置申请的权限范围
                .scopes("all")
                /**
                 * 配置grant_type,表示授权类型
                 * authorization_code: 授权码
                 * password: 密码
                 * client_credentials: 客户端
                 * refresh_token: 更新令牌
                 */
.authorizedGrantTypes("authorization_code","password","refresh_token");
    }
}
JWT内容增强器
public class JwtTokenEnhancer implements TokenEnhancer {

    @Override
    public OAuth2AccessToken enhance(OAuth2AccessToken accessToken,
                                     OAuth2Authentication authentication) {
        Map<String, Object> info = new HashMap<>();
        info.put("enhance", "enhance info");
        ((DefaultOAuth2AccessToken) accessToken).setAdditionalInformation(info);
        return accessToken;
    }
}
使用jjwt工具类来解析Authorization头中存储的JWT内容
@RestController
@RequestMapping("/user")
public class UserController {

    @GetMapping("/getCurrentUser")
    public Object getCurrentUser(Authentication authentication,
                                 HttpServletRequest request) {
        String header = request.getHeader("Authorization");
        String token = null;
        if(header!=null){
            token = header.substring(header.indexOf("bearer") + 7);
        }else {
            token = request.getParameter("access_token");
        }
        return Jwts.parser()
                .setSigningKey("123123".getBytes(StandardCharsets.UTF_8))
                .parseClaimsJws(token)
                .getBody();

    }
}
run
http://localhost:8080/oauth/token?username=mx&password=123456&grant_type=password&client_id=client&client_secret=123123&scope=all
{
access_token: "eyJhbGciOiJIUzI1NiIsInR5cCI6IkpXVCJ9.eyJhcHBuYW1lIjoiZW5oYW5jZSBpbmZvIGFwcG5hbWUgbWVuZGQiLCJ1c2VyX25hbWUiOiJteCIsInNjb3BlIjpbImFsbCJdLCJleHAiOjE2Njg3NTg5NTUsImF1dGhvcml0aWVzIjpbImFkbWluIl0sImp0aSI6ImU2YzQ5YjJhLTNmODAtNGQ2My1hNTg3LTQ3NDUxZjAzMDEyYiIsImNsaWVudF9pZCI6ImNsaWVudCIsImVuaGFuY2UiOiJlbmhhbmNlIGluZm8ifQ.RfxaL-MB5ibPGWIl7yqlpf0y8e7t6eEYM1YqMA8aCQg",
token_type: "bearer",
refresh_token: "eyJhbGciOiJIUzI1NiIsInR5cCI6IkpXVCJ9.eyJhcHBuYW1lIjoiZW5oYW5jZSBpbmZvIGFwcG5hbWUgbWVuZGQiLCJ1c2VyX25hbWUiOiJteCIsInNjb3BlIjpbImFsbCJdLCJhdGkiOiJlNmM0OWIyYS0zZjgwLTRkNjMtYTU4Ny00NzQ1MWYwMzAxMmIiLCJleHAiOjE2Njk2MTkzNTUsImF1dGhvcml0aWVzIjpbImFkbWluIl0sImp0aSI6IjFhNDc3NTc2LTAwOTItNDYwYy1hM2RlLWIyYzk3ODAyMzMxZCIsImNsaWVudF9pZCI6ImNsaWVudCIsImVuaGFuY2UiOiJlbmhhbmNlIGluZm8ifQ.Yk8J4tf49WrfRbd6yZrc8WqyNIL98XTygiI9tzVhxCA",
expires_in: 3599,
scope: "all",
appname: "enhance info appname mendd",
enhance: "enhance info",
jti: "e6c49b2a-3f80-4d63-a587-47451f03012b",
}
curl --location --request GET 'http://localhost:8080/user/getCurrentUser' \
--header 'Authorization: bearer eyJhbGciOiJIUzI1NiIsInR5cCI6IkpXVCJ9.eyJhcHBuYW1lIjoiZW5oYW5jZSBpbmZvIGFwcG5hbWUgbWVuZGQiLCJ1c2VyX25hbWUiOiJteCIsInNjb3BlIjpbImFsbCJdLCJleHAiOjE2Njg3NTg5NTUsImF1dGhvcml0aWVzIjpbImFkbWluIl0sImp0aSI6ImU2YzQ5YjJhLTNmODAtNGQ2My1hNTg3LTQ3NDUxZjAzMDEyYiIsImNsaWVudF9pZCI6ImNsaWVudCIsImVuaGFuY2UiOiJlbmhhbmNlIGluZm8ifQ.RfxaL-MB5ibPGWIl7yqlpf0y8e7t6eEYM1YqMA8aCQg'
http://localhost:8080/user/getCurrentUser?access_token=eyJhbGciOiJIUzI1NiIsInR5cCI6IkpXVCJ9.eyJhcHBuYW1lIjoiZW5oYW5jZSBpbmZvIGFwcG5hbWUgbWVuZGQiLCJ1c2VyX25hbWUiOiJteCIsInNjb3BlIjpbImFsbCJdLCJleHAiOjE2Njg3NTg5NTUsImF1dGhvcml0aWVzIjpbImFkbWluIl0sImp0aSI6ImU2YzQ5YjJhLTNmODAtNGQ2My1hNTg3LTQ3NDUxZjAzMDEyYiIsImNsaWVudF9pZCI6ImNsaWVudCIsImVuaGFuY2UiOiJlbmhhbmNlIGluZm8ifQ.RfxaL-MB5ibPGWIl7yqlpf0y8e7t6eEYM1YqMA8aCQg
{
	appname: "enhance info appname mendd",
	user_name: "mx",
	scope: [
		"all"
	],
	exp: 1668758955,
	authorities: [
		"admin"
	],
	jti: "e6c49b2a-3f80-4d63-a587-47451f03012b",
	client_id: "client",
	enhance: "enhance info",
}