文章目录
- 前言
- bean注册的方式
- class扫描bean
- @ComponentScan
- @Import
- DeferredImportSelector
- ImportBeanDefinitionRegistrar
- xml注册bean
- spring扩展点
- 总结
前言
本篇主要以注册bean的方式从源码角度展开分析总结。
bean注册的方式
首先,由spring管理的对象,称为bean,那么创建一个bean其实就是让spring创建一个bean,在创建bean时,先要注册bean,也就是进行class的解析,得到bean的定义beanDefinition,这个bean的定义保存了bean的名称,类全名,资源文件信息,注解信息等;
那么注册bean的方式有那些?
- class扫描,spring会自动扫描class路径,将含有注解如
@PropertySource,@ComponentScan,@Import,@ImportResource,@Bean这些注解标注的class作为bean的class进行解析,得到beanDefinition - xml方式,进行bean的配置,然后通过解析xml得到beanDefinition
class扫描bean
class扫描其实是找到class资源,然后解析class,得到beanDefinition,然后再解析beanDefinition,这个解析beanDefinition就是配置类解析;
位置:org.springframework.context.annotation.ConfigurationClassParser#doProcessConfigurationClass
在这里,他会解析注解@ComponentScan,@Import,@ImportResource,@PropertySource,@Bean,我们简单看下它的一个解析的大概流程;
假设现在是springBoot应用启动,那么它应该怎么走?
配置类上有@SpringBootApplication注解,它里面包含一个@Component注解,它一开始也就是应用启动时就会被注册为一个配置类,之后进行解析,也就是解析@ComponentScan,@Import,@ImportResource,@PropertySource,@Bean这几个注解,如下步骤:
- 解析嵌套的类
- 解析@PropertySource注解
- 解析@ComponentScan
- 解析@Import方法
- 解析@ImportResouce方法
- 解析@Bean方法
- 接口上的默认方法(default修饰)标注有@Bean也进行解析
- 获取父级类,然后返回,返回,就是一个递归调用
protected final SourceClass doProcessConfigurationClass(
ConfigurationClass configClass, SourceClass sourceClass, Predicate<String> filter)
throws IOException {
if (configClass.getMetadata().isAnnotated(Component.class.getName())) {
// 1. 解析嵌套的类,一个类里可能存在一个内部类,并且含有@Component
processMemberClasses(configClass, sourceClass, filter);
}
// 2. 解析@PropertySource注解
// 加载value值,将其读取并添加到environment中
for (AnnotationAttributes propertySource : AnnotationConfigUtils.attributesForRepeatable(
sourceClass.getMetadata(), PropertySources.class,
org.springframework.context.annotation.PropertySource.class)) {
if (this.environment instanceof ConfigurableEnvironment) {
processPropertySource(propertySource);
}
else {
logger.info("Ignoring @PropertySource annotation on [" + sourceClass.getMetadata().getClassName() +
"]. Reason: Environment must implement ConfigurableEnvironment");
}
}
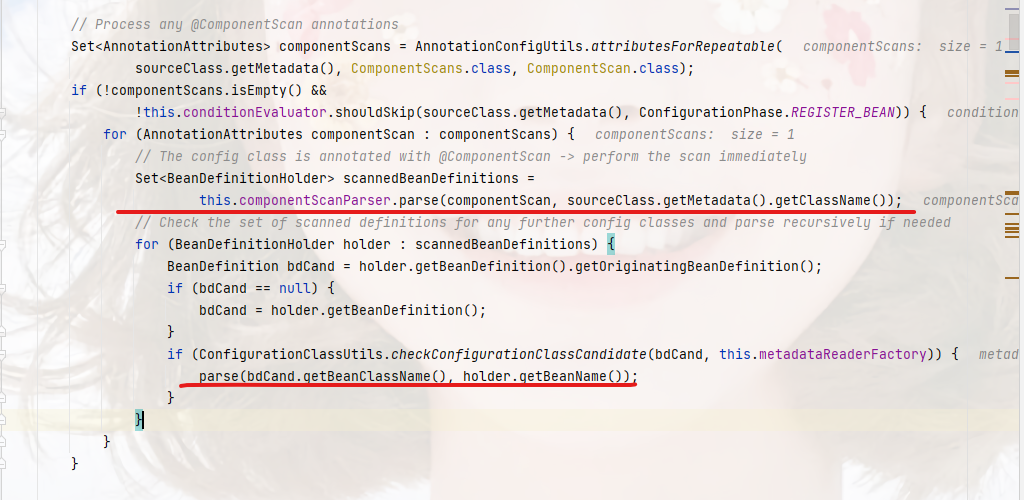
// 3. 解析@ComponentScan
// 这里解析时一个递归的过程,扫描指定路径下class,扫描到后,同样会走进这个方法
Set<AnnotationAttributes> componentScans = AnnotationConfigUtils.attributesForRepeatable(
sourceClass.getMetadata(), ComponentScans.class, ComponentScan.class);
if (!componentScans.isEmpty() &&
!this.conditionEvaluator.shouldSkip(sourceClass.getMetadata(), ConfigurationPhase.REGISTER_BEAN)) {
for (AnnotationAttributes componentScan : componentScans) {
// The config class is annotated with @ComponentScan -> perform the scan immediately
Set<BeanDefinitionHolder> scannedBeanDefinitions =
this.componentScanParser.parse(componentScan, sourceClass.getMetadata().getClassName());
// Check the set of scanned definitions for any further config classes and parse recursively if needed
for (BeanDefinitionHolder holder : scannedBeanDefinitions) {
BeanDefinition bdCand = holder.getBeanDefinition().getOriginatingBeanDefinition();
if (bdCand == null) {
bdCand = holder.getBeanDefinition();
}
if (ConfigurationClassUtils.checkConfigurationClassCandidate(bdCand, this.metadataReaderFactory)) {
parse(bdCand.getBeanClassName(), holder.getBeanName());
}
}
}
}
// 4. 解析@Import方法
// 这里导入的类也会进行分类处理,有:ImportSelector, ImportBeanDefinitionRegistrar
// 如果都不是,就是Component,同样的也是一个递归,走这个方法
processImports(configClass, sourceClass, getImports(sourceClass), filter, true);
// 5. 解析@ImportResouce方法
// 这里通过environment解析后,添加到配置类中
AnnotationAttributes importResource =
AnnotationConfigUtils.attributesFor(sourceClass.getMetadata(), ImportResource.class);
if (importResource != null) {
String[] resources = importResource.getStringArray("locations");
Class<? extends BeanDefinitionReader> readerClass = importResource.getClass("reader");
for (String resource : resources) {
String resolvedResource = this.environment.resolveRequiredPlaceholders(resource);
configClass.addImportedResource(resolvedResource, readerClass);
}
}
// 6. 解析@Bean方法
// 解析后得到beanMethod,然后添加到配置类中
Set<MethodMetadata> beanMethods = retrieveBeanMethodMetadata(sourceClass);
for (MethodMetadata methodMetadata : beanMethods) {
configClass.addBeanMethod(new BeanMethod(methodMetadata, configClass));
}
// 7. 接口上的默认方法(default修饰)标注有@Bean也进行解析
processInterfaces(configClass, sourceClass);
// 8. 获取父级类,然后返回,返回,就是一个递归调用
if (sourceClass.getMetadata().hasSuperClass()) {
String superclass = sourceClass.getMetadata().getSuperClassName();
if (superclass != null && !superclass.startsWith("java") &&
!this.knownSuperclasses.containsKey(superclass)) {
this.knownSuperclasses.put(superclass, configClass);
// Superclass found, return its annotation metadata and recurse
return sourceClass.getSuperClass();
}
}
// No superclass -> processing is complete
return null;
}
@ComponentScan
@ComponentScan就是扫描class,默认是取当前配置类的类路径进行扫描,底层位置:
org.springframework.context.annotation.ClassPathBeanDefinitionScanner#doScan
底层之前的文章有解析过spring源码篇(六)配置类解析过程,这里不做分析,我们看图
这里它通过递归扫描,得到对应路径下的所有beanDefinition,然后调用parse递归解析配置类,
那么要被spring扫描器识别为一个需要注入的bean对象,这个类,就必须有@Component,@ManagedBean两个注解,我们常用的比如@Controller,@Service,@Configuration这些注解,里面都包含了一个@Component注解,所有都能被扫描到,那么另一个@ManagedBean是JSF定义bean的注解,不是很了解,知道就行;
那么这里得出一个结论:类上含有@Component注解,就可以被注册
@Import

内部对import注解能处理的类分了3个类别:
-
ImportSelector实现类;会区分是不是DeferredImportSelector实现类,这个也是自动配置导入类,不是这个类则执行
selectImports方法,然后递归 -
ImportBeanDefinitionRegistrar实现类这个是
beanDefinition注册类,在配置类解析完会执行registerl类的registerBeanDefinition方法 -
Component标注的类

DeferredImportSelector
SpringBoot源码篇(一)自动配置
ImportBeanDefinitionRegistrar
ImportBeanDefinitionRegistrar调用的位置:org.springframework.context.annotation.ConfigurationClassPostProcessor#processConfigBeanDefinitions

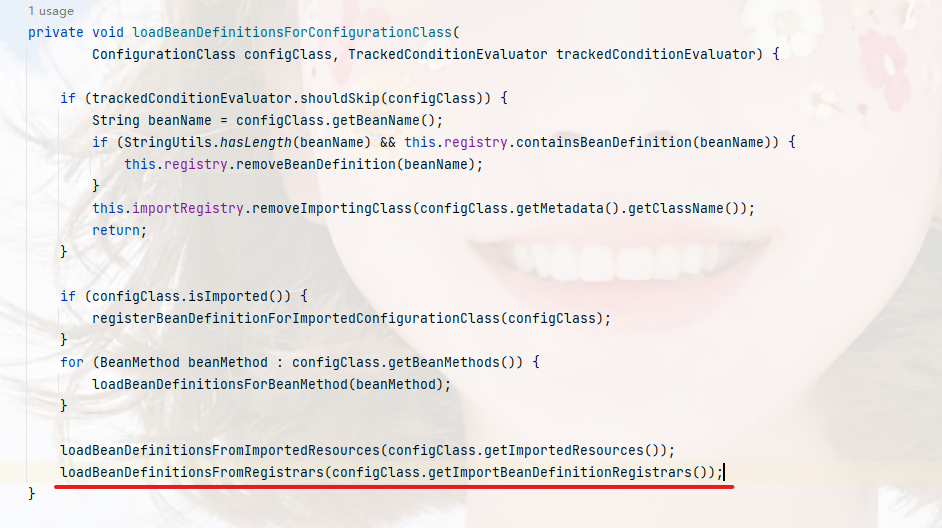
	private void loadBeanDefinitionsFromRegistrars(Map<ImportBeanDefinitionRegistrar, AnnotationMetadata> registrars) {
        // 遍历ImportBeanDefinitionRegistrar集合
		registrars.forEach((registrar, metadata) ->
                           // 执行registerBeanDefinitions,也就是我们重写的方法
				registrar.registerBeanDefinitions(metadata, this.registry, this.importBeanNameGenerator));
	}
那么这里就是spring提供的扩展点调用的地方,我们看一下它提供了哪些方法:
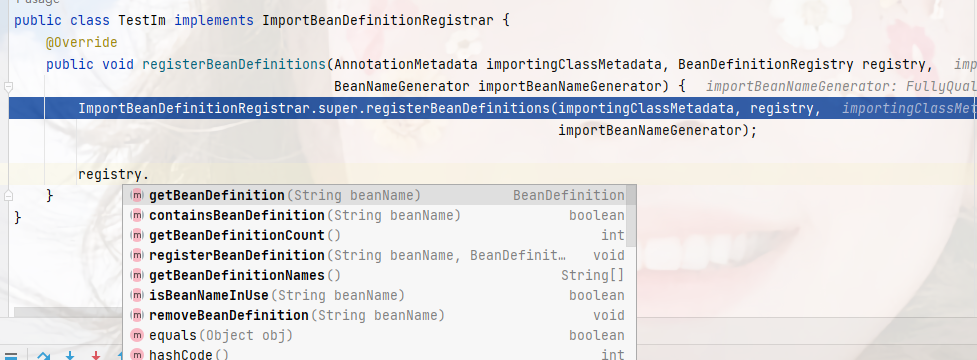
包含,获取bean定义,注册和移除bean定义,很好,到这里,我们已经可以实现bean的修改,删除,移除这些操作了,因为bean都是根据bean定义来创建的;
我们今天的主题是注册bean的问题,那么我这里也简单注册一个bean:
public class TestIm implements ImportBeanDefinitionRegistrar {
    /**
     *
     * @param importingClassMetadata 配置类的注解元数据
     * @param registry bean定义注册器
     * @param importBeanNameGenerator beanName生成器
     */
    @Override
    public void registerBeanDefinitions(AnnotationMetadata importingClassMetadata, BeanDefinitionRegistry registry,
                                        BeanNameGenerator importBeanNameGenerator) {
        // 定义一个新的bean定义
        RootBeanDefinition rootBeanDefinition = new RootBeanDefinition();
        rootBeanDefinition.setBeanClass(BeanUtil.class);
        // 注册我们自己的bean定义
        String beanName = importBeanNameGenerator.generateBeanName(rootBeanDefinition, registry);
        registry.registerBeanDefinition(beanName, rootBeanDefinition);
    }
}
这里注册的是hutool的工具beanUtil,可以从图中看到,已经注册上去了

到这里,我们对@Import总结下:
- 可以直接导入一个类作为bean
- 导入的类实现了
ImportSelector,可通过selectImports方法获取要导入的类,那么这里就分两种情况:- 实现普通的
ImportSelector类,通过selectImports方法获取需要注册bean - 实现
DeferredImportSelector类,这个是自动配置所实现的类,当然我们也可以实现
- 实现普通的
- 导入的类实现了
ImportBeanDefinitionRegistrar,在registerBeanDefinitions方法中通过BeanDefinitionRegistry操作bean定义
xml注册bean
我们先创建一个xml,xml中定义了一个beanName为test7的bean,
<?xml version="1.0" encoding="UTF-8"?>
<beans xmlns="http://www.springframework.org/schema/beans"
       xmlns:xsi="http://www.w3.org/2001/XMLSchema-instance"
       xsi:schemaLocation="http://www.springframework.org/schema/beans http://www.springframework.org/schema/beans/spring-beans.xsd">

    <bean id="test7" class="com.liry.te.Test7" scope="singleton"/>
</beans>
然后配置类上通过@ImportResource(value = "classpath:spring-beans.xml")引入(我这里用的Spring Boot测试)
位置:org.springframework.context.annotation.ConfigurationClassParser#doProcessConfigurationClass
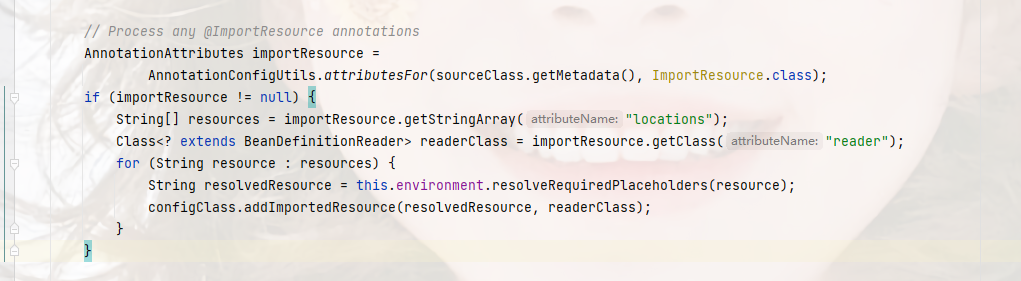
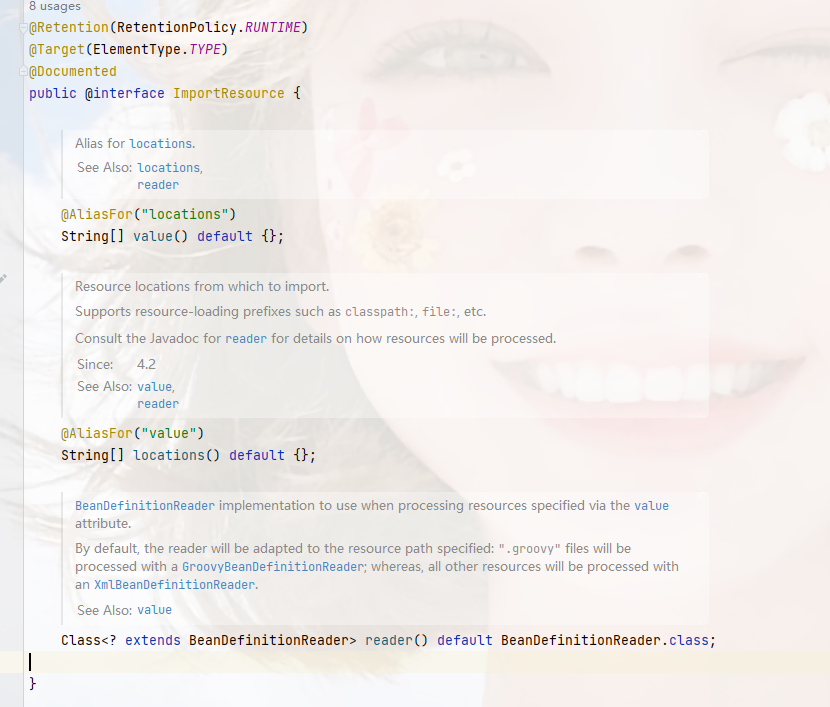
这里它是获取的是ImportResource的locations属性值作为资源文件的地址,这个属性是被链接到value上的,所以我们的配置是没问题的,然后它还获取了一个BeanDefinitionReader的读取器,这个它是默认的,看下图注解@ImportResource的定义,然后在获取到地址后,都添加到配置类中,这个和@Bean的处理方式一样;
之后就是加载beanDefinition
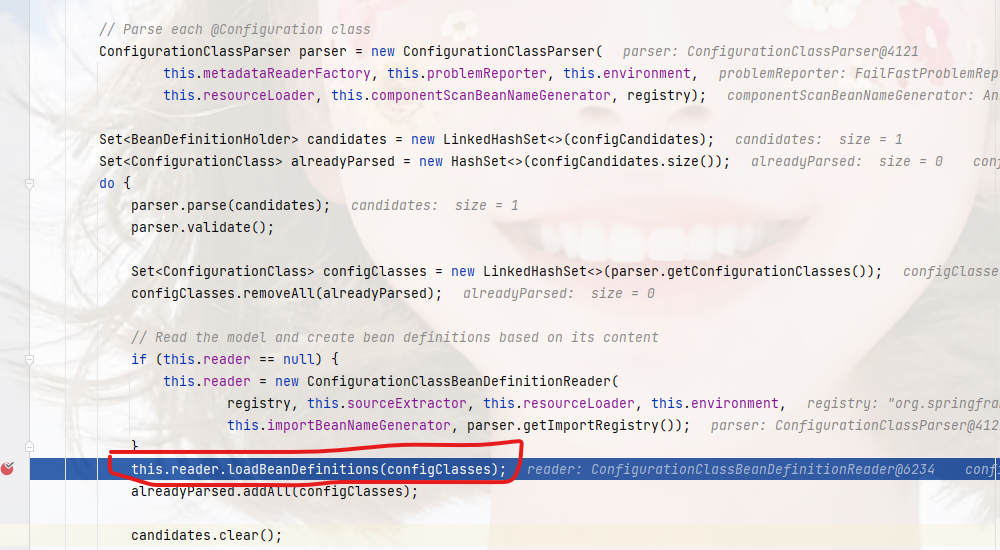

这里就是真正进行资源文件解析和注册的地方
	private void loadBeanDefinitionsFromImportedResources(
			Map<String, Class<? extends BeanDefinitionReader>> importedResources) {

		Map<Class<?>, BeanDefinitionReader> readerInstanceCache = new HashMap<>();

		importedResources.forEach((resource, readerClass) -> {
			// 1. 选择默认的bean定义读取器,这里只是指定了类型
            // 它提供了两个:一个是groovy文件的,另一个是xml文件的
			if (BeanDefinitionReader.class == readerClass) {
				if (StringUtils.endsWithIgnoreCase(resource, ".groovy")) {
					// groovy文件的bean定义读取器
					readerClass = GroovyBeanDefinitionReader.class;
				}
				else {
					// xml文件的bean定义读取器
					readerClass = XmlBeanDefinitionReader.class;
				}
			}
			// 2. 拿实例化好的读取器
			BeanDefinitionReader reader = readerInstanceCache.get(readerClass);
            // 拿不到,因为是空的
			if (reader == null) {
				try {
					// 通过反射实例化读取器
					reader = readerClass.getConstructor(BeanDefinitionRegistry.class).newInstance(this.registry);
					// 赋予额外功能
					if (reader instanceof AbstractBeanDefinitionReader) {
						AbstractBeanDefinitionReader abdr = ((AbstractBeanDefinitionReader) reader);
						abdr.setResourceLoader(this.resourceLoader);
						abdr.setEnvironment(this.environment);
					}
                    // 添加缓存,避免每次都实例化
					readerInstanceCache.put(readerClass, reader);
				}
				catch (Throwable ex) {
					throw new IllegalStateException(
							"Could not instantiate BeanDefinitionReader class [" + readerClass.getName() + "]");
				}
			}

			// 3. 使用选择的读取器实例进行加载bean定义信息
			reader.loadBeanDefinitions(resource);
		});
	}
到这里我就不再进行深入了,下面的步骤大概的是,读取资源文件也就是io操作,然后解析xml,设置属性,构建beanDefinition对象。
对Xml方式的总结:
通过xml方式配置bean定义的属性信息,通过XmlBeanDefinitionReader注册到spring容器
spring扩展点
class扫描中一个特殊的方式,就是spring扩展点的方式,上面说的那些东西,其实也是通过spring扩展点实现的,它是由ConfigurationClassPostProcessor实现BeanDefinitionRegistryPostProcessor接口而达到的功能,同样我们也可以利用这些扩展点进行我们bean的注册;
位置:org.springframework.context.support.PostProcessorRegistrationDelegate#invokeBeanFactoryPostProcessors(org.springframework.beans.factory.config.ConfigurableListableBeanFactory, java.util.List<org.springframework.beans.factory.config.BeanFactoryPostProcessor>)
代码有点长就不贴了,其逻辑基本上就是获取2个后置处理器进行执行:
-
BeanFactoryPostProcessor
-
BeanDefinitionRegistryPostProcessor:bean的扫描和解析就是实现这个接口的
以BeanFactoryPostProcessor方式注册一个bean:
@Component
public class TestIm2 implements BeanFactoryPostProcessor {
    @Override
    public void postProcessBeanFactory(ConfigurableListableBeanFactory beanFactory) throws BeansException {
        String beanName = "test8";
        Test8 test8 = new Test8();
        beanFactory.registerSingleton(beanName, test8);
    }
}
可以看到,这种方式和之前的都不一样,这里不是注册一个beanDefinition,而是一个实例,这里我们拿到的参数是ConfigurableListableBeanFactory类型的,提供了操作bean的功能;
另一种则是实现BeanDefinitionRegistryPostProcessor接口
@Component
public class TestIm3 implements BeanDefinitionRegistryPostProcessor {

    @Override
    public void postProcessBeanDefinitionRegistry(BeanDefinitionRegistry registry) throws BeansException {
        GenericBeanDefinition genericBeanDefinition = new GenericBeanDefinition();
        genericBeanDefinition.setBeanClassName("com.liry.te.Test9");
        registry.registerBeanDefinition("com.liry.te.Test9", genericBeanDefinition);
    }

    @Override
    public void postProcessBeanFactory(ConfigurableListableBeanFactory beanFactory) throws BeansException {
        // 这里就和BeanFactoryPostProcessor一样
    }
}
总结
注册bean分有:class扫描,xml扫描;
而注册的方法也都是围绕这两种方式来的,那我们对上面知识点进行总结:
- spring扫描bean,当类上有
@Component,@ManagedBean标注时,能被扫描到并解析,然后注册 - spring扫描bean,通过注解
@ComponentScan扫描指定路径下的bean,然后注册 - 扫描的bean上有注解
@Import注解,如果是ImportSelector实现类,会执行selector导入方法,进而注册我们指定的bean,那这里还有一个隐藏点,就是以自动配置的方式进行注册,也就是spring的SPI机制;如果是ImportBeanDefinitionRegistrar实现类,可以通过注册器注册我们指定的bean定义 - xml文件方式配置bean定义信息,通过导入到spring容器(@ImportResource)实现注册
- 通过实现这两个接口
BeanFactoryPostProcessor和BeanDefinitionRegistryPostProcessor完成spring扩展点的注入,也可以实现bean的注册;有一个不一样的点就是BeanFactoryPostProcessor接口它提供的并不是bean定义的注册,而是直接注册一个实例对象