目录
一、搭建环境
1.1、spring环境搭建
1.1.1 测试SpringIOC环境
1.2、搭建Mybatis环境(原生mybatis)
二、Spring整合mybatis
三、Spring整合SpringMVC
四、SSM执行流程
五、纯注解开发配置文件模板
声明:
SpringMVC:
注解 + XML
注解: @Controller + @RequestMapping
xml: 总控制器 视图解析 开启注解扫描
Spring:
IOC:
全XML
半XML半注解 ★
全注解
AOP:
XML
Mybatis:
核心配置 + sql映射xml
核心配置 + 注解 ★
-----------------------
1.搭建Spring环境 IOC
2.搭建Mybatis环境 核心配置+sql映射xml
3.Spring和Mybatis整合
加入Spring的AOP
4.搭建SpringMVC环境
5.整合SpringMVC和Spring整合
一、搭建环境
1.1、spring环境搭建
maven依赖:
    <properties>
        <!-- 定义变量 -->
        <spring-version>5.0.2.RELEASE</spring-version>
    </properties>

    <dependencies>
        <!-- spring核心jar包 -->
        <dependency>
            <groupId>org.springframework</groupId>
            <artifactId>spring-context</artifactId>
            <version>${spring-version}</version>
        </dependency>
        <!-- Mybatis jar包 -->
        <dependency>
            <groupId>org.mybatis</groupId>
            <artifactId>mybatis</artifactId>
            <version>3.4.5</version>
        </dependency>
        <!-- Spring整合jdbc的jar包 -->
        <dependency>
            <groupId>org.springframework</groupId>
            <artifactId>spring-jdbc</artifactId>
            <version>${spring-version}</version>
        </dependency>
        <!-- spring和junit的整合坐标 -->
        <dependency>
            <groupId>org.springframework</groupId>
            <artifactId>spring-test</artifactId>
            <version>${spring-version}</version>
        </dependency>
        <!-- springmvc的坐标 -->
        <dependency>
            <groupId>org.springframework</groupId>
            <artifactId>spring-webmvc</artifactId>
            <version>${spring-version}</version>
        </dependency>
        <!-- mysql驱动包 -->
        <dependency>
            <groupId>mysql</groupId>
            <artifactId>mysql-connector-java</artifactId>
            <version>5.1.6</version>
        </dependency>
        <!-- spring整合mybatis的坐标 -->
        <dependency>
            <groupId>org.mybatis</groupId>
            <artifactId>mybatis-spring</artifactId>
            <version>1.3.0</version>
        </dependency>
        <!-- aspectJ坐标 切入点表达式-->
        <dependency>
            <groupId>org.aspectj</groupId>
            <artifactId>aspectjweaver</artifactId>
            <version>1.8.13</version>
        </dependency>
        <!-- junit的整合坐标 -->
        <dependency>
            <groupId>junit</groupId>
            <artifactId>junit</artifactId>
            <version>4.12</version>
        </dependency>
        <!-- Servlet的jar包 -->
        <dependency>
            <groupId>javax.servlet</groupId>
            <artifactId>javax.servlet-api</artifactId>
            <version>3.0.1</version>
            <scope>provided</scope>
        </dependency>
        <!-- jsp的jar包 -->
        <dependency>
            <groupId>javax.servlet</groupId>
            <artifactId>jsp-api</artifactId>
            <version>2.0</version>
            <scope>provided</scope>
        </dependency>
        <!-- jstl的jar包-->
        <dependency>
            <groupId>jstl</groupId>
            <artifactId>jstl</artifactId>
            <version>1.2</version>
        </dependency>
        <!-- druid jar包 -->
        <dependency>
            <groupId>com.alibaba</groupId>
            <artifactId>druid</artifactId>
            <version>1.0.13</version>
        </dependency>
        <!-- c3p0 jar包 -->
        <dependency>
            <groupId>c3p0</groupId>
            <artifactId>c3p0</artifactId>
            <version>0.9.1.2</version>
        </dependency>

         <dependency>
            <groupId>org.projectlombok</groupId>
            <artifactId>lombok</artifactId>
            <version>1.16.20</version>
        </dependency>
    </dependencies>
数据库:
CREATE TABLE `account2` (
  `id` int(11) NOT NULL AUTO_INCREMENT,
  `name` varchar(40) DEFAULT NULL,
  `money` float DEFAULT NULL,
  PRIMARY KEY (`id`)
) ENGINE=InnoDB AUTO_INCREMENT=9 DEFAULT CHARSET=utf8;

INSERT INTO `account2` VALUES ('1', 'tom', '1000');
INSERT INTO `account2` VALUES ('2', 'rose', '1000');
INSERT INTO `account2` VALUES ('3', 'jack', '1000');
实体类:
@Data//getting、setting、equals、canEqual、hashCode、toString
@AllArgsConstructor
@NoArgsConstructor
public class Account {
    //基本类型int有默认值 可能会干扰代码
    private Integer id;
    private String name;
    private Float money;
}
service:
public interface AccountService {
    List<Account> findAll();
}

@Service("accountService")
public class AccountServiceImpl implements AccountService {
    @Override
    public List<Account> findAll() {
        System.out.println("findAll方法被调用");
        return null;
    }
}
applicationContext.xml配置文件
<?xml version="1.0" encoding="UTF-8"?>
<beans xmlns="http://www.springframework.org/schema/beans"
       xmlns:mvc="http://www.springframework.org/schema/mvc"
       xmlns:xsi="http://www.w3.org/2001/XMLSchema-instance"
       xmlns:context="http://www.springframework.org/schema/context"
       xsi:schemaLocation="http://www.springframework.org/schema/beans
        http://www.springframework.org/schema/beans/spring-beans.xsd
        http://www.springframework.org/schema/mvc
        http://www.springframework.org/schema/mvc/spring-mvc.xsd http://www.springframework.org/schema/context http://www.springframework.org/schema/context/spring-context.xsd">

    <!-- 开启包扫描 -->
    <context:component-scan base-package="com.hhy"/>
</beans>
1.1.1 测试SpringIOC环境
@RunWith(SpringJUnit4ClassRunner.class)
@ContextConfiguration(locations = "classpath:applicationContext.xml")
public class TestSpring {

    @Resource(name = "accountService")
    private AccountService acS;

    @Test
    public void t1() {
        acS.findAll();
    }
}
1.2、搭建Mybatis环境(原生mybatis)
xml模板可以去mybatis官网复制
mybatis – MyBatis 3 | 入门
AccountDao.java
public interface AccountDao {
    List<Account> findAll();
}
AccountDao.xml:
<?xml version="1.0" encoding="UTF-8" ?>
<!DOCTYPE mapper
        PUBLIC "-//mybatis.org//DTD Mapper 3.0//EN"
        "https://mybatis.org/dtd/mybatis-3-mapper.dtd">
<mapper namespace="com.hhy.dao.AccountDao">
    <!--resultType="account"此处使用了别名,因为在mybatisConfig中使用了<typeAliases>扫包-->
    <select id="findAll" resultType="account">
<!--    <select id="findAll" resultType="com.hhy.pojo.Account">-->
        select * from account;
    </select>
</mapper>
mybatisConfig.xml
<?xml version="1.0" encoding="UTF-8" ?>
<!DOCTYPE configuration
        PUBLIC "-//mybatis.org//DTD Config 3.0//EN"
        "https://mybatis.org/dtd/mybatis-3-config.dtd">
<configuration>
    <!-- 1.配置需要解析的properties文件 -->
    <properties resource="jdbc.properties"></properties>
    <!-- 2.批量给pojo取别名 -->
    <typeAliases>
        <package name="com.hhy.pojo"></package>
    </typeAliases>
    <!-- 3.配置连接数据的环境 -->
    <environments default="development">
        <environment id="development">
            <!-- 使用JDBC默认的事务管理 -->
            <transactionManager type="JDBC" />
            <!-- 配置连接池, POOLED:使用Mybatis的连接池 -->
            <dataSource type="POOLED">
                <property name="driver" value="${jdbc.driverClass}" ></property>
                <property name="url" value="${jdbc.url}" ></property>
                <property name="username" value="${jdbc.userName}"></property>
                <property name="password" value="${jdbc.password}"></property>
            </dataSource>
        </environment>
    </environments>
    <!-- 4.配置sql映射文件的位置 -->
    <mappers>
        <!-- 配置sql映射文件所在的包
            要求:
                sql映射文件的名称要和dao接口的名称保持一致
                sql映射文件的包路径要和接口的包路径保持一致
         -->
        <package name="com.hhy.dao" ></package>
    </mappers>
</configuration>
jdbc.properties:
jdbc.userName=root
jdbc.password=123456
jdbc.url=jdbc:mysql:///test0908
jdbc.driverClass=com.mysql.jdbc.Driver
测例:
@RunWith(SpringJUnit4ClassRunner.class)
@ContextConfiguration(locations = "classpath:applicationContext.xml")
public class TestMybatis {

    @Resource(name = "accountService")
    private AccountService acS;

    @Test
    public void t1() throws IOException {
        //1.获取核心配置文件的文件流对象
        InputStream is = Resources.getResourceAsStream("mybatisConfig.xml");
        //2.获取SqlSessionFactory会话工厂对象
        SqlSessionFactory sqlSessionFactory = new SqlSessionFactoryBuilder().build(is);
        //3.获取SqlSession会话对象
        SqlSession sqlSession = sqlSessionFactory.openSession();
        //4.获取接口的代理对象
        AccountDao mapper = sqlSession.getMapper(AccountDao.class);
        //5.调用方法执行
        List<Account> list = mapper.findAll();
        for (Account account : list) {
            System.out.println(account);
        }
        System.out.println(list);
        //6.关闭流
        sqlSession.close();
        is.close();
    }
}
二、Spring整合mybatis
注释mybatisConfig.xml文件,全部配置在applicationContext.xml文件中。
AccountServiceImpl:
@Service("accountService")
public class AccountServiceImpl implements AccountService {

    @Autowired
    private AccountDao accountDao;

    @Override
    public List<Account> findAll() {
        System.out.println("findAll方法被调用");
        return accountDao.findAll();
    }
}
applicationContext.xml
<?xml version="1.0" encoding="UTF-8"?>
<beans xmlns="http://www.springframework.org/schema/beans"
xmlns:mvc="http://www.springframework.org/schema/mvc"
xmlns:xsi="http://www.w3.org/2001/XMLSchema-instance"
xmlns:context="http://www.springframework.org/schema/context" xmlns:tx="http://www.springframework.org/schema/tx"
xmlns:aop="http://www.springframework.org/schema/aop"
xsi:schemaLocation="http://www.springframework.org/schema/beans
http://www.springframework.org/schema/beans/spring-beans.xsd
http://www.springframework.org/schema/mvc
http://www.springframework.org/schema/mvc/spring-mvc.xsd http://www.springframework.org/schema/context http://www.springframework.org/schema/context/spring-context.xsd http://www.springframework.org/schema/tx http://www.springframework.org/schema/tx/spring-tx.xsd http://www.springframework.org/schema/aop http://www.springframework.org/schema/aop/spring-aop.xsd">
<!-- 开启包扫描 -->
<context:component-scan base-package="com.hhy"/>
<!--引入外部jdbc.properties资源-->
<context:property-placeholder location="classpath:jdbc.properties"/>
<!--配置数据源-->
<bean id="dataSource" class="org.springframework.jdbc.datasource.DriverManagerDataSource">
<!--此处如需使用jdbc.properties中值,需引入-->
<property name="url" value="${jdbc.url}"/>
<property name="driverClassName" value="${jdbc.driverClass}"/>
<property name="username" value="${jdbc.userName}"/>
<property name="password" value="${jdbc.password}"/>
</bean>
<!--配置spring整合mybatis-->
<bean id="sessionFactory" class="org.mybatis.spring.SqlSessionFactoryBean">
<!--在mybatisConfig.xml配置的数据源不属于spring管理的方式,需重新配置-->
<property name="dataSource" ref="dataSource"/>
<!-- 2.批量给pojo取别名 -->
<property name="typeAliasesPackage" value="com.hhy.pojo"/>
<!--引入mybatis核心配置文件-->
<!-- <property name="configLocation" value="classpath:mybatisConfig.xml"/>-->
</bean>
<!--配置接口扫描:dao加入ioc管理,spring扫描mapper的方式-->
<bean class="org.mybatis.spring.mapper.MapperScannerConfigurer">
<property name="basePackage" value="com.hhy.dao"/>
</bean>
<!-- TODO:Spring的AOP 托管Mybatis的事务控制 -->
<!-- 配置事务管理器对象 -->
<!--此处id名要与事务注解内部AliasFor注解名相同-->
<bean id="transactionManager" class="org.springframework.jdbc.datasource.DataSourceTransactionManager">
<property name="dataSource" ref="dataSource"></property>
</bean>
<!--事务-->
<!-- <tx:advice id="myAdvice" transaction-manager="transactionManager">-->
<!-- <tx:attributes>-->
<!-- <tx:method name="find*" propagation="SUPPORTS" read-only="true"/>-->
<!-- <tx:method name="*" propagation="REQUIRED" read-only="false"/>-->
<!-- </tx:attributes>-->
<!-- </tx:advice>-->
<!-- <!–配置AOP–>-->
<!-- <aop:config>-->
<!-- <!–配置切面–>-->
<!-- <aop:pointcut id="pt" expression="execution(* com.hhy.service.impl.*.*(..))"/>-->
<!-- <aop:advisor advice-ref="myAdvice" pointcut-ref="pt"></aop:advisor>-->
<!-- </aop:config>-->
<!-- 开启AOP注解的支持 -->
<aop:aspectj-autoproxy/>
<!--开启事务注解驱动-->
<tx:annotation-driven/>
</beans>AccountServiceImpl.java
@Service("accountService")
@Transactional(propagation = Propagation.REQUIRED ,readOnly = false)
public class AccountServiceImpl implements AccountService {

    @Autowired
    private AccountDao accountDao;

    @Transactional(propagation = Propagation.SUPPORTS)
    @Override
    public List<Account> findAll() {
        System.out.println("findAll方法被调用");
        return accountDao.findAll();
    }
}
测例:
@RunWith(SpringJUnit4ClassRunner.class)
@ContextConfiguration(locations = "classpath:applicationContext.xml")
public class TestSpring {

    @Resource(name = "accountService")
    private AccountService acS;

    @Test
    public void t1() {
        final List<Account> all = acS.findAll();
        System.out.println("all = " + all);
    }
}
三、Spring整合SpringMVC
spring的配置项applicationContext.xml扫描dao和service层,为父容器,
而springMVC的配置项专门扫描controller层,为子容器,子容器可以调用父容器的bean,controller注入service,service为父容器的bean。

pom.xml新增依赖:
<!--json格式所需要的依赖-->
        <dependency>
            <groupId>com.fasterxml.jackson.core</groupId>
            <artifactId>jackson-core</artifactId>
            <version>2.9.8</version>
        </dependency>
        <dependency>
            <groupId>com.fasterxml.jackson.core</groupId>
            <artifactId>jackson-databind</artifactId>
            <version>2.9.8</version>
        </dependency>
        <dependency>
            <groupId>com.fasterxml.jackson.core</groupId>
            <artifactId>jackson-annotations</artifactId>
            <version>2.9.8</version>
        </dependency>
applicationContext.xml:
<?xml version="1.0" encoding="UTF-8"?>
<beans xmlns="http://www.springframework.org/schema/beans"
xmlns:mvc="http://www.springframework.org/schema/mvc"
xmlns:xsi="http://www.w3.org/2001/XMLSchema-instance"
xmlns:context="http://www.springframework.org/schema/context" xmlns:tx="http://www.springframework.org/schema/tx"
xmlns:aop="http://www.springframework.org/schema/aop"
xsi:schemaLocation="http://www.springframework.org/schema/beans
http://www.springframework.org/schema/beans/spring-beans.xsd
http://www.springframework.org/schema/mvc
http://www.springframework.org/schema/mvc/spring-mvc.xsd http://www.springframework.org/schema/context http://www.springframework.org/schema/context/spring-context.xsd http://www.springframework.org/schema/tx http://www.springframework.org/schema/tx/spring-tx.xsd http://www.springframework.org/schema/aop http://www.springframework.org/schema/aop/spring-aop.xsd">
<!-- 开启包扫描 -->
<context:component-scan base-package="com.hhy">
<!--排除controller层的bean,springmvc会单独扫描
(此处expression可以进入@controller右键复制全限定名)-->
<context:exclude-filter type="annotation" expression="org.springframework.stereotype.Controller"/>
</context:component-scan>
<!--引入外部jdbc.properties资源-->
<context:property-placeholder location="classpath:jdbc.properties"/>
<!--配置数据源-->
<bean id="dataSource" class="org.springframework.jdbc.datasource.DriverManagerDataSource">
<!--此处如需使用jdbc.properties中值,需引入-->
<property name="url" value="${jdbc.url}"/>
<property name="driverClassName" value="${jdbc.driverClass}"/>
<property name="username" value="${jdbc.userName}"/>
<property name="password" value="${jdbc.password}"/>
</bean>
<!--配置spring整合mybatis-->
<bean id="sessionFactory" class="org.mybatis.spring.SqlSessionFactoryBean">
<!--在mybatisConfig.xml配置的数据源不属于spring管理的方式,需重新配置-->
<property name="dataSource" ref="dataSource"/>
<!-- 2.批量给pojo取别名 -->
<property name="typeAliasesPackage" value="com.hhy.pojo"/>
<!--引入mybatis核心配置文件-->
<!-- <property name="configLocation" value="classpath:mybatisConfig.xml"/>-->
</bean>
<!--配置接口扫描:dao加入ioc管理,spring扫描mapper的方式-->
<bean class="org.mybatis.spring.mapper.MapperScannerConfigurer">
<property name="basePackage" value="com.hhy.dao"/>
</bean>
<!-- TODO:Spring的AOP 托管Mybatis的事务控制 -->
<!-- 配置事务管理器对象 -->
<!--此处id名要与事务注解内部AliasFor注解名相同-->
<bean id="transactionManager" class="org.springframework.jdbc.datasource.DataSourceTransactionManager">
<property name="dataSource" ref="dataSource"></property>
</bean>
<!--事务-->
<!-- <tx:advice id="myAdvice" transaction-manager="transactionManager">-->
<!-- <tx:attributes>-->
<!-- <tx:method name="find*" propagation="SUPPORTS" read-only="true"/>-->
<!-- <tx:method name="*" propagation="REQUIRED" read-only="false"/>-->
<!-- </tx:attributes>-->
<!-- </tx:advice>-->
<!-- <!–配置AOP–>-->
<!-- <aop:config>-->
<!-- <!–配置切面–>-->
<!-- <aop:pointcut id="pt" expression="execution(* com.hhy.service.impl.*.*(..))"/>-->
<!-- <aop:advisor advice-ref="myAdvice" pointcut-ref="pt"></aop:advisor>-->
<!-- </aop:config>-->
<!-- 开启AOP注解的支持 -->
<aop:aspectj-autoproxy/>
<!--开启事务注解驱动-->
<tx:annotation-driven/>
</beans>springmvc.xml:
<?xml version="1.0" encoding="UTF-8"?>
<beans xmlns="http://www.springframework.org/schema/beans"
       xmlns:mvc="http://www.springframework.org/schema/mvc"
       xmlns:xsi="http://www.w3.org/2001/XMLSchema-instance"
       xmlns:context="http://www.springframework.org/schema/context" xmlns:tx="http://www.springframework.org/schema/tx"
       xmlns:aop="http://www.springframework.org/schema/aop"
       xsi:schemaLocation="http://www.springframework.org/schema/beans
        http://www.springframework.org/schema/beans/spring-beans.xsd
        http://www.springframework.org/schema/mvc
        http://www.springframework.org/schema/mvc/spring-mvc.xsd http://www.springframework.org/schema/context http://www.springframework.org/schema/context/spring-context.xsd http://www.springframework.org/schema/tx http://www.springframework.org/schema/tx/spring-tx.xsd http://www.springframework.org/schema/aop http://www.springframework.org/schema/aop/spring-aop.xsd">

    <!--开启包扫描,springmvc专用,仅扫描controller层bean-->
    <context:component-scan base-package="com.hhy.controller"/>
    <!--配置视图解析器-->
    <bean class="org.springframework.web.servlet.view.InternalResourceViewResolver">
        <property name="prefix" value="/WEB-INF/pages/"></property>
        <property name="suffix" value=".jsp"></property>
    </bean>
    <!-- 配置注解驱动 -->
    <mvc:annotation-driven/>
    <!-- 配置静态资源不做拦截 -->
    <mvc:default-servlet-handler/>
</beans>
web.xml:
<?xml version="1.0" encoding="UTF-8"?>
<web-app xmlns="http://xmlns.jcp.org/xml/ns/javaee"
         xmlns:xsi="http://www.w3.org/2001/XMLSchema-instance"
         xsi:schemaLocation="http://xmlns.jcp.org/xml/ns/javaee http://xmlns.jcp.org/xml/ns/javaee/web-app_4_0.xsd"
         version="4.0">
    <!--配值servletContext共享域:通知spring:父容器的位置-->
    <context-param>
        <param-name>contextConfigLocation</param-name>
        <param-value>classpath:applicationContext.xml</param-value>
    </context-param>
    <!--配置监听器(tomcat启动),tomcat一启动就触发加载applicationContext.xml-->
    <listener>
        <listener-class>org.springframework.web.context.ContextLoaderListener</listener-class>
    </listener>
    <!--配置核心控制器(前端控制器/调度控制器/总控制器)servlet-->
    <servlet>
        <servlet-name>dispatcherServlet</servlet-name>
        <servlet-class>org.springframework.web.servlet.DispatcherServlet</servlet-class>
        <!-- 配置SpringMVC的核心配置文件/资源 -->
        <init-param>
            <param-name>contextConfigLocation</param-name>
            <param-value>classpath:springmvc.xml</param-value>
        </init-param>
        <!--配置servlet加载时机-->
        <load-on-startup>1</load-on-startup>
    </servlet>
    <!--配置映射规则-->
    <servlet-mapping>
        <servlet-name>dispatcherServlet</servlet-name>
        <!--给前端控制器配置的路径为 / (缺省匹配)可以匹配浏览器发送的所以请求
             注意: jsp除外-->
        <url-pattern>/</url-pattern>
    </servlet-mapping>

    <!-- 在web.xml中配置springMVC编码过滤器 -->
    <filter>
        <filter-name>CharacterEncodingFilter</filter-name>
        <filter-class>
            org.springframework.web.filter.CharacterEncodingFilter
        </filter-class>
        <!-- 设置过滤器中的属性值 -->
        <init-param>
            <param-name>encoding</param-name>
            <param-value>UTF-8</param-value>
        </init-param>
    </filter>
    <!-- 过滤所有请求 -->
    <filter-mapping>
        <filter-name>CharacterEncodingFilter</filter-name>
        <url-pattern>/*</url-pattern>
    </filter-mapping>

    <!-- 配置静态资源处理 -->
<!--    <servlet-mapping>-->
<!--        <servlet-name>default</servlet-name>-->
<!--        <url-pattern>*.html</url-pattern>-->
<!--        <url-pattern>*.css</url-pattern>-->
<!--        <url-pattern>*.js</url-pattern>-->
<!--        <url-pattern>*.png</url-pattern>-->
<!--    </servlet-mapping>-->
</web-app>
AccountController.java:
@Controller
public class AccountController {
@Resource(name = "accountService")
private AccountService accS;
@RequestMapping(value = "/account/findAll")
@ResponseBody
public List<Account> findAll(){
List<Account> all = accS.findAll();
return all;
}
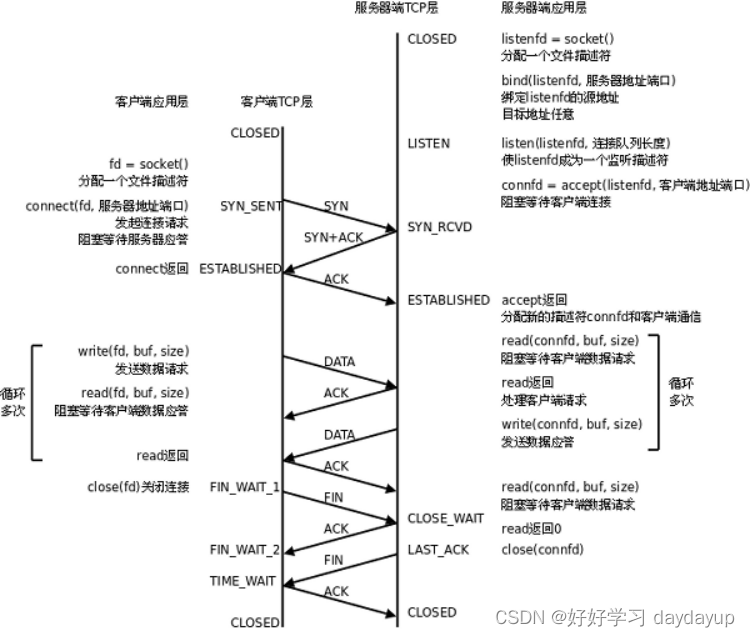
}四、SSM执行流程
当服务器启动时,只会加载web项目的核心配置文件 ------ web.xml。
web.xml中配置servletContext共享域,及监听器,监听器(监听tomcat启动),tomcat一启动就触发加载applicationContext.xml,获取父容器。
web.xml中配置servlet,tomcat解析自动创建DispatcherServlet对象调用初始化方法,拿到springmvc.xml文件,形成子容器。
父容器扫包service及dao层且排除controller层,子容器单独扫controller层。
五、纯注解开发配置文件模板
https://blog.csdn.net/m0_56678122/article/details/128388031
![[streamlit]数据科学科研工作者的神器,必须要推荐一下](https://img-blog.csdnimg.cn/ca38fa14fd22488d9e4fa1707bc4acb3.png)

![[前端攻坚]:详解call、apply、bind的实现](https://img-blog.csdnimg.cn/c1228dcc49b842e98df6827dec716e20.png#pic_center)


![[Cortex-M3]-5-cache uncache](https://img-blog.csdnimg.cn/d8f74ce4d8ca4131990dd2dc4c34d21b.png)
