Java阶段五Day07
文章目录
- Java阶段五Day07
- 问题解析
- dubbo和nacos
- Dubbo负载均衡
- 负载均衡介绍
- 准备一个负载均衡的环境
- Dubbo负载均衡策略
- 配置负载均衡的方式
- dubbo配置负载均衡优先级
- 微服务阶段性架构
- Spring Boot Starter自定义配置
- 准备一个starter案例项目
- Spring框架版本迭代
- 案例学习3.X/4.X重要注解
- @Configuration
- @Bean
- @ComponentScan
- @Import
- @PropertySource
- @ImportResource
- springboot自动配置原理
- debug工具
- springboot原理详解
- 条件注解@Conditional
- 条件配置类案例
- 导入的配置类在哪
- 阅读当前autoconfigure
- 自定义starter
- 准备一个自动配置类
- 准备spring.factories
问题解析
dubbo和nacos
NACOS功能- 注册中心
- 配置中心
dubbo功能RPC远程调用框架:PROVIDER提供者、CONSUMER消费者、注册协调(NACOS/ZOOKEEPER/REDIS/ 其他)
- 客户端2种类型,互不干扰
nacos客户端- 共同点
- 注册在
nacos springboot自动配置
- 注册在
- 区别
- 注册,调用的http协议的接口(
v1/ns/instance,v1/ns/instance/list) - 注册的信息是外界调用的入口
- 注册,调用的http协议的接口(
- 共同点
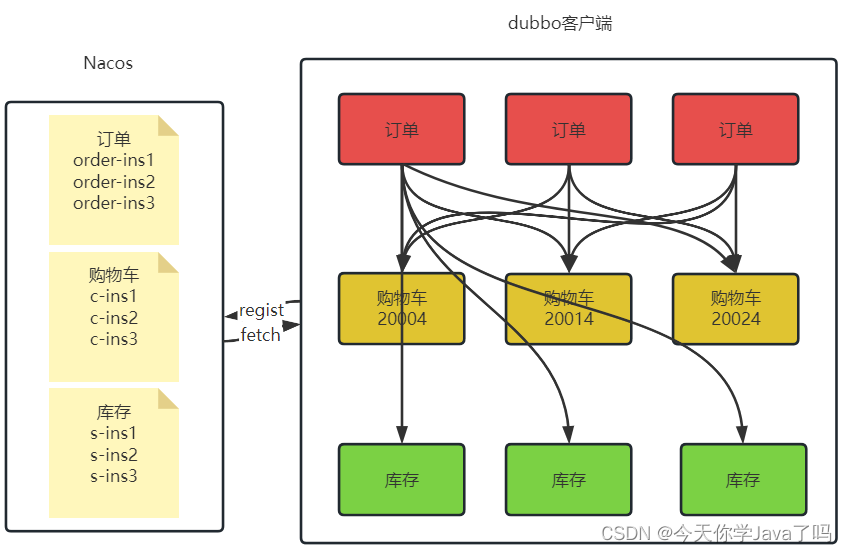
dubbo客户端- 共同点
- 注册在
nacos springboot自动配置
- 注册在
- 区别
- 注册,调用的rpc支持的接口
- 注册的信息是内部调用
- 共同点
Dubbo负载均衡
负载均衡介绍
负载均衡:
- 负载: 并发,流量,请求等被程序处理的任务,都可以称为负载,微服务中指的一般是流量和并发.
- 均衡: 集群分布式环境下,将负载平衡的分配给处理负载的任务单元
准备一个负载均衡的环境
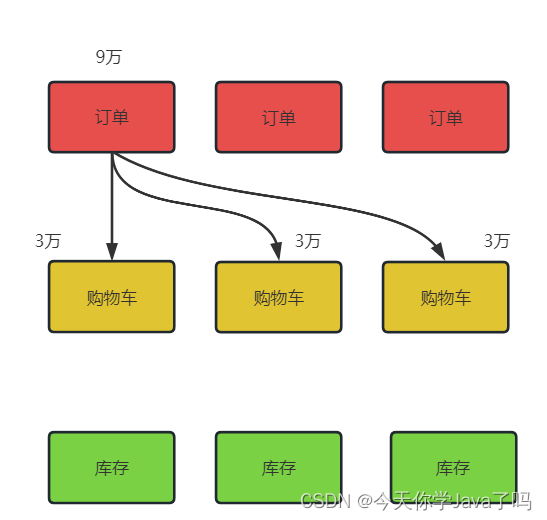
订单调用购物车,将购物车实现多实例启动集群环境
- 复制启动配置项
- 修改启动项端口覆盖的值(20004 20014 20024 20034)
- 在调用方法中deleteUserCart打桩,区分调用的路径
结论,Dubbo的负载均衡,默认的策略是 随机负载均衡计算
Dubbo负载均衡策略
random: 随机分配负载均衡roundRobin: 轮训分配负载均衡,挨个访问leastactive: 最小活跃分配负载均衡,越闲,分配的越多.使用相应数量在单位时间处理的越多的,越闲
配置负载均衡的方式
- 注解使用(局部配置)
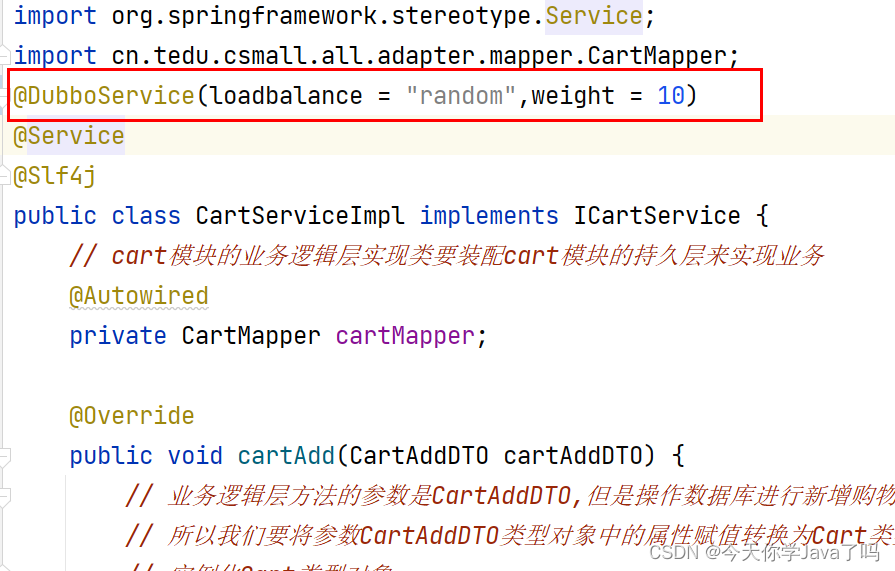
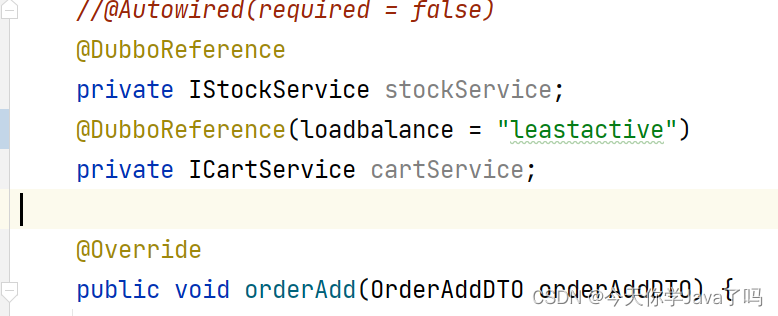
-
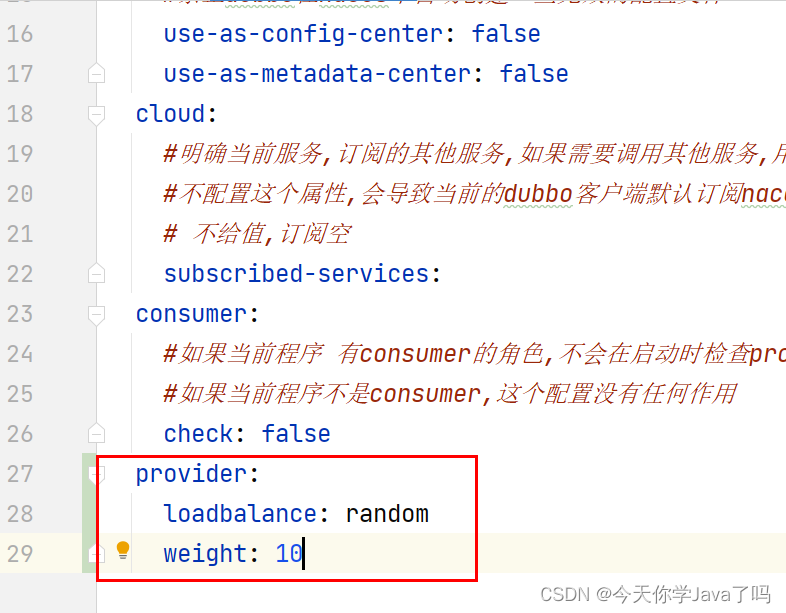
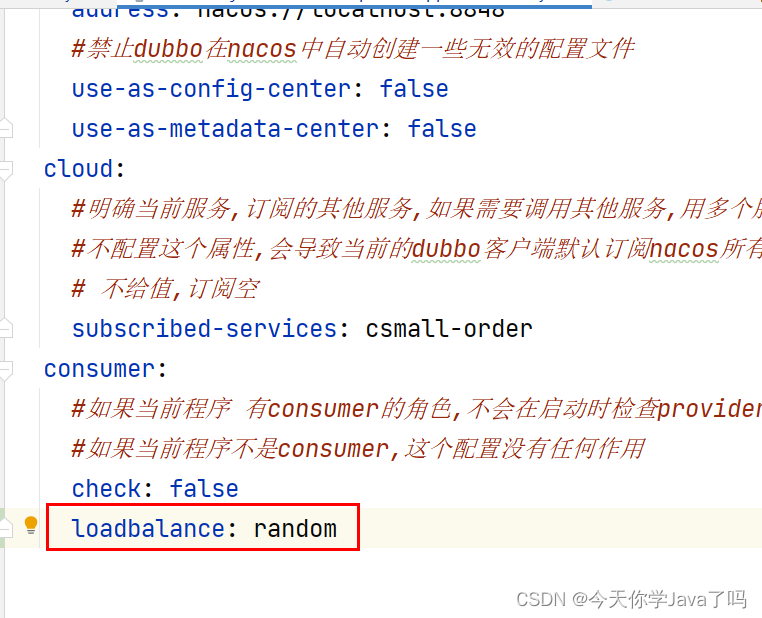
配置yaml(全局配置)
dubbo配置负载均衡优先级
-
全局和局部
局部优先级>全局优先级
-
provider和consumerprovider优先级>consumer优先级
局部provider > 全局provider > 局部consumer > 全局consumer
微服务阶段性架构
Spring Boot Starter自定义配置
到目前看到的很多现象都是和springboot自动配置有关的,减少了很多配置相关工作,自动实现需要的功能,比如nacos自动配置,dubbo自动配置.
- 通过这一章节的学习理解
springboot自动配置原理- 核心注解: 三个组合的作用
- 启动记载
EnableAutoConfiguration流程
- 通过对
springboot自动配置理解,实现自定义starter- 会应用
- 理解其中注解的作用: configuration bean import componentScan Conditional衍生注解 阅读springboot大量自动配置源码
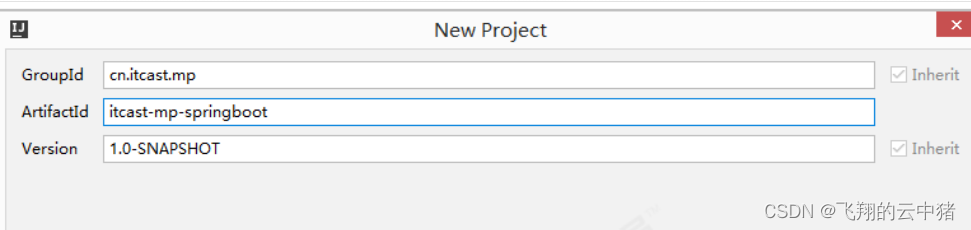
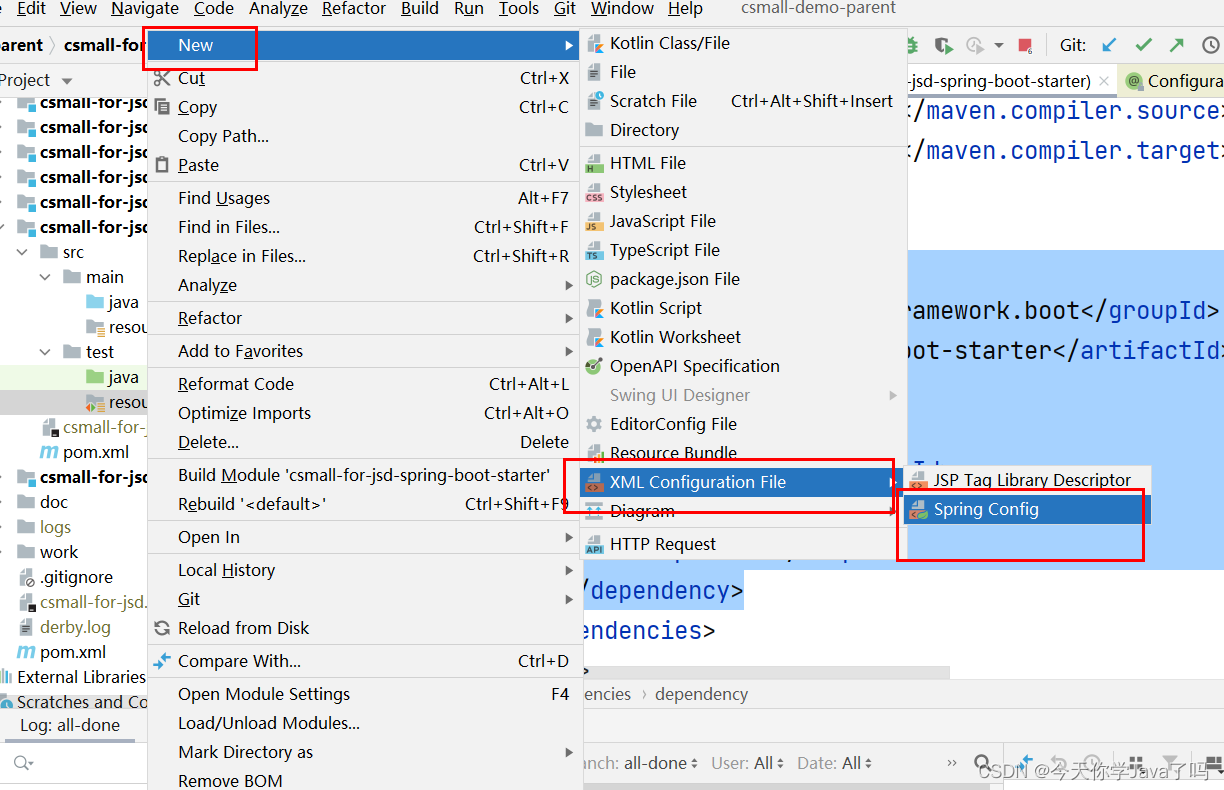
准备一个starter案例项目
-
名字:
csmall-for-jsd-spring-boot-starter -
依赖:
spring-boot-starterjunit
<dependency>
    <groupId>org.springframework.boot</groupId>
    <artifactId>spring-boot-starter</artifactId>
</dependency>
<dependency>
    <groupId>junit</groupId>
    <artifactId>junit</artifactId>
    <scope>test</scope>
</dependency>
Spring框架版本迭代
- SPRING1.X 时代
大量编写xml配置文件的节点,spring框架开发应用程序,每个xml中都会使用大量bean标签,来实现SPRING容器的IOC DI功能.不存在注解 @Autowired,@Component,@Service,@Controller,@Repository
- SPRING2.X时代
java出现了jdk1.5,新特性注解,反射,枚举等功能。SPRING随之推出了基于java5的注解功能的新特性,IOC容器的注解,使得扫描注解能够构造bean对象,@Component,@Service,@Controller,@Repository, DI注入,@Qualifier, @Autowired。让在1.x时代编写大量的xml配置文件的工作减少了很多很多.
什么情况下使用注解:业务层使用注解(Controller Service)
什么#情况下使用xml配置:引入的技术 redis,mysql,等使用xml配置
- SPRING3.X时代
基于java5的注解功能上,spring扩展了大量的功能注解,比如@Configuration,@Bean, @ComponentScan等等,他们可以让在2.x时代残留的那种xml配置,彻底的消失了,从xml配置完全转化成为代码注解的编写
趋势:配置越来越简单
- SPRING4.X/5.X
都是在基于这个趋势,实现更多注解的扩展,让代码的功能变得更强,开发的效率变得更高,出现了很多组合注解,@RestController
4.X时代,spring提供了一个叫做条件注解的@Conditional,springboot能够做到0 xml配置文件是springboot功劳吗?本质不是,spring就支持不需要配置文件xml了
案例学习3.X/4.X重要注解
@Configuration
这个注解在spring3.0出现,作用是一个配置类,一般用来声明一个或者多个bean对象,通过使用内部的方法注解@Bean,交给容器管理.作为配置类.和2.X版本相比,取代XML的作用.一个xml配置,相当于一个配置类.
- 案例读取
xml
第一步: 准备好一个文件
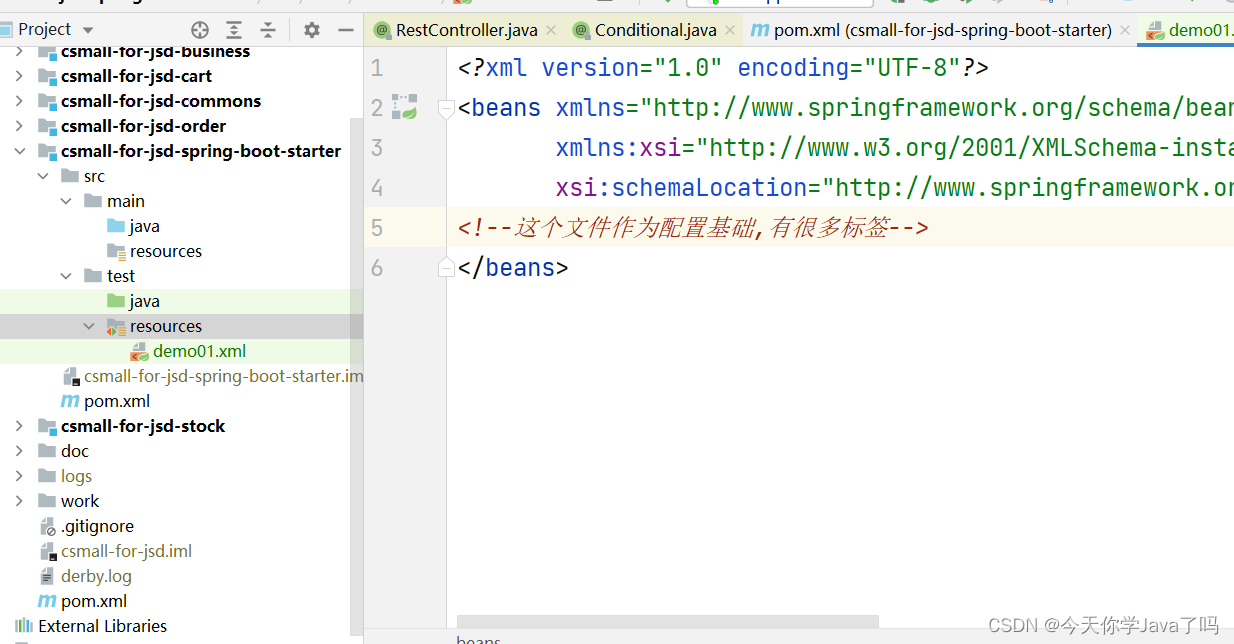
第二步: 通过测试代码,可以加载spring应用的元数据xml配置文件
根据xml配置内容,读取到后,管理spring容器的内存数据
@Test
public void loadXML(){
    //准备加载的文件路径
    String filePath="classpath:demo01.xml";
    //对应加载spring应用的上下文类型
    ClassPathXmlApplicationContext
            application=new ClassPathXmlApplicationContext(filePath);
}
第三步: xml中准备bean标签,创建一个容器bean对象,需要对应一个测试Bean01的类
package com.tarena.csmall.starter.test.beans;

/**
 * @author java@tedu.cn
 * @version 1.0
 */
public class Bean01 {
    public Bean01() {
        System.out.println("Bean01被容器加载了");
    }
}
修改xml
<?xml version="1.0" encoding="UTF-8"?>
<beans xmlns="http://www.springframework.org/schema/beans"
       xmlns:xsi="http://www.w3.org/2001/XMLSchema-instance"
       xsi:schemaLocation="http://www.springframework.org/schema/beans http://www.springframework.org/schema/beans/spring-beans.xsd">
<!--这个文件作为配置基础,有很多标签-->
<bean id="bean01" class="com.tarena.csmall.starter.test.beans.Bean01"/>
</beans>
第四步:@Configuration所属的类,是一个配置类,可以代替xml使用
package com.tarena.csmall.starter.test.configs;

import org.springframework.context.annotation.Configuration;

/**
spring应用的配置类定义,必须添加@Configuration注解
 */
@Configuration
public class MyConfiguration01 {

}
- 案例读取Configuration配置类
/**
 * 通过配置类加载spring应用
 */
@Test
public void loadConfig(){
    //对应加载spring应用的上下文类型
    AnnotationConfigApplicationContext
    application= new AnnotationConfigApplicationContext
            (MyConfiguration01.class);
}
@Bean
常见使用在方法上的注解,作用是配合一个配置类,或者是一个spring可以加载扫描的类例如@Component,使得方法的返回值作为bean对象被容器管理. 效果和一个xml中的bean标签一样
package com.tarena.csmall.starter.test.configs;

import com.tarena.csmall.starter.test.beans.Bean01;
import org.springframework.context.annotation.Bean;
import org.springframework.context.annotation.Configuration;

/**
spring应用的配置类定义,必须添加@Configuration注解
 */
@Configuration
public class MyConfiguration01 {
    /**
     * @Bean注解创建bean01
     */
    @Bean(name="bean01")
    public Bean01 bean01(){
        //可以实现对Bean01对象的初始化
        Bean01 bean01=new Bean01();
        return bean01;
    }
}
@ComponentScan
配合一个配置类@Configuration实现类注解的扫描.扫描@Controller , @Service,@Componet ,@Autowired, @Configuration等
xml实现注解的扫描
<?xml version="1.0" encoding="UTF-8"?>
<beans xmlns="http://www.springframework.org/schema/beans"
       xmlns:xsi="http://www.w3.org/2001/XMLSchema-instance"
       xmlns:context="http://www.springframework.org/schema/context"
       xsi:schemaLocation="
       http://www.springframework.org/schema/beans
       http://www.springframework.org/schema/beans/spring-beans.xsd
       http://www.springframework.org/schema/context
       http://www.springframework.org/schema/beans/spring-context.xsd">
    <!--这个文件作为配置基础,有很多标签-->
    <bean id="bean01" class="com.tarena.csmall.starter.test.beans.Bean01"/>
    <!--包扫描-->
    <context:component-scan base-package="com.tarena.csmall.starter.test.beans"/>
    <!--<context:component-scan base-package=""/>-->
</beans>
- 准备
Bean02
package com.tarena.csmall.starter.test.beans;

import org.springframework.stereotype.Component;

/**
 * @author java@tedu.cn
 * @version 1.0
 */
@Component
public class Bean02 {
    public Bean02() {
        System.out.println("Bean02被容器加载了");
    }
}
- 配置类添加注解
package com.tarena.csmall.starter.test.configs;

import com.tarena.csmall.starter.test.beans.Bean01;
import org.springframework.context.annotation.Bean;
import org.springframework.context.annotation.ComponentScan;
import org.springframework.context.annotation.Configuration;

/**
spring应用的配置类定义,必须添加@Configuration注解
 */
@Configuration
//什么属性都不加,会默认扫描当前配置类所在的包
@ComponentScan(basePackages ={"com.tarena.csmall.starter.test.beans"} )
public class MyConfiguration01 {
    /**
     * @Bean注解创建bean01
     */
    @Bean(name="bean01")
    public Bean01 bean01(){
        //可以实现对Bean01对象的初始化
        Bean01 bean01=new Bean01();
        return bean01;
    }
}
@Import
在xml编写的时候,不会将所有的xml逻辑,都集中在一个xml中
为了易读,将文件分开.导入的总是一个入口(demo01.xml)
在spring项目中,无论是自己编写还是已经提供的配置类,都会存在大量的配置类叫做Configuration。被容器加载的入口配置类可以通过引入这个注解,导入其它想要生效的配置类,也要配合配置类注解使用Import
- demo02.xml
<?xml version="1.0" encoding="UTF-8"?>
<beans xmlns="http://www.springframework.org/schema/beans"
       xmlns:xsi="http://www.w3.org/2001/XMLSchema-instance"
       xmlns:context="http://www.springframework.org/schema/context"
       xsi:schemaLocation="
       http://www.springframework.org/schema/beans
       http://www.springframework.org/schema/beans/spring-beans.xsd
       http://www.springframework.org/schema/context
       http://www.springframework.org/schema/context/spring-context.xsd">
    <!--加载一个bean03-->
    <bean id="bean03" class="com.tarena.csmall.starter.test.beans.Bean03"/>
</beans>
- 通过
demo01加载demo02
可以使用import标签
<?xml version="1.0" encoding="UTF-8"?>
<beans xmlns="http://www.springframework.org/schema/beans"
       xmlns:xsi="http://www.w3.org/2001/XMLSchema-instance"
       xmlns:context="http://www.springframework.org/schema/context"
       xsi:schemaLocation="
       http://www.springframework.org/schema/beans
       http://www.springframework.org/schema/beans/spring-beans.xsd
       http://www.springframework.org/schema/context
       http://www.springframework.org/schema/context/spring-context.xsd">
    <!--这个文件作为配置基础,有很多标签-->
    <bean id="bean01" class="com.tarena.csmall.starter.test.beans.Bean01"/>
    <!--包扫描-->
    <context:component-scan base-package="com.tarena.csmall.starter.test.beans"/>
    <!--<context:component-scan base-package=""/>-->
    <!--导入demo02-->
    <import resource="demo02.xml"/>
</beans>
- 补充配置类
package com.tarena.csmall.starter.test.configs;

import com.tarena.csmall.starter.test.beans.Bean01;
import com.tarena.csmall.starter.test.beans.Bean03;
import org.springframework.context.annotation.Bean;
import org.springframework.context.annotation.ComponentScan;
import org.springframework.context.annotation.Configuration;

/**
spring应用的配置类定义,必须添加@Configuration注解
 */
@Configuration
public class MyConfiguration02 {
    @Bean(name="bean03")
    public Bean03 bean03(){
        //可以实现对Bean01对象的初始化
        Bean03 bean03=new Bean03();
        return bean03;
    }
}
- 导入当前
spring应用
package com.tarena.csmall.starter.test.configs;

import com.tarena.csmall.starter.test.beans.Bean01;
import org.springframework.context.annotation.Bean;
import org.springframework.context.annotation.ComponentScan;
import org.springframework.context.annotation.Configuration;
import org.springframework.context.annotation.Import;

/**
spring应用的配置类定义,必须添加@Configuration注解
 */
@Configuration
//什么属性都不加,会默认扫描当前配置类所在的包
@ComponentScan(basePackages ={"com.tarena.csmall.starter.test.beans"} )
//可以导入两种值
//第一种直接导入配置类
//第二种导入选择器,导入的类非常非常多 100多个200多个...
//springboot中使用的第二种导入方式
@Import(value ={MyConfiguration02.class} )
public class MyConfiguration01 {
    /**
     * @Bean注解创建bean01
     */
    @Bean(name="bean01")
    public Bean01 bean01(){
        //可以实现对Bean01对象的初始化
        Bean01 bean01=new Bean01();
        return bean01;
    }
}
对应标签和注解的关系,转化,还有很多
@PropertySource
导入自定义的配置文件properties
比如自定义jdbc.properties
csmall.user=wangcuihua
csmall.password=123456
也会读入内存,可以使用@Value使用
package com.tarena.csmall.starter.test.configs;

import com.tarena.csmall.starter.test.beans.Bean01;
import org.springframework.beans.factory.annotation.Value;
import org.springframework.context.annotation.*;

/**
spring应用的配置类定义,必须添加@Configuration注解
 */
@Configuration
//什么属性都不加,会默认扫描当前配置类所在的包
@ComponentScan(basePackages ={"com.tarena.csmall.starter.test.beans"} )
//可以导入两种值
//第一种直接导入配置类
//第二种导入选择器,导入的类非常非常多 100多个200多个...
//springboot中使用的第二种导入方式
@Import(value ={MyConfiguration02.class} )
@PropertySource("classpath:jdbc.properties")
public class MyConfiguration01 {
    /**
     * @Bean注解创建bean01
     */
    @Bean(name="bean01")
    public Bean01 bean01(){
        //可以实现对Bean01对象的初始化
        Bean01 bean01=new Bean01();
        return bean01;
    }
}
@ImportResource
通过这个注解,允许启动spring应用中,元数据(配置类和配置xml都看成是元数据)可以来自配置类的同时,也来自配置xml文件
这个注解可以作用在配置上,读取额外的配置xml文件
- 准备
Bean04
package com.tarena.csmall.starter.test.beans;

/**
 * @author java@tedu.cn
 * @version 1.0
 */
public class Bean04 {
    public Bean04() {
        System.out.println("Bean04被容器加载了");
    }
}
demo03.xml
<?xml version="1.0" encoding="UTF-8"?>
<beans xmlns="http://www.springframework.org/schema/beans"
       xmlns:xsi="http://www.w3.org/2001/XMLSchema-instance"
       xmlns:context="http://www.springframework.org/schema/context"
       xsi:schemaLocation="
       http://www.springframework.org/schema/beans
       http://www.springframework.org/schema/beans/spring-beans.xsd
       http://www.springframework.org/schema/context
       http://www.springframework.org/schema/context/spring-context.xsd">
    <!--加载一个bean03-->
    <bean id="bean04" class="com.tarena.csmall.starter.test.beans.Bean04"/>
</beans>
- 修改入口配置类
package com.tarena.csmall.starter.test.configs;

import com.tarena.csmall.starter.test.beans.Bean01;
import org.springframework.beans.factory.annotation.Value;
import org.springframework.context.annotation.*;

/**
spring应用的配置类定义,必须添加@Configuration注解
 */
@Configuration
//什么属性都不加,会默认扫描当前配置类所在的包
@ComponentScan(basePackages ={"com.tarena.csmall.starter.test.beans"} )
//可以导入两种值
//第一种直接导入配置类
//第二种导入选择器,导入的类非常非常多 100多个200多个...
//springboot中使用的第二种导入方式
@Import(value ={MyConfiguration02.class} )
@PropertySource("classpath:jdbc.properties")
@ImportResource("classpath:demo03.xml")
public class MyConfiguration01 {
    /**
     * @Bean注解创建bean01
     */
    @Bean(name="bean01")
    public Bean01 bean01(){
        //可以实现对Bean01对象的初始化
        Bean01 bean01=new Bean01();
        return bean01;
    }
}
springboot自动配置原理
核心在于启动类的注解@SpringBootApplication
debug工具
debug运行
代码中,定好断点,debug运行
debug工具和视图
![[外链图片转存失败,源站可能有防盗链机制,建议将图片保存下来直接上传(img-uVras4Id-1689591089796)(E:/TeduWork/notes-2303/%25E8%25AF%25BE%25E5%25A0%2582%25E7%25AC%2594%25E8%25AE%25B0/Day07/assets/image-20230717152034653.png)]](https://img-blog.csdnimg.cn/a89ab138ffde489da5f7faee93607cba.png)
springboot原理详解
核心注解
-
springboot利用spring注解功能编写整理的一个组合注解SpringApplicationConfiguration: 包装了一个@Configuration的注解,所以有这个注解的类本身就是一个配置类(启动类是个配置).ComponentScan: 扫描 自定义的各种注解所在的包,比如servicecontroller全局异常捕获(加载和扫描我们自己的业务逻辑).EnableAutoConfiguration: 开启自动配置加载
-
步骤:
- 导入一个选择器: 执行一个核心方法
selectImports
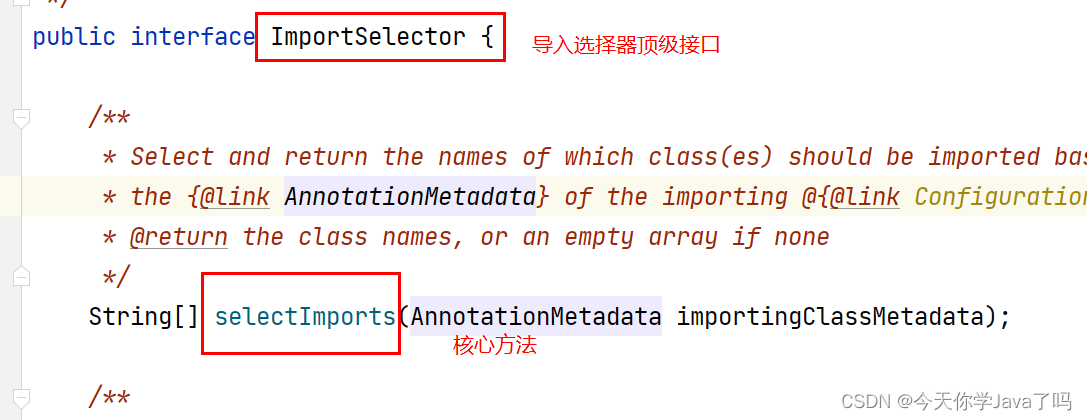
方法返回结果是一个数组
String[],元素是自动配置类全路径名称.{"com.aa.a.**AutoConfiguration","com.aa.b.**AutoConfiguration"..}![[外链图片转存失败,源站可能有防盗链机制,建议将图片保存下来直接上传(img-7v2A8W74-1689591089798)(E:/TeduWork/notes-2303/%25E8%25AF%25BE%25E5%25A0%2582%25E7%25AC%2594%25E8%25AE%25B0/Day07/assets/image-20230717153800902.png)]](https://img-blog.csdnimg.cn/93cb8534f76f4ce39fb95d5a74a7ed41.png)
Import导入注解,获取这些字符串数组元素,就会执行导入功能
对比
import另一种导入方式,直接导入配置类的反射对象.这里只多了一步,解析全路径名称,获取反射对象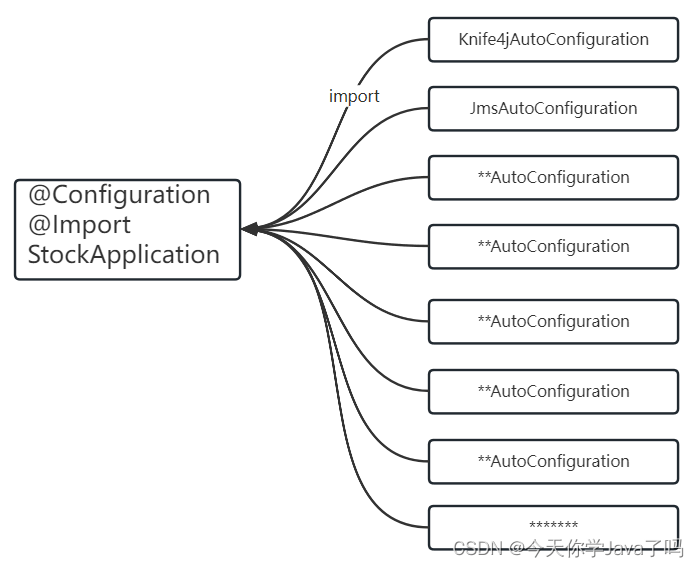
- 导入一个选择器: 执行一个核心方法
问题:如此多的配置类,不可能在一个项目中全部使用
要进行过滤和筛选,哪些有效,哪些无效
条件注解@Conditional
在众多的自动配置类中,就需要满足一定条件,才能加载.这个功能是spring提供的条件注解,在springboot做了衍生满足条件,配置类才加载,不满足条件,配置类不加载的。一个springboot工程启动,如果观察哪些配置满足条件,可以使用debug模式,对应root范围
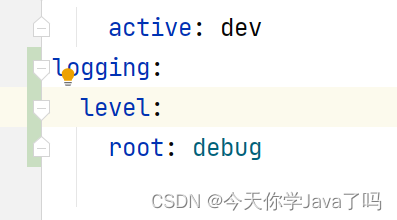
会在日志中出现提示
matched configuration
unmatched configuration
提示哪些条件没有满足
@ConditionalOnClass
类注解和方法注解,条件满足类加载,方法加载.条件不满足,则不加载.
指定class必须在依赖环境中存在.存在则满足,不存在则不满足
@ConditionalOnMissingClass
与上面的条件逻辑是相反的.存在则不满足,不存在则满足
@ConditionalOnBean
类注解和方法注解, 某个限定条件的bean对象在容器中存在 则满足,不存在则不满足
@ConditionalOnMissingBean
与上面条件逻辑相反.一般是留给自定义扩展的
@ConditionalOnProperty
根据条件对属性的描述,判断满足还是不满足,可以提供属性存在,属性值是否指定,属性值是否未命中等逻辑.
条件配置类案例
测试@ConditionalOnMissingClass和@ConditionalOnProperty
- 准备一个被扫描的配置类
MyConditionalConfiguration01
package com.tarena.csmall.starter.test.condition;

/**
 * @author java@tedu.cn
 * @version 1.0
 */

import org.springframework.boot.autoconfigure.condition.ConditionalOnProperty;
import org.springframework.context.annotation.Bean;
import org.springframework.context.annotation.Configuration;

/**
 * 测试一个注解@ConditionalOnProperty
 */
@Configuration
/**
 * 如果内存中有个csmall.password=123456
 * 则条件满足
 * jwt.rsa.pwd=678
 */
@ConditionalOnProperty
        (prefix = "csmall",value ="password",havingValue ="123456")
public class MyConditionalConfiguration01 {
    public MyConditionalConfiguration01() {
        System.out.println("条件配置类01,条件满足,加载");
    }
}
ConditionalOnProperty 描述
属性有csmall.password=123456 的属性数据 条件则满足,没有,或者值不是123456都不满足
- 使用入口配置类扫描这个测试
package com.tarena.csmall.starter.test.configs;

import com.tarena.csmall.starter.test.beans.Bean01;
import org.springframework.beans.factory.annotation.Value;
import org.springframework.context.annotation.*;

/**
spring应用的配置类定义,必须添加@Configuration注解
 */
@Configuration
//什么属性都不加,会默认扫描当前配置类所在的包
@ComponentScan(basePackages ={
        "com.tarena.csmall.starter.test.beans",
        "com.tarena.csmall.starter.test.condition"} )
//可以导入两种值
//第一种直接导入配置类
//第二种导入选择器,导入的类非常非常多 100多个200多个...
//springboot中使用的第二种导入方式
@Import(value ={MyConfiguration02.class} )
@PropertySource("classpath:jdbc.properties")
@ImportResource("classpath:demo03.xml")
public class MyConfiguration01 {
    /**
     * @Bean注解创建bean01
     */
    @Bean(name="bean01")
    public Bean01 bean01(){
        //可以实现对Bean01对象的初始化
        Bean01 bean01=new Bean01();
        return bean01;
    }
}
@ConditionalOnClass/ConditionalOnMissingClass
package com.tarena.csmall.starter.test.condition;

import org.springframework.boot.autoconfigure.condition.ConditionalOnClass;
import org.springframework.boot.autoconfigure.condition.ConditionalOnMissingClass;
import org.springframework.context.annotation.Configuration;
import redis.clients.jedis.Jedis;


@Configuration
//jedis是redis的一个java客户端. redisTemplate底层在使用的就有可能是jedis
@ConditionalOnMissingClass({"redis.clients.jedis.dfgdsf"})
public class MyConditionalConfiguration02 {
    public MyConditionalConfiguration02() {
        System.out.println("条件配置类02,条件满足,加载");
    }
}
导入的配置类在哪
通过selector导入String[], String[]哪来的? springboot如果将其写死.没有扩展的空间了
springboot提供了自动配置的导入逻辑,需要准备一个META-INF/spring.factories的文件,这个文件的格式,可以参考spring-boot-autoconfigure中的内容
![[外链图片转存失败,源站可能有防盗链机制,建议将图片保存下来直接上传(img-thhH4WYb-1689591089799)(E:/TeduWork/notes-2303/%25E8%25AF%25BE%25E5%25A0%2582%25E7%25AC%2594%25E8%25AE%25B0/Day07/assets/image-20230717164921879.png)]](https://img-blog.csdnimg.cn/ce4929b929204f169664a696de0b0318.png)
![[外链图片转存失败,源站可能有防盗链机制,建议将图片保存下来直接上传(img-ov5guAVR-1689591089800)(E:/TeduWork/notes-2303/%25E8%25AF%25BE%25E5%25A0%2582%25E7%25AC%2594%25E8%25AE%25B0/Day07/assets/image-20230717164948273.png)]](https://img-blog.csdnimg.cn/1c63af58300347d9b2aaf362a1676c79.png)
![[外链图片转存失败,源站可能有防盗链机制,建议将图片保存下来直接上传(img-rlFo9yt7-1689591089804)(E:/TeduWork/notes-2303/%25E8%25AF%25BE%25E5%25A0%2582%25E7%25AC%2594%25E8%25AE%25B0/Day07/assets/image-20230717165143786.png)]](https://img-blog.csdnimg.cn/d7472bf1f1f74ae6a1feb956d9807d6b.png)
加载自动配置的逻辑全部介绍完了:
-
启动类的核心注解(
EnableAutoConfiguration) -
叫
Enable的注解都在导入 -
Import注解导入一个selector选择器(返回一堆配置类的全路径名称String[]) -
并不是所有的自动配置类都加载,需要满足条件注解
-
这些
String[]来自于一个META-INF/spring.factories的文件,通过注解作为key值,读取数据
阅读当前autoconfigure
-srping-boot-starter,必定包含autoconfigure
mybatis-spring-boot-starter:mybatis-spring-boot-autoconfiguredubbo-spring-boot-starter:dubbo-spring-boot-autoconfigure
自定义starter
需求描述:
使用stock 依赖自定义starter 定义一个配置,不需要stock扫描,也不需要手动导入,使用自动配置扩展逻辑配置在spring.factories文件中,使用属性 csmall.user.enable开启自动配置逻辑(条件)
准备一个自动配置类
package com.tarena.spring.boot.starter.config;

import com.tarena.spring.boot.starter.po.User;
import lombok.extern.slf4j.Slf4j;
import org.springframework.boot.autoconfigure.condition.ConditionalOnProperty;
import org.springframework.context.annotation.Bean;
import org.springframework.context.annotation.Configuration;

/**
 * @author java@tedu.cn
 * @version 1.0
 */
@Configuration
@Slf4j
public class UserAutoConfiguration {
    //创建一个user对象,但是是否创建取决于属性条件
    @Bean
    @ConditionalOnProperty
            (prefix = "csmall",value = "enable",havingValue = "true")
    public User initUser(){
        log.debug("条件满足,user创建容器bean对象");
        User user=new User();
        return user;
    }
}
只要加载配置类,条件满足,容器user bean对象就创建了,条件不满足,user不创建
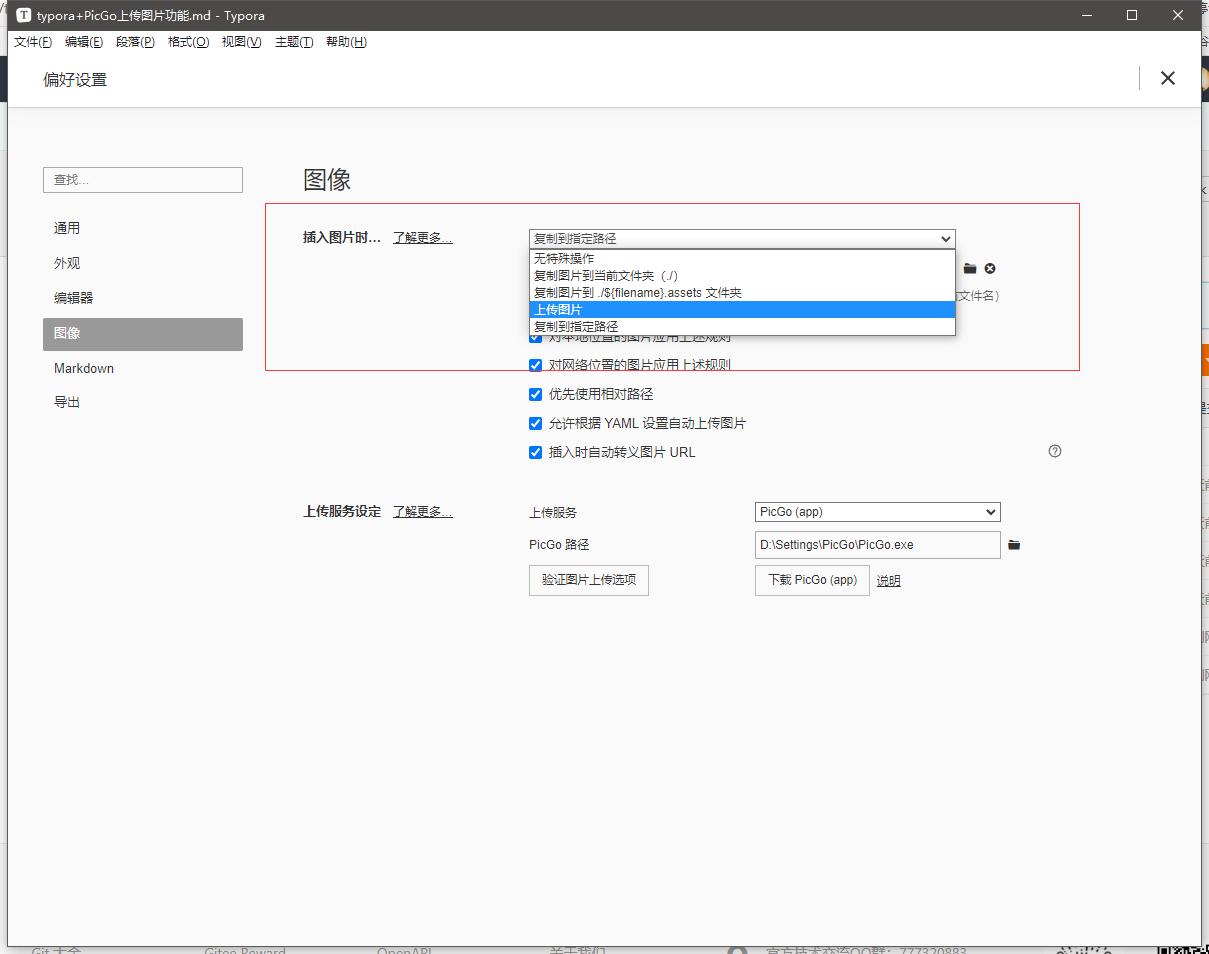
准备spring.factories
在自定义的starter项目中,准备一个文件resources/META-INF/spring.factories
![[外链图片转存失败,源站可能有防盗链机制,建议将图片保存下来直接上传(img-x4YHJ3XX-1689591089805)(E:/TeduWork/notes-2303/%25E8%25AF%25BE%25E5%25A0%2582%25E7%25AC%2594%25E8%25AE%25B0/Day07/assets/image-20230717173707695.png)]](https://img-blog.csdnimg.cn/abfa872cf9e54b888c3825d6b530dc68.png)
org.springframework.boot.autoconfigure.EnableAutoConfiguration=\
com.tarena.spring.boot.starter.config.UserAutoConfiguration