本文主要是记录学习openvino_notebootk 302-pytorch-quantization-aware-training文档的一些收获,对于yolov5在cpu部署感兴趣的可以参考下。
此文档的目的是为了了解openvino如何降低模型部署的推理时间,同时尽可能保证精度。
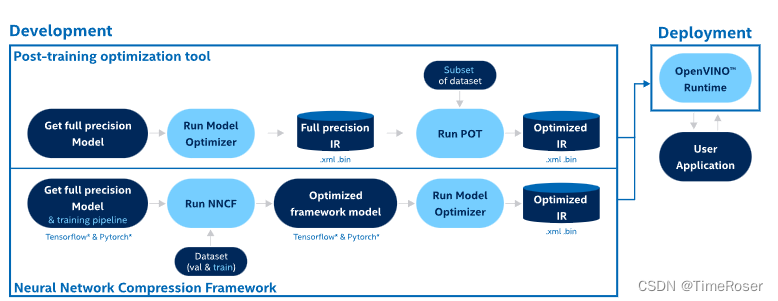
此文档一共提供了两种PTQ量化方式,下面分别介绍。
0. 数据集准备
首先两者都需要使用数据进行校准(calibration),借助于yolov5优秀的代码,这里直接调用它的dataloader即可。
data = check_dataset(DATASET_CONFIG)
val_dataloader = create_dataloader(
    data["val"], imgsz=640, batch_size=1, stride=32, pad=0.5, workers=1
)[0]

return val_dataloader
1. PTQ with POT(post-training Optimization Tool) 不推荐- _ -
1.1 准备数据
获取yolov5原始的data之后,对于POT,需要再实现openvino.tools.pot.api里面的DataLoader类, 有两个必须要实现的方法__init__ and __gtitem__.
from openvino.tools.pot.api import DataLoader

class YOLOv5POTDataLoader(DataLoader):
    """Inherit from DataLoader function and implement for YOLOv5."""

    def __init__(self, data_source):
        super().__init__({})
        self._data_loader = data_source
        self._data_iter = iter(self._data_loader)

    def __len__(self):
        return len(self._data_loader.dataset)

    def __getitem__(self, item):
        try:
            batch_data = next(self._data_iter)
        except StopIteration:
            self._data_iter = iter(self._data_loader)
            batch_data = next(self._data_iter)

        im, target, path, shape = batch_data

        im = im.float()
        im /= 255
        nb, _, height, width = im.shape
        img = im.cpu().detach().numpy()
        target = target.cpu().detach().numpy()

        annotation = dict()
        annotation["image_path"] = path
        annotation["target"] = target
        annotation["batch_size"] = nb
        annotation["shape"] = shape
        annotation["width"] = width
        annotation["height"] = height
        annotation["img"] = img

        return (item, annotation), img
1.2 配置量化流程
对于POT,量化参数需要通过配置字典(configuration dictionary)定义。包括algorithms,描述算法的参数,engine 描述推理流程的参数(optional),model描述float模型的路径。
algorithms_config = [
    {
        "name": "DefaultQuantization",
        "params": {
            "preset": "mixed",
            "stat_subset_size": 300,
            "target_device": "CPU"
        },
    }
]

engine_config = {"device": "CPU"}

model_config = {
    "model_name": f"{MODEL_NAME}",
    "model": fp32_path,
    "weights": fp32_path.replace(".xml", ".bin"),
}
配置好之后,通过以下代码加载模型和创建pipeline
from openvino.tools.pot.engines.ie_engine import IEEngine
from openvino.tools.pot.graph import load_model
from openvino.tools.pot.pipeline.initializer import create_pipeline

#  Load model as POT model representation
pot_model = load_model(model_config)

#  Initialize the engine for metric calculation and statistics collection.
engine = IEEngine(config=engine_config, data_loader=pot_data_loader)

# Step 5: Create a pipeline of compression algorithms.
pipeline = create_pipeline(algorithms_config, engine)
1.3 运行
通过调用pipeline.run(pot_model)来开始POT量化,可以通过save_model来保存,optionally,可以通过compress_model_weights来对模型的权重进行压缩。这里不是很理解,我还以为int8之后模型的大小会自动变小呢?
from openvino.tools.pot.graph.model_utils import compress_model_weights
from openvino.tools.pot.graph import load_model, save_model

compressed_model = pipeline.run(pot_model)
compress_model_weights(compressed_model)
optimized_save_dir = Path(f"{MODEL_PATH}/POT_INT8_openvino_model/")
save_model(compressed_model, optimized_save_dir, model_config["model_name"] + "_int8")
pot_int8_path = f"{optimized_save_dir}/{MODEL_NAME}_int8.xml"
2. PTQ with NNCF
2.1 准备数据
nncf不需要再实现一个Dataloader类,它只需要将yolov5中的val_dataloader 封装进nncf.Dataset中即可。此外,可以将data预处理的逻辑写进去,以使数据满足model的输入要求,上面的POT也实现了该功能。
import nncf

# Define the transformation method. This method should take a data item returned
# per iteration through the `data_source` object and transform it into the model's
# expected input that can be used for the model inference.
def transform_fn(data_item):
    # unpack input images tensor
    images = data_item[0]
    # convert input tensor into float format
    images = images.float()
    # scale input
    images = images / 255
    # convert torch tensor to numpy array
    images = images.cpu().detach().numpy()
    return images

# Wrap framework-specific data source into the `nncf.Dataset` object.
nncf_calibration_dataset = nncf.Dataset(data_source, transform_fn)
2.2 参数配置
nncf有多种量化方式。nncf.quantize用来进行 DefaultQuantization Algorithm, nncf.quantize_with_accuracy_control用来进行 AccuracyAwareQuantization. 他也有一些参数诸如preset , model_type, subset_size, fast_bias_correction等,当前我只知道subset_size代表数据集的数量,其它还不是很明确。本文用到的配置如下
subset_size = 300
preset = nncf.QuantizationPreset.MIXED
2.3 运行
通过调用nncf.quantize来进行nncf量化,通过调用oepnvino.runtime.serialize保存模型。
from openvino.runtime import Core

core = Core()
ov_model = core.read_model(fp32_path)
quantized_model = nncf.quantize(
    ov_model, nncf_calibration_dataset, preset=preset, subset_size=subset_size
)
nncf_int8_path = f"{MODEL_PATH}/NNCF_INT8_openvino_model/{MODEL_NAME}_int8.xml"
serialize(quantized_model, nncf_int8_path)
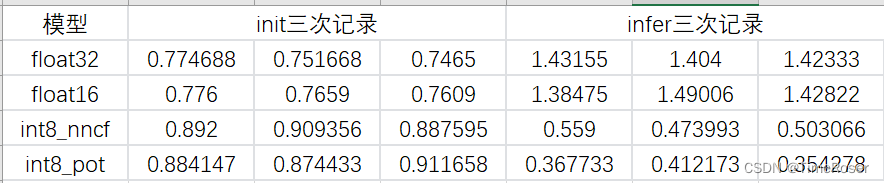
3. 实验结果
这是在我本地测试一张1600*1600的c++推理结果,分为模型加载(init)和推理(infer)两部分,在效果没有明显差别的情况下,POT和nncf性能都提升了4倍左右。
4. 完整代码
下面是我将jupyter中的代码移植到本地yolov5中的完整代码。
import torch
import nncf
import sys
from openvino.tools import mo
from openvino.runtime import serialize
from pathlib import Path

sys.path.append('.')
sys.path.append('..')
from utils.dataloaders import create_dataloader
from utils.general import check_dataset
from openvino.tools.pot.api import DataLoader
from openvino.tools.pot.engines.ie_engine import IEEngine
from openvino.tools.pot.graph import load_model
from openvino.tools.pot.pipeline.initializer import create_pipeline
from openvino.tools.pot.graph.model_utils import compress_model_weights
from openvino.tools.pot.graph import save_model
from openvino.runtime import Core

from export import attempt_load, yaml_save
from val import run as validation_fn


IMAGE_SIZE = 1600
ONNX_PATH = './weights/best.onnx'
MODEL_NAME = "yolov5l"
MODEL_PATH = "./weights"
DATASET_CONFIG = "mydata/0612.yaml"

fp32_path = f"{MODEL_PATH}/FP32_openvino_model/{MODEL_NAME}_fp32.xml"
fp16_path = f"{MODEL_PATH}/FP16_openvino_model/{MODEL_NAME}_fp16.xml"


class YOLOv5POTDataLoader(DataLoader):
    """Inherit from DataLoader function and implement for YOLOv5."""
    def __init__(self, data_source):
        super().__init__({})
        self._data_loader = data_source
        self._data_iter   = iter(self._data_loader)

    def __len__(self):
        return len(self._data_loader.dataset)

    def __getitem__(self, index):
        try:
            batch_data = next(self._data_iter)
        except StopIteration:
            self._data_iter = iter(self._data_loader)
            batch_data = next(self._data_iter)

        im, target, path, shape = batch_data
        im = im.float()
        im /= 255
        nb, _, height, width = im.shape
        img = im.cpu().detach().numpy()
        target = target.cpu().detach().numpy()

        annotation = dict()
        annotation["image_path"] = path
        annotation["target"] = target
        annotation["batch_size"] = nb
        annotation["shape"] = shape
        annotation["width"] = width
        annotation["height"] = height
        annotation["img"] = img

        return (index, annotation), img

def onnx2mo(onnx_path):

    # fp32 IR model
    fp32_path = f"{MODEL_PATH}/FP32_openvino_model/{MODEL_NAME}_fp32.xml"
    print(f"Export ONNX to OpenVINO FP32 IR to: {fp32_path}")
    model = mo.convert_model(onnx_path)
    serialize(model, fp32_path)

    # fp16 IR model
    fp16_path = f"{MODEL_PATH}/FP16_openvino_model/{MODEL_NAME}_fp16.xml"
    print(f"Export ONNX to OpenVINO FP16 IR to: {fp16_path}")
    model = mo.convert_model(onnx_path, compress_to_fp16=True)
    serialize(model, fp16_path)


def create_data_source():
    data = check_dataset(DATASET_CONFIG)
    val_dataloader = create_dataloader(data['train'], imgsz=IMAGE_SIZE, batch_size=1, stride=32, pad=0.5, workers=1)[0]
    return val_dataloader


# create nncf dataset
def transform_fn(data_item):
    # unpack input images tensor
    images = data_item[0]
    # convert input tensor into float format
    images = images.float()
    # scale input
    images = images / 255
    # convert torch tensor to numpy array
    images = images.cpu().detach().numpy()
    return images

# prepare config and pipeline for pot
algorithms_config = [
    {
        "name": "DefaultQuantization",
        "params": {
            "preset": "mixed",
            "stat_subset_size": 300,
            "target_device": "CPU"
        },
    }
]

engine_config = {"device": "CPU"}

model_config = {
    "model_name": f"{MODEL_NAME}",
    "model": fp32_path,
    "weights": fp32_path.replace(".xml", ".bin"),
}


subset_size = 80
preset = nncf.QuantizationPreset.MIXED


# quantiaztion with pot
def quant_pot():
    compressed_model = pipeline.run(pot_model)
    compress_model_weights(compressed_model)
    optimized_save_dir = Path(f"{MODEL_PATH}/POT_INT8_openvino_model/")
    save_model(compressed_model, optimized_save_dir, model_config["model_name"] + "_int8")
    pot_int8_path = f"{optimized_save_dir}/{MODEL_NAME}_int8.xml"

# quantization with nncf
def quant_nncf():
    core = Core()
    ov_model = core.read_model(fp32_path)
    quantized_model = nncf.quantize(
        ov_model, nncf_calibration_dataset, preset=preset, subset_size=subset_size
    )
    nncf_int8_path = f"{MODEL_PATH}/NNCF_INT8_openvino_model/{MODEL_NAME}_int8.xml"
    serialize(quantized_model, nncf_int8_path)

if __name__ == '__main__':
    onnx2mo(ONNX_PATH)

    # create yolov5 dataloader class for pot
    data_source = create_data_source()
    pot_data_loader = YOLOv5POTDataLoader(data_source)
    print('create yolov5 pot data done')

    nncf_calibration_dataset = nncf.Dataset(data_source, transform_func=transform_fn)
    print('wrap data source into nncf.dataset object. ')

    #  Load model as POT model representation
    pot_model = load_model(model_config)

    #  Initialize the engine for metric calculation and statistics collection.
    engine = IEEngine(config=engine_config, data_loader=pot_data_loader)

    # Step 5: Create a pipeline of compression algorithms.
    pipeline = create_pipeline(algorithms_config, engine)

    quant_pot()
    # print('pot quant done.')
    quant_nncf()
    print('nncf quant done.')