目录
- 一、Spring Framwork简介
- 1. Spring Framework五大功能模块
- 2. Spring Framework特性
- 二、IOC容器
- 1. IOC思想
- 2. IOC容器在Spring中的实现
- 3.基于xml管理Bean
- 3.1 引入依赖
- 3.2 创建类
- 3.3 创建Spring的配置文件
- 3.4 创建测试类
- 3.5 总结
- 4.DI依赖注入
- 4.1 setter注入
- 4.2 构造器注入
- 4.3 特殊值赋值
- 5.bean作用域
- 5.1 单例模式
- 5.2 多例模式
- 6.bean的生命周期
- 6.1 具体的生命周期过程
- 6.2 创建类对象
- 6.3 配置bean
- 6.4 测试方法
- 6.5 bean的后置处理器
- 7.FactoryBean
- 7.1 简介
- 7.2 创建类UserFactoryBean
- 7.3 配置bean
- 7.4 测试方法
- 8.自动装配
- 8.1 概念
- 8.2 基于xml管理bean
- 7.3 基于xml的自动装配
- 8.4 基于注解管理bean(注解+扫描)
- 1. 注解
- 2. 扫描
- 3. 标识组件的常用注解
- 4. 创建类对象
- 5. 测试
- 6. 扫描组件配置
- 8.5 基于注解的自动装配
- 1. 创建组件
- 2. @Autowired:实现自动装配功能的注解
- 三、代理模式
- 1.概念
- 2.静态代理
- 2.1 创建接口对象
- 2.2 创建接口对象的实现类
- 2.3 测试方法
- 2.4 总结
- 3.动态代理
- 3.1 创建代理对象工厂
- 3.2 测试方法
- 4.AOP:面向切面编程
- 4.1 概述
- 4.2 相关术语
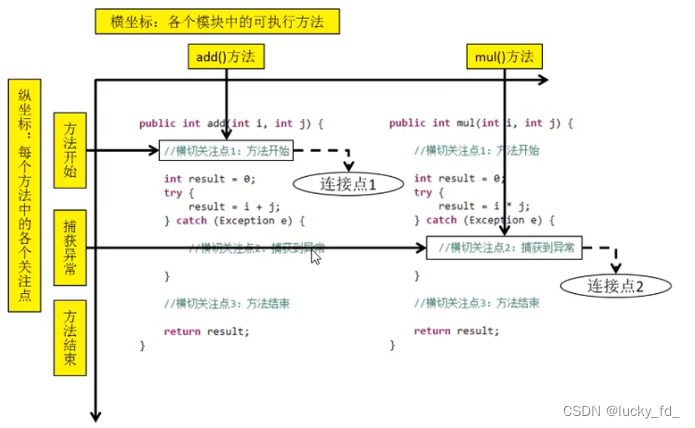
- 1. 横切关注点
- 2. 通知
- 3. 切面
- 4. 目标
- 5. 代理
- 6.连接点
- 7. 切入点
- 4.3 作用
- 4.4 基于注解的AOP
- 1. 添加依赖
- 2. 配置spring文件
- 3. 创建目标对象
- 4. 创建切面类
- 5. 测试类
- 6. 切面的优先级
- 4.5 基于xml的AOP
- 1. 创建切面
- 2. 配置spring配置文件
- 3. 测试方法:
- 四、事务管理
- 1.jdbcTemplate
- 1.1 引入依赖
- 1.2 创建jdbc.properties
- 1.3 spring配置文件
- 1.4 创建测试类
- 2.事务概念
- 2.1 编程式事务
- 2.2 声明式事务
- 3.基于注解的声明式事务
- 3.1 准备工作
- 1. 配置spring配置文件
- 3.2 具体实现
- 1. 创建相关业务类
- 2. 测试事务
- 3.3 事务属性
- 1. readonly 只读
- 2. timeout 超时
- 3. rollbackFor 回滚策略
- 4. isolation 事务隔离级别
- 5. propagation 事务传播行为
- 4.基于xml的声明式事务
- 4.1 引入依赖
- 4.2 spring配置文件
- 4.3 测试方法
一、Spring Framwork简介
Spring 基础框架,可以视为Spring 基础设施,基本上任何其他 Spring 项目都是以 SpringFramework 为基础的。
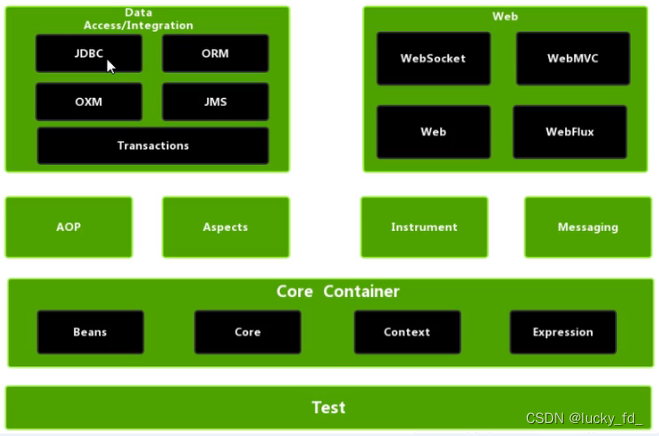
1. Spring Framework五大功能模块
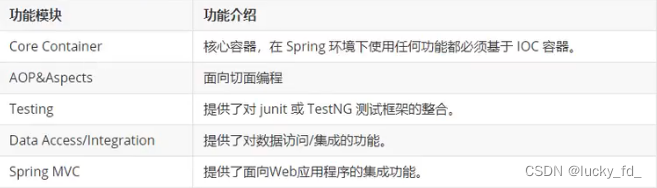
Spring 5 的模块结构图:
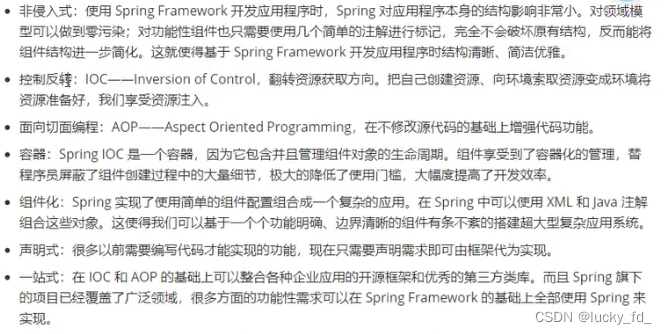
2. Spring Framework特性
二、IOC容器
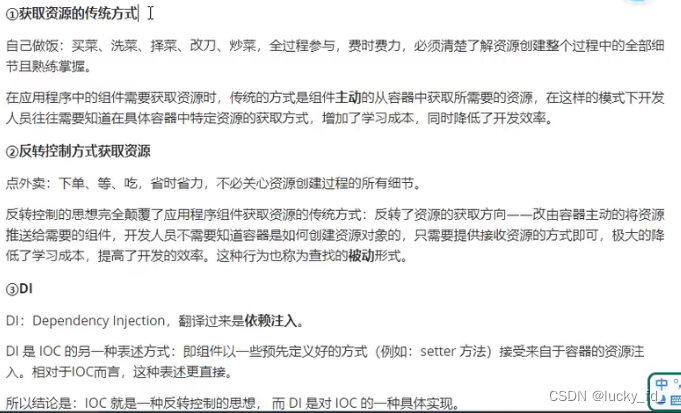
lOC: Inversion of Control,翻译过来是反转控制。把对象创建和对象之间的调用过程,交给 Spring 进行管理
1. IOC思想
2. IOC容器在Spring中的实现
Spring 的IOC 容器就是IOC 思想的一个落地的产品实现。IOC 容器中管理的组件也叫做 bean。在创建 bean 之前,首先需要创建IOC容器。
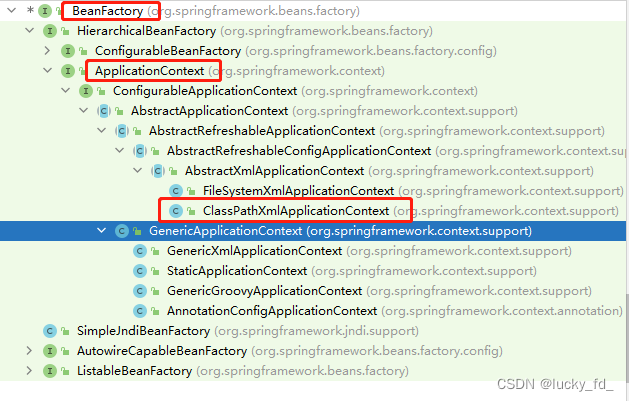
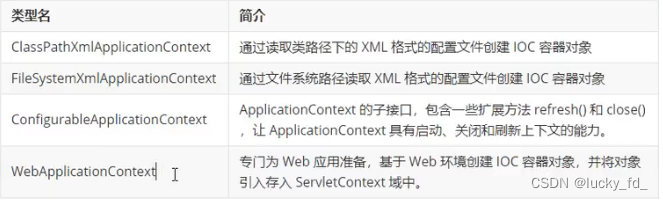
Spring 提供了IOC容器的两种实现方式:
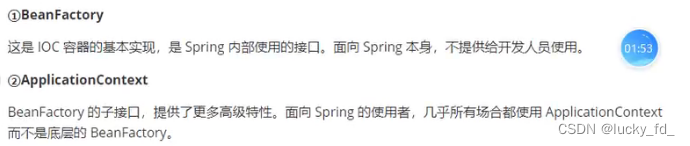
(1) BeanFactory:IOC容器基本实现,是 Spring 内部的使用接口,不提供开发人员进行使用
加载配置文件时候不会创建对象,只有在使用(获取)对象的时候才会创建
(2) ApplicationContext:BeanFactory接口的子接口,提供更多更强大的功能,一般由开发人员进行使用,加载配置文件时候就会把配置文件中的对象进行创建
IOC底层原理:xml解析、工厂模式、反射


3.基于xml管理Bean
3.1 引入依赖
<dependencies>
  <!--基于Maven依赖传递性,导入spring-context依赖即可导入当前所需所有jar包-->
  <dependency>
    <groupId>org.springframework</groupId>
    <artifactId>spring-context</artifactId>
    <version>5.3.19</version>
  </dependency>
  <dependency>
    <groupId>junit</groupId>
    <artifactId>junit</artifactId>
    <version>4.11</version>
    <scope>test</scope>
  </dependency>
</dependencies>
3.2 创建类
package com.fd.spring.pojo;

public interface Person {
}

package com.fd.spring.pojo;

/**
 * SSM
 *
 * @author lucky_fd
 * @since 2023-06-05
 */

public class Student implements Person{

    private Integer id;

    private String name;

    private Integer age;

    private String gender;

    public Student() {
    }

    public Student(Integer id, String name, Integer age, String gender) {
        this.id = id;
        this.name = name;
        this.age = age;
        this.gender = gender;
    }

    public Integer getId() {
        return id;
    }

    public void setId(Integer id) {
        this.id = id;
    }

    public String getName() {
        return name;
    }

    public void setName(String name) {
        this.name = name;
    }

    public Integer getAge() {
        return age;
    }

    public void setAge(Integer age) {
        this.age = age;
    }

    public String getGender() {
        return gender;
    }

    public void setGender(String gender) {
        this.gender = gender;
    }

    @Override
    public String toString() {
        return "Student{" +
                "id=" + id +
                ", name='" + name + '\'' +
                ", age=" + age +
                ", gender='" + gender + '\'' +
                '}';
    }
}
3.3 创建Spring的配置文件
<?xml version="1.0" encoding="UTF-8"?>
<beans xmlns="http://www.springframework.org/schema/beans"
       xmlns:xsi="http://www.w3.org/2001/XMLSchema-instance"
       xsi:schemaLocation="http://www.springframework.org/schema/beans http://www.springframework.org/schema/beans/spring-beans.xsd">

    <!--
    bean:配置一个bean对象,将对象交给IOC容器管理
    属性:
        id: bean的唯一标识,不能重复
        class: 设置bean对象所对应的类型
    -->
    <bean id="studentOne" class="com.fd.spring.pojo.Student"></bean>

    <!--<bean id="studentTwo" class="com.fd.spring.pojo.Student"></bean>-->

</beans>
3.4 创建测试类
@Test
public void studentTest() {
/*
* 获取bean的三种方式:
* 1、根bean的id获取
* 2、根bean的类型获取
* 注意:根据类型获取bean时,要求IOC容器中有且只有一个类型匹配的bean
* 若没有任何一个类型匹配的bean,此时抛出异常:NoSuchBeanDefinitionException
* 若有多个类型匹配的bean,此时抛出异常:NoUniqueBeanDefinitionException
* 3、根据bean的id和类型获取
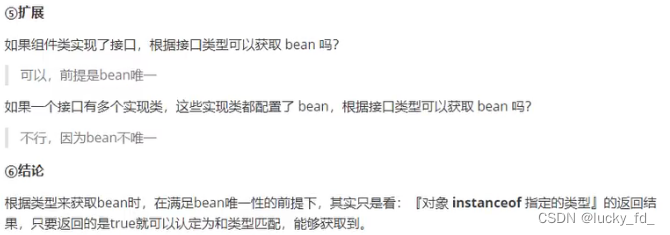
* 结论:根据类型来获取bean时,在满足bean唯一性的前提下其实只是看:[对象 instanceof 指定的类型]的返回结果只要返回的是true就可以认定为和类型匹配,能够获取到。
* 即通过bean的类型、bean所继承的类的类型、bean所实现的接口的类型都可以获取bean
*
* */
ClassPathXmlApplicationContext applicationContext = new ClassPathXmlApplicationContext("spring_ioc.xml");
// 根据bean的id获取bean
Student studentOne = (Student)applicationContext.getBean("studentOne");
System.out.println(studentOne);
// 根据bean的类型获取bean, 注意:根据类型获取bean时,要求IOC容器中有且只有一个类型匹配的bean
Student bean = applicationContext.getBean(Student.class);
System.out.println(bean);
// 根据bean的id和类型来获取bean
Student one = applicationContext.getBean("studentOne", Student.class);
System.out.println(one);
// 通过接口获取
Person person = applicationContext.getBean(Person.class);
System.out.println(person);
}
3.5 总结
获取bean的三种方式:
* 1、根bean的id获取
* 2、根bean的类型获取
* 注意:根据类型获取bean时,要求IOC容器中有且只有一个类型匹配的bean
* 若没有任何一个类型匹配的bean,此时抛出异常:NoSuchBeanDefinitionException
* 若有多个类型匹配的bean,此时抛出异常:NoUniqueBeanDefinitionException
* 3、根据bean的id和类型获取
* 结论:根据类型来获取bean时,在满足bean唯一性的前提下其实只是看:[对象 instanceof 指定的类型]的返回结果只要返回的是true就可以认定为和类型匹配,能够获取到。
* 即通过bean的类型、bean所继承的类的类型、bean所实现的接口的类型都可以获取bean
4.DI依赖注入
4.1 setter注入
Spring配置文件
<bean id="studentOne" class="com.fd.spring.pojo.Student">
    <!--
        property:通过成员变量的setXxx()方法进行赋值
        name:设置需要赋值的属性名 (和set方法有关)
        value:设置为属性所赋的值
    -->
    <property name="id" value="1001"></property>
    <property name="name" value="张三"></property>
    <property name="age" value="25"></property>
    <property name="gender" value="男"></property>
</bean>
测试方法:
@Test
public void DiTest() {
    // 获取IOC容器
    ApplicationContext ioc = new ClassPathXmlApplicationContext("spring_ioc.xml");
    Student studentOne = (Student)ioc.getBean("studentOne");
    System.out.println(studentOne);
}
4.2 构造器注入
Spring配置文件
<bean id="studentTwo" class="com.fd.spring.pojo.Student">
    <constructor-arg name="id" value="1002" type="int"></constructor-arg>
    <constructor-arg name="age" value="28"></constructor-arg>
    <constructor-arg name="gender" value="女"></constructor-arg>
    <constructor-arg name="name" value="丽丽"></constructor-arg>
</bean>
测试方法:
@Test
public void DiConstructorTest() {
    ClassPathXmlApplicationContext applicationContext = new ClassPathXmlApplicationContext("spring_ioc.xml");
    Student studentTwo = applicationContext.getBean("studentTwo", Student.class);
    System.out.println(studentTwo);
}
4.3 特殊值赋值
- 字面量赋值
什么是字面量?
int a = 10:
声明一个变量a,初始化为10,此时a就不代表字母a了,而是作为一个变量的名字。当我们引用a的时候,我们实际上拿到的值是10。
而如果a是带引号的:‘a’,那么它现在不是一个变量,它就是代表a这个字母本身,这就是字面量。所以字面最没有引申含义,就是我们看到的这个数据本身。
<constructor-arg name="name" value="丽丽"></constructor-arg>
- null值
<bean id="studentThree" class="com.fd.spring.pojo.Student">
    <constructor-arg name="age">
        <null/>
    </constructor-arg>
</bean>
- xml实体

- CDATA节:其中的内容会原样解析

CDATA节是xml中一个特殊的标签,因此不能写在一个属性中。
<bean id="studentFour" class="com.fd.spring.pojo.Student">
    <!--
        property:通过成员变量的setXxx()方法进行赋值
        name:设置需要赋值的属性名 (和set方法有关)
        value:设置为属性所赋的值
    -->
    <property name="id" value="1004"></property>
    <property name="name">
        <value><![CDATA[<张二麻子>]]></value>
    </property>
    <property name="age" value="25"></property>
    <property name="gender" value="男"></property>
</bean>
测试结果:

- 类类型的属性赋值
1.引用外部的Bean的id
<bean id="studentFive" class="com.fd.spring.pojo.Student">
    <property name="id" value="1005"></property>
    <property name="name" value="赵六"></property>
    <property name="age" value="25"></property>
    <property name="gender" value="男"></property>
    <!--ref: 引用IOC容器中的某个bean的id-->
    <property name="dept" ref="deptOne"></property>
</bean>

<bean id="deptOne" class="com.fd.spring.pojo.Dept">
    <property name="deptId" value="1"></property>
    <property name="deptName" value="1班"></property>
</bean>

2.通过级联方式赋值
<bean id="studentFive" class="com.fd.spring.pojo.Student">
    <property name="id" value="1005"></property>
    <property name="name" value="赵六"></property>
    <property name="age" value="25"></property>
    <property name="gender" value="男"></property>
    <!--ref: 引用IOC容器中的某个bean的id-->
    <property name="dept" ref="deptOne"></property>
    <!--级联的方式,要保证提前为clazz类对象属性赋值或者实例化-->
    <property name="dept.deptId" value="2"></property>
    <property name="dept.deptName" value="2班"></property>
</bean>

<bean id="deptOne" class="com.fd.spring.pojo.Dept">
    <property name="deptId" value="1"></property>
    <property name="deptName" value="1班"></property>
</bean>

3. 内部bean
<bean id="studentFive" class="com.fd.spring.pojo.Student">
    <property name="id" value="1005"></property>
    <property name="name" value="赵六"></property>
    <property name="age" value="25"></property>
    <property name="gender" value="男"></property>
    <property name="dept">
        <!--内部bean,只能在当前bean的内部使用,不能直接通过IOC容器获取-->
        <bean id="deptTwo" class="com.fd.spring.pojo.Dept">
            <property name="deptId" value="3"></property>
            <property name="deptName" value="3班"></property>
        </bean>
    </property>
</bean>

- 数值类型属性赋值
<bean id="studentSix" class="com.fd.spring.pojo.Student">
    <property name="id" value="1005"></property>
    <property name="name" value="赵六"></property>
    <property name="age" value="25"></property>
    <property name="gender" value="男"></property>
    <property name="hobby">
        <array>
            <value>学习</value>
            <value>吃饭</value>
        </array>
    </property>
</bean>
测试方法:
@Test
public void DiTest1() {
    ClassPathXmlApplicationContext applicationContext = new ClassPathXmlApplicationContext("spring_ioc.xml");
    Student studentSix = applicationContext.getBean("studentSix", Student.class);
    System.out.println(studentSix);
}

- list集合类型属性赋值
1.级联赋值
<bean id="deptTwo" class="com.fd.spring.pojo.Dept">
    <property name="deptId" value="2"></property>
    <property name="deptName" value="2班"></property>
    <property name="students">
        <list>
            <ref bean="studentOne"></ref>
            <ref bean="studentTwo"></ref>
            <ref bean="studentThree"></ref>
         </list>
    </property>
</bean>
测试方法:
@Test
public void DiTest2() {
    ClassPathXmlApplicationContext applicationContext = new ClassPathXmlApplicationContext("spring_ioc.xml");
    Dept deptTwo = applicationContext.getBean("deptTwo", Dept.class);
    System.out.println(deptTwo);
}

2.引用赋值(需要用到util命名空间)
<?xml version="1.0" encoding="UTF-8"?>
<beans xmlns="http://www.springframework.org/schema/beans"
       xmlns:xsi="http://www.w3.org/2001/XMLSchema-instance"
       xmlns:util="http://www.springframework.org/schema/util"

       xsi:schemaLocation="http://www.springframework.org/schema/beans http://www.springframework.org/schema/beans/spring-beans.xsd http://www.springframework.org/schema/util
       http://www.springframework.org/schema/util/spring-util-4.0.xsd">

    <bean id="deptTwo" class="com.fd.spring.pojo.Dept">
        <property name="deptId" value="2"></property>
        <property name="deptName" value="2班"></property>
        <property name="students" ref="studentList"></property>
    </bean>

    <!--配置一个集合类型的bean,需要使用util的约束-->
    <util:list id="studentList">
        <ref bean="studentOne"></ref>
        <ref bean="studentTwo"></ref>
        <ref bean="studentThree"></ref>
    </util:list>
</beans>
- map集合属性赋值
1.级联赋值
<bean id="studentSeven" class="com.fd.spring.pojo.Student">
    <property name="id" value="1006"></property>
    <property name="name" value="王五"></property>
    <property name="age" value="25"></property>
    <property name="gender" value="男"></property>
    <property name="hobby">
        <array>
            <value>学习</value>
            <value>吃饭</value>
        </array>
    </property>
    <property name="teacherMap">
        <map>
            <entry key="10086" value-ref="teacherOne"/>
            <entry key="10087" value-ref="teacherTwo"/>
        </map>
    </property>
</bean>

<bean id="teacherOne" class="com.fd.spring.pojo.Teacher">
    <property name="id" value="10086"></property>
    <property name="name" value="小红"></property>
</bean>
<bean id="teacherTwo" class="com.fd.spring.pojo.Teacher">
    <property name="id" value="10087"></property>
    <property name="name" value="小王"></property>
</bean>
测试方法:
@Test
public void DiTest3() {
    ClassPathXmlApplicationContext applicationContext = new ClassPathXmlApplicationContext("spring_ioc.xml");
    Student studentSeven = applicationContext.getBean("studentSeven", Student.class);
    System.out.println(studentSeven);
}

2.引用赋值
<bean id="studentSeven" class="com.fd.spring.pojo.Student">
        <property name="id" value="1006"></property>
        <property name="name" value="王五"></property>
        <property name="age" value="25"></property>
        <property name="gender" value="男"></property>
        <property name="hobby">
            <array>
                <value>学习</value>
                <value>吃饭</value>
            </array>
        </property>
        <property name="teacherMap" ref="map"></property>
    </bean>

    <util:map id="map">
        <entry key="10086" value-ref="teacherOne"/>
        <entry key="10087" value-ref="teacherTwo"/>
    </util:map>

    <bean id="teacherOne" class="com.fd.spring.pojo.Teacher">
        <property name="id" value="10086"></property>
        <property name="name" value="小红"></property>
    </bean>
    <bean id="teacherTwo" class="com.fd.spring.pojo.Teacher">
        <property name="id" value="10087"></property>
        <property name="name" value="小王"></property>
    </bean>
- p命名空间
引入约束
<?xml version="1.0" encoding="UTF-8"?>
<beans xmlns="http://www.springframework.org/schema/beans"
       xmlns:xsi="http://www.w3.org/2001/XMLSchema-instance"
       xmlns:util="http://www.springframework.org/schema/util" xmlns:p="http://www.springframework.org/schema/p"

       xsi:schemaLocation="http://www.springframework.org/schema/beans http://www.springframework.org/schema/beans/spring-beans.xsd http://www.springframework.org/schema/util
       http://www.springframework.org/schema/util/spring-util-4.0.xsd">

       <bean id="studentEight" class="com.fd.spring.pojo.Student"
          p:id="1007" p:age="35" p:name="老王" p:dept-ref="deptOne">

       </bean>
</beans>
测试方法:
@Test
public void DiTest4() {
    ClassPathXmlApplicationContext applicationContext = new ClassPathXmlApplicationContext("spring_ioc.xml");
    Student studentEight = applicationContext.getBean("studentEight", Student.class);
    System.out.println(studentEight);
}

- 管理数据源和引入外部属性文件
引入依赖
<!--mysql驱动-->
<dependency>
  <groupId>mysql</groupId>
  <artifactId>mysql-connector-java</artifactId>
  <version>8.0.21</version>
</dependency>
<!--数据源: 德鲁伊连接池-->
<dependency>
  <groupId>com.alibaba</groupId>
  <artifactId>druid</artifactId>
  <version>1.2.6</version>
</dependency>
配置spring配置文件
<?xml version="1.0" encoding="UTF-8"?>
<beans xmlns="http://www.springframework.org/schema/beans"
       xmlns:xsi="http://www.w3.org/2001/XMLSchema-instance"
       xsi:schemaLocation="http://www.springframework.org/schema/beans http://www.springframework.org/schema/beans/spring-beans.xsd">

    <bean id="datasource" class="com.alibaba.druid.pool.DruidDataSource">
        <property name="driverClassName" value="com.mysql.cj.jdbc.Driver"/>
        <property name="url" value="jdbc:mysql://localhost:3306/mydb?serverTimezone=UTC"/>
        <property name="password" value="mysql123."/>
        <property name="username" value="admin"/>
    </bean>

</beans>
或者:引入properties配置文件,需添加context约束
<?xml version="1.0" encoding="UTF-8"?>
<beans xmlns="http://www.springframework.org/schema/beans"
       xmlns:xsi="http://www.w3.org/2001/XMLSchema-instance" xmlns:context="http://www.springframework.org/schema/context"
       xsi:schemaLocation="http://www.springframework.org/schema/beans http://www.springframework.org/schema/beans/spring-beans.xsd
       http://www.springframework.org/schema/context http://www.springframework.org/schema/context/spring-context-4.2.xsd">

    <!--引入properties-->
    <context:property-placeholder location="jdbc.properties"></context:property-placeholder>

    <bean id="datasource" class="com.alibaba.druid.pool.DruidDataSource">
        <property name="driverClassName" value="${jdbc.driver}"/>
        <property name="url" value="${jdbc.url}"/>
        <property name="password" value="${jdbc.password}"/>
        <property name="username" value="${jdbc.username}"/>
    </bean>

</beans>
测试方法:
@Test
public void dataSourceTest() {
    ClassPathXmlApplicationContext applicationContext = new ClassPathXmlApplicationContext("spring_datasource.xml");
    DruidDataSource bean = applicationContext.getBean(DruidDataSource.class);
    System.out.println(bean);
}

5.bean作用域
5.1 单例模式
spring配置文件,可以通过bean标签的scope属性设置bean的作用域范围
<?xml version="1.0" encoding="UTF-8"?>
<beans xmlns="http://www.springframework.org/schema/beans"
xmlns:xsi="http://www.w3.org/2001/XMLSchema-instance"
xsi:schemaLocation="http://www.springframework.org/schema/beans http://www.springframework.org/schema/beans/spring-beans.xsd">
<!--
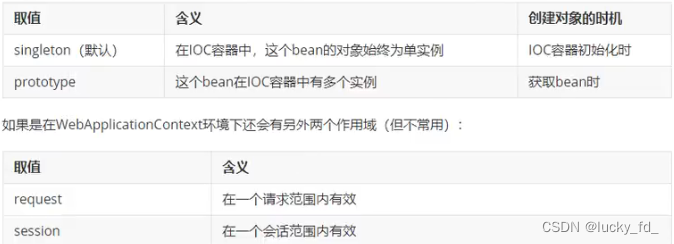
scope:设置bean的作用域
scope="singleton | prototype"
singleton (单例):表示获取该bean所对应的对象都是同一个
prototype (多例): 示获取该bean所对应的对象都不是同一个
-->
<bean id="student" class="com.fd.spring.pojo.Student" scope="singleton">
<property name="id" value="1001"/>
<property name="name" value="张三"/>
</bean>
</beans>
测试方法:
@Test
public void scopeTest() {
    ClassPathXmlApplicationContext applicationContext = new ClassPathXmlApplicationContext("spring-scope.xml");
    Student bean1 = applicationContext.getBean(Student.class);
    Student bean2 = applicationContext.getBean(Student.class);
    System.out.println(bean1 == bean2);
}

5.2 多例模式
<bean id="student" class="com.fd.spring.pojo.Student" scope="prototype">
    <property name="id" value="1001"/>
    <property name="name" value="张三"/>
</bean>
测试方法:
@Test
public void scopeTest() {
    ClassPathXmlApplicationContext applicationContext = new ClassPathXmlApplicationContext("spring-scope.xml");
    Student bean1 = applicationContext.getBean(Student.class);
    Student bean2 = applicationContext.getBean(Student.class);
    System.out.println(bean1 == bean2);
}

6.bean的生命周期
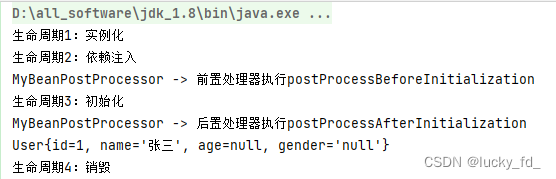
6.1 具体的生命周期过程
- bean对象创建(调用无参构造器)
- 给bean对象设置属性
- bean对象初始化之前操作 (由bean的后置处理器负责)
- bean对象初始化(需在配置bean时指定初始化方法)
- bean对象初始化之后操作(由bean的后置处理器负责)
- bean对象就绪可以使用
- bean对象销毁(需在配置bean时指定销毁方法)
- lOC容器关闭
6.2 创建类对象
package com.fd.spring.pojo;

/**
 * SSM
 *
 * @author lucky_fd
 * @since 2023-06-07
 */

public class User {
    private Integer id;

    private String name;

    public Integer getId() {
        return id;
    }

    public void setId(Integer id) {
        this.id = id;
        System.out.println("生命周期2:依赖注入");
    }

    public String getName() {
        return name;
    }

    public void setName(String name) {
        this.name = name;
    }

    public User() {
        System.out.println("生命周期1:实例化");
    }

    public User(Integer id, String name) {
        this.id = id;
        this.name = name;
    }

    @Override
    public String toString() {
        return "User{" +
                "id=" + id +
                ", name='" + name + '\'' +
                '}';
    }

    public void initMethod() {
        System.out.println("生命周期3:初始化");
    }

    public void destroyMethod() {
        System.out.println("生命周期4:销毁");
    }
}
6.3 配置bean
<bean id="user" class="com.fd.spring.pojo.User" init-method="initMethod" destroy-method="destroyMethod">
    <property name="id" value="1"/>
    <property name="name" value="张三"/>
</bean>

<bean id="beanPostProcessor" class="com.fd.spring.process.MyBeanPostProcessor"></bean>
6.4 测试方法
@Test
public void test() {

    /*
    * 1、实例化
    * 2、依赖注入
    * 3、bean对象初始化之前操作
    * 4、初始化,需要通过bean的init-method属性指定初始化的方法
    * 5、bean对象初始化之后操作
    * 6、IOC容器关闭时销毁,需要通过bean的destroy-method属性指定销毁的方法
    *
    * */
    //ConfigurableApplicationContext是ApplicationContext的子接口,其中扩展了刷新和关闭容器的方法
    ConfigurableApplicationContext applicationContext = new ClassPathXmlApplicationContext("spring-scope.xml");
    User bean = applicationContext.getBean(User.class);
    System.out.println(bean);
    applicationContext.close();
}
测试结果:
6.5 bean的后置处理器
bean的后置处理器会在生命周期的初始化前后添加额外的操作,需要实现BeanPostProcessor接口,且配置到I0C容器中,需要注意的是,bean后置处理器不是单独针对某一个bean生效,而是针对I0C容器中所有bean都会执行
package com.fd.spring.process;

import org.springframework.beans.BeansException;
import org.springframework.beans.factory.config.BeanPostProcessor;

/**
 * SSM
 *
 * @author lucky_fd
 * @since 2023-06-09
 */

public class MyBeanPostProcessor implements BeanPostProcessor {

    @Override
    public Object postProcessBeforeInitialization(Object bean, String beanName) throws BeansException {
        // 此方法在bean的生命周期初始化之前执行
        System.out.println("MyBeanPostProcessor -> 前置处理器执行postProcessBeforeInitialization");
        return BeanPostProcessor.super.postProcessBeforeInitialization(bean, beanName);
    }

    @Override
    public Object postProcessAfterInitialization(Object bean, String beanName) throws BeansException {
        // 此方法在bean的生命周期初始化之后执行
        System.out.println("MyBeanPostProcessor -> 后置处理器执行postProcessAfterInitialization");
        return BeanPostProcessor.super.postProcessAfterInitialization(bean, beanName);
    }
}
7.FactoryBean
7.1 简介
FactoryBean是一个接口,需要创建一个类实现该接口其中有三个方法:
- getObject():通过一个对象交给IOC容器管理
- getObjectType(): 设置所提供对象的类型
- isSingleton(): 所提供的对象是否单例
当把FactoryBean的实现类配置为bean时,会将当前类中getObject()所返回的对象交给IOC容器管理,就可以直接通过IOC容器getBena获取工厂getObject()所返回的对象
7.2 创建类UserFactoryBean
package com.fd.spring.factory;

import com.fd.spring.pojo.User;
import org.springframework.beans.factory.FactoryBean;

/**
 * SSM
 *
 * @author lucky_fd
 * @since 2023-06-09
 */
public class UserFactoryBean implements FactoryBean<User> {

    /*
    * FactoryBean是一个接口,需要创建一个类实现该接口其中有三个方法:
    * getObject():通过一个对象交给IOC容器管理
    * getObjectType(): 设置所提供对象的类型
    * isSingleton(): 所提供的对象是否单例
    * 当把FactoryBean的实现类配置为bean时,会将当前类中getObject()所返回的对象交给IOC容器管理
    *
    * */
    @Override
    public User getObject() throws Exception {
        return new User();
    }

    @Override
    public Class<?> getObjectType() {
        return User.class;
    }
}
FactoryBean接口
package org.springframework.beans.factory;

import org.springframework.lang.Nullable;

public interface FactoryBean<T> {
    String OBJECT_TYPE_ATTRIBUTE = "factoryBeanObjectType";

    @Nullable
    T getObject() throws Exception;

    @Nullable
    Class<?> getObjectType();

    default boolean isSingleton() {
        return true;
    }
}
7.3 配置bean
<?xml version="1.0" encoding="UTF-8"?>
<beans xmlns="http://www.springframework.org/schema/beans"
       xmlns:xsi="http://www.w3.org/2001/XMLSchema-instance"
       xsi:schemaLocation="http://www.springframework.org/schema/beans http://www.springframework.org/schema/beans/spring-beans.xsd">

    <bean class="com.fd.spring.factory.UserFactoryBean"></bean>

</beans>
7.4 测试方法
@Test
public void factoryBeanTest() {
    ApplicationContext applicationContext = new ClassPathXmlApplicationContext("spring-factory.xml");
    // 没有配置User类的bean,这里通过UserFactoryBean也获取到了User类的bean对象
    User bean = applicationContext.getBean(User.class);
    System.out.println(bean);
}
测试结果:

8.自动装配
8.1 概念
自动装配:
根据指定的策略,在IOC容器中匹配某个bean,自动为bean 中的类类型的属性或接口类型的属性赋值
8.2 基于xml管理bean
场景模拟:三层架构:controller层->service层->dao层(mapper层)
// 控制层
public class UserController {

    private UserService userService;

    public UserService getUserService() {
        return userService;
    }

    public void setUserService(UserService userService) {
        this.userService = userService;
    }

    public void saveUser() {
        userService.save();
    }
}

// 业务层
public interface UserService {

    void save();
}
public class UserServiceImpl implements UserService {

    private UserDao userDao;

    public UserDao getUserDao() {
        return userDao;
    }

    public void setUserDao(UserDao userDao) {
        this.userDao = userDao;
    }

    @Override
    public void save() {
        userDao.save();
    }
}

// 持久层
public interface UserDao {
    void save();
}
public class UserDaoImpl implements UserDao {
    @Override
    public void save() {
        System.out.println("保存成功");
    }
}
spring配置文件:
通过配置property进行bean装配,需要我们在配置文件中手动配置
<?xml version="1.0" encoding="UTF-8"?>
<beans xmlns="http://www.springframework.org/schema/beans"
       xmlns:xsi="http://www.w3.org/2001/XMLSchema-instance"
       xsi:schemaLocation="http://www.springframework.org/schema/beans http://www.springframework.org/schema/beans/spring-beans.xsd">

    <bean class="com.fd.spring.controller.UserController" id="userController">
        <property name="userService" ref="userService"/>
    </bean>

    <bean class="com.fd.spring.service.impl.UserServiceImpl" id="userService">
        <property name="userDao" ref="userDao"/>
    </bean>

    <bean class="com.fd.spring.dao.impl.UserDaoImpl" id="userDao"></bean>

</beans>
测试方法:
@Test
public void autowireByXmlTest() {
    ApplicationContext applicationContext = new ClassPathXmlApplicationContext("spring-autowire-xml.xml");
    UserController userController = applicationContext.getBean(UserController.class);
    userController.saveUser();
}
结果:

7.3 基于xml的自动装配
自动装配的策略 autowire:
- no,default:表示不装配,即bean中的属性不会自动匹配某个bean为属性赋值,此时属性使用默认值
- byType:根据要赋值的属性的类型,在IOC容器中匹配某个bean,为属性赋值
注意:
a> 若通过类型没有找到任何一个类型匹配的bean,此时不装配,属性使用默认值
b> 若通过类型找到了多个类型配的bean,此时会抛出异常:NoUniqueBeanDefinitionException
总结:当使用byType实现自动装配时,IOC容器中有且只有一个类型匹配的bean能够为属性赋值 - byName:将要赋值的属性的属性名作为bean的id在IOC容器中匹配某bean,为属性赋值
总结:当类型匹配的bean有多个时,此时可以使用byName实现自动装配

spring配置文件:自动装配
<?xml version="1.0" encoding="UTF-8"?>
<beans xmlns="http://www.springframework.org/schema/beans"
       xmlns:xsi="http://www.w3.org/2001/XMLSchema-instance"
       xsi:schemaLocation="http://www.springframework.org/schema/beans http://www.springframework.org/schema/beans/spring-beans.xsd">

    <bean class="com.fd.spring.controller.UserController" id="userController" autowire="byType">
        <!--<property name="userService" ref="userService"/>-->
    </bean>

    <bean class="com.fd.spring.service.impl.UserServiceImpl" id="userService" autowire="byType">
        <!--<property name="userDao" ref="userDao"/>-->
    </bean>

    <bean class="com.fd.spring.dao.impl.UserDaoImpl" id="userDao"></bean>

</beans>
8.4 基于注解管理bean(注解+扫描)
1. 注解
和 XML配置文件一样,注解本身并不能执行,注解本身仅仅只是做一个标记,具体的功能是框架检测到注解标记的位置,然后针对这个位置按照注解标记的功能来执行具体操作。
本质上: 所有一切的操作都是java代码来完成的,XML和注解只是告诉框架中的java代码如何执行
举例:元旦联欢会要布置教室,蓝色的地方贴上元旦快乐四个字,红色的地方贴上拉花,黄色的地方贴上气球。
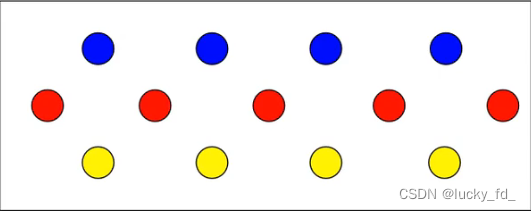
班长做了所有标记,同学们来完成具体工作。墙上的标记相当于我们在代码中便用的注解,后面同学们做的工作相当于框架的具体操作。
2. 扫描
Spring 为了知道程序员在哪些地方标记了什么注解,就需要通过扫描的方式,来进行检测。然后根据注解进行后
续操作。
spring配置文件开启组件扫描:
<?xml version="1.0" encoding="UTF-8"?>
<beans xmlns="http://www.springframework.org/schema/beans"
       xmlns:xsi="http://www.w3.org/2001/XMLSchema-instance"
       xmlns:context="http://www.springframework.org/schema/context"
       xsi:schemaLocation="http://www.springframework.org/schema/beans http://www.springframework.org/schema/beans/spring-beans.xsd
       http://www.springframework.org/schema/context http://www.springframework.org/schema/context/spring-context-4.2.xsd">

    <!--开启组件扫描,扫描com.fd.spring包下的所有类-->
    <context:component-scan base-package="com.fd.spring"></context:component-scan>

</beans>
3. 标识组件的常用注解
@Component: 将类标识为普通组件
@Controller: 将类标识为控制层组件
@Service: 将类标识为业务层组件
@Repository: 将类标识为持久层组件
通过注解+扫描所配置的bean的id,默认值为类的小驼峰,即类名的首字母为小写的结果,可以通过标识组件的注解的value属性值设置bean的自定义的id
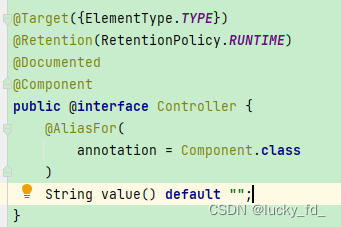
以上四个注解的联系与区别?
通过查看源码我们得知,@Controller、@Service、@Repository这三个注解只是在@Component注解的基础上起了三个新的名字。
对于Spring使用IOC容器管理这些组件来说没有区别。所以@Controller、 @Service、@Repository这三个注解只是给开发人员看的,让我们能够便于分辨组件的作用。
注意:虽然它们本质上一样,但是为了代码的可读性,为了程序结构严谨我们肯定不能随便胡乱标记。
4. 创建类对象
@Controller
public class UserController {
}

public interface UserService {
}
@Service
public class UserServiceImpl implements UserService {
}

public interface UserDao {
}
@Repository
public class UserDaoImpl implements UserDao {
}
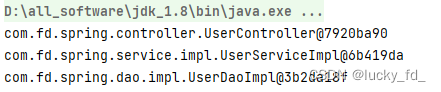
5. 测试
@Test
public void iocByAnnotationTest() {
    /*
    * 通过注解+扫描所配置的bean的id,默认值为类的小驼峰,即类名的首字母为小写的结果,
    * 可以通过标识组件的注解的value属性值设置bean的自定义的id
    */
    ApplicationContext applicationContext = new ClassPathXmlApplicationContext("spring-ioc-annotation.xml");
    UserController userController = applicationContext.getBean(UserController.class);
    System.out.println(userController);
    UserService userService = applicationContext.getBean(UserService.class);
    System.out.println(userService);
    UserDao userDao = applicationContext.getBean(UserDao.class);
    System.out.println(userDao);
}
测试结果:
6. 扫描组件配置
context:exclude-filter:排除扫描
- type:设置排除扫描的方式,type=“annotation | assignable”
- annotation:根据注解的类型进行排除,expression需要设置排除的注解的全类名根据类的类型进行排除
- assignable:根据类的类型进行排除,expression需要设置排除的类的全类名
context:include-filter:包含扫描
注意:需要在context:component-scan标签中设置use-default-filters=“false”
- use-default-filters="true”(默认),所设置的包下所有的类都需要扫描,此时可以使用排除扫描
- use-default-filters="false”,所设置的包下所有的类都不需要扫描,此时可以使用包含扫描
排除扫描:
<!--开启组件扫描-->
<context:component-scan base-package="com.fd.spring">
    <!--根据注解进行排除-->
    <context:exclude-filter type="annotation" expression="org.springframework.stereotype.Controller"/>
    <!--根据类的类型进行排除-->
    <context:exclude-filter type="assignable" expression="com.fd.spring.controller.UserController"/>
</context:component-scan>
包含扫描:
<context:component-scan base-package="com.fd.spring" use-default-filters="false">
    <!--根据注解只扫描-->
    <context:include-filter type="annotation" expression="org.springframework.stereotype.Controller"/>
    <!--根据类的类型只扫描-->
    <context:include-filter type="assignable" expression="com.fd.spring.controller.UserController"/>
</context:component-scan>
8.5 基于注解的自动装配
1. 创建组件
@Controller("controller")
public class UserController {

    /*autowire注解放在成员变量上,此时不需要设置成员变量的set方法*/
    @Autowired
    private UserService userService;

    public void saveUser() {
        userService.saveUser();
    }
}

public interface UserService {
    void saveUser();
}
@Service
public class UserServiceImpl implements UserService {
    @Autowired
    private UserDao userDao;
    @Override
    public void saveUser() {
        userDao.saveUser();
    }
}

public interface UserDao {
    void saveUser();
}
@Repository
public class UserDaoImpl implements UserDao {
    @Override
    public void saveUser() {
        System.out.println("保存成功");
    }
}
测试方法:
@Test
public void iocByAnnotationTest() {
    ApplicationContext applicationContext = new ClassPathXmlApplicationContext("spring-ioc-annotation.xml");
    UserController userController = applicationContext.getBean("controller", UserController.class);
    userController.saveUser();
}

2. @Autowired:实现自动装配功能的注解
-
@Autowired注解能够标识的位置
a、标识在成员变量上,此时不需要设置成员变量的set方法
//autowire注解放在成员变量上,此时不需要设置成员变量的set方法
@Autowired
private UserService userService;
b、标识在set方法上
/*autowire注解放在成员变量的set方法上*/
@Autowired
public void setUserService(UserService userService) {
	this.userService = userService;
}
c、标识在为当前成员变量赋值的有参构造上
/*autowire注解放在当前成员变量的有参构造上*/ @Autowired public UserController(UserService userService) { this.userService = userService; } -
@Autowired注解的原理
a> 默认通过byType的方式,在IOC容器中通过类型匹配某个bean为属性赋值
b> 若有多个类型匹配的bean,此时会自动转换为byName的方式实现自动装配的效果,即将要赋值的属性的属性名作为bean的id匹配某个bean为属性赋值
c> byType和byName的方式都无法实现自动装配,即IOC容器中有多个类型匹配的bean且这些bean的id和要赋值的属性的属性名都不一致,此时抛异常:NOUniqueBeanDefinitionException
d> 在c的基础上此时可以在要赋值的属性上,添加一个注解Qualifier通过该注解的value属性值,指定某个bean的id,将这个bean为属性赋值
@Autowired
@Qualifier("userServiceImpl")
private UserService userService;
注意:
IOC容器中没有任何一个类型匹配的bean,此时抛出异常:NoSuchBeanDefinitionException。在@Autowired注解中有个属性required,默认值为true,要求必须完成自动装配可以将required设置为false,此时能装配则装配,无法装配则使用属性的默认值

三、代理模式
1.概念
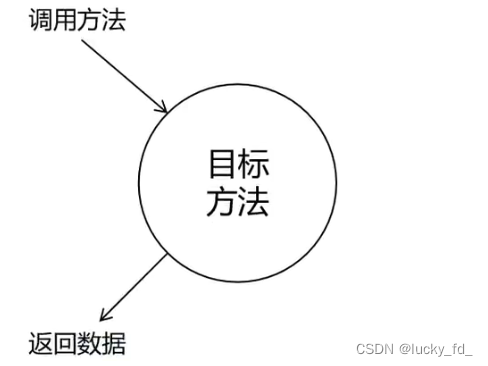
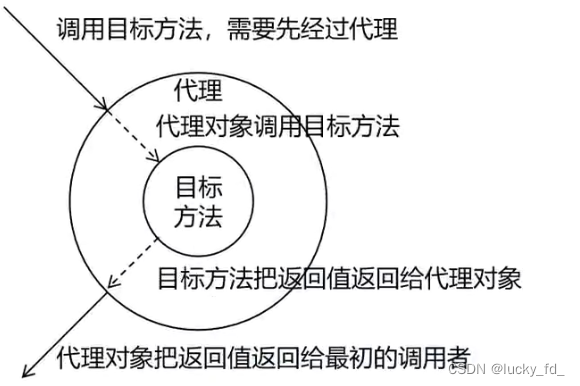
二十三种设计模式中的一种,属于结构型模式。它的作用就是通过提供一个代理类,让我们在调用目标方法的时候,不再是直接对目标方法进行调用,而是通过代理类间接调用。让不属于目标方法核心逻辑的代码从目标方法中剥离出来一解耦。调用目标方法时先调用代理对象的方法,减少对目标方法的调用和打扰,同时让附加功能能够集中在一起也有利于统一维护!
使用代理前:
使用代理后:
相关术语:
- 代理:将非核心逻辑剥离出来以后,封装这些非核心逻辑的类、对象、方法
- 目标:被代理“套用”了非核心逻辑代码的类、对象、方法。
2.静态代理
2.1 创建接口对象
public interface Calculator {
    int add(int i, int j);

    int sub(int i, int j);

    int mul(int i, int j);

    int div(int i, int j);
}
2.2 创建接口对象的实现类
public class CalculatorImpl implements Calculator{
    @Override
    public int add(int i, int j) {
        System.out.println("打印日志,方法执行前,参数:" + i + "," +j);
        int result = i + j;
        System.out.println("打印日志,方法执行后,结果:" + result);
        return result;
    }

    @Override
    public int sub(int i, int j) {
        System.out.println("打印日志,方法执行前,参数:" + i + "," +j);
        int result = i - j;
        System.out.println("打印日志,方法执行后,参数:" + i + "," +j);
        return result;
    }

    @Override
    public int mul(int i, int j) {
        System.out.println("打印日志,方法执行前,参数:" + i + "," +j);
        int result = i * j;
        System.out.println("打印日志,方法执行后,结果:" + result);
        return result;
    }

    @Override
    public int div(int i, int j) {
        System.out.println("打印日志,方法执行前,参数:" + i + "," +j);
        int result = i / j;
        System.out.println("打印日志,方法执行后,结果:" + result);
        return result;
    }
}
2.3 测试方法
@Test
public void proxyTest() {
    CalculatorImpl calculator = new CalculatorImpl();
    CalculatorStaticProxy proxy = new CalculatorStaticProxy(calculator);
    int result = proxy.add(10, 5);
}
2.4 总结
静态代理确实实现了解耦,但是由于代码都写死了,完全不具备任何的灵活性。就拿日志功能来说,将来其他地方也需要附加日志,那还得再声明更多个静态代理类,那就产生了大量重复的代码,日志功能还是分散的,没有统一管理。
提出进一步的需求:将日志功能集中到一个代理类中,将来有任何日志需求,都通过这一个代理类来实现这就需要使用动态代理技术了。
3.动态代理
动态代理有两种:
1、jdk动态代理,要求必须有接口,最终生成的代理类和目标类实现相同的接口在com.sun.proxy包下,类名为$proxy+数字
2、cglib动态代理,最终生成的代理类会继承目标类,并且和目标类在相同的包下
3.1 创建代理对象工厂
public class ProxyFactory {

    private final Object target;

    public ProxyFactory(Object target) {
        this.target = target;
    }

    public Object getProxy() {
        /*
            classLoader Loader: 指定加载动态生成的代理类的类加载器
            Class[] interfaces:获取目标对象实现的所有接口的class对象的数组
            InvocationHandler h:设置代理中的抽象方法如何重写
        */
        ClassLoader classLoader = this.getClass().getClassLoader(); // 先获取类的Class实例,再获取类的加载器
        Class<?>[] interfaces = this.target.getClass().getInterfaces(); // 先获取类的Class实例,再获取接口
        // 执行代理方法最终会调用此方法,执行被被代理类的方法
        InvocationHandler h = new InvocationHandler() {
            @Override
            public Object invoke(Object proxy, Method method, Object[] args) throws Throwable {
                //proxy表示代理对象,method表示要执行的方法,args表示要执行的方法到的参数列表
                System.out.println("打印日志,方法执行之前, 参数:" + Arrays.toString(args));

                Object result = method.invoke(target, args);

                System.out.println("打印日志,方法执行之后,结果:" + result);
                return result;
            }
        };
        return Proxy.newProxyInstance(classLoader, interfaces, h);
    }
}
3.2 测试方法
@Test
public void proxyTest1() {
    ProxyFactory proxyFactory = new ProxyFactory(new CalculatorImpl());
    Calculator proxy = (Calculator)proxyFactory.getProxy();
    int result = proxy.add(5, 5);
}
4.AOP:面向切面编程
4.1 概述
AOP (Aspect Oriented Programming) 是一种设计思想,是软件设计领域中的面向切面编程,它是面向对象编程(OOP)的一种补充和完善,它以通过预编译方式和运行期动态代理方式实现在不修改源代码的情况下给程序动态统一添加额外功能的一种技术。
4.2 相关术语
1. 横切关注点
从每个方法中抽取出来的同一类非核心业务。在同一个项目中,我们可以使用多个横切关注点对相关方法进行多个不同方面的增强。
这个概念不是语法层面天然存在的,而是根据附加功能的逻辑上的需要:有十个附加功能,就有十个横切关注点。
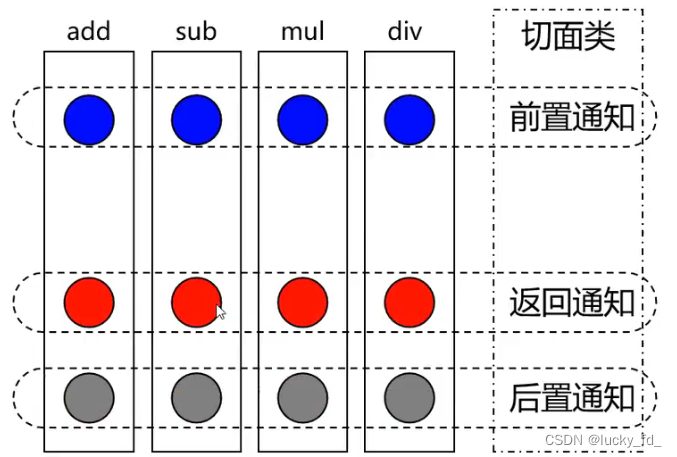
2. 通知
每一个横切关注点上要做的事情都需要写一个方法来实现,这样的方法就叫通知方法。
前置通知: 在被代理的目标方法前执行
返回通知: 在被代理的目标方法成功结束后执行(寿终正寝)
异常通知: 在被代理的目标方法异常结束后执行(死于非命)
后置通知: 在被代理的目标方法最终结束后执行(盖棺定论)
环绕通知: 使用try…catch…finally结构围绕整个被代理的目标方法,包括上面四种通知对应的所有位置
各种通知的执行顺序:
Spring版本5.3.x以前:
前置通知
目标操作
后置通知
返回通知或异常通知。
Spring版本5.3.x以后:
前置通知
目标操作
返回通知或异常通知
后置通知
3. 切面
封装通知方法的类。
4. 目标
被代理的目标对象
5. 代理
为目标对象应用通知之后创建的代理对象
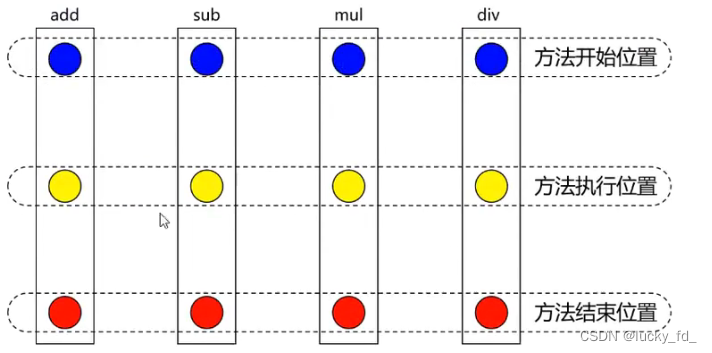
6.连接点
这是一个纯逻辑的语法概念
把方法排成一排,每一个横切位置看成x轴方向,把方法从上到下执行的顺序看成y轴,x轴和y轴的交叉点就是连接点。
7. 切入点
定位连接点的方式
每个类的方法中都包含多个连接点,所以连接点是类中客观存在的事物 (从逻辑上来说)。
如果把连接点看作数据库中的记录,那么切入点就是查询记录的 SQL 语句。
Spring的AOP 技术可以通过切入点定位到特定的连接点。
切点通过 org.springframework.aop.Pointcut 接口进行描述,它使用类和方法作为连接点的查询条件
4.3 作用
简化代码:把方法中固定位置的重复的代码抽取出来,让被抽取的方法更专注于自己的核心功能,提高内聚性。
代码增强:把特定的功能封装到切面类中,看哪里有需要,就往上套,被套用了切面逻辑的方法就被切面给增强了。
4.4 基于注解的AOP
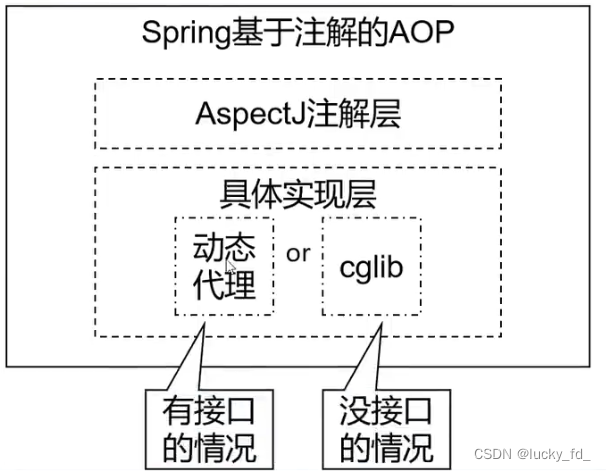
- 动态代理(lnvocationHandler) : JDK原生的实现方式,需要被代理的目标类必须实现接口。因为这个技术要求代理对象和目标对象实现同样的接口(兄弟两个拜把子模式)
- cglib: 通过继承被代理的目标类(认干模式)实现代理,所以不需要目标类实现接口。
- Aspect: 本质上是静态代理,将代理逻辑”织入”被代理的目标类编译得到的宁节码文件,所以最终效果是动态的。weaver就是织入器。Spring只是借用了Aspectj中的注解。
1. 添加依赖
<dependency>
  <groupId>org.springframework</groupId>
  <artifactId>spring-aspects</artifactId>
  <version>5.3.1</version>
</dependency>
或者
<dependency>
    <groupId>org.aspectj</groupId>
    <artifactId>aspectjweaver</artifactId>
    <version>1.9.7</version>
</dependency>
<dependency>
    <groupId>org.springframework.boot</groupId>
    <artifactId>spring-boot-starter-aop</artifactId>
    <version>2.6.7</version>
</dependency>
2. 配置spring文件
<?xml version="1.0" encoding="UTF-8"?>
<beans xmlns="http://www.springframework.org/schema/beans"
       xmlns:xsi="http://www.w3.org/2001/XMLSchema-instance"
       xmlns:context="http://www.springframework.org/schema/context"
       xmlns:aop="http://www.springframework.org/schema/aop"
       xsi:schemaLocation="http://www.springframework.org/schema/beans http://www.springframework.org/schema/beans/spring-beans.xsd
        http://www.springframework.org/schema/context http://www.springframework.org/schema/context/spring-context-4.2.xsd http://www.springframework.org/schema/aop https://www.springframework.org/schema/aop/spring-aop.xsd">
    <!--
        AOP的注意事项:
        切面类和目标类都需要交给IOC器管理
        切面类必须通过@Aspect注解标识为一个切面
        在Spring的配置文件中设置<aop:aspectj-autoproxy/>开启基于注解的AOP
    -->
    <!--开启扫描-->
    <context:component-scan base-package="com.fd.spring"/>

    <!--开启基于注解的AOP-->
    <aop:aspectj-autoproxy/>
</beans>
3. 创建目标对象
public interface Calculator {
    int add(int i, int j);

    int sub(int i, int j);

    int mul(int i, int j);

    int div(int i, int j);
}

@Component
public class CalculatorImpl implements Calculator {
    @Override
    public int add(int i, int j) {
        int result = i + j;
        return result;
    }

    @Override
    public int sub(int i, int j) {
        int result = i - j;
        return result;
    }

    @Override
    public int mul(int i, int j) {
        return i * j;
    }

    @Override
    public int div(int i, int j) {
        int result = i / j;
        return result;
    }
}
4. 创建切面类
1.在切面中,需要通过指定的注解将方法标识为通知方法
@Before():前置通知,在目标对象方法执行之前执行
@After():后置通知,在目标对象方法的finally字句中执行
@AfterReturning():返回通知,在目标对象获取返回值之后执行
2.切入点表达式:设置在标识通知的注解的value属性中
execution(* com.fd.spring.annotation.CalculatorImpl.(…))
第一个表示任意的访问修饰符和返回值类型
第二个表示类中任意的方法
…表示任意的参数列表
类的地方也可以使用,表示包下所有的类
3.重用切入点表达式
@Pointcut声明一个公共的切入点表达式
@Pointcut(“execution(* com.fd.spring.annotation.CalculatorImpl.*(…))”)
public void pointCut() {}
使用方法:@After(“pointCut()”) //使用的是重用切入点表达式方法名
4.获取连接点信息
在通知方法的参数位置,设置JoinPoint类型的参数,就可以获取连接点所对应方法的信息
// 获取连接点所对应的方法名
Signature signature = joinPoint.getSignature();
// 获取连接点所对应方法的参数
Object[] args = joinPoint.getArgs();
package com.fd.spring.annotation;

import org.aspectj.lang.JoinPoint;
import org.aspectj.lang.ProceedingJoinPoint;
import org.aspectj.lang.Signature;
import org.aspectj.lang.annotation.*;
import org.springframework.stereotype.Component;

import java.util.Arrays;

/**
 * SSM
 *
 * @author lucky_fd
 * @since 2023-06-17
 *
 * 切面类必须通过@Aspect注解标识为一个切面
 */
@Component
@Aspect // 将当前组件标记为切面
public class LoggerAspect {

    /*
        1.在切面中,需要通过指定的注解将方法标识为通知方法
            @Before():前置通知,在目标对象方法执行之前执行
            @After():后置通知,在目标对象方法的finally字句中执行
            @AfterReturning():返回通知,在目标对象获取返回值之后执行

        2.切入点表达式:设置在标识通知的注解的value属性中
            execution(* com.fd.spring.annotation.CalculatorImpl.*(..))
            第一个*表示任意的访问修饰符和返回值类型
            第二个*表示类中任意的方法
            ..表示任意的参数列表
            类的地方也可以使用*,表示包下所有的类

        3.重用切入点表达式
            @Pointcut声明一个公共的切入点表达式
                @Pointcut("execution(* com.fd.spring.annotation.CalculatorImpl.*(..))")
                public void pointCut() {}
            使用方法:@After("pointCut()") //使用的是重用切入点表达式方法名

        4.获取连接点信息
            在通知方法的参数位置,设置JoinPoint类型的参数,就可以获取连接点所对应方法的信息
            // 获取连接点所对应的方法名
            Signature signature = joinPoint.getSignature();
            // 获取连接点所对应方法的参数
            Object[] args = joinPoint.getArgs();

    */

    // 切入点表达式的重用
    @Pointcut("execution(* com.fd.spring.annotation.CalculatorImpl.*(..))")
    public void pointCut() {}

    //@Before("execution(public int com.fd.spring.annotation.CalculatorImpl.add(int, int))") //切入点表达式
    @Before("execution(* com.fd.spring.annotation.CalculatorImpl.*(..))")
    public void beforeNotice(JoinPoint joinPoint) {
        // 获取连接点所对应的方法名
        Signature signature = joinPoint.getSignature();
        // 获取连接点所对应方法的参数
        Object[] args = joinPoint.getArgs();
        System.out.println("前置通知,方法:" + signature.getName() + ", 参数:" + Arrays.toString(args));
    }

    @After("pointCut()")
    public void AfterNotice(JoinPoint joinPoint) {
        // 获取连接点所对应的方法名
        Signature signature = joinPoint.getSignature();
        System.out.println("后置通知,方法:" + signature.getName());
    }

    /**
        在返回通知中若要获取目标对象方法的返回值
        只需要通过@AfterReturning注解的returning属性
        就可以将通知方法的某个参数指定为接收目标对象方法的返回值的参数
     * */
    @AfterReturning(value = "pointCut()", returning = "result")
    public void afterReturningNotice(JoinPoint joinPoint, Object result) {
        // 获取连接点所对应的方法名
        Signature signature = joinPoint.getSignature();
        System.out.println("返回通知, 方法:" + signature.getName() + ", 返回值:" + result);
    }

    /**
     在返回通知中若要获取目标对象方法的返回值
     只需要通过AfterThrowing注解的throwing属性
     就可以将通知方法的某个参数指定为接收目标对象方法的返回值的参数
     * */
    @AfterThrowing(value = "pointCut()", throwing = "result")
    public void afterThrowNotice(JoinPoint joinPoint, Exception result) {
        // 获取连接点所对应的方法名
        Signature signature = joinPoint.getSignature();
        System.out.println("异常通知, 方法:" + signature.getName() + ", 异常:" + result);
    }

    /*
        环绕通知的方法的返回值一定要和目标对象方法的返回值一致
    * */
    @Around("pointCut()")
    public Object aroundNotice(ProceedingJoinPoint joinPoint) {
        Object result;
        try {
            System.out.println("环绕通知-->前置通知");
            // 目标对象的执行
            result = joinPoint.proceed();
            System.out.println("环绕通知-->返回通知");
        } catch (Throwable e) {
            System.out.println("环绕通知-->异常通知");
            throw new RuntimeException(e);
        } finally {
            System.out.println("环绕通知-->后置通知");
        }
        return result;
    }
}
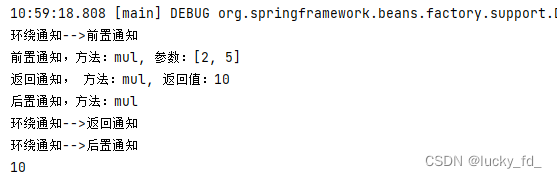
5. 测试类
在spring中通过AOP代理后原目标对象就被隐藏了就不能再通过IOC获取原目标对象,只能通过接口去获取目标的代理对象
@Test
public void aopTest() {
    ApplicationContext applicationContext = new ClassPathXmlApplicationContext("aop-annotation.xml");
    // 在spring中通过AOP代理后原目标对象就被隐藏了就不能再通过IOC获取原目标对象,只能通过获取接口去获取代理对象
    Calculator bean = applicationContext.getBean(Calculator.class);
    // int add = bean.add(10, 5);
    // int div = bean.div(10, 0);
    int mul = bean.mul(2, 5);
    System.out.println(mul);
}
测试结果:
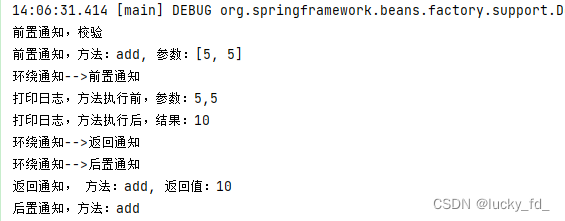
6. 切面的优先级
可以通过@order注解的value属性设置优先级,默认值Integer的最大值
@order注解的value属性值越小,优先级越高
@Retention(RetentionPolicy.RUNTIME)
@Target({ElementType.TYPE, ElementType.METHOD, ElementType.FIELD})
@Documented
public @interface Order {

   /**
    * The order value.
    * <p>Default is {@link Ordered#LOWEST_PRECEDENCE}.
    * @see Ordered#getOrder()
    */
   int value() default Ordered.LOWEST_PRECEDENCE;

}
@Component
@Aspect
@Order(1)
public class ValidateAspect {

    // @Before("execution(* com.fd.spring.annotation.CalculatorImpl.*(..))")
    @Before("com.fd.spring.annotation.LoggerAspect.pointCut()")
    public void beforeMethod() {
        System.out.println("前置通知,校验");
    }
}
测试结果:

4.5 基于xml的AOP
1. 创建切面
@Component
public class LoggerAspect {

    public void beforeNotice(JoinPoint joinPoint) {
        // 获取连接点所对应的方法名
        Signature signature = joinPoint.getSignature();
        // 获取连接点所对应方法的参数
        Object[] args = joinPoint.getArgs();
        System.out.println("前置通知,方法:" + signature.getName() + ", 参数:" + Arrays.toString(args));
    }

    public void afterNotice(JoinPoint joinPoint) {
        // 获取连接点所对应的方法名
        Signature signature = joinPoint.getSignature();
        System.out.println("后置通知,方法:" + signature.getName());
    }

    /**
        在返回通知中若要获取目标对象方法的返回值
        只需要通过@AfterReturning注解的returning属性
        就可以将通知方法的某个参数指定为接收目标对象方法的返回值的参数
     * */
    public void afterReturningNotice(JoinPoint joinPoint, Object result) {
        // 获取连接点所对应的方法名
        Signature signature = joinPoint.getSignature();
        System.out.println("返回通知, 方法:" + signature.getName() + ", 返回值:" + result);
    }

    /**
     在返回通知中若要获取目标对象方法的返回值
     只需要通过AfterThrowing注解的throwing属性
     就可以将通知方法的某个参数指定为接收目标对象方法的返回值的参数
     * */
    public void afterThrowNotice(JoinPoint joinPoint, Exception result) {
        // 获取连接点所对应的方法名
        Signature signature = joinPoint.getSignature();
        System.out.println("异常通知, 方法:" + signature.getName() + ", 异常:" + result);
    }

    /*
        环绕通知的方法的返回值一定要和目标对象方法的返回值一致
    * */
    public Object aroundNotice(ProceedingJoinPoint joinPoint) {
        Object result;
        try {
            System.out.println("环绕通知-->前置通知");
            // 目标对象的执行
            result = joinPoint.proceed();
            System.out.println("环绕通知-->返回通知");
        } catch (Throwable e) {
            System.out.println("环绕通知-->异常通知");
            throw new RuntimeException(e);
        } finally {
            System.out.println("环绕通知-->后置通知");
        }
        return result;
    }
}
2. 配置spring配置文件
<?xml version="1.0" encoding="UTF-8"?>
<beans xmlns="http://www.springframework.org/schema/beans"
       xmlns:xsi="http://www.w3.org/2001/XMLSchema-instance"
       xmlns:context="http://www.springframework.org/schema/context"
       xmlns:aop="http://www.springframework.org/schema/aop"
       xsi:schemaLocation="http://www.springframework.org/schema/beans http://www.springframework.org/schema/beans/spring-beans.xsd
        http://www.springframework.org/schema/context http://www.springframework.org/schema/context/spring-context-4.2.xsd http://www.springframework.org/schema/aop https://www.springframework.org/schema/aop/spring-aop.xsd">

    <context:component-scan base-package="com.fd.spring.xml"/>

    <aop:config>
        <!--设置一个公共的切入点表达式-->
        <aop:pointcut id="pointCut" expression="execution(* com.fd.spring.xml.CalculatorImpl.*(..))"/>
        <!--将IOC容器中的某个bean设置为切面-->
        <aop:aspect ref="loggerAspect">
            <aop:before method="beforeNotice" pointcut-ref="pointCut"/>
            <aop:after method="afterNotice" pointcut-ref="pointCut"/>
            <aop:after-returning method="afterReturningNotice" pointcut-ref="pointCut" returning="result"/>
            <aop:after-throwing method="afterThrowNotice" pointcut-ref="pointCut" throwing="result"/>
            <aop:around method="aroundNotice" pointcut-ref="pointCut"/>
        </aop:aspect>

        <aop:aspect ref="validateAspect" order="1">
            <aop:before method="beforeMethod" pointcut-ref="pointCut"/>
        </aop:aspect>
    </aop:config>
</beans>
3. 测试方法:
@Test
public void xmlTest() {
    ApplicationContext applicationContext = new ClassPathXmlApplicationContext("aop-xml.xml");
    com.fd.spring.xml.Calculator bean = applicationContext.getBean(com.fd.spring.xml.Calculator.class);
    int add = bean.add(5, 5);
}
测试结果:
四、事务管理
1.jdbcTemplate
Spring 框架对JDBC进行封装,使用JdbcTemplate 方便实现对数据库操作
1.1 引入依赖
<dependencies>
  <dependency>
    <groupId>org.springframework</groupId>
    <artifactId>spring-context</artifactId>
    <version>5.3.19</version>
  </dependency>
  <!--Spring 测试相关,整合junit,要求junit在4.12及以上-->
  <dependency>
    <groupId>org.springframework</groupId>
    <artifactId>spring-test</artifactId>
    <version>5.3.19</version>
  </dependency>
  <!--
    Spring 持久化层支持jar包
    Spring 在执行持久化层操作、与持久化层技术进行整合过程中,需要使用orm、jdbc,tx三个jar包
    导入 orm 包就可以通过 Maven 的依传递性把其他两个也导入
  -->
  <dependency>
    <groupId>org.springframework</groupId>
    <artifactId>spring-orm</artifactId>
    <version>5.3.19</version>
  </dependency>
  <!--mysql驱动-->
  <dependency>
    <groupId>mysql</groupId>
    <artifactId>mysql-connector-java</artifactId>
    <version>8.0.28</version>
  </dependency>
  <!--数据源-->
  <dependency>
    <groupId>com.alibaba</groupId>
    <artifactId>druid</artifactId>
    <version>1.2.11</version>
  </dependency>
  <dependency>
    <groupId>junit</groupId>
    <artifactId>junit</artifactId>
    <version>4.12</version>
    <scope>test</scope>
  </dependency>
</dependencies>
1.2 创建jdbc.properties
jdbc.driver=com.mysql.cj.jdbc.Driver
jdbc.url=jdbc:mysql://localhost:3306/mydb?serverTimezone=UTC
jdbc.username=root
jdbc.password=mysql123.
1.3 spring配置文件
<?xml version="1.0" encoding="UTF-8"?>
<beans xmlns="http://www.springframework.org/schema/beans"
       xmlns:xsi="http://www.w3.org/2001/XMLSchema-instance"
       xmlns:context="http://www.springframework.org/schema/context"
       xsi:schemaLocation="http://www.springframework.org/schema/beans http://www.springframework.org/schema/beans/spring-beans.xsd http://www.springframework.org/schema/context https://www.springframework.org/schema/context/spring-context.xsd">

    <!--引入外部配置文件jdbc.properties  classpath:指类路径-->
    <context:property-placeholder location="classpath:jdbc.properties"/>
    <!--配置数据源-->
    <bean class="com.alibaba.druid.pool.DruidDataSource" id="dataSource">
        <property name="driverClassName" value="${jdbc.driver}"></property>
        <property name="url" value="${jdbc.url}"></property>
        <property name="username" value="${jdbc.username}"></property>
        <property name="password" value="${jdbc.password}"></property>
    </bean>
    <!--配置jdbc实例-->
    <bean class="org.springframework.jdbc.core.JdbcTemplate">
        <!--设置数据源,连接数据库-->
        <property name="dataSource" ref="dataSource"/>
    </bean>
</beans>
1.4 创建测试类
//指定当前测试类在Spring的测试环境中执行,此时就可以通过注入的方式直接获取IOC容器中bean
@RunWith(SpringJUnit4ClassRunner.class)
// 设置Spring测试环境的配置文件
@ContextConfiguration(“classpath:spring-jdbc.xml”)
//指定当前测试类在Spring的测试环境中执行,此时就可以通过注入的方式直接获取IOC容器中bean
@RunWith(SpringJUnit4ClassRunner.class)
// 设置Spring测试环境的配置文件
@ContextConfiguration("classpath:spring-jdbc.xml")
public class AppTest
{
    @Autowired
    private JdbcTemplate jdbcTemplate;

    @Test
    public void insertTest() {
        String sql = "insert into t_user values (null, ?, ?, ?, ?, ?)";
        jdbcTemplate.update(sql, "付东", "123456", "28", "nan", "252230@qq.com");
    }

    @Test
    public void selectTest() {
        String sql = "select * from t_user where id = ?";
        User user = jdbcTemplate.queryForObject(sql, new BeanPropertyRowMapper<>(User.class), "1");
        System.out.println(user);
    }

    @Test
    public void selectAllTest() {
        String sql = "select * from t_user";
        List<User> users = jdbcTemplate.query(sql, new BeanPropertyRowMapper<>(User.class));
        users.forEach(System.out::println);
    }
}
2.事务概念
(1) 事务是数据库操作最基本单元,逻辑上一组操作,要么都成功,如果有一个失败所有操作都失败
(2) 典型场景: 银行转账
luy 转账 100元给 mary
lucy少 100,mary多100
事务四个特性(ACID)
- 原子性
- 一致性
- 隔离性
- 持久性
2.1 编程式事务
事务功能的相关操作全部通过自己编写代码来实现

2.2 声明式事务
既然事务控制的代码有规律可循,代码的结构基本是确定的,所以框架就可以将固定模式的代码抽取出来,进行相关的封装。封装起来后,我们只需要在配置文件中进行简单的配置即可完成操作。
- 好处1:提高开发效率
- 好处2: 消除了几余的代码.
- 好处3:框架会综合考虑相关领域中在实际开发环境下有可能遇到的各种问题,进行了健壮性、性能等各个方面的优化
所以,我们可以总结下面两个概念:
- 编程式:自己写代码实现功能
- 声明式:通过配置让框架实现功能
3.基于注解的声明式事务
3.1 准备工作
1. 配置spring配置文件
<!--引入外部配置文件jdbc.properties  classpath:指类路径-->
<context:property-placeholder location="classpath:jdbc.properties"/>
<!--配置数据源-->
<bean class="com.alibaba.druid.pool.DruidDataSource" id="dataSource">
    <property name="driverClassName" value="${jdbc.driver}"></property>
    <property name="url" value="${jdbc.url}"></property>
    <property name="username" value="${jdbc.username}"></property>
    <property name="password" value="${jdbc.password}"></property>
</bean>
<!--配置jdbc实例-->
<bean class="org.springframework.jdbc.core.JdbcTemplate">
    <!--设置数据源-->
    <property name="dataSource" ref="dataSource"/>
</bean>

<!--开启扫描-->
<context:component-scan base-package="com.fd.spring"></context:component-scan>

<!--配置事务管理器-->
<bean class="org.springframework.jdbc.datasource.DataSourceTransactionManager" id="transactionManager">
    <property name="dataSource" ref="dataSource"/>
</bean>

<!--
    基于注解开启事务的驱动
    将使用@Transactional注解所标识的方法或类中所有的方法使用事务进行管理

    transaction-manager属性设置事务管理器的id
    若事务管理器的bean的id默认为transactionManager,则该属性以不写
-->
<tx:annotation-driven transaction-manager="transactionManager"></tx:annotation-driven>
3.2 具体实现
1. 创建相关业务类
POJO层:
@Component
public class User {

    private String id;

    private String name;

    private String password;

    private Integer age;

    private String gender;

    private String email;

    private Double balance;

    ...
}

@Component
public class Book {

    private String bookId;

    private String bookName;

    private Double price;

    private Integer stock;

    ...
}
Controller层
@Controller
public class BookController {

    @Autowired
    private IBookService bookService;

    @Autowired
    private ICheckoutService checkoutService;

    public void BuyBook(String userId, String bookId) {
        bookService.buyBook(userId, bookId);
    }

    public void checkout(String userId, String[] bookIds) {
        checkoutService.checkout(userId,bookIds);
    }
}
Service层
public interface IBookService {

    void buyBook(String userId, String bookId);
}

@Service
public class BookServiceImpl implements IBookService {

    @Autowired
    private IBookDao bookDao;

    @Override
    @Transactional()
    public void buyBook(String userId, String bookId) {
        // 查询图书的价格
        Double price = bookDao.getPriceById(bookId);
        // 更新图书的库存
        bookDao.updateStock(bookId);
        // 更新用户的余额
        bookDao.updateBalance(userId,price);
    }
}

public interface ICheckoutService {
    void checkout(String userId, String[] bookIds);
}

@Service
public class CheckoutServiceImpl implements ICheckoutService {

    @Autowired
    private IBookService bookService;

    @Override
    @Transactional
    public void checkout(String userId, String[] bookIds) {
        for (int i = 0; i < bookIds.length; i++) {
            bookService.buyBook(userId, bookIds[i]);
        }
    }
}
Dao层
public interface IBookDao {

    Double getPriceById(String bookId);

    void updateStock(String bookId);

    void updateBalance(String userId, Double price);
}

@Repository
public class BookDaoImpl implements IBookDao {

    @Autowired
    private JdbcTemplate jdbcTemplate;

    @Override
    public Double getPriceById(String bookId) {
        String sql = "select price from t_book where book_id = ?";
        return jdbcTemplate.queryForObject(sql, Double.class, bookId);
    }

    @Override
    public void updateStock(String bookId) {
        String sql = "update t_book set stock = stock -1 where book_id = ?";
        jdbcTemplate.update(sql, bookId);
    }

    @Override
    public void updateBalance(String userId, Double price) {
        String sql = "update t_user set balance = balance - ? where id = ?";
        jdbcTemplate.update(sql, price, userId);
    }
}
2. 测试事务
@Test
public void buyBookTest() {
    /*
        声明式事务的配置步骤:
            1、在Spring的配置文件中配置事务管理器
            2、开启事务的注解驱动
            在需要被事务管理的方法上,添加@Transactional注解,该方法就会被事务管理
            @Transactional注解标识的位置:
            1.标识在方法上
            2、标识在类上,则类中所有的方法都全被事务管理

    * */
    bookController.BuyBook("1", "1");

    // bookController.checkout("1", new String[] {"1", "2"});
}
如果用户的余额不足报错,则图书的sql执行也会进行回滚。

SQL [update t_user set balance = balance - ? where id = ?]; Data truncation: Out of range value for column ‘balance’ at row 1; nested exception is com.mysql.cj.jdbc.exceptions.MysqlDataTruncation: Data truncation: Out of range value for column ‘balance’ at row 1
3.3 事务属性
1. readonly 只读
对一个查询操作来说,如果我们把它设置成只读,就能够明确告诉数据库,这个操作不涉及写操作。这样数据库就能够针对查询操作来进行优化。
注意:如果对增删改设置只读会抛出以下异常:

2. timeout 超时
事务在执行过程中,有可能因为遇到某些问题,导致程序卡住,从而长时间占用数据库资源。而长时间占用资源大概率是因为程序运行出现了问题(可能是]ava程序或MySQL数据库或网络连接等等)。此时这个很可能出问题的程序应该被回滚,撤销它已做的操作,事务结束,把资源让出来,让其他正常程序可以执,概括来说就是一句话:超时回滚,释放资源。
@Override
@Transactional(timeout = 3)
public void buyBook(String userId, String bookId) {
    try {
        TimeUnit.SECONDS.sleep(5);
    }catch (Exception e) {
        e.printStackTrace();
    }
    // 查询图书的价格
    Double price = bookDao.getPriceById(bookId);
    // 更新图书的库存
    bookDao.updateStock(bookId);
    // 跟新用户的余额
    bookDao.updateBalance(userId,price);
}
执行过程抛出异常:

3. rollbackFor 回滚策略
声明式事务默认只针对运行时异常回滚,编译时异常不回滚。
可以通过@Transactional中相关属性设置回滚策略。
- rollbackFor属性: 需要设置一个Class类型的对象。
- rollbackForClassName属性: 需要设置一个字符串类型的全类名。
- noRollbackFor属性: 需要设置一个Class类型的对象。
- noRollbackForClassName属性: 需要设置一个字符串类型的全类名
@Transactional(
        rollbackFor = Exception.class,
        rollbackForClassName = "java.lang.Exception"
)
4. isolation 事务隔离级别
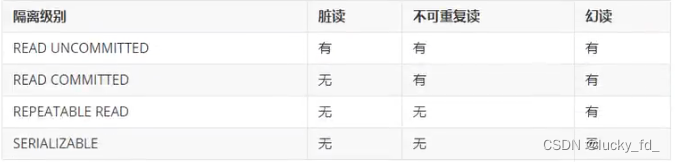
数据库系统必须具有隔离并发运行各个事务的能力,使它们不会相互影响,避免各种并发问题。一个事务与其他事务隔离的程度称为隔离级别。SQL标准中规定了多种事务隔离级别,不同隔离级别对应不同的干扰程度,隔离级别越高,数据一致性就越好,但并发性越弱。
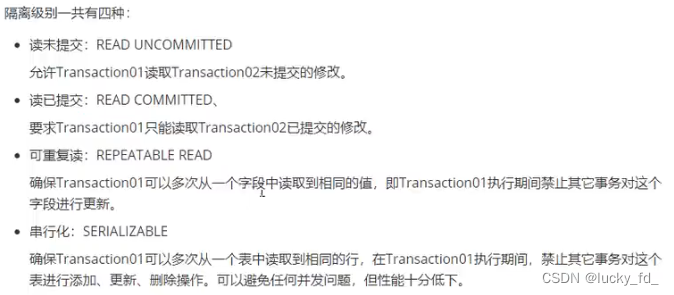
各个隔离级别解决并发问题的能力见下表:
各种数据库产品对事务隔离级别的支持程度:
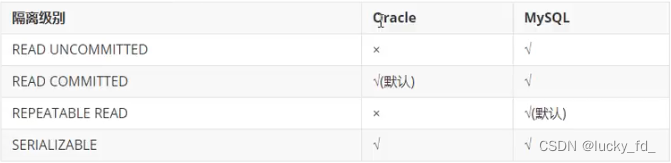
事务隔离级别默认为:可重复读
@Transactional(
    isolation = Isolation.SERIALIZABLE
)

// 枚举对象
public enum Isolation {
    DEFAULT(-1),
    READ_UNCOMMITTED(1),
    READ_COMMITTED(2),
    REPEATABLE_READ(4),
    SERIALIZABLE(8);

    private final int value;

    private Isolation(int value) {
        this.value = value;
    }

    public int value() {
        return this.value;
    }
}
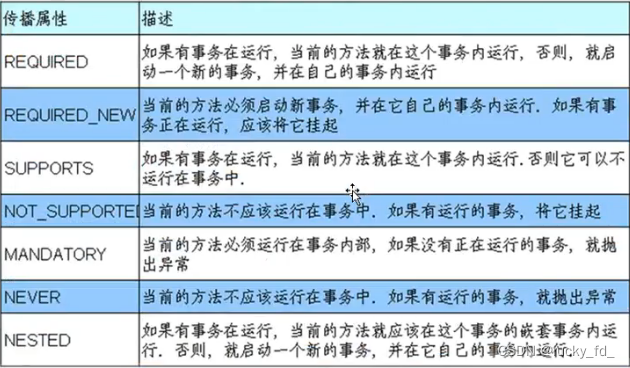
5. propagation 事务传播行为
当事务方法被另一个事务方法调用时,必须指定事务应该如何传播。例如:方法可能继续在现有事务中运行,也可能开启一个新事务,并在自己的事务中运行。
可以通过@Transactional中的propagation属性设置事务传播行为。
修改BookServicelmpl中buyBook()上,注解@Transactional的propagation属性
@Transactional(propagation = Propagation.REQUIRED),默认情况,表示如果当前线程上有已经开启的事务可用,那么就在这个事务中运行。经过观察,购买图书的方法buyBook()在checkout()中被调用,checkout()上有事务注解,因此在此事务中执行。所购买的两本图书的价格为80和50,而用户的余额为100,因此在购买第二本图书时余额不足失败,导致整个checkout()回滚,即只要有一本书买不了,就都买不了
@Transactional(propagation = Propagation.REQUIRES_NEN),表示不管当前线程上是否有已经开启的事务,都要开启新事务。同样的场暴,每次购买图书都是在buyBook()的事务中执行,因此第一本图书购买成功,事务结束,第二本图书购买失败,只在第二次的buyBook0中回滚,购买第一本图书不受影响,即能买几本就买几本
4.基于xml的声明式事务
4.1 引入依赖
<dependency>
    <groupId>org.aspectj</groupId>
    <artifactId>aspectjweaver</artifactId>
    <version>1.9.7</version>
</dependency>
<dependency>
    <groupId>org.springframework.boot</groupId>
    <artifactId>spring-boot-starter-aop</artifactId>
    <version>2.6.7</version>
</dependency>
注意:基于xml的声明式事务必须引入Aspects的依赖
4.2 spring配置文件
<!--配置事务管理器-->
<bean class="org.springframework.jdbc.datasource.DataSourceTransactionManager" id="transactionManager">
    <property name="dataSource" ref="dataSource"/>
</bean>

<!--
    基于xml配置事务通知
    tx:advice标签:配置事务通知
    id属性: 给事务通知标签设置唯一标识,便于引用
    transaction-manager属性: 关联事务管理器
-->
<tx:advice id="tx" transaction-manager="transactionManager">
    <!--
        配置事务属性
        * 可以*表达式来配置方法
    -->
    <tx:attributes>
        <tx:method name="buyBook" timeout="3"/>
        <tx:method name="*"/>
    </tx:attributes>
</tx:advice>

<aop:config>
    <aop:advisor advice-ref="tx" pointcut="execution(* com.fd.spring.service.impl.*.*(..))"></aop:advisor>
</aop:config>
4.3 测试方法
@Test
public void buyBookTest() {

    /*
        声明式事务的配置步骤:
            1、在Spring的配置文件中配置事务管理器
            2、开启事务的注解驱动
            在需要被事务管理的方法上,添加@Transactional注解,该方法就会被事务管理
            @Transactional注解标识的位置:
            1.标识在方法上
            2、标识在类上,则类中所有的方法都全被事务管理

    * */
    bookController.BuyBook("1", "1");

    // bookController.checkout("1", new String[] {"1", "2"});
}