Object counting——生成密度图density map

news2025/7/7 19:47:19

文章目录

  • 过程
  • 代码
  • 参考

在这里插入图片描述

过程

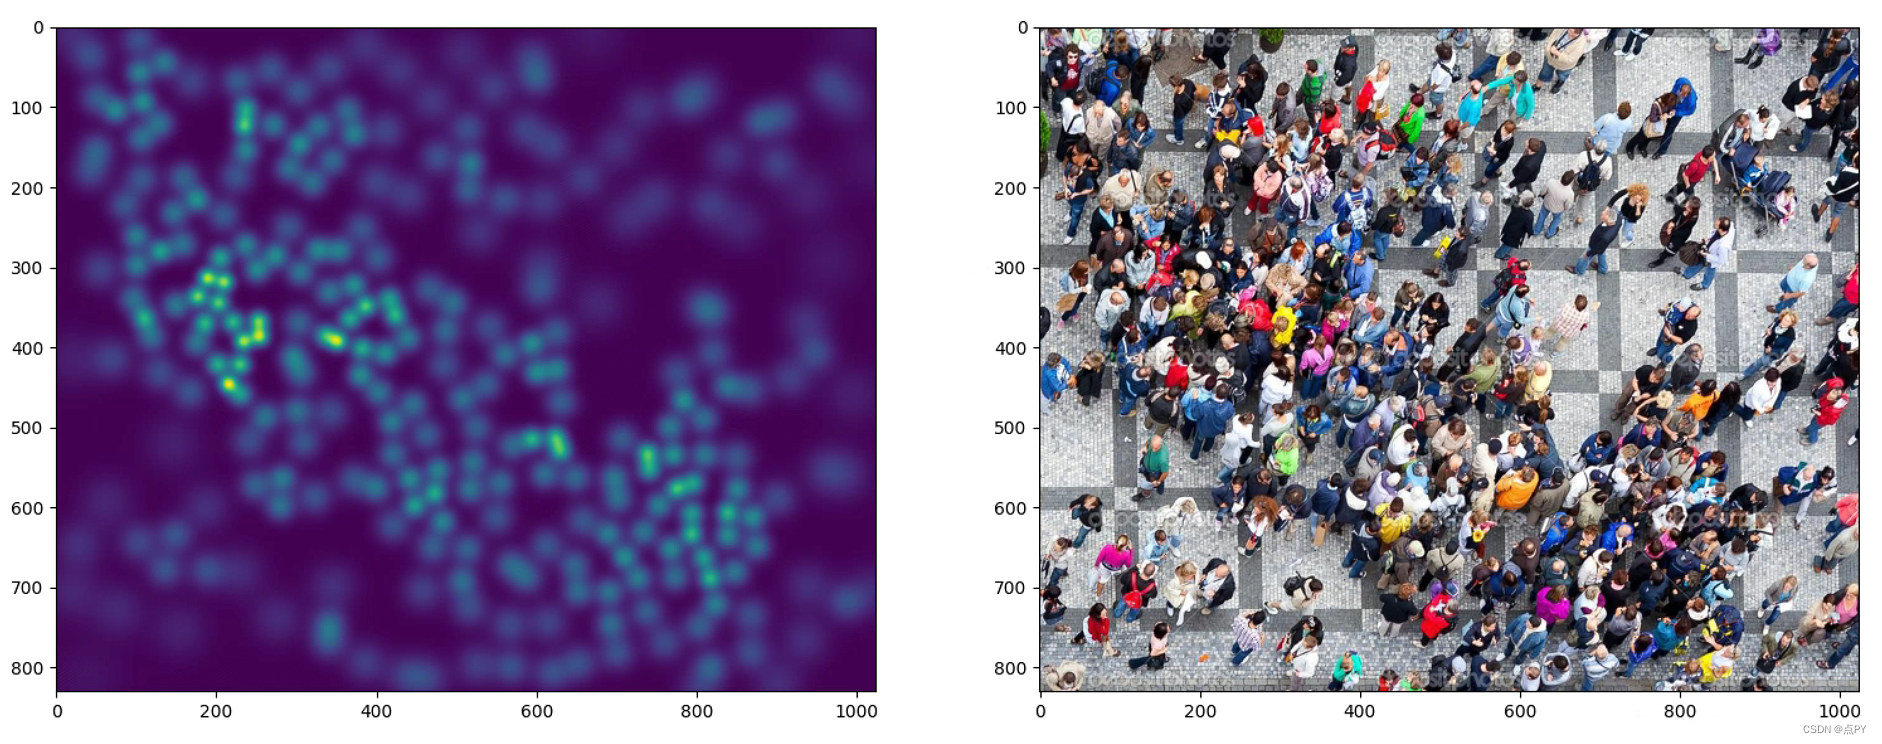
首先构造一个和原始图片大小相同的矩阵,并将其全部置为0,然后将每个被标记的人头对应的位置置为1,这样就得到了一个只有0和1的矩阵,最后通过高斯核函数进行卷积得到一个连续的密度图。

代码

import h5py
import scipy.io as io
import PIL.Image as Image
import numpy as np
import os
import glob
from matplotlib import pyplot as plt
from scipy.ndimage.filters import gaussian_filter 
from scipy.spatial import KDTree
import scipy
import json
from matplotlib import cm as CM
import torch

#this is borrowed from https://github.com/davideverona/deep-crowd-counting_crowdnet
def gaussian_filter_density(gt):
    print(gt.shape)
    density = np.zeros(gt.shape, dtype=np.float32)
    gt_count = np.count_nonzero(gt)
    if gt_count == 0:
        return density

    pts = np.array(list(zip(np.nonzero(gt)[1], np.nonzero(gt)[0])))
    leafsize = 2048
    # build kdtree
    tree =  KDTree(pts.copy(), leafsize=leafsize)
    # query kdtree
    distances, locations = tree.query(pts, k=4)

    print('generate density...')
    for i, pt in enumerate(pts):
        pt2d = np.zeros(gt.shape, dtype=np.float32)
        pt2d[pt[1],pt[0]] = 1.
        if gt_count > 1:
            sigma = (distances[i][1]+distances[i][2]+distances[i][3])*0.1
        else:
            sigma = np.average(np.array(gt.shape))/2./2. #case: 1 point
        density += scipy.ndimage.filters.gaussian_filter(pt2d, sigma, mode='constant')
    print('done.')
    return density

if __name__ == "__main__":
    #set the root to the Shanghai dataset you download
    root = r'D:\dl_dataset\object_counting\ShanghaiTech_Crowd_Counting_Dataset'
    #now generate the ShanghaiA's ground truth
    part_A_train = os.path.join(root,'part_A_final/train_data','images')
    part_A_test = os.path.join(root,'part_A_final/test_data','images')
    part_B_train = os.path.join(root,'part_B_final/train_data','images')
    part_B_test = os.path.join(root,'part_B_final/test_data','images')
    path_sets = [part_A_train,part_A_test]

    img_paths = []
    for path in path_sets:
        for img_path in glob.glob(os.path.join(path, '*.jpg')):
            img_paths.append(img_path)

    for img_path in img_paths:
        print(img_path)
        mat = io.loadmat(img_path.replace('.jpg','.mat').replace('images','ground_truth').replace('IMG_','GT_IMG_'))
        img= plt.imread(img_path)
        k = np.zeros((img.shape[0],img.shape[1]))
        gt = mat["image_info"][0,0][0,0][0]
        for i in range(0,len(gt)):
            if int(gt[i][1])<img.shape[0] and int(gt[i][0])<img.shape[1]:
                k[int(gt[i][1]),int(gt[i][0])]=1
        k = gaussian_filter_density(k)
        # plt.subplot(121)
        # plt.imshow(k)
        # plt.subplot(122)
        # plt.imshow(img)
        # plt.show()

        with h5py.File(img_path.replace('.jpg','.h5').replace('images','ground_truth'), 'w') as hf:
                hf['density'] = k

    # #now see a sample from ShanghaiA
    plt.imshow(Image.open(img_paths[0]))
    gt_file = h5py.File(img_paths[0].replace('.jpg','.h5').replace('images','ground_truth'),'r')
    groundtruth = np.asarray(gt_file['density'])
    plt.imshow(groundtruth,cmap=CM.jet)

    #now generate the ShanghaiB's ground truth
    path_sets = [part_B_train,part_B_test]

    img_paths = []
    for path in path_sets:
        for img_path in glob.glob(os.path.join(path, '*.jpg')):
            img_paths.append(img_path)

    for img_path in img_paths:
        print(img_path)
        mat = io.loadmat(img_path.replace('.jpg','.mat').replace('images','ground_truth').replace('IMG_','GT_IMG_'))
        img= plt.imread(img_path)
        k = np.zeros((img.shape[0],img.shape[1]))
        gt = mat["image_info"][0,0][0,0][0]
        for i in range(0,len(gt)):
            if int(gt[i][1])<img.shape[0] and int(gt[i][0])<img.shape[1]:
                k[int(gt[i][1]),int(gt[i][0])]=1
        k = gaussian_filter(k,15)
        with h5py.File(img_path.replace('.jpg','.h5').replace('images','ground_truth'), 'w') as hf:
                hf['density'] = k

参考

https://github.com/leeyeehoo/CSRNet-pytorch/blob/master/make_dataset.ipynb

https://blog.csdn.net/qq_40356092/article/details/108140273

本文来自互联网用户投稿,该文观点仅代表作者本人,不代表本站立场。本站仅提供信息存储空间服务,不拥有所有权,不承担相关法律责任。如若转载,请注明出处:http://www.coloradmin.cn/o/703977.html

如若内容造成侵权/违法违规/事实不符,请联系多彩编程网进行投诉反馈,一经查实,立即删除!

相关文章

如何对修改密码接口进行压测?终于找到解决办法了

做接口测试中&#xff0c;对于一般性的单业务接口测试很多工具可供选择&#xff0c;但是对于一些相关业务相关性的关联接口测试就比较麻烦&#xff0c;使用工具比如jmeter、postman、soapui等等就比较麻烦。我比较偏重脚本化执行测试用例&#xff0c;所以选择了groovy作为主要语…

JAVA选择题笔试:static成员与非static成员、父类子类方法的继承、接口与抽象类、final的使用

0、前言 本文针对一些java基础知识的一些考点做出解析。 1、静态成员 与 非静态成员 静态变量与静态方法都是静态成员。 先说静态变量与普通成员变量的区别&#xff0c;例如如下两个变量&#xff1a; public class Demo {public static String A "静态变量";publi…

迅镭激光高功率切割机成功交付招商重工,助推船舶行业智造升级!

近日&#xff0c;迅镭激光-招商重工高功率激光切割机交机仪式在招商局重工(江苏)有限公司顺利举行。 招商重工项目负责人佘刚林、孙宗宇&#xff0c;迅镭激光总经理助理刘富生、营销中心行业总监杨林等领导参加交付仪式&#xff0c;共同见证了这一激动人心的时刻。 本次交付的机…

日历组件 el-calendar 实现标记功能

需求&#xff1a;在日历组件中选择月份时&#xff0c;可以显示当月已经质检或需质检的数据 思路&#xff1a;前端每次点击日期选择器的时候调用接口&#xff0c;接口返回当月需要质检或已质检的数据&#xff0c;前端拿到数据就开始做判断然后回显。 大体样式 代码&#xff1a…

【每日一短语】给某人严重的惊吓

1、短语及释义 scare the pants off sb. 释义&#xff1a; 把某人的裤子吓掉&#xff1b;引申为严重的惊吓 2、示例及出处 美剧&#xff1a;《生活大爆炸》第八季第2集 The Big Bang Theory, Season 8 Episode 2 Leonard Hofstadter: I think the idea that someone could be …

【操作指南】EasyNTS上云网关如何删除日志?

EasyNTS上云网关主要包括两个部分&#xff1a;第一部分是软硬结合的EasyNTS上云网关设备。EasyNTS上云网关有单独的软件部分&#xff0c;具有拉转推功能&#xff0c;用户可集成部署在自己的硬件终端和业务系统中&#xff0c;也有软硬一体的硬件部分&#xff0c;根据需求直接配置…

CSS中伪元素详解和用法例子详解

文章目录 一、伪元素介绍二、::before和::after三、::first-line和::first-letter四、::selection五、::placeholder 一、伪元素介绍 伪元素&#xff1a;用于创建一些不在DOM树中的元素&#xff0c;并为其添加样式。 二、::before和::after ::before 伪元素可以用来创建一个…

浅谈 Android Tombstone(墓碑日志)分析步骤 - 02

tomestone 日志&#xff1a; *** *** *** *** *** *** *** *** *** *** *** *** *** *** *** *** Build fingerprint: qti/trinket/trinket:11/RKQ1.211119.001/37:user/test-keys Revision: 0 ABI: arm Timestamp: 2023-06-19 23:47:310800 pid: 742, tid: 32482, name: CAM_M…

Spring Bean的生命周期解读

目录 1. Spring IOC容器 1.1 Spring IOC 容器的设计 1.1.1 BeanFactory 1.1.2 ApplicationContext 1.2 Spring Bean的生命周期 1.2.1 BeanDefinition 1.2.2 InstantiationAwareBeanPostProcessor和BeanPostProcessor 1.2.3 测试生命周期 1. Spring IOC容器 1.1 Spring …

【前端工程化】深入浅出vite(一)--vite的优点及原理、性能优化

Vite 需要 Node.js 版本 14.18&#xff0c;16。然而&#xff0c;有些模板需要依赖更高的 Node 版本才能正常运行&#xff0c;当你的包管理器发出警告时&#xff0c;请注意升级你的 Node 版本。 背景 webpack支持多种模块化&#xff0c;将不同模块的依赖关系构建成依赖图来进行…

帮助中心对企业有用吗?

帮助中心一般是指产品的说明或者使用帮助&#xff0c;客户在利用一些网站的功能或者服务时往往会遇到一些看似很简单&#xff0c;但不经过说明可能很难搞清楚的问题&#xff0c;企业有时甚至会因为这些细节问题的影响而失去用户&#xff0c;其实在很多情况下&#xff0c;只要经…

如何添加mathtype到往word菜单?

mathtype6.9安装完事&#xff0c;总是不在word中显示菜单&#xff0c;网上搜了好几个教程&#xff0c;步骤各不相同&#xff0c;索性自己试了一遍&#xff0c;整理了下关键步骤&#xff0c;做个备份&#xff0c;下次直接看自己的经验&#xff01; 把math type安装目录中&#…

MySQL中常用工具

♥️作者&#xff1a;小刘在C站 ♥️个人主页&#xff1a; 小刘主页 ♥️努力不一定有回报&#xff0c;但一定会有收获加油&#xff01;一起努力&#xff0c;共赴美好人生&#xff01; ♥️学习两年总结出的运维经验&#xff0c;以及思科模拟器全套网络实验教程。专栏&#xf…

LeetCode 15.三数之和

文章目录 题目描述解题思路代码 题目描述 链接&#xff1a;https://leetcode.cn/problems/3sum 解题思路 排序 双指针 注意点&#xff1a;去重 代码 public IList<IList<int>> ThreeSum(int[] nums) {// 结果数组List<IList<int>> result new Li…

Nacos 2.x版本 配置中心和服务注册与发现 源码解析

一、配置中心源码解析 1.首先找到nacos读取配置的入口 1&#xff09;找到nacos-config包下的spring.factories中的NacosConfigBootstrapConfiguration 2&#xff09;NacosConfigBootstrapConfiguration会做两件事情&#xff0c;加载完成两个bean&#xff0c;一个是NacosConfi…

2023品牌新媒体矩阵营销洞察报告:流量内卷下,如何寻找增长新引擎?

近年来&#xff0c;随着移动互联网的发展渗透&#xff0c;短视频、直播的兴起&#xff0c;新消费/新零售、兴趣电商/社交电商等的驱动下&#xff0c;布局线上渠道已成为绝大多数品牌的必然选择。 2022年&#xff0c;越来越多的品牌加入到自运营、自播的行列中&#xff0c;并且…

【线性代数】快速复习笔记

线性代数快速复习 行列式行列式的基础计算某行&#xff08;列加上或减去另一行&#xff08;列的几倍&#xff0c;行列式不变某行列乘k,等于k乘此行列式互换两行列&#xff0c;行列式变号 行列式的性质1 主对角线是X&#xff0c;其余是其他常数a2 范德蒙德行列式3 行列式加减法4…

Linux中安装配置启动Redis

Linux中安装配置启动Redis 一、下载redis 使用命令下载&#xff1a; wget https://download.redis.io/releases/redis-6.0.10.tar.gzls du sh redis-6.0.10.tar.gz解压 [rootnode02 ~]# tar xzf redis-6.0.10.tar.gz [rootnode02 ~]# cd redis-6.0.10 [rootnode02 redis-6.…

低代码:改变未来的智慧力量!打造智能产业新纪元!

前言 在数智时代的浪潮中&#xff0c;智慧产业成为推动经济发展的重要引擎。随着科技的不断进步&#xff0c;传统工厂也在加速转型为智能工厂&#xff0c;实现产业体系的智能化建设已经成为当今企业追求的目标。 概念 产业体系智能化是指借助信息技术手段&#xff0c;对传统产业…

redis高可用(二)

redis高可用&#xff08;二&#xff09; 一、主从复制 1.概念 主从复制&#xff0c;是指将一台Redis服务器的数据&#xff0c;复制到其他的Redis服务器。前者称为主节点(Master)&#xff0c;后者称为从节点(Slave)&#xff1b;数据的复制是单向的&#xff0c;只能由主节点到…