本篇参考C++单向循环链表实现整理,先搞懂结构框架,后期根据视频利用c对内容实现,也可以对c有更高的提升。
文章目录
- 1. 链表定义
- 2. 链表插入
- 3. 链表打印(注意打印过程是跳过头节点head的)
- 4. 实验
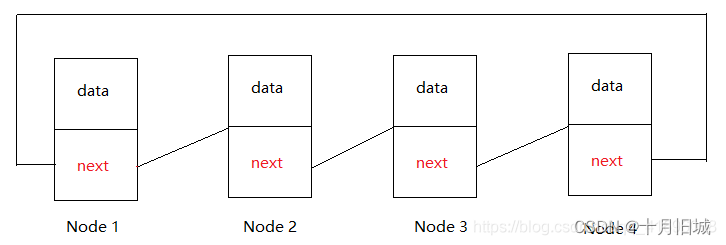
单向循环链表与单向链表十分相似,具有关单向链表详细理论与实现过程可见 “C++数据结构X篇_04_单向链表框架搭建、实现和测试”。 实际上单向循环链表与单向链表仅仅有尾部node指针域指向不同的差别,对于单向链表尾部node由于没有后续node,其指针域需指向NULL。而单向循环链表将尾部node的指针域指向头部node,首位相连构成单向循环链表,具体形式为:
具体实现代码为:
1. 链表定义
//定义节点
class circle_node
{
public:
	int data;
	circle_node* next;
};
//定义循环链表
class circle_list
{
public:
	circle_node* head;
	int size;
};

//链表初始化
circle_list* list_init()
{
	circle_list* L =new circle_list;
	L->size=0;
	L->head=new circle_node;
	L->head->data=NULL;
	L->head->next=L->head;  //头指针初始指向自己
	return L;
}
这里与单向链表唯一的不同就是,头指针L->head->next=L->head指向自己而不是指向NULL。
2. 链表插入
//插入链表
void list_insert(circle_list *L,int pos,int data)
{
	//创建新指针new_node;
	circle_node* new_node=new circle_node;
	new_node->data=data;
	new_node->next=NULL;
	//根据位置查找pos的前一个节点
	circle_node* pcurrent=L->head;
	for (int i = 0; i < pos; i++)
	{
		pcurrent=pcurrent->next;
	}
	//将new_node插入
	new_node->next=pcurrent->next;
	pcurrent->next=new_node;
	L->size++;
}
这里的插入方式与单向链表完全相同。
3. 链表打印(注意打印过程是跳过头节点head的)
//打印链表,按num自由指定打印数据个数
void list_print(circle_list *L,int num)
{
	circle_node* pcurrent=L->head->next;
	for (int i = 0; i <num; i++)
	{
        if (pcurrent==L->head)
		{
			pcurrent=L->head->next;
		}
		cout<<pcurrent->data<<"\t";
		pcurrent=pcurrent->next;
	}
	cout<<endl;
}
由于单向循环链表首尾相连,因此打印链表时可根据需要打印node的数量指定num。
4. 实验
int main()
{
	//创建单向循环链表
	circle_list* L=list_init();
	//插入数据0~9
	for (int i = 0; i < 10; i++)
	{
		list_insert(L,i,i);
	}
	cout<<"链表中数据为:"<<endl;
	list_print(L,10);
	cout<<"链表中2倍数据为:"<<endl;
	list_print(L,20);
	system("pause");
	return 0;
}
结果为:

5. 学习视频:循环链表思路;循环链表框架;循环链表框架实现;循环链表测试