目录
一、结构体的概念
二、结构体定义和使用
三、结构体数组
四、结构体指针
五、结构体嵌套结构体
六、结构体做函数参数
七、结构体中const使用场景
一、结构体的概念
结构体属于用户自定义的数据类型,允许用户存储不同的数据类型
二、结构体定义和使用
语法: struct 结构体名 { 结构体成员列表 };
通过结构体创建变量的方式有三种:
- struct 结构体名 变量名
- struct 结构体名 变量名 = { 成员1值, 成员2值 … }
- 定义结构体时顺便创建变量
示例:
#include<iostream>
using namespace std;
// 1、创建学生数据
// 学生包括(姓名,年龄,分数 )
// 2、通过学生类型创建具体的学生
// 自定义数据类型,一些类型集合组成的一个类型
// 语法:struct 类型名称 { 成员列表 };
struct Student
{
// 成员列表
// 姓名
string name;
// 年龄
int age;
// 分数
int score;
}s3; // s3就是顺便创建结构体变量
int main()
{
// 三种通过自定义数据类型创建自定义数据
// 1、struct Student s1;
// struct 关键字可以省略(创建变量的时候可以省略,在定义结构体的时候不可以省略)
struct Student s1;
// 给s1属性赋值
s1.name="张三";
s1.age=18;
s1.score=100;
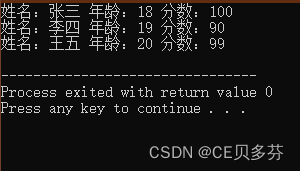
cout<<"姓名:"<<s1.name<<" 年龄:"<<s1.age<<" 分数:"<<s1.score<<endl;
// 2、struct Student s2 = { ... };
struct Student s2={"李四",19,90};
cout<<"姓名:"<<s2.name<<" 年龄:"<<s2.age<<" 分数:"<<s2.score<<endl;
// 3、在定义结构体时顺便创建结构体变量
s3.name="王五";
s3.age=20;
s3.score=99;
cout<<"姓名:"<<s3.name<<" 年龄:"<<s3.age<<" 分数:"<<s3.score<<endl;
return 0;
}运行结果:
总结1:定义结构体时的关键字是strcut,不可以省略
总结2:创建结构体变量时,关键字struct可以省略
总结3:结构体变量利用操作符“.”访问成员
三、结构体数组
作用:将自定义的结构体放入到数组中方便维护
语法:struct 结构体名 数组名[元素个数] = { { },{ },{ } … { } };
示例:
#include<iostream>
using namespace std;
// 结构体数组
// 1、定义结构体
// 2、创建结构体数组
// 3、给结构体数组中的元素赋值
// 4、遍历结构体数组
struct Student
{
// 成员列表
// 姓名
string name;
// 年龄
int age;
// 分数
int score;
};
int main()
{
// 创建结构体数组
struct Student stuArray[3]=
{
{"张三",18,100},
{"李四",19,99},
{"王五",20,98}
};
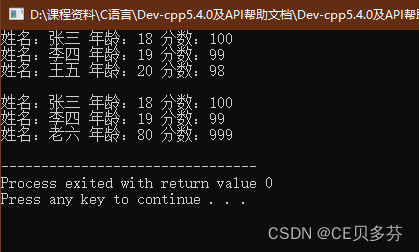
// 遍历数组
for(int i=0;i<3;i++)
{
cout<<"姓名:"<<stuArray[i].name<<" 年龄:"<<stuArray[i].age<<" 分数:"
<<stuArray[i].score<<endl;
}
cout<<endl;
// 给结构体数组中的元素赋值
stuArray[2].name="老六";
stuArray[2].age=80;
stuArray[2].score=999;
// 遍历数组
for(int i=0;i<3;i++)
{
cout<<"姓名:"<<stuArray[i].name<<" 年龄:"<<stuArray[i].age<<" 分数:"
<<stuArray[i].score<<endl;
}
return 0;
}运行结果:
四、结构体指针
作用:通过指针访问结构体中的成员
- 利用操作符 -> 可以通过结构体指针访问结构体属性
示例:
#include<iostream>
using namespace std;
// 结构体指针
// 定义学生的结构体
struct Student
{
// 成员列表
// 姓名
string name;
// 年龄
int age;
// 分数
int score;
};
int main()
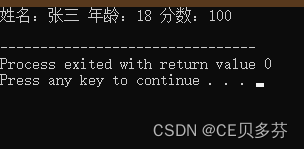
{
// 创建学生结构体变量
struct Student stu={"张三",18,100};
// 通过指针指向结构体变量
struct Student * p=&stu;
// 通过指针访问结构体变量中的数据
// 通过结构体指针,访问结构体中的属性,需要利用'->'
cout<<"姓名:"<<p->name<<" 年龄:"<<p->age<<" 分数:"<<p->score<<endl;
return 0;
}运行结果:
五、结构体嵌套结构体
作用:结构体中的成员可以是另一个结构体
例如:每个老师辅导一个学员,一个老师的结构体中,记录一个学生的结构体
示例:
#include<iostream>

using namespace std;


// 定义学生的结构体

struct Student

{

    // 成员列表

    string name;  // 姓名

    int age;        // 年龄

    int score;  // 分数

};


// 教师结构体定义

struct Teacher

{

    // 成员列表

    int id;  // 职工编号

    string name;  // 教师姓名

    int age;  // 教师年龄

    struct Student stu;  // 子结构体  学生

};

int main()

{

    // 结构体嵌套结构体

    // 创建老师

    struct Teacher t1;

    t1.id=10000;

    t1.name="李四";

    t1.age=40;

    t1.stu.name="老八";

    t1.stu.age=18;

    t1.stu.score=100;


    cout<<"老师职工编号:"<<t1.id<<"\t老师姓名:"<<t1.name<<"\t年龄:"<<t1.age<<endl

        <<"学生姓名: "<<t1.stu.name<<"\t\t学生年龄:"<<t1.stu.age<<"\t分数:"

        <<t1.stu.score<<endl;

    return 0;

}
运行结果:

总结:在结构体中可以定义另一个结构体作为成员,用来解决实际问题。
六、结构体做函数参数
作用:将结构体作为参数向函数中传递
传递方式有两种:
- 值传递
- 地址传递
示例:
#include<iostream>
using namespace std;
// 定义学生的结构体
struct Student
{
// 成员列表
string name; // 姓名
int age; // 年龄
int score; // 分数
};
// 打印学生信息函数
// 1、值传递
void printStudent1(struct Student s)
{
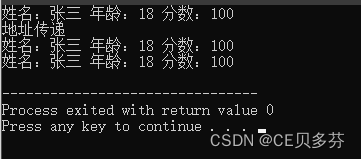
cout<<"值传递"<<endl;
cout<<"姓名:"<<s.name<<" 年龄:"<<s.age<<" 分数:"<<s.score<<endl;
s.age=100;
}
// 2、地址传递
void printStudent2(struct Student *p)
{
cout<<"地址传递"<<endl;
cout<<"姓名:"<<p->name<<" 年龄:"<<p->age<<" 分数:"<<p->score<<endl;
p->age=90;
}
int main()
{
// 结构体做函数参数
// 将学生传入到一个参数中,打印学生身上的所有信息
// 创建一个结构体变量
struct Student s={"张三",18,100};
cout<<"姓名:"<<s.name<<" 年龄:"<<s.age<<" 分数:"<<s.score<<endl;
printStudent1(s);
// 修改值之后
cout<<endl<<"(值传递)修改值之后的输出"<<endl;
cout<<"姓名:"<<s.name<<" 年龄:"<<s.age<<" 分数:"<<s.score<<endl;
printStudent2(&s);
// 修改值之后
cout<<endl<<"(地址传递)修改值之后的输出"<<endl;
cout<<"姓名:"<<s.name<<" 年龄:"<<s.age<<" 分数:"<<s.score<<endl;
return 0;
}运行结果:

总结:如果不想修改主函数中的数据,用值传递,反之用地址传递。
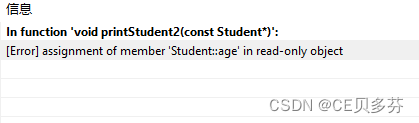
七、结构体中const使用场景
作用:用const来防止误操作
示例:
#include<iostream>

using namespace std;


// 定义学生的结构体

struct Student

{

    // 成员列表

    string name;  // 姓名

    int age;        // 年龄

    int score;  // 分数

};


void printStudent2(const struct Student *p)// 加const防止函数体中的误操作

{

    cout<<"地址传递"<<endl;

    cout<<"姓名:"<<p->name<<" 年龄:"<<p->age<<" 分数:"<<p->score<<endl;

    p->age=90;// 操作失败,因为加入const修饰

}

int main()

{

    // 创建一个结构体变量

    struct Student s={"张三",18,100};

    cout<<"姓名:"<<s.name<<" 年龄:"<<s.age<<" 分数:"<<s.score<<endl;


    printStudent2(&s);

    cout<<"姓名:"<<s.name<<" 年龄:"<<s.age<<" 分数:"<<s.score<<endl;

    return 0;

}
运行结果