WMS 系统窗口添加流程
文章目录
- WMS 系统窗口添加流程
- 一. addView
- 二. addView代码分析
- 2.1 应用端调用WindowManager的addView
- 2.2 WindowManager的实现类是WindowManagerImpl
- 2.3 WindowManagerGlobal
- 2.4 setView
- 2.4 addToDisplayAsUser(Session.java)
- 2.5 addWindow(WindowManagerService.java)
- 2.6 WindowToken的创建
- 三. relayout
- 3.1 TraversalRunnable
- 3.2 doTraversal
- 3.3 performTraversals
- 3.4 relayoutWindow
- 3.4.1 relayout(Session)
- 3.4.1.1 relayoutWindow(WindowManagerService)
- 3.4.1.2 createSurfaceControl
- 3.4.2 performSurfacePlacement 强制布局
- 四. finishDraw
- 4.1 reportDrawFinished
- 4.2 finishDrawing(Session.java)
- 4.3 finishDrawingWindow(WindowManagerService.java)
- 4.4 WindowState.finishDraw
- 4.5 finishDrawingLocked(WindowStateAnimation.java)
- 4.6 requestTraversal(Windowurfaceplacer.java)
- 4.7 mPerformSurfacePlacement
- 4.8. performSurfacePlacement(WindowSurfacePlacer.java)
- 4.9 performSurfacePlacement
- 4.10 performSurfacePlacementLoop
- 4.11 mRoot.performSurfacePlacement
- 4.12 performSurfacePlacementNoTrace
- 4.13 applySurfaceChangesTransaction
- 4.14 applySurfaceChangesTransaction(DisplayContent)
- 4.15 mApplySurfaceChangesTransaction
- 4.16 commitFinishDrawingLocked(WindowAnimator)
- 4.17 performShowLocked
- 五. prepareSurface
- 5.1 prepareSurfaces
- 5.1.1 prepareSurfaces
- 5.1.2 prepareSurfaces(WindowContainer)
- 5.1.3 prepareSurfaces(WindowState)
- 5.1.4 mWinAnimator.prepareSurfaceLocked
- 5.1.5 showSurfaceRobustlyLocked
- 5.1.6 showRobustly
- 5.1.7 closeSurfaceTransaction
- 六. 高清大图
千里马framework学习笔记
环境: android 13
分析系统窗口添加流程,以悬浮窗为例
整体步骤分为四个,如下:
- addView
- relayout
- finishraw
- prepareurfaces
一. addView
主要流程如下:
先说结论:addView主要做了什么?
addView 创建了WindowToken以及WindowState
其中也包括InputChannel的创建(事件相关)
二. addView代码分析
2.1 应用端调用WindowManager的addView
WindowManager mWindowManager;
mWindowManager = (WindowManager) getSystemService(Context.WINDOW_SERVICE);
mWindowManager.addView(mLayout, mLayoutParams);
2.2 WindowManager的实现类是WindowManagerImpl
    public void addView(@NonNull View view, @NonNull ViewGroup.LayoutParams params) {
        applyTokens(params);
        // 这里又调用了WindowManagerGlobal的addview
        mGlobal.addView(view, params, mContext.getDisplayNoVerify(), mParentWindow,
                mContext.getUserId());
    }
2.3 WindowManagerGlobal
    public void addView(View view, ViewGroup.LayoutParams params,
            Display display, Window parentWindow, int userId) {
       	// ... 省略若干容错代码

        final WindowManager.LayoutParams wparams = (WindowManager.LayoutParams) params;
        if (parentWindow != null) {
        // 一些参数调整
            parentWindow.adjustLayoutParamsForSubWindow(wparams);
        }
		// ... 省略一些代码
        ViewRootImpl root;
        View panelParentView = null;

        synchronized (mLock) {
			// ... 仅保留主要代码
            IWindowSession windowlessSession = null;


            if (windowlessSession == null) {
            	// 创建ViewRootImpl
                root = new ViewRootImpl(view.getContext(), display);
            }
			// 设置View的参数
            view.setLayoutParams(wparams);
			// 将view保存到一个集合中    ArrayList<View> mViews = new ArrayList<View>();
            mViews.add(view);
            // 将 root 也添加到集合中  ArrayList<ViewRootImpl> mRoots = new ArrayList<ViewRootImpl>();
            mRoots.add(root);
            // 将参数也添加到集合中  ArrayList<WindowManager.LayoutParams> mParams = new ArrayList<WindowManager.LayoutParams>();
            mParams.add(wparams);

            // do this last because it fires off messages to start doing things
            try {
            	// TODO 重点,这里就是将view添加到WMS中的入口
                root.setView(view, wparams, panelParentView, userId);
            } catch (RuntimeException e) {
                // BadTokenException or InvalidDisplayException, clean up.
                if (index >= 0) {
                    removeViewLocked(index, true);
                }
                throw e;
            }
        }
    }
2.4 setView
    public void setView(View view, WindowManager.LayoutParams attrs, View panelParentView,
            int userId) {
        synchronized (this) {
        // 这里view是不为null的一般
            if (mView == null) {
                mView = view;
				// ... 省略部分非主体代码
				// 下面就是InputChannel的创建了,这个和事件相关,不在这里分析
                InputChannel inputChannel = null;
                if ((mWindowAttributes.inputFeatures
                        & WindowManager.LayoutParams.INPUT_FEATURE_NO_INPUT_CHANNEL) == 0) {
                    inputChannel = new InputChannel();
                }

                try {
					// 调用session的addToDisplayAsUser将window添加到wms
                    res = mWindowSession.addToDisplayAsUser(mWindow, mWindowAttributes,
                            getHostVisibility(), mDisplay.getDisplayId(), userId,
                            mInsetsController.getRequestedVisibilities(), inputChannel, mTempInsets,
                            mTempControls);
                   }catch (RemoteException e) {
                    mAdded = false;
                    mView = null;
                    mAttachInfo.mRootView = null;
                    mFallbackEventHandler.setView(null);
                    unscheduleTraversals();
                    setAccessibilityFocus(null, null);
                    throw new RuntimeException("Adding window failed", e);
                } finally {
                    if (restore) {
                        attrs.restore();
                    }
                }
                // ... 省略非主体代码
2.4 addToDisplayAsUser(Session.java)
    public int addToDisplayAsUser(IWindow window, WindowManager.LayoutParams attrs,
            int viewVisibility, int displayId, int userId, InsetsVisibilities requestedVisibilities,
            InputChannel outInputChannel, InsetsState outInsetsState,
            InsetsSourceControl[] outActiveControls) {
            // 这里直接调用了WMS的addWindow,Session只是一个代理罢了(binder通信)
        return mService.addWindow(this, window, attrs, viewVisibility, displayId, userId,
                requestedVisibilities, outInputChannel, outInsetsState, outActiveControls);
    }
2.5 addWindow(WindowManagerService.java)
    public int addWindow(Session session, IWindow client, LayoutParams attrs, int viewVisibility,
            int displayId, int requestUserId, InsetsVisibilities requestedVisibilities,
            InputChannel outInputChannel, InsetsState outInsetsState,
            InsetsSourceControl[] outActiveControls) {

        WindowState parentWindow = null;
        final int callingUid = Binder.getCallingUid();
        final int callingPid = Binder.getCallingPid();
        final long origId = Binder.clearCallingIdentity();
        final int type = attrs.type;

        synchronized (mGlobalLock) {
			// 根据displayId获取displayContent,一般为0,手机一般一个屏幕
            final DisplayContent displayContent = getDisplayContentOrCreate(displayId, attrs.token);
			// ... 省略容错代码
            ActivityRecord activity = null;
            final boolean hasParent = parentWindow != null;
           	// 窗口不存在的时候这里是获取不到的
            WindowToken token = displayContent.getWindowToken(
                    hasParent ? parentWindow.mAttrs.token : attrs.token);
            // If this is a child window, we want to apply the same type checking rules as the
            // parent window type.
            final int rootType = hasParent ? parentWindow.mAttrs.type : type;

            boolean addToastWindowRequiresToken = false;

            final IBinder windowContextToken = attrs.mWindowContextToken;
			// 这里一般为null
            if (token == null) {
                // token的创建,在创建的时候就将它挂载到层级结构树上了
               token = new WindowToken.Builder(this, binder, type)
                            .setDisplayContent(displayContent)
                            .setOwnerCanManageAppTokens(session.mCanAddInternalSystemWindow)
                            .setRoundedCornerOverlay(isRoundedCornerOverlay)
                            .build();
            }

			// windowState的创建
            final WindowState win = new WindowState(this, session, client, token, parentWindow,
                    appOp[0], attrs, viewVisibility, session.mUid, userId,
                    session.mCanAddInternalSystemWindow);

            res = ADD_OKAY;

            win.attach();
            // 保存window 方便查找 StateHashMap<IBinder, WindowState> mWindowMap = new HashMap<>();
            mWindowMap.put(client.asBinder(), win);
			// 将windowState添加到windowToken下面
            win.mToken.addWindow(win);
		}
		// ... 省略非主体部分

        return res;
    }
2.6 WindowToken的创建
    protected WindowToken(WindowManagerService service, IBinder _token, int type,
            boolean persistOnEmpty, DisplayContent dc, boolean ownerCanManageAppTokens,
            boolean roundedCornerOverlay, boolean fromClientToken, @Nullable Bundle options) {
        super(service);
        token = _token;
        windowType = type;
        mOptions = options;
        mPersistOnEmpty = persistOnEmpty;
        mOwnerCanManageAppTokens = ownerCanManageAppTokens;
        mRoundedCornerOverlay = roundedCornerOverlay;
        mFromClientToken = fromClientToken;
        if (dc != null) {
        	// 这里,将windowToken添加到层级结构树上
            dc.addWindowToken(token, this);
        }
    }
到此为止,addView部分,流程结束
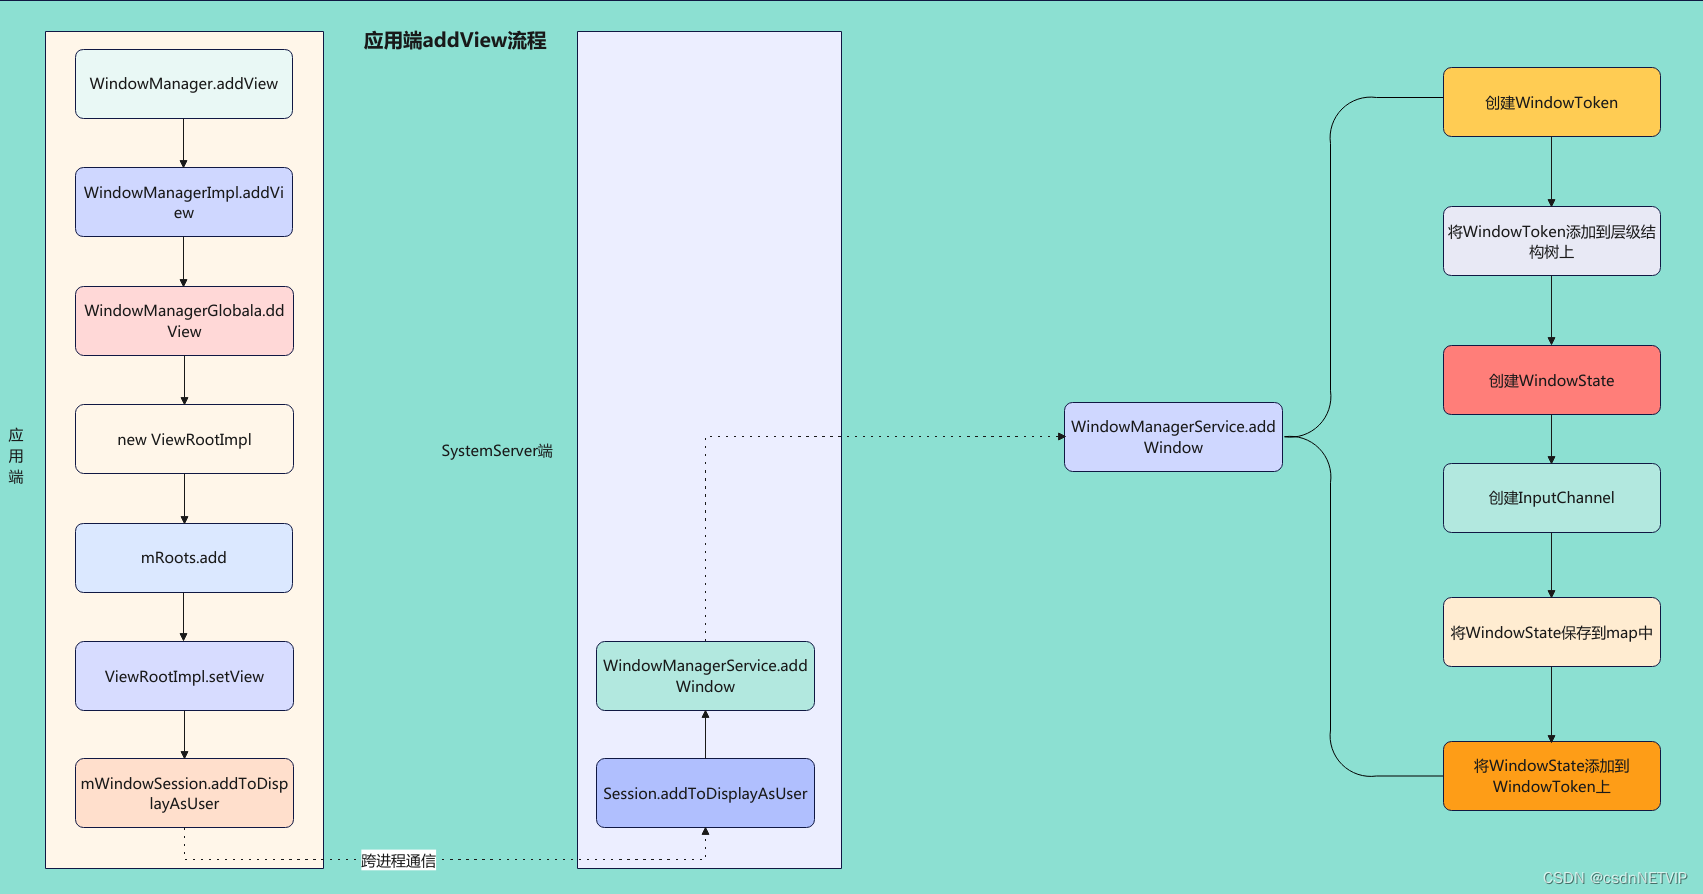
三. relayout
主要流程如下图:
在收到Vsync信号时会执行ViewRootImpl中的TraversalRunnable方法
3.1 TraversalRunnable
	// 这是一个runnable,会执行其中的run方法
    final class TraversalRunnable implements Runnable {
        @Override
        public void run() {
        	// 如上图,执行doTraversal
            doTraversal();
        }
    }
3.2 doTraversal
    void doTraversal() {
        if (mTraversalScheduled) {
            mTraversalScheduled = fals;
            // 紧接着执行performTraversals,这些方法都是一路调下去的,也没啥好解释的
            performTraversals();
        }
    }
3.3 performTraversals
// 这个方法太长,删除了部分不重要的
private void performTraversals() {
     			// ... 省略部分代码
     			// 对window进行布局
                relayoutResult = relayoutWindow(params, viewVisibility, insetsPending);
                final boolean dragResizing = mPendingDragResizing;
                if (mSyncSeqId > mLastSyncSeqId) {
                    mLastSyncSeqId = mSyncSeqId;
                    if (DEBUG_BLAST) {
                        Log.d(mTag, "Relayout called with blastSync");
                    }
                    reportNextDraw();
                    mSyncBuffer = true;
                }
                // ... 省略部分代码
    }
3.4 relayoutWindow
    private int relayoutWindow(WindowManager.LayoutParams params, int viewVisibility,
            boolean insetsPending) throws RemoteException {

        int relayoutResult = 0;
        // 获取窗口配置
        WindowConfiguration winConfig = getConfiguration().windowConfiguration;
    		// 根据参数对window布局
            relayoutResult = mWindowSession.relayout(mWindow, params,
                    requestedWidth, requestedHeight, viewVisibility,
                    insetsPending ? WindowManagerGlobal.RELAYOUT_INSETS_PENDING : 0,
                    mTmpFrames, mPendingMergedConfiguration, mSurfaceControl, mTempInsets,
                    mTempControls, mRelayoutBundle);
            final int maybeSyncSeqId = mRelayoutBundle.getInt("seqid");
            if (maybeSyncSeqId > 0) {
                mSyncSeqId = maybeSyncSeqId;
            }

            if (mTranslator != null) {
                mTranslator.translateRectInScreenToAppWindow(mTmpFrames.frame);
                mTranslator.translateRectInScreenToAppWindow(mTmpFrames.displayFrame);
                mTranslator.translateInsetsStateInScreenToAppWindow(mTempInsets);
                mTranslator.translateSourceControlsInScreenToAppWindow(mTempControls);
            }
            mInsetsController.onStateChanged(mTempInsets);
            mInsetsController.onControlsChanged(mTempControls);

            mPendingAlwaysConsumeSystemBars =
                    (relayoutResult & RELAYOUT_RES_CONSUME_ALWAYS_SYSTEM_BARS) != 0;

        final int transformHint = SurfaceControl.rotationToBufferTransform(
                (mDisplayInstallOrientation + mDisplay.getRotation()) % 4);
        return relayoutResult;
    }
3.4.1 relayout(Session)
    public int relayout(IWindow window, WindowManager.LayoutParams attrs,
            int requestedWidth, int requestedHeight, int viewFlags, int flags,
            ClientWindowFrames outFrames, MergedConfiguration mergedConfiguration,
            SurfaceControl outSurfaceControl, InsetsState outInsetsState,
            InsetsSourceControl[] outActiveControls, Bundle outSyncSeqIdBundle) {
		// 这里又调用到了WMS中的relayoutWindow
        int res = mService.relayoutWindow(this, window, attrs,
                requestedWidth, requestedHeight, viewFlags, flags,
                outFrames, mergedConfiguration, outSurfaceControl, outInsetsState,
                outActiveControls, outSyncSeqIdBundle);
        return res;
    }
3.4.1.1 relayoutWindow(WindowManagerService)
    public int relayoutWindow(Session session, IWindow client, LayoutParams attrs,
            int requestedWidth, int requestedHeight, int viewVisibility, int flags,
            ClientWindowFrames outFrames, MergedConfiguration mergedConfiguration,
            SurfaceControl outSurfaceControl, InsetsState outInsetsState,
            InsetsSourceControl[] outActiveControls, Bundle outSyncIdBundle) {

        synchronized (mGlobalLock) {
            // 获取windowState,这就是前面保存起来的windowState
            final WindowState win = windowForClientLocked(session, client, false);
            final DisplayContent displayContent = win.getDisplayContent();
            final DisplayPolicy displayPolicy = displayContent.getDisplayPolicy();

            WindowStateAnimator winAnimator = win.mWinAnimator;

            if (shouldRelayout) {
            // TODO: 重点,创建SrufaceControl
               result = createSurfaceControl(outSurfaceControl, result, win, winAnimator);
            }
            // 强制布局
		   mWindowPlacerLocked.performSurfacePlacement(true /* force */);
        return result;
    }
3.4.1.2 createSurfaceControl
    private int createSurfaceControl(SurfaceControl outSurfaceControl, int result,
            WindowState win, WindowStateAnimator winAnimator) {
		// 声明一个本地的变量
        WindowSurfaceController surfaceController;
        // 开始创建
        surfaceController = winAnimator.createSurfaceLocked();
     	// 如果不为null则创建成功
        if (surfaceController != null) {
        	// 赋值给outSurfaceControl,这个是传出参数,传进来是空的,这里就将重新指向了新创建的surfaceControl
            surfaceController.getSurfaceControl(outSurfaceControl);
            ProtoLog.i(WM_SHOW_TRANSACTIONS, "OUT SURFACE %s: copied", outSurfaceControl);
        }
        return result;
    }
这个函数执行完,SurfaceControl就创建好了,接着我们往回退
3.4.2 performSurfacePlacement 强制布局
    final void performSurfacePlacement(boolean force) {
        int loopCount = 6;
        do {
            mTraversalScheduled = false;
            // 这里调用栈很深,可以跟着上面的流程图走一遍
            performSurfacePlacementLoop();
            mService.mAnimationHandler.removeCallbacks(mPerformSurfacePlacement);
            loopCount--;
        } while (mTraversalScheduled && loopCount > 0);
        mService.mRoot.mWallpaperActionPending = false;
    }
到此,relayout也结束了
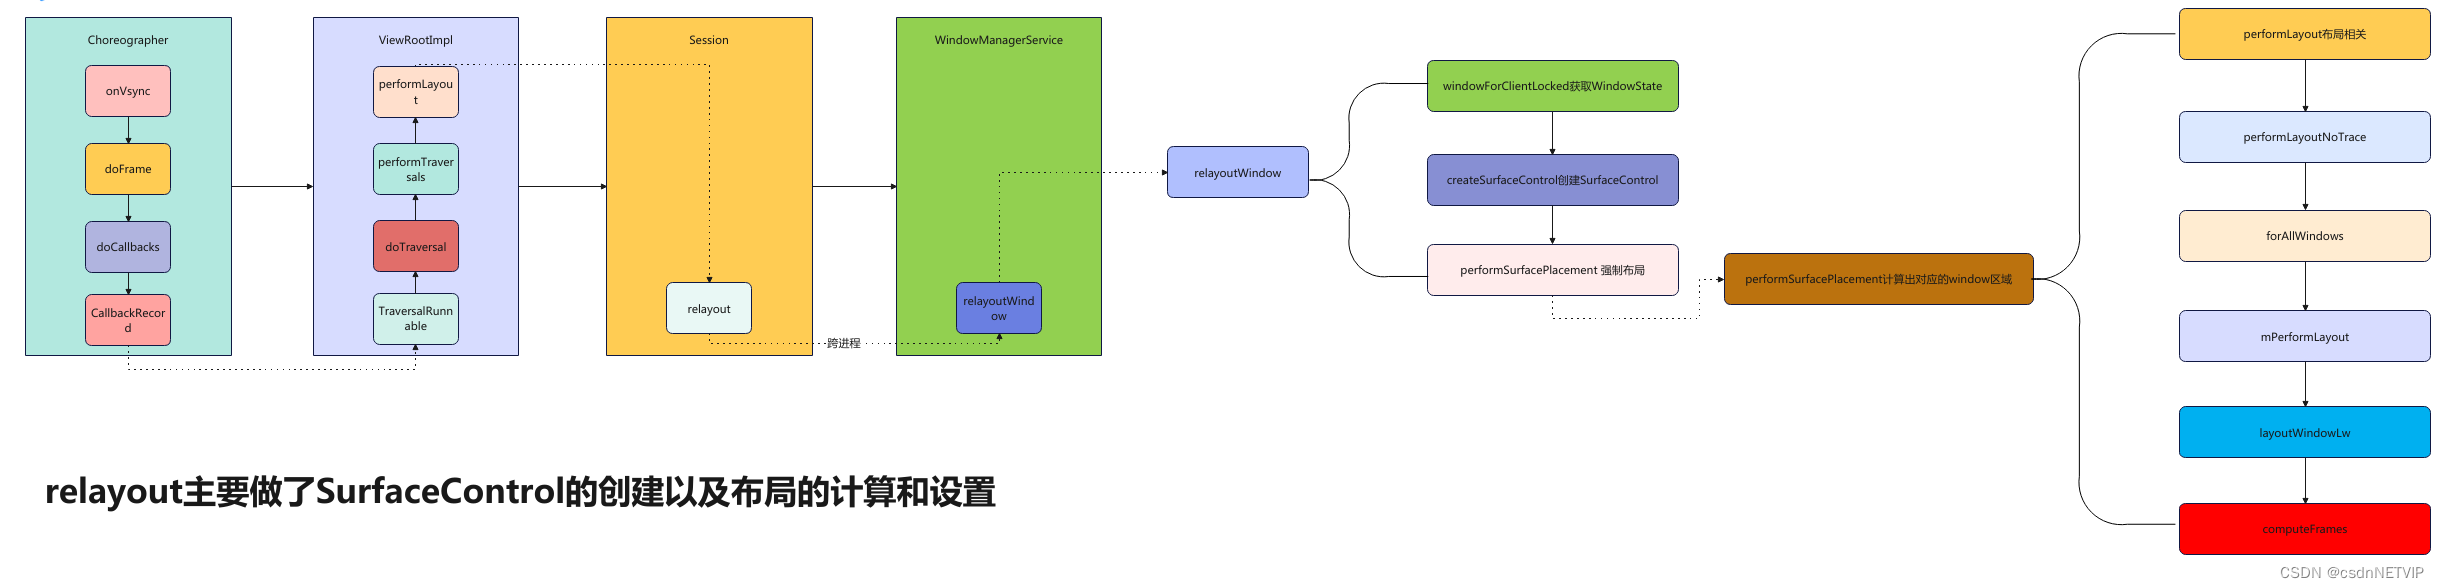
四. finishDraw
主流程图如下:
当layout完成之后,wms会通知应用开始绘制,应用端绘制完成之后会告知wms已经绘制完成,wms会将根据状态将surface提交给surfaceflinger进行合成。
其中,绘制状态如下:
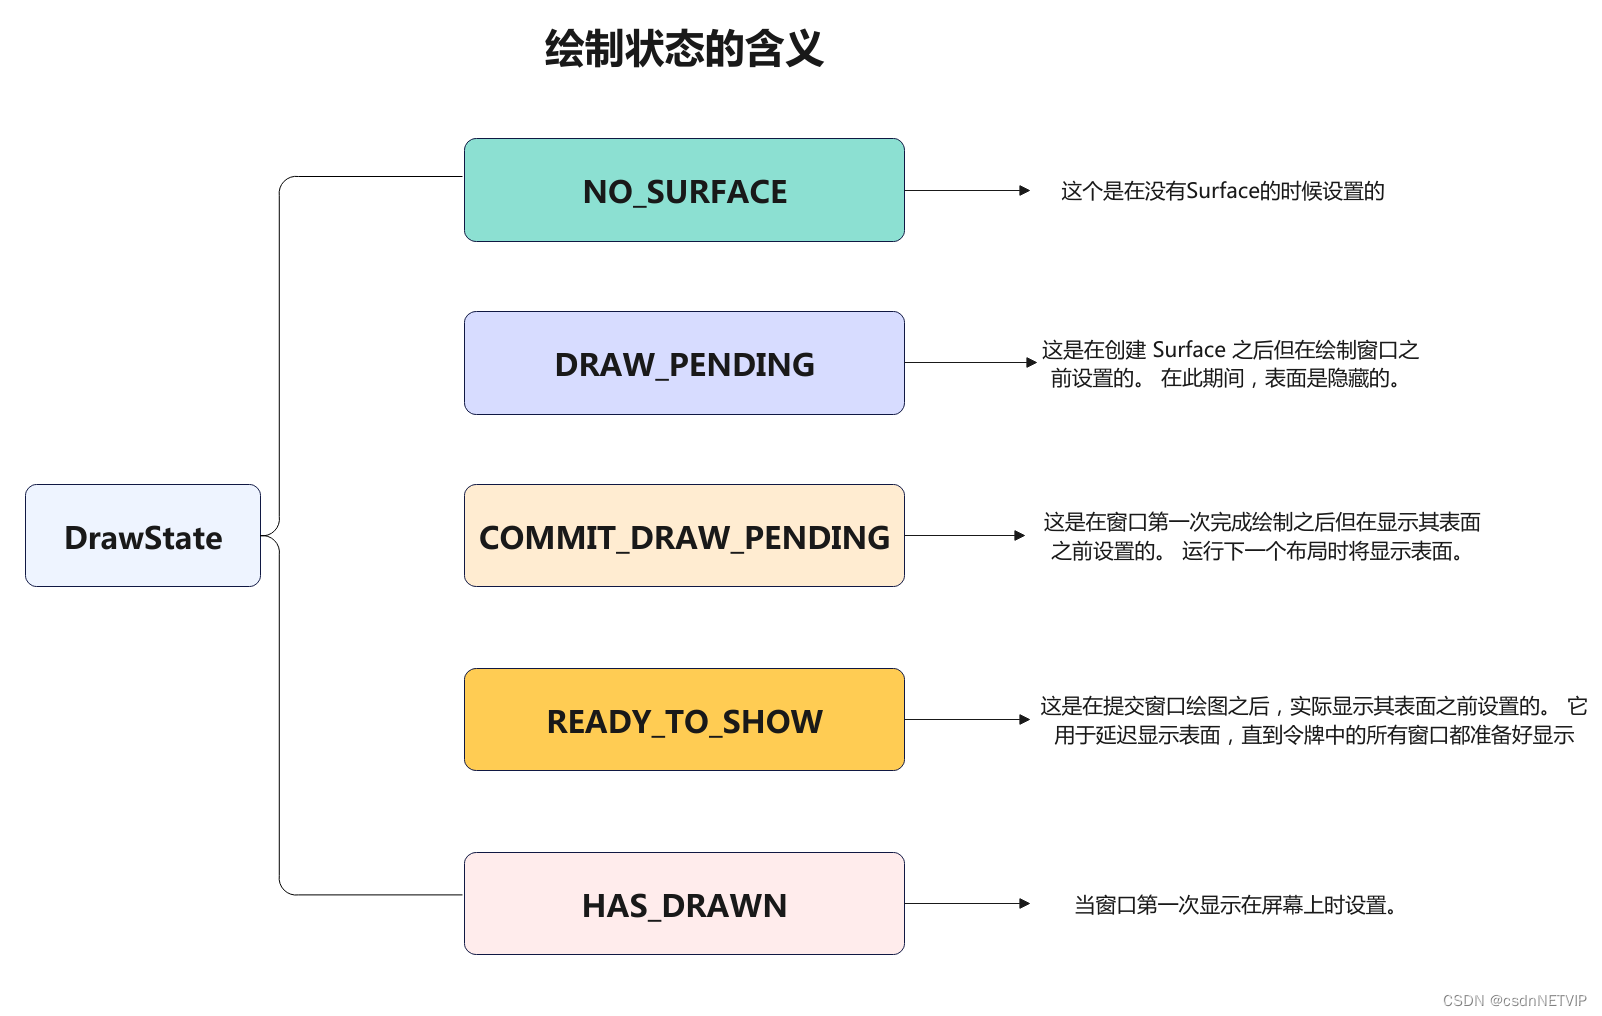
没有surface的时候,处于NO_SURFACE状态,经过relayout后,创建了surfaceControl,就变成了DRAW_PENDING
上面的流程图,其中reportDrawFinished是回调方法,当绘制完成之后会回调到这里,看流程图的时候需要注意,并不是顺序往下调用的。
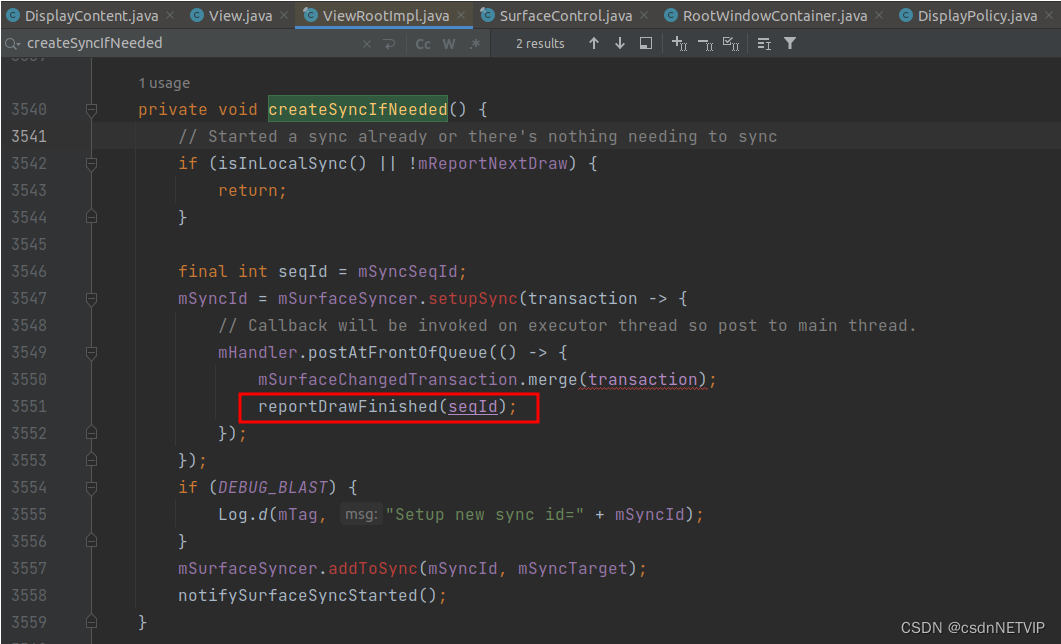
这段代码着重说明一下, 通过 mSurfaceSyncer.setupSync() 方法将transaction添加到 mSurfaceSyncer 中进行同步。还会设置一个回调函数,该回调函数会在 SurfaceSync 对象完成同步后被调用。
在回调函数中,首先将当前的绘制操作合并到 mSurfaceChangedTransaction 中,然后调用 reportDrawFinished() 方法通知主线程界面绘制完成。最后,在创建 SurfaceSync 对象后,还会将其添加到 mSyncTarget 中,以进行同步。
这段代码的作用是为界面绘制操作创建一个 SurfaceSync 对象,并将其添加到同步队列中进行同步,以保证多个 Surface 的同步更新。
TODO: 这里容易忽略这个回调。就会认为没有绘制就走了finishDraw的流程,所以一定记得是绘制完成了才走的这里
4.1 reportDrawFinished
    private void reportDrawFinished(int seqId) {
    	// 调用session的finishDrawing
       mWindowSession.finishDrawing(mWindow, mSurfaceChangedTransaction, seqId);
    }
4.2 finishDrawing(Session.java)
    public void finishDrawing(IWindow window,
            @Nullable SurfaceControl.Transaction postDrawTransaction, int seqId) {
     	// 这里又直接调用了wms的finishDrawingWindow,和上面一样,其实就可以看出来了,Session其实就是应用端和WMS沟通的代理
        mService.finishDrawingWindow(this, window, postDrawTransaction, seqId);
    }
4.3 finishDrawingWindow(WindowManagerService.java)
    void finishDrawingWindow(Session session, IWindow client,
            @Nullable SurfaceControl.Transaction postDrawTransaction, int seqId) {
            synchronized (mGlobalLock) {
            	// 获得windowstate
                WindowState win = windowForClientLocked(session, client, false);
                // 调用windowState的finishDrawing
                if (win != null && win.finishDrawing(postDrawTransaction, seqId)) {
                    win.setDisplayLayoutNeeded();
                    mWindowPlacerLocked.requestTraversal();
                }
            }
    }
4.4 WindowState.finishDraw
    boolean finishDrawing(SurfaceControl.Transaction postDrawTransaction, int syncSeqId) {
        if (mOrientationChangeRedrawRequestTime > 0) {
         // ... 省略
        final boolean layoutNeeded =
                mWinAnimator.finishDrawingLocked(postDrawTransaction, mClientWasDrawingForSync);
        mClientWasDrawingForSync = false;
        // We always want to force a traversal after a finish draw for blast sync.
        return !skipLayout && (hasSyncHandlers || layoutNeeded);
    }
4.5 finishDrawingLocked(WindowStateAnimation.java)
    boolean finishDrawingLocked(SurfaceControl.Transaction postDrawTransaction,
            boolean forceApplyNow) {
            // 前面就知道,当创建完成SurfaceControl之后,DrawState就会变成DRAW_PENDING,这里符合条件
        if (mDrawState == DRAW_PENDING) {
            ProtoLog.v(WM_DEBUG_DRAW,
                    "finishDrawingLocked: mDrawState=COMMIT_DRAW_PENDING %s in %s", mWin,
                    mSurfaceController);
            if (startingWindow) {
                ProtoLog.v(WM_DEBUG_STARTING_WINDOW, "Draw state now committed in %s", mWin);
            }
            // 这里直接赋值为COMMIT_DRAW_PENDING
            mDrawState = COMMIT_DRAW_PENDING;
            layoutNeeded = true;
        }
        return layoutNeeded;
    }
根据流程图,回到wms
4.6 requestTraversal(Windowurfaceplacer.java)
    void requestTraversal() {

		// 接下来执行mPerformSurfacePlacement
        mService.mAnimationHandler.post(mPerformSurfacePlacement);
    }
源码就是这样的,一层一层的,我们只需要关注重点就行,主体流程不需要记忆,这里仅仅是按照源码分析,因为不同的版本,源码会有不同的差异,但主体思想一般不会有大改动。
4.7 mPerformSurfacePlacement
    private class Traverser implements Runnable {
        @Override
        public void run() {
            synchronized (mService.mGlobalLock) {
            // 执行这个方法
                performSurfacePlacement();
            }
        }
    }
4.8. performSurfacePlacement(WindowSurfacePlacer.java)
    final void performSurfacePlacement() {
        performSurfacePlacement(false /* force */);
    }
4.9 performSurfacePlacement
    final void performSurfacePlacement(boolean force) {
        if (mDeferDepth > 0 && !force) {
            mDeferredRequests++;
            return;
        }
        int loopCount = 6;
        do {
            mTraversalScheduled = false;
            // 执行这个,其实和前面都一样了
            performSurfacePlacementLoop();
            mService.mAnimationHandler.removeCallbacks(mPerformSurfacePlacement);
            loopCount--;
        } while (mTraversalScheduled && loopCount > 0);
        mService.mRoot.mWallpaperActionPending = false;
    }
4.10 performSurfacePlacementLoop
    private void performSurfacePlacementLoop() {

        mService.mRoot.performSurfacePlacement();

    }
4.11 mRoot.performSurfacePlacement
    void performSurfacePlacement() {
        Trace.traceBegin(TRACE_TAG_WINDOW_MANAGER, "performSurfacePlacement");
        try {
        // 继续执行这里
            performSurfacePlacementNoTrace();
        } finally {
            Trace.traceEnd(TRACE_TAG_WINDOW_MANAGER);
        }
    }
4.12 performSurfacePlacementNoTrace
    void performSurfacePlacementNoTrace() {

		// 打开一个事物
        mWmService.openSurfaceTransaction();
        try {
        	// 执行这个函数
            applySurfaceChangesTransaction();
        } catch (RuntimeException e) {
            Slog.wtf(TAG, "Unhandled exception in Window Manager", e);
        } finally {
        	// 关闭一个事物
            mWmService.closeSurfaceTransaction("performLayoutAndPlaceSurfaces");

        }
    }
4.13 applySurfaceChangesTransaction
    private void applySurfaceChangesTransaction() {

        final int count = mChildren.size();
        for (int j = 0; j < count; ++j) {
            final DisplayContent dc = mChildren.get(j);
            // 执行这里
            dc.applySurfaceChangesTransaction();
        }
    }
4.14 applySurfaceChangesTransaction(DisplayContent)
    void applySurfaceChangesTransaction() {
       		// 执行 mApplySurfaceChangesTransaction
            forAllWindows(mApplySurfaceChangesTransaction, true /* traverseTopToBottom */);
    }
4.15 mApplySurfaceChangesTransaction
    private final Consumer<WindowState> mApplySurfaceChangesTransaction = w -> {

			// 执行这里
            final boolean committed = winAnimator.commitFinishDrawingLocked();

    };
4.16 commitFinishDrawingLocked(WindowAnimator)
    boolean commitFinishDrawingLocked() {

        // TODO 这里将状态修改为READY_TO_SHOW
        mDrawState = READY_TO_SHOW;
        boolean result = false;
        final ActivityRecord activity = mWin.mActivityRecord;
        if (activity == null || activity.canShowWindows()
                || mWin.mAttrs.type == TYPE_APPLICATION_STARTING) {
                // 对于系统窗口来讲,会走这里
            result = mWin.performShowLocked();
        }
        return result;
    }
4.17 performShowLocked
boolean performShowLocked() {
		// 赋值状态为HAS_DRAWN
        mWinAnimator.mDrawState = HAS_DRAWN;
        return true;
    }
其中,在上面的分析中,有一点需要注意,commitfinishDrawing之后,会将mdrawState设置为READY_TO_SHOW,然后就又设置为HAS_DRAW,这个时候HAS_DRAW并非代表已经显示出来了,窗口内容仅仅是被绘制到了表面缓冲区,只有prepareSurface执行完成之后,才会告知系统surface缓冲区可以进行后续操作。
五. prepareSurface
主流程如下图:
5.1 prepareSurfaces
在HAS_DRAW之后,回到前面的commitfinishDrawing之后的逻辑
    void prepareSurfaces() {
        try {
            final Transaction transaction = getPendingTransaction();
            // 执行父类的prepareSurfaces
            super.prepareSurfaces();

            // TODO: Once we totally eliminate global transaction we will pass transaction in here
            //       rather than merging to global.
            SurfaceControl.mergeToGlobalTransaction(transaction);
        } finally {
            Trace.traceEnd(TRACE_TAG_WINDOW_MANAGER);
        }
    }
5.1.1 prepareSurfaces
        void prepareSurfaces() {
            mDimmer.resetDimStates();
            // 继续prepareSurfaces
            super.prepareSurfaces();

        }
5.1.2 prepareSurfaces(WindowContainer)
    void prepareSurfaces() {
        // If a leash has been set when the transaction was committed, then the leash reparent has
        // been committed.
        mCommittedReparentToAnimationLeash = mSurfaceAnimator.hasLeash();
        for (int i = 0; i < mChildren.size(); i++) {
        	// 执行mChildren的prepareSurfaces
            mChildren.get(i).prepareSurfaces();
        }
    }
5.1.3 prepareSurfaces(WindowState)
    void prepareSurfaces() {

		// 执行这里
        mWinAnimator.prepareSurfaceLocked(getSyncTransaction());
        super.prepareSurfaces();
    }
5.1.4 mWinAnimator.prepareSurfaceLocked
    void prepareSurfaceLocked(SurfaceControl.Transaction t) {
        final WindowState w = mWin;
        if (!hasSurface()) {

            // There is no need to wait for an animation change if our window is gone for layout
            // already as we'll never be visible.
            if (w.getOrientationChanging() && w.isGoneForLayout()) {
                ProtoLog.v(WM_DEBUG_ORIENTATION, "Orientation change skips hidden %s", w);
                w.setOrientationChanging(false);
            }
            return;
        }

        computeShownFrameLocked();

        if (w.isParentWindowHidden() || !w.isOnScreen()) {
            hide(t, "prepareSurfaceLocked");
            mWallpaperControllerLocked.hideWallpapers(w);

            // If we are waiting for this window to handle an orientation change. If this window is
            // really hidden (gone for layout), there is no point in still waiting for it.
            // Note that this does introduce a potential glitch if the window becomes unhidden
            // before it has drawn for the new orientation.
            if (w.getOrientationChanging() && w.isGoneForLayout()) {
                w.setOrientationChanging(false);
                ProtoLog.v(WM_DEBUG_ORIENTATION,
                        "Orientation change skips hidden %s", w);
            }
        } else if (mLastAlpha != mShownAlpha
                || mLastHidden) {       // 窗口在没有显示之前都是隐藏的,创建surface的时候置位true
            mLastAlpha = mShownAlpha;
            ProtoLog.i(WM_SHOW_TRANSACTIONS,
                    "SURFACE controller=%s alpha=%f HScale=%f, VScale=%f: %s",
                    mSurfaceController, mShownAlpha, w.mHScale, w.mVScale, w);

            boolean prepared =
                mSurfaceController.prepareToShowInTransaction(t, mShownAlpha);    // 设置一下alpha

            if (prepared && mDrawState == HAS_DRAWN) {
                if (mLastHidden) {
                // 执行这里
                    if (showSurfaceRobustlyLocked(t))


            }
        }


    }
5.1.5 showSurfaceRobustlyLocked
    private boolean showSurfaceRobustlyLocked(SurfaceControl.Transaction t) {
    	// 执行showRobustly
        boolean shown = mSurfaceController.showRobustly(t);
    }
5.1.6 showRobustly
    boolean showRobustly(SurfaceControl.Transaction t) {

		// 这里就告诉系统我们已经可以显示了
        t.show(mSurfaceControl);
        return true;
    }
5.1.7 closeSurfaceTransaction
关闭事物
六. 高清大图