注意:svg的图形绘制的点位置坐标是基于画布的位置坐标,相当于从左上角的点为起点。
先来个简单示例:
在点与点之间绘制连线箭头
<!DOCTYPE html>
<html lang="en">
<head>
  <meta charset="UTF-8">
  <meta http-equiv="X-UA-Compatible" content="IE=edge">
  <meta name="viewport" content="width=device-width, initial-scale=1.0">
  <title>Document</title>
</head>
<body>
  <svg width="300" height="300" style="background: #efefef">
    <path d="M 100 50 L 50 100" stroke="url(#grad1)" stroke-width="2" marker-end="url(#arrowhead)" />
    <path d="M 100 50 L 100 100" stroke="black" stroke-width="2" marker-end="url(#arrowhead)" />
    <path d="M 100 50 L 150 100" stroke="black" stroke-width="2" marker-end="url(#arrowhead)" />
    <defs>
      <marker id="arrowhead" viewBox="0 0 10 10" refX="8" refY="5" markerWidth="6" markerHeight="6" orient="auto">
        <path d="M 0 0 L 10 5 L 0 10 z" />
      </marker>
      <linearGradient id="grad1" x1="0%" y1="0%" x2="100%" y2="0%">
        <stop offset="0%" stop-color="#ff0000" />
        <stop offset="100%" stop-color="#00ff00" />
      </linearGradient>
    </defs>
  </svg>
</body>
</html>
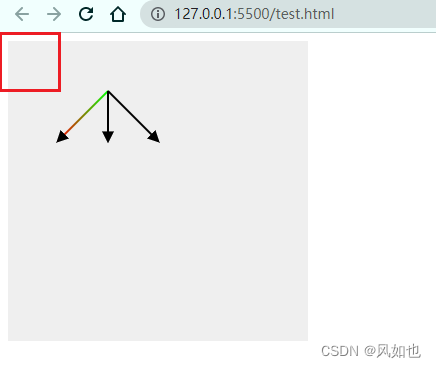
上面示例中可以看到,svg画布的位置在哪,path中点的坐标就从哪里开始,默认是从浏览器可视窗口的左上角开始。那么我们只要知道点的坐标就能绘制箭头了。
接下来,就是获取dom元素的位置坐标,使用到Element.getBoundingClientRect()
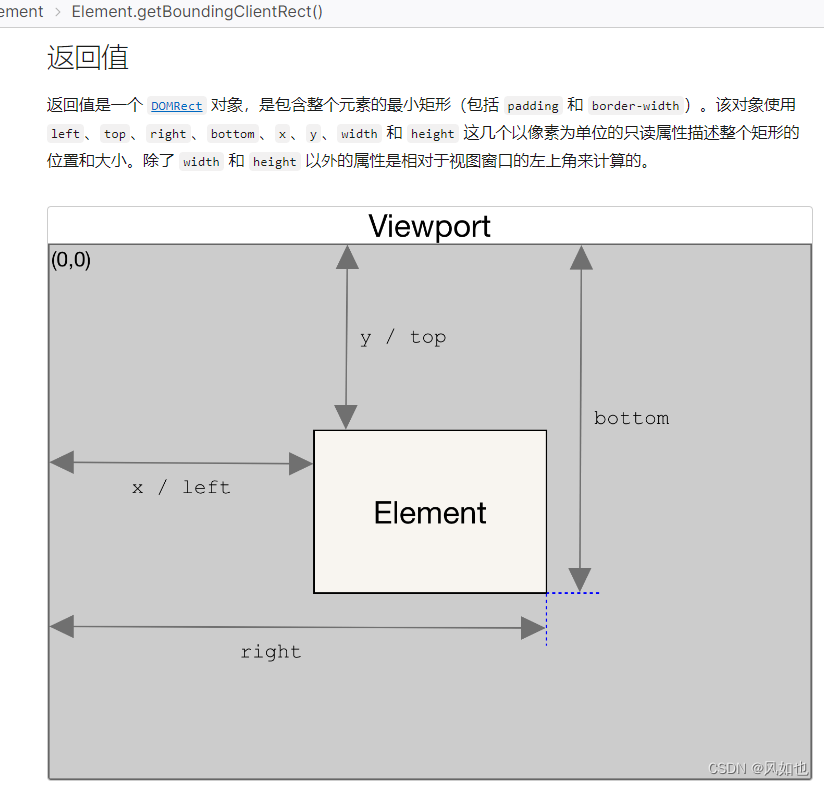
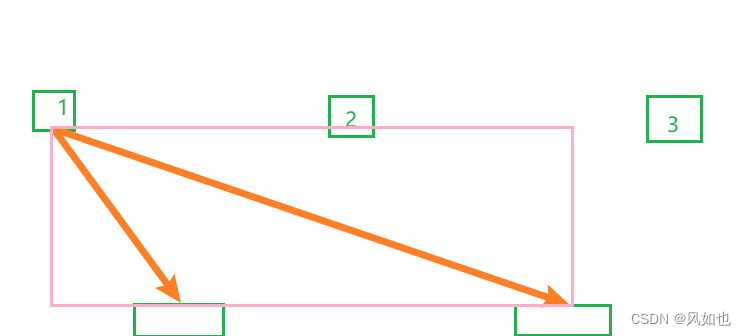
比如,我们现在需要在1个顶点,2个终点之间设置连线,由于path的点坐标是基于svg的画布位置,所以我们可以把画布的位置基于元素定位,画布的宽为3个元素之间最大-宽度最小的值,高为高度最高-高度最低的值。粉色框为svg画布的位置,框1、框2、框3表示顶点元素可能出现的位置。
代码示例:
<!DOCTYPE html>
<html lang="en">
<head>
  <meta charset="UTF-8">
  <meta http-equiv="X-UA-Compatible" content="IE=edge">
  <meta name="viewport" content="width=device-width, initial-scale=1.0">
  <title>Document</title>
</head>
<body>
  <div style="width: 50px;height: 50px;position: absolute;left: 55px;top: 160px;background: red;" id="box1"></div>
  <div style="width: 50px;height: 50px;position: absolute;left: 55px;top: 530px;background: blue;" id="box2"></div>
  <div style="width: 50px;height: 50px;position: absolute;left: 925px;top: 530px;background: green;" id="box3"></div>
  <script>
    // 获取元素
    const box1 = document.querySelector('#box1')
    const box2 = document.querySelector('#box2')
    const box3 = document.querySelector('#box3')
    // 获取坐标
    const coordinate1 = getPosition(box1, 'bottom')
    const coordinate2 = getPosition(box2, 'top')
    const coordinate3 = getPosition(box3, 'top')

    // 动态创建svg
    let svgWidth = 0
    let pointStart = 0
    // 获取svg的宽度
    let coordinateArr = [coordinate1[0], coordinate2[0], coordinate3[0]].sort((a, b) => b - a);
    // 如果开始元素宽度最大,则设为svg的宽
    if (coordinate1[0] > coordinate2[0] && coordinate1[0] > coordinate3[0]) {
      svgWidth = coordinate1[0] - 75; // 50 + 25,需要减去最左侧盒子的left+width/2
      // 第二个箭头的结束点位置
      pointStart = coordinate3[0] - 75;
    } else {
      // 用最大宽度-最小宽度
      svgWidth = coordinateArr[0] - coordinateArr[2];
      pointStart = svgWidth - 5;
    }
    const svgHeight = coordinate3[1] - coordinate1[1]
    const svgEl = document.createElementNS("http://www.w3.org/2000/svg", "svg");
    // 如果只有一个分支可以考虑设置svg的宽高直接为10,然后左上角坐标 = (start元素底部中心点横坐标 - 5, start元素底部中心点纵坐标)
    // 默认是设置宽高为10的原因在于画布需要有空间,这样箭头才能正常显示

    // 以下是针对有两个分支的情况
    // svg的顶部中心位置就是起始坐标
    // svg的左右两个角落位置就是两个结束点坐标
    const start = `${coordinate1[0] - coordinate2[0]}`
    svgEl.innerHTML = `
      <path d="M ${start} 0 L 0 ${svgHeight}" stroke="url(#grad1)" stroke-width="2" marker-end="url(#arrowhead)" />
      <path d="M ${start} 0 L ${pointStart} ${svgHeight}" stroke="url(#grad1)" stroke-width="2" marker-end="url(#arrowhead)" />
      <defs>
        <marker id="arrowhead" viewBox="0 0 10 10" refX="8" refY="5" markerWidth="6" markerHeight="6" orient="auto">
          <path d="M 0 0 L 10 5 L 0 10 z" fill="red" />
        </marker>
        <linearGradient id="grad1" x1="0%" y1="0%" x2="0%" y2="100%">
          <stop offset="0%" stop-color="#ff0000" />
          <stop offset="100%" stop-color="#00ff00" />
        </linearGradient>
      </defs>
    `
    svgEl.setAttribute('width', svgWidth)
    svgEl.setAttribute('height', svgHeight)
    svgEl.style.cssText = `background: #ddd; position: absolute;left: ${coordinate2[0]}px;top: ${coordinate1[1]}px;`
    document.body.appendChild(svgEl)


    function getPosition (el, direction) {
      const rect = el?.getBoundingClientRect()
      const x = (rect.right - rect.left) / 2 + rect.left
      const y = rect[direction]
      return [x, y]
    }
  </script>
</body>
</html>
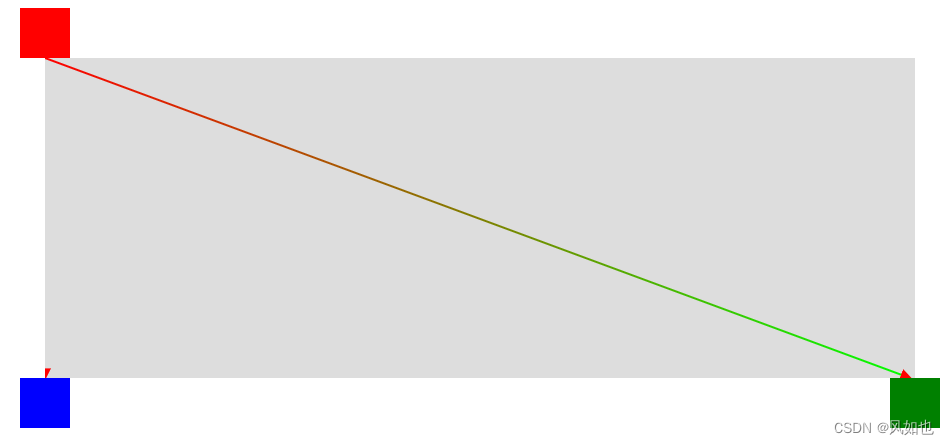
注意:当点与点之前的x坐标相同,如果填充色是渐变色的话,会存在
path的箭头变为0的情况。我们可以设置点的位置偏差来避免这种情况;还有部门三角形箭头被遮挡的情况,可以把点的y坐标适当减个5的值,避免这种情况
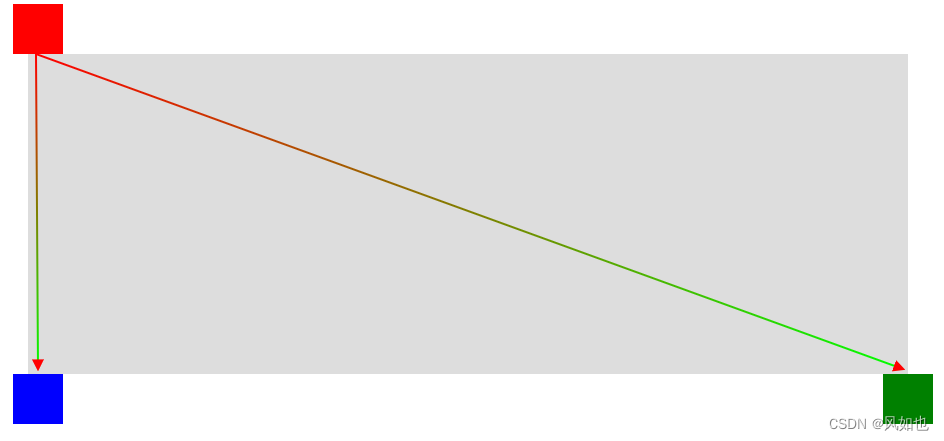
优化代码:
<!DOCTYPE html>
<html lang="en">
<head>
  <meta charset="UTF-8">
  <meta http-equiv="X-UA-Compatible" content="IE=edge">
  <meta name="viewport" content="width=device-width, initial-scale=1.0">
  <title>Document</title>
</head>
<body>
<!--可以修改left的值-->
  <div style="width: 50px;height: 50px;position: absolute;left: 55px;top: 160px;background: red;" id="box1"></div>
  <div style="width: 50px;height: 50px;position: absolute;left: 55px;top: 530px;background: blue;" id="box2"></div>
  <div style="width: 50px;height: 50px;position: absolute;left: 925px;top: 530px;background: green;" id="box3"></div>

  <script>
    // 获取元素
    const box1 = document.querySelector('#box1')
    const box2 = document.querySelector('#box2')
    const box3 = document.querySelector('#box3')
    // 获取坐标
    const coordinate1 = getPosition(box1, 'bottom')
    const coordinate2 = getPosition(box2, 'top')
    const coordinate3 = getPosition(box3, 'top')
    console.log(coordinate1)
    console.log(coordinate2)
    console.log(coordinate3)

    // 动态创建svg
    const pad = 10 // 偏移量,避免箭头宽度为0
    let svgWidth = 0
    let pointStart = 0
    // 获取svg的宽度
    let coordinateArr = [coordinate1[0], coordinate2[0], coordinate3[0]].sort((a, b) => b - a);
    // 如果开始元素宽度最大,则设为svg的宽
    if (coordinate1[0] > coordinate2[0] && coordinate1[0] > coordinate3[0]) {
      svgWidth = coordinate1[0] - 75 + pad; // 50 + 25,需要减去最左侧盒子的left+width/2
      // 第二个箭头的结束点位置
      pointStart = coordinate3[0] - 75 + pad;
    } else {
      // 用最大宽度-最小宽度
      svgWidth = coordinateArr[0] - coordinateArr[2] + pad;
      pointStart = svgWidth - 5;
    }
    const svgHeight = coordinate3[1] - coordinate1[1]
    const svgEl = document.createElementNS("http://www.w3.org/2000/svg", "svg");
    // 如果只有一个分支可以考虑设置svg的宽高直接为10,然后左上角坐标 = (start元素底部中心点横坐标 - 5, start元素底部中心点纵坐标)
    // 默认是设置宽高为10的原因在于画布需要有空间,这样箭头才能正常显示

    // 以下是针对有两个分支的情况
    // svg的顶部中心位置就是起始坐标
    // svg的左右两个角落位置就是两个结束点坐标
    const start = `${coordinate1[0] - coordinate2[0] + 8}`
    const pointEnd = svgHeight - 5
    svgEl.innerHTML = `
      <path d="M ${start} 0 L ${pad} ${pointEnd}" stroke="url(#grad1)" stroke-width="2" marker-end="url(#arrowhead)" />
      <path d="M ${start} 0 L ${pointStart} ${pointEnd}" stroke="url(#grad1)" stroke-width="2" marker-end="url(#arrowhead)" />
      <defs>
        <marker id="arrowhead" viewBox="0 0 10 10" refX="8" refY="5" markerWidth="6" markerHeight="6" orient="auto">
          <path d="M 0 0 L 10 5 L 0 10 z" fill="red" />
        </marker>
        <linearGradient id="grad1" x1="0%" y1="0%" x2="0%" y2="100%">
          <stop offset="0%" stop-color="#ff0000" />
          <stop offset="100%" stop-color="#00ff00" />
        </linearGradient>
      </defs>
    `
    svgEl.setAttribute('width', svgWidth)
    svgEl.setAttribute('height', svgHeight)
    // 这个地方left - 10是为了避免开始点和结束点的x点坐标一样的时候,使用渐变色填充宽度消失的问题,将画布左移10px避免偏差
    svgEl.style.cssText = `background: #ddd; position: absolute;left: ${coordinateArr[2] - pad}px;top: ${coordinate1[1]}px;`
    document.body.appendChild(svgEl)


    function getPosition (el, direction) {
      const rect = el?.getBoundingClientRect()
      const x = (rect.right - rect.left) / 2 + rect.left
      const y = rect[direction]
      return [x, y]
    }
  </script>
</body>
</html>
注意:在创建之前需要判断当前文档是否存在svg元素,如果存在需要先删除再创建,避免存在多个svg元素