文章目录
- 用户-角色-菜单-资源 各表关系图
- 菜单 和 路由
- 菜单表及分析
- 分析
- /api/admin/user/menus接口
- MenuServiceImpl#listUserMenus
- 接口返回示例及分析
- 前端代码分析
- menu.js
- SideBar.vue
- 接口权限控制
- 资源表 及 分析
- 分析
- WebSecurityConfig
- 权限控制整体流程
- 先说登录
- UserDetailsServiceImpl
- 再看权限控制
- 自定义FilterInvocationSecurityMetadataSourceImpl
- 自定义AccessDecisionManagerImpl
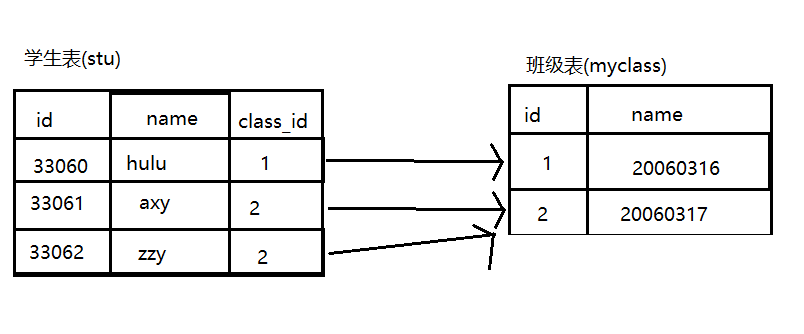
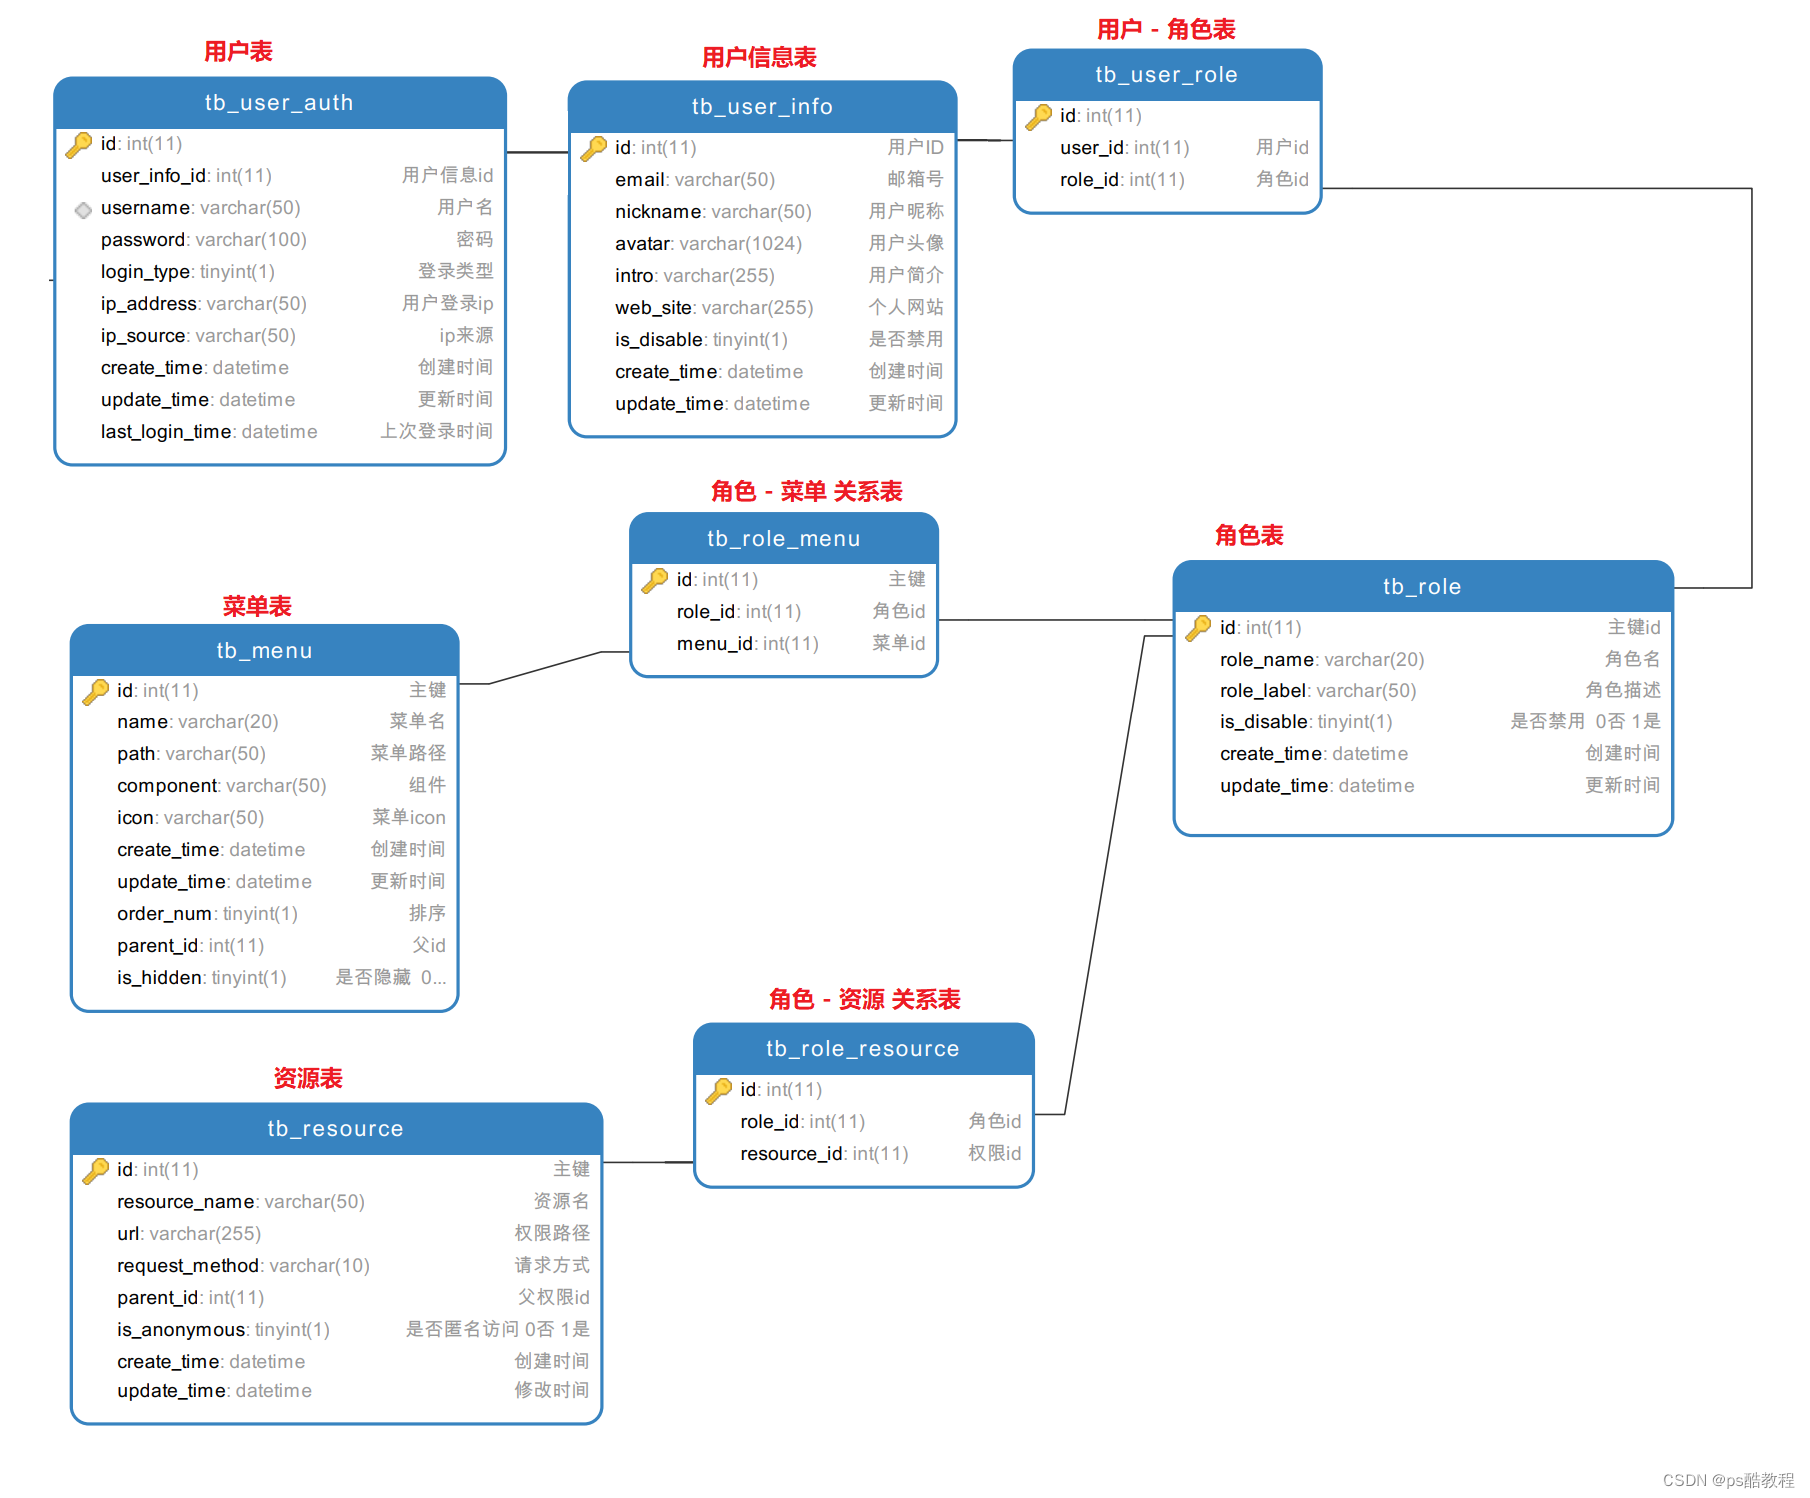
用户-角色-菜单-资源 各表关系图
菜单 和 路由
菜单表及分析
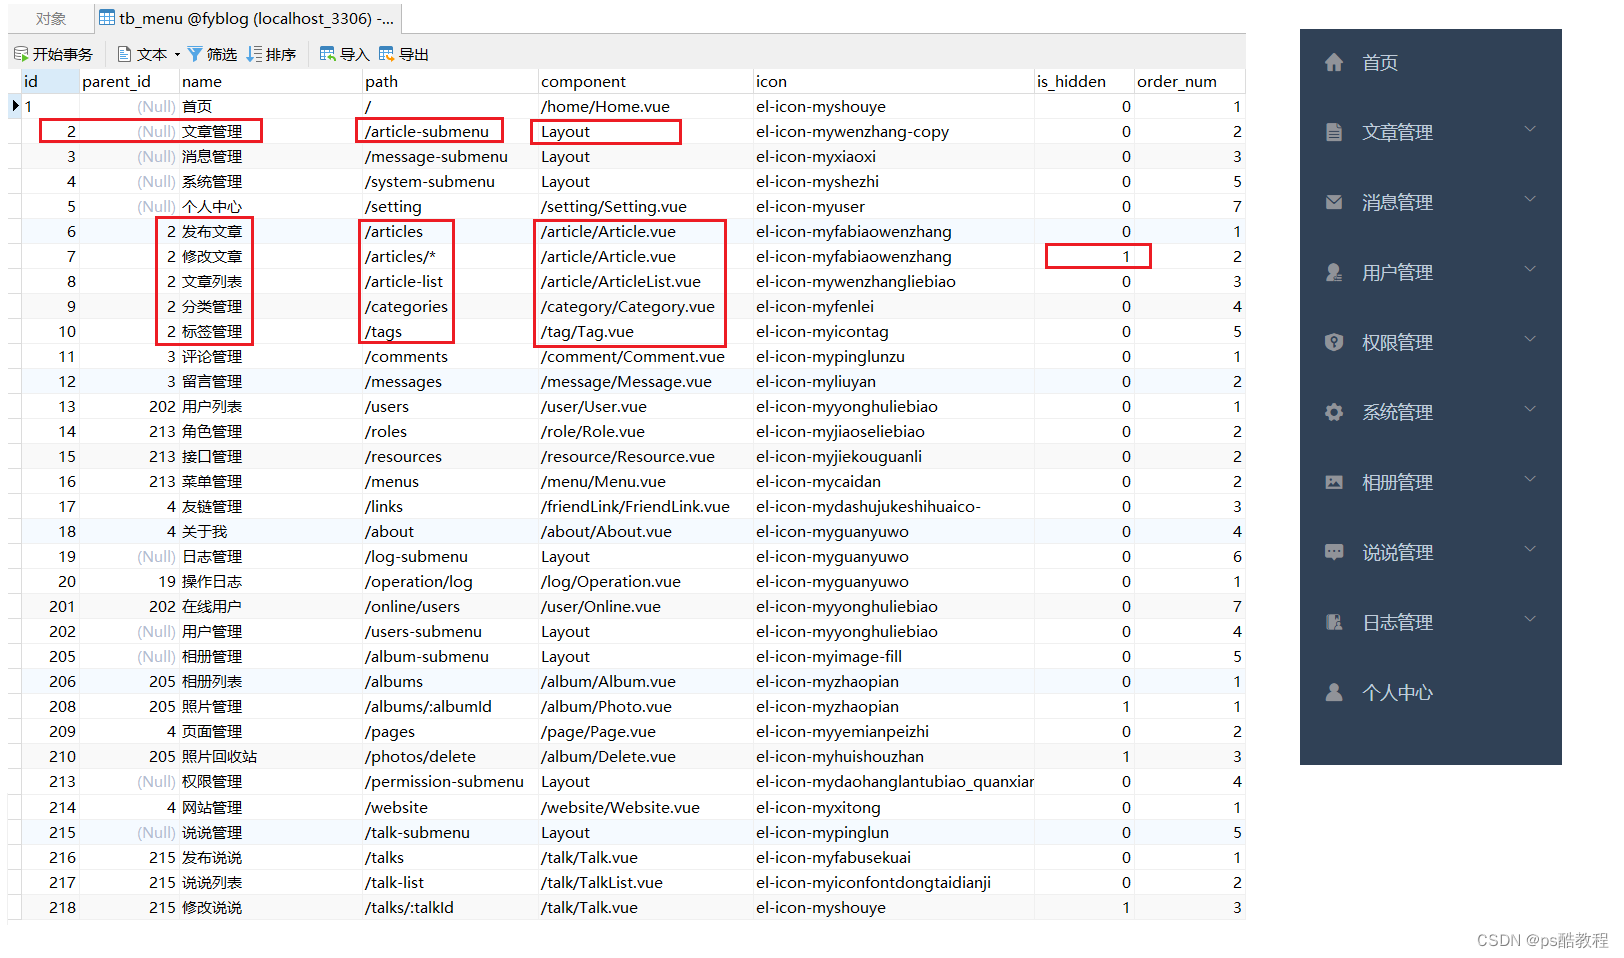
分析
要形成右边这种菜单,需要2部分来做支撑。
- 第一部分:需要构建出菜单之间的父子级关系出来。
- 在上表中,通过id与parent_id,就可以构建出来,但是应当注意到:它这种似乎没有做超过2级的菜单。它的这种,第一级要么是菜单,要么是目录,第二级只能是菜单,不能是目录。也就是说,目录下面不能是目录,只能是菜单(目前的前端vue项目里面没有对菜单做递归)。
- 第二部分:需要嵌套路由支持。
- 也就是要做到后台管理系统的这种布局,在切换菜单的时候,右侧主区域切换到不同的组件需要嵌套路由作支撑。
- 在考虑动态路由的时候,就不要考虑父子级之间的关系,只需要知道:要展示到主区域的组件在vue项目里面的路径(vue组件所在项目路径-表中的component字段),以及该路由组件的路径(vue组件对应的路由路径-表中的path字段)
/api/admin/user/menus接口
MenuServiceImpl#listUserMenus
@Override
public List<UserMenuDTO> listUserMenus() {
    // 查询用户菜单信息
    //(仅通过tb_user_role、tb_role_menu、tb_menu连表查询 用户拥有的角色 有哪些菜单)
    List<Menu> menuList = menuDao.listMenusByUserInfoId(UserUtils.getLoginUser().getUserInfoId());

    // 获取目录列表
    //(仅返回上一步查询到的菜单中parent_id为null的菜单)
    List<Menu> catalogList = listCatalog(menuList);

    // 获取目录下的子菜单
    //(将相同parent_id的菜单进行分组,以parent_id作为key,放入map中,
    //  从这里就看出来了,它不支持多级菜单了)
    Map<Integer, List<Menu>> childrenMap = getMenuMap(menuList);

    // 转换前端菜单格式
    return convertUserMenuList(catalogList, childrenMap);
}

private List<UserMenuDTO> convertUserMenuList(List<Menu> catalogList, Map<Integer, List<Menu>> childrenMap) {

	// 遍历每个parent_id为null的菜单,

	// 		- 如果通过上面构建的map中,能找到它的子菜单,
	//		  那么就把它当作多级菜单处理(认为是目录),
	//	      将它的子菜单排序,并添加到children属性中;

	//      - 如果没有找到,就作为菜单处理(认为是菜单),创建一个UserMenuDTO,并设置component为Layout,path为菜单的path
	//		  将此菜单(path会被置为空字符串,这个设置空字符串是有意义的),添加到刚刚创建的UserMenuDTO的children中,
	//        也就是说,如果一级是菜单,会把它包到里面去;

	// 整个过程,没有使用递归 或者 通过构建map的方式 构建多级菜单,但是如果是一级菜单,它是会把它包一层的


    return catalogList.stream().map(item -> {
        // 获取目录
        UserMenuDTO userMenuDTO = new UserMenuDTO();
        List<UserMenuDTO> list = new ArrayList<>();
        // 获取目录下的子菜单
        List<Menu> children = childrenMap.get(item.getId());
        if (CollectionUtils.isNotEmpty(children)) {
            // 多级菜单处理
            userMenuDTO = BeanCopyUtils.copyObject(item, UserMenuDTO.class);
            list = children.stream()
                    .sorted(Comparator.comparing(Menu::getOrderNum))
                    .map(menu -> {
                        UserMenuDTO dto = BeanCopyUtils.copyObject(menu, UserMenuDTO.class);
                        dto.setHidden(menu.getIsHidden().equals(TRUE));
                        return dto;
                    })
                    .collect(Collectors.toList());
        } else {
            // 一级菜单处理
            userMenuDTO.setPath(item.getPath());
            userMenuDTO.setComponent(COMPONENT); // "Layouot"
            list.add(UserMenuDTO.builder()
                    .path("")
                    .name(item.getName())
                    .icon(item.getIcon())
                    .component(item.getComponent())
                    .build());
        }
        userMenuDTO.setHidden(item.getIsHidden().equals(TRUE));
        userMenuDTO.setChildren(list);
        return userMenuDTO;
    }).collect(Collectors.toList());
}
接口返回示例及分析
- 观察下面的 首页 和 个人中心 的确是被包了一层,
- 刚刚提到 前端需要 侧边栏菜单 和 添加动态路由,那么这里只提供一个接口的话,并且里面没有分
菜单和路由,那么前端势必就要自己组装 出合适的数据格式了。- 大致猜想下,这2部分内容该如何组装出来?
- 路由:首先分析路由,这个比较简单,从下面的数据返回就可以看出来,它实际上已经大致和vue-router所需要的路由类似了,只需要把component的部分,通过
异步组件加载方式,把它导入进去就可以了。比如:下面的首页,当匹配到/,就会默认展示Layout,然后由于里面有一个path为空字符串的子路由,vue-router会把这个子路由渲染到Layout的路由出口的地方。里面还有个小问题,比如说下面的文章管理,它的path是/article-submenu,那我直接在地址上输入这个路径的话,它是会渲染一个Layout组件,然后路由出口是空的,也就是主区域是空白的,此时也可以给文章管理加一个path为空字符串的子路由,让它显示一个默认的页面,当然这个目录是点击不了的,只是为了防止用户输入这个路劲而已。此处可以参考:vue3后台管理系统、vue2异步组件 - 菜单: 侧边栏第一层级的菜单有可能是菜单,也有可能是目录,目录是不能点击的,只能作展开/收缩。那如何区分它们呢?因为使用element-ui组件去渲染左侧菜单,那么就必须知道,当前这个菜单有没有子菜单,如果有子菜单,用的是el-sub-menu,如果直接是一个菜单的话,那就是el-menu-item(此处可参考:vue3后台管理系统 的 使用el-menu创建侧边栏菜单 部分),可以通过name来进行判断,因为通过包了一层的方式生成的最外面的那层菜单的name是没有赋值的,因此,它肯定为null,也就是说,碰到为null的name的一级菜单,直接拿这个菜单下面的一个子菜单(这种只会存在一个子菜单),比如首页、个人中心就是这样的。还有的就是有name的菜单就通过el-sub-menu把它渲染出来,这样,他就是一个目录了。
- 路由:首先分析路由,这个比较简单,从下面的数据返回就可以看出来,它实际上已经大致和vue-router所需要的路由类似了,只需要把component的部分,通过
- 大致猜想下,这2部分内容该如何组装出来?
{
    "flag":true,
    "code":20000,
    "message":"操作成功",
    "data":[
        {
            "name":null,
            "path":"/",
            "component":"Layout",
            "icon":null,
            "hidden":false,
            "children":[
                {
                    "name":"首页",
                    "path":"",
                    "component":"/home/Home.vue",
                    "icon":"el-icon-myshouye",
                    "hidden":null,
                    "children":null
                }
            ]
        },
        {
            "name":"文章管理",
            "path":"/article-submenu",
            "component":"Layout",
            "icon":"el-icon-mywenzhang-copy",
            "hidden":false,
            "children":[
                {
                    "name":"发布文章",
                    "path":"/articles",
                    "component":"/article/Article.vue",
                    "icon":"el-icon-myfabiaowenzhang",
                    "hidden":false,
                    "children":null
                },
                {
                    "name":"修改文章",
                    "path":"/articles/*",
                    "component":"/article/Article.vue",
                    "icon":"el-icon-myfabiaowenzhang",
                    "hidden":true,
                    "children":null
                },
                {
                    "name":"文章列表",
                    "path":"/article-list",
                    "component":"/article/ArticleList.vue",
                    "icon":"el-icon-mywenzhangliebiao",
                    "hidden":false,
                    "children":null
                },
                {
                    "name":"分类管理",
                    "path":"/categories",
                    "component":"/category/Category.vue",
                    "icon":"el-icon-myfenlei",
                    "hidden":false,
                    "children":null
                },
                {
                    "name":"标签管理",
                    "path":"/tags",
                    "component":"/tag/Tag.vue",
                    "icon":"el-icon-myicontag",
                    "hidden":false,
                    "children":null
                }
            ]
        },
        {
            "name":"消息管理",
            "path":"/message-submenu",
            "component":"Layout",
            "icon":"el-icon-myxiaoxi",
            "hidden":false,
            "children":[
                {
                    "name":"评论管理",
                    "path":"/comments",
                    "component":"/comment/Comment.vue",
                    "icon":"el-icon-mypinglunzu",
                    "hidden":false,
                    "children":null
                },
                {
                    "name":"留言管理",
                    "path":"/messages",
                    "component":"/message/Message.vue",
                    "icon":"el-icon-myliuyan",
                    "hidden":false,
                    "children":null
                }
            ]
        },
        {
            "name":"用户管理",
            "path":"/users-submenu",
            "component":"Layout",
            "icon":"el-icon-myyonghuliebiao",
            "hidden":false,
            "children":[
                {
                    "name":"用户列表",
                    "path":"/users",
                    "component":"/user/User.vue",
                    "icon":"el-icon-myyonghuliebiao",
                    "hidden":false,
                    "children":null
                },
                {
                    "name":"在线用户",
                    "path":"/online/users",
                    "component":"/user/Online.vue",
                    "icon":"el-icon-myyonghuliebiao",
                    "hidden":false,
                    "children":null
                }
            ]
        },
        {
            "name":"权限管理",
            "path":"/permission-submenu",
            "component":"Layout",
            "icon":"el-icon-mydaohanglantubiao_quanxianguanli",
            "hidden":false,
            "children":[
                {
                    "name":"角色管理",
                    "path":"/roles",
                    "component":"/role/Role.vue",
                    "icon":"el-icon-myjiaoseliebiao",
                    "hidden":false,
                    "children":null
                },
                {
                    "name":"接口管理",
                    "path":"/resources",
                    "component":"/resource/Resource.vue",
                    "icon":"el-icon-myjiekouguanli",
                    "hidden":false,
                    "children":null
                },
                {
                    "name":"菜单管理",
                    "path":"/menus",
                    "component":"/menu/Menu.vue",
                    "icon":"el-icon-mycaidan",
                    "hidden":false,
                    "children":null
                }
            ]
        },
        {
            "name":"系统管理",
            "path":"/system-submenu",
            "component":"Layout",
            "icon":"el-icon-myshezhi",
            "hidden":false,
            "children":[
                {
                    "name":"网站管理",
                    "path":"/website",
                    "component":"/website/Website.vue",
                    "icon":"el-icon-myxitong",
                    "hidden":false,
                    "children":null
                },
                {
                    "name":"页面管理",
                    "path":"/pages",
                    "component":"/page/Page.vue",
                    "icon":"el-icon-myyemianpeizhi",
                    "hidden":false,
                    "children":null
                },
                {
                    "name":"友链管理",
                    "path":"/links",
                    "component":"/friendLink/FriendLink.vue",
                    "icon":"el-icon-mydashujukeshihuaico-",
                    "hidden":false,
                    "children":null
                },
                {
                    "name":"关于我",
                    "path":"/about",
                    "component":"/about/About.vue",
                    "icon":"el-icon-myguanyuwo",
                    "hidden":false,
                    "children":null
                }
            ]
        },
        {
            "name":"相册管理",
            "path":"/album-submenu",
            "component":"Layout",
            "icon":"el-icon-myimage-fill",
            "hidden":false,
            "children":[
                {
                    "name":"相册列表",
                    "path":"/albums",
                    "component":"/album/Album.vue",
                    "icon":"el-icon-myzhaopian",
                    "hidden":false,
                    "children":null
                },
                {
                    "name":"照片管理",
                    "path":"/albums/:albumId",
                    "component":"/album/Photo.vue",
                    "icon":"el-icon-myzhaopian",
                    "hidden":true,
                    "children":null
                },
                {
                    "name":"照片回收站",
                    "path":"/photos/delete",
                    "component":"/album/Delete.vue",
                    "icon":"el-icon-myhuishouzhan",
                    "hidden":true,
                    "children":null
                }
            ]
        },
        {
            "name":"说说管理",
            "path":"/talk-submenu",
            "component":"Layout",
            "icon":"el-icon-mypinglun",
            "hidden":false,
            "children":[
                {
                    "name":"发布说说",
                    "path":"/talks",
                    "component":"/talk/Talk.vue",
                    "icon":"el-icon-myfabusekuai",
                    "hidden":false,
                    "children":null
                },
                {
                    "name":"说说列表",
                    "path":"/talk-list",
                    "component":"/talk/TalkList.vue",
                    "icon":"el-icon-myiconfontdongtaidianji",
                    "hidden":false,
                    "children":null
                },
                {
                    "name":"修改说说",
                    "path":"/talks/:talkId",
                    "component":"/talk/Talk.vue",
                    "icon":"el-icon-myshouye",
                    "hidden":true,
                    "children":null
                }
            ]
        },
        {
            "name":"日志管理",
            "path":"/log-submenu",
            "component":"Layout",
            "icon":"el-icon-myguanyuwo",
            "hidden":false,
            "children":[
                {
                    "name":"操作日志",
                    "path":"/operation/log",
                    "component":"/log/Operation.vue",
                    "icon":"el-icon-myguanyuwo",
                    "hidden":false,
                    "children":null
                }
            ]
        },
        {
            "name":null,
            "path":"/setting",
            "component":"Layout",
            "icon":null,
            "hidden":false,
            "children":[
                {
                    "name":"个人中心",
                    "path":"",
                    "component":"/setting/Setting.vue",
                    "icon":"el-icon-myuser",
                    "hidden":null,
                    "children":null
                }
            ]
        }
    ]
}
前端代码分析
menu.js
- 下面的代码只遍历了2层,只处理了图标 和 路由的组件异步加载,和 Layout的字符串转为实际的Layout组件,这些都是vue-router的要求。
- 路由 和 菜单 用的 是同一份数据。此处可与vue3后台管理系统 # 调整路由处作对比学习,感觉的确他的更加灵活一点,他的可以不同path的路径都可以用Layout作为App.vue的路由出口展示的组件。我的是直接就当作Layout的子路由了,但更加简单,但有一点必须作为前提,那就是一点要跟着vue-router的用法走,这个是大前提,所以做的时候,肯定需要先把静态路由搭建出来,确认没问题之后,再搞动态路由。
import Layout from "@/layout/index.vue";
import router from "../../router";
import store from "../../store";
import axios from "axios";
import Vue from "vue";

export function generaMenu() {
  // 查询用户菜单
  axios.get("/api/admin/user/menus").then(({ data }) => {
    if (data.flag) {
      var userMenuList = data.data;
      userMenuList.forEach(item => {
        if (item.icon != null) {
          item.icon = "iconfont " + item.icon;
        }
        if (item.component == "Layout") {
          item.component = Layout;
        }
        if (item.children && item.children.length > 0) {
          item.children.forEach(route => {
            route.icon = "iconfont " + route.icon;
            route.component = loadView(route.component);
          });
        }
      });
      // 添加侧边栏菜单
      store.commit("saveUserMenuList", userMenuList);
      // 添加菜单到路由
      router.addRoutes(userMenuList);
    } else {
      Vue.prototype.$message.error(data.message);
      router.push({ path: "/login" });
    }
  });
}

export const loadView = view => {
  // 路由懒加载
  return resolve => require([`@/views${view}`], resolve);
};
SideBar.vue
- 此处可对照 vue3后台管理系统 # 使用el-menu创建侧边栏菜单
- 下面只做了2级遍历。多级菜单实现可参考: vue3后台管理系统 # 创建TreeMenu.vue递归组件
<template>

  <div>

    <el-menu
      class="side-nav-bar"
      router
      :collapse="this.$store.state.collapse"
      :default-active="this.$route.path"
      background-color="#304156"
      text-color="#BFCBD9"
      active-text-color="#409EFF"
    >

      <template v-for="route of this.$store.state.userMenuList">

        <!-- 二级菜单 -->
        <template v-if="route.name && route.children && !route.hidden">
          <el-submenu :key="route.path" :index="route.path">
            <!-- 二级菜单标题 -->
            <template slot="title">
              <i :class="route.icon" />
              <span>{{ route.name }}</span>
            </template>
            <!-- 二级菜单选项 -->
            <template v-for="(item, index) of route.children">
              <el-menu-item v-if="!item.hidden" :key="index" :index="item.path">
                <i :class="item.icon" />
                <span slot="title">{{ item.name }}</span>
              </el-menu-item>
            </template>
          </el-submenu>
        </template>

        <!-- 一级菜单 -->
        <template v-else-if="!route.hidden">
          <el-menu-item :index="route.path" :key="route.path">
            <i :class="route.children[0].icon" />
            <span slot="title">{{ route.children[0].name }}</span>
          </el-menu-item>
        </template>

      </template>
    </el-menu>
  </div>
</template>
接口权限控制
资源表 及 分析
分析
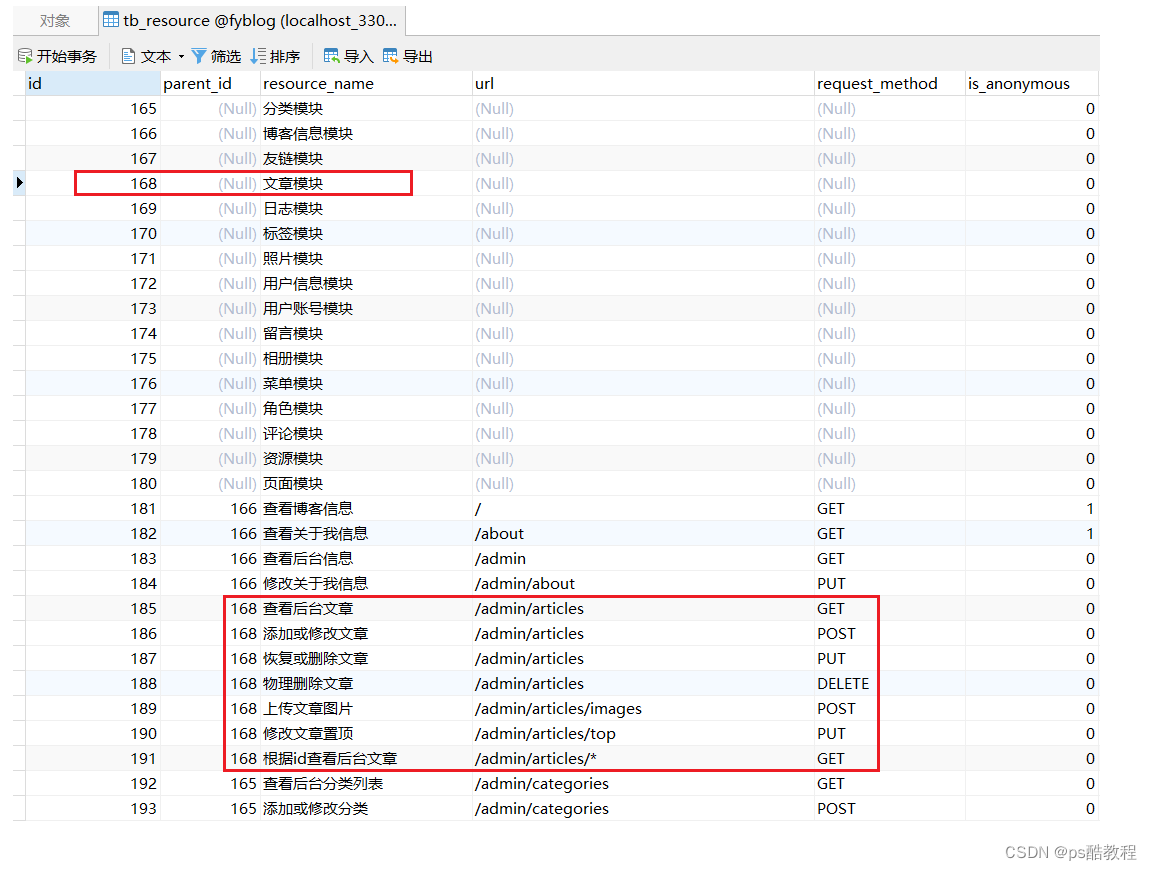
- 将系统中的每一controller里面的接口,当作一个资源,接口名称就是资源名称、接口访问路径就是资源url。每一个controller类也是一个资源,它用来管理内部的接口(作为它们的父资源,父资源的parent_id为null),也就是说里面只会存在2级关系。
- 使用角色 去 关联 资源,用户 去 关联 角色,因此,就可以确定一个用户拥有哪些资源。一个角色如果关联了某个controller下面的某个或者某几个资源,那么它一定关联了这个controller资源(也就是子关联了,那么父也一定要关联)。那个菜单也应如此,但是我发现,角色分配菜单那里,选择了子菜单,却没有自动勾选对应的父级菜单,连父级菜单都没的话,返回的就是空菜单。资源那里是正常的。
- 当确定某个用户具有哪些角色,就可以确定这个用户拥有了哪些资源,其实,就是拥有了哪些接口的访问权限,接口的访问权限是通过security这个权限框架控制的,并且博客中是做到了
动态权限控制,即新增或者修改资源、更新角色 与 资源的关系时,项目不需要重启,用户也不需要退出再登录,即可按修改后的接口访问权限实时的生效,但是用户登录后,再修改这个用户的角色,这个是不能实时生效的,需要退出退出再登录。
WebSecurityConfig
package com.minzheng.blog.config;

import com.minzheng.blog.handler.*;
import org.springframework.beans.factory.annotation.Autowired;
import org.springframework.context.annotation.Bean;
import org.springframework.context.annotation.Configuration;
import org.springframework.security.access.AccessDecisionManager;
import org.springframework.security.config.annotation.ObjectPostProcessor;
import org.springframework.security.config.annotation.web.builders.HttpSecurity;

import org.springframework.security.config.annotation.web.configuration.EnableWebSecurity;
import org.springframework.security.config.annotation.web.configuration.WebSecurityConfigurerAdapter;
import org.springframework.security.core.session.SessionRegistry;
import org.springframework.security.core.session.SessionRegistryImpl;
import org.springframework.security.crypto.bcrypt.BCryptPasswordEncoder;
import org.springframework.security.crypto.password.PasswordEncoder;
import org.springframework.security.web.access.intercept.FilterInvocationSecurityMetadataSource;
import org.springframework.security.web.access.intercept.FilterSecurityInterceptor;
import org.springframework.security.web.session.HttpSessionEventPublisher;


/**
 * Security配置类
 *
 * @author yezhiqiu
 * @date 2021/07/29
 */
@Configuration
@EnableWebSecurity
public class WebSecurityConfig extends WebSecurityConfigurerAdapter {

    @Autowired
    private AuthenticationEntryPointImpl authenticationEntryPoint;

    @Autowired
    private AccessDeniedHandlerImpl accessDeniedHandler;

    @Autowired
    private AuthenticationSuccessHandlerImpl authenticationSuccessHandler;

    @Autowired
    private AuthenticationFailHandlerImpl authenticationFailHandler;

    @Autowired
    private LogoutSuccessHandlerImpl logoutSuccessHandler;

    @Bean
    public FilterInvocationSecurityMetadataSource securityMetadataSource() {
        return new FilterInvocationSecurityMetadataSourceImpl();
    }

    @Bean
    public AccessDecisionManager accessDecisionManager() {
        return new AccessDecisionManagerImpl();
    }

    @Bean
    public SessionRegistry sessionRegistry() {
        return new SessionRegistryImpl();
    }

    @Bean
    public HttpSessionEventPublisher httpSessionEventPublisher() {
        return new HttpSessionEventPublisher();
    }

    /**
     * 密码加密
     *
     * @return {@link PasswordEncoder} 加密方式
     */
    @Bean
    public PasswordEncoder passwordEncoder() {
        return new BCryptPasswordEncoder();
    }

    /**
     * 配置权限
     *
     * @param http http
     * @throws Exception 异常
     */
    @Override
    protected void configure(HttpSecurity http) throws Exception {
        // 配置登录注销路径
        http.formLogin()
                .loginProcessingUrl("/login")
                .successHandler(authenticationSuccessHandler)
                .failureHandler(authenticationFailHandler)
                .and()
                .logout()
                .logoutUrl("/logout")
                .logoutSuccessHandler(logoutSuccessHandler);
        // 配置路由权限信息
        http.authorizeRequests()
                .withObjectPostProcessor(new ObjectPostProcessor<FilterSecurityInterceptor>() {
                    @Override
                    public <O extends FilterSecurityInterceptor> O postProcess(O fsi) {
                        fsi.setSecurityMetadataSource(securityMetadataSource());
                        fsi.setAccessDecisionManager(accessDecisionManager());
                        return fsi;
                    }
                })
                .anyRequest().permitAll()
                .and()
                // 关闭跨站请求防护
                .csrf().disable().exceptionHandling()
                // 未登录处理
                .authenticationEntryPoint(authenticationEntryPoint)
                // 权限不足处理
                .accessDeniedHandler(accessDeniedHandler)
                .and()
                .sessionManagement()
                .maximumSessions(20)
                .sessionRegistry(sessionRegistry());
    }

}
权限控制整体流程
先说登录
- 用户登录是通过Security配置的formLogin()配置的UsernamePasswordAuthenticationFilter这个过滤器来登录的,这个过滤器会提取登录请求中的"username","password"请求参数,交给认证管理器作认证,而认证管理器是security默认配置的,(具体可以看AbstractAuthenticationFilterConfigurer#configure(B http)这里是从sharedObject中拿到AuthenticationManager设置到UsernamePasswordAuthenticationFilter过滤器中)。而认证管理器是security它自己会默认创建一个,并且它默认会去寻找spring容器中定义的UserDetailsService这个类型的bean(具体见InitializeUserDetailsManagerConfigurer#configure(AuthenticationManagerBuilder auth)),里面的配置过程比较复杂(见Spring Security框架配置运行流程完整分析),
- 需要花费不少的时间才能看明白配置过程,但只需要知道它默认会去寻找定义的UserDetailsService实现类bean,设置到AuthenticationManager认证管理中,而formLogin()配置的UsernamePasswordAuthenticationFilter正是需要认证管理器,因此实际的查询用户操作就交给了我们配置的UserDetailsService这个bean中。
- 登录代码如下,实际上就是查询出了当前用户拥有的角色、当前用户点赞过哪些文章、评论、说说,以及ip地址和来源地和浏览器等
UserDetailsServiceImpl
@Service
public class UserDetailsServiceImpl implements UserDetailsService {
    @Autowired
    private UserAuthDao userAuthDao;
    @Autowired
    private UserInfoDao userInfoDao;
    @Autowired
    private RoleDao roleDao;
    @Autowired
    private RedisService redisService;
    @Resource
    private HttpServletRequest request;

    @Override
    public UserDetails loadUserByUsername(String username) {
        if (StringUtils.isBlank(username)) {
            throw new BizException("用户名不能为空!");
        }
        // 查询账号是否存在
        UserAuth userAuth = userAuthDao.selectOne(new LambdaQueryWrapper<UserAuth>()
                .select(UserAuth::getId, UserAuth::getUserInfoId, UserAuth::getUsername, UserAuth::getPassword, UserAuth::getLoginType)
                .eq(UserAuth::getUsername, username));
        if (Objects.isNull(userAuth)) {
            throw new BizException("用户名不存在!");
        }
        // 封装登录信息
        return convertUserDetail(userAuth, request);
    }

    /**
     * 封装用户登录信息
     *
     * @param user    用户账号
     * @param request 请求
     * @return 用户登录信息
     */
    public UserDetailDTO convertUserDetail(UserAuth user, HttpServletRequest request) {
        // 查询账号信息
        UserInfo userInfo = userInfoDao.selectById(user.getUserInfoId());
        // 查询账号角色
        List<String> roleList = roleDao.listRolesByUserInfoId(userInfo.getId());
        // 查询账号点赞信息
        Set<Object> articleLikeSet = redisService.sMembers(ARTICLE_USER_LIKE + userInfo.getId());
        Set<Object> commentLikeSet = redisService.sMembers(COMMENT_USER_LIKE + userInfo.getId());
        Set<Object> talkLikeSet = redisService.sMembers(TALK_USER_LIKE + userInfo.getId());
        // 获取设备信息
        String ipAddress = IpUtils.getIpAddress(request);
        String ipSource = IpUtils.getIpSource(ipAddress);
        UserAgent userAgent = IpUtils.getUserAgent(request);
        // 封装权限集合
        return UserDetailDTO.builder()
                .id(user.getId())
                .loginType(user.getLoginType())
                .userInfoId(userInfo.getId())
                .username(user.getUsername())
                .password(user.getPassword())
                .email(userInfo.getEmail())
                .roleList(roleList)
                .nickname(userInfo.getNickname())
                .avatar(userInfo.getAvatar())
                .intro(userInfo.getIntro())
                .webSite(userInfo.getWebSite())
                .articleLikeSet(articleLikeSet)
                .commentLikeSet(commentLikeSet)
                .talkLikeSet(talkLikeSet)
                .ipAddress(ipAddress)
                .ipSource(ipSource)
                .isDisable(userInfo.getIsDisable())
                .browser(userAgent.getBrowser().getName())
                .os(userAgent.getOperatingSystem().getName())
                .lastLoginTime(LocalDateTime.now(ZoneId.of(SHANGHAI.getZone())))
                .build();
    }

}
再看权限控制
看这一部分之前,需要先搞懂security他的工作原理,它是基于filter过滤器实现的,可以先看:Security源码学习笔记&OAuth2 # 第十节部分 关于FilterIntercetor的介绍。配置的起源在于使用http.authorizeRequests()修改了其中默认配置的组件,而替换成了博客中使用的组件。
自定义FilterInvocationSecurityMetadataSourceImpl
security会把当前访问的资源请求对象,封装为FilterInvocation,把它交给SecurityMetadataSource#getAttributes方法,以获得访问当前资源请求对象所需要的权限。
下面代码的过程就是在通过ant-style的路径匹配,根据配置的资源url,查询到访问当前的资源可以是哪些角色,也就是说,用户必须要有返回中的任一角色,才能访问FilterInvocation,否则不允许访问。
下面还有一个返回指定“disable”固定字符串的意思是没有任何角色能够访问这个资源,除非你有一个disable的角色,但这个角色显然不存在,也就是没人可以访问这个资源。
package com.minzheng.blog.handler;

import com.minzheng.blog.dao.RoleDao;
import com.minzheng.blog.dto.ResourceRoleDTO;
import org.springframework.beans.factory.annotation.Autowired;
import org.springframework.security.access.ConfigAttribute;
import org.springframework.security.access.SecurityConfig;
import org.springframework.security.web.FilterInvocation;
import org.springframework.security.web.access.intercept.FilterInvocationSecurityMetadataSource;
import org.springframework.stereotype.Component;
import org.springframework.util.AntPathMatcher;
import org.springframework.util.CollectionUtils;

import javax.annotation.PostConstruct;
import java.util.Collection;
import java.util.List;

/**
 * 接口拦截规则
 *
 * @author yezhiqiu
 * @date 2021/07/27
 */
@Component
public class FilterInvocationSecurityMetadataSourceImpl implements FilterInvocationSecurityMetadataSource {

    /**
     * 资源角色列表
     */
    private static List<ResourceRoleDTO> resourceRoleList;

    @Autowired
    private RoleDao roleDao;

    /**
     * 加载资源角色信息
     */
    @PostConstruct
    private void loadDataSource() {
        resourceRoleList = roleDao.listResourceRoles();
    }

    /**
     * 清空接口角色信息
     */
    public void clearDataSource() {
        resourceRoleList = null;
    }

    @Override
    public Collection<ConfigAttribute> getAttributes(Object object) throws IllegalArgumentException {
        // 修改接口角色关系后重新加载
        if (CollectionUtils.isEmpty(resourceRoleList)) {
            this.loadDataSource();
        }
        FilterInvocation fi = (FilterInvocation) object;
        // 获取用户请求方式
        String method = fi.getRequest().getMethod();
        // 获取用户请求Url
        String url = fi.getRequest().getRequestURI();
        AntPathMatcher antPathMatcher = new AntPathMatcher();
        // 获取接口角色信息,若为匿名接口则放行,若无对应角色则禁止
        for (ResourceRoleDTO resourceRoleDTO : resourceRoleList) {
            if (antPathMatcher.match(resourceRoleDTO.getUrl(), url) && resourceRoleDTO.getRequestMethod().equals(method)) {
                List<String> roleList = resourceRoleDTO.getRoleList();
                if (CollectionUtils.isEmpty(roleList)) {
                    return SecurityConfig.createList("disable");
                }
                return SecurityConfig.createList(roleList.toArray(new String[]{}));
            }
        }
        return null;
    }

    @Override
    public Collection<ConfigAttribute> getAllConfigAttributes() {
        return null;
    }

    @Override
    public boolean supports(Class<?> aClass) {
        return FilterInvocation.class.isAssignableFrom(aClass);
    }

}
自定义AccessDecisionManagerImpl
在上一步,获取到了访问某一资源需要的权限后,接下来,按照security的尿性,它会交给访问决策管理器,然后决策管理器会交给投票器,然后再根据投票结果确定是否能访问当前资源。
但是博客中是直接
@Component
public class AccessDecisionManagerImpl implements AccessDecisionManager {
    @Override
    public void decide(Authentication authentication, Object o, Collection<ConfigAttribute> collection) throws AccessDeniedException, InsufficientAuthenticationException {
        // 获取用户权限列表
        List<String> permissionList = authentication.getAuthorities()
                .stream()
                .map(GrantedAuthority::getAuthority)
                .collect(Collectors.toList());
        for (ConfigAttribute item : collection) {
            if (permissionList.contains(item.getAttribute())) {
                return;
            }
        }
        throw new AccessDeniedException("没有操作权限");
    }

    @Override
    public boolean supports(ConfigAttribute configAttribute) {
        return true;
    }

    @Override
    public boolean supports(Class<?> aClass) {
        return true;
    }
}