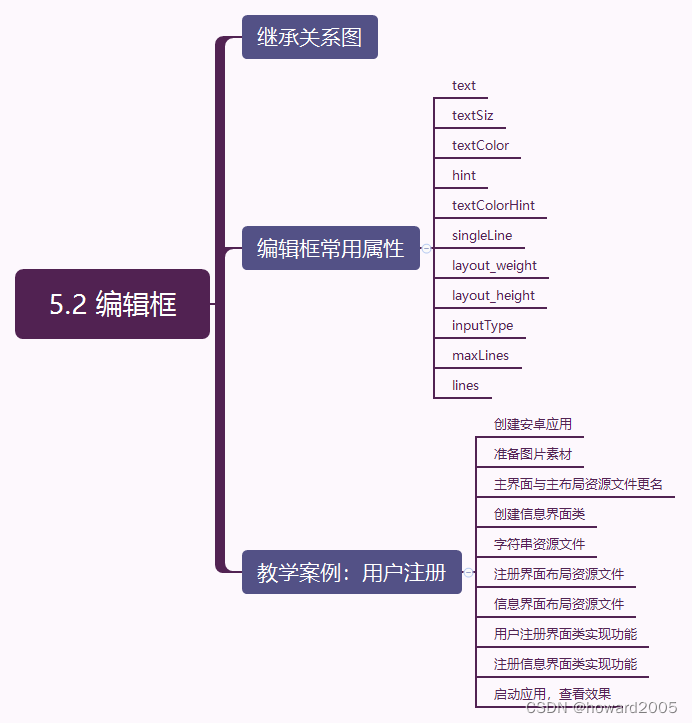
文章目录
- 零、本讲学习目标
- 一、导入新课
- 二、新课讲解
- (一)继承关系图
- (二)编辑框常用属性
- (三)教学案例:用户注册
- 1、创建安卓应用
- 2、准备图片素材
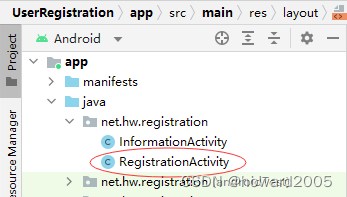
- 3、主界面与主布局资源文件更名
- 4、创建息界面类
- 5、字符串资源文件
- 6、注册界面布局资源文件
- 7、信息界面布局资源文件
- 8、用户注册界面类实现功能
- 9、注册信息界面类实现功能
- 10、启动应用,查看效果
- 三、归纳总结
- 四、上机操作
零、本讲学习目标
- 熟悉编辑框常用属性
- 能在应用中使用编辑框
一、导入新课
- 在安卓应用中经常需要用户输入信息,比如用户名、密码、电话号码之类,一般采用编辑框来接收用户输入的任何文本信息。
二、新课讲解
(一)继承关系图
- EditText是TextView的子类,用于接收用户输入的数据
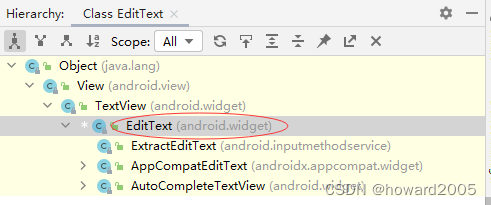
- 课后大家可以去玩一玩EditText的子类AutoCompleteTextView
(二)编辑框常用属性
| 属性 | 含义 |
|---|
| text | 文本内容 |
| textSize | 文本字号,单位:sp |
| textColor | 文本颜色,#ff0000 - 红色 |
| hint | 提示信息 |
| singleLine | 单行(true or false) |
| layout_height | 高度,单位:dp (wrap_content, match_parent) |
| layout_weight | 宽度,单位:dp (wrap_content, match_parent) |
| inputType | 输入类型(普通文本、密码、邮件……) |
| maxLines | 最大行数 |
| lines | 行数 |
(三)教学案例:用户注册
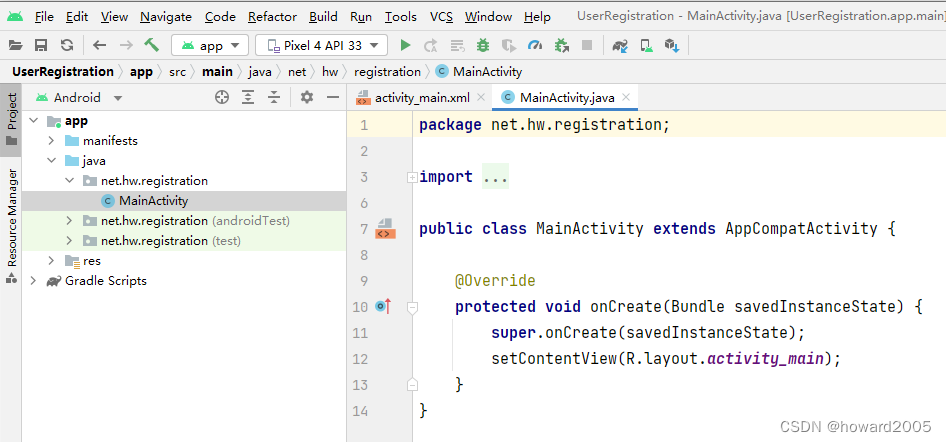
1、创建安卓应用
- 基于
Empty Activity模板创建安卓应用 - UserRegistration

- 单击【Finish】按钮
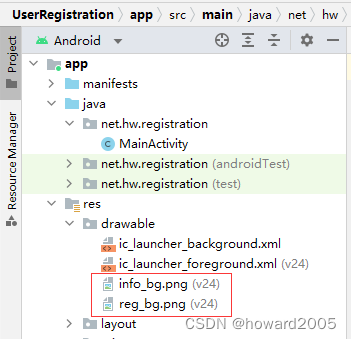
2、准备图片素材
- 将两张背景图片拷贝到
drawable目录
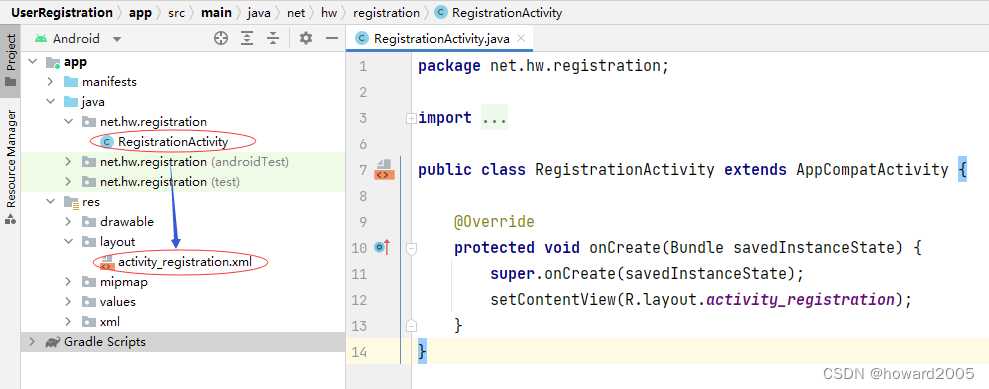
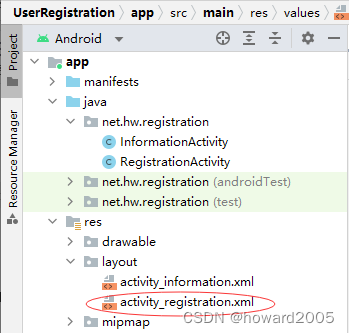
3、主界面与主布局资源文件更名
- 将主界面类
MainActivity更名为注册界面类RegistrationActivity - 将主布局资源文件
activity_main.xml更名为注册布局资源文件activity_registration.xml
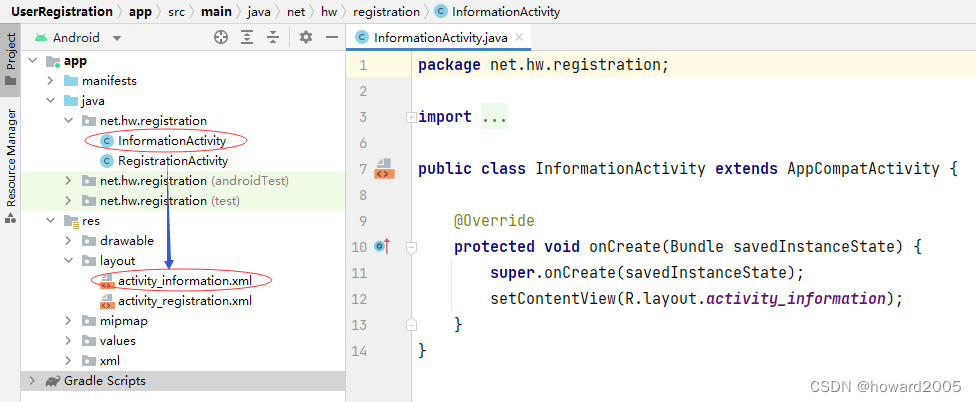
4、创建息界面类
- 基于
Empty Activity模板创建信息界面类 - InformationActivity
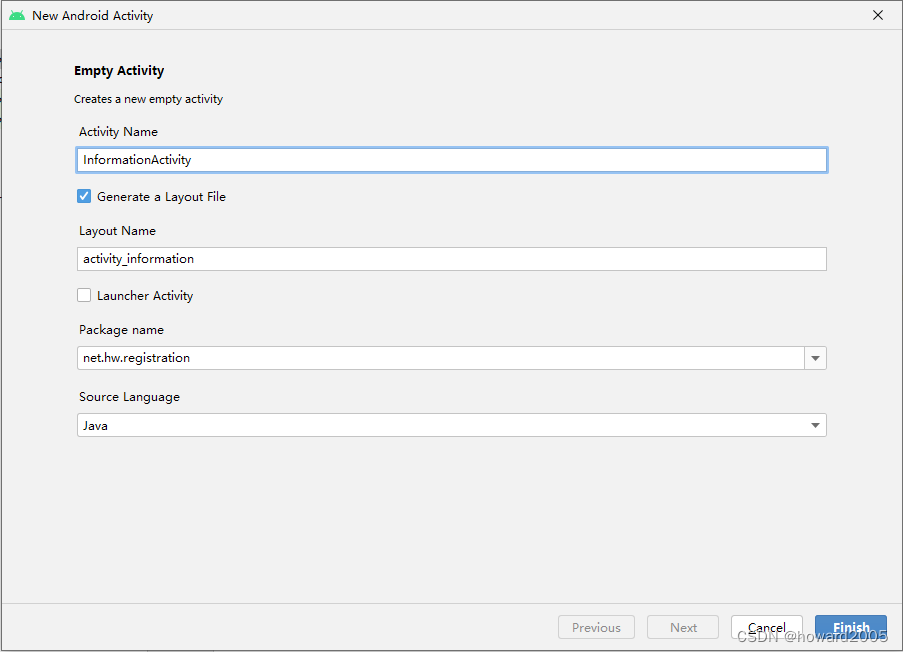
- 单击【Finish】按钮
5、字符串资源文件
- 字符串资源文件 -
strings.xml

<resources>
    <string name="app_name">用户注册</string>
    <string name="name">姓名:</string>
    <string name="gender">性别:</string>
    <string name="age">年龄:</string>
    <string name="phone">电话:</string>
    <string name="email">邮箱:</string>
    <string name="home_page">主页:</string>
    <string name="memo">备注:</string>
    <string name="register">注册</string>
    <string name="cancel">取消</string>
</resources>
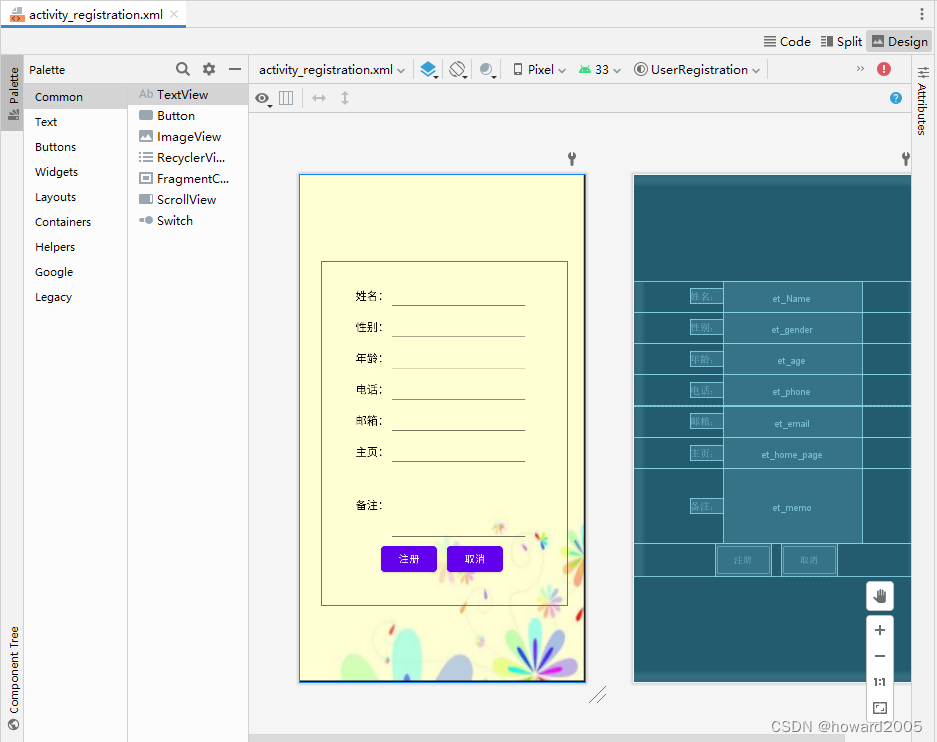
6、注册界面布局资源文件
- 注册界面布局资源文件 -
activity_registration.xml
<?xml version="1.0" encoding="utf-8"?>
<LinearLayout xmlns:android="http://schemas.android.com/apk/res/android"
    android:layout_width="match_parent"
    android:layout_height="match_parent"
    android:background="@drawable/reg_bg"
    android:gravity="center"
    android:orientation="vertical">

    <LinearLayout
        android:layout_width="match_parent"
        android:layout_height="wrap_content"
        android:gravity="center">

        <TextView
            android:id="@+id/tv_name"
            android:layout_width="wrap_content"
            android:layout_height="wrap_content"
            android:text="@string/name"
            android:textColor="#000000"
            android:textSize="16sp" />

        <EditText
            android:id="@+id/et_name"
            android:layout_width="200dp"
            android:layout_height="wrap_content"
            android:ems="10"
            android:singleLine="true" />
    </LinearLayout>

    <LinearLayout
        android:layout_width="match_parent"
        android:layout_height="wrap_content"
        android:gravity="center">

        <TextView
            android:id="@+id/tv_gender"
            android:layout_width="wrap_content"
            android:layout_height="wrap_content"
            android:text="@string/gender"
            android:textColor="#000000"
            android:textSize="16sp" />

        <EditText
            android:id="@+id/et_gender"
            android:layout_width="200dp"
            android:layout_height="wrap_content"
            android:ems="10"
            android:singleLine="true" />
    </LinearLayout>

    <LinearLayout
        android:layout_width="match_parent"
        android:layout_height="wrap_content"
        android:gravity="center">

        <TextView
            android:id="@+id/tv_age"
            android:layout_width="wrap_content"
            android:layout_height="wrap_content"
            android:text="@string/age"
            android:textColor="#000000"
            android:textSize="16sp" />

        <EditText
            android:id="@+id/et_age"
            android:layout_width="200dp"
            android:layout_height="wrap_content"
            android:ems="10"
            android:inputType="number"
            android:singleLine="true" />
    </LinearLayout>

    <LinearLayout
        android:layout_width="match_parent"
        android:layout_height="wrap_content"
        android:gravity="center">

        <TextView
            android:id="@+id/tv_phone"
            android:layout_width="wrap_content"
            android:layout_height="wrap_content"
            android:text="@string/phone"
            android:textColor="#000000"
            android:textSize="16sp" />

        <EditText
            android:id="@+id/et_phone"
            android:layout_width="200dp"
            android:layout_height="wrap_content"
            android:ems="10"
            android:inputType="phone"
            android:singleLine="true" />
    </LinearLayout>

    <LinearLayout
        android:layout_width="match_parent"
        android:layout_height="wrap_content"
        android:gravity="center">

        <TextView
            android:id="@+id/tv_email"
            android:layout_width="wrap_content"
            android:layout_height="wrap_content"
            android:text="@string/email"
            android:textColor="#000000"
            android:textSize="16sp" />

        <EditText
            android:id="@+id/et_email"
            android:layout_width="200dp"
            android:layout_height="wrap_content"
            android:ems="10"
            android:inputType="textEmailAddress"
            android:singleLine="true" />
    </LinearLayout>

    <LinearLayout
        android:layout_width="match_parent"
        android:layout_height="wrap_content"
        android:gravity="center">

        <TextView
            android:id="@+id/tv_home_page"
            android:layout_width="wrap_content"
            android:layout_height="wrap_content"
            android:text="@string/home_page"
            android:textColor="#000000"
            android:textSize="16sp" />

        <EditText
            android:id="@+id/et_home_page"
            android:layout_width="200dp"
            android:layout_height="wrap_content"
            android:ems="10"
            android:inputType="textUri"
            android:singleLine="true" />
    </LinearLayout>

    <LinearLayout
        android:layout_width="match_parent"
        android:layout_height="wrap_content"
        android:gravity="center">

        <TextView
            android:id="@+id/tv_memo"
            android:layout_width="wrap_content"
            android:layout_height="wrap_content"
            android:text="@string/memo"
            android:textColor="#000000"
            android:textSize="16sp" />

        <EditText
            android:id="@+id/et_memo"
            android:layout_width="200dp"
            android:layout_height="wrap_content"
            android:ems="10"
            android:lines="4" />
    </LinearLayout>

    <LinearLayout
        android:layout_width="match_parent"
        android:layout_height="wrap_content"
        android:gravity="center">

        <Button
            android:id="@+id/btn_register"
            android:layout_width="80dp"
            android:layout_height="wrap_content"
            android:onClick="doRegister"
            android:layout_marginRight="15dp"
            android:text="@string/register" />

        <Button
            android:id="@+id/btn_cancel"
            android:layout_width="80dp"
            android:layout_height="wrap_content"
            android:onClick="doCancel"
            android:text="@string/cancel" />
    </LinearLayout>
</LinearLayout>
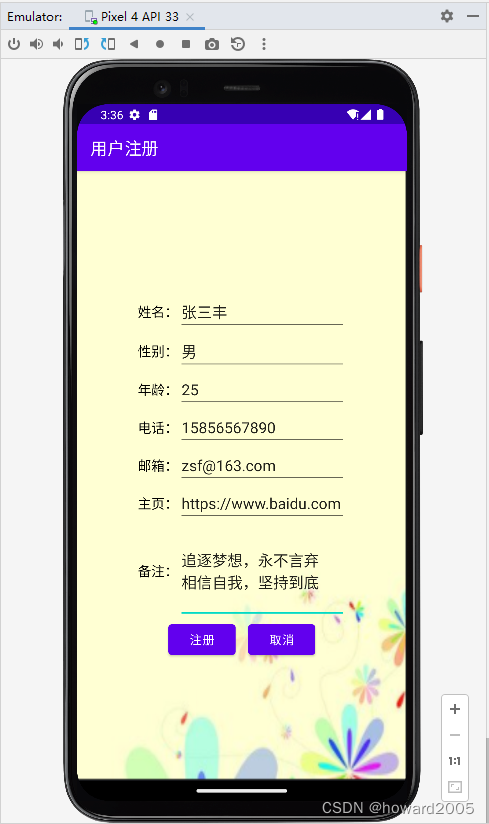
- 查看预览效果
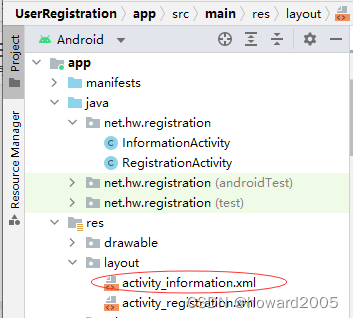
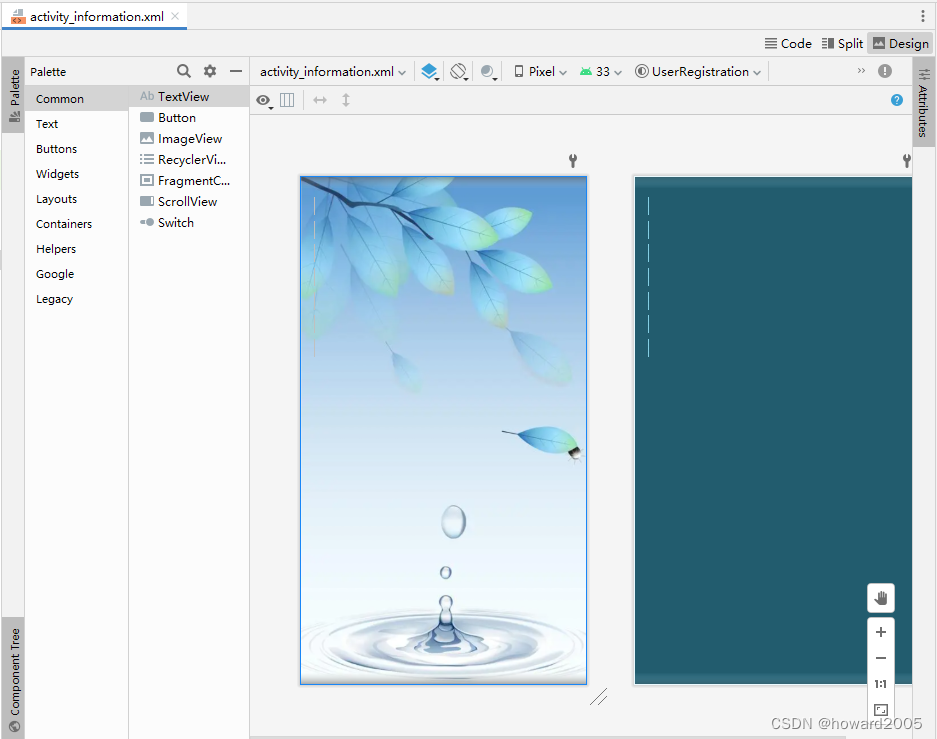
7、信息界面布局资源文件
- 信息界面布局资源文件 -
activity_information.xml
<?xml version="1.0" encoding="utf-8"?>
<LinearLayout xmlns:android="http://schemas.android.com/apk/res/android"
    android:layout_width="match_parent"
    android:layout_height="match_parent"
    android:background="@drawable/info_bg"
    android:orientation="vertical"
    android:padding="20dp" >

    <TextView
        android:id="@+id/tv_name"
        android:layout_width="wrap_content"
        android:layout_height="wrap_content"
        android:layout_marginTop="10dp"
        android:textColor="#0000ff"
        android:textSize="18sp" />

    <TextView
        android:id="@+id/tv_gender"
        android:layout_width="wrap_content"
        android:layout_height="wrap_content"
        android:layout_marginTop="10dp"
        android:textColor="#0000ff"
        android:textSize="18sp" />

    <TextView
        android:id="@+id/tv_age"
        android:layout_width="wrap_content"
        android:layout_height="wrap_content"
        android:layout_marginTop="10dp"
        android:textColor="#0000ff"
        android:textSize="18sp" />

    <TextView
        android:id="@+id/tv_phone"
        android:layout_width="wrap_content"
        android:layout_height="wrap_content"
        android:layout_marginTop="10dp"
        android:autoLink="phone"
        android:textColor="#0000ff"
        android:textSize="18sp" />

    <TextView
        android:id="@+id/tv_email"
        android:layout_width="wrap_content"
        android:layout_height="wrap_content"
        android:layout_marginTop="10dp"
        android:autoLink="email"
        android:textColor="#0000ff"
        android:textSize="18sp" />

    <TextView
        android:id="@+id/tv_home_page"
        android:layout_width="wrap_content"
        android:layout_height="wrap_content"
        android:layout_marginTop="10dp"
        android:autoLink="web"
        android:textColor="#0000ff"
        android:textSize="18sp" />

    <TextView
        android:id="@+id/tv_memo"
        android:layout_width="wrap_content"
        android:layout_height="wrap_content"
        android:layout_marginTop="10dp"
        android:textColor="#0000ff"
        android:textSize="18sp" />
</LinearLayout>
- 查看预览效果
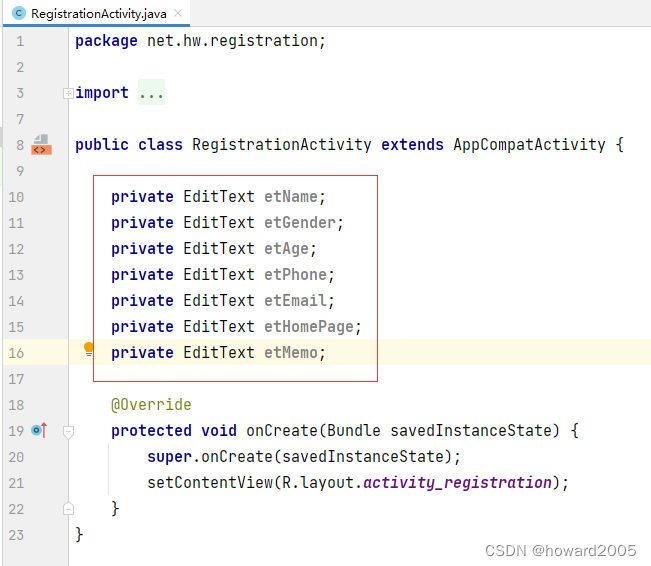
8、用户注册界面类实现功能
- 用户注册界面类 -
RegistrationActivity
- 声明变量
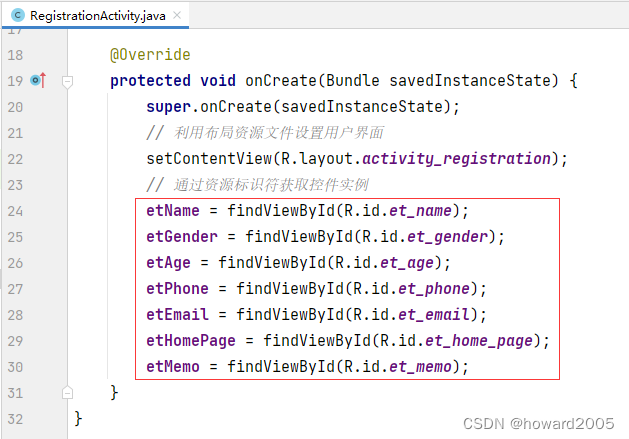
- 通过资源标识符获取控件实例
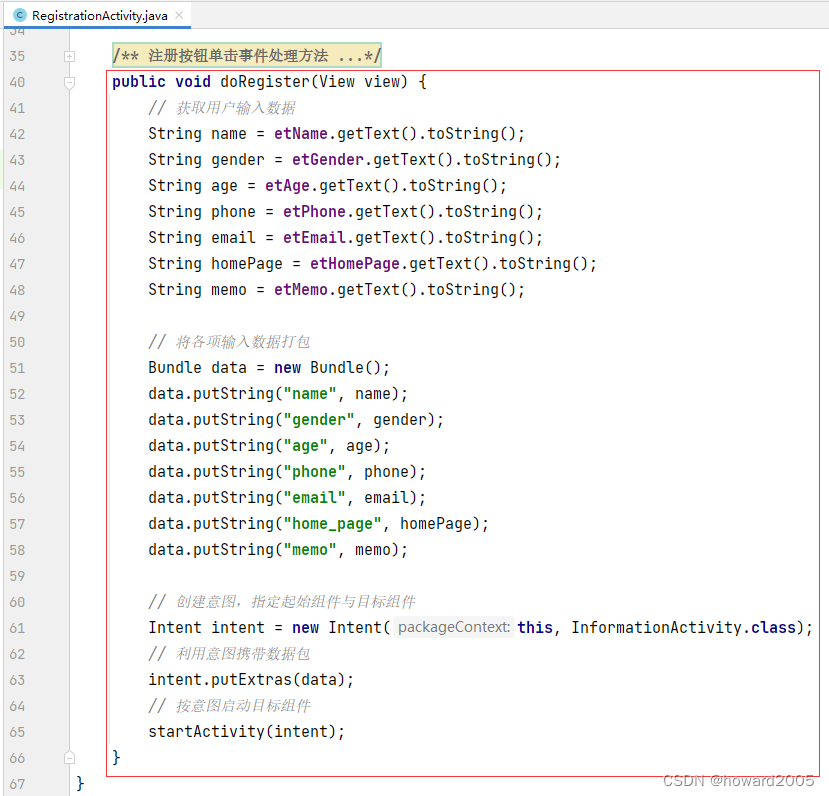
- 编写注册按钮单击事件处理方法
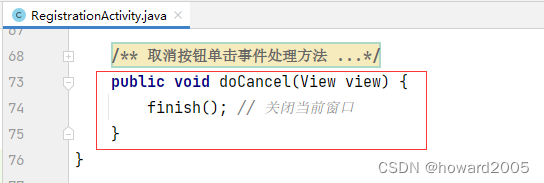
- 编写取消按钮单击事件处理方法
- 查看完整代码
package net.hw.registration;
import androidx.appcompat.app.AppCompatActivity;
import android.content.Intent;
import android.os.Bundle;
import android.view.View;
import android.widget.EditText;
public class RegistrationActivity extends AppCompatActivity {
private EditText etName;
private EditText etGender;
private EditText etAge;
private EditText etPhone;
private EditText etEmail;
private EditText etHomePage;
private EditText etMemo;
@Override
protected void onCreate(Bundle savedInstanceState) {
super.onCreate(savedInstanceState);
setContentView(R.layout.activity_registration);
etName = findViewById(R.id.et_name);
etGender = findViewById(R.id.et_gender);
etAge = findViewById(R.id.et_age);
etPhone = findViewById(R.id.et_phone);
etEmail = findViewById(R.id.et_email);
etHomePage = findViewById(R.id.et_home_page);
etMemo = findViewById(R.id.et_memo);
}
public void doRegister(View view) {
String name = etName.getText().toString();
String gender = etGender.getText().toString();
String age = etAge.getText().toString();
String phone = etPhone.getText().toString();
String email = etEmail.getText().toString();
String homePage = etHomePage.getText().toString();
String memo = etMemo.getText().toString();
Bundle data = new Bundle();
data.putString("name", name);
data.putString("gender", gender);
data.putString("age", age);
data.putString("phone", phone);
data.putString("email", email);
data.putString("home_page", homePage);
data.putString("memo", memo);
Intent intent = new Intent(this, InformationActivity.class);
intent.putExtras(data);
startActivity(intent);
}
public void doCancel(View view) {
finish();
}
}
9、注册信息界面类实现功能
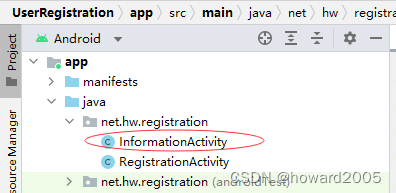
- 注册信息显示界面 -
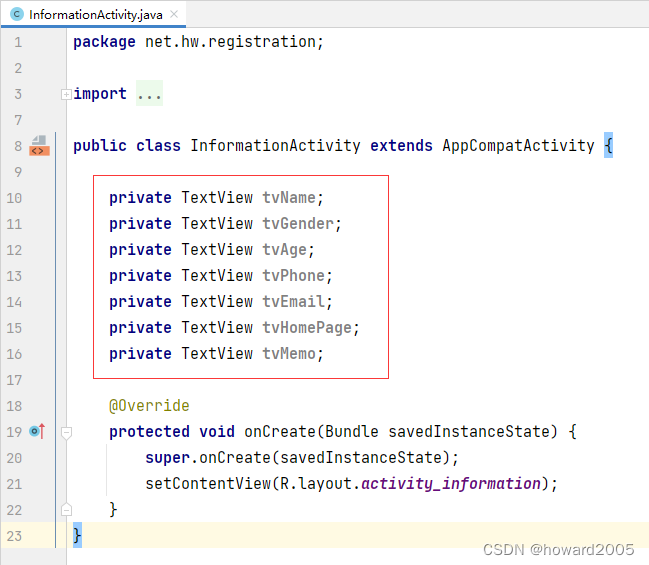
InformationActivity
- 声明变量
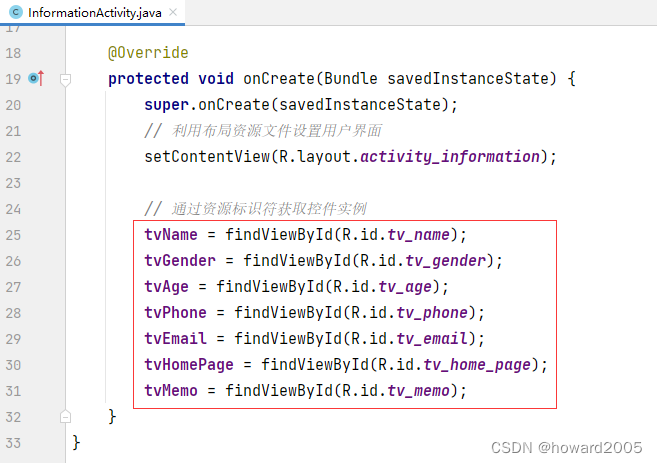
- 通过资源标识符获取控件实例
- 获取意图及其携带数据,用来设置标签内容
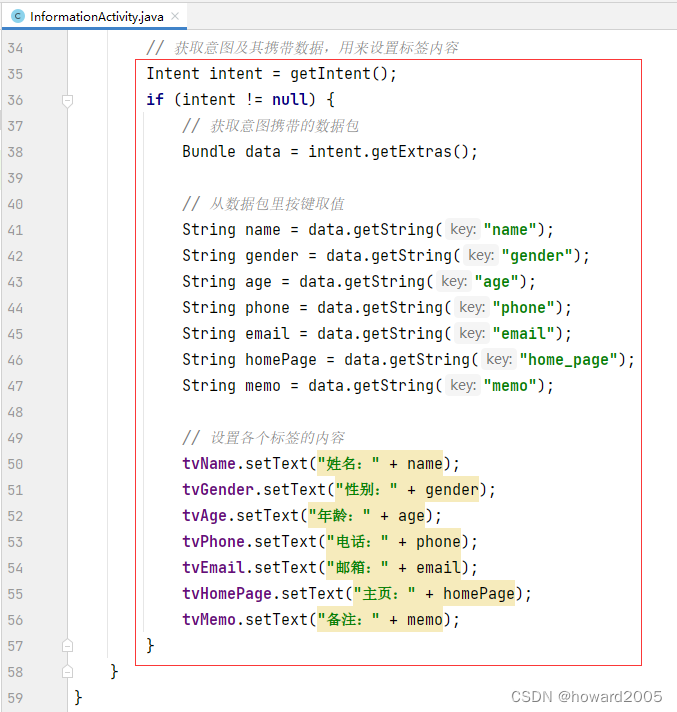
- 查看完整代码
package net.hw.registration;
import androidx.appcompat.app.AppCompatActivity;
import android.content.Intent;
import android.os.Bundle;
import android.widget.TextView;
public class InformationActivity extends AppCompatActivity {
private TextView tvName;
private TextView tvGender;
private TextView tvAge;
private TextView tvPhone;
private TextView tvEmail;
private TextView tvHomePage;
private TextView tvMemo;
@Override
protected void onCreate(Bundle savedInstanceState) {
super.onCreate(savedInstanceState);
setContentView(R.layout.activity_information);
tvName = findViewById(R.id.tv_name);
tvGender = findViewById(R.id.tv_gender);
tvAge = findViewById(R.id.tv_age);
tvPhone = findViewById(R.id.tv_phone);
tvEmail = findViewById(R.id.tv_email);
tvHomePage = findViewById(R.id.tv_home_page);
tvMemo = findViewById(R.id.tv_memo);
Intent intent = getIntent();
if (intent != null) {
Bundle data = intent.getExtras();
String name = data.getString("name");
String gender = data.getString("gender");
String age = data.getString("age");
String phone = data.getString("phone");
String email = data.getString("email");
String homePage = data.getString("home_page");
String memo = data.getString("memo");
tvName.setText("姓名:" + name);
tvGender.setText("性别:" + gender);
tvAge.setText("年龄:" + age);
tvPhone.setText("电话:" + phone);
tvEmail.setText("邮箱:" + email);
tvHomePage.setText("主页:" + homePage);
tvMemo.setText("备注:" + memo);
}
}
}
10、启动应用,查看效果
- 在注册界面输入数据
- 单击【注册】按钮,跳转到信息界面
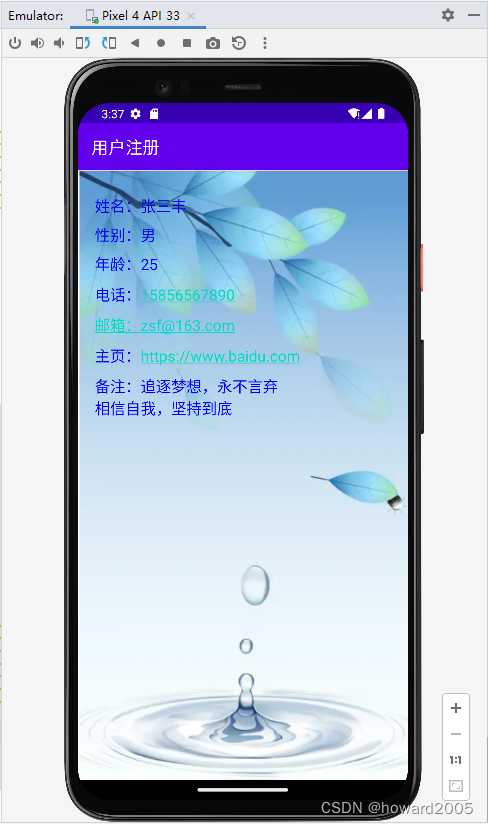
- 当然可以测试电话、邮箱和主页链接
三、归纳总结
- 回顾本节课所讲的内容,并通过提问的方式引导学生解答问题并给予指导。
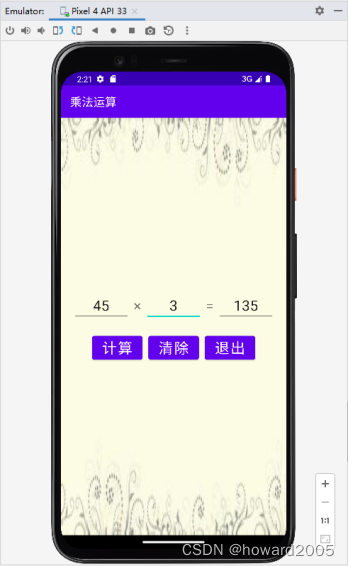
四、上机操作
- 形式:单独完成
- 题目:编写乘法运算程序
- 要求:输入被乘数与乘数,单击【计算】按钮,显示结果。单击【清除】按钮,清空三个编辑框。单击【退出】按钮,退出应用程序。


![[附源码]计算机毕业设计JAVAjsp宠物店管理系统](https://img-blog.csdnimg.cn/05c3c66aaca14031bb84bf237a8aa2f1.png)
![Mybatis-Plus知识点[MyBatis+MyBatis-Plus的基础运用]](https://img-blog.csdnimg.cn/bd4fe645a435422b8fd6b4cd9969466f.png)