vue通知提醒消息

news2025/7/10 10:58:25

目录

前言

一、Notification

二、Notification引用

           1.全局引用

           2.单独引用

三、参数说明

四、简单案例 

五、项目实战

1、定义全局Notification。

2、Websocket实时接收通知。

3、消息通知


前言

最近有个项目需求就是在客户端的右上角要实时展示提醒消息,下面来看下简单的实现步骤


一、Notification

这是基于悬浮出现在页面角落,显示全局的通知提醒消息。这个elmennt-ui组件可以实现我们上面的功能。

二、Notification引用

1.全局引用

element 为 Vue.prototype 添加了全局方法 $notify。因此在 vue instance 中可以采用本页面中的方式调用 Notification。

2.单独引用

import { Notification } from 'element-ui';

此时调用方法为 Notification(options)。我们也为每个 type 定义了各自的方法,如 Notification.success(options)。并且可以调用 Notification.closeAll() 手动关闭所有实例。
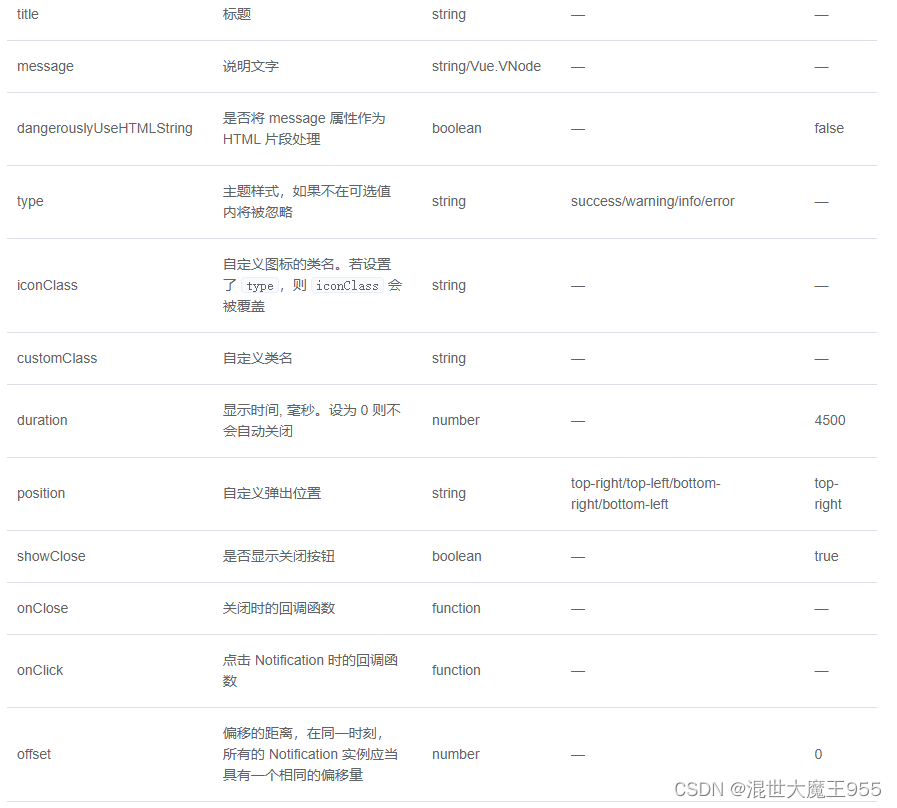
三、参数说明


四、简单案例 

右上角就会弹出我们写的html代码段是不是特别简单

<template>
  <el-button
    plain
    @click="open">
    使用 HTML 片段
  </el-button>
</template>

<script>
  export default {
    methods: {
      open() {
        this.$notify({
          title: 'HTML 片段',
          dangerouslyUseHTMLString: true,
          message: '<strong>这是 <i>HTML</i> 片段</strong>'
        });
      }
    }
  }
</script>

五、项目实战

这里大概说一下我的流程,我这里需要建立Websocket连接,服务器实时推送信息给客户端在右上角展示,这里需要用到Websocket以及本章学的通知。Websocket在前一章有讲。案例仅供参考。

1、定义全局Notification。

/* 全局Notification */
	Vue.prototype.$baseNotify = (message, title, type, position) => {
		Notification({
			title: title,
			message: message,
			position: position || 'top-right',
			type: type || 'success',
			duration: messageDuration,
		})
	}

2、Websocket实时接收通知。

initWebSocket() {
        const token = getAccessToken()

        const wsurl = `${this.troubelUrl}?code=trouble&token=${token}`
        this.twebsock = new WebSocket(wsurl)
        this.twebsock.onmessage = this.websocketonmessage
        this.twebsock.onopen = this.websocketonopen
        this.twebsock.onerror = this.websocketonerror
        this.twebsock.onclose = this.websocketclose
      },
      websocketonopen() {
        //webscoket定时心跳
        this.troubleTimer = setInterval(() => {
          let pageUrl = window.location.hash
          if (pageUrl !== '' && pageUrl !== '#/login') {
            this.websocketsend('heartbeat')
          }
        }, 50000)
        console.log('数据发送...')
      },
      websocketonerror(e) {
        //连接建立失败重连
        setTimeout(() => {
          this.initWebSocket()
        }, 10000)
        console.log('故障连接出错~')
      },
      websocketonmessage(evt) {
        var monitorData = evt.data
        monitorData = JSON.parse(monitorData)
        this.switchOther(this.troublePush, monitorData)
      },
      //根据数据判断进行弹框(紧急呼叫,长时间关人)
      switchOther(switchValue, monitorData) {
        if (switchValue === true || switchValue === 'true') {
            this.handleOpen(monitorData)
        }
      },
      websocketsend(data) {
        this.twebsock.send(data)
      },
      websocketclose(e) {
        if (this.twebsock == null) {
          return
        }
        this.twebsock.close()
        this.twebsock = null
        clearInterval(this.troubleTimer)
        console.log('故障推送关闭~')
      },

3、消息通知

      //monitorItem取的前面Websocket返回回来的值
      handleOpen(monitorItem) {
        this.openDialogflase = true
        const h = this.$createElement
        let notify = this.$notify({
          title: monitorItem.troubleType,
          message: h('p', null, [
            h(
              'span',
              {
                style: {
                  display: 'inline-block',
                  margin: '0 0 10px 0',
                },
              },
              `${monitorItem.projectName}-${monitorItem.useCode}`
            ),
            h(
              'p',
              {
                style: {
                  display: 'flex',
                  alignItems: 'center',
                  justifyContent: 'space-between',
                  margin: '0 0 5px 0',
                },
              },
              [
                h('span', null, monitorItem.duration),
                h(
                  'span',
                  {
                    style: {
                      color: '#efefef',
                    },
                  },
                  monitorItem.fromType
                ),
              ]
            ),
            h('p', null, monitorItem.address),
            h(
              'button',
              {
                style: {
                  padding: '5px 20px',
                  fontSize: '14px',
                  borderRadius: '4px',
                  color: '#fff',
                  background: '#ff575a',
                  border: 'none',
                  margin: '10px 10px 0 0',
                  display: 'inline-block',
                },
                on: {
                  click: this.clickBtn.bind(this, monitorItem),
                },
              },
              '查看详情'
            ),
            h(
              'button',
              {
                style: {
                  padding: '5px 20px',
                  fontSize: '14px',
                  borderRadius: '4px',
                  color: '#fff',
                  background: '#ff575a',
                  border: 'none',
                  margin: '10px 10px 0 0',
                  display: 'inline-block',
                },
                on: {
                  click: this.handleShi.bind(this, monitorItem),
                },
              },
              '双向视频'
            ),
            h(
              'button',
              {
                style: {
                  padding: '5px 20px',
                  fontSize: '14px',
                  borderRadius: '4px',
                  color: '#fff',
                  background: '#ff575a',
                  border: 'none',
                  margin: '10px 0 0 0',
                  display: 'inline-block',
                },
                on: {
                  click: this.handleQuXiao.bind(this, monitorItem),
                },
              },
              '取消'
            ),
          ]),
          duration: 0,
          showClose: false,
        })

        //将通知实例放入       
 this.notifications[monitorItem.orderKey] = notify
        this.handleAudio()
      },
 //关闭当前故障弹框
      handleQuXiao(monitorItem) {
        this.openDialogflase = false
        this.notifications[monitorItem.orderKey].close()
        delete this.notifications[monitorItem.orderKey]
      },
      //关闭所有弹窗
      closeAll() {
        let vue = this
        for (let key in vue.notifications) {
          vue.notifications[key].close()
          delete vue.notifications[key]
        }
      },

本文来自互联网用户投稿,该文观点仅代表作者本人,不代表本站立场。本站仅提供信息存储空间服务,不拥有所有权,不承担相关法律责任。如若转载,请注明出处:http://www.coloradmin.cn/o/406700.html

如若内容造成侵权/违法违规/事实不符,请联系多彩编程网进行投诉反馈,一经查实,立即删除!

相关文章

vue3使用tinymce

1、安装相关依赖 npm install tinymce -S npm install tinymce/tinymce-vue -S2、下载中文包 地址 https://www.tiny.cloud/get-tiny/language-packages/ 3. 引入皮肤和汉化包 在项目public文件夹下新建tinymce文件夹&#xff0c; 将下载的汉化包解压到此文件夹 然后在node…

js延迟加载的六种方式

1. defer 属性 HTML 4.01 为<script>标签定义了defer属性。标签定义了defer属性元素中设置defer属性&#xff0c;等于告诉浏览器立即下载&#xff0c;但延迟执行标签定义了defer属性。 用途&#xff1a;表明脚本在执行时不会影响页面的构造。也就是说&#xff0c;脚本会…

论文阅读笔记《Nctr: Neighborhood Consensus Transformer for Feature Matching》

核心思想 本文提出一种融合邻域一致性的Transfomer结构来实现特征点的匹配&#xff08;NCTR&#xff09;。整个的实现流程和思想与SuperGlue相似&#xff0c;改进点在于考虑到了邻域一致性。邻域一致性在许多的传统图像匹配和图匹配任务中都有应用&#xff0c;他基于一个很重要…

【VUE前进之路】使用数据代理,计算属性与监视属性的妙用

1.数据代理 1.1什么是数据代理 通过一个对象代理对另一个对象中属性的操作&#xff08;读/写&#xff09; 1.Vue中的数据代理&#xff1a;通过vm对象来代理data对象中属性的操作&#xff08;读/写&#xff09; 2.Vue中数据代理的好处:更加方便的操作data中的数据 3.基本原理:…

ESLint 配置入门

大家好&#xff0c;我是前端西瓜哥&#xff0c;今天带大家了解 ESLint 的配置项。 ESLint 是一款检查 JavaScript 程序是否符合特定的规则的工具。比如字符串用单引号还是双引号&#xff0c;tab 缩进用 2 个空格还是 4 个空格还是其他&#xff0c;这些都可以用 ESLint 来规定。…

微信小程序---分包操作

有时候我们的小程序太大&#xff0c;首次打开小程序的时候回比较慢&#xff0c;这个时候我们可以试试分包操作。分包可以让用户在操作小程序的时候按需下载资源&#xff08;用户在进入某些页面的时候才去下载相应的资源&#xff0c;可以加快小程序的速度&#xff0c;优化用户体…

前端学习笔记(15)-Vue3状态管理store及Vuex的使用

1.状态管理 2.用响应式API做简单状态管理 3.Vuex基础 4.Vuex 核心概念 5. VuexsessionStorage实现数据存储1.状态管理理论上来说&#xff0c;每一个 Vue 组件实例都已经在“管理”它自己的响应式状态了。我们以一个简单的计数器组件为例&#xff1a;<script setup> impor…

最新小程序反编译详细教程,亲测可用

小程序因为触手可及、自带推广等的特点&#xff0c;自诞生以来&#xff0c;实现了很多的商业场景&#xff0c;同时取代了App的大部分市场份额。其实小程序的开发和网页开发类似&#xff0c;同样使用的是JavaScript开发的&#xff0c;属于前端&#xff0c;所以借助一些程序的帮助…

html+css唯美登录页面,代码提供(效果展示)

文章目录效果图所有代码效果图 所有代码 <!DOCTYPE html> <html lang"en"> <head><meta charset"UTF-8"><meta http-equiv"X-UA-Compatible" content"IEedge"><meta name"viewport" cont…

vue脚手架报错:“Component name “***“ should always be multi-word”解决方法

出现的问题 在我们写完脚手架运行 npm run serve 后控制台报错 页面报错 报错的原因 在为自定义组件命名的时候未按照官方代码规范进行命名&#xff0c;根据 ESLint 官方代码风格指南&#xff0c;除了根组件&#xff08;App.vue&#xff09;以外&#xff0c;其他自定义组件命名…

若依框架登录后跳转其他页面获取不同的菜单登录进入后跳转至动态路由的第一个路由

最近碰到的需求是登录进入后,先跳转至一个自己定义的页面,在这个页面选择一个系统后,进入若依的系统,根据选择的系统获取相应的菜单,进入页面后默认跳转至后端返回的动态路由的第一个路由 1.首先在登录页面login.vue做如下改动 写成你要跳转过去的页面:(这个路由如果是自己定…

蓝桥杯冲击-02约数篇(必考)

文章目录 前言 一、约数是什么 二、三大模板 1、试除法求约数个数 2、求约数个数 3、求约数之和 三、真题演练 前言 约数和质数一样在蓝桥杯考试中是在数论中考察频率较高的一种&#xff0c;在省赛考察的时候往往就是模板题&#xff0c;难度大一点会结合其他知识点考察&#x…

安装element ui

安装element ui记录 步骤 1.先在dev控制台输入npm i element-ui --save 2.出现警告 F:\vue_test\src> npm i element-ui --save npm WARN deprecated core-js2.6.12: core-js<3.23.3 is no longer maintained and not recommended for usage due to the number of is…

Vue项目实战——实现一个任务清单(学以致用,两小时带你巩固和强化Vue知识点)

Vue2.x 项目实战&#xff08;一&#xff09; 内容参考链接Vue2.x全家桶Vue2.x 全家桶参考链接Vue2.x项目&#xff08;一&#xff09;Vue2.x 实现一个任务清单Vue2.x项目&#xff08;二&#xff09;Vue2.x 实现GitHub搜索案例Vue3.x项目&#xff08;三&#xff09;Vue3.x 实现一…

Vue 高德地图(@amap/amap-jsapi-loader)的基本使用:添加标记、POI关键字搜索、路线规划...(方法一)

高德地图的基本事件与使用前言&#xff1a; 引入并初始化渲染地图1、初始化地图2、地图鼠标点击事件3、添加标记、 移除标记点4、搜索服务——POI关键字搜索 [AMap.PlaceSearch]5、驾车路线规划服务5.1 可拖拽驾车路线规划 [AMap.DragRoute]5.2 途经点 &#xff08;起点 终点 途…

在vue3+ts项目里使用query和params传参

一 query 传参 &#xff08;类似get请求&#xff09; query 传参方式① 传递方组件 home.vue <template><div classc><p>query传参</p><el-button type"success" click"toList"> to list</el-button> </div>…

LayUI框架的使用步骤实现登录页面

目录 一、LayUI的简介 二、下载安装 三、引入并且测试 四、自定义模块 四、利用LayUI实现一个登录页面 一、LayUI的简介 1.1 什么是LayUI&#xff1f; Layui&#xff08;谐音&#xff1a;类 UI) 是一套开源的 Web UI 解决方案&#xff1b; 由国人开发&#xff08;作者贤心…

Python人脸识别

#头文件&#xff1a;import cv2 as cvimport numpy as npimport osfrom PIL import Imageimport xlsxwriterimport psutilimport time#人脸录入def get_image_name(name):name_map {f.split(.)[1]:int(f.split(.)[0]) for f in os.listdir("./picture")}if not name…

宇宙最强-GPT-4 横空出世:最先进、更安全、更有用

文章目录前言一、准确性提升1.创造力2.视觉输入3.更长的上下文二、相比于ChatGPT有哪些提升1.GPT-4 的高级推理能力超越了 ChatGPT2.GPT-4 在多种测试考试中均优于 ChatGPT。三、研究团队在GPT-4模型都做了哪些改善1.遵循 GPT、GPT-2 和 GPT-3 的研究路径2.我们花了 6 个月的时…

2022年Web前端开发流程和学习路线(详尽版)

前言 前端侧重于人机交互和用户体验&#xff0c;后端侧重于业务逻辑和大规模数据处理。理论上&#xff0c;面向用户的产品里&#xff0c;所有问题&#xff08;包括产品、设计、后端、甚至看不见的问题&#xff09;的表现形式&#xff0c;都会暴露在前端&#xff0c;而只有部分…