face3d: Python tools for processing 3D face
git code: https://github.com/yfeng95/face3d
paper list: PaperWithCode
该方法广泛用于基于三维人脸关键点的人脸生成、属性检测(如位姿、深度、PNCC等),能够快速实现人脸建模与渲染。推荐!!!
目录
- face3d: Python tools for processing 3D face
- 一、介绍
- 1.1 目录
- 1.2 构建
- 1.2.1先决条件
- 1.3 使用
- 1.3.1 克隆
- 1.3.2 编译C++文件为.so文件,用于python;如果使用numpy版本,则忽略此步。
- 1.3.3 准备BFM数据(如果不使用3dmm可跳过此步)
- 1 下载原始的BFM模型
- 2 下载额外的BFM信息:
- 3 下载STN中的UV坐标
- 1.3.4 运行
- 1.4 运行例子
- 2 pipeline源码解读
- 2.0导入相关库文件
- 2.1 加载网格数据(mesh data)
- 2.2 修改顶点(vertices)
- 2.3 修改颜色/纹理(添加光照)
- 2.4 修改顶点(映射,改变相机位置)
- 2.5 转化为2D图像
- 总结
相机坐标下的人脸变换
光照渲染
3DMM模型
提示:对于初学者来说,作者强烈建议按照这个顺序来运行样例,然后再看mesh_numpy中的代码和读每个文件中的注释。
一、介绍
这里尝试去实现有关三维人脸的一些基础功能,如处理网格数据mesh data、基于morphable model的人脸生成,基于单张人脸图片及其关键点的三维人脸重构,带有不同光照效果的人脸渲染等操作。
该工程大部分代码基于python,但有些功能如rasterization使用C++实现循环渲染会快很多,并使用Cython编译供python环境使用,该工具轻量而运行快。
1.1 目录
三维网络数据,是最流行的三维人脸表征方法;3DMM模型广泛用于产生和重构三维人脸。
# Since triangle mesh is the most popular representation of 3D face,
# the main part is mesh processing.
mesh/             # written in python and c++
|  cython/               # c++ files, use cython to compile
|  io.py                 # read & write obj
|  vis.py                # plot mesh
|  transform.py          # transform mesh & estimate matrix
|  light.py              # add light & estimate light(to do)
|  render.py             # obj to image using rasterization render

mesh_numpy/      # the same with mesh/, with each part written in numpy
                 # slow but easy to learn and modify

# 3DMM is one of the most popular methods to generate & reconstruct 3D face.
morphable_model/
|  morphable_model.py    # morphable model class: generate & fit
|  fit.py                # estimate shape&expression parameters. 3dmm fitting.
|  load.py               # load 3dmm data
1.2 构建
1.2.1先决条件
Python 2 or Python 3
Python packages:
	numpy
	skimage (for reading&writing image)
	scipy (for loading mat)
	matplotlib (for show)
	Cython (for compiling c++ file)

%可参考pip3命令行下载国内源:
pip3 install numpy -i  https://pypi.tuna.tsinghua.edu.cn/simple
pip3 install scikit-image -i  https://pypi.tuna.tsinghua.edu.cn/simple
pip3 install scipy -i  https://pypi.tuna.tsinghua.edu.cn/simple
pip3 install matplotlib -i  https://pypi.tuna.tsinghua.edu.cn/simple
pip3 install Cython -i  https://pypi.tuna.tsinghua.edu.cn/simple
1.3 使用
1.3.1 克隆
git clone https://github.com/YadiraF/face3d
cd face3d
1.3.2 编译C++文件为.so文件,用于python;如果使用numpy版本,则忽略此步。
cd face3d/mesh/cython
python setup.py build_ext -i
1.3.3 准备BFM数据(如果不使用3dmm可跳过此步)
1 下载原始的BFM模型
链接:https://faces.dmi.unibas.ch/bfm/main.php?nav=1-2&id=downloads
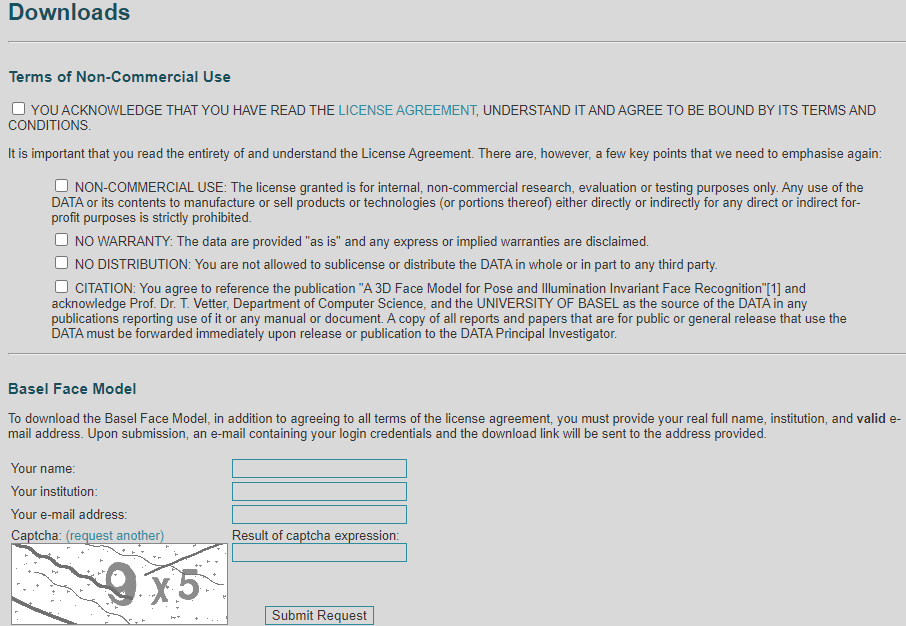
将所有框都勾上,填写对应的信息后会收到一个下载link,将下载后的文件拷贝:
copy 01_MorphabelModel.mat to raw/
2 下载额外的BFM信息:
链接:3DFFA
下载【face profiling】和【3DFFA】
链接:HPEN
下载HPEN
将下载好的三个压缩包解压,分别在里面找到如下文件:
model_info.mat Model_Expression.mat Model_face_contour_trimed.mat Model_tri_mouth.mat Modelplus_nose_hole.mat Modelplus_parallel.mat vertex_code.mat
然后在face3d/examples/Data/BFM目录下新建一个文件夹3ddfa,将上述文件拷贝进去。
3DDFA(Face Alignment Across Large Poses: A 3D Solution) HFPE(High-Fidelity Pose and Expression Normalization for Face Recognition in the Wild)
3 下载STN中的UV坐标
链接:BFM_UV
点击download下载后解压,在face3d/examples/Data/BFM目录下新建一个文件夹stn,再将BFM_UV.mat复制到stn/
1.3.4 运行
在BFM目录下创建Out文件夹
运行Matlab中的generate.m,产生的文件将会保存在 Out/
提示:一些空文件夹可能需要通过mkdir创建
1.4 运行例子
examples使用cython版本,如果使用numpy,将mesh替换为mesh_numpy即可
cd examples
python 1_pipeline.py
如果得到如下输出,并且在pipeline下有生产的照片说明运行成功

2 pipeline源码解读
提示:为了方便理解,源码解读可能会使用numpy版本;而示例使用的是cython版本。
Pipeline:将3D目标转化为2D图像
2.0导入相关库文件
''' Simple example of pipeline
3D obj(process) --> 2d image
'''
import os, sys
import numpy as np
import scipy.io as sio
from skimage import io
from time import time
import matplotlib.pyplot as plt

sys.path.append('..')
import face3d
from face3d import mesh
2.1 加载网格数据(mesh data)
网格数据包含:顶点,三角网格数据,颜色(可选),纹理(可选)。这里使用颜色来表征人脸面部的纹理
# ------------------------------ 1. load mesh data
# -- mesh data consists of: vertices, triangles, color(optinal), texture(optional)
# -- here use colors to represent the texture of face surface
C = sio.loadmat('Data/example1.mat')
vertices = C['vertices']; colors = C['colors']; triangles = C['triangles']
colors = colors/np.max(colors)
这里示例的网格数据来自.mat文件,分别获取其中的vertices、color和triangles数据,并将颜色归一化。

2.2 修改顶点(vertices)
改变网格对象在世界坐标系中的位置。三维物体的变换方式有:缩放(scale)、旋转、平移等操作。这里在y通道上设置scale尺度为180,旋转30°,原地平移。
# ------------------------------ 2. modify vertices(transformation. change position of obj)
# -- change the position of mesh object in world space
# scale. target size=180 for example
s = 180/(np.max(vertices[:,1]) - np.min(vertices[:,1]))
# rotate 30 degree for example
R = mesh.transform.angle2matrix([0, 30, 0])
# no translation. center of obj:[0,0]
t = [0, 0, 0]
transformed_vertices = mesh.transform.similarity_transform(vertices, s, R, t)
其中,angle2matrix的源码如下:
def angle2matrix(angles):
    ''' get rotation matrix from three rotation angles(degree). right-handed.
    Args:
        angles: [3,]. x, y, z angles
        x: pitch. positive for looking down.
        y: yaw. positive for looking left.
        z: roll. positive for tilting head right.
    Returns:
        R: [3, 3]. rotation matrix.
    '''
    x, y, z = np.deg2rad(angles[0]), np.deg2rad(angles[1]), np.deg2rad(angles[2])
    # x
    Rx=np.array([[1,      0,       0],
                 [0, cos(x),  -sin(x)],
                 [0, sin(x),   cos(x)]])
    # y
    Ry=np.array([[ cos(y), 0, sin(y)],
                 [      0, 1,      0],
                 [-sin(y), 0, cos(y)]])
    # z
    Rz=np.array([[cos(z), -sin(z), 0],
                 [sin(z),  cos(z), 0],
                 [     0,       0, 1]])

    R=Rz.dot(Ry.dot(Rx))
    return R.astype(np.float32)
其作用是根据输入的角度生产旋转矩阵。
x:pitch 倾斜。正,向下看。
y: yaw 偏转。正,向左看。
z: roll 滚动。正,表示向右倾斜头部。
similarity_transform 的源码如下:
def similarity_transform(vertices, s, R, t3d):
    ''' similarity transform. dof = 7.
    3D: s*R.dot(X) + t
    Homo: M = [[sR, t],[0^T, 1]].  M.dot(X)
    Args:(float32)
        vertices: [nver, 3].
        s: [1,]. scale factor.
        R: [3,3]. rotation matrix.
        t3d: [3,]. 3d translation vector.
    Returns:
        transformed vertices: [nver, 3]
    '''
    t3d = np.squeeze(np.array(t3d, dtype = np.float32))
    transformed_vertices = s * vertices.dot(R.T) + t3d[np.newaxis, :]

    return transformed_vertices
输入三维顶点、缩放因子s、旋转角R和平移向量t3d,即可得到变换后的新坐标
2.3 修改颜色/纹理(添加光照)
添加点光源。光源位置在世界坐标系中定义
# ------------------------------ 3. modify colors/texture(add light)
# -- add point lights. light positions are defined in world space
# set lights
light_positions = np.array([[-128, -128, 300]])
light_intensities = np.array([[1, 1, 1]])
lit_colors = mesh.light.add_light(transformed_vertices, triangles, colors, light_positions, light_intensities)
其中,mesh.light.add_light定义如下
def add_light(vertices, triangles, colors, light_positions = 0, light_intensities = 0):
    ''' Gouraud shading. add point lights.
    In 3d face, usually assume:
    1. The surface of face is Lambertian(reflect only the low frequencies of lighting)
    2. Lighting can be an arbitrary combination of point sources
    3. No specular (unless skin is oil, 23333)

    Ref: https://cs184.eecs.berkeley.edu/lecture/pipeline
    Args:
        vertices: [nver, 3]
        triangles: [ntri, 3]
        light_positions: [nlight, 3]
        light_intensities: [nlight, 3]
    Returns:
        lit_colors: [nver, 3]
    '''
    nver = vertices.shape[0]
    normals = get_normal(vertices, triangles) # [nver, 3]

    # ambient
    # La = ka*Ia

    # diffuse
    # Ld = kd*(I/r^2)max(0, nxl)
    direction_to_lights = vertices[np.newaxis, :, :] - light_positions[:, np.newaxis, :] # [nlight, nver, 3]
    direction_to_lights_n = np.sqrt(np.sum(direction_to_lights**2, axis = 2)) # [nlight, nver]
    direction_to_lights = direction_to_lights/direction_to_lights_n[:, :, np.newaxis]
    normals_dot_lights = normals[np.newaxis, :, :]*direction_to_lights # [nlight, nver, 3]
    normals_dot_lights = np.sum(normals_dot_lights, axis = 2) # [nlight, nver]
    diffuse_output = colors[np.newaxis, :, :]*normals_dot_lights[:, :, np.newaxis]*light_intensities[:, np.newaxis, :]
    diffuse_output = np.sum(diffuse_output, axis = 0) # [nver, 3]

    # specular
    # h = (v + l)/(|v + l|) bisector
    # Ls = ks*(I/r^2)max(0, nxh)^p
    # increasing p narrows the reflectionlob

    lit_colors = diffuse_output # only diffuse part here.
    lit_colors = np.minimum(np.maximum(lit_colors, 0), 1)
    return lit_colors
Gouraud 着色法:是用于网格中插值的着色方法,可实现边缘的连续变化。在三维人脸中,通常由以下假设:
1、人脸表面是Lambertian,即朗博表面,只会反射低频的光
2、光照可以是点光源的任意组合。
3、无镜面反射。
这些参考了https://cs184.eecs.berkeley.edu/lecture/pipeline。但是这个网站好像挂掉了
get_normal函数在源码中另有定义,这里不再赘述。
输入的参数有:顶点坐标、三角网格数据、光源位置、光线强度。经过运算后输出加入点光源后的颜色数据。这里,如果没有相关知识,默认拿来使用即可。
2.4 修改顶点(映射,改变相机位置)
将对象从世界坐标系转换为相机坐标系,即观察者角度。如果使用标准相机,可忽略。
# ------------------------------ 4. modify vertices(projection. change position of camera)
# -- transform object from world space to camera space(what the world is in the eye of observer).
# -- omit if using standard camera
camera_vertices = mesh.transform.lookat_camera(transformed_vertices, eye = [0, 0, 200], at = np.array([0, 0, 0]), up = None)
# -- project object from 3d world space into 2d image plane. orthographic or perspective projection
projected_vertices = mesh.transform.orthographic_project(camera_vertices)
其中,相机坐标系lookat_camera的定义如下:
def normalize(x):
    epsilon = 1e-12
    norm = np.sqrt(np.sum(x**2, axis = 0))
    norm = np.maximum(norm, epsilon)
    return x/norm
def lookat_camera(vertices, eye, at = None, up = None):
    """ 'look at' transformation: from world space to camera space
    standard camera space:
        camera located at the origin.
        looking down negative z-axis.
        vertical vector is y-axis.
    Xcam = R(X - C)
    Homo: [[R, -RC], [0, 1]]
    Args:
      vertices: [nver, 3]
      eye: [3,] the XYZ world space position of the camera.5
      at: [3,] a position along the center of the camera's gaze.
      up: [3,] up direction
    Returns:
      transformed_vertices: [nver, 3]
    """
    if at is None:
      at = np.array([0, 0, 0], np.float32)
    if up is None:
      up = np.array([0, 1, 0], np.float32)

    eye = np.array(eye).astype(np.float32)
    at = np.array(at).astype(np.float32)
    z_aixs = -normalize(at - eye) # look forward
    x_aixs = normalize(np.cross(up, z_aixs)) # look right
    y_axis = np.cross(z_aixs, x_aixs) # look up

    R = np.stack((x_aixs, y_axis, z_aixs))#, axis = 0) # 3 x 3
    transformed_vertices = vertices - eye # translation
    transformed_vertices = transformed_vertices.dot(R.T) # rotation
    return transformed_vertices
标准相机空间设定为:相机在原点;向下看,是负Z轴;垂直向量为Y轴。
输入参数为:顶点,摄像机在世界坐标系的位置,沿着相机视线中心的位置(默认为[0,0,0]),向上方向(默认为(0,1,0))
根据输入,计算出旋转矩R,并通过Xcam=R(X-C)计算出新顶点的位置。
2.5 转化为2D图像
设置图像宽高为256
# ------------------------------ 5. render(to 2d image)
# set h, w of rendering
h = w = 256
# change to image coords for rendering
image_vertices = mesh.transform.to_image(projected_vertices, h, w)
# render
rendering =  mesh.render.render_colors(image_vertices, triangles, lit_colors, h, w)
mesh.transform.to_image部分的源码如下:
def to_image(vertices, h, w, is_perspective = False):
    ''' change vertices to image coord system
    3d system: XYZ, center(0, 0, 0)
    2d image: x(u), y(v). center(w/2, h/2), flip y-axis.
    Args:
        vertices: [nver, 3]
        h: height of the rendering
        w : width of the rendering
    Returns:
        projected_vertices: [nver, 3]
    '''
    image_vertices = vertices.copy()
    if is_perspective:
        # if perspective, the projected vertices are normalized to [-1, 1]. so change it to image size first.
        image_vertices[:,0] = image_vertices[:,0]*w/2
        image_vertices[:,1] = image_vertices[:,1]*h/2
    # move to center of image
    image_vertices[:,0] = image_vertices[:,0] + w/2
    image_vertices[:,1] = image_vertices[:,1] + h/2
    # flip vertices along y-axis.
    image_vertices[:,1] = h - image_vertices[:,1] - 1
    return image_vertices
输入参数为:顶点坐标、图像宽高、透视选项(默认为Fals),通过计算得到二维顶点坐标。
mesh.render.render_colors的源码如下:(此为numpy版本)
def render_colors(vertices, triangles, colors, h, w, c = 3):
    ''' render mesh with colors
    Args:
        vertices: [nver, 3]
        triangles: [ntri, 3]
        colors: [nver, 3]
        h: height
        w: width
    Returns:
        image: [h, w, c].
    '''
    assert vertices.shape[0] == colors.shape[0]
    # initial
    image = np.zeros((h, w, c))
    depth_buffer = np.zeros([h, w]) - 999999.

    for i in range(triangles.shape[0]):
        tri = triangles[i, :] # 3 vertex indices
        # the inner bounding box
        umin = max(int(np.ceil(np.min(vertices[tri, 0]))), 0)
        umax = min(int(np.floor(np.max(vertices[tri, 0]))), w-1)
        vmin = max(int(np.ceil(np.min(vertices[tri, 1]))), 0)
        vmax = min(int(np.floor(np.max(vertices[tri, 1]))), h-1)

        if umax<umin or vmax<vmin:
            continue

        for u in range(umin, umax+1):
            for v in range(vmin, vmax+1):
                if not isPointInTri([u,v], vertices[tri, :2]):
                    continue
                w0, w1, w2 = get_point_weight([u, v], vertices[tri, :2])
                point_depth = w0*vertices[tri[0], 2] + w1*vertices[tri[1], 2] + w2*vertices[tri[2], 2]

                if point_depth > depth_buffer[v, u]:
                    depth_buffer[v, u] = point_depth
                    image[v, u, :] = w0*colors[tri[0], :] + w1*colors[tri[1], :] + w2*colors[tri[2], :]
    return image
输入为顶点坐标、三角网格数据、网格颜色数据以及目标图片的长宽。
输出为目标的带纹理的二维图像数据。
# ---- show rendering
# plt.imshow(rendering)
# plt.show()
save_folder = 'results/pipeline'
if not os.path.exists(save_folder):
os.mkdir(save_folder)
io.imsave('{}/rendering.jpg'.format(save_folder), rendering)
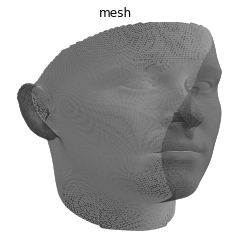
# ---- show mesh
# mesh.vis.plot_mesh(camera_vertices, triangles)
# plt.show()
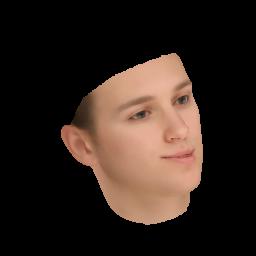
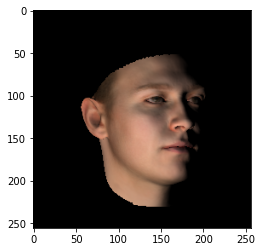
这里展示二维图片效果:
也可展示出相加空间下的模型:
总结
这里主要介绍如何重现效果,以及解读如何从3D人脸数据转换为二维人脸数据的代码。那么,三维数据又包含哪些信息呢?如何实现不同的三维人脸生成呢?继续系列二。