文章目录
- 23-商品详情-评价组件-图片预览
- 24-商品详情-评价组件-★分页组件
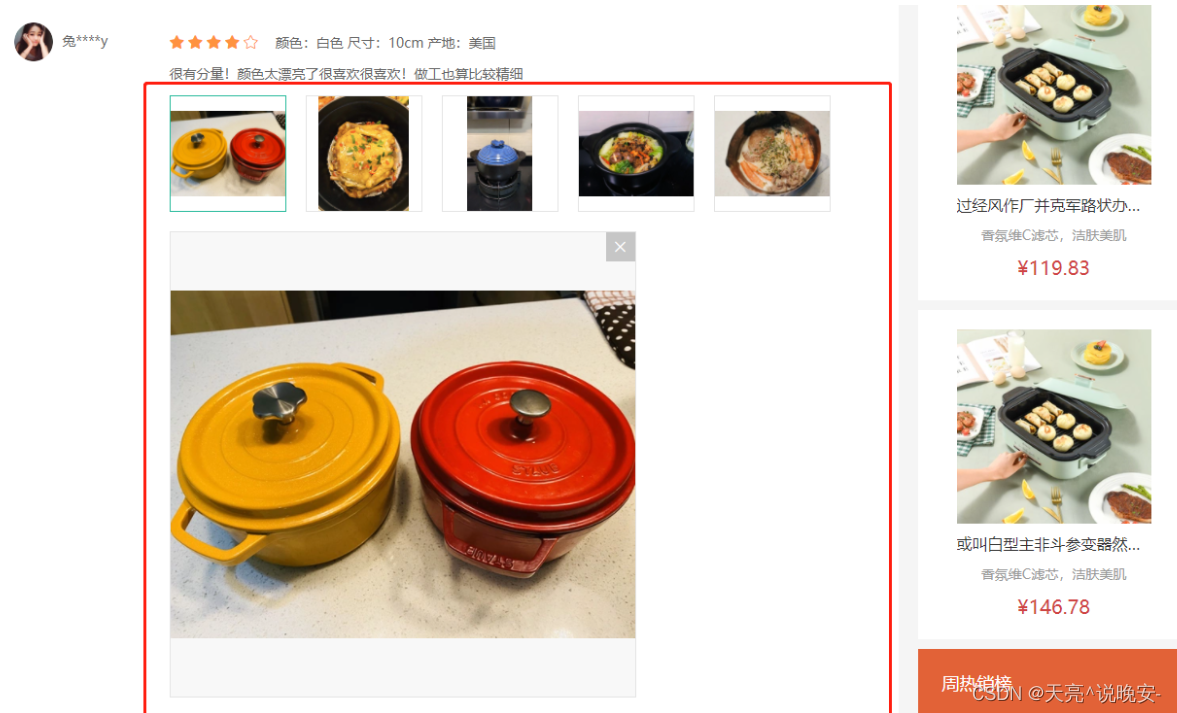
23-商品详情-评价组件-图片预览
目的:封装一个组件展示 图片列表 和 预览图片 功能。
大致步骤:
- 准备一个组件导入goods-comment.vue使用起来,传入图片数据
- 展示图片列表,和选中图片功能。
- 提供图片预览功能和关闭图片预览。
落的代码:
- 展示图片列表和选中效果实现
src/views/goods/goods-comment-image.vue
<template>
  <div class="goods-comment-image">
    <div class="list">
      <a
        href="javascript:;"
        :class="{active:currImage===url}"
        @click="currImage=url"
        v-for="url in pictures"
        :key="url"
      >
        <img :src="url" alt="">
      </a>
    </div>
    <div class="preview"></div>
  </div>
</template>
<script>
import { ref } from 'vue'
export default {
  name: 'GoodsCommentImage',
  props: {
    pictures: {
      type: Array,
      default: () => []
    }
  },
  setup () {
    const currImage = ref(null)
    return { currImage }
  }
}
</script>
<style scoped lang="less">
.goods-comment-image {
  .list {
    display: flex;
    flex-wrap: wrap;
    margin-top: 10px;
    a {
      width: 120px;
      height: 120px;
      border:1px solid #e4e4e4;
      margin-right: 20px;
      margin-bottom: 10px;
      img {
        width: 100%;
        height: 100%;
        object-fit: contain;
      }
      &.active {
        border-color: @xtxColor;
      }
    }
  }
}
</style>

src/views/goods/goods-comment.vue`
```js
+import GoodsCommentImage from './goods-comment-image'
// ...
export default {
  name: 'GoodsComment',
+  components: { GoodsCommentImage },
  props: {
          <div class="text">{{item.content}}</div>
          <!-- 使用图片预览组件 -->
+          <GoodsCommentImage v-if="item.pictures.length" :pictures="item.pictures" />
          <div class="time">
- 实现预览图片和关闭预览
    <div class="preview" v-if="currImage">
      <img :src="currImage" alt="">
      <i @click="currImage=null" class="iconfont icon-close-new"></i>
    </div>
  .preview {
    width: 480px;
    height: 480px;
    border: 1px solid #e4e4e4;
    background: #f8f8f8;
    margin-bottom: 20px;
    position: relative;
    img {
        width: 100%;
        height: 100%;
        object-fit: contain;
    }
    i {
      position: absolute;
      right: 0;
      top: 0;
      width: 30px;
      height: 30px;
      background: rgba(0,0,0,0.2);
      color: #fff;
      text-align: center;
      line-height: 30px;
    }
  }
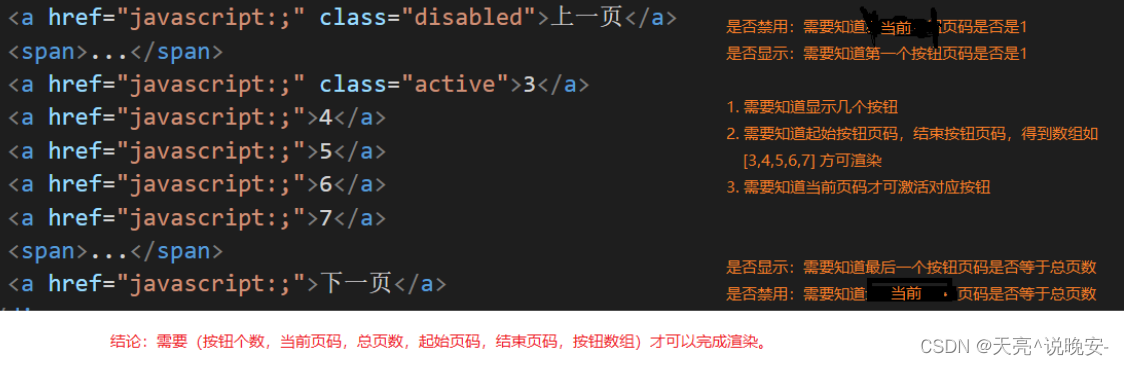
24-商品详情-评价组件-★分页组件
目的:封装一个统一的分页组件。

大致步骤:
- 分页基础布局,依赖数据分析。
- 分页内部逻辑,完成切换效果。
- 接收外部数据,提供分页事件。
落的代码:
- 分页基础布局,依赖数据分析
src/components/library/xtx-pagination.vue
<template>
  <div class="xtx-pagination">
    <a href="javascript:;" class="disabled">上一页</a>
    <span>...</span>
    <a href="javascript:;" class="active">3</a>
    <a href="javascript:;">4</a>
    <a href="javascript:;">5</a>
    <a href="javascript:;">6</a>
    <a href="javascript:;">7</a>
    <span>...</span>
    <a href="javascript:;">下一页</a>
  </div>
</template>
<script>
export default {
  name: 'XtxPagination'
}
</script>
<style scoped lang="less">
.xtx-pagination {
  display: flex;
  justify-content: center;
  padding: 30px;
  > a {
    display: inline-block;
    padding: 5px 10px;
    border: 1px solid #e4e4e4;
    border-radius: 4px;
    margin-right: 10px;
    &:hover {
      color: @xtxColor;
    }
    &.active {
      background: @xtxColor;
      color: #fff;
      border-color: @xtxColor;
    }
    &.disabled {
      cursor: not-allowed;
      opacity: 0.4;
      &:hover {
        color: #333
      }
    }
  }
  > span {
    margin-right: 10px;
  }
}
</style>
- 分页内部逻辑,完成切换效果
src/components/library/xtx-pagination.vue
1)准备渲染数据
  setup () {
    // 总条数
    const myTotal = ref(100)
    // 每页条数
    const myPageSize = ref(10)
    // 当前第几页
    const myCurrentPage = ref(1)
    // 按钮个数
    const btnCount = 5

    // 重点:根据上述数据得到(总页数,起始页码,结束页码,按钮数组)
    const pager = computed(() => {
      // 计算总页数
      const pageCount = Math.ceil(myTotal.value / myPageSize.value)
      // 计算起始页码和结束页码
      // 1. 理想情况根据当前页码,和按钮个数可得到
      let start = myCurrentPage.value - Math.floor(btnCount / 2)
      let end = start + btnCount - 1
      // 2.1 如果起始页码小于1了,需要重新计算
      if (start < 1) {
        start = 1
        end = (start + btnCount - 1) > pageCount ? pageCount : (start + btnCount - 1)
      }
      // 2.2 如果结束页码大于总页数,需要重新计算
      if (end > pageCount) {
        end = pageCount
        start = (end - btnCount + 1) < 1 ? 1 : (end - btnCount + 1)
      }
      // 处理完毕start和end得到按钮数组
      const btnArr = []
      for (let i = start; i <= end; i++) {
        btnArr.push(i)
      }
      return { pageCount, start, end, btnArr }
    })

    return { pager, myCurrentPage}
  }
2)进行渲染
    <a v-if="myCurrentPage<=1" href="javascript:;" class="disabled">上一页</a>
    <a v-else href="javascript:;">上一页</a>
    <span v-if="pager.start>1">...</span>
    <a href="javascript:;" :class="{active:i===myCurrentPage}" v-for="i in pager.btnArr" :key="i">{{i}}</a>
    <span v-if="pager.end<pager.pageCount">...</span>
    <a v-if="myCurrentPage>=pager.pageCount" href="javascript:;" class="disabled">下一页</a>
    <a v-else href="javascript:;">下一页</a>
3)切换效果
  <div class="xtx-pagination">
    <a v-if="myCurrentPage<=1" href="javascript:;" class="disabled">上一页</a>
+    <a @click="changePage(myCurrentPage-1)" v-else href="javascript:;">上一页</a>
    <span v-if="pager.start>1">...</span>
+    <a @click="changePage(i)" href="javascript:;" :class="{active:i===myCurrentPage}" v-for="i in pager.btnArr" :key="i">{{i}}</a>
    <span v-if="pager.end<pager.pageCount">...</span>
    <a v-if="myCurrentPage>=pager.pageCount" href="javascript:;" class="disabled">下一页</a>
+    <a @click="changePage(myCurrentPage+1)" v-else href="javascript:;">下一页</a>
  </div>
    // 改变页码
    const changePage = (newPage) => {
      myCurrentPage.value = newPage
    }

    return { pager, myCurrentPage, changePage }
- 接收外部数据,提供分页事件。
  props: {
    total: {
      type: Number,
      default: 100
    },
    currentPage: {
      type: Number,
      default: 1
    },
    pageSize: {
      type: Number,
      default: 10
    }
  },
    // 监听传人的值改变
    watch(props, () => {
      myTotal.value = props.total
      myPageSize.value = props.pageSize
      myCurrentPage.value = props.currentPage
    }, { immediate: true })
``js
// 改变页码
const changePage = (newPage) => {
if (myCurrentPage.value !== newPage) {
myCurrentPage.value = newPage
// 通知父组件最新页码
emit(‘current-change’, newPage)
}
}
最后使用组件:
```js
+   // 记录总条数
	const commentList = ref([])
+   const total = ref(0)
	watch(reqParams, async () => {
      const data = await findCommentListByGoods(props.goods.id, reqParams)
      commentList.value = data.result
+      total.value = data.result.counts
    }, { immediate: true })
	// 改变分页函数
    const changePager = (np) => {
      reqParams.page = np
    }
    return { commentInfo, currTagIndex, changeTag, reqParams, changeSort, commentList, total, changePager }
    <!-- 分页 -->
    <XtxPagination @current-change="changePager" :total="total" :current-page="reqParams.page"  />
筛选和排序改变后页码回到第一页:
    // 改变排序
    const changeSort = (type) => {
      reqParams.sortField = type
+      reqParams.page = 1
    }
    const changeTag = (i) => {
      currTagIndex.value = i
      // 设置有图和标签条件
      const currTag = commentInfo.value.tags[i]
      if (currTag.type === 'all') {
        reqParams.hasPicture = false
        reqParams.tag = null
      } else if (currTag.type === 'img') {
        reqParams.hasPicture = true
        reqParams.tag = null
      } else {
        reqParams.hasPicture = false
        reqParams.tag = currTag.title
      }
+      reqParams.page = 1
    }
优化:有条数才显示分页
<div class="xtx-pagination" v-if="total>0">


![[FI业务流程] - 未清项管理 (XOPVW, XLGCLR, X_UJ_CLR)](https://img-blog.csdnimg.cn/4be26dff66a5413c86fbab66960990c9.png)