这篇笔记不包括源码分析,呜呜感觉时间不够用了还得留时间准备教资面试
axios理解和使用
json-server服务与搭建
-
终端安装npm i -g json-server
-
启动服务 json-server --watch db.json 启动在当前文档前
-
数据去db.json找
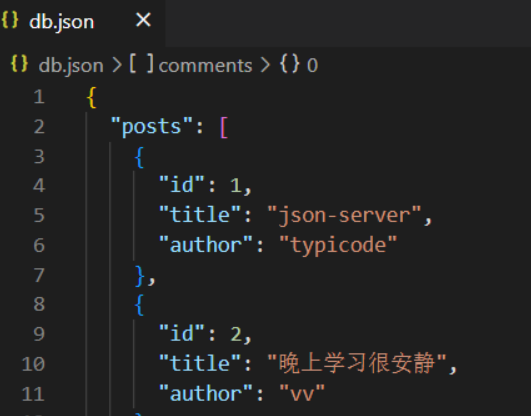
查看id为2的页面在http://localhost:3000.posts/2 /2就是id
认识axios
是基于promise的http客户端,可以在浏览器和node.js下运行
可以发送ajax请求
项目使用npm i axios / yarn add axios
国内访问快速且正确的获取axios资源去bootcdn,复制axios的script标签,再打印出来

axios 的基本使用
  <div class="container">
    <h2 class="page-header">基本使用</h2>
    <button class="btn btn-primary">发送GET请求</button>
    <button class="btn btn-warning">发送post请求</button>
    <button class="btn btn-success">发送put请求</button>
    <button class="btn btn-danger">发送 delete 请求</button>
  </div>
  <script>
    // 获取按钮
    const btns = document.querySelectorAll('button')
    btns[0].onclick = function() {
      // 发送 ajax请求
      axios({
        // 请求类型
        method: 'GET',
        // url
        url: 'http://localhost:3000/posts/2',
      }).then(response => {
        console.log(response);
      })
    }
    // 添加一篇新的文章
    btns[1].onclick = function() {
      // 发送 ajax请求
      axios({
        // 请求类型
        method: 'POST',
        // url
        url: 'http://localhost:3000/posts',
        // 请求体
        data: {
          title: "晚上涛哥没回消息",
          author: "vv"
        }
      }).then(response => {
        console.log(response);
      })
    }
    // 更新数据
    btns[2].onclick = function() {
      // 发送 ajax请求
      axios({
        // 请求类型
        method: 'PUT',
        // url
        url: 'http://localhost:3000/posts/3',
        // 请求体
        data: {
          title: "晚上涛哥没回消息",
          author: "vera"
        }
      }).then(response => {
        console.log(response);
      })
    }
    // 删除数据
    btns[3].onclick = function() {
      // 发送 ajax请求
      axios({
        // 请求类型
        method: 'DELETE',
        // url
        url: 'http://localhost:3000/posts/3',
        // 请求体   删除数据无需设置请求体
        // data: {
        //   title: "晚上涛哥没回消息",
        //   author: "vera"
        // }
      }).then(response => {
        console.log(response);
      })
    }
posts/2 后面的数字是页面跳转至那个id的页面
axios 其他方式发送请求
axios.request
axios.head
axios.option
axios.patch
axios 请求相应结果的结构
axios配置对象详细说明
url: 往哪发送请求
method: 用什么发
baseURL :设定url的基础结构 (会与url结合形成最终的 url 结果),换言之url简写、 baseURL是http前面的
transFormRequest :相应完后的预处理
headers: 对请求头信息进行处理
params:设定URL 的参数 例如 post?a=100&b=200
1、axios调用的返回值是Promise实例
2、成功的值叫response 失败的值叫error
3、axios成功的值是一个axios封装的response对象,服务器返回的真正数据在response.data中- 配置中的想要的url是小写,严格规定的
4、携带query参数时,编写的配置项叫params
5、携带params参数时,需要自己手动在拼在url中
axios默认配置
每写一个请求都要写一遍url 路径太麻烦了,为了对重复代码的编写,可以提前设定好配置用axios.defaults
<div class="container">
<h2 class="page-header">基本使用</h2>
<button class="btn btn-primary">发送GET请求</button>
<button class="btn btn-warning">发送post请求</button>
<button class="btn btn-success">发送put请求</button>
<button class="btn btn-danger">发送 delete 请求</button>
</div>
<script>
// 获取按钮
const btns = document.querySelectorAll('button')
// 设置默认配置
axios.defaults.methods = 'GET' //设置默认的请求类型为 get
axios.defaults.baseURL = 'http://localhost:3000' //设置基础 URL
axios.defaults.params = {id: 100}
axios.defaults.timeout = 3000
btns[0].onclick = function() {
axios({
url: '/posts',
}).then(response => {
console.log(response);
})
}
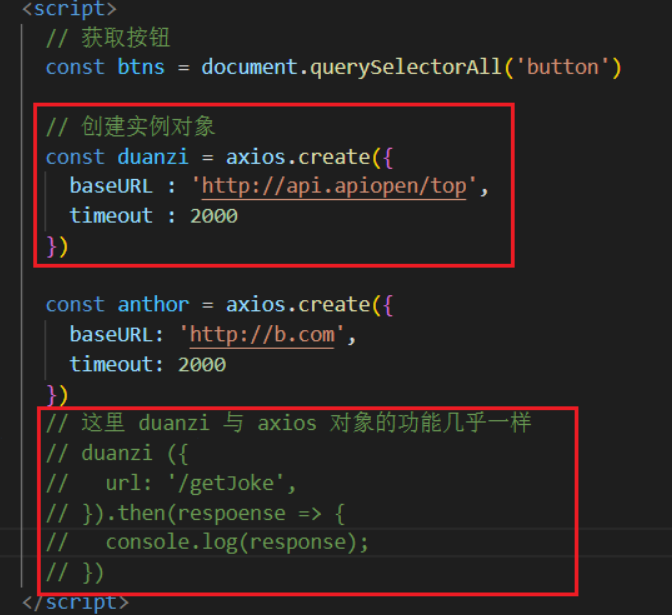
axios创建实例对象发送请求
有时实际开发中会用两个甚至两个接口文档,创建另外一个实例对象发送请求更省时省力
axios 拦截器
拦截器相当于函数,分为两大类(请求拦截器、相应拦截器)
请求前给数据和内容做一些检测,如果请求没有什么问题就可以请求
当服务器返回结果前:先对结果做一些预处理(格式化处理、记录..)
怎么用?
    // Promise
      // 设置一个请求拦截器
    axios.interceptors.request.use(function (config) {
      console.log('请求拦截器 成功');
        return config;
      }, function (error) {
        console.log('请求拦截器 失败');
        return Promise.reject(error);
      });

    // 设置响应拦截器
    axios.interceptors.response.use(function (response) {
      console.log('响应拦截器 成功');
        return response;
      }, function (error) {
        console.log('响应拦截器 失败');
        return Promise.reject(error);
      });

      // 发送请求
      axios({
        method: 'GET',
        url: 'http://localhost:3000/posts'
      }).then(response => {
        console.log(response);
      })
可以修改请求体,设置url参数 config.timeout = 2000 / congif.params = {a:100}
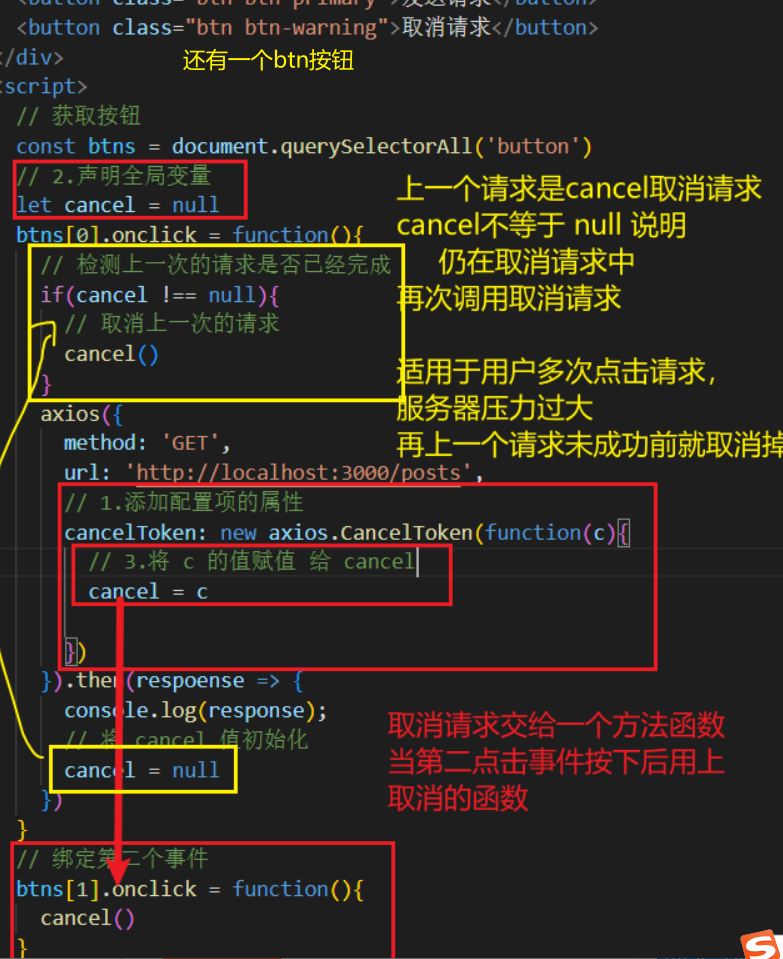
axios 取消请求






![[附源码]java毕业设计中华美食网站](https://img-blog.csdnimg.cn/44ec824b7956435c84104d6babea7b17.png)
