1 JDBC基础知识
1.1 JDBC简介
JDBC是使用Java语言操作关系型数据库的一套API,全称Java DataBase Connectivity,Java数据库连接。JDBC定义了操作所有关系型数据库的规则,同一套Java代码可以操作不同的关系型数据库。也就是JDBC是Java语言操作数据库的接口规范,MySQL、Oracle、DB2等数据库厂商实现JDBC接口,使开发者可以通过JDBC接口操作自己家的数据库。数据库自己的JDBC接口实现类叫作驱动(以jar包形式提供)。

1.2 JDBC使用
导入MySQL驱动jar包
<dependency>
  <groupId>mysql</groupId>
  <artifactId>mysql-connector-java</artifactId>
  <version>6.0.2</version>
</dependency>
2、入门使用
import java.sql.Connection;
import java.sql.DriverManager;
import java.sql.Statement;

public class Main {
    public static void main(String[] args) {
        try {
            String url = "jdbc:mysql://localhost:3306/db1";
            String user = "root";
            String password = "1234";
            //注册驱动
            Class.forName("com.mysql.jdbc.Driver");
            //获取连接
            Connection connection = DriverManager.getConnection(url,user,password);
            //定义SQL语句
            String sql = "update account set monkey = 2000 where id = 1";
            //获取执行SQL的Statement
            Statement statement = connection.createStatement();
            //执行SQL,返回值代表受影响的行数
            int rowCount = statement.executeUpdate(sql);
            //释放资源
            statement.close();
            connection.close();
        } catch (Exception e) {
            throw new RuntimeException(e);
        }
    }
}
1.3 JDBC API详解
1.3.1 DriverManager
1、注册驱动对象
public static synchronized void registerDriver(java.sql.Driver driver)
    throws SQLException {

    registerDriver(driver, null);
}


2、获取数据库连接
public static Connection getConnection(String url,
    String user, String password) throws SQLException {
    java.util.Properties info = new java.util.Properties();

    if (user != null) {
        info.put("user", user);
    }
    if (password != null) {
        info.put("password", password);
    }

    return (getConnection(url, info, Reflection.getCallerClass()));
}
1.3.2 Connection
1、获取执行SQL的Statement
//普通执行SQL对象,存在SQL注入风险
Statement createStatement() throws SQLException;
//预编译SQL的执行SQL对象,可预防SQL注入
PreparedStatement prepareStatement(String sql) throws SQLException;
2、事务管理
void setAutoCommit(boolean autoCommit) throws SQLException;
boolean getAutoCommit() throws SQLException;
void commit() throws SQLException;
void rollback() throws SQLException;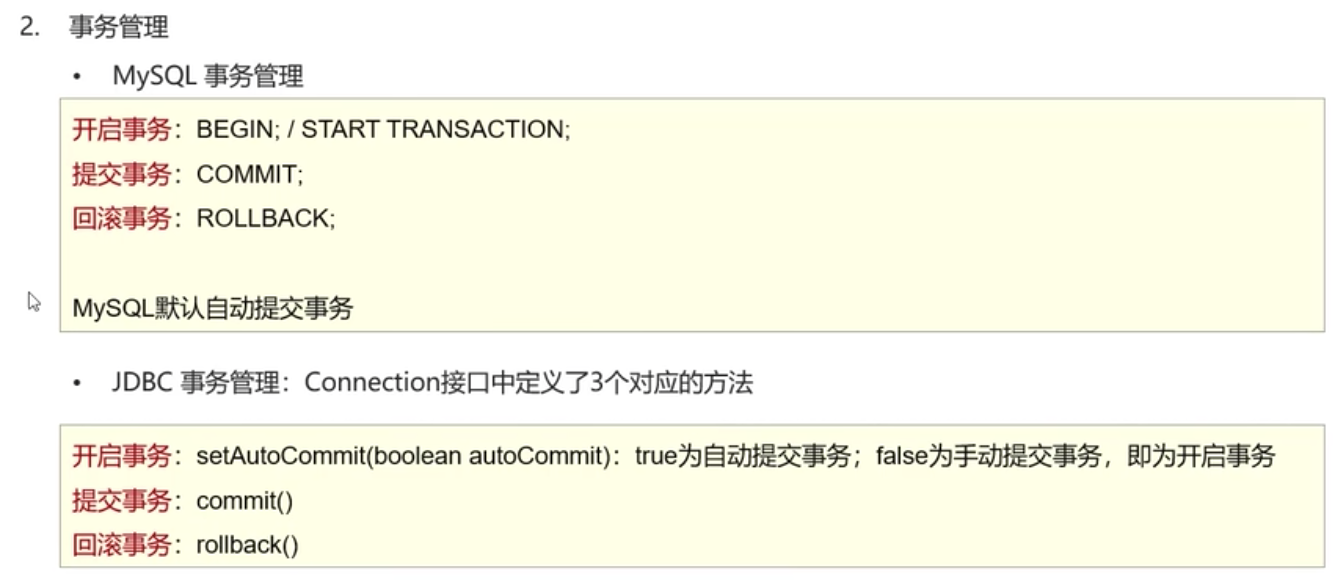
事务使用如下:
String url = "jdbc:mysql://localhost:3306/db1";
String user = "root";
String password = "1234";
//注册驱动
Class.forName("com.mysql.jdbc.Driver");
//获取连接
Connection connection = DriverManager.getConnection(url,user,password);
//定义SQL语句
String sql1 = "update account set monkey = 2000 where id = 1";
String sql2 = "update account set monkey = 3000 where id = 2";
//获取执行SQL的Statement
Statement statement = connection.createStatement();
try {
    //我们希望sql1和sql2同成功同失败,因此在执行SQL前开启事务
    connection.setAutoCommit(false);
    //执行SQL,返回值代表受影响的行数
    int rowCount1 = statement.executeUpdate(sql1);
    int rowCount2 = statement.executeUpdate(sql2);
    //手动提交事务
    connection.commit();
}catch (Exception e) {
    //如果执行SQL的过程中发生异常,回滚事务
    connection.rollback();
}

//释放资源
statement.close();
connection.close();
1.3.3 Statement
执行DDL、DML语句
/**
 * Executes the given SQL statement, which may be an <code>INSERT</code>,
 * <code>UPDATE</code>, or <code>DELETE</code> statement or an
 * SQL statement that returns nothing, such as an SQL DDL statement.
 *<p>
 * <strong>Note:</strong>This method cannot be called on a
 * <code>PreparedStatement</code> or <code>CallableStatement</code>.
 * @param sql an SQL Data Manipulation Language (DML) statement, such as <code>INSERT</code>, <code>UPDATE</code> or
 * <code>DELETE</code>; or an SQL statement that returns nothing,
 * such as a DDL statement.
 *
 * @return either (1) the row count for SQL Data Manipulation Language (DML) statements
 *         or (2) 0 for SQL statements that return nothing
 *
 * @exception SQLException if a database access error occurs,
 * this method is called on a closed <code>Statement</code>, the given
 * SQL statement produces a <code>ResultSet</code> object, the method is called on a
 * <code>PreparedStatement</code> or <code>CallableStatement</code>
 * @throws SQLTimeoutException when the driver has determined that the
 * timeout value that was specified by the {@code setQueryTimeout}
 * method has been exceeded and has at least attempted to cancel
 * the currently running {@code Statement}
 */
int executeUpdate(String sql) throws SQLException;
返回值:1、DML语句返回影响的行数 2、DDL语句执行成功后返回0
执行DQL语句
/**
 * Executes the given SQL statement, which returns a single
 * <code>ResultSet</code> object.
 *<p>
 * <strong>Note:</strong>This method cannot be called on a
 * <code>PreparedStatement</code> or <code>CallableStatement</code>.
 * @param sql an SQL statement to be sent to the database, typically a
 *        static SQL <code>SELECT</code> statement
 * @return a <code>ResultSet</code> object that contains the data produced
 *         by the given query; never <code>null</code>
 * @exception SQLException if a database access error occurs,
 * this method is called on a closed <code>Statement</code>, the given
 *            SQL statement produces anything other than a single
 *            <code>ResultSet</code> object, the method is called on a
 * <code>PreparedStatement</code> or <code>CallableStatement</code>
 * @throws SQLTimeoutException when the driver has determined that the
 * timeout value that was specified by the {@code setQueryTimeout}
 * method has been exceeded and has at least attempted to cancel
 * the currently running {@code Statement}
 */
ResultSet executeQuery(String sql) throws SQLException;
1.3.3 SQL注入问题
SQL注入是通过输入特定字符来修改事先已经定义好的SQL语句,用来达到执行代码对服务器进行攻击的方式。下面以输入用户名、 密码来登录为例说明。
正常情况,登录成功:
try {
    String url = "jdbc:mysql://localhost:3306/db1";
    String user = "root";
    String password = "1234";
    //注册驱动
    Class.forName("com.mysql.jdbc.Driver");
    //获取连接
    Connection connection = DriverManager.getConnection(url, user, password);
    String name = "zhangsan";
    String pwd = "123";
    //定义SQL语句
    String sql = "select * from user where username='" + name + "' and password='" + pwd + "'";
    Statement statement = connection.createStatement();
    ResultSet resultSet = statement.executeQuery(sql);
    if (resultSet.next()) {
        System.out.println("登录成功");
    } else {
        System.out.println("登录失败");
    }
    //释放资源
    resultSet.close();
    statement.close();
    connection.close();
} catch (Exception e) {
    throw new RuntimeException(e);
}
输入敏感字符,存在注入情况,也可以登录成功:
try {
    String url = "jdbc:mysql://localhost:3306/db1";
    String user = "root";
    String pwd = "' or '1' ='1";
    //注册驱动
    Class.forName("com.mysql.jdbc.Driver");
    //获取连接
    Connection connection = DriverManager.getConnection(url, user, password);
    String name = “用户名随便写” ;
    String pwd = "123";
    //定义SQL语句
    String sql = "select * from user where username='" + name + "' and password='" + pwd + "'";
    Statement statement = connection.createStatement();
    ResultSet resultSet = statement.executeQuery(sql);
    if (resultSet.next()) {
        System.out.println("登录成功");
    } else {
        System.out.println("登录失败");
    }
    //释放资源
    resultSet.close();
    statement.close();
    connection.close();
} catch (Exception e) {
    throw new RuntimeException(e);
}
注入后的SQL语句如下:
select * from user where username =‘用户名随便写’ and password =‘ ’ or ‘1’=‘1’
1.3.4 PreparedStatement
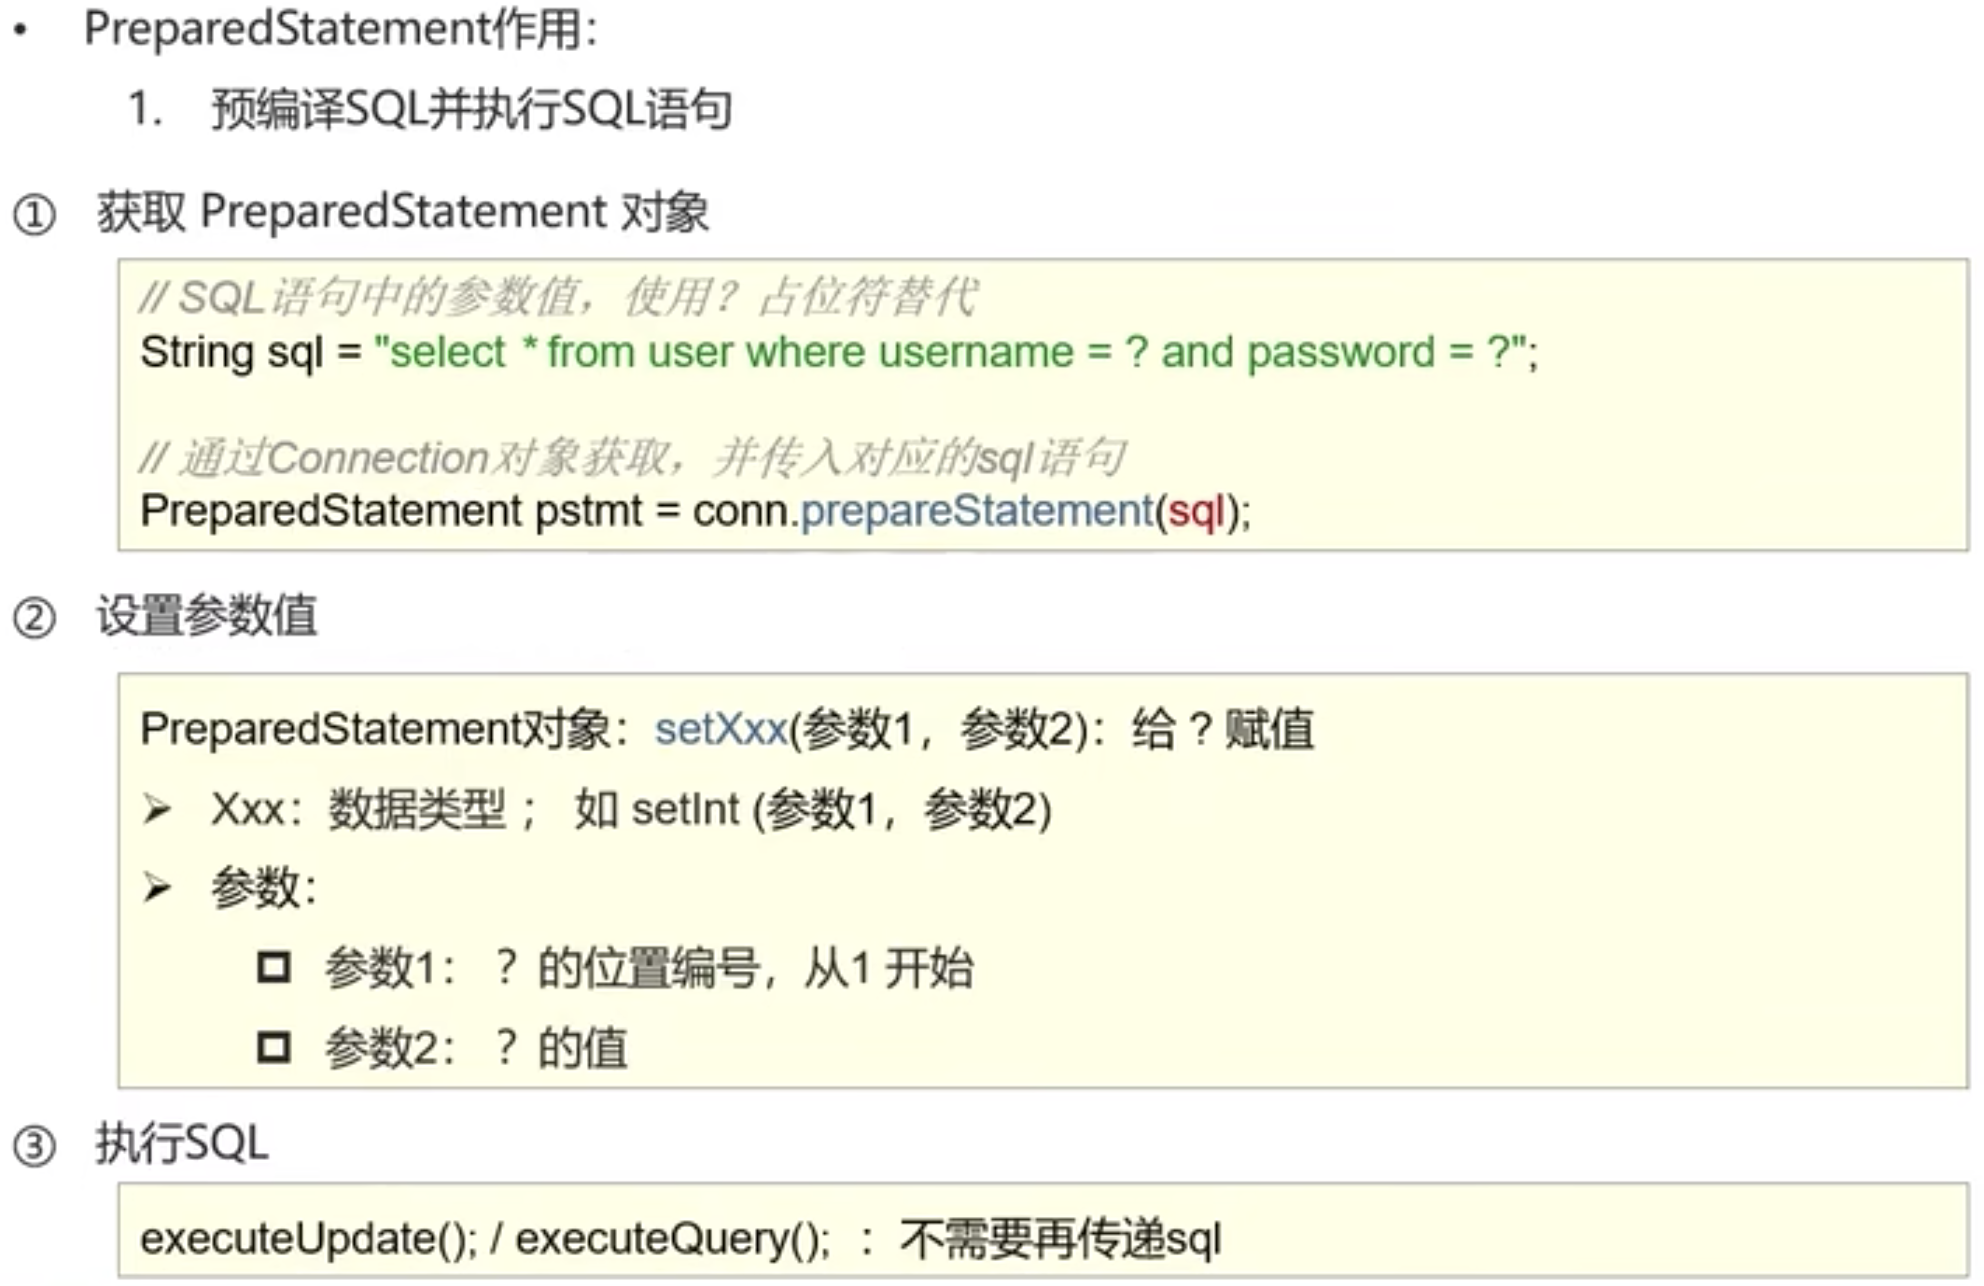
String url = "jdbc:mysql://localhost:3306/db1?userServerPrepStmts=true";
String user = "root";
String password = "1234";
//注册驱动
Class.forName("com.mysql.jdbc.Driver");
//获取连接
Connection connection = DriverManager.getConnection(url, user, password);
//定义SQL语句
String sql = "select * from user where username=? and password=?";
PreparedStatement preparedStatement = connection.prepareStatement(sql);
preparedStatement.setString(1,"zhangsan");
preparedStatement.setString(2,"1234");
ResultSet resultSet = preparedStatement.executeQuery();
if (resultSet.next()) {
    System.out.println("登录成功");
} else {
    System.out.println("登录失败");
}
//释放资源
resultSet.close();
preparedStatement.close();
connection.close();
PreparedStatement在setXXX设置参数时会将传入敏感字符进行转义,从而解决SQL注入问题。
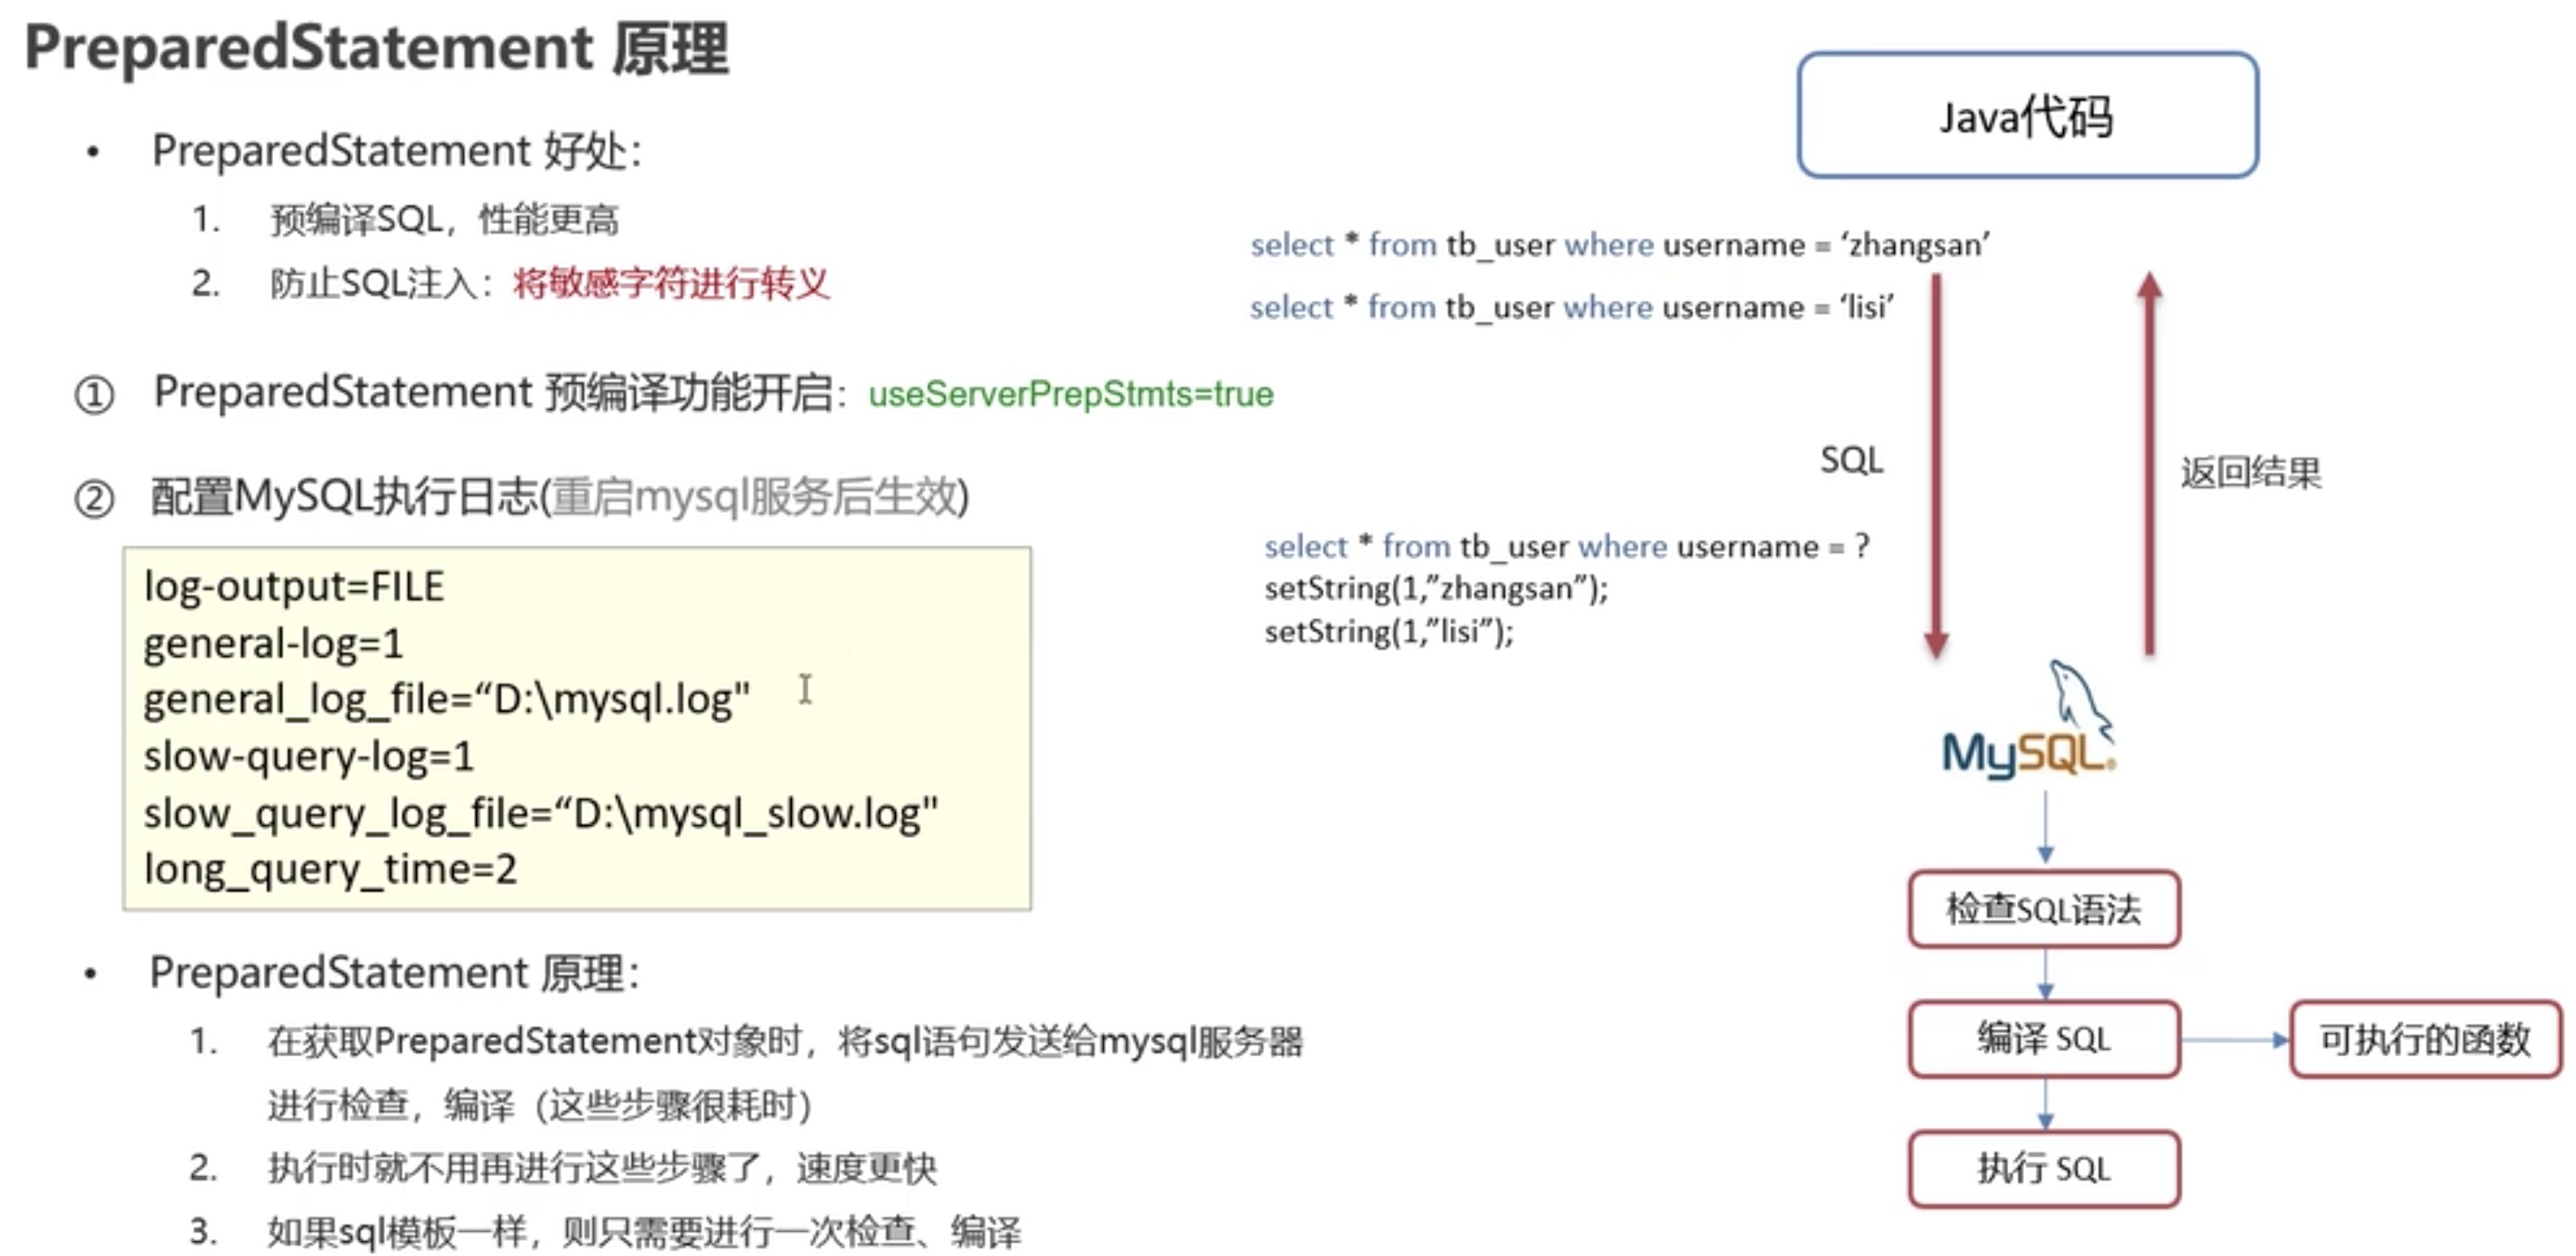
预编译功能默认是关闭的,通过配置URL可以打开预编译功能,jdbc:mysql://localhost:3306/db1?userServerPrepStmts=true
1.3.5 ResultSet

String url = "jdbc:mysql://localhost:3306/db1";
String user = "root";
String password = "1234";
//注册驱动
Class.forName("com.mysql.jdbc.Driver");
//获取连接
Connection connection = DriverManager.getConnection(url,user,password);
//定义SQL语句
String sql = "select * from user";
//获取执行SQL的Statement
Statement statement = connection.createStatement();
ResultSet set =  statement.executeQuery(sql);
while (set.next()) {
    int id = set.getInt("id”);//传入列的字段名
    String name = set.getString("name”);//传入列的字段名
    String pd = set.getString(3);//传入列的编号
}
//释放资源
set.close();
statement.close();
connection.close();
1.4 数据库连接池
1.4.1 数据库连接池简介
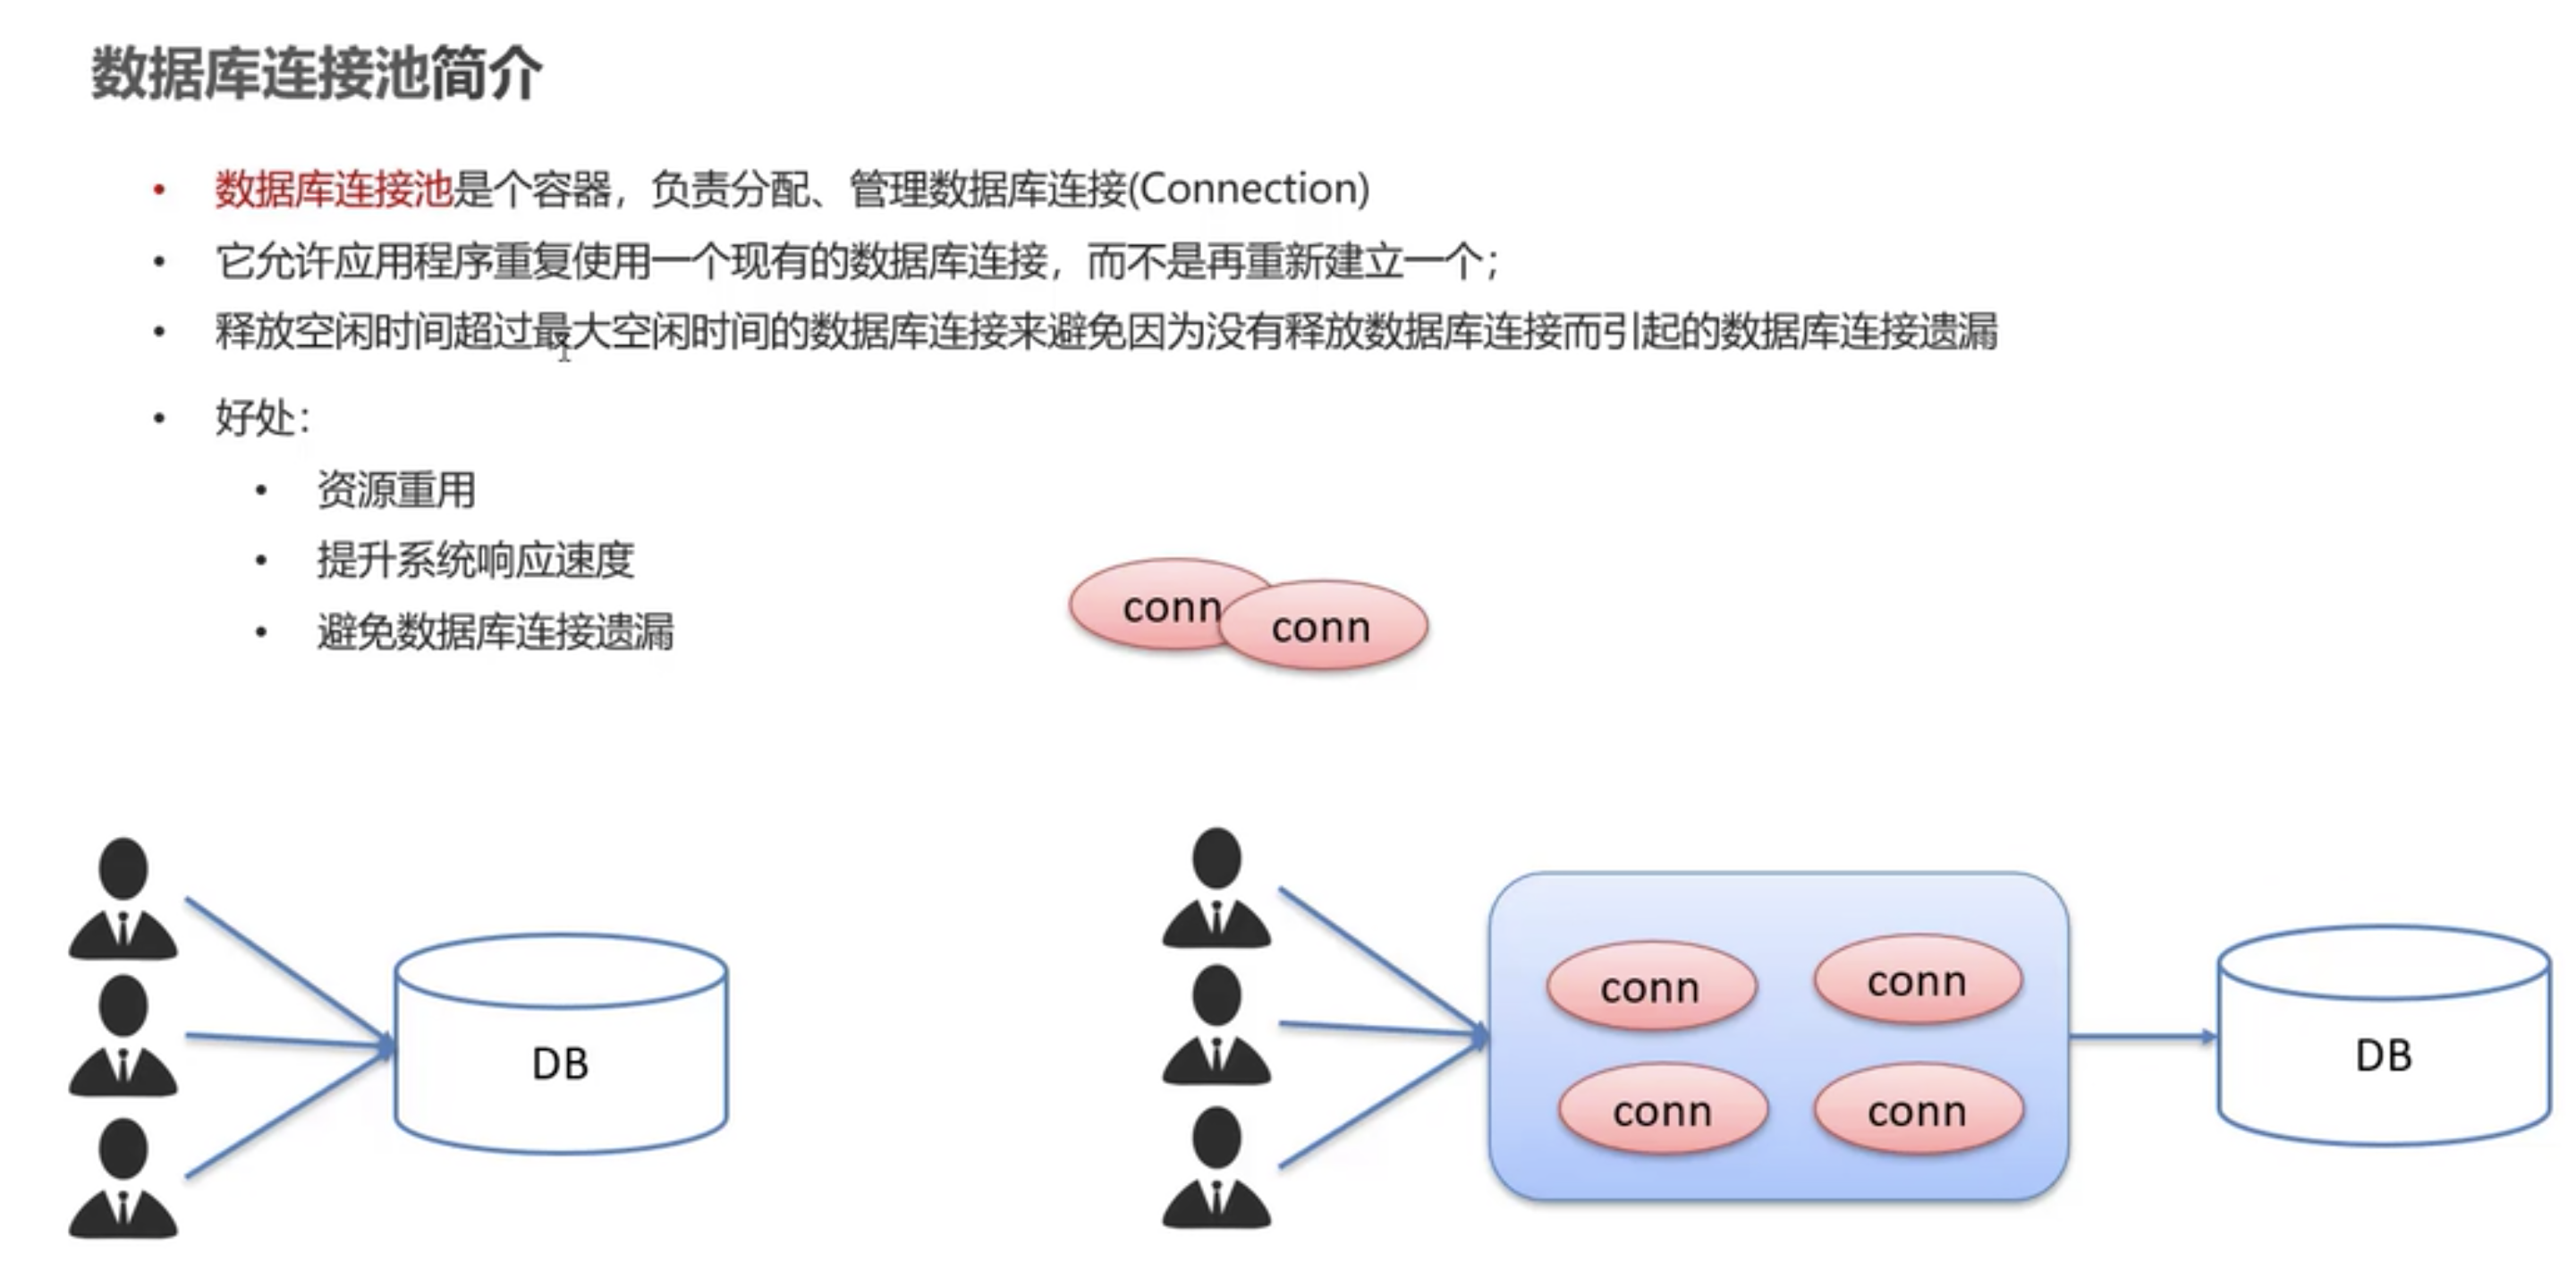
建立数据库连接很耗时、关闭数据库连接也耗时
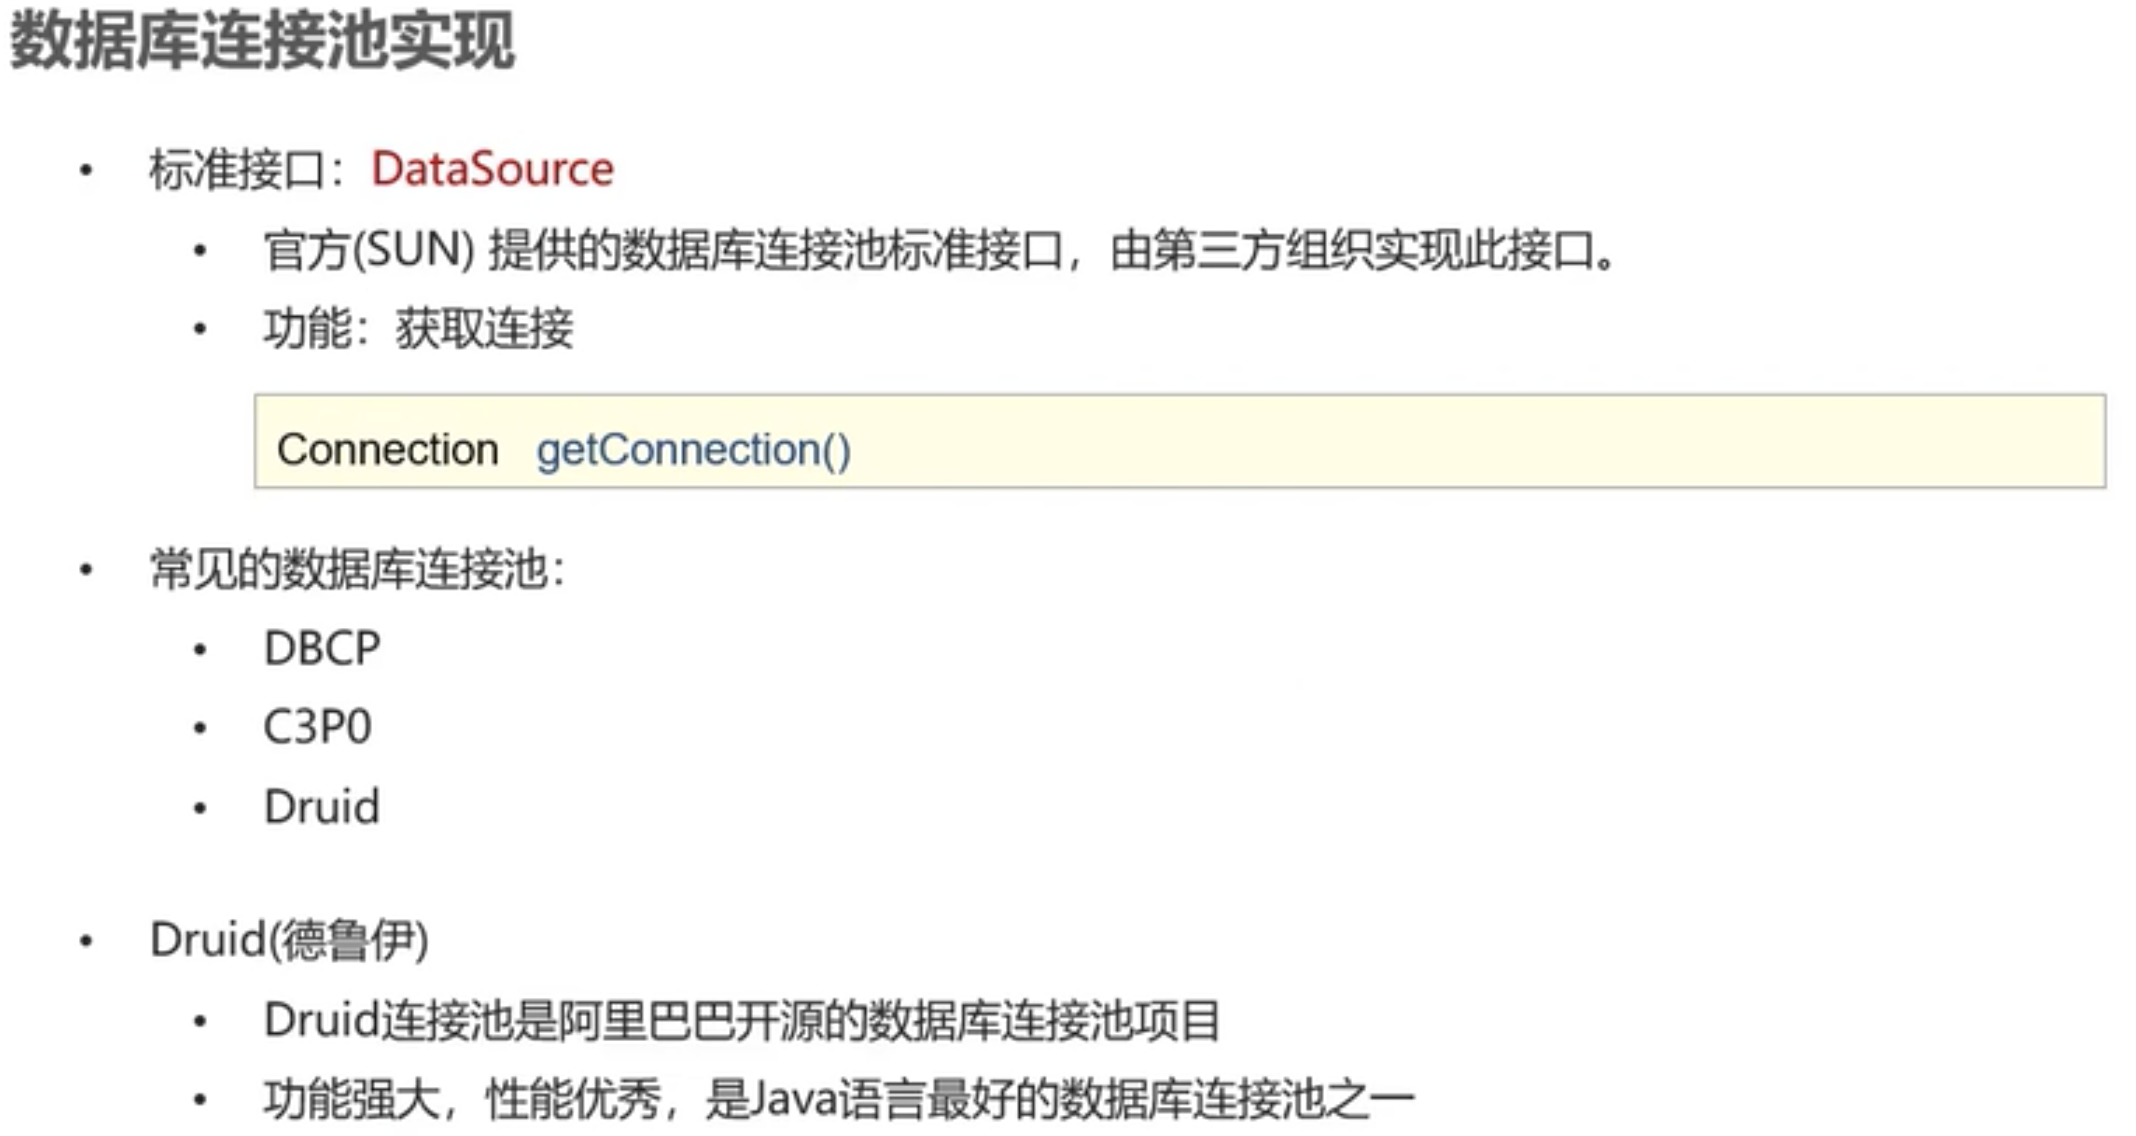
1.4.2 Druid数据库连接池
1、导入jar包
<dependency>
  <groupId>com.alibaba</groupId>
  <artifactId>druid</artifactId>
  <version>1.1.16</version>
</dependency>
<dependency>
      <groupId>mysql</groupId>
      <artifactId>mysql-connector-java</artifactId>
      <version>6.0.2</version>
</dependency>
2、定义配置文件
新建druid.properties文件,并配置如下:
driverClassName=com.mysql.jdbc.Driver
url=jdbc:mysql://localhost:3306/db1?userServerPrepStmts=true
username=root
password=1234
initialSize=5
maxActive=10
#最大等待时间,单位毫秒
maxWait=3000
注意健的名称固定
3、加载配置文件、获取数据库连接池对象、获取连接
import javax.sql.DataSource;
import java.io.FileInputStream;
import java.sql.Connection;
import java.util.Properties;

public class Main {
    public static void main(String[] args) {

        try {
            Properties properties = new Properties();
            properties.load(new FileInputStream("druid.properties"));
            DataSource dataSource = DruidDataSourceFactory.createDataSource(properties);
            Connection connection = dataSource.getConnection();
        } catch (Exception e) {
            throw new RuntimeException(e);
        }
    }
}
2 MyBatis基础知识
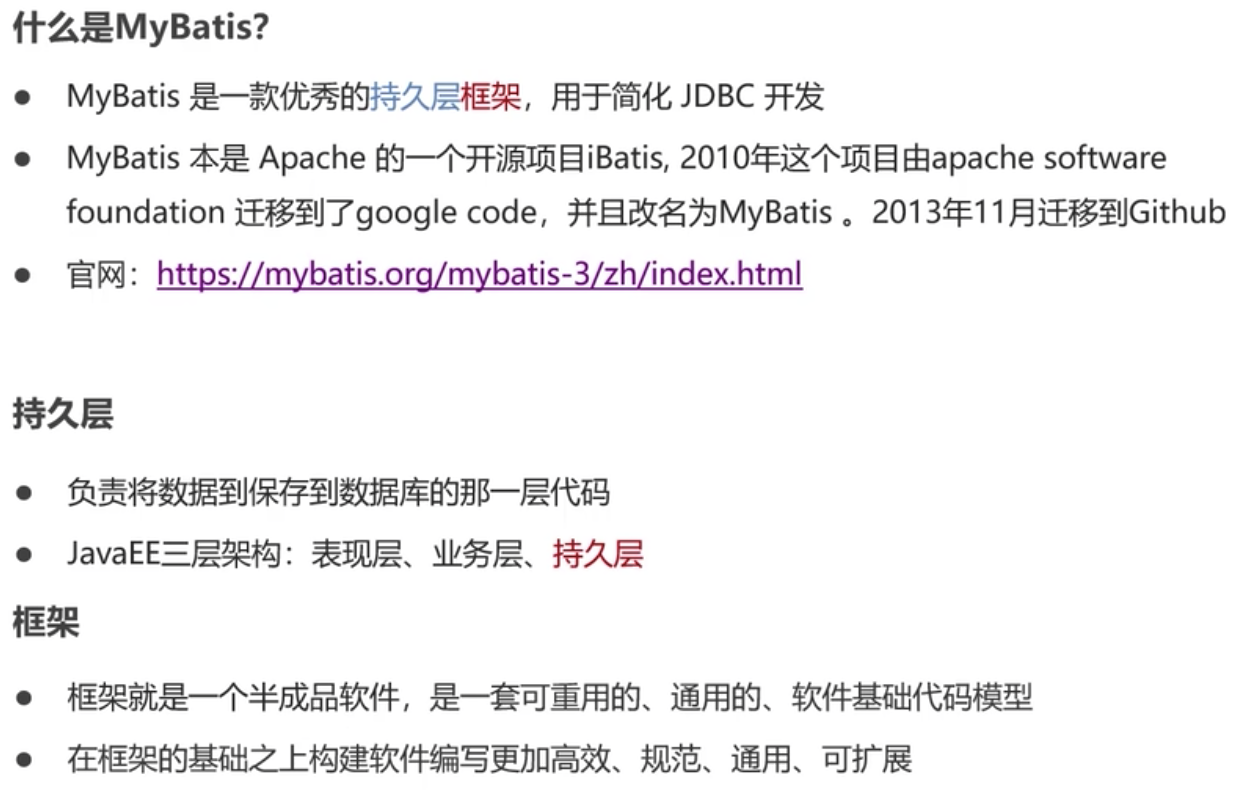
2.1 简介
官网:https://mybatis.org/mybatis-3/zh/index.html
2.2 入门使用
建库建表
create database db1;
create table user(id int primary key auto_increment,username varchar(20),password varchar(20),gender char(1),addr varchar(30));
导入mybatis依赖坐标
<dependency>
  <groupId>org.mybatis</groupId>
  <artifactId>mybatis</artifactId>
  <version>3.5.11</version>
</dependency>

<!--MySQL 驱动坐标 -->
<dependency>
  <groupId>mysql</groupId>
  <artifactId>mysql-connector-java</artifactId>
  <version>6.0.2</version>
</dependency>
<!-- 单元测试坐标-->
<dependency>
  <groupId>junit</groupId>
  <artifactId>junit</artifactId>
  <version>3.8.2</version>
  <scope>test</scope>
</dependency>
Mybatis配置文件
mybatis-config.xml
<?xml version="1.0" encoding="UTF-8" ?>
<!DOCTYPE configuration
        PUBLIC "-//mybatis.org//DTD Config 3.0//EN"
        "https://mybatis.org/dtd/mybatis-3-config.dtd">
<configuration>
    <environments default="development">
        <environment id="development">
            <transactionManager type="JDBC"/>
            <dataSource type="POOLED">
                <property name="driver" value="com.mysql.jdbc.Driver"/>
                <property name="url" value="jdbc:mysql://localhost:3306/db1?userServerPrepStmts=true"/>
                <property name="username" value="root"/>
                <property name="password" value="1234"/>
            </dataSource>
        </environment>
    </environments>
    <mappers>

        <!--加载SQL映射文件 -->
        <mapper resource="UserMapper.xml"/>
    </mappers>
</configuration>
sql映射文件
UserMapper.xml
<?xml version="1.0" encoding="UTF-8" ?>
<!DOCTYPE mapper
        PUBLIC "-//mybatis.org//DTD Mapper 3.0//EN"
        "https://mybatis.org/dtd/mybatis-3-mapper.dtd">
<mapper namespace="test">
    <select id="selectAll" resultType="User">
        select * from User;
    </select>
</mapper>
编码
        String resource = "mybatis-config.xml";
        InputStream inputStream = null;
        try {
            inputStream = Resources.getResourceAsStream(resource);
            SqlSessionFactory sqlSessionFactory = new SqlSessionFactoryBuilder().build(inputStream);
            SqlSession session = sqlSessionFactory.openSession();
            List<User> userList =  session.selectList("test.selectAll");//名称空间.sqlId
            System.out.println(userList);
            session.close();//释放资源
        } catch (IOException e) {
            throw new RuntimeException(e);
        }
2.3 Mapper代理开发
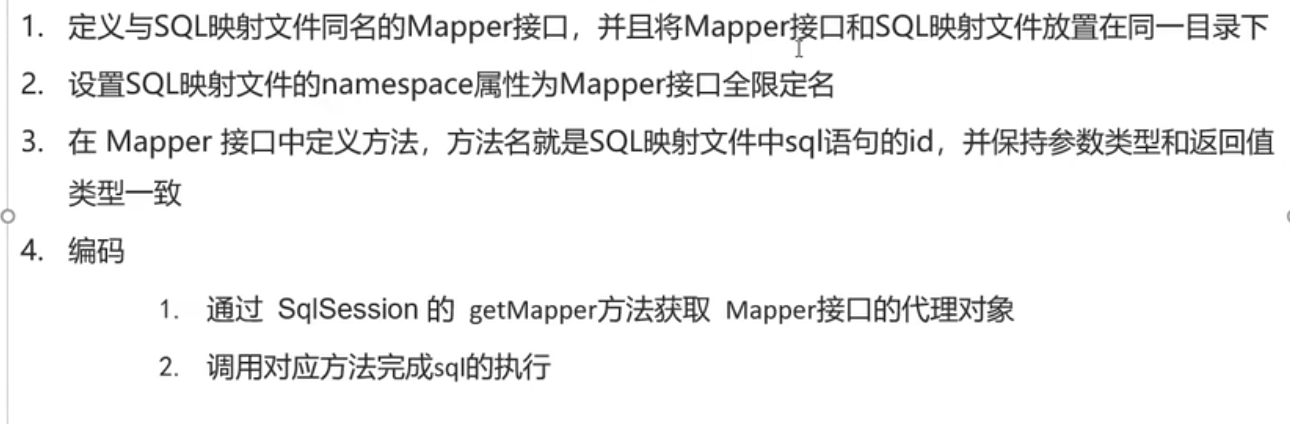
1.新建Mapper接口
返回值类型要与SQL映射文件中一致;方法名要和SQL映射文件SQL语句的ID相同。
package mapper;

import pojo.User;

import java.util.List;

public interface UserMapper {
    List<User> selectAll();
}
2.修改UserMapper.xml中的命名空间属性
<?xml version="1.0" encoding="UTF-8" ?>
<!DOCTYPE mapper
        PUBLIC "-//mybatis.org//DTD Mapper 3.0//EN"
        "https://mybatis.org/dtd/mybatis-3-mapper.dtd">
<mapper namespace="mapper.UserMapper">
    <select id="selectAll" resultType="pojo.User">
        select * from User;
    </select>
</mapper>
3.修改mybatis-config.xml中SQL映射文件加载方式
<?xml version="1.0" encoding="UTF-8" ?>
<!DOCTYPE configuration
        PUBLIC "-//mybatis.org//DTD Config 3.0//EN"
        "https://mybatis.org/dtd/mybatis-3-config.dtd">
<configuration>
    <environments default="development">
        <environment id="development">
            <transactionManager type="JDBC"/>
            <dataSource type="POOLED">
                <property name="driver" value="com.mysql.jdbc.Driver"/>
                <property name="url" value="jdbc:mysql://localhost:3306/db1?userServerPrepStmts=true"/>
                <property name="username" value="root"/>
                <property name="password" value="mrxi2016."/>
            </dataSource>
        </environment>
    </environments>
    <mappers>
        <!-- 包扫描方式,扫描resources/mapper包下面的所有SQL映射文件-->
       <package name="mapper"/>
    </mappers>
</configuration>
注意原来的<mapper resource="mapper/UserMapper.xml"/>方式也可用。包扫描方式省事,不用配置多个SQL映射文件
4.获取mapper对象执行SQL
String resource = "mybatis-config.xml";
InputStream inputStream = null;
try {
    inputStream = Resources.getResourceAsStream(resource);
    SqlSessionFactory sqlSessionFactory = new SqlSessionFactoryBuilder().build(inputStream);
    SqlSession session = sqlSessionFactory.openSession();
    UserMapper userMapper = session.getMapper(UserMapper.class);
    List<User> userList = userMapper.selectAll();
    System.out.println(userList);
    session.close();
} catch (IOException e) {
    throw new RuntimeException(e);
}
2.4 配置文件完成增删改查
建库建表
Create database db1;
create table tb_brand(id int primary key auto_increment,brand_name varchar(20),company_name varchar(20),ordered int,description varchar(100),status int);
Brand实体类
package pojo;

public class Brand {
    private int id;
    private String brandName;
    private String companyName;
    private int ordered;
    private int status;

    public int getId() {
        return id;
    }

    public void setId(int id) {
        this.id = id;
    }

    public String getBrandName() {
        return brandName;
    }

    public void setBrandName(String brandName) {
        this.brandName = brandName;
    }

    public String getCompanyName() {
        return companyName;
    }

    public void setCompanyName(String companyName) {
        this.companyName = companyName;
    }

    public int getOrdered() {
        return ordered;
    }

    public void setOrdered(int ordered) {
        this.ordered = ordered;
    }

    public int getStatus() {
        return status;
    }

    public void setStatus(int status) {
        this.status = status;
    }


    @Override
    public String toString() {
        return "Brand{" +
                "id=" + id +
                ", brandName='" + brandName + '\'' +
                ", companyName='" + companyName + '\'' +
                ", ordered=" + ordered +
                ", status=" + status +
                '}';
    }
}
2.4.1 查询所有数据
BrandMapper
package mapper;

import pojo.Brand;

import java.util.List;

public interface BrandMapper {
    /**
     * 查询所有数据
     * @return
     */
    List<Brand> selectAll();
}
BrandMapper.xml
<?xml version="1.0" encoding="UTF-8" ?>
<!DOCTYPE mapper
        PUBLIC "-//mybatis.org//DTD Mapper 3.0//EN"
        "https://mybatis.org/dtd/mybatis-3-mapper.dtd">
<mapper namespace="mapper.BrandMapper">

    <select id="selectAll" resultType="pojo.Brand">
        select * from tb_brand;
    </select>

</mapper>
存在以下问题:表中的字段名称和实体类的属性名称不一致时,不能自动封装。
解决方法1:起别名,给表中的不一样的字段起别名,别名就是实体属性名称
如下:
<mapper namespace="mapper.BrandMapper">

    <select id="selectAll" resultType="pojo.Brand">
        select id,brand_name as brandName,company_name as companyName,ordered,status from tb_brand;
    </select>

</mapper>
起别名缺点是每次定义select查询都定义一次别名,可以定义SQL片段解决,引入SQL片段即可,如下:
<mapper namespace="mapper.BrandMapper">


    <sql id="brand_column">
        id,brand_name as brandName,company_name as companyName,ordered,status

    </sql>

    <select id="selectAll" resultType="pojo.Brand">
        select <include refid="brand_column"/> from tb_brand;
    </select>
</mapper>
解决方法2:定义resultMap标签(推荐),在select中用resultMap代替resultTpye
<mapper namespace="mapper.BrandMapper">
     <!--
        id:唯一标识
        type:实体类型,支持别名
     -->
    <resultMap id="brandResultMap" type="pojo.Brand">
        <!--
        result标签,id定义主键,result定义一般字段。
        column:表中的字段  property:实体属性
        -->
        <result column="brand_name" property="brandName"/>
        <result column="company_name" property="companyName"/>
    </resultMap>
    <select id="selectAll" resultMap="brandResultMap">
        select * from tb_brand;
    </select>

</mapper>