文章目录
- 1、过滤模块的概念
- 2、过滤模块原理
- 2.1、过滤链表
- 2.2、执行顺序
- 3、过滤模块的实现
- 3.1、编写模块结构
- 3.1.1、模块配置结构
- 3.1.2、模块配置命令
- 3.1.3、模块上下文
- 3.1.4、定义模块
- 3.2、设置响应头
- 3.3、设置响应体
- 3.4、编译测试
- 3.5、完整代码
- 4、参考
文章参考<零声教育>的C/C++linux服务期高级架构系统教程学习: 服务器高级架构体系
nginx 模块的实现流程
- 初始化
- conf 文件
- 请求处理的流程
关于模块的基础知识,建议先阅读我之前写过的 Nginx: handler 模块的实现,再来看这篇。
1、过滤模块的概念
过滤模块是一种 http 模块,一个请求可以被任意个 http 过滤模块处理,可以根据需要叠加效果或者依次处理,因此常用来处理附加功能,如图片压缩等。
http 过滤模块仅处理服务器发送给客户端的 http 响应,而不处理客户端发往服务器的 http 请求。
http 过滤模块可以选择性处理 http 头部和 http 包体,也可以两者都处理。例如 gzip 过滤模块先处理 http 头部,然后检查 http 头部里的 Content-Type 是否属于配置文件中指定的 gzip 压缩类型,接着处理 http 包体,针对每一块 buffer 缓冲区都进行 gzip 压缩,这样再交给下一个 http 过滤模块处理。
2、过滤模块原理
2.1、过滤链表
所有 http 过滤模块组成一个单链表,http 框架定义两个 static 指针,指向整个链表的第一个元素,分别指向用于处理 http 头部和 http 包体的方法。这个单向链表时围绕着每个文件(http 过滤模块)中的这两个方法来建立的,也就是说,链表中的元素实际上就是处理方法。
typedef ngx_int_t (*ngx_http_output_header_filter_pt)(ngx_http_request_t *r);
typedef ngx_int_t (*ngx_http_output_body_filter_pt) (ngx_http_request_t *r, ngx_chain_t *chain);
/* 参数
 - 参数 r: 当前请求;
 - 参数 chain:要发送的 http 包体
*/

// 单链表的入口
extern ngx_http_output_header_filter_pt ngx_http_top_header_filter
extern ngx_http_output_body_filter_pt ngx_http_top_body_filter
当执行 ngx_http_send_header 发送 http 头部时,ngx_http_top_header_filter 指针遍历所有的 http 头部过滤模块,并依次执行;当执行 ngx_http_output_filter 发送 http 包体时,ngx_http_top_body_filter 指针遍历所有的 http 包体过滤模块,并依次执行。
每个 http 过滤模块初始化时,会找到链表的首元素ngx_http_top_header_filter指针和ngx_http_top_body_filter 指针,再使用静态类型的 ngx_http_next_header_filter指针和 ngx_http_next_body_filter指针将自己插入到链表的首部,其定义如下。注意两个指针必须是 static 静态变量,仅在当前文件中生效,这就允许所有的过滤模块有各自的指针。
// 定义两个静态指针,分别用于指向下一个过滤模块的 http header 和 http body
static ngx_http_output_header_filter_pt  ngx_http_next_header_filter;
static ngx_http_output_body_filter_pt    ngx_http_next_body_filter;
在实际使用中,如果需要调用下一个 http 模块,只需要调用 ngx_http_next_header_filter(r)和ngx_http_next_body_filter(r, chain)即可。
2.2、执行顺序
http 过滤模块的调用顺序由 configure 命令生成。由于每个 http 过滤模块初始化方法都会把自己头插到单链表的首部,所以调用初始化方法的顺序决定过滤模块在链表中的位置。模块的初始化顺序就是 ngx_modules.c 中的 ngx_modules 数组成员的顺序,也可以在 configure 命令执行后,make 编译命令前自行修改。初始化顺序与模块执行顺序相反(头插法)。
3、过滤模块的实现
这里要实现的一个返回给用户的页面增加前缀的过滤模块,如图:Hello World 就是过滤模块添加的前缀。

3.1、编写模块结构
3.1.1、模块配置结构
定义该模块的配置结构来存储配置项(配置命令)。Nginx 的配置信息分为三个作用域 main, server, location,每个模块提供的配置命令需要定义不同的模块配置结构来存储。
typedef struct {
	ngx_flag_t enable;
} ngx_http_myfilter_conf_t;
存储 http 上下文,用于添加前缀。
typedef struct {
	ngx_int_t add_prefix;
} ngx_http_myfilter_ctx_t;
3.1.2、模块配置命令
自定义的 ngx_command_t 类型的 commands 数组
static ngx_command_t ngx_http_myfilter_module_cmds[] = {
	{
		ngx_string("add_prefix"),
		NGX_HTTP_MAIN_CONF | NGX_HTTP_SRV_CONF | NGX_HTTP_LOC_CONF | NGX_CONF_FLAG,
		ngx_conf_set_flag_slot,
		NGX_HTTP_LOC_CONF_OFFSET,
		offsetof(ngx_http_myfilter_conf_t, enable),
		NULL,
	},
	ngx_null_command
};
使用预设的函数 ngx_conf_set_flag_slot 解析命令,作用于 NGX_HTTP_CONTENT_PHASE 阶段。
这里的宏定义 offsetof():返回一个结构体成员相对于结构体起始的字节偏移量
#define offsetof(s,m) ((size_t)&(((s*)0)->m))
offsetof(type, member-designator)
3.1.3、模块上下文
定义 ngx_http_module_t 类型的 ctx 成员,记录 http 模块的上下文。
static ngx_http_module_t ngx_http_myfilter_module_ctx = {
	NULL, 							   /* preconfiguration */
	ngx_http_myfilter_init,				/* postconfiguration */

	NULL, 								/* create main configuration */
	NULL, 								/* init main configuration */

	NULL, 								/* create server configuration */
	NULL,								/* merge server configuration */

	ngx_http_myfilter_create_loc_conf,	/* create location configuration */
	ngx_http_myfilter_merge_loc_conf, 	/* merge location configuration */
};
解析配置文件后,http 过滤模块初始化函数
// 定义两个静态指针,分别用于指向下一个过滤模块的 http header 和 http body
static ngx_http_output_header_filter_pt  ngx_http_next_header_filter;
static ngx_http_output_body_filter_pt    ngx_http_next_body_filter;

// 初始化 http 过滤模块
static ngx_int_t ngx_http_myfilter_init(ngx_conf_t *cf) {
	// 插入到 http 响应头处理方法链表的首部
	ngx_http_next_header_filter = ngx_http_top_header_filter;
	ngx_http_top_header_filter = ngx_http_myfilter_header_filter;

	// 插入到 http 响应体处理方法链表的首部
	ngx_http_next_body_filter = ngx_http_top_body_filter;
	ngx_http_top_body_filter = ngx_http_myfilter_body_filter;

	return NGX_OK;
}
loc 配置项回调函数1:分配存储配置项的结构体
void *ngx_http_myfilter_create_loc_conf(ngx_conf_t *cf) {
	// 创建存储配置项的结构体
	ngx_http_myfilter_conf_t *conf = ngx_palloc(cf->pool, sizeof(ngx_http_myfilter_conf_t));
	if (conf == NULL) {
		return NULL;
	}
	// 设置当前配置项未使用
	// 若使用预设函数 ngx_conf_set_flag_slot 解析配置项参数,则必须初始化为 NGX_CONF_UNSET
	conf->enable = NGX_CONF_UNSET;

	return conf;
}
loc 配置项回调函数2:合并配置项的方法
char *ngx_http_myfilter_merge_loc_conf(ngx_conf_t *cf, void *parent, void *child) {
	ngx_http_myfilter_conf_t *prev = (ngx_http_myfilter_conf_t*)parent;
	ngx_http_myfilter_conf_t *next = (ngx_http_myfilter_conf_t*)child;

	// 合并 ngx_flag_t 类型的配置项 enable
	ngx_conf_merge_value(next->enable, prev->enable, 0);

	return NGX_CONF_OK;
}
3.1.4、定义模块
定义 ngx_module_t 类型的变量定义模块本身信息,并添加配置信息,模块上下文信息。
ngx_module_t ngx_http_myfilter_module = {
	NGX_MODULE_V1,				    // 宏定义:预设值
	&ngx_http_myfilter_module_ctx,	 /* module context */
	ngx_http_myfilter_module_cmd,	 /* module directives */
	NGX_HTTP_MODULE,			    /* module type */
	NULL,						   /* init master */
	NULL,						   /* init module */
	NULL,						   /* init process */
	NULL,						   /* init thread */
	NULL,						   /* exit thread */
	NULL,						   /* exit process */
	NULL,						   /* exit master */
	NGX_MODULE_V1_PADDING			// 宏定义:预设值
};
3.2、设置响应头
// 过滤模块的功能:添加前缀
static ngx_str_t prefix = ngx_string("<h2> Hello World !!! </h2>");

// 处理请求中的 http 头部
static ngx_int_t ngx_http_myfilter_header_filter(ngx_http_request_t *r) {
	ngx_http_myfilter_ctx_t *ctx;
	ngx_http_myfilter_conf_t *conf;

	// 若返回的响应码不是200,直接交由下一个过滤模块处理响应码非200的情况
	if (r->headers_out.status != NGX_HTTP_OK) {
		return ngx_http_next_header_filter(r);
	}

	// 获取 http 上下文
	ctx = ngx_http_get_module_ctx(r, ngx_http_myfilter_module);
	// 若该请求的上下文已经存在,说明该函数已经被调用,直接交由下一个过滤模块处理
	if (ctx) {
		return ngx_http_next_header_filter(r);
	}

	// 获取配置命令
	conf = ngx_http_get_module_loc_conf(r, ngx_http_myfilter_module);
	// 若该配置项的enable成员为0,未开启,直接交由下一个过滤模块处理
	if (conf->enable == 0) {
		return ngx_http_next_header_filter(r);
	}

	// 构造 http 上下文
	ctx = ngx_pcalloc(r->pool, sizeof(ngx_http_myfilter_ctx_t));
	if (ctx == NULL) {
		return NGX_ERROR;
	}

	// 不添加前缀
	ctx->add_prefix = 0;

	// 将构造的上下文设置到当前请求中
	ngx_http_set_ctx(r, ctx, ngx_http_myfilter_module);
	// 自定义过滤模块值处理 Content-Type 是 "text/plain" 类型的 http 响应
	if (r->headers_out.content_type.len >= sizeof("text/plain") -1
		&& ngx_strncasecmp(r->headers_out.content_type.data, (u_char*)"text/plain", sizeof("text/plain") - 1) == 0)
	{
		// 设置为1,表示在 http 响应体中添加前缀
		ctx->add_prefix = 1;

		// 添加前缀 prefix 后,http 响应体增加长度
		if (r->headers_out.content_length_n > 0) {
			r->headers_out.content_length_n += prefix.len;
		}
	}

	// 交由下一个过滤模块继续处理
	return ngx_http_next_header_filter(r);
}
3.3、设置响应体
static ngx_int_t ngx_http_myfilter_body_filter(ngx_http_request_t *r, ngx_chain_t *chain) {
	ngx_http_myfilter_ctx_t *ctx;
	ctx = ngx_http_get_module_ctx(r, ngx_http_myfilter_module);

	// 若获取不到上下文,或者上下文结构体重的 add_prefix 为0或者2,不添加前缀
	// 交由下一个过滤模块处理
	if (ctx == NULL || ctx->add_prefix != 1) {
		return ngx_http_next_body_filter(r, chain);
	}

	// 设置http响应体中该前缀已添加
	ctx->add_prefix = 2;

	// 从内存池中分配内存,用于存储字符串前缀
	ngx_buf_t *b = ngx_create_temp_buf(r->pool, prefix.len);
	// 将 ngx_buf_t 中的指针正确地指向 prefix 字符串
	b->start = b->pos = prefix.data;
	b->last = b->pos + prefix.len;

	// 从内存池中生成 ngx_chain_t 链表,将更分配的 ngx_chain_t 设置到 buf 成员中
	// 并将它添加到原先待发送的 http 响应体前面
	ngx_chain_t *c1 = ngx_alloc_chain_link(r->pool);
	c1->buf = b;
	c1->next = chain;

	// 调用下一个模块的 http body 处理方法,传入新生成的链表 c1
	return ngx_http_next_body_filter(r, c1);
}
3.4、编译测试
编写配置文件
在对应的模块目录中添加配置文件 config,配置文件中需要定义以下三个变量
# 1、模块名称,仅在 configure 文件执行时使用
ngx_addon_name=ngx_http_myfilter_module
# 2、添加新增模块
HTTP_FILTER_MODULES="$HTTP_FILTER_MODULES ngx_http_myfilter_module"
# 3、添加新增模块的源代码,多个源代码间用空格符连接
NGX_ADDON_SRCS="$NGX_ADDON_SRCS $ngx_addon_dir/ngx_http_myfilter_module.c"
编译测试
进入 nginx 源码目录,执行 configure 脚本,添加模块所在路径
./configure --add-module=PATH
# 例:
./configure --prefix=/usr/local/nginx --with-http_stub_status_module --with-http_ssl_module --with-http_realip_module --with-http_v2_module --with-openssl=../openssl-1.1.1g --add-module=/root/code/ # 这里是我的模块路径
configure 脚本执行完毕后,Nginx 会生成 objs/Makefile 和 objs/ngx_modules.c 两个文件,这里也可以查看到自定义的模块已添加。当然,也可以直接修改这两个文件添加自定义模块。
编译,编译过程中显示自定义模块已添加。
make
make install
进入到 nginx 安装目录,在 ./conf/nginx.conf 的 location 块中添加自定义的 add_prefix on命令。
启动 nginx
/usr/local/nginx/sbin/nginx -c /usr/local/nginx/conf/nginx.conf
/usr/local/nginx/sbin/nginx -s reload
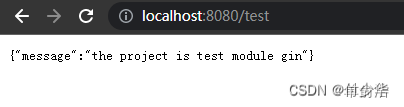
访问 nginx,可以看到自定义过滤模块的执行效果
3.5、完整代码
#include <ngx_config.h>
#include <ngx_core.h>
#include <ngx_http.h>

// 配置项
typedef struct {
	ngx_flag_t enable;
} ngx_http_myfilter_conf_t;

// http 上下文
typedef struct {
	ngx_int_t add_prefix;
} ngx_http_myfilter_ctx_t;

// 模块声明
ngx_module_t ngx_http_myfilter_module;

// 定义两个静态指针,分别用于指向下一个过滤模块的 http header 和 http body
static ngx_http_output_header_filter_pt  ngx_http_next_header_filter;
static ngx_http_output_body_filter_pt    ngx_http_next_body_filter;

// 过滤模块的功能:添加前缀
static ngx_str_t prefix = ngx_string("<h2> Hello World !!! </h2>");

// 处理请求中的 http 头部
static ngx_int_t ngx_http_myfilter_header_filter(ngx_http_request_t *r) {
	ngx_http_myfilter_ctx_t *ctx;
	ngx_http_myfilter_conf_t *conf;

	// 若返回的响应码不是200,直接交由下一个过滤模块处理响应码非200的情况
	if (r->headers_out.status != NGX_HTTP_OK) {
		return ngx_http_next_header_filter(r);
	}

	// 获取 http 上下文
	ctx = ngx_http_get_module_ctx(r, ngx_http_myfilter_module);
	// 若该请求的上下文已经存在,说明该函数已经被调用,直接交由下一个过滤模块处理
	if (ctx) {
		return ngx_http_next_header_filter(r);
	}

	// 获取配置项
	conf = ngx_http_get_module_loc_conf(r, ngx_http_myfilter_module);
	// 若该配置项的 enable 成员为0,配置文件没有配置 add_prefix 配置项,直接交由下一个过滤模块处理
	if (conf->enable == 0) {
		return ngx_http_next_header_filter(r);
	}

	// 构造 http 上下文
	ctx = ngx_pcalloc(r->pool, sizeof(ngx_http_myfilter_ctx_t));
	if (ctx == NULL) {
		return NGX_ERROR;
	}

	// 不添加前缀
	ctx->add_prefix = 0;

	// 将构造的上下文设置到当前请求中
	ngx_http_set_ctx(r, ctx, ngx_http_myfilter_module);
	// 自定义过滤模块值处理 Content-Type 是 "text/plain" 类型的 http 响应
	if (r->headers_out.content_type.len >= sizeof("text/plain") -1
		&& ngx_strncasecmp(r->headers_out.content_type.data, (u_char*)"text/plain", sizeof("text/plain") - 1) == 0)
	{
		// 设置为1,表示在 http 响应体中添加前缀
		ctx->add_prefix = 1;

		// 添加前缀 prefix 后,http 响应体增加长度
		if (r->headers_out.content_length_n > 0) {
			r->headers_out.content_length_n += prefix.len;
		}
	}

	// 交由下一个过滤模块继续处理
	return ngx_http_next_header_filter(r);
}

// 处理请求中的 http 包体
static ngx_int_t ngx_http_myfilter_body_filter(ngx_http_request_t *r, ngx_chain_t *chain) {
	ngx_http_myfilter_ctx_t *ctx;
	ctx = ngx_http_get_module_ctx(r, ngx_http_myfilter_module);

	// 若获取不到上下文,或者上下文结构体重的 add_prefix 为0或者2,不添加前缀
	// 交由下一个过滤模块处理
	if (ctx == NULL || ctx->add_prefix != 1) {
		return ngx_http_next_body_filter(r, chain);
	}

	// 设置http响应体中该前缀已添加
	ctx->add_prefix = 2;

	// 从内存池中分配内存,用于存储字符串前缀
	ngx_buf_t *b = ngx_create_temp_buf(r->pool, prefix.len);
	// 将 ngx_buf_t 中的指针正确地指向 prefix 字符串
	b->start = b->pos = prefix.data;
	b->last = b->pos + prefix.len;

	// 从内存池中生成 ngx_chain_t 链表,将更分配的 ngx_chain_t 设置到 buf 成员中
	// 并将它添加到原先待发送的 http 响应体前面
	ngx_chain_t *c1 = ngx_alloc_chain_link(r->pool);
	c1->buf = b;
	c1->next = chain;

	// 调用下一个模块的 http body 处理方法,传入新生成的链表 c1
	return ngx_http_next_body_filter(r, c1);
}

// 初始化 http 过滤模块
static ngx_int_t ngx_http_myfilter_init(ngx_conf_t *cf) {
	// 插入到 http 响应头处理方法链表的首部
	ngx_http_next_header_filter = ngx_http_top_header_filter;
	ngx_http_top_header_filter = ngx_http_myfilter_header_filter;

	// 插入到 http 响应体处理方法链表的首部
	ngx_http_next_body_filter = ngx_http_top_body_filter;
	ngx_http_top_body_filter = ngx_http_myfilter_body_filter;

	return NGX_OK;
}

// loc 配置项回调函数1:分配存储配置项的结构体
static void *ngx_http_myfilter_create_loc_conf(ngx_conf_t *cf) {
	// 创建存储配置项的结构体
	ngx_http_myfilter_conf_t *conf = ngx_palloc(cf->pool, sizeof(ngx_http_myfilter_conf_t));
	if (conf == NULL) {
		return NULL;
	}
	// 设置当前配置项未使用
	// 若使用预设函数 ngx_conf_set_flag_slot 解析配置项参数,则必须初始化为 NGX_CONF_UNSET
	conf->enable = NGX_CONF_UNSET;

	return conf;
}

// loc 配置项回调函数2:合并配置项的方法
static char *ngx_http_myfilter_merge_loc_conf(ngx_conf_t *cf, void *parent, void *child) {
	ngx_http_myfilter_conf_t *prev = (ngx_http_myfilter_conf_t*)parent;
	ngx_http_myfilter_conf_t *next = (ngx_http_myfilter_conf_t*)child;

	// 合并 ngx_flag_t 类型的配置项 enable
	ngx_conf_merge_value(next->enable, prev->enable, 0);

	return NGX_CONF_OK;
}

// 定义命令数组
static ngx_command_t ngx_http_myfilter_module_cmds[] = {
	{
		ngx_string("add_prefix"),
		NGX_HTTP_MAIN_CONF | NGX_HTTP_SRV_CONF | NGX_HTTP_LOC_CONF | NGX_CONF_FLAG,
		ngx_conf_set_flag_slot,
		NGX_HTTP_LOC_CONF_OFFSET,
		offsetof(ngx_http_myfilter_conf_t, enable), // 宏定义:返回一个结构体成员相对于结构体起始的偏移量
		NULL,
	},
	ngx_null_command
};

// 定义 http 模块。记录 http 模块的上下文信息
static ngx_http_module_t ngx_http_myfilter_module_ctx = {
	NULL, 								/* preconfiguration */
	ngx_http_myfilter_init,				/* postconfiguration */

	NULL, 								/* create main configuration */
	NULL, 								/* init main configuration */

        NULL, 								/* create server configuration */
	NULL,								/* merge server configuration */

	ngx_http_myfilter_create_loc_conf,	/* create location configuration */
	ngx_http_myfilter_merge_loc_conf, 	/* merge location configuration */
};

// 定义模块。http 过滤模块
ngx_module_t ngx_http_myfilter_module = {
	NGX_MODULE_V1,
	&ngx_http_myfilter_module_ctx,
	ngx_http_myfilter_module_cmds,
	NGX_HTTP_MODULE,
	NULL,
	NULL,
	NULL,
	NULL,
	NULL,
	NULL,
	NULL,
	NGX_MODULE_V1_PADDING
};
4、参考
- 陶辉. 深入理解Nginx:模块开发与架构解析[M]. 北京:机械工业出版社,2016.
- 聂松松等. Nginx底层设计与源码分析[M]. 北京:机械工业出版社,2021.
- Nginx 入门指南


![Java集合框架【二容器[LinkedList容器类、Set接口]】](https://img-blog.csdnimg.cn/3c0685a3dfa74e29b917168aa1508ce0.png)
![[附源码]java毕业设计学校失物招领系统](https://img-blog.csdnimg.cn/facfb73eac814a87a8d36d954f82aa93.png)


![21. [Python GUI] PyQt5中的模型与视图框架-抽象模型基类QAbstractItemModel与自定义模型](https://img-blog.csdnimg.cn/img_convert/0245530fec3b75e07f93e950c901eb77.png)