简述
「使用逻辑回归暴力预测金融欺诈,并不断增加特征维度持续测试」的做法,体现了一种逐步建模与迭代验证的实验思路,在金融欺诈检测中非常有价值,本文作为一篇回顾性记录了早年间公司给某行做反欺诈预测用到的技术和思路。百度原始论文目前搜不到了,当时这篇论文的要点就提到,通过特征增广,只要是特征就用起来,使用最简单的逻辑回归模型来提高预测的精确度。在工程上会攒出惊人数量级的特征维度, 但是效果也是很明显的
简单说了有很明显的以下意义
| 类别 | 意义与作用 |
|---|---|
| 建模策略 | 用逻辑回归打底,快速获得欺诈检测的性能基线 |
| 特征工程 | 逐步加入特征可以精准评估其增益,防止过拟合或噪声引入 |
| 可解释性 | 每一轮逻辑回归结果都可以回溯和解释,满足金融合规要求 |
不断增加特征维度:逐步特征注入的意义
“不断增加特征维度并进行逻辑回归测试”,这是一个典型的特征迭代探索过程(Feature Incremental Analysis),其意义包括:
1. 评估每个特征或一组特征的预测增益
通过每次只加入一列或一组新特征,观察模型性能变化(如 Recall 提升情况),可明确:哪些特征有效,哪些冗余或带噪声
2. 帮助构建更轻量可解释的模型
在金融场景下,可解释性极重要。逐步加入有效特征,有助于合规:便于模型在监管审查时解释每一步
3. 支持工程实践中的在线迭代开发
这种“增量构建 + 持续测试”的方式与业务需求匹配:可能后续有新特征,如设备类型、IP地址、商户代码,逐步测试可以确保每次上线的模型在当前特征下最优。
工程意义
持续测试不是纯学术,而是贴近工程现实的:
| 工程需求 | 你这样做的优势 |
|---|---|
| 模型部署快速迭代 | 每次新特征上线后,能快速评估是否要加入生产 |
| 资源限制 | 简化逻辑回归相比复杂模型更容易上线测试 |
| 数据动态更新 | 新交易行为、新维度不断加入,适合增量测试 |
数据集Kaggle – Credit Card Fraud
-
链接:https://www.kaggle.com/datasets/mlg-ulb/creditcardfraud
-
规模:284,807 条交易数据,欺诈样本比例:0.17%(极度不平衡)
-
特征:30 个字段,含匿名特征 V1~V28 + 时间、金额、标签(Class)实际信用卡交易,匿名化处理,适合模型测试和不平衡分类研究
代码实现
实现一个手写的逻辑回归模型来预测信用卡欺诈行为,使用creditcard.csv数据集,并逐步引入新特征来提高准确性。从头实现逻辑回归,包括数据预处理模型训练和特征选择。
一般思路
- 数据加载和预处理:
- 加载creditcard.csv数据集(假设包含特征如Time, V1-V28, Amount, Class)。
- 对特征进行标准化(StandardScaler手动实现),因为逻辑回归对特征尺度敏感。
- 处理数据不平衡(信用卡欺诈数据集通常正负样本极不平衡),使用下采样或上采样。
- 逻辑回归模型:
- 实现sigmoid函数、损失函数(交叉熵损失)。
- 使用梯度下降进行优化。
- 手动实现预测和评估指标(准确率、精确率、召回率、F1分数)。
- 特征工程:
- 初始模型使用所有特征(V1-V28, Amount)。
- 逐步引入新特征,例如:Amount的衍生特征(对数转换、标准化后的平方)。Time特征的周期性特征(如小时、分钟)。V1-V28的交互项或多项式特征。
- 使用特征重要性(基于权重绝对值)选择最有影响的特征。
- 迭代优化:
- 通过多次实验,比较不同特征组合的性能。
- 记录每次引入新特征后的模型性能(F1分数为主,因为数据不平衡)。
在欺诈预测里指标的含义
1. Accuracy(准确率)
整体上模型预测对了多少比例。
在欺诈检测中的意义:
模型整体预测对的比例。
⚠️ 由于欺诈比例极低(如仅 0.17%),高准确率常常是虚假的。比如:
-
你预测全部是“正常交易”,准确率也可以达到 99.8%。
-
但模型其实一个欺诈都没识别出来。
2. Precision(精确率)
预测为欺诈的交易中,实际真的是欺诈的比例。
在欺诈检测中的意义:
模型命中的质量。预测欺诈是否精准?
-
高 precision:你标为“欺诈”的交易,大多数是真的欺诈。
-
低 precision:你误报太多“正常交易”为欺诈(误杀正常用户)。
3. Recall(召回率)
所有真实欺诈中,被模型成功识别出来的比例。
在欺诈检测中的意义:
模型有没有漏掉真正的欺诈?
-
高 recall:几乎所有欺诈交易都抓到了(不漏)
-
低 recall:很多欺诈交易模型没抓到(漏检)
4. F1-score(调和平均分)
Precision 和 Recall 的调和平均,综合考虑“误杀”和“漏检”。
在欺诈检测中的意义:
衡量模型综合能力的关键指标。适合在不平衡数据下使用。
-
当你既不想漏掉欺诈(Recall),也不想误报正常交易(Precision),就用 F1。
流程
[开始]
   |
   v
[初始化参数]
   - feature_subset_ratio = 0.5
   - learning_rate = 0.001
   - num_iterations = 3000
   - num_trials = 100
   - class_weights = {0: 1.0, 1: 10.0}
   - stages = [Initial, Stage 1, Stage 2, Stage 3]
   |
   v
[循环每个阶段 (stage_name, stage)]
   |
   v
[初始化阶段性能记录]
   - metrics = []
   - last_feature_names = None
   - last_feature_importance = None
   |
   v
[循环每次试验 (trial = 1 to num_trials)]
   |
   v
[加载和预处理数据]
   - random_seed = 42 + trial
   - 加载 creditcard.csv
   - 下采样 (20% 非欺诈样本)
   - 随机选择 50% 特征
   - 标准化特征
   - 返回 X_subset, y, selected_feature_names, original_X, 索引信息
   |
   v
[分割训练/测试集]
   - 使用 random_seed 分割 80% 训练集, 20% 测试集
   - X_train, X_test, y_train, y_test
   |
   v
[特征增广]
   - 调用 add_features_stage(stage)
   - 阶段0: 随机特征子集
   - 阶段1: + Amount_log, Amount_square
   - 阶段2: + Time_hours
   - 阶段3: + V1_V2_interaction, V3_V4_interaction, V1_square
   - 返回 X_new, feature_names, num_new_features
   |
   v
[初始化权重]
   - 如果 stage == 0 或 prev_weights 为空:
       init_weights = zeros(X_new.shape[1])
   - 否则:
       init_weights = [prev_weights, zeros(num_new_features)]
   |
   v
[训练模型]
   - 调用 train_and_evaluate
   - 使用 gradient_descent (init_weights, learning_rate, num_iterations, class_weights)
   - 加权损失函数优化召回率
   - 返回 metrics (accuracy, precision, recall, f1), weights
   |
   v
[保存结果]
   - metrics.append(metrics)
   - 如果 trial == num_trials - 1:
       保存 last_feature_names, last_feature_importance
   - 更新 prev_weights = weights
   |
   v
[结束试验循环]
   |
   v
[计算平均性能]
   - avg_metrics = mean(metrics)
   - 输出 Accuracy, Precision, Recall, F1
   |
   v
[输出特征重要性 (仅 Stage 3)]
   - 如果 stage == 3:
       创建 DataFrame(last_feature_names, last_feature_importance)
       按 Importance 降序输出
   |
   v
[结束阶段循环]
   |
   v
[结束]
代码
实际经过多轮修改后的代码
import numpy as np
import pandas as pd
import random


# Sigmoid函数
def sigmoid(z):
    return 1 / (1 + np.exp(-np.clip(z, -500, 500)))


# 加权交叉熵损失函数
def compute_weighted_loss(y, y_pred, class_weights):
    y_pred = np.clip(y_pred, 1e-15, 1 - 1e-15)
    weights = np.where(y == 1, class_weights[1], class_weights[0])
    return -np.mean(weights * (y * np.log(y_pred) + (1 - y) * np.log(1 - y_pred)))


# 梯度下降(加权)
def gradient_descent(X, y, weights, learning_rate, num_iterations, class_weights):
    m = len(y)
    for _ in range(num_iterations):
        y_pred = sigmoid(np.dot(X, weights))
        weights_vector = np.where(y == 1, class_weights[1], class_weights[0])
        gradient = np.dot(X.T, weights_vector * (y_pred - y)) / m
        weights -= learning_rate * gradient
    return weights


# 标准化特征
def standardize(X):
    mean = np.mean(X, axis=0)
    std = np.std(X, axis=0)
    std[std == 0] = 1  # 防止除以零
    return (X - mean) / std, mean, std


# 评估指标
def evaluate(y_true, y_pred):
    y_pred_binary = (y_pred >= 0.5).astype(int)
    accuracy = np.mean(y_true == y_pred_binary)
    precision = np.sum((y_true == 1) & (y_pred_binary == 1)) / np.sum(y_pred_binary == 1) if np.sum(
        y_pred_binary == 1) > 0 else 0
    recall = np.sum((y_true == 1) & (y_pred_binary == 1)) / np.sum(y_true == 1) if np.sum(y_true == 1) > 0 else 0
    f1 = 2 * precision * recall / (precision + recall) if (precision + recall) > 0 else 0
    return accuracy, precision, recall, f1


# 加载和预处理数据
def load_and_preprocess_data(filepath, downsample_ratio=0.2, feature_subset_ratio=0.5, random_seed=42):
    df = pd.read_csv(filepath)
    feature_names = df.columns.drop('Class').tolist()
    X = df.drop(columns=['Class']).values
    y = df['Class'].values

    # 下采样负样本
    random.seed(random_seed)
    fraud_indices = np.where(y == 1)[0]
    non_fraud_indices = np.where(y == 0)[0]
    sampled_non_fraud = random.sample(list(non_fraud_indices), int(len(non_fraud_indices) * downsample_ratio))
    selected_indices = np.concatenate([fraud_indices, sampled_non_fraud])
    np.random.seed(random_seed)
    np.random.shuffle(selected_indices)

    X = X[selected_indices]
    y = y[selected_indices]

    # 随机选择一部分特征
    num_features = X.shape[1]
    num_selected = int(num_features * feature_subset_ratio)
    selected_feature_indices = random.sample(range(num_features), num_selected)
    selected_feature_indices.sort()
    X_subset = X[:, selected_feature_indices]
    selected_feature_names = [feature_names[i] for i in selected_feature_indices]

    # 记录Time、Amount、V1、V3、V4的列索引
    time_col = feature_names.index('Time') if 'Time' in feature_names else -1
    amount_col = feature_names.index('Amount') if 'Amount' in feature_names else -1
    v1_col = feature_names.index('V1') if 'V1' in feature_names else -1
    v3_col = feature_names.index('V3') if 'V3' in feature_names else -1
    v4_col = feature_names.index('V4') if 'V4' in feature_names else -1
    time_col_selected = selected_feature_indices.index(time_col) if time_col in selected_feature_indices else -1
    amount_col_selected = selected_feature_indices.index(amount_col) if amount_col in selected_feature_indices else -1
    v1_col_selected = selected_feature_indices.index(v1_col) if v1_col in selected_feature_indices else -1
    v3_col_selected = selected_feature_indices.index(v3_col) if v3_col in selected_feature_indices else -1
    v4_col_selected = selected_feature_indices.index(v4_col) if v4_col in selected_feature_indices else -1

    # 标准化
    X_subset, mean, std = standardize(X_subset)
    return X_subset, y, mean, std, selected_feature_names, X, selected_feature_indices, time_col, amount_col, v1_col, v3_col, v4_col, time_col_selected, amount_col_selected, v1_col_selected, v3_col_selected, v4_col_selected


# 创建新特征(分阶段)
def add_features_stage(X, feature_names, original_X, selected_feature_indices, time_col, amount_col, v1_col, v3_col,
                       v4_col, time_col_selected, amount_col_selected, v1_col_selected, v3_col_selected,
                       v4_col_selected, stage):
    X_new = X.copy()
    new_feature_names = feature_names.copy()
    num_new_features = 0

    if stage >= 1:  # 阶段1:Amount相关特征
        if amount_col_selected != -1:
            amount = original_X[:, amount_col]
            amount_log = np.log1p(np.abs(amount))
            X_new = np.column_stack([X_new, amount_log])
            new_feature_names.append('Amount_log')
            amount_square = amount ** 2
            X_new = np.column_stack([X_new, amount_square])
            new_feature_names.append('Amount_square')
            num_new_features += 2

    if stage >= 2:  # 阶段2:Time相关特征
        if time_col_selected != -1:
            time_hours = (original_X[:, time_col] % (24 * 3600)) / 3600
            X_new = np.column_stack([X_new, time_hours])
            new_feature_names.append('Time_hours')
            num_new_features += 1

    if stage >= 3:  # 阶段3:交互项和多项式特征
        v1_col_idx = feature_names.index('V1') if 'V1' in feature_names else -1
        v2_col_idx = feature_names.index('V2') if 'V2' in feature_names else -1
        if v1_col_idx != -1 and v2_col_idx != -1:
            v1_v2_interaction = original_X[:, feature_names.index('V1')] * original_X[:, feature_names.index('V2')]
            X_new = np.column_stack([X_new, v1_v2_interaction])
            new_feature_names.append('V1_V2_interaction')
            num_new_features += 1
        if v3_col_selected != -1 and v4_col_selected != -1:
            v3_v4_interaction = original_X[:, v3_col] * original_X[:, v4_col]
            X_new = np.column_stack([X_new, v3_v4_interaction])
            new_feature_names.append('V3_V4_interaction')
            num_new_features += 1
        if v1_col_selected != -1:
            v1_square = original_X[:, v1_col] ** 2
            X_new = np.column_stack([X_new, v1_square])
            new_feature_names.append('V1_square')
            num_new_features += 1

    return X_new, new_feature_names, num_new_features


# 训练和评估模型
def train_and_evaluate(X_train, X_test, y_train, y_test, learning_rate, num_iterations, class_weights, init_weights):
    weights = init_weights
    weights = gradient_descent(X_train, y_train, weights, learning_rate, num_iterations, class_weights)
    y_pred = sigmoid(np.dot(X_test, weights))
    return evaluate(y_test, y_pred), weights


# 主函数
def main():
    filepath = 'creditcard.csv'
    feature_subset_ratio = 0.5
    learning_rate = 0.001
    num_iterations = 3000
    num_trials = 100
    class_weights = {0: 1.0, 1: 10.0}  # 欺诈样本权重更高
    stages = [
        ("Initial (Random Subset)", 0),
        ("Stage 1: Amount Features", 1),
        ("Stage 2: Time Features", 2),
        ("Stage 3: Interaction & Polynomial Features", 3)
    ]

    print(
        f"\n=== Feature Subset Ratio: {feature_subset_ratio}, Learning Rate: {learning_rate}, Iterations: {num_iterations} ===")

    prev_weights = None  # 用于跨阶段继承权重
    for stage_name, stage in stages:
        print(f"\n--- {stage_name} ---")
        metrics = []
        last_feature_names = None
        last_feature_importance = None

        for trial in range(num_trials):
            print(f"\nTrial {trial + 1}")
            random_seed = 42 + trial
            # 加载数据
            X_subset, y, mean, std, selected_feature_names, original_X, selected_feature_indices, time_col, amount_col, v1_col, v3_col, v4_col, time_col_selected, amount_col_selected, v1_col_selected, v3_col_selected, v4_col_selected = load_and_preprocess_data(
                filepath, downsample_ratio=0.2, feature_subset_ratio=feature_subset_ratio, random_seed=random_seed)

            # 分割训练和测试集
            np.random.seed(random_seed)
            indices = np.arange(len(y))
            np.random.shuffle(indices)
            train_size = int(0.8 * len(y))
            train_idx, test_idx = indices[:train_size], indices[train_size:]
            X_train, X_test = X_subset[train_idx], X_subset[test_idx]
            y_train, y_test = y[train_idx], y[test_idx]

            # 添加特征
            X_new, feature_names, num_new_features = add_features_stage(X_subset, selected_feature_names, original_X,
                                                                        selected_feature_indices, time_col, amount_col,
                                                                        v1_col, v3_col, v4_col, time_col_selected,
                                                                        amount_col_selected, v1_col_selected,
                                                                        v3_col_selected, v4_col_selected, stage)
            X_train_new, X_test_new = X_new[train_idx], X_new[test_idx]

            # 初始化权重(继承上一阶段权重)
            if stage == 0 or prev_weights is None:
                init_weights = np.zeros(X_new.shape[1])
            else:
                init_weights = np.zeros(X_new.shape[1])
                init_weights[:len(prev_weights)] = prev_weights

            # 训练和评估
            result, weights = train_and_evaluate(X_train_new, X_test_new, y_train, y_test, learning_rate,
                                                 num_iterations, class_weights, init_weights)
            metrics.append(result)
            print(
                f"Accuracy: {result[0]:.4f}, Precision: {result[1]:.4f}, Recall: {result[2]:.4f}, F1: {result[3]:.4f}")

            # 保存最后一次的特征重要性
            if trial == num_trials - 1:
                last_feature_names = feature_names
                last_feature_importance = np.abs(weights)

        # 计算平均性能
        avg_metrics = np.mean(metrics, axis=0)
        print(f"\nAverage Performance for {stage_name}:")
        print(
            f"Accuracy: {avg_metrics[0]:.4f}, Precision: {avg_metrics[1]:.4f}, Recall: {avg_metrics[2]:.4f}, F1: {avg_metrics[3]:.4f}")

        # 更新跨阶段权重(使用最后一次试验的权重)
        prev_weights = weights

        # 输出特征重要性(仅最后阶段)
        if stage == 3 and last_feature_names and last_feature_importance is not None:
            if len(last_feature_names) != len(last_feature_importance):
                print(
                    f"Error: Length mismatch - feature_names: {len(last_feature_names)}, feature_importance: {len(last_feature_importance)}")
                return
            importance_df = pd.DataFrame({'Feature': last_feature_names, 'Importance': last_feature_importance})
            print(f"\nFeature Importance (Last Trial, Stage 3):")
            print(importance_df.sort_values(by='Importance', ascending=False))


if __name__ == "__main__":
main()- 初始化参数:
- 设置超参数:feature_subset_ratio=0.5(随机选择50%特征),learning_rate=0.001,num_iterations=3000,num_trials=100,class_weights={0: 1.0, 1: 10.0}(欺诈样本权重更高)。
- 定义特征增广阶段(stages):
- 阶段0:初始随机特征子集。
- 阶段1:添加Amount_log、Amount_square。
- 阶段2:添加Time_hours。
- 阶段3:添加V1_V2_interaction、V3_V4_interaction、V1_square。
- 循环每个特征增广阶段:
- 对于每个阶段(Initial, Stage 1, Stage 2, Stage 3):
- 初始化性能记录:创建列表metrics存储每次试验的性能指标。
- 初始化特征重要性:保存最后一次试验的特征名称和权重。
- 对于每个阶段(Initial, Stage 1, Stage 2, Stage 3):
训练和评估
预期的结果是随着特征增广后,越来越多的特征的加入预测的召回率会更高, 能把更多的欺诈项目找出来,而且模型训练过程并不需要改变模型结构
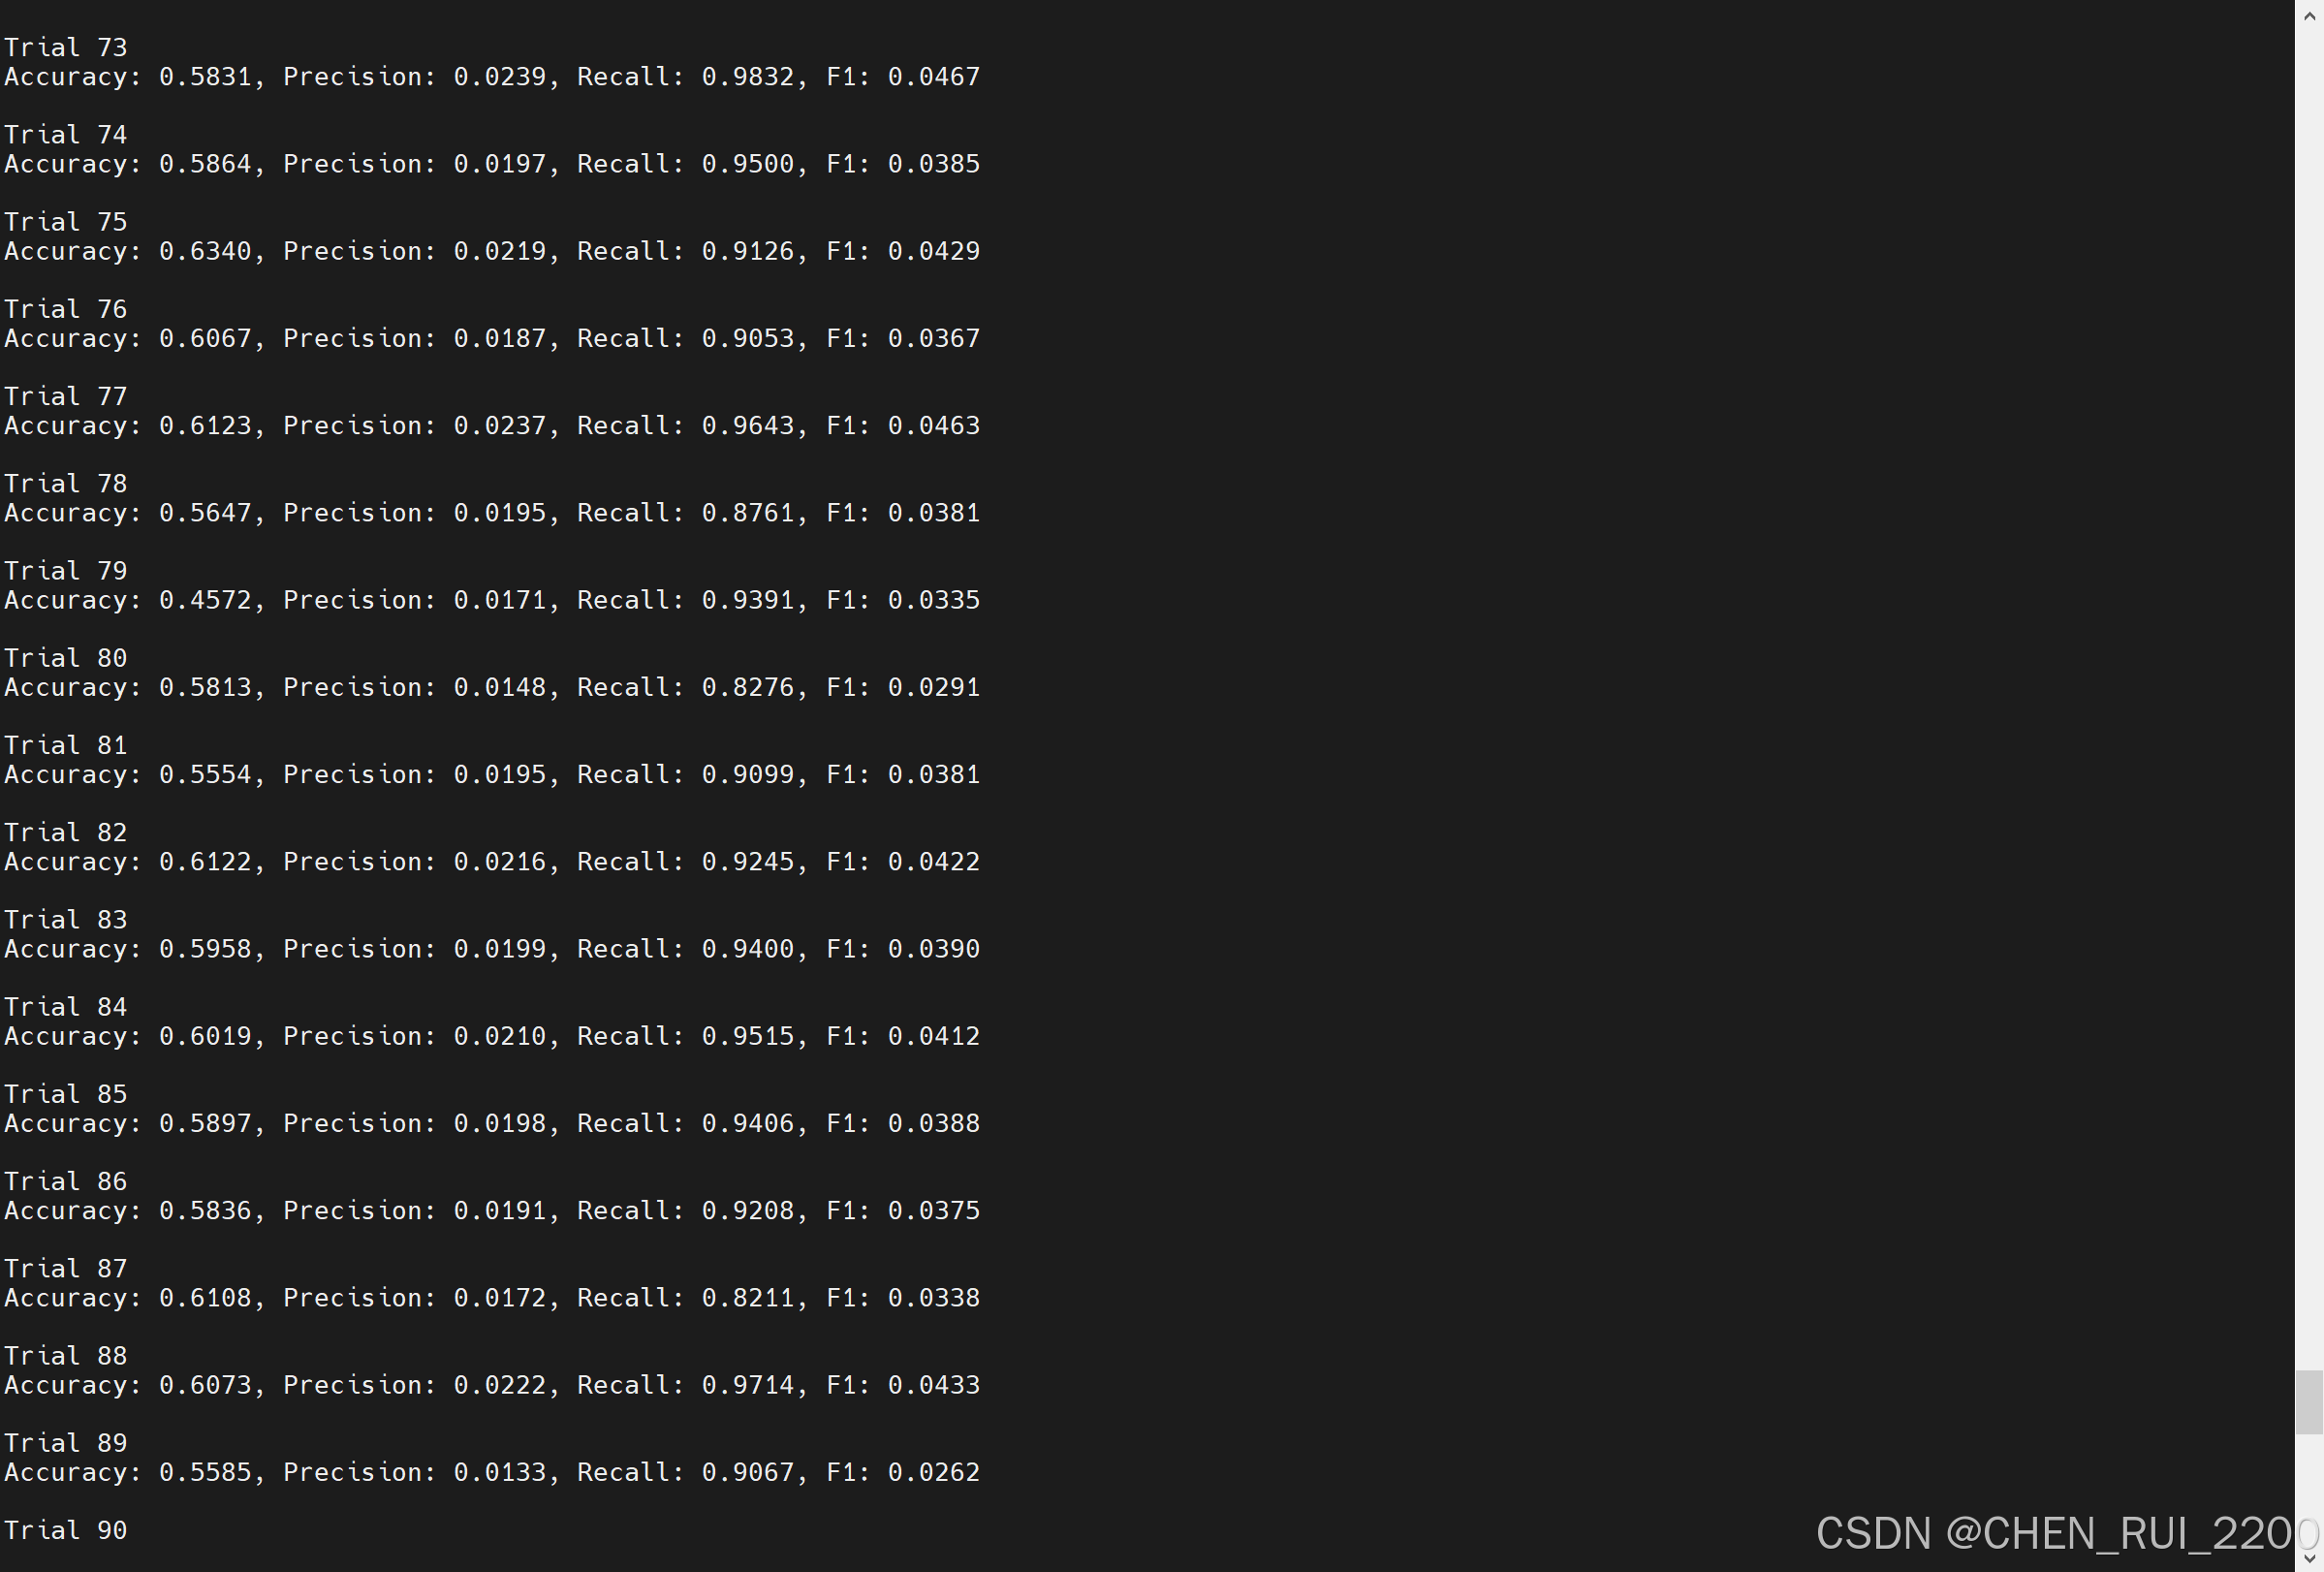
--- Initial (Random Subset) ---
...
Trial 100
Accuracy: 0.5832, Precision: 0.0209, Recall: 0.9508, F1: 0.0409...
--- Stage 1: Amount Features ---
...
Trial 100
Accuracy: 0.5832, Precision: 0.2692, Recall: 0.9808, F1: 0.4224...
--- Stage 2: Time Features ---
Accuracy: 0.9904, Precision: 0.4431, Recall: 0.8132, F1: 0.5736...
--- Stage 3: Interaction & Polynomial Features ---
Accuracy: 0.9908, Precision: 0.4934, Recall: 0.7212, F1: 0.5859

![[ACTF2020 新生赛]Include 1(php://filter伪协议)](https://i-blog.csdnimg.cn/direct/09cb532228734a828e63036f3fbd9caf.png)