curl --silent --remote-name --location https://download.ceph.com/rpm-squid/el9/noarch/cephadm
chmod +x cephadm

./cephadm add-repo --release reef
apt-get --download-only install ceph ceph-mon ceph-mgr ceph-common

mkdir /reef/mon
mv /var/cache/apt/archives/*.deb /reef/mon/
dpkg -i /reef/mon/*.deb
ssh-keygen -t ed25519
ssh-copy-id root@mon1
ssh-copy-id root@mon2
ssh-copy-id root@mon3
ssh-copy-id root@stor1
ssh-copy-id root@stor2
ssh-copy-id root@stor3
ssh stor1
cephadm bootstrap --mon-ip < ip1 >< cluster_cidr> --public-network < public_cidr> --initial-dashboard-user admin --initial-dashboard-password 'Os#123'
将配置文件:/etc/ceph/ceph.conf,admin密钥环:client.admin.keyring,拷贝到其他mon节点
cephadm shell
ceph orch host add mon2 ip2
ceph orch host add mon3 ip3
ceph orch daemon add mon mon2
ceph orch daemon add mon mon3
ceph orch daemon add mgr mon1
ceph orch daemon add mgr mon2
ceph orch daemon add mgr mon3
ceph -s
ceph mgr stat
ceph mgr module enable dashboard
ceph config get mgr mgr/dashboard/server_addr
ceph config get mgr mgr/dashboard/server_port
apt-get --download-only install ceph ceph-osd ceph-common lvm2

mkdir /reef/stor
mv /var/cache/apt/archives/*.deb /reef/stor/
dpkg -i /reef/stor/*.deb
将配置文件:/etc/ceph/ceph.conf,拷贝到osd节点
ceph orch host add stor1 ip11
ceph orch host add stor2 ip12
ceph orch daemon add osd --all-available-devices --hosts stor1
ceph orch daemon add osd --all-available-devices --hosts stor2
ceph -s
ceph osd tree
ceph osd df
stor节点的nvme ssd作wal写缓冲、db元数据,sata hdd作容量盘 采用bluestore存储引擎,自动创建crush rule
pvcreate /dev/nvme0n1
vgcreate nvme-vg /dev/nvme0n1
lvcreate -L < lv_capacity> -n waldb1 nvme-vg
lvcreate -L < lv_capacity> -n waldb2 nvme-vg
lvcreate -L < lv_capacity> -n waldb3 nvme-vg
lvcreate -L < lv_capacity> -n waldb4 nvme-vg
ceph-volume lvm create --data /dev/sdb --block.db /dev/nvme-vg/waldb1
ceph-volume lvm create --data /dev/sdc --block.db /dev/nvme-vg/waldb2
ceph-volume lvm create --data /dev/sdd --block.db /dev/nvme-vg/waldb3
ceph-volume lvm create --data /dev/sdd --block.db /dev/nvme-vg/waldb4
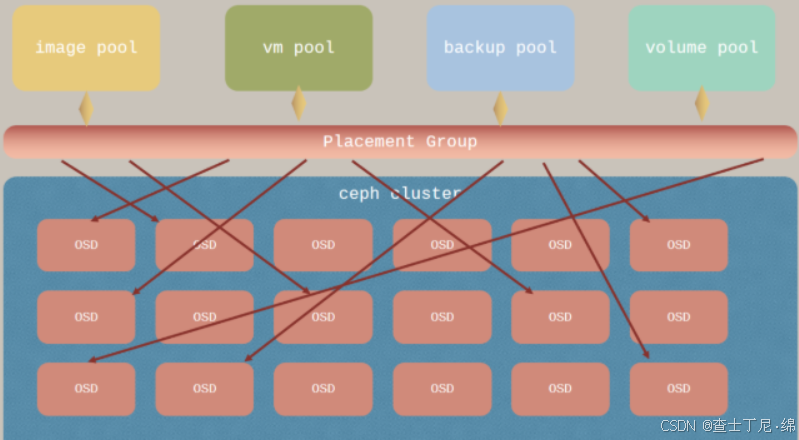
ceph osd pool create volumes < pg_num> < pgp_num> replicated
ceph osd pool create images < pg_num> < pgp_num> replicated
ceph osd pool create vms < pg_num> < pgp_num> replicated
ceph osd pool application enable volumes rbd
ceph osd pool application enable images rbd
ceph osd pool application enable vms rbd
ceph osd pool set volumes size 3
ceph osd pool set images size 3
ceph osd pool set vms size 3
ceph auth get-or-create client.glance mon 'allow r' osd 'allow rwx pool=images'
ceph auth get-or-create client.nova mon 'allow r' osd 'allow rwx pool=vms'
ceph auth get-or-create client.cinder mon 'allow r' osd 'allow rwx pool=volumes'
ceph auth get client.glance -o /etc/ceph/ceph.client.glance.keyring
ceph auth get client.nova -o /etc/ceph/ceph.client.nova.keyring
ceph auth get client.cinder -o /etc/ceph/ceph.client.cinder.keyring
ceph auth list
ceph auth get-key client.< user>
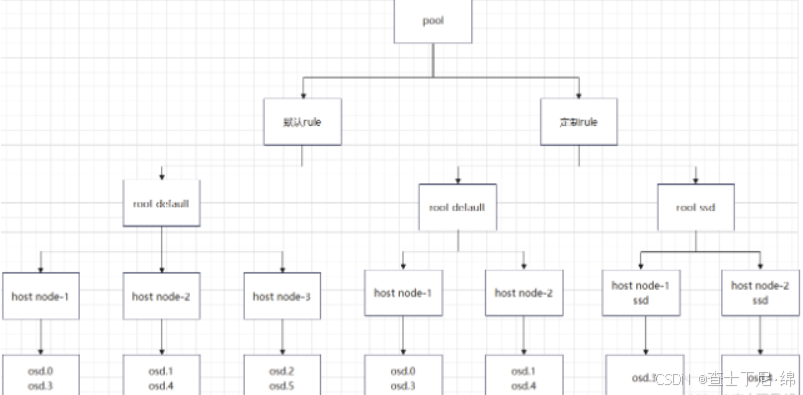
crush算法通过计算位置来确定数据的存储、检索,授权客户端直接连接osd 对象通过算法被切分成数据片,分布在不同的osd上 提供很多种的bucket,最小的节点是osd 结构如下: osd ( or device)
host
chassis
rack
row
pdu
pod
room
datacenter
zone
region
root
ceph osd crush add-bucket ssd-b root
ceph osd crush add-bucket n1-ssd-b host
ceph osd crush add-bucket n2-ssd-b host
ceph osd crush move n1-ssd-b root = ssd-b
ceph osd crush move n2-ssd-b root = ssd-b
ceph osd crush move osd.3 host = n1-ssd-b root = ssd-b
ceph osd crush move osd.4 host = n2-ssd-b root = ssd-b
ceph osd crush rule create-replicated rule1 ssd-b host
ceph osd pool set pool1 crush_rule rule1
ceph osd tree
ceph osd crush tree
ceph osd crush dump
ceph osd crush rule ls