第一部分:设计模式基础
1. 设计模式概述
设计模式(Design Pattern)是一套被反复使用、多数人知晓的、经过分类编目的代码设计经验的总结,它描述了在软件设计过程中一些不断重复出现的问题以及该问题的解决方案。设计模式是在特定环境下解决软件设计问题的定制化方案,它不是可以直接转化成代码的模板,而是在特定情况下应用的指导原则。

- 提高代码可维护性、可扩展性和复用性:
设计模式通过提供经过验证的解决方案,帮助开发者编写更清晰、更模块化的代码。例如,使用工厂模式可以降低代码耦合度:
// 不使用工厂模式
public class Client {
    private Database db = new MySQLDatabase(); // 直接依赖具体实现

    public void doWork() {
        db.connect();
        // ...
    }
}

// 使用工厂模式
public class Client {
    private Database db = DatabaseFactory.createDatabase(); // 依赖抽象

    public void doWork() {
        db.connect();
        // ...
    }
}- 复杂业务场景下的优势:
在复杂业务场景中,设计模式能有效管理对象间的交互和状态变化。例如电商系统中的订单状态管理,使用状态模式可以避免大量的条件判断语句:
// 订单状态接口
public interface OrderState {
    void next(Order order);
    void previous(Order order);
    void printStatus();
}

// 具体状态:已下单
public class OrderedState implements OrderState {
    public void next(Order order) {
        order.setState(new PaidState());
    }

    public void previous(Order order) {
        System.out.println("订单刚创建,没有上一个状态");
    }

    public void printStatus() {
        System.out.println("订单已下单,等待支付");
    }
}

// 订单类
public class Order {
    private OrderState state;

    public Order() {
        this.state = new OrderedState();
    }

    public void nextState() {
        state.next(this);
    }

    // 其他方法...
}- 新技术与设计模式的关系:
新技术往往建立在经典设计模式之上。例如:
- AOP(面向切面编程)基于代理模式实现
- Spring框架的依赖注入是工厂模式和策略模式的结合
- 响应式编程大量使用观察者模式
// AOP中的代理模式示例
public interface UserService {
    void addUser(String name);
}

public class UserServiceImpl implements UserService {
    public void addUser(String name) {
        System.out.println("添加用户: " + name);
    }
}

public class UserServiceProxy implements UserService {
    private UserService userService;

    public UserServiceProxy(UserService userService) {
        this.userService = userService;
    }

    public void addUser(String name) {
        System.out.println("开始事务...");
        userService.addUser(name);
        System.out.println("提交事务...");
    }
}
设计模式和架构模式在实际开发中常常结合使用。架构模式提供系统的整体结构,而设计模式则解决架构中各部分的实现细节问题。理解它们的区别和联系,有助于开发者在不同层次上做出更合理的设计决策。
2. 面向对象设计原则
2.1 SOLID原则
- 单一职责原则(SRP):一个类只做一件事
// 反例 public class Employee { public void calculateSalary() { /* 计算薪资逻辑 */ } public void saveToDatabase() { /* 数据库保存逻辑 */ } public void generateReport() { /* 生成报表逻辑 */ } } // 正例 public class Employee { public void calculateSalary() { /* 计算薪资逻辑 */ } } public class EmployeeRepository { public void save(Employee employee) { /* 数据库保存逻辑 */ } } public class EmployeeReportGenerator { public void generate(Employee employee) { /* 生成报表逻辑 */ } } - 开闭原则(OCP):软件实体(类、模块、函数等)对扩展开放,对修改关闭
// 反例 public class AreaCalculator { public double calculate(Object shape) { if (shape instanceof Rectangle) { // 计算矩形面积 } else if (shape instanceof Circle) { // 计算圆形面积 } // 每新增一种形状都需要修改此类 } } // 正例 public interface Shape { double calculateArea(); } public class Rectangle implements Shape { @Override public double calculateArea() { /* 实现 */ } } public class Circle implements Shape { @Override public double calculateArea() { /* 实现 */ } } public class AreaCalculator { public double calculate(Shape shape) { return shape.calculateArea(); } } - 里氏替换原则(LSP):子类可透明替换父类,不会引起任何错误
// 反例 public class Bird { public void fly() { /* 飞行实现 */ } } public class Penguin extends Bird { @Override public void fly() { throw new UnsupportedOperationException("企鹅不会飞,但强制让飞,报异常!"); } } // 正例 public class Bird { // 基础鸟类功能 } public class FlyingBird extends Bird { public void fly() { /* 飞行实现 */ } } public class Penguin extends Bird { // 企鹅特有功能 } - 接口隔离原则(ISP):接口要小而专,客户端不应该被迫依赖于它们不使用的接口
// 反例 public interface Worker { void work(); void eat(); void sleep(); } public class Robot implements Worker { public void work() { /* 工作 */ } public void eat() { /* 机器人不需要吃东西 */ } public void sleep() { /* 机器人不需要睡觉 */ } } // 正例 public interface Workable { void work(); } public interface Feedable { void eat(); void sleep(); } public class Human implements Workable, Feedable { // 实现所有方法 } public class Robot implements Workable { // 只需要实现工作方法 } - 依赖倒置原则(DIP):面向接口编程,高层模块不应该依赖于低层模块,二者都应该依赖于抽象
// 反例
public class LightBulb {
    public void turnOn() { /* 开灯 */ }
    public void turnOff() { /* 关灯 */ }
}

public class Switch {
    private LightBulb bulb;

    public void operate() {
        // 直接依赖具体实现
        if (bulb.isOn()) bulb.turnOff();
        else bulb.turnOn();
    }
}


// 正例
public interface Switchable {
    void turnOn();
    void turnOff();
}

public class LightBulb implements Switchable {
    @Override
    public void turnOn() { /* 实现 */ }
    @Override
    public void turnOff() { /* 实现 */ }
}

public class Switch {
    private Switchable device;

    public void operate() {
        // 依赖抽象接口
        if (device.isOn()) device.turnOff();
        else device.turnOn();
    }
}
2.2 其他重要原则
- 迪米特法则(LoD):最少知识原则
- 合成复用原则(CRP):优先使用组合而非继承
- KISS原则:保持简单
第二部分:创建型模式与应用
1. 单例模式
单例模式是Java中最常用的设计模式之一,它确保一个类只有一个实例,并提供一个全局访问点。本文将全面解析单例模式的核心概念、实现方式、实际应用场景以及常见陷阱,并提供可直接在生产环境中使用的代码示例。
1.1 核心概念与实现方式
- 饿汉式、懒汉式、双重检查锁、静态内部类、枚举
饿汉式单例
饿汉式单例在类加载时就创建实例,保证了线程安全,但可能造成资源浪费。
/**
 * 饿汉式单例实现
 * 优点:线程安全,实现简单
 * 缺点:类加载时就初始化,可能造成资源浪费
 */
public class EagerSingleton {
    // 类加载时就创建实例,保证线程安全
    private static final EagerSingleton INSTANCE = new EagerSingleton();

    // 私有构造函数防止外部实例化
    private EagerSingleton() {
        // 防止反射攻击
        if (INSTANCE != null) {
            throw new IllegalStateException("单例实例已存在");
        }
    }

    // 提供全局访问点
    public static EagerSingleton getInstance() {
        return INSTANCE;
    }

    // 示例方法
    public void doSomething() {
        System.out.println("饿汉式单例方法执行");
    }
}
懒汉式单例
懒汉式单例在第一次使用时才创建实例,节省了资源,但需要考虑线程安全问题。
/**
 * 懒汉式单例基础实现(非线程安全)
 * 优点:延迟加载,节省资源
 * 缺点:非线程安全
 */
public class LazySingleton {
    private static LazySingleton instance;

    private LazySingleton() {}

    public static LazySingleton getInstance() {
        if (instance == null) {
            instance = new LazySingleton();
        }
        return instance;
    }
}

/**
 * 线程安全的懒汉式单例(同步方法)
 * 优点:线程安全,延迟加载
 * 缺点:每次获取实例都需要同步,性能较差
 */
public class ThreadSafeLazySingleton {
    private static ThreadSafeLazySingleton instance;

    private ThreadSafeLazySingleton() {}

    // 同步方法保证线程安全
    public static synchronized ThreadSafeLazySingleton getInstance() {
        if (instance == null) {
            instance = new ThreadSafeLazySingleton();
        }
        return instance;
    }
}
双重检查锁定(DCL)单例
双重检查锁定结合了懒汉式和饿汉式的优点,既实现了延迟加载,又保证了线程安全。
/**
 * 双重检查锁定单例(推荐生产使用)
 * 优点:线程安全,延迟加载,性能较好
 * 注意:JDK5+才能保证完全正确,需要volatile关键字
 */
public class DoubleCheckedLockingSingleton {
    // volatile保证可见性和禁止指令重排序
    private static volatile DoubleCheckedLockingSingleton instance;

    private DoubleCheckedLockingSingleton() {
        // 防止反射攻击
        if (instance != null) {
            throw new IllegalStateException("单例实例已存在");
        }
    }

    public static DoubleCheckedLockingSingleton getInstance() {
        // 第一次检查,避免不必要的同步
        if (instance == null) {
            synchronized (DoubleCheckedLockingSingleton.class) {
                // 第二次检查,确保只有一个实例被创建
                if (instance == null) {
                    instance = new DoubleCheckedLockingSingleton();
                }
            }
        }
        return instance;
    }
}
静态内部类单例
静态内部类方式实现了延迟加载和线程安全,且不需要同步。
/**
 * 静态内部类实现单例(推荐生产使用)
 * 优点:线程安全,延迟加载,实现简单
 * 原理:利用类加载机制保证线程安全
 */
public class StaticInnerClassSingleton {
    // 私有构造函数
    private StaticInnerClassSingleton() {}

    // 静态内部类
    private static class SingletonHolder {
        private static final StaticInnerClassSingleton INSTANCE = new StaticInnerClassSingleton();
    }

    public static StaticInnerClassSingleton getInstance() {
        return SingletonHolder.INSTANCE;
    }
}
枚举单例
枚举单例是《Effective Java》推荐的方式,简洁且能防止反射和序列化攻击。
/**
 * 枚举实现单例(最佳实践)
 * 优点:线程安全,防止反射和序列化攻击,实现简单
 * 推荐:生产环境首选方式
 */
public enum EnumSingleton {
    INSTANCE;

    // 示例方法
    public void doSomething() {
        System.out.println("枚举单例方法执行");
    }

    // 可以添加任意方法和属性
    private String config;

    public String getConfig() {
        return config;
    }

    public void setConfig(String config) {
        this.config = config;
    }
}- 线程安全问题与解决方案
- 饿汉式:天生线程安全,因为实例在类加载时创建
- 懒汉式基础版:非线程安全,多线程可能创建多个实例
- 同步方法懒汉式:线程安全但性能差
- 双重检查锁定:线程安全且性能好,但实现较复杂
- 静态内部类:线程安全且实现简单
- 枚举:最佳实践,线程安全且防止反射攻击
1.2 实际应用场景
- 配置管理类
/** * 配置管理器单例实现 * 适用于:全局配置信息管理 */ public class ConfigurationManager { private static final ConfigurationManager INSTANCE = new ConfigurationManager(); private Properties configProps; private ConfigurationManager() { loadConfigurations(); } public static ConfigurationManager getInstance() { return INSTANCE; } private void loadConfigurations() { configProps = new Properties(); try (InputStream input = getClass().getClassLoader().getResourceAsStream("config.properties")) { if (input != null) { configProps.load(input); } } catch (IOException e) { throw new RuntimeException("加载配置文件失败", e); } } public String getProperty(String key) { return configProps.getProperty(key); } public String getProperty(String key, String defaultValue) { return configProps.getProperty(key, defaultValue); } } - 数据库连接池
/** * 数据库连接池单例实现 * 适用于:管理数据库连接资源 */ public class DatabaseConnectionPool { private static volatile DatabaseConnectionPool instance; private final List<Connection> connectionPool; private final int MAX_POOL_SIZE = 10; private DatabaseConnectionPool() { // 初始化连接池 connectionPool = new ArrayList<>(MAX_POOL_SIZE); initializePool(); } public static DatabaseConnectionPool getInstance() { if (instance == null) { synchronized (DatabaseConnectionPool.class) { if (instance == null) { instance = new DatabaseConnectionPool(); } } } return instance; } private void initializePool() { try { for (int i = 0; i < MAX_POOL_SIZE; i++) { // 这里应该使用真实的数据库连接配置 Connection conn = DriverManager.getConnection("jdbc:mysql://localhost:3306/mydb", "user", "password"); connectionPool.add(conn); } } catch (SQLException e) { throw new RuntimeException("初始化数据库连接池失败", e); } } public synchronized Connection getConnection() { if (connectionPool.isEmpty()) { throw new RuntimeException("连接池已耗尽"); } return connectionPool.remove(connectionPool.size() - 1); } public synchronized void releaseConnection(Connection conn) { if (conn != null) { connectionPool.add(conn); } } } - 日志处理器
/** * 日志处理器单例实现 * 适用于:集中管理应用日志 */ public class Logger { private static final Logger INSTANCE = new Logger(); private final Queue<String> logQueue; private final int MAX_QUEUE_SIZE = 1000; private final Thread logThread; private volatile boolean running = true; private Logger() { logQueue = new LinkedList<>(); logThread = new Thread(this::processLogs); logThread.start(); // 添加JVM关闭钩子 Runtime.getRuntime().addShutdownHook(new Thread(() -> { running = false; try { logThread.join(); } catch (InterruptedException e) { Thread.currentThread().interrupt(); } })); } public static Logger getInstance() { return INSTANCE; } public void log(String message) { synchronized (logQueue) { if (logQueue.size() >= MAX_QUEUE_SIZE) { logQueue.poll(); // 移除最旧的消息 } logQueue.offer(message); logQueue.notify(); } } private void processLogs() { while (running || !logQueue.isEmpty()) { String message; synchronized (logQueue) { while (logQueue.isEmpty() && running) { try { logQueue.wait(1000); } catch (InterruptedException e) { Thread.currentThread().interrupt(); } } message = logQueue.poll(); } if (message != null) { // 实际应用中应该写入文件或发送到日志服务器 System.out.println("[LOG] " + message); } } } } - Spring中的单例Bean
/**
 * Spring中的单例Bean示例
 * 使用注解方式声明单例Bean
 */
@Service // 等同于@Component,但更明确表示服务层
public class OrderService {

    @Autowired
    private OrderRepository orderRepository;

    public Order createOrder(Order order) {
        // 业务逻辑处理
        return orderRepository.save(order);
    }
}

/**
 * 配置类中声明单例Bean
 */
@Configuration
public class AppConfig {

    @Bean
    public DataSource dataSource() {
        // 创建并返回数据源实例
        // 默认是单例的,整个应用共享同一个实例
        return new HikariDataSource();
    }
}
Spring框架默认使用单例作用域管理Bean,但不同于传统单例模式,Spring的单例是相对于IoC容器而言的。Spring单例Bean的特点:
1.默认作用域就是单例,无需特殊配置
2.由Spring容器管理生命周期,不同于传统单例模式
3.支持依赖注入,更符合现代应用架构
4.可以通过@Scope("singleton")显式声明,但通常不需要
1.3 反模式与陷阱
- 单例导致的内存泄漏
单例对象如果持有外部资源的引用而不释放,会导致内存泄漏
/**
 * 可能导致内存泄漏的单例示例
 */
public class LeakySingleton {
    private static LeakySingleton instance;
    private Map<String, Object> cache = new HashMap<>();

    private LeakySingleton() {}

    public static synchronized LeakySingleton getInstance() {
        if (instance == null) {
            instance = new LeakySingleton();
        }
        return instance;
    }

    // 向缓存添加数据,但从不清理
    public void addToCache(String key, Object value) {
        cache.put(key, value);
    }

    // 问题:缓存会无限增长,导致内存泄漏
}解决方案:
- 对缓存设置大小限制或过期策略
- 提供清理缓存的方法
- 使用WeakReference存储缓存对象
/**
 * 改进后的安全单例缓存
 */
public class SafeCacheSingleton {
    private static SafeCacheSingleton instance;
    private final Map<String, SoftReference<Object>> cache;
    private final int MAX_CACHE_SIZE = 1000;

    private SafeCacheSingleton() {
        cache = new LinkedHashMap<String, SoftReference<Object>>(MAX_CACHE_SIZE, 0.75f, true) {
            @Override
            protected boolean removeEldestEntry(Map.Entry<String, SoftReference<Object>> eldest) {
                return size() > MAX_CACHE_SIZE;
            }
        };
    }

    public static synchronized SafeCacheSingleton getInstance() {
        if (instance == null) {
            instance = new SafeCacheSingleton();
        }
        return instance;
    }

    public void addToCache(String key, Object value) {
        synchronized (cache) {
            cache.put(key, new SoftReference<>(value));
        }
    }

    public Object getFromCache(String key) {
        synchronized (cache) {
            SoftReference<Object> ref = cache.get(key);
            return ref != null ? ref.get() : null;
        }
    }

    public void clearCache() {
        synchronized (cache) {
            cache.clear();
        }
    }
}- 过度使用单例的问题
- 测试困难:单例状态在测试间持久化,导致测试相互影响
- 隐藏的依赖:单例作为全局变量,使依赖关系不明确
- 违反单一职责原则:单例类往往承担过多职责
- 并发问题:虽然单例本身线程安全,但其内部状态可能需要额外同步
/**
 * 职责单一的单例示例
 */
public class IdGenerator {
    private static final IdGenerator INSTANCE = new IdGenerator();
    private final AtomicLong counter = new AtomicLong(0);

    private IdGenerator() {}

    public static IdGenerator getInstance() {
        return INSTANCE;
    }

    // 唯一职责:生成ID
    public long nextId() {
        return counter.incrementAndGet();
    }
}- 总结与最佳实践
实现方式选择:
- 简单场景:枚举单例(最佳选择)
- 需要延迟加载:静态内部类方式
- 复杂初始化:双重检查锁定
线程安全:
- 确保单例创建过程线程安全
- 注意单例内部状态的线程安全
生产环境注意事项:
- 防止反射攻击:在构造函数中添加检查
- 处理序列化:实现readResolve方法或使用枚举
- 考虑内存泄漏:合理管理单例持有的资源
替代方案:
- 在Spring等现代框架中,优先使用依赖注入
- 考虑使用框架提供的单例管理能力
通过合理使用单例模式,可以有效地管理共享资源,提高系统性能,但务必注意避免过度使用和潜在陷阱。
2. 工厂模式家族
2.1 简单工厂模式
简单工厂模式(Simple Factory Pattern)又称为静态工厂方法模式(Static Factory Method Pattern),它定义一个工厂类,根据传入的参数不同返回不同类的实例,被创建的实例通常都具有共同的父类。
- 静态工厂方法的实现
// 抽象产品接口
public interface Chart {
    void display();
}

// 具体产品类:柱状图
public class HistogramChart implements Chart {
    @Override
    public void display() {
        System.out.println("显示柱状图");
    }
}

// 具体产品类:饼状图
public class PieChart implements Chart {
    @Override
    public void display() {
        System.out.println("显示饼状图");
    }
}

// 图表工厂类
public class ChartFactory {
    // 静态工厂方法
    public static Chart getChart(String type) {
        if ("histogram".equalsIgnoreCase(type)) {
            return new HistogramChart();
        } else if ("pie".equalsIgnoreCase(type)) {
            return new PieChart();
        }
        throw new IllegalArgumentException("Unsupported chart type");
    }
}

// 客户端使用
public class Client {
    public static void main(String[] args) {
        Chart chart = ChartFactory.getChart("pie");
        chart.display(); // 输出: 显示饼状图
    }
}- 适用场景与局限性
适用场景:
- 工厂类负责创建的对象比较少,客户端只需要传入工厂类的参数,不需要关心对象创建的细节
- 需要集中管理对象的创建逻辑,避免创建逻辑分散在代码各处
- 需要对客户端隐藏具体实现类,降低耦合度
局限性:
- 违反开闭原则:增加新产品时需要修改工厂类逻辑
- 工厂类职责过重,随着产品增多会变得臃肿复杂
- 使用静态方法导致工厂类无法通过继承来扩展
典型应用案例:
- JDK中的
Calendar.getInstance()、NumberFormat.getInstance()等- 日志框架中的LoggerFactory.getLogger()
- Spring框架中的BeanFactory.getBean()方法族
2.2 工厂方法模式
工厂方法模式(Factory Method Pattern)定义了一个创建对象的接口,但让子类决定实例化哪一个类。工厂方法使一个类的实例化延迟到其子类。
模式结构:
- 抽象创建者:声明工厂方法,返回抽象产品类型
- 具体创建者:实现工厂方法,返回具体产品实例
- 抽象产品:定义产品的接口
- 具体产品:实现抽象产品接口的具体类
- 抽象创建者与具体创建者
// 抽象产品 public interface Logger { void log(String message); } // 具体产品 public class FileLogger implements Logger { @Override public void log(String message) { System.out.println("Log to file: " + message); } } public class ConsoleLogger implements Logger { @Override public void log(String message) { System.out.println("Log to console: " + message); } } // 抽象创建者 public abstract class LoggerFactory { public abstract Logger createLogger(); public void log(String message) { Logger logger = createLogger(); logger.log(message); } } // 具体创建者 public class FileLoggerFactory extends LoggerFactory { @Override public Logger createLogger() { return new FileLogger(); } } public class ConsoleLoggerFactory extends LoggerFactory { @Override public Logger createLogger() { return new ConsoleLogger(); } } - JDK中的工厂方法应用
集合框架中的迭代器:
public interface Collection<E> {
    Iterator<E> iterator(); // 工厂方法
}

public class ArrayList<E> implements Collection<E> {
    public Iterator<E> iterator() {
        return new Itr(); // 具体产品
    }

    private class Itr implements Iterator<E> { /*...*/ }
}URLStreamHandlerFactory:
URL.setURLStreamHandlerFactory(new URLStreamHandlerFactory() {
    public URLStreamHandler createURLStreamHandler(String protocol) {
        if ("myproto".equals(protocol)) {
            return new MyURLStreamHandler(); // 具体产品
        }
        return null;
    }
});
2.3 抽象工厂模式
抽象工厂模式(Abstract Factory Pattern)提供一个创建一系列相关或相互依赖对象的接口,而无需指定它们具体的类。
- 产品族与产品等级结构
核心概念:
- 产品等级结构:产品的继承结构,如抽象电视机与海尔电视机、TCL电视机等具体品牌电视机构成的产品等级结构
- 产品族:由同一个工厂生产的,位于不同产品等级结构中的一组产品,如海尔电器工厂生产的海尔电视机、海尔电冰箱构成一个产品族
- 跨平台UI组件库实现
下面是一个跨平台UI组件库的抽象工厂实现:
// 抽象产品:按钮
public interface Button {
    void render();
    void onClick();
}

// 具体产品:Windows按钮
public class WindowsButton implements Button {
    public void render() {
        System.out.println("Render Windows style button");
    }

    public void onClick() {
        System.out.println("Windows button clicked");
    }
}

// 具体产品:MacOS按钮
public class MacOSButton implements Button {
    public void render() {
        System.out.println("Render MacOS style button");
    }

    public void onClick() {
        System.out.println("MacOS button clicked");
    }
}

// 抽象产品:复选框
public interface Checkbox {
    void render();
    void onCheck();
}

// 具体产品:Windows复选框
public class WindowsCheckbox implements Checkbox {
    public void render() {
        System.out.println("Render Windows style checkbox");
    }

    public void onCheck() {
        System.out.println("Windows checkbox checked");
    }
}

// 具体产品:MacOS复选框
public class MacOSCheckbox implements Checkbox {
    public void render() {
        System.out.println("Render MacOS style checkbox");
    }

    public void onCheck() {
        System.out.println("MacOS checkbox checked");
    }
}

// 抽象工厂
public interface GUIFactory {
    Button createButton();
    Checkbox createCheckbox();
}

// 具体工厂:Windows工厂
public class WindowsFactory implements GUIFactory {
    public Button createButton() {
        return new WindowsButton();
    }

    public Checkbox createCheckbox() {
        return new WindowsCheckbox();
    }
}

// 具体工厂:MacOS工厂
public class MacOSFactory implements GUIFactory {
    public Button createButton() {
        return new MacOSButton();
    }

    public Checkbox createCheckbox() {
        return new MacOSCheckbox();
    }
}

// 客户端代码
public class Application {
    private Button button;
    private Checkbox checkbox;

    public Application(GUIFactory factory) {
        button = factory.createButton();
        checkbox = factory.createCheckbox();
    }

    public void renderUI() {
        button.render();
        checkbox.render();
    }
}
2.4 实际应用案例
2.4.1.BeanFactory
Spring框架的核心容器BeanFactory是工厂模式的典型应用,它通过工厂方法模式管理Bean的生命周期。
核心接口:
public interface BeanFactory {
    Object getBean(String name) throws BeansException;
    <T> T getBean(String name, Class<T> requiredType) throws BeansException;
    Object getBean(String name, Object... args) throws BeansException;
    // 其他方法...
}实现原理:
- 工厂方法:
getBean()是核心工厂方法 - 产品族管理:可以管理单例、原型等不同作用域的Bean
- 延迟加载:支持懒加载模式,优化启动性能
扩展实现:
public class InstanceFactory {
    private static final Map<String, Object> beanMap = new HashMap<>();

    static {
        // 初始化Bean
        beanMap.put("userService", new UserServiceImpl());
        beanMap.put("orderService", new OrderServiceImpl());
    }

    public static Object getBean(String name) {
        return beanMap.get(name);
    }
}
Spring的BeanFactory比简单工厂更强大:
- 支持依赖注入
- 管理Bean的生命周期
- 提供AOP等高级特性
2.4.2.JDBC驱动加载机制
JDBC驱动加载机制是工厂方法模式的应用,DriverManager作为抽象工厂,各数据库厂商提供具体驱动实现。
驱动加载流程:
// 1. 加载驱动类 (静态工厂方法)
Class.forName("com.mysql.jdbc.Driver");

// 2. 获取连接 (工厂方法)
Connection conn = DriverManager.getConnection(
    "jdbc:mysql://localhost:3306/test", "user", "password");

// 3. 创建Statement
Statement stmt = conn.createStatement();

// 4. 执行查询
ResultSet rs = stmt.executeQuery("SELECT * FROM users");工厂模式体现:
DriverManager.getConnection()是工厂方法- 不同数据库厂商提供自己的
Driver实现 - 客户端通过统一接口使用不同数据库
2.4.3.Appender工厂
Log4j等日志框架使用抽象工厂模式创建不同的Appender(输出目的地)。
配置示例:
log4j.rootLogger=DEBUG, console, file

# 控制台Appender
log4j.appender.console=org.apache.log4j.ConsoleAppender
log4j.appender.console.layout=org.apache.log4j.PatternLayout
log4j.appender.console.layout.ConversionPattern=[%c]-%m%n

# 文件Appender
log4j.appender.file=org.apache.log4j.RollingFileAppender
log4j.appender.file.File=C:/logs/app.log
log4j.appender.file.MaxFileSize=10MB工厂实现:
public interface Appender {
    void append(LoggingEvent event);
}

public class ConsoleAppender implements Appender {
    public void append(LoggingEvent event) {
        System.out.println(event.getMessage());
    }
}

public class FileAppender implements Appender {
    private String filePath;

    public FileAppender(String filePath) {
        this.filePath = filePath;
    }

    public void append(LoggingEvent event) {
        // 写入文件的实现
    }
}

public class AppenderFactory {
    public static Appender createAppender(String appenderName, Properties props) {
        if ("console".equals(appenderName)) {
            return new ConsoleAppender();
        } else if ("file".equals(appenderName)) {
            String filePath = props.getProperty("log4j.appender.file.File");
            return new FileAppender(filePath);
        }
        throw new IllegalArgumentException("Unknown appender: " + appenderName);
    }
}
日志框架通过工厂模式可以灵活配置输出目的地,而不需要修改业务代码。
2.5.工厂模式总结对比
| 模式 | 特点 | 优点 | 缺点 | 适用场景 |
|---|---|---|---|---|
| 简单工厂 | 一个工厂类,静态方法创建产品 | 封装创建逻辑,客户端与产品解耦 | 违反开闭原则,工厂类职责过重 | 创建对象较少,不频繁变化的场景 53 |
| 工厂方法 | 抽象工厂类,子类决定创建何种产品 | 符合开闭原则,支持扩展 | 每增加产品需增加工厂类 | 不明确知道创建何种对象的场景 60 |
| 抽象工厂 | 创建多个产品族的对象 | 保证产品兼容性,易于交换产品系列 | 难以支持新种类产品 | 需要创建相关或依赖对象的系列 21 |
在实际开发中,应根据业务需求选择合适的工厂模式:
- 简单工厂:适用于对象创建逻辑简单的场景
- 工厂方法:适用于需要灵活扩展的场景
- 抽象工厂:适用于需要保证产品兼容性的复杂场景
工厂模式是Java开发中最常用的设计模式之一,合理运用可以大大提高代码的可维护性和扩展性。
3. 建造者模式
5.1 模式结构与实现
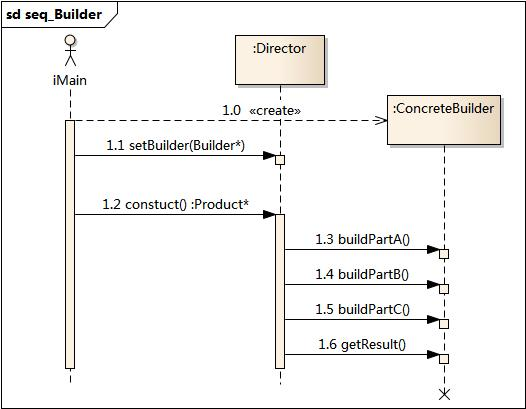
- 角色定义与UML类图
建造者模式(Builder Pattern)是一种创建型设计模式,它将复杂对象的构建与其表示分离,使得同样的构建过程可以创建不同的表示。该模式主要包含以下4个核心角色:
- Director(指挥者):负责调用具体建造者来构建产品对象,它知道构建顺序但不知道具体构建细节
- Builder(抽象建造者):定义构建产品各个部件的抽象接口
- ConcreteBuilder(具体建造者):实现Builder接口,提供具体构建方法和返回产品的方法
- Product(产品):被构建的复杂对象,包含多个组成部件
- 标准实现示例:
产品类(Product)
public class Computer {
    private final String cpu;  // 必须参数
    private final String ram;  // 必须参数
    private final int usbCount; // 可选参数
    private final String keyboard; // 可选参数
    private final String display; // 可选参数

    // 私有构造方法,只能通过Builder构建
    private Computer(Builder builder) {
        this.cpu = builder.cpu;
        this.ram = builder.ram;
        this.usbCount = builder.usbCount;
        this.keyboard = builder.keyboard;
        this.display = builder.display;
    }

    // 静态Builder类
    public static class Builder {
        private String cpu;  // 必须参数
        private String ram;  // 必须参数
        private int usbCount; // 可选参数,默认值
        private String keyboard = "默认键盘"; // 可选参数,默认值
        private String display = "默认显示器"; // 可选参数,默认值

        // 必须参数的构造方法
        public Builder(String cpu, String ram) {
            this.cpu = cpu;
            this.ram = ram;
        }

        // 可选参数的设置方法,返回Builder实现链式调用
        public Builder setUsbCount(int usbCount) {
            this.usbCount = usbCount;
            return this;
        }

        public Builder setKeyboard(String keyboard) {
            this.keyboard = keyboard;
            return this;
        }

        public Builder setDisplay(String display) {
            this.display = display;
            return this;
        }

        // 构建方法
        public Computer build() {
            return new Computer(this);
        }
    }
}
指挥者类(Director)
public class ComputerDirector {
    public Computer constructGamingComputer() {
        return new Computer.Builder("Intel i9", "32GB")
                .setUsbCount(4)
                .setKeyboard("机械键盘")
                .setDisplay("4K 144Hz")
                .build();
    }

    public Computer constructOfficeComputer() {
        return new Computer.Builder("Intel i5", "16GB")
                .setUsbCount(2)
                .setKeyboard("薄膜键盘")
                .build();
    }
}
客户端调用
public class Client {
    public static void main(String[] args) {
        // 使用Builder直接构建
        Computer gamingComputer = new Computer.Builder("AMD Ryzen 9", "32GB")
                .setUsbCount(6)
                .setKeyboard("RGB机械键盘")
                .setDisplay("2K 240Hz")
                .build();

        // 使用Director构建预设配置
        ComputerDirector director = new ComputerDirector();
        Computer officeComputer = director.constructOfficeComputer();
        Computer highEndComputer = director.constructGamingComputer();
    }
}
链式调用实现原理:
链式调用的核心在于每个setter方法都返回Builder对象本身(this),使得可以连续调用多个方法。这种编码风格使代码更加简洁易读,也是建造者模式的常见实现方式。
5.2 实际应用场景
建造者模式特别适用于以下场景:
- 参数多且有可选参数:当一个类的构造函数参数超过4个,且很多参数是可选的
- 参数之间有依赖关系:某些参数必须在其他参数设置后才能设置
- 对象不可变:构建完成后对象状态不应再改变
- 多种配置变体:需要创建具有不同配置的同一类对象
电商订单系统示例:
public class Order {
    private final String orderId;
    private final Long userId;
    private final List<OrderItem> items;
    private final PaymentInfo paymentInfo;
    private final ShippingInfo shippingInfo;
    private final CouponInfo couponInfo;
    private final Date createTime;

    private Order(Builder builder) {
        this.orderId = builder.orderId;
        this.userId = builder.userId;
        this.items = builder.items;
        this.paymentInfo = builder.paymentInfo;
        this.shippingInfo = builder.shippingInfo;
        this.couponInfo = builder.couponInfo;
        this.createTime = builder.createTime;
    }

    public static class Builder {
        private String orderId;
        private Long userId;
        private List<OrderItem> items = new ArrayList<>();
        private PaymentInfo paymentInfo;
        private ShippingInfo shippingInfo;
        private CouponInfo couponInfo;
        private Date createTime = new Date();

        public Builder(String orderId, Long userId) {
            this.orderId = orderId;
            this.userId = userId;
        }

        public Builder addItem(OrderItem item) {
            this.items.add(item);
            return this;
        }

        public Builder setPaymentInfo(PaymentInfo paymentInfo) {
            this.paymentInfo = paymentInfo;
            return this;
        }

        public Builder setShippingInfo(ShippingInfo shippingInfo) {
            this.shippingInfo = shippingInfo;
            return this;
        }

        public Builder applyCoupon(CouponInfo couponInfo) {
            this.couponInfo = couponInfo;
            return this;
        }

        public Order build() {
            // 可以在此处添加校验逻辑
            if (items.isEmpty()) {
                throw new IllegalStateException("订单必须包含至少一件商品");
            }
            if (paymentInfo == null) {
                throw new IllegalStateException("必须设置支付信息");
            }
            return new Order(this);
        }
    }
}
Lombok的@Builder注解
Lombok的@Builder注解可以自动生成建造者模式的代码,大大简化开发:
import lombok.Builder;
import lombok.ToString;

@Builder
@ToString
public class User {
    private String username;
    private String password;
    private int age;
    private String email;
    private String phone;
}

// 使用方式
public class Main {
    public static void main(String[] args) {
        User user = User.builder()
                .username("john_doe")
                .password("secure123")
                .age(30)
                .email("john@example.com")
                .phone("1234567890")
                .build();

        System.out.println(user);
    }
}
编译后的代码实际上会生成类似于以下的结构:
public class User {
    private String username;
    private String password;
    // 其他字段...

    User(String username, String password, int age, String email, String phone) {
        this.username = username;
        this.password = password;
        this.age = age;
        this.email = email;
        this.phone = phone;
    }

    public static UserBuilder builder() {
        return new UserBuilder();
    }

    public static class UserBuilder {
        private String username;
        private String password;
        private int age;
        private String email;
        private String phone;

        UserBuilder() {}

        public UserBuilder username(String username) {
            this.username = username;
            return this;
        }

        // 其他setter方法...

        public User build() {
            return new User(username, password, age, email, phone);
        }
    }
}
MyBatis的SqlSessionFactoryBuilder
MyBatis使用SqlSessionFactoryBuilder来构建SqlSessionFactory:
String resource = "mybatis-config.xml";
InputStream inputStream = Resources.getResourceAsStream(resource);
SqlSessionFactory sqlSessionFactory =
    new SqlSessionFactoryBuilder().build(inputStream);

// 或者使用Java配置方式
DataSource dataSource = BlogDataSourceFactory.getBlogDataSource();
TransactionFactory transactionFactory = new JdbcTransactionFactory();
Environment environment = new Environment("development", transactionFactory, dataSource);
Configuration configuration = new Configuration(environment);
configuration.addMapper(BlogMapper.class);
SqlSessionFactory sqlSessionFactory =
    new SqlSessionFactoryBuilder().build(configuration);
SqlSessionFactoryBuilder的内部实现简化版:
public class SqlSessionFactoryBuilder {
    public SqlSessionFactory build(InputStream inputStream) {
        try {
            XMLConfigBuilder parser = new XMLConfigBuilder(inputStream);
            return build(parser.parse());
        } catch (Exception e) {
            throw ExceptionFactory.wrapException("Error building SqlSession.", e);
        } finally {
            ErrorContext.instance().reset();
            try {
                inputStream.close();
            } catch (IOException e) {
                // Intentionally ignore. Prefer previous error.
            }
        }
    }

    public SqlSessionFactory build(Configuration config) {
        return new DefaultSqlSessionFactory(config);
    }
}
5.3.建造者模式的最佳实践
- 将Builder作为静态内部类:这是最常用的实现方式,可以访问外部类的私有构造方法
- 参数校验:在build()方法中进行参数校验,确保对象的有效性
- 不可变对象:建造者模式特别适合创建不可变对象,因为所有参数都可以在构造时一次性设置
- 与工厂模式结合:对于特别复杂的对象,可以结合工厂方法模式来创建不同的Builder
- 方法链设计:每个setter方法都返回Builder对象本身,支持链式调用
建造者模式通过将复杂对象的构建过程分解为多个步骤,并允许通过不同的具体建造者实现不同的构建过程,提供了极大的灵活性。同时,它将客户端与复杂对象的构建过程解耦,使得客户端无需知道具体的构建细节,只需指定需要构建的类型即可。
4. 原型模式
4.1 浅拷贝与深拷贝
4.1.1.基本概念与区别
原型模式(Prototype Pattern)是一种创建型设计模式,它通过复制现有对象来创建新对象,而不是通过new操作符。在Java中,拷贝分为三种类型:
- 浅拷贝(Shallow Copy):只复制对象本身,不复制对象引用的其他对象。新对象和原对象共享引用对象的同一内存地址 。
- 深拷贝(Deep Copy):不仅复制对象本身,还复制对象包含的所有子对象。新对象和原对象完全独立 。
- 引用拷贝(Reference Copy):仅复制对象的引用,新旧对象指向同一个内存地址 。
4.1.2.clone()方法的实现
Java中实现拷贝需要以下步骤:
- 实现
Cloneable接口(标记接口) - 重写
Object类的clone()方法
浅拷贝示例:
public class Student implements Cloneable {
    private String name;
    private int age;
    private Date birthDate;  // 引用类型

    // 构造方法和其他方法省略

    @Override
    public Object clone() throws CloneNotSupportedException {
        return super.clone();  // 浅拷贝
    }
}深拷贝实现方式:
- 递归调用clone方法:
@Override
public Object clone() throws CloneNotSupportedException {
    Student cloned = (Student)super.clone();
    cloned.birthDate = (Date)this.birthDate.clone();  // 对引用类型也调用clone
    return cloned;
}- 通过构造方法实现深拷贝:
public Student(Student other) {
    this.name = other.name;
    this.age = other.age;
    this.birthDate = new Date(other.birthDate.getTime());
}
4.1.3.序列化实现深拷贝
当对象图较复杂时,手动实现深拷贝会很繁琐,可以使用序列化机制:
import java.io.*;

public class DeepCopyUtil {
    @SuppressWarnings("unchecked")
    public static <T extends Serializable> T deepCopy(T object) {
        try {
            ByteArrayOutputStream bos = new ByteArrayOutputStream();
            ObjectOutputStream oos = new ObjectOutputStream(bos);
            oos.writeObject(object);
            oos.flush();

            ByteArrayInputStream bis = new ByteArrayInputStream(bos.toByteArray());
            ObjectInputStream ois = new ObjectInputStream(bis);
            return (T) ois.readObject();
        } catch (Exception e) {
            throw new RuntimeException("Deep copy failed", e);
        }
    }
}
使用条件:
- 所有涉及的对象都必须实现
Serializable接口 - 性能比直接clone方法差,但实现简单
4.2 实际应用场景
4.2.1.对象创建成本高
原型模式特别适用于以下高成本对象创建场景:
- 需要复杂计算初始化:如从数据库加载大量数据、复杂数学计算等
- 需要复杂配置:如需要多个步骤配置的对象
- 需要访问远程资源:如从网络或文件系统加载数据
示例代码:
public class ExpensiveObject implements Cloneable {
    private List<String> heavyData;
    private Configuration config;

    public ExpensiveObject() {
        // 耗时的初始化过程
        this.heavyData = loadHeavyDataFromDB();  // 可能耗时
        this.config = initComplexConfig();       // 复杂配置
    }

    // 原型模式优化创建
    public ExpensiveObject createFromPrototype() {
        try {
            ExpensiveObject copy = (ExpensiveObject)this.clone();
            // 可能需要重置某些状态
            return copy;
        } catch (CloneNotSupportedException e) {
            throw new RuntimeException("Clone not supported", e);
        }
    }
}
4.2.2.撤销操作历史记录
原型模式可以用于实现撤销(Undo)功能:
- 保存对象的历史状态作为"备忘录"
- 需要撤销时,从历史状态恢复
实现代码:
public class Document implements Cloneable {
    private String content;
    private List<String> images;

    // 创建备忘录(使用原型模式)
    public Document createMemento() {
        try {
            Document memento = (Document)this.clone();
            // 深拷贝可变字段
            memento.images = new ArrayList<>(this.images);
            return memento;
        } catch (CloneNotSupportedException e) {
            throw new RuntimeException("Clone failed", e);
        }
    }

    // 从备忘录恢复
    public void restoreFromMemento(Document memento) {
        this.content = memento.content;
        this.images = new ArrayList<>(memento.images);
    }
}

public class DocumentHistory {
    private Stack<Document> history = new Stack<>();

    public void save(Document doc) {
        history.push(doc.createMemento());
    }

    public Document undo() {
        if (!history.isEmpty()) {
            return history.pop();
        }
        return null;
    }
}
4.2.3.Spring原型Bean
在Spring框架中,原型(Prototype)作用域的Bean每次获取时都会创建新实例:
配置原型Bean:
@Component
@Scope(ConfigurableBeanFactory.SCOPE_PROTOTYPE)
public class PrototypeBean {
    private static int instanceCount = 0;

    public PrototypeBean() {
        instanceCount++;
        System.out.println("PrototypeBean instance created: " + instanceCount);
    }
}获取原型Bean的方式:
- 使用ApplicationContext:
@Autowired
private ApplicationContext applicationContext;

public void usePrototype() {
    PrototypeBean bean = applicationContext.getBean(PrototypeBean.class);
}- 使用@Lookup注解:
@RestController
public class MyController {

    @GetMapping("/bean")
    public String getBean() {
        PrototypeBean bean = createPrototypeBean();
        return "Prototype bean: " + bean.hashCode();
    }

    @Lookup
    protected PrototypeBean createPrototypeBean() {
        return null; // 由Spring实现
    }
}- 使用ObjectProvider:
@Autowired
private ObjectProvider<PrototypeBean> prototypeBeanProvider;

public void usePrototype() {
    PrototypeBean bean = prototypeBeanProvider.getObject();
}原型Bean的典型应用场景:
- 每次需要新实例的场景
- 有状态的Bean
- 需要隔离不同请求的Bean
- Builder模式中保持配置但创建不同对象
4.2.4.最佳实践
深拷贝的权衡:
- 完全深拷贝几乎不可能实现,因为对象可能包含循环引用
- 根据实际需求决定拷贝深度
- 不可变对象(如String)不需要深拷贝
性能考虑:
- 原型模式比直接创建对象快,特别是大对象
- 序列化方式比clone()方法慢
设计建议:
- 考虑使用"拷贝构造器"或"拷贝工厂"代替Cloneable
- 对于复杂对象,结合原型模式和建造者模式
Spring中的使用技巧:
- 原型Bean与@Autowired一起使用时要小心,因为注入只发生一次
- 对于有依赖的原型Bean,最好使用方法注入
原型模式通过复制现有对象来创建新对象,避免了昂贵的创建过程,是创建型模式中非常有价值的一种。正确使用原型模式可以显著提高性能,特别是在需要创建大量相似对象的场景中。
第三部分:结构型模式与应用
1. 适配器模式
1.1 类适配器与对象适配器
适配器模式是将一个类的接口转换成客户希望的另外一个接口,使得原本由于接口不兼容而不能一起工作的类可以一起工作。
1.1.1.继承与组合
类适配器(通过继承实现):
// 目标接口
interface Target {
    void request();
}

// 被适配者
class Adaptee {
    public void specificRequest() {
        System.out.println("被适配者的方法");
    }
}

// 类适配器
class ClassAdapter extends Adaptee implements Target {
    @Override
    public void request() {
        specificRequest();
    }
}对象适配器(通过组合实现):
// 对象适配器
class ObjectAdapter implements Target {
    private Adaptee adaptee;

    public ObjectAdapter(Adaptee adaptee) {
        this.adaptee = adaptee;
    }

    @Override
    public void request() {
        adaptee.specificRequest();
    }
}

// 使用示例
public class AdapterDemo {
    public static void main(String[] args) {
        // 类适配器
        Target classAdapter = new ClassAdapter();
        classAdapter.request();

        // 对象适配器
        Adaptee adaptee = new Adaptee();
        Target objectAdapter = new ObjectAdapter(adaptee);
        objectAdapter.request();
    }
}
1.1.2.第三方库适配
// 假设我们有一个第三方支付接口
interface ThirdPartyPayment {
    void pay(double amount);
}

// 我们系统的支付接口
interface PaymentService {
    void makePayment(double amount, String currency);
}

// 适配器
class PaymentAdapter implements PaymentService {
    private ThirdPartyPayment thirdPartyPayment;

    public PaymentAdapter(ThirdPartyPayment thirdPartyPayment) {
        this.thirdPartyPayment = thirdPartyPayment;
    }

    @Override
    public void makePayment(double amount, String currency) {
        // 转换货币为美元(假设第三方只接受美元)
        if (!"USD".equals(currency)) {
            amount = convertCurrency(amount, currency);
        }
        thirdPartyPayment.pay(amount);
    }

    private double convertCurrency(double amount, String currency) {
        // 实际项目中这里会调用汇率转换服务
        return amount * 0.85; // 简单示例
    }
}
1.2 实际应用场景
1.2.1.JDBC驱动适配不同数据库
// JDBC本身就是适配器模式的典型应用
public class JdbcAdapterExample {
    public static void main(String[] args) {
        // 同样的接口,不同的数据库驱动
        Connection mysqlConn = DriverManager.getConnection("jdbc:mysql://localhost:3306/test");
        Connection oracleConn = DriverManager.getConnection("jdbc:oracle:thin:@localhost:1521:orcl");

        // 使用相同的接口操作不同的数据库
        Statement mysqlStmt = mysqlConn.createStatement();
        Statement oracleStmt = oracleConn.createStatement();
    }
}
1.2.2.SLF4J日志门面
import org.slf4j.Logger;
import org.slf4j.LoggerFactory;

public class Slf4jExample {
    private static final Logger logger = LoggerFactory.getLogger(Slf4jExample.class);

    public static void main(String[] args) {
        // 同样的日志接口,底层可以适配Log4j、Logback、JUL等不同实现
        logger.info("This is an info message");
        logger.error("This is an error message");
    }
}
1.2.3.Spring MVC中的HandlerAdapter
// Spring MVC中的HandlerAdapter接口
public interface HandlerAdapter {
    boolean supports(Object handler);

    ModelAndView handle(HttpServletRequest request, HttpServletResponse response, Object handler) throws Exception;

    long getLastModified(HttpServletRequest request, Object handler);
}

// 实际应用中,Spring会根据不同的Controller类型选择不同的适配器
2. 装饰器模式
2.1 动态添加职责
装饰器模式允许向一个现有的对象添加新的功能,同时又不改变其结构。
2.1.1.透明装饰与半透明装饰
透明装饰(保持接口一致):
// 组件接口
interface Coffee {
    double getCost();
    String getDescription();
}

// 具体组件
class SimpleCoffee implements Coffee {
    @Override
    public double getCost() {
        return 1.0;
    }

    @Override
    public String getDescription() {
        return "Simple coffee";
    }
}

// 装饰器基类(透明装饰)
abstract class CoffeeDecorator implements Coffee {
    protected final Coffee decoratedCoffee;

    public CoffeeDecorator(Coffee coffee) {
        this.decoratedCoffee = coffee;
    }

    public double getCost() {
        return decoratedCoffee.getCost();
    }

    public String getDescription() {
        return decoratedCoffee.getDescription();
    }
}

// 具体装饰器
class MilkDecorator extends CoffeeDecorator {
    public MilkDecorator(Coffee coffee) {
        super(coffee);
    }

    @Override
    public double getCost() {
        return super.getCost() + 0.5;
    }

    @Override
    public String getDescription() {
        return super.getDescription() + ", with milk";
    }
}

class SugarDecorator extends CoffeeDecorator {
    public SugarDecorator(Coffee coffee) {
        super(coffee);
    }

    @Override
    public double getCost() {
        return super.getCost() + 0.2;
    }

    @Override
    public String getDescription() {
        return super.getDescription() + ", with sugar";
    }
}
2.1.2.半透明装饰
// 半透明装饰器
class WhipCreamDecorator extends CoffeeDecorator {
    public WhipCreamDecorator(Coffee coffee) {
        super(coffee);
    }

    // 新增方法
    public String getExtraTopping() {
        return "Whipped cream";
    }

    @Override
    public double getCost() {
        return super.getCost() + 0.7;
    }

    @Override
    public String getDescription() {
        return super.getDescription() + ", with whipped cream";
    }
}

// 使用示例
public class DecoratorDemo {
    public static void main(String[] args) {
        // 透明装饰
        Coffee coffee = new SimpleCoffee();
        coffee = new MilkDecorator(coffee);
        coffee = new SugarDecorator(coffee);
        System.out.println(coffee.getDescription() + " costs $" + coffee.getCost());

        // 半透明装饰
        Coffee specialCoffee = new SimpleCoffee();
        specialCoffee = new WhipCreamDecorator(specialCoffee);
        System.out.println(((WhipCreamDecorator)specialCoffee).getExtraTopping());
    }
}
2.1.3.与继承的区别
- 装饰器模式是动态的,可以在运行时添加或移除功能
- 继承是静态的,在编译时就已经确定
- 装饰器模式可以组合多个功能,而继承会导致类爆炸
2.2 实际应用场景
2.2.1.Java I/O流体系
public class IoDecoratorExample {
    public static void main(String[] args) throws IOException {
        // FileInputStream是具体组件
        InputStream inputStream = new FileInputStream("test.txt");

        // BufferedInputStream是装饰器
        inputStream = new BufferedInputStream(inputStream);

        // DataInputStream是另一个装饰器
        DataInputStream dataInputStream = new DataInputStream(inputStream);

        // 可以这样组合使用
        DataInputStream dis = new DataInputStream(
            new BufferedInputStream(
                new FileInputStream("test.txt")
            )
        );
    }
}
2.2.2.Servlet API中的HttpServletRequestWrapper
public class LoggingRequestWrapper extends HttpServletRequestWrapper {
    public LoggingRequestWrapper(HttpServletRequest request) {
        super(request);
    }

    @Override
    public String getParameter(String name) {
        String value = super.getParameter(name);
        System.out.println("Request parameter: " + name + "=" + value);
        return value;
    }
}

// 在Filter中使用
public class LoggingFilter implements Filter {
    @Override
    public void doFilter(ServletRequest request, ServletResponse response, FilterChain chain)
            throws IOException, ServletException {
        HttpServletRequest httpRequest = (HttpServletRequest) request;
        LoggingRequestWrapper wrapper = new LoggingRequestWrapper(httpRequest);
        chain.doFilter(wrapper, response);
    }
}
2.2.3.Spring Cache中的缓存装饰
@Configuration
@EnableCaching
public class CacheConfig extends CachingConfigurerSupport {

    @Bean
    public CacheManager cacheManager() {
        ConcurrentMapCacheManager cacheManager = new ConcurrentMapCacheManager() {
            @Override
            protected Cache createConcurrentMapCache(String name) {
                // 装饰原始缓存,添加日志功能
                return new LoggingCacheWrapper(super.createConcurrentMapCache(name));
            }
        };
        return cacheManager;
    }
}

class LoggingCacheWrapper implements Cache {
    private final Cache delegate;

    public LoggingCacheWrapper(Cache delegate) {
        this.delegate = delegate;
    }

    @Override
    public String getName() {
        return delegate.getName();
    }

    @Override
    public Object getNativeCache() {
        return delegate.getNativeCache();
    }

    @Override
    public ValueWrapper get(Object key) {
        System.out.println("Getting from cache: " + key);
        return delegate.get(key);
    }

    // 实现其他方法...
}
3. 代理模式
3.1 静态代理与动态代理
代理模式为其他对象提供一种代理以控制对这个对象的访问。
3.1.1.静态代理
// 接口
interface UserService {
    void addUser(String username);
}

// 真实对象
class UserServiceImpl implements UserService {
    @Override
    public void addUser(String username) {
        System.out.println("添加用户: " + username);
    }
}

// 静态代理
class UserServiceProxy implements UserService {
    private UserService userService;

    public UserServiceProxy(UserService userService) {
        this.userService = userService;
    }

    @Override
    public void addUser(String username) {
        System.out.println("开始执行添加用户操作");
        userService.addUser(username);
        System.out.println("添加用户操作完成");
    }
}

// 使用
public class StaticProxyDemo {
    public static void main(String[] args) {
        UserService userService = new UserServiceImpl();
        UserService proxy = new UserServiceProxy(userService);
        proxy.addUser("张三");
    }
}
3.1.2.JDK动态代理
// 动态代理处理器
class LoggingInvocationHandler implements InvocationHandler {
    private final Object target;

    public LoggingInvocationHandler(Object target) {
        this.target = target;
    }

    @Override
    public Object invoke(Object proxy, Method method, Object[] args) throws Throwable {
        System.out.println("Before method: " + method.getName());
        Object result = method.invoke(target, args);
        System.out.println("After method: " + method.getName());
        return result;
    }
}

// 使用
public class JdkProxyDemo {
    public static void main(String[] args) {
        UserService userService = new UserServiceImpl();

        UserService proxy = (UserService) Proxy.newProxyInstance(
            UserService.class.getClassLoader(),
            new Class[]{UserService.class},
            new LoggingInvocationHandler(userService)
        );

        proxy.addUser("李四");
    }
}
3.1.3.CGLIB动态代理
// 需要引入cglib依赖
class UserServiceInterceptor implements MethodInterceptor {
    @Override
    public Object intercept(Object obj, Method method, Object[] args, MethodProxy proxy) throws Throwable {
        System.out.println("Before method: " + method.getName());
        Object result = proxy.invokeSuper(obj, args);
        System.out.println("After method: " + method.getName());
        return result;
    }
}

// 使用
public class CglibProxyDemo {
    public static void main(String[] args) {
        Enhancer enhancer = new Enhancer();
        enhancer.setSuperclass(UserServiceImpl.class);
        enhancer.setCallback(new UserServiceInterceptor());

        UserService proxy = (UserService) enhancer.create();
        proxy.addUser("王五");
    }
}
3.2 实际应用场景
3.2.1.Spring AOP实现原理
@Aspect
@Component
public class LoggingAspect {

    @Before("execution(* com.example.service.*.*(..))")
    public void logBefore(JoinPoint joinPoint) {
        System.out.println("Before method: " + joinPoint.getSignature().getName());
    }

    @AfterReturning(pointcut = "execution(* com.example.service.*.*(..))",
                    returning = "result")
    public void logAfterReturning(JoinPoint joinPoint, Object result) {
        System.out.println("After method: " + joinPoint.getSignature().getName() +
                         ", result: " + result);
    }
}

// Spring AOP底层使用JDK动态代理或CGLIB实现
3.2.2.MyBatis的Mapper接口代理
// MyBatis的Mapper接口
public interface UserMapper {
    @Select("SELECT * FROM users WHERE id = #{id}")
    User getUserById(int id);
}

// MyBatis会为这个接口创建动态代理
SqlSession session = sqlSessionFactory.openSession();
try {
    UserMapper mapper = session.getMapper(UserMapper.class);
    User user = mapper.getUserById(1);
} finally {
    session.close();
}
3.2.3.RPC框架中的远程调用
// RPC客户端代理
public class RpcProxy implements InvocationHandler {
    private String host;
    private int port;

    public RpcProxy(String host, int port) {
        this.host = host;
        this.port = port;
    }

    @SuppressWarnings("unchecked")
    public <T> T getProxy(Class<T> clazz) {
        return (T) Proxy.newProxyInstance(
            clazz.getClassLoader(),
            new Class<?>[]{clazz},
            this
        );
    }

    @Override
    public Object invoke(Object proxy, Method method, Object[] args) throws Throwable {
        // 构造RPC请求
        RpcRequest request = new RpcRequest();
        request.setClassName(method.getDeclaringClass().getName());
        request.setMethodName(method.getName());
        request.setParameterTypes(method.getParameterTypes());
        request.setParameters(args);

        // 发送网络请求
        return sendRequest(request);
    }

    private Object sendRequest(RpcRequest request) {
        // 实际网络通信代码...
        return null;
    }
}

// 使用
public class RpcClient {
    public static void main(String[] args) {
        RpcProxy proxy = new RpcProxy("localhost", 8080);
        UserService userService = proxy.getProxy(UserService.class);
        userService.addUser("远程用户");
    }
}
4. 外观模式
4.1 简化复杂子系统
外观模式提供了一个统一的接口,用来访问子系统中的一群接口。
4.1.1.门面角色的设计
// 子系统1
class CPU {
    public void start() {
        System.out.println("CPU is starting...");
    }

    public void shutdown() {
        System.out.println("CPU is shutting down...");
    }
}

// 子系统2
class Memory {
    public void load() {
        System.out.println("Memory is loading data...");
    }

    public void free() {
        System.out.println("Memory is freeing data...");
    }
}

// 子系统3
class HardDrive {
    public void read() {
        System.out.println("HardDrive is reading data...");
    }

    public void write() {
        System.out.println("HardDrive is writing data...");
    }
}

// 外观类
class ComputerFacade {
    private CPU cpu;
    private Memory memory;
    private HardDrive hardDrive;

    public ComputerFacade() {
        this.cpu = new CPU();
        this.memory = new Memory();
        this.hardDrive = new HardDrive();
    }

    public void start() {
        System.out.println("Computer starting...");
        cpu.start();
        memory.load();
        hardDrive.read();
        System.out.println("Computer started successfully");
    }

    public void shutdown() {
        System.out.println("Computer shutting down...");
        cpu.shutdown();
        memory.free();
        hardDrive.write();
        System.out.println("Computer shutdown successfully");
    }
}

// 使用
public class FacadeDemo {
    public static void main(String[] args) {
        ComputerFacade computer = new ComputerFacade();
        computer.start();
        System.out.println("----------------");
        computer.shutdown();
    }
}
4.1.2.与代理模式的区别
- 代理模式通常代表一个单一对象,而外观模式代表一个子系统
- 代理模式控制对对象的访问,外观模式提供简化的接口
- 代理模式通常一对一,外观模式通常一对多
4.2 实际应用场景
4.2.1.SLF4J简化日志API
// SLF4J作为外观,底层可以适配多种日志实现
import org.slf4j.Logger;
import org.slf4j.LoggerFactory;

public class Slf4jFacadeExample {
    private static final Logger logger = LoggerFactory.getLogger(Slf4jFacadeExample.class);

    public static void main(String[] args) {
        logger.debug("Debug message");
        logger.info("Info message");
        logger.error("Error message");
    }
}
4.2.2.Spring的JdbcTemplate
@Repository
public class UserRepository {
    @Autowired
    private JdbcTemplate jdbcTemplate;

    public User findById(int id) {
        // JdbcTemplate封装了JDBC的复杂操作
        return jdbcTemplate.queryForObject(
            "SELECT * FROM users WHERE id = ?",
            new Object[]{id},
            (rs, rowNum) -> {
                User user = new User();
                user.setId(rs.getInt("id"));
                user.setName(rs.getString("name"));
                return user;
            }
        );
    }

    public void save(User user) {
        jdbcTemplate.update(
            "INSERT INTO users (name) VALUES (?)",
            user.getName()
        );
    }
}
4.2.3.微服务网关设计
// 简化的API网关外观
@RestController
@RequestMapping("/api")
public class ApiGateway {

    @Autowired
    private UserServiceClient userService;

    @Autowired
    private OrderServiceClient orderService;

    @Autowired
    private ProductServiceClient productService;

    @GetMapping("/user/{userId}/details")
    public ResponseEntity<UserDetails> getUserDetails(@PathVariable int userId) {
        // 聚合多个微服务的调用
        User user = userService.getUser(userId);
        List<Order> orders = orderService.getUserOrders(userId);

        UserDetails details = new UserDetails();
        details.setUser(user);
        details.setOrders(orders);

        return ResponseEntity.ok(details);
    }

    @PostMapping("/order")
    public ResponseEntity<Order> createOrder(@RequestBody OrderRequest request) {
        // 验证用户
        User user = userService.getUser(request.getUserId());

        // 验证产品
        Product product = productService.getProduct(request.getProductId());

        // 创建订单
        Order order = orderService.createOrder(
            request.getUserId(),
            request.getProductId(),
            request.getQuantity()
        );

        return ResponseEntity.ok(order);
    }
}
5. 组合模式
5.1 部分-整体层次结构
组合模式将对象组合成树形结构以表示"部分-整体"的层次结构。
透明模式与安全模式
5.1.1.透明模式(所有方法都在Component中定义)
// 组件接口
interface FileSystemComponent {
    void display();
    void add(FileSystemComponent component);
    void remove(FileSystemComponent component);
    FileSystemComponent getChild(int index);
}

// 叶子组件
class File implements FileSystemComponent {
    private String name;

    public File(String name) {
        this.name = name;
    }

    @Override
    public void display() {
        System.out.println("File: " + name);
    }

    // 叶子节点不需要实现这些方法
    @Override
    public void add(FileSystemComponent component) {
        throw new UnsupportedOperationException();
    }

    @Override
    public void remove(FileSystemComponent component) {
        throw new UnsupportedOperationException();
    }

    @Override
    public FileSystemComponent getChild(int index) {
        throw new UnsupportedOperationException();
    }
}

// 复合组件
class Directory implements FileSystemComponent {
    private String name;
    private List<FileSystemComponent> children = new ArrayList<>();

    public Directory(String name) {
        this.name = name;
    }

    @Override
    public void display() {
        System.out.println("Directory: " + name);
        for (FileSystemComponent component : children) {
            component.display();
        }
    }

    @Override
    public void add(FileSystemComponent component) {
        children.add(component);
    }

    @Override
    public void remove(FileSystemComponent component) {
        children.remove(component);
    }

    @Override
    public FileSystemComponent getChild(int index) {
        return children.get(index);
    }
}5.1.2.安全模式(只在Composite中定义管理子组件的方法)
// 安全模式的组件接口
interface FileSystemComponent {
    void display();
}

// 安全模式的复合组件
class Directory implements FileSystemComponent {
    private String name;
    private List<FileSystemComponent> children = new ArrayList<>();

    public Directory(String name) {
        this.name = name;
    }

    @Override
    public void display() {
        System.out.println("Directory: " + name);
        for (FileSystemComponent component : children) {
            component.display();
        }
    }

    // 这些方法不在接口中定义
    public void add(FileSystemComponent component) {
        children.add(component);
    }

    public void remove(FileSystemComponent component) {
        children.remove(component);
    }

    public FileSystemComponent getChild(int index) {
        return children.get(index);
    }
}

// 使用示例
public class CompositeDemo {
    public static void main(String[] args) {
        // 透明模式使用
        FileSystemComponent root = new Directory("root");
        FileSystemComponent home = new Directory("home");
        FileSystemComponent documents = new Directory("documents");

        root.add(home);
        home.add(documents);
        documents.add(new File("resume.doc"));
        documents.add(new File("notes.txt"));

        root.display();
    }
}
5.1.3.树形结构的表示
// 更复杂的树形结构示例
class TreeNode {
    private String name;
    private List<TreeNode> children = new ArrayList<>();
    private TreeNode parent;

    public TreeNode(String name) {
        this.name = name;
    }

    public void addChild(TreeNode child) {
        child.setParent(this);
        this.children.add(child);
    }

    public void removeChild(TreeNode child) {
        child.setParent(null);
        this.children.remove(child);
    }

    public List<TreeNode> getChildren() {
        return Collections.unmodifiableList(children);
    }

    public TreeNode getParent() {
        return parent;
    }

    private void setParent(TreeNode parent) {
        this.parent = parent;
    }

    public void traverse() {
        System.out.println(name);
        for (TreeNode child : children) {
            child.traverse();
        }
    }
}

// 使用
public class TreeDemo {
    public static void main(String[] args) {
        TreeNode root = new TreeNode("Root");

        TreeNode child1 = new TreeNode("Child1");
        TreeNode child2 = new TreeNode("Child2");

        root.addChild(child1);
        root.addChild(child2);

        TreeNode grandChild1 = new TreeNode("GrandChild1");
        TreeNode grandChild2 = new TreeNode("GrandChild2");

        child1.addChild(grandChild1);
        child1.addChild(grandChild2);

        root.traverse();
    }
}
5.2 实际应用场景
5.2.1.GUI组件系统
// GUI组件示例
interface GUIComponent {
    void render();
    void add(GUIComponent component);
    void remove(GUIComponent component);
}

class Window implements GUIComponent {
    private List<GUIComponent> components = new ArrayList<>();
    private String title;

    public Window(String title) {
        this.title = title;
    }

    @Override
    public void render() {
        System.out.println("Rendering Window: " + title);
        for (GUIComponent component : components) {
            component.render();
        }
    }

    @Override
    public void add(GUIComponent component) {
        components.add(component);
    }

    @Override
    public void remove(GUIComponent component) {
        components.remove(component);
    }
}

class Panel implements GUIComponent {
    private List<GUIComponent> components = new ArrayList<>();
    private String name;

    public Panel(String name) {
        this.name = name;
    }

    @Override
    public void render() {
        System.out.println("Rendering Panel: " + name);
        for (GUIComponent component : components) {
            component.render();
        }
    }

    @Override
    public void add(GUIComponent component) {
        components.add(component);
    }

    @Override
    public void remove(GUIComponent component) {
        components.remove(component);
    }
}

class Button implements GUIComponent {
    private String label;

    public Button(String label) {
        this.label = label;
    }

    @Override
    public void render() {
        System.out.println("Rendering Button: " + label);
    }

    @Override
    public void add(GUIComponent component) {
        throw new UnsupportedOperationException();
    }

    @Override
    public void remove(GUIComponent component) {
        throw new UnsupportedOperationException();
    }
}

// 使用
public class GuiDemo {
    public static void main(String[] args) {
        Window window = new Window("Main Window");

        Panel mainPanel = new Panel("Main Panel");
        Panel sidePanel = new Panel("Side Panel");

        Button okButton = new Button("OK");
        Button cancelButton = new Button("Cancel");

        mainPanel.add(okButton);
        mainPanel.add(cancelButton);

        window.add(mainPanel);
        window.add(sidePanel);

        window.render();
    }
}
5.2.2.组织架构表示
// 组织架构示例
class Employee {
    private String name;
    private String position;
    private List<Employee> subordinates = new ArrayList<>();

    public Employee(String name, String position) {
        this.name = name;
        this.position = position;
    }

    public void addSubordinate(Employee employee) {
        subordinates.add(employee);
    }

    public void removeSubordinate(Employee employee) {
        subordinates.remove(employee);
    }

    public List<Employee> getSubordinates() {
        return subordinates;
    }

    public void printOrganization(String indent) {
        System.out.println(indent + position + ": " + name);
        for (Employee subordinate : subordinates) {
            subordinate.printOrganization(indent + "  ");
        }
    }
}

// 使用
public class OrganizationDemo {
    public static void main(String[] args) {
        Employee ceo = new Employee("John", "CEO");

        Employee headSales = new Employee("Robert", "Head Sales");
        Employee headMarketing = new Employee("Michelle", "Head Marketing");

        Employee salesExecutive1 = new Employee("Richard", "Sales Executive");
        Employee salesExecutive2 = new Employee("Bob", "Sales Executive");

        Employee clerk1 = new Employee("Laura", "Marketing Clerk");
        Employee clerk2 = new Employee("James", "Marketing Clerk");

        ceo.addSubordinate(headSales);
        ceo.addSubordinate(headMarketing);

        headSales.addSubordinate(salesExecutive1);
        headSales.addSubordinate(salesExecutive2);

        headMarketing.addSubordinate(clerk1);
        headMarketing.addSubordinate(clerk2);

        ceo.printOrganization("");
    }
}
5.2.3.XML文档处理
// XML节点抽象
interface XmlNode {
    void writeXml(StringBuilder xml, int indent);
}

class XmlElement implements XmlNode {
    private String tag;
    private List<XmlNode> children = new ArrayList<>();
    private Map<String, String> attributes = new HashMap<>();

    public XmlElement(String tag) {
        this.tag = tag;
    }

    public void addAttribute(String name, String value) {
        attributes.put(name, value);
    }

    public void addChild(XmlNode child) {
        children.add(child);
    }

    @Override
    public void writeXml(StringBuilder xml, int indent) {
        indent(xml, indent);
        xml.append("<").append(tag);

        for (Map.Entry<String, String> entry : attributes.entrySet()) {
            xml.append(" ").append(entry.getKey())
               .append("=\"").append(entry.getValue()).append("\"");
        }

        if (children.isEmpty()) {
            xml.append("/>\n");
        } else {
            xml.append(">\n");
            for (XmlNode child : children) {
                child.writeXml(xml, indent + 2);
            }
            indent(xml, indent);
            xml.append("</").append(tag).append(">\n");
        }
    }

    private void indent(StringBuilder xml, int indent) {
        for (int i = 0; i < indent; i++) {
            xml.append(" ");
        }
    }
}

class XmlText implements XmlNode {
    private String text;

    public XmlText(String text) {
        this.text = text;
    }

    @Override
    public void writeXml(StringBuilder xml, int indent) {
        indent(xml, indent);
        xml.append(text).append("\n");
    }

    private void indent(StringBuilder xml, int indent) {
        for (int i = 0; i < indent; i++) {
            xml.append(" ");
        }
    }
}

// 使用
public class XmlDemo {
    public static void main(String[] args) {
        XmlElement root = new XmlElement("bookstore");

        XmlElement book1 = new XmlElement("book");
        book1.addAttribute("category", "COOKING");

        XmlElement title1 = new XmlElement("title");
        title1.addChild(new XmlText("Everyday Italian"));

        XmlElement author1 = new XmlElement("author");
        author1.addChild(new XmlText("Giada De Laurentiis"));

        book1.addChild(title1);
        book1.addChild(author1);

        root.addChild(book1);

        StringBuilder xml = new StringBuilder();
        root.writeXml(xml, 0);
        System.out.println(xml.toString());
    }
}
6. 享元模式
6.1 对象共享与池化技术
享元模式通过共享技术有效地支持大量细粒度对象的复用。
6.1.1.内部状态与外部状态
// 享元接口
interface Shape {
    void draw(int x, int y, int width, int height);
}

// 具体享元
class Circle implements Shape {
    private String color;

    public Circle(String color) {
        this.color = color;
    }

    @Override
    public void draw(int x, int y, int width, int height) {
        System.out.println("Drawing Circle: Color=" + color +
                         ", x=" + x + ", y=" + y +
                         ", width=" + width + ", height=" + height);
    }
}

// 享元工厂
class ShapeFactory {
    private static final Map<String, Shape> circleMap = new HashMap<>();

    public static Shape getCircle(String color) {
        Shape circle = circleMap.get(color);

        if (circle == null) {
            circle = new Circle(color);
            circleMap.put(color, circle);
            System.out.println("Creating new circle of color: " + color);
        }

        return circle;
    }

    public static int getCircleCount() {
        return circleMap.size();
    }
}

// 使用
public class FlyweightDemo {
    private static final String[] COLORS = {"Red", "Green", "Blue", "White", "Black"};

    public static void main(String[] args) {
        for (int i = 0; i < 20; ++i) {
            String color = COLORS[(int)(Math.random() * COLORS.length)];
            Shape circle = ShapeFactory.getCircle(color);
            circle.draw(
                (int)(Math.random() * 100),
                (int)(Math.random() * 100),
                (int)(Math.random() * 50 + 50),
                (int)(Math.random() * 50 + 50)
            );
        }

        System.out.println("Total circles created: " + ShapeFactory.getCircleCount());
    }
}
6.1.2.线程池的实现原理
// 简化的线程池实现
class ThreadPool {
    private BlockingQueue<Runnable> taskQueue;
    private List<WorkerThread> threads = new ArrayList<>();
    private boolean isStopped = false;

    public ThreadPool(int numberOfThreads) {
        taskQueue = new LinkedBlockingQueue<>();

        for (int i = 0; i < numberOfThreads; i++) {
            threads.add(new WorkerThread(taskQueue));
        }

        for (WorkerThread thread : threads) {
            thread.start();
        }
    }

    public synchronized void execute(Runnable task) throws Exception {
        if (isStopped) {
            throw new IllegalStateException("ThreadPool is stopped");
        }
        taskQueue.put(task);
    }

    public synchronized void stop() {
        isStopped = true;
        for (WorkerThread thread : threads) {
            thread.doStop();
        }
    }
}

class WorkerThread extends Thread {
    private BlockingQueue<Runnable> taskQueue;
    private boolean isStopped = false;

    public WorkerThread(BlockingQueue<Runnable> queue) {
        taskQueue = queue;
    }

    public void run() {
        while (!isStopped()) {
            try {
                Runnable task = taskQueue.take();
                task.run();
            } catch (Exception e) {
                // 处理异常
            }
        }
    }

    public synchronized void doStop() {
        isStopped = true;
        this.interrupt(); // 中断处于等待状态的线程
    }

    public synchronized boolean isStopped() {
        return isStopped;
    }
}

// 使用
public class ThreadPoolDemo {
    public static void main(String[] args) throws Exception {
        ThreadPool pool = new ThreadPool(3);

        for (int i = 0; i < 10; i++) {
            int taskNo = i;
            pool.execute(() -> {
                System.out.println("Task " + taskNo + " executed by " + Thread.currentThread().getName());
            });
        }

        Thread.sleep(2000);
        pool.stop();
    }
}
6.2 实际应用场景
6.2.1.字符串常量池
public class StringPoolDemo {
    public static void main(String[] args) {
        String s1 = "Hello";
        String s2 = "Hello";
        String s3 = new String("Hello").intern();

        System.out.println(s1 == s2); // true
        System.out.println(s1 == s3); // true

        String s4 = new String("Hello");
        System.out.println(s1 == s4); // false
        System.out.println(s1.equals(s4)); // true
    }
}
6.2.2.数据库连接池
// 使用HikariCP连接池
public class DatabasePoolExample {
    public static void main(String[] args) {
        HikariConfig config = new HikariConfig();
        config.setJdbcUrl("jdbc:mysql://localhost:3306/test");
        config.setUsername("root");
        config.setPassword("password");
        config.setMaximumPoolSize(10);
        config.setMinimumIdle(5);

        try (HikariDataSource dataSource = new HikariDataSource(config)) {
            // 从池中获取连接
            try (Connection connection = dataSource.getConnection()) {
                Statement statement = connection.createStatement();
                ResultSet rs = statement.executeQuery("SELECT * FROM users");

                while (rs.next()) {
                    System.out.println(rs.getString("name"));
                }
            }
        } catch (SQLException e) {
            e.printStackTrace();
        }
    }
}
6.2.3.Integer.valueOf()缓存
public class IntegerCacheDemo {
    public static void main(String[] args) {
        Integer i1 = 127;  // 自动装箱,使用缓存
        Integer i2 = 127;
        System.out.println(i1 == i2); // true

        Integer i3 = 128;  // 超出缓存范围
        Integer i4 = 128;
        System.out.println(i3 == i4); // false

        Integer i5 = Integer.valueOf(127); // 使用缓存
        Integer i6 = Integer.valueOf(127);
        System.out.println(i5 == i6); // true

        Integer i7 = new Integer(
7.桥接模式:解耦抽象与实现的设计艺术
桥接模式是一种结构型设计模式,它通过将抽象部分与实现部分分离,使它们可以独立地变化,从而解决多维度的扩展问题。这种模式特别适用于系统中存在多个独立变化维度的场景,能够有效避免类爆炸问题。
7.1 抽象与实现分离
7.1.1.多维度变化的解耦
桥接模式的核心思想是通过组合代替继承来解耦抽象与实现。在传统继承方式中,如果有两个变化维度(如形状和颜色),每增加一种形状和颜色的组合都会导致子类数量呈乘积增长。而桥接模式通过将其中一个维度(如颜色)抽取出来作为独立的类层次结构,并通过组合方式与另一个维度(如形状)建立关联,从而将类数量从乘积关系变为加和关系。
桥接模式的UML类图包含以下关键角色:
- Abstraction:抽象化角色,定义抽象接口,包含一个对实现化对象的引用
- RefinedAbstraction:扩展抽象化角色,实现父类业务方法并通过组合调用实现化角色
- Implementor:实现化角色接口,定义实现部分的接口
- ConcreteImplementor:具体实现化角色
// 实现部分接口
interface Color {
    String fill();
}

// 具体实现
class Red implements Color {
    public String fill() {
        return "红色";
    }
}

class Blue implements Color {
    public String fill() {
        return "蓝色";
    }
}

// 抽象部分
abstract class Shape {
    protected Color color;

    public Shape(Color color) {
        this.color = color;
    }

    public abstract String draw();
}

// 扩展抽象
class Circle extends Shape {
    public Circle(Color color) {
        super(color);
    }

    public String draw() {
        return "圆形(" + color.fill() + ")";
    }
}

class Square extends Shape {
    public Square(Color color) {
        super(color);
    }

    public String draw() {
        return "正方形(" + color.fill() + ")";
    }
}
7.1.2.与策略模式的区别
桥接模式和策略模式在结构上非常相似,都使用了组合来解耦,但它们的意图和应用场景有本质区别:
目的不同:
- 桥接模式关注的是抽象与实现的分离,使两者可以独立变化,解决的是"多维度变化"问题
- 策略模式关注的是算法的封装与替换,解决的是"多种算法选择"问题
抽象层级不同:
- 桥接模式中的抽象部分和实现部分通常是平行的两个维度(如形状和颜色)
- 策略模式中的策略通常是同一行为的多种实现(如不同的排序算法)
变化方向:
- 桥接模式处理的是正交维度的变化(形状和颜色互不影响)
- 策略模式处理的是同一维度的不同算法实现
// 策略模式示例 - 支付方式策略
interface PaymentStrategy {
    void pay(double amount);
}

class CreditCardPayment implements PaymentStrategy {
    public void pay(double amount) {
        System.out.println("使用信用卡支付:" + amount);
    }
}

class AlipayPayment implements PaymentStrategy {
    public void pay(double amount) {
        System.out.println("使用支付宝支付:" + amount);
    }
}

// 上下文
class PaymentContext {
    private PaymentStrategy strategy;

    public void setStrategy(PaymentStrategy strategy) {
        this.strategy = strategy;
    }

    public void executePayment(double amount) {
        strategy.pay(amount);
    }
}
7.2 实际应用场景
7.2.1.JDBC驱动架构
JDBC(Java Database Connectivity)是桥接模式的经典应用。JDBC为所有关系型数据库提供通用接口(抽象部分),而具体数据库厂商提供实现(实现部分)。
JDBC架构中的桥接模式体现:
- 抽象部分:
Connection、Statement、ResultSet等接口 - 实现部分:各数据库厂商提供的驱动实现类(如MySQL的
com.mysql.jdbc.Driver)
// JDBC使用示例展示桥接模式
public class JdbcExample {
    public static void main(String[] args) throws Exception {
        // 1. 加载驱动(实现部分)
        Class.forName("com.mysql.cj.jdbc.Driver");

        // 2. 获取连接(抽象部分)
        Connection conn = DriverManager.getConnection(
            "jdbc:mysql://localhost:3306/test", "user", "password");

        // 3. 创建语句
        Statement stmt = conn.createStatement();

        // 4. 执行查询
        ResultSet rs = stmt.executeQuery("SELECT * FROM users");

        // 5. 处理结果
        while(rs.next()) {
            System.out.println(rs.getString("username"));
        }

        // 6. 关闭连接
        conn.close();
    }
}JDBC驱动注册机制也体现了桥接模式的思想。当调用Class.forName()加载驱动类时,驱动类通过静态块向DriverManager注册自己:
// MySQL驱动实现
public class Driver extends NonRegisteringDriver implements java.sql.Driver {
    static {
        try {
            DriverManager.registerDriver(new Driver());
        } catch (SQLException e) {
            throw new RuntimeException("Can't register driver!");
        }
    }
}
这种设计使得应用程序可以在不修改代码的情况下,通过更换驱动来支持不同的数据库,完美体现了抽象与实现分离的原则。
7.2.2.消息中间件API设计
消息中间件(如RabbitMQ、Kafka等)的API设计也广泛应用了桥接模式。消息中间件通常需要支持多种协议(如AMQP、MQTT、STOMP)和多种消息模式(如点对点、发布/订阅),这些变化维度可以通过桥接模式解耦。
消息中间件中的桥接模式结构:
- 抽象部分:消息发送/接收的核心接口
- 实现部分:不同协议的具体实现
// 消息发送抽象
interface MessageSender {
    void send(String topic, String message);
}

// 消息接收抽象
interface MessageReceiver {
    void subscribe(String topic, MessageHandler handler);
}

// 实现部分 - Kafka实现
class KafkaMessageSender implements MessageSender {
    private KafkaProducer producer;

    public KafkaMessageSender(KafkaProducer producer) {
        this.producer = producer;
    }

    public void send(String topic, String message) {
        producer.send(new ProducerRecord(topic, message));
    }
}

class KafkaMessageReceiver implements MessageReceiver {
    private KafkaConsumer consumer;

    public KafkaMessageReceiver(KafkaConsumer consumer) {
        this.consumer = consumer;
    }

    public void subscribe(String topic, MessageHandler handler) {
        consumer.subscribe(Collections.singletonList(topic));
        while(true) {
            ConsumerRecords records = consumer.poll(Duration.ofMillis(100));
            for(ConsumerRecord record : records) {
                handler.handle(record.value());
            }
        }
    }
}

// 客户端代码
public class MessageClient {
    private MessageSender sender;
    private MessageReceiver receiver;

    public MessageClient(MessageSender sender, MessageReceiver receiver) {
        this.sender = sender;
        this.receiver = receiver;
    }

    public void process() {
        receiver.subscribe("test", message -> {
            System.out.println("Received: " + message);
            sender.send("response", "Processed: " + message);
        });
    }
}
这种设计允许开发者独立扩展消息协议和消息处理逻辑,例如可以轻松添加RabbitMQ实现而不影响现有代码。
7.2.3.跨平台图形渲染
跨平台图形渲染引擎是桥接模式的另一个典型应用场景。这类系统通常需要处理两个主要变化维度:渲染API(如OpenGL、Vulkan、Metal)和平台抽象(如Windows、Linux、macOS)。
跨平台渲染引擎的桥接模式实现:
// 渲染API接口(实现部分)
interface RenderAPI {
    void renderTriangle(float x1, float y1, float x2, float y2, float x3, float y3);
    void renderRectangle(float x, float y, float width, float height);
}

// OpenGL实现
class OpenGLRender implements RenderAPI {
    public void renderTriangle(float x1, float y1, float x2, float y2, float x3, float y3) {
        System.out.println("OpenGL渲染三角形");
        // 实际OpenGL调用
    }

    public void renderRectangle(float x, float y, float width, float height) {
        System.out.println("OpenGL渲染矩形");
        // 实际OpenGL调用
    }
}

// Vulkan实现
class VulkanRender implements RenderAPI {
    public void renderTriangle(float x1, float y1, float x2, float y2, float x3, float y3) {
        System.out.println("Vulkan渲染三角形");
        // 实际Vulkan调用
    }

    public void renderRectangle(float x, float y, float width, float height) {
        System.out.println("Vulkan渲染矩形");
        // 实际Vulkan调用
    }
}

// 图形抽象(抽象部分)
abstract class Shape {
    protected RenderAPI renderAPI;

    protected Shape(RenderAPI renderAPI) {
        this.renderAPI = renderAPI;
    }

    public abstract void draw();
}

// 具体图形
class Triangle extends Shape {
    private float x1, y1, x2, y2, x3, y3;

    public Triangle(RenderAPI renderAPI, float x1, float y1,
                   float x2, float y2, float x3, float y3) {
        super(renderAPI);
        this.x1 = x1; this.y1 = y1;
        this.x2 = x2; this.y2 = y2;
        this.x3 = x3; this.y3 = y3;
    }

    public void draw() {
        renderAPI.renderTriangle(x1, y1, x2, y2, x3, y3);
    }
}

class Rectangle extends Shape {
    private float x, y, width, height;

    public Rectangle(RenderAPI renderAPI, float x, float y, float width, float height) {
        super(renderAPI);
        this.x = x; this.y = y;
        this.width = width; this.height = height;
    }

    public void draw() {
        renderAPI.renderRectangle(x, y, width, height);
    }
}

// 平台抽象层
interface PlatformWindow {
    void createWindow();
    void swapBuffers();
}

// Windows平台实现
class WindowsWindow implements PlatformWindow {
    public void createWindow() {
        System.out.println("创建Windows窗口");
    }

    public void swapBuffers() {
        System.out.println("Windows交换缓冲区");
    }
}

// Linux平台实现
class LinuxWindow implements PlatformWindow {
    public void createWindow() {
        System.out.println("创建Linux窗口");
    }

    public void swapBuffers() {
        System.out.println("Linux交换缓冲区");
    }
}
这种架构设计使得图形渲染引擎可以:
- 独立扩展渲染API(如新增Metal支持)
- 独立扩展平台支持(如新增Android支持)
- 任意组合渲染API和平台
在实际的跨平台渲染引擎中,桥接模式通常与其他模式(如抽象工厂)结合使用,以处理更复杂的场景,如不同平台的资源管理、线程模型等。
7.3.桥接模式的最佳实践
7.3.1.适用场景总结
根据实际开发经验,桥接模式特别适用于以下场景:
-
多维度变化系统:当一个类存在两个或更多独立变化的维度,且这些维度都需要扩展时
示例:图形编辑器中的形状和颜色、支付系统中的支付方式和支付渠道 -
避免继承爆炸:当使用继承会导致类层次结构急剧膨胀时
示例:N种形状×M种颜色,使用继承需要N×M个子类,桥接模式只需N+M个类 -
运行时绑定实现:需要在运行时切换不同实现时
示例:动态切换数据库连接、动态更换主题/皮肤 -
共享实现:多个对象需要共享一个实现,同时不希望客户端感知到这种共享时
示例:多个View共享同一个渲染引擎
7.3.2.实现建议
合理识别变化维度:正确识别系统中独立变化的维度是应用桥接模式的关键
分析需求变化点,找出真正独立的变化轴设计清晰的抽象接口:抽象部分应专注于高层逻辑,将具体工作委派给实现部分
抽象接口应保持稳定,避免频繁变化使用依赖注入:通过构造函数或setter注入实现部分,提高灵活性
示例:new Circle(new Red())考虑默认实现:为常用场景提供默认实现,简化客户端代码
示例:提供DefaultRenderAPI作为基础实现与工厂模式结合:当实现部分的创建逻辑复杂时,可使用工厂管理实现对象的创建
示例:RenderAPIFactory.createAPI(type)
7.3.3.性能考量
桥接模式通过引入间接层(抽象与实现的分离)带来了一些性能开销,但在大多数场景下这种开销可以忽略不计。性能敏感的场景可以考虑以下优化:
- 减少桥接调用:合并频繁的桥接调用,减少跨层通信
- 缓存常用实现:对频繁使用的实现对象进行缓存
- 对象池技术:对创建成本高的实现对象使用对象池
7.4.反模式与常见误区
尽管桥接模式功能强大,但在实际应用中也有一些需要注意的反模式和常见误区:
过度设计:在变化维度固定的简单系统中使用桥接模式会导致不必要的复杂性
建议:当变化维度不超过1个时,谨慎考虑是否真的需要桥接模式错误识别维度:将非独立的维度误认为独立维度,导致设计僵化
示例:将"颜色"和"透明度"作为独立维度,而实际上它们都属于"外观"维度抽象泄漏:实现细节通过抽象接口泄漏到客户端
反例:抽象接口中包含实现特有的方法混淆策略模式:将算法选择问题误用桥接模式解决
区分:策略模式针对同一行为的不同算法,桥接模式针对不同维度的变化
7.5.现代Java中的桥接模式
随着Java语言的发展,一些新特性可以使桥接模式的实现更加简洁:
7.5.1.使用函数式接口
在Java 8+中,可以使用函数式接口简化实现部分的定义:
// 使用函数式接口定义实现部分
interface Renderer {
    void render(Shape shape);
}

// Lambda实现
Renderer openGLRenderer = shape -> {
    if(shape instanceof Circle) {
        // OpenGL渲染圆形
    } else if(shape instanceof Rectangle) {
        // OpenGL渲染矩形
    }
};

Renderer vulkanRenderer = shape -> {
    if(shape instanceof Circle) {
        // Vulkan渲染圆形
    } else if(shape instanceof Rectangle) {
        // Vulkan渲染矩形
    }
};

// 使用
Shape circle = new Circle(openGLRenderer, 10, 10, 5);
circle.draw();
7.5.2.结合模块系统
Java 9引入的模块系统(JPMS)可以帮助更好地组织桥接模式的代码结构:
module graphics.core {
    exports com.example.graphics.abstractions;
    exports com.example.graphics.implementations;
}

module graphics.opengl {
    requires graphics.core;
    provides com.example.graphics.implementations.RenderAPI
        with com.example.opengl.OpenGLRender;
}

module graphics.vulkan {
    requires graphics.core;
    provides com.example.graphics.implementations.RenderAPI
        with com.example.vulkan.VulkanRender;
}
这种模块化的组织方式使得抽象部分和实现部分可以完全独立开发和部署。
7.6.总结
桥接模式是处理多维度变化系统的强大工具,它通过分离抽象和实现,提高了系统的扩展性和可维护性。在实际开发中,正确识别独立变化维度是应用桥接模式的关键。JDBC驱动架构、消息中间件API和跨平台渲染引擎等实际案例证明了桥接模式在复杂系统中的价值。
当面临以下情况时,考虑使用桥接模式:
- 系统存在多个独立变化的维度
- 继承导致类层次结构过于复杂
- 需要在运行时切换实现
- 希望抽象部分和实现部分能够独立扩展
记住,设计模式不是银弹,桥接模式也不应被强制应用于所有场景。合理评估系统需求,在真正需要解耦抽象与实现的地方使用桥接模式,才能发挥其最大价值。
第四部分:行为型模式与应用
1. 模板方法模式
1.1 算法骨架与步骤
1.1.1.钩子方法的使用
钩子方法是在抽象类中声明并实现的方法(通常为空实现或默认实现),子类可以选择性地覆盖它。
public abstract class Game {
    // 模板方法
    public final void play() {
        initialize();
        startPlay();
        endPlay();
        if (needCelebrate()) { // 钩子方法
            celebrate();
        }
    }

    // 具体方法
    protected void initialize() {
        System.out.println("游戏初始化完成");
    }

    // 抽象方法
    protected abstract void startPlay();
    protected abstract void endPlay();

    // 钩子方法
    protected boolean needCelebrate() {
        return false;
    }

    protected void celebrate() {
        // 默认实现为空
    }
}

public class BasketballGame extends Game {
    @Override
    protected void startPlay() {
        System.out.println("篮球比赛开始");
    }

    @Override
    protected void endPlay() {
        System.out.println("篮球比赛结束");
    }

    @Override
    protected boolean needCelebrate() {
        return true; // 覆盖钩子方法
    }

    @Override
    protected void celebrate() {
        System.out.println("庆祝比赛胜利!");
    }
}
1.1.2.好莱坞原则
"不要打电话给我们,我们会打给你"。高层组件决定何时调用底层组件,底层组件不直接调用高层组件。
实际应用场景
- JUnit测试框架
public abstract class TestCase { // 模板方法 public final void runBare() throws Throwable { setUp(); // 前置处理 try { runTest(); // 执行测试 } finally { tearDown(); // 后置处理 } } protected void setUp() throws Exception {} protected void tearDown() throws Exception {} protected void runTest() throws Throwable { // 反射调用测试方法 } } - Spring的JdbcTemplate
public class JdbcTemplate { public <T> T execute(ConnectionCallback<T> action) throws DataAccessException { Connection con = DataSourceUtils.getConnection(getDataSource()); try { // 设置连接属性 Connection conToUse = con; // 执行用户定义的操作 T result = action.doInConnection(conToUse); // 处理警告 handleWarnings(con); return result; } catch (SQLException ex) { // 异常处理 throw translateException("ConnectionCallback", sql, ex); } finally { // 释放连接 DataSourceUtils.releaseConnection(con, getDataSource()); } } } - Servlet的doGet/doPost
public abstract class HttpServlet extends GenericServlet {
    protected void service(HttpServletRequest req, HttpServletResponse resp)
        throws ServletException, IOException {
        String method = req.getMethod();
        if (method.equals("GET")) {
            doGet(req, resp);
        } else if (method.equals("POST")) {
            doPost(req, resp);
        }
        // 其他HTTP方法...
    }

    protected abstract void doGet(HttpServletRequest req, HttpServletResponse resp)
        throws ServletException, IOException;

    protected abstract void doPost(HttpServletRequest req, HttpServletResponse resp)
        throws ServletException, IOException;
}
2. 策略模式
2.1 算法族的封装
策略模式定义了一系列算法,将每个算法封装起来,并使它们可以互相替换。
-
与命令模式的区别:
- 策略模式:关注算法替换,同一行为的不同实现
- 命令模式:将请求封装为对象,支持撤销、排队等操
2.2 实际应用场景
- 支付方式选择
// 策略接口 public interface PaymentStrategy { void pay(double amount); } // 具体策略 public class CreditCardPayment implements PaymentStrategy { private String cardNumber; public CreditCardPayment(String cardNumber) { this.cardNumber = cardNumber; } @Override public void pay(double amount) { System.out.println("使用信用卡" + cardNumber + "支付" + amount + "元"); } } public class AlipayPayment implements PaymentStrategy { private String account; public AlipayPayment(String account) { this.account = account; } @Override public void pay(double amount) { System.out.println("使用支付宝" + account + "支付" + amount + "元"); } } // 环境类 public class PaymentContext { private PaymentStrategy strategy; public void setStrategy(PaymentStrategy strategy) { this.strategy = strategy; } public void executePayment(double amount) { strategy.pay(amount); } } // 使用 PaymentContext context = new PaymentContext(); context.setStrategy(new CreditCardPayment("1234-5678-9012-3456")); context.executePayment(100.00); - 排序算法切换
public interface SortStrategy { void sort(int[] array); } public class BubbleSort implements SortStrategy { @Override public void sort(int[] array) { // 冒泡排序实现 } } public class QuickSort implements SortStrategy { @Override public void sort(int[] array) { // 快速排序实现 } } public class Sorter { private SortStrategy strategy; public void setStrategy(SortStrategy strategy) { this.strategy = strategy; } public void sortArray(int[] array) { strategy.sort(array); } } - Spring的ResourceLoader
public interface ResourceLoader {
    Resource getResource(String location);
}

public class DefaultResourceLoader implements ResourceLoader {
    @Override
    public Resource getResource(String location) {
        // 根据location前缀选择不同的Resource实现
        if (location.startsWith("classpath:")) {
            return new ClassPathResource(location.substring("classpath:".length()));
        } else if (location.startsWith("http:")) {
            return new UrlResource(location);
        }
        // 其他资源类型...
    }
}
3. 观察者模式
3.1 发布-订阅机制
观察者模式定义了对象之间的一对多依赖,当一个对象状态改变时,所有依赖者都会收到通知。
推模型与拉模型
- 推模型:主题将详细数据推送给观察者
- 拉模型:主题发送最小通知,观察者主动拉取所需数据
线程安全问题
- 使用CopyOnWriteArrayList存储观察者
- 同步通知方法
- 使用事件队列
3.2 实际应用场景
- Swing事件处理
button.addActionListener(new ActionListener() { @Override public void actionPerformed(ActionEvent e) { // 处理按钮点击事件 } }); - Spring的事件机制
// 自定义事件 public class OrderCreatedEvent extends ApplicationEvent { private Order order; public OrderCreatedEvent(Object source, Order order) { super(source); this.order = order; } public Order getOrder() { return order; } } // 事件发布者 @Service public class OrderService { @Autowired private ApplicationEventPublisher eventPublisher; public void createOrder(Order order) { // 创建订单逻辑... eventPublisher.publishEvent(new OrderCreatedEvent(this, order)); } } // 事件监听者 @Component public class OrderEventListener { @EventListener public void handleOrderCreated(OrderCreatedEvent event) { // 处理订单创建事件 } } - 消息队列消费者
// RabbitMQ消费者示例
@RabbitListener(queues = "order.queue")
public void receiveOrderMessage(OrderMessage message) {
    // 处理订单消息
}
4. 责任链模式
4.1 请求处理链
责任链模式将请求的发送者和接收者解耦,使多个对象都有机会处理请求。
纯与不纯的责任链
- 纯责任链:请求必须被某个处理者处理
- 不纯责任链:请求可以被部分处理或全部处理
中断链的条件
- 请求已被处理
- 请求无法被后续处理者处理
- 达到最大处理次数
4.2 实际应用场景
- Servlet Filter
public class LogFilter implements Filter { @Override public void doFilter(ServletRequest request, ServletResponse response, FilterChain chain) throws IOException, ServletException { // 前置处理 System.out.println("请求开始: " + request.getRemoteAddr()); // 传递给下一个过滤器 chain.doFilter(request, response); // 后置处理 System.out.println("请求结束"); } } - Spring Security过滤器链
public class SecurityFilterChain { private List<Filter> filters; public void doFilter(ServletRequest request, ServletResponse response) { new VirtualFilterChain(filters).doFilter(request, response); } private static class VirtualFilterChain implements FilterChain { private final Iterator<Filter> iterator; public VirtualFilterChain(List<Filter> filters) { this.iterator = filters.iterator(); } @Override public void doFilter(ServletRequest request, ServletResponse response) { if (iterator.hasNext()) { Filter nextFilter = iterator.next(); nextFilter.doFilter(request, response, this); } } } } - 审批流程系统
public abstract class Approver {
    protected Approver successor;

    public void setSuccessor(Approver successor) {
        this.successor = successor;
    }

    public abstract void processRequest(PurchaseRequest request);
}

public class Manager extends Approver {
    @Override
    public void processRequest(PurchaseRequest request) {
        if (request.getAmount() < 10000) {
            System.out.println("经理审批通过");
        } else if (successor != null) {
            successor.processRequest(request);
        }
    }
}

public class Director extends Approver {
    @Override
    public void processRequest(PurchaseRequest request) {
        if (request.getAmount() < 50000) {
            System.out.println("总监审批通过");
        } else if (successor != null) {
            successor.processRequest(request);
        }
    }
}
5. 状态模式
5.1 状态驱动的行为
状态模式允许对象在内部状态改变时改变其行为。
状态转换逻辑
- 由Context类负责
- 由State类负责
- 由客户端负责
与策略模式的区别
- 状态模式:状态自动转换,行为由状态决定
- 策略模式:策略由客户端选择,行为由策略决定
5.2 实际应用场景
- 订单状态管理
public interface OrderState { void confirm(OrderContext context); void cancel(OrderContext context); void ship(OrderContext context); } public class NewOrderState implements OrderState { @Override public void confirm(OrderContext context) { System.out.println("订单已确认"); context.setState(new ConfirmedState()); } @Override public void cancel(OrderContext context) { System.out.println("订单已取消"); context.setState(new CancelledState()); } @Override public void ship(OrderContext context) { System.out.println("新订单不能直接发货"); } } public class OrderContext { private OrderState state; public OrderContext() { this.state = new NewOrderState(); } public void setState(OrderState state) { this.state = state; } public void confirm() { state.confirm(this); } public void cancel() { state.cancel(this); } public void ship() { state.ship(this); } } - 游戏角色状态
public interface CharacterState { void walk(); void run(); void attack(); } public class NormalState implements CharacterState { @Override public void walk() { System.out.println("正常行走"); } @Override public void run() { System.out.println("快速奔跑"); } @Override public void attack() { System.out.println("普通攻击"); } } public class PoisonedState implements CharacterState { @Override public void walk() { System.out.println("中毒状态,行走缓慢"); } @Override public void run() { System.out.println("中毒状态,无法奔跑"); } @Override public void attack() { System.out.println("中毒状态,攻击力减半"); } } - TCP连接状态
public interface TCPState {
    void open(TCPConnection connection);
    void close(TCPConnection connection);
    void acknowledge(TCPConnection connection);
}

public class TCPEstablished implements TCPState {
    @Override
    public void open(TCPConnection connection) {
        System.out.println("连接已建立,无需再次打开");
    }

    @Override
    public void close(TCPConnection connection) {
        System.out.println("关闭连接");
        connection.setState(new TCPClosed());
    }

    @Override
    public void acknowledge(TCPConnection connection) {
        System.out.println("发送ACK确认");
    }
}
6. 命令模式
6.1 请求封装为对象
- 命令队列与日志
public class CommandQueue { private Queue<Command> queue = new LinkedList<>(); public void addCommand(Command command) { queue.add(command); } public void executeAll() { while (!queue.isEmpty()) { Command command = queue.poll(); command.execute(); } } } public class CommandLogger { private List<Command> history = new ArrayList<>(); public void logAndExecute(Command command) { history.add(command); command.execute(); } public void replay() { for (Command command : history) { command.execute(); } } } - 撤销与重做实现
public interface Command {
    void execute();
    void undo();
}

public class InsertTextCommand implements Command {
    private String text;
    private int position;
    private TextEditor editor;

    public InsertTextCommand(TextEditor editor, String text, int position) {
        this.editor = editor;
        this.text = text;
        this.position = position;
    }

    @Override
    public void execute() {
        editor.insert(text, position);
    }

    @Override
    public void undo() {
        editor.delete(position, text.length());
    }
}

public class TextEditor {
    private StringBuilder text = new StringBuilder();
    private Deque<Command> undoStack = new ArrayDeque<>();
    private Deque<Command> redoStack = new ArrayDeque<>();

    public void executeCommand(Command command) {
        command.execute();
        undoStack.push(command);
        redoStack.clear();
    }

    public void undo() {
        if (!undoStack.isEmpty()) {
            Command command = undoStack.pop();
            command.undo();
            redoStack.push(command);
        }
    }

    public void redo() {
        if (!redoStack.isEmpty()) {
            Command command = redoStack.pop();
            command.execute();
            undoStack.push(command);
        }
    }
}
6.2 实际应用场景
- GUI菜单系统
public interface MenuItemCommand { void execute(); } public class SaveCommand implements MenuItemCommand { private Document document; public SaveCommand(Document document) { this.document = document; } @Override public void execute() { document.save(); } } public class MenuItem { private String label; private MenuItemCommand command; public MenuItem(String label, MenuItemCommand command) { this.label = label; this.command = command; } public void onClick() { command.execute(); } } - 事务管理
public interface TransactionCommand { void execute(); void rollback(); } public class MoneyTransferCommand implements TransactionCommand { private Account from; private Account to; private BigDecimal amount; public MoneyTransferCommand(Account from, Account to, BigDecimal amount) { this.from = from; this.to = to; this.amount = amount; } @Override public void execute() { from.debit(amount); to.credit(amount); } @Override public void rollback() { to.debit(amount); from.credit(amount); } } public class TransactionManager { private List<TransactionCommand> commands = new ArrayList<>(); public void addCommand(TransactionCommand command) { commands.add(command); } public void commit() { try { for (TransactionCommand command : commands) { command.execute(); } } catch (Exception e) { rollback(); throw e; } } public void rollback() { for (int i = commands.size() - 1; i >= 0; i--) { commands.get(i).rollback(); } } } - 异步任务队列
public interface AsyncCommand {
    void execute();
}

public class EmailNotificationCommand implements AsyncCommand {
    private String email;
    private String message;

    public EmailNotificationCommand(String email, String message) {
        this.email = email;
        this.message = message;
    }

    @Override
    public void execute() {
        // 发送邮件逻辑
        System.out.println("发送邮件到 " + email + ": " + message);
    }
}

public class TaskQueue {
    private ExecutorService executor = Executors.newFixedThreadPool(4);
    private Queue<AsyncCommand> queue = new ConcurrentLinkedQueue<>();

    public void addTask(AsyncCommand command) {
        queue.add(command);
    }

    public void startProcessing() {
        while (!queue.isEmpty()) {
            AsyncCommand command = queue.poll();
            executor.submit(() -> command.execute());
        }
    }
}
7. 访问者模式
7.1 双重分派机制
访问者模式通过双重分派实现数据结构和操作的分离。
- 对扩展开放:新增操作只需添加新的访问者
- 对修改关闭:元素类不需要修改
7.2 实际应用场景
- 编译器语法树分析
public interface ASTNode { void accept(ASTVisitor visitor); } public class VariableNode implements ASTNode { private String name; @Override public void accept(ASTVisitor visitor) { visitor.visit(this); } } public interface ASTVisitor { void visit(VariableNode node); void visit(AssignmentNode node); void visit(IfStatementNode node); } public class TypeCheckingVisitor implements ASTVisitor { @Override public void visit(VariableNode node) { // 类型检查逻辑 } // 其他visit方法实现... } - 文件系统遍历
public interface FileSystemVisitor { void visit(File file); void visit(Directory directory); } public class FileSizeCalculator implements FileSystemVisitor { private long totalSize = 0; @Override public void visit(File file) { totalSize += file.getSize(); } @Override public void visit(Directory directory) { // 目录本身不占空间 } public long getTotalSize() { return totalSize; } } - ASM字节码操作
public class MyClassVisitor extends ClassVisitor {
    public MyClassVisitor(int api, ClassVisitor cv) {
        super(api, cv);
    }

    @Override
    public MethodVisitor visitMethod(int access, String name,
            String desc, String signature, String[] exceptions) {
        // 处理方法
        return new MyMethodVisitor(api,
                super.visitMethod(access, name, desc, signature, exceptions));
    }
}

public class MyMethodVisitor extends MethodVisitor {
    public MyMethodVisitor(int api, MethodVisitor mv) {
        super(api, mv);
    }

    @Override
    public void visitCode() {
        // 插入字节码
        super.visitCode();
    }
}
第五部分:设计模式综合应用
1. 设计模式在框架中的应用
1.1 Spring框架中设计模式
1.1.1.工厂模式:BeanFactory
Spring框架的核心IoC容器本质上是一个超级工厂,通过工厂模式管理应用对象的生命周期和配置。
核心实现:
// 工厂接口
public interface BeanFactory {
    Object getBean(String name) throws BeansException;
    <T> T getBean(String name, Class<T> requiredType) throws BeansException;
    // 其他工厂方法...
}

// 具体实现 - DefaultListableBeanFactory
public class DefaultListableBeanFactory implements ConfigurableListableBeanFactory {
    private final Map<String, BeanDefinition> beanDefinitionMap = new ConcurrentHashMap<>(256);

    public Object getBean(String name) throws BeansException {
        return doGetBean(name, null, null, false);
    }

    protected <T> T doGetBean(...) {
        // 复杂的对象创建逻辑
        // 1. 检查单例缓存
        // 2. 处理原型/其他作用域
        // 3. 依赖注入
        // 4. 初始化回调
    }
}生产应用场景:
- 配置集中管理:所有Bean的创建都通过BeanFactory统一管理
- 依赖解耦:对象不再直接new,而是从工厂获取
- 灵活扩展:可通过FactoryBean接口自定义复杂对象的创建逻辑
最佳实践:
// 自定义FactoryBean示例
public class MyServiceFactoryBean implements FactoryBean<MyService> {
    @Override
    public MyService getObject() throws Exception {
        // 复杂对象的创建逻辑
        MyService service = new MyServiceImpl();
        service.setConfig(...);
        service.init();
        return service;
    }

    @Override
    public Class<?> getObjectType() {
        return MyService.class;
    }
}
1.1.2.代理模式:AOP实现
Spring AOP基于代理模式实现,为业务组件提供横切关注点的能力。
动态代理实现原理:
// Spring AOP核心代理创建逻辑
public class DefaultAopProxyFactory implements AopProxyFactory {
    public AopProxy createAopProxy(AdvisedSupport config) {
        if (config.isOptimize() || config.isProxyTargetClass() || hasNoUserSuppliedProxyInterfaces(config)) {
            Class<?> targetClass = config.getTargetClass();
            if (targetClass.isInterface() || Proxy.isProxyClass(targetClass)) {
                return new JdkDynamicAopProxy(config);  // JDK动态代理
            }
            return new ObjenesisCglibAopProxy(config);  // CGLIB代理
        }
        return new JdkDynamicAopProxy(config);
    }
}生产级AOP配置:
@Aspect
@Component
public class ServiceMonitorAspect {

    // 监控服务执行时间
    @Around("execution(* com..service.*.*(..))")
    public Object monitorServicePerformance(ProceedingJoinPoint pjp) throws Throwable {
        long start = System.currentTimeMillis();
        try {
            return pjp.proceed();
        } finally {
            long elapsed = System.currentTimeMillis() - start;
            if (elapsed > 1000) {
                log.warn("Slow service execution: {} took {}ms",
                    pjp.getSignature(), elapsed);
            }
        }
    }

    // 事务重试逻辑
    @Around("@annotation(retryable)")
    public Object retryOperation(ProceedingJoinPoint pjp, Retryable retryable) throws Throwable {
        int attempts = 0;
        do {
            try {
                return pjp.proceed();
            } catch (RetryableException e) {
                if (++attempts >= retryable.maxAttempts()) {
                    throw e;
                }
                Thread.sleep(retryable.backoff());
            }
        } while (true);
    }
}
1.1.3.模板方法:JdbcTemplate
Spring的JdbcTemplate是模板方法模式的经典实现,封装了JDBC操作的固定流程。
核心模板结构:
public class JdbcTemplate extends JdbcAccessor implements JdbcOperations {

    public <T> T execute(ConnectionCallback<T> action) {
        Connection con = DataSourceUtils.getConnection(getDataSource());
        try {
            // 前置处理:设置连接属性等
            Connection conToUse = con;
            // 执行用户定义的操作
            T result = action.doInConnection(conToUse);
            // 后置处理:处理警告等
            handleWarnings(con);
            return result;
        } catch (SQLException ex) {
            // 异常转换
            throw translateException("ConnectionCallback", sql, ex);
        } finally {
            // 资源释放
            DataSourceUtils.releaseConnection(con, getDataSource());
        }
    }

    public <T> T query(String sql, RowMapper<T> rowMapper) {
        return execute(sql, new RowMapperResultSetExtractor<>(rowMapper));
    }
}生产应用示例:
@Repository
public class UserRepository {

    private final JdbcTemplate jdbcTemplate;

    public UserRepository(DataSource dataSource) {
        this.jdbcTemplate = new JdbcTemplate(dataSource);
    }

    public List<User> findActiveUsers() {
        return jdbcTemplate.query(
            "SELECT * FROM users WHERE status = ?",
            (rs, rowNum) -> new User(
                rs.getLong("id"),
                rs.getString("username"),
                rs.getString("email")
            ),
            "ACTIVE"
        );
    }

    @Transactional
    public void batchInsert(List<User> users) {
        jdbcTemplate.batchUpdate(
            "INSERT INTO users (username, email) VALUES (?, ?)",
            new BatchPreparedStatementSetter() {
                public void setValues(PreparedStatement ps, int i) {
                    User user = users.get(i);
                    ps.setString(1, user.getUsername());
                    ps.setString(2, user.getEmail());
                }
                public int getBatchSize() {
                    return users.size();
                }
            });
    }
}
1.2 JDK中的设计模式
1.2.1.迭代器模式:Collection迭代
JDK集合框架通过迭代器模式提供统一的遍历接口。
核心实现:
// 迭代器接口
public interface Iterator<E> {
    boolean hasNext();
    E next();
    default void remove() { ... }
    default void forEachRemaining(Consumer<? super E> action) { ... }
}

// 集合接口
public interface Iterable<T> {
    Iterator<T> iterator();
    default void forEach(Consumer<? super T> action) { ... }
    default Spliterator<T> spliterator() { ... }
}

// ArrayList中的具体实现
private class Itr implements Iterator<E> {
    int cursor;       // 下一个元素的索引
    int lastRet = -1;  // 上一个返回元素的索引
    int expectedModCount = modCount;

    public boolean hasNext() {
        return cursor != size;
    }

    public E next() {
        checkForComodification();
        int i = cursor;
        if (i >= size)
            throw new NoSuchElementException();
        Object[] elementData = ArrayList.this.elementData;
        if (i >= elementData.length)
            throw new ConcurrentModificationException();
        cursor = i + 1;
        return (E) elementData[lastRet = i];
    }

    final void checkForComodification() {
        if (modCount != expectedModCount)
            throw new ConcurrentModificationException();
    }
}生产应用:
// 安全删除元素的正确方式
public void removeNegativeNumbers(List<Integer> numbers) {
    Iterator<Integer> iterator = numbers.iterator();
    while (iterator.hasNext()) {
        if (iterator.next() < 0) {
            iterator.remove();  // 安全删除当前元素
        }
    }
}

// 并行迭代处理
public void processInParallel(Collection<Data> dataCollection) {
    Spliterator<Data> split1 = dataCollection.spliterator();
    Spliterator<Data> split2 = split1.trySplit();

    new Thread(() -> split1.forEachRemaining(this::process)).start();
    new Thread(() -> split2.forEachRemaining(this::process)).start();
}
1.2.2.装饰器模式:IO流
Java I/O流体系是装饰器模式的经典应用,通过层层包装增强流的功能。
生产级IO操作:
// 带缓冲的GZIP文件读取
public byte[] readGzippedFile(Path filePath) throws IOException {
    try (InputStream in = new BufferedInputStream(
                          new GZIPInputStream(
                          new FileInputStream(filePath.toFile())))) {
        ByteArrayOutputStream out = new ByteArrayOutputStream();
        byte[] buffer = new byte[8192];
        int bytesRead;
        while ((bytesRead = in.read(buffer)) != -1) {
            out.write(buffer, 0, bytesRead);
        }
        return out.toByteArray();
    }
}

// 带校验的加密输出
public void writeEncryptedData(Path dest, byte[] data, SecretKey key) throws IOException {
    try (OutputStream out = new DigestOutputStream(
                            new CipherOutputStream(
                            new BufferedOutputStream(
                            new FileOutputStream(dest.toFile())),
                            createCipher(key, Cipher.ENCRYPT_MODE)),
                            MessageDigest.getInstance("SHA-256"))) {
        out.write(data);
        byte[] digest = ((DigestOutputStream) out).getMessageDigest().digest();
        // 存储摘要用于验证
        Files.write(dest.resolveSibling(dest.getFileName() + ".sha256"), digest);
    }
}
1.2.3.观察者模式:Event机制
JDK内置的观察者模式实现提供了基本的事件通知机制。
核心组件:
// 被观察者
public class Observable {
    private boolean changed = false;
    private Vector<Observer> obs = new Vector<>();

    public synchronized void addObserver(Observer o) {
        if (o == null) throw new NullPointerException();
        if (!obs.contains(o)) obs.addElement(o);
    }

    public void notifyObservers(Object arg) {
        Object[] arrLocal;
        synchronized (this) {
            if (!changed) return;
            arrLocal = obs.toArray();
            clearChanged();
        }
        for (int i = arrLocal.length-1; i>=0; i--)
            ((Observer)arrLocal[i]).update(this, arg);
    }
}

// 观察者接口
public interface Observer {
    void update(Observable o, Object arg);
}生产级事件系统实现:
// 自定义事件总线
public class EventBus {
    private final Map<Class<?>, List<Consumer<Object>>> handlers = new ConcurrentHashMap<>();

    public <T> void subscribe(Class<T> eventType, Consumer<T> handler) {
        handlers.computeIfAbsent(eventType, k -> new CopyOnWriteArrayList<>())
               .add((Consumer<Object>) handler::accept);
    }

    public <T> void publish(T event) {
        List<Consumer<Object>> eventHandlers = handlers.get(event.getClass());
        if (eventHandlers != null) {
            eventHandlers.forEach(handler -> {
                try {
                    handler.accept(event);
                } catch (Exception e) {
                    System.err.println("Error handling event: " + e.getMessage());
                }
            });
        }
    }
}

// 使用示例
public class OrderService {
    private final EventBus eventBus;

    public OrderService(EventBus eventBus) {
        this.eventBus = eventBus;
        eventBus.subscribe(OrderCreatedEvent.class, this::handleOrderCreated);
    }

    public void createOrder(Order order) {
        // 创建订单逻辑...
        eventBus.publish(new OrderCreatedEvent(order));
    }

    private void handleOrderCreated(OrderCreatedEvent event) {
        // 发送通知、更新报表等
    }
}
1.3.设计模式最佳实践总结
模式组合应用:
- Spring中经常组合使用工厂模式+单例模式管理Bean
- AOP中组合代理模式+责任链模式实现拦截器链
- JdbcTemplate组合模板方法+回调模式
性能考量:
- 代理模式选择:JDK动态代理 vs CGLIB
- 单例模式:注意线程安全和性能影响
- 观察者模式:避免过长的通知链影响性能
扩展性设计:
- 通过工厂模式支持新类型的创建
- 使用装饰器模式透明增强功能
- 模板方法模式允许定制特定步骤
生产陷阱规避:
- 代理模式导致的this调用问题
- 观察者模式的内存泄漏风险
- 装饰器模式的过度包装问题
这些设计模式在框架中的实现经过了长期的生产验证,理解其原理和实现方式有助于我们更好地使用框架,并在自己的代码中合理应用这些模式。
MVC架构中的设计模式
- 组合模式:View层次
- 策略模式:Controller分发
- 观察者模式:Model通知
微服务架构中的设计模式
- 外观模式:API网关
- 代理模式:服务调用
- 单例模式:配置中心
2. 设计模式最佳实践
3.1 模式组合应用
3.1.1.工厂+策略模式实现支付系统
理论描述: 工厂模式和策略模式的组合是解决多支付方式场景的经典方案。策略模式定义了一系列算法(支付方式),并将每个算法封装起来,使它们可以互相替换;工厂模式负责创建这些策略对象,将对象的创建与使用分离。
这种组合的优势在于:
- 解耦:支付策略的创建与业务逻辑分离
- 扩展性:新增支付方式只需添加新策略类,无需修改现有代码
- 灵活性:运行时动态切换支付方式
代码实现:
// 支付策略接口
public interface PaymentStrategy {
    void pay(double amount);
    String getType();
}

// 具体支付策略实现
@Component
public class AlipayStrategy implements PaymentStrategy {
    @Override
    public void pay(double amount) {
        System.out.println("支付宝支付: " + amount + "元");
        // 实际调用支付宝SDK
    }

    @Override
    public String getType() {
        return "ALIPAY";
    }
}

@Component
public class WechatPayStrategy implements PaymentStrategy {
    @Override
    public void pay(double amount) {
        System.out.println("微信支付: " + amount + "元");
        // 实际调用微信支付SDK
    }

    @Override
    public String getType() {
        return "WECHAT_PAY";
    }
}

// 支付策略工厂
@Component
public class PaymentStrategyFactory {
    private final Map<String, PaymentStrategy> strategyMap = new ConcurrentHashMap<>();

    @Autowired
    public PaymentStrategyFactory(List<PaymentStrategy> strategies) {
        strategies.forEach(strategy ->
            strategyMap.put(strategy.getType(), strategy));
    }

    public PaymentStrategy getStrategy(String paymentType) {
        PaymentStrategy strategy = strategyMap.get(paymentType);
        if (strategy == null) {
            throw new IllegalArgumentException("不支持的支付方式: " + paymentType);
        }
        return strategy;
    }
}

// 支付服务
@Service
public class PaymentService {
    @Autowired
    private PaymentStrategyFactory strategyFactory;

    public void processPayment(String paymentType, double amount) {
        PaymentStrategy strategy = strategyFactory.getStrategy(paymentType);
        strategy.pay(amount);
    }
}

// 使用示例
@RestController
@RequestMapping("/payments")
public class PaymentController {
    @Autowired
    private PaymentService paymentService;

    @PostMapping
    public ResponseEntity<String> pay(@RequestParam String type,
                                    @RequestParam double amount) {
        paymentService.processPayment(type, amount);
        return ResponseEntity.ok("支付处理中");
    }
}实际应用场景:
- 电商平台的多支付渠道接入
- 金融系统的多种计费方式
- 会员系统的多种积分计算策略
3.1.2.观察者+命令模式实现事件系统
理论描述: 观察者模式用于实现发布-订阅机制,命令模式将请求封装为对象。两者结合可以构建灵活的事件系统,其中:
- 观察者模式负责事件的通知和响应
- 命令模式将事件处理逻辑封装为可执行对象
这种组合的优势:
- 解耦:事件发布者与处理者完全解耦
- 灵活性:可以动态添加/移除事件处理器
- 可扩展:新增事件类型不影响现有代码
代码实现:
// 事件接口
public interface Event {
    String getType();
}

// 命令接口
public interface EventHandler {
    void handle(Event event);
    boolean canHandle(Event event);
}

// 具体事件
public class OrderCreatedEvent implements Event {
    private final Order order;

    public OrderCreatedEvent(Order order) {
        this.order = order;
    }

    @Override
    public String getType() {
        return "ORDER_CREATED";
    }

    public Order getOrder() {
        return order;
    }
}

// 具体事件处理器
@Component
public class SendEmailHandler implements EventHandler {
    @Override
    public void handle(Event event) {
        OrderCreatedEvent orderEvent = (OrderCreatedEvent) event;
        System.out.println("发送订单确认邮件给: "
            + orderEvent.getOrder().getCustomerEmail());
    }

    @Override
    public boolean canHandle(Event event) {
        return event.getType().equals("ORDER_CREATED");
    }
}

@Component
public class InventoryUpdateHandler implements EventHandler {
    @Override
    public void handle(Event event) {
        OrderCreatedEvent orderEvent = (OrderCreatedEvent) event;
        System.out.println("更新库存,减少商品: "
            + orderEvent.getOrder().getItems());
    }

    @Override
    public boolean canHandle(Event event) {
        return event.getType().equals("ORDER_CREATED");
    }
}

// 事件总线(观察者模式实现)
@Service
public class EventBus {
    private final List<EventHandler> handlers = new CopyOnWriteArrayList<>();

    public void registerHandler(EventHandler handler) {
        handlers.add(handler);
    }

    public void unregisterHandler(EventHandler handler) {
        handlers.remove(handler);
    }

    public void publish(Event event) {
        handlers.stream()
            .filter(handler -> handler.canHandle(event))
            .forEach(handler -> handler.handle(event));
    }
}

// 使用示例
@RestController
@RequestMapping("/orders")
public class OrderController {
    @Autowired
    private EventBus eventBus;

    @PostMapping
    public ResponseEntity<Order> createOrder(@RequestBody Order order) {
        // 保存订单到数据库...

        // 发布订单创建事件
        eventBus.publish(new OrderCreatedEvent(order));

        return ResponseEntity.ok(order);
    }
}实际应用场景:
- 订单状态变更通知系统
- 用户行为追踪和分析系统
- 微服务架构中的事件驱动通信
3.1.3.装饰器+责任链模式实现过滤器链
理论描述: 装饰器模式动态地给对象添加额外职责,责任链模式将请求的发送者和接收者解耦。两者结合可以实现灵活的过滤器链:
- 装饰器模式为每个过滤器添加统一接口
- 责任链模式组织过滤器的执行顺序
这种组合的优势:
- 灵活性:可以动态添加/移除过滤器
- 可扩展:新增过滤器不影响现有逻辑
- 解耦:过滤器之间相互独立
代码实现:
// 过滤器接口
public interface Filter {
    void doFilter(Request request, Response response, FilterChain chain);
}

// 过滤器链
public class FilterChain {
    private final List<Filter> filters = new ArrayList<>();
    private int index = 0;

    public FilterChain addFilter(Filter filter) {
        filters.add(filter);
        return this;
    }

    public void doFilter(Request request, Response response) {
        if (index < filters.size()) {
            Filter filter = filters.get(index++);
            filter.doFilter(request, response, this);
        }
    }
}

// 具体过滤器实现
public class AuthenticationFilter implements Filter {
    @Override
    public void doFilter(Request request, Response response, FilterChain chain) {
        System.out.println("执行认证检查...");
        if (!request.getHeader("Authorization").equals("valid-token")) {
            response.setStatus(401);
            return;
        }
        chain.doFilter(request, response);
    }
}

public class LoggingFilter implements Filter {
    @Override
    public void doFilter(Request request, Response response, FilterChain chain) {
        System.out.println("请求日志: " + request.getPath());
        long start = System.currentTimeMillis();
        chain.doFilter(request, response);
        long duration = System.currentTimeMillis() - start;
        System.out.println("请求处理时间: " + duration + "ms");
    }
}

// 装饰器模式增强过滤器
public abstract class FilterDecorator implements Filter {
    protected Filter decoratedFilter;

    public FilterDecorator(Filter decoratedFilter) {
        this.decoratedFilter = decoratedFilter;
    }

    @Override
    public void doFilter(Request request, Response response, FilterChain chain) {
        decoratedFilter.doFilter(request, response, chain);
    }
}

public class MetricsFilterDecorator extends FilterDecorator {
    public MetricsFilterDecorator(Filter decoratedFilter) {
        super(decoratedFilter);
    }

    @Override
    public void doFilter(Request request, Response response, FilterChain chain) {
        System.out.println("开始收集指标...");
        super.doFilter(request, response, chain);
        System.out.println("结束收集指标...");
    }
}

// 使用示例
public class Application {
    public static void main(String[] args) {
        FilterChain chain = new FilterChain();

        // 基本过滤器
        Filter authFilter = new AuthenticationFilter();
        Filter logFilter = new LoggingFilter();

        // 装饰后的过滤器
        Filter decoratedFilter = new MetricsFilterDecorator(logFilter);

        chain.addFilter(authFilter)
             .addFilter(decoratedFilter);

        // 模拟请求
        Request request = new Request("/api/data", "valid-token");
        Response response = new Response();

        chain.doFilter(request, response);
    }
}实际应用场景:
- Web应用的安全过滤器链
- 数据处理的管道式处理
- 日志和监控系统的拦截器链
3.2 避免过度设计
3.2.1.何时使用设计模式
设计模式应该在以下情况下考虑使用:
- 代码重复:多处出现相似代码结构时,考虑使用模板方法、策略等模式消除重复
- 对象创建复杂:创建逻辑复杂或需要解耦时,使用工厂、建造者等创建型模式
- 系统结构复杂:类之间依赖关系复杂时,使用适配器、桥接等结构型模式
- 行为多变:算法或行为需要灵活切换时,使用策略、状态等行为型模式
- 需要解耦:组件间需要松耦合时,使用观察者、中介者等模式
判断标准:
- 模式是否解决了当前的实际问题?
- 不使用模式会带来什么维护成本?
- 模式的引入成本是否值得?
3.2.2.模式滥用的危害
过度使用设计模式会导致:
- 代码复杂度增加:不必要的抽象层和间接调用
- 可读性降低:其他开发者难以理解过度设计的结构
- 维护困难:简单的修改需要涉及多个类
- 性能损耗:额外的抽象层可能带来性能开销
常见滥用场景:
- 为简单对象创建复杂工厂
- 使用策略模式替代简单的条件判断
- 在不必要的地方强制使用设计模式
3.2.3.重构到模式的技巧
将现有代码重构为设计模式的建议:
- 识别痛点:先找出代码中的问题(重复、僵化、脆弱等)
- 小步重构:每次只应用一个模式解决一个具体问题
- 测试驱动:确保重构不会破坏现有功能
- 渐进式改进:从简单实现开始,按需引入模式
重构原则:
- 优先组合而非继承:使用对象组合实现灵活的行为变化
- 面向接口编程:依赖抽象而非具体实现
- 单一职责:每个类/方法只做一件事
- 开闭原则:对扩展开放,对修改关闭
通过合理应用设计模式组合和避免过度设计,可以构建出既灵活又不过度复杂的系统架构。关键在于根据实际需求权衡设计复杂度和灵活性。
第六部分:博主的话
博主用了近一个月的时间写了这篇文章,从设计模式的概念,到各个设计模式的详细案例来对每一个设计模式进行解读,希望能够和大家共同学习。好多同学看源码就是一头雾水,究其因就是因为里面用到了大量的实际模式,这也是开发源代码在工程与哲学层面的一个思考和结合,我们要用好设计模式不容易,需要阅读大量的源代码,通过不断地学习和运用,才能领悟到每一个设计的独到之处。最后,排版粗糙请大家谅解,希望大家都能成为一位优秀的开发者。