使用Yolov8 训练交通标志数据集:TT100K数据集划分(一)
- 一、数据集下载
- 二、划分数据集
- 三、目录放置
一、数据集下载
-
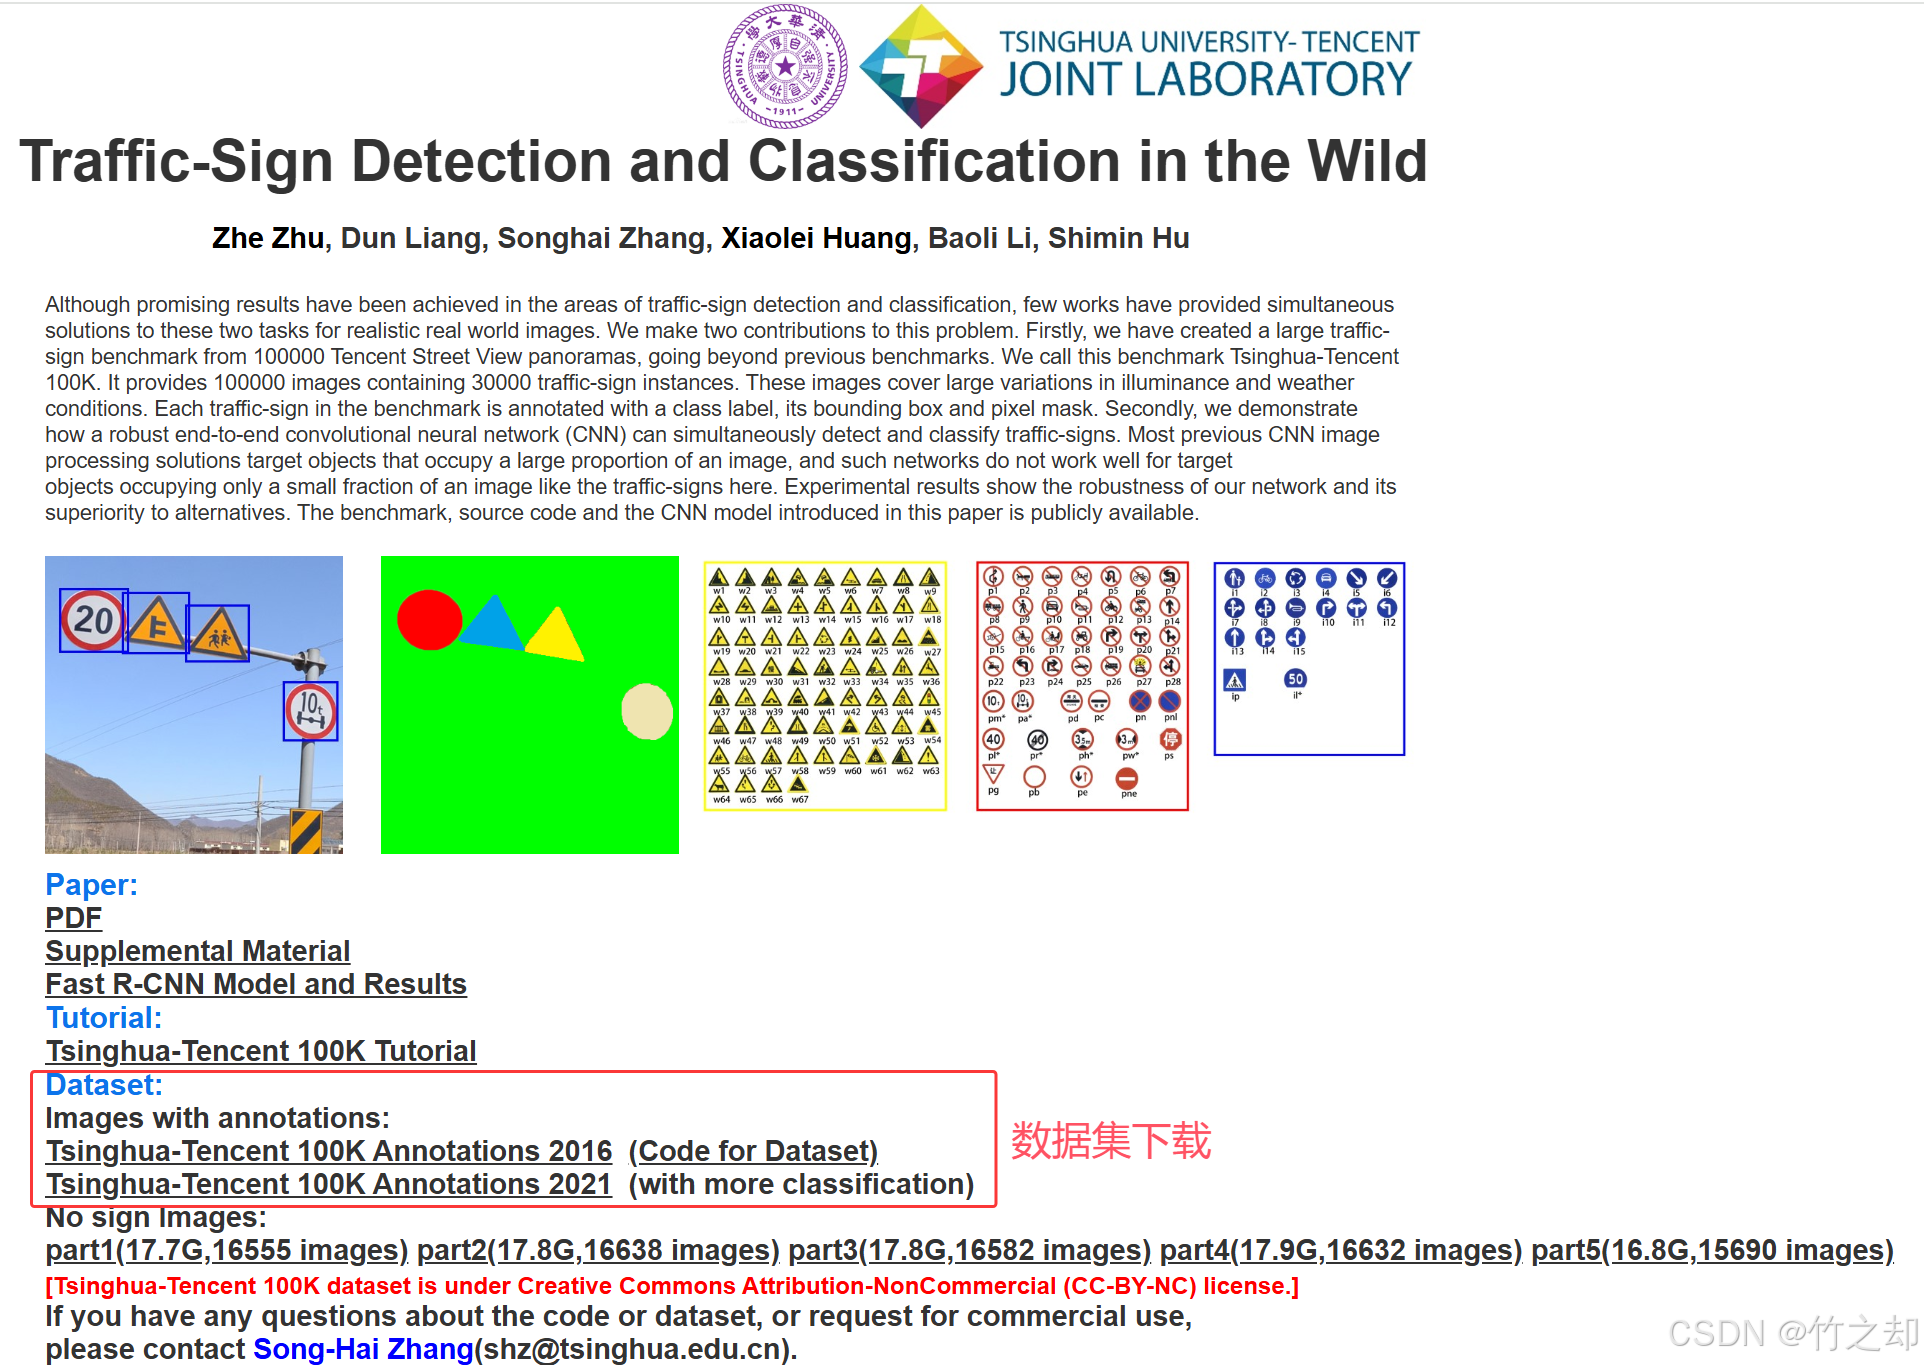
官方网址:TT100K
-
数据集对比
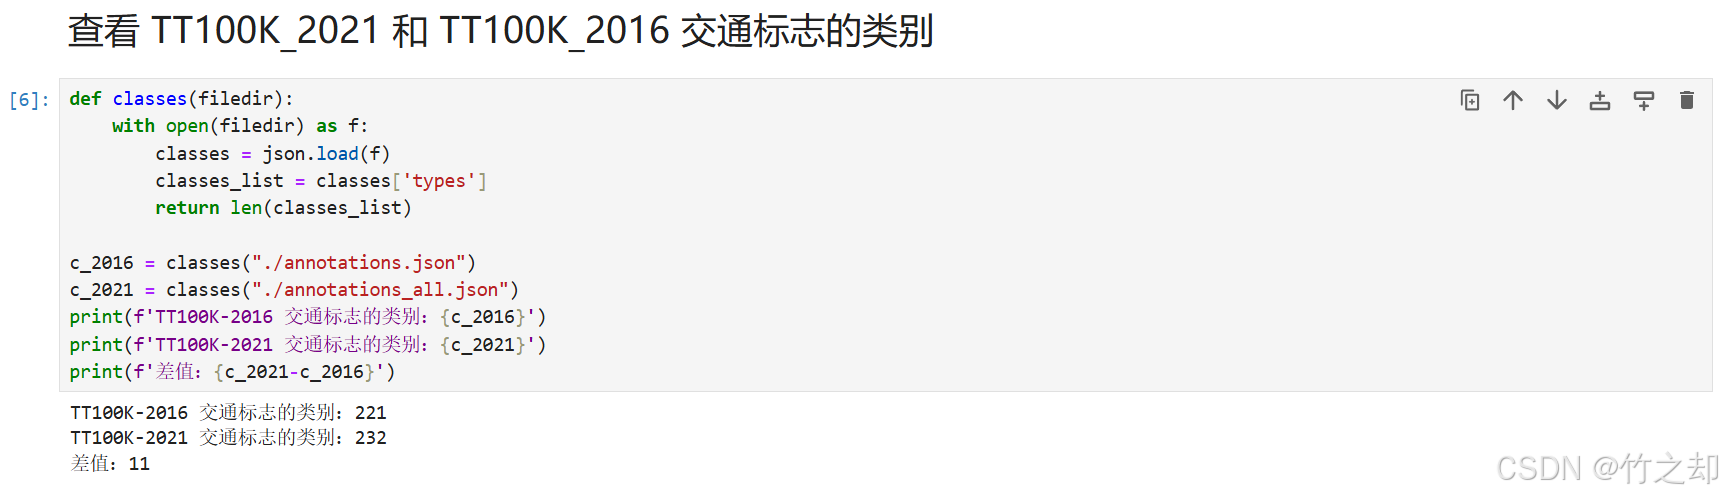
源码如下:def classes(filedir): with open(filedir) as f: classes = json.load(f) classes_list = classes['types'] return len(classes_list) c_2016 = classes("./annotations.json") c_2021 = classes("./annotations_all.json") print(f'TT100K-2016 交通标志的类别:{c_2016}') print(f'TT100K-2021 交通标志的类别:{c_2021}') print(f'差值:{c_2021-c_2016}') -
查看类别数目
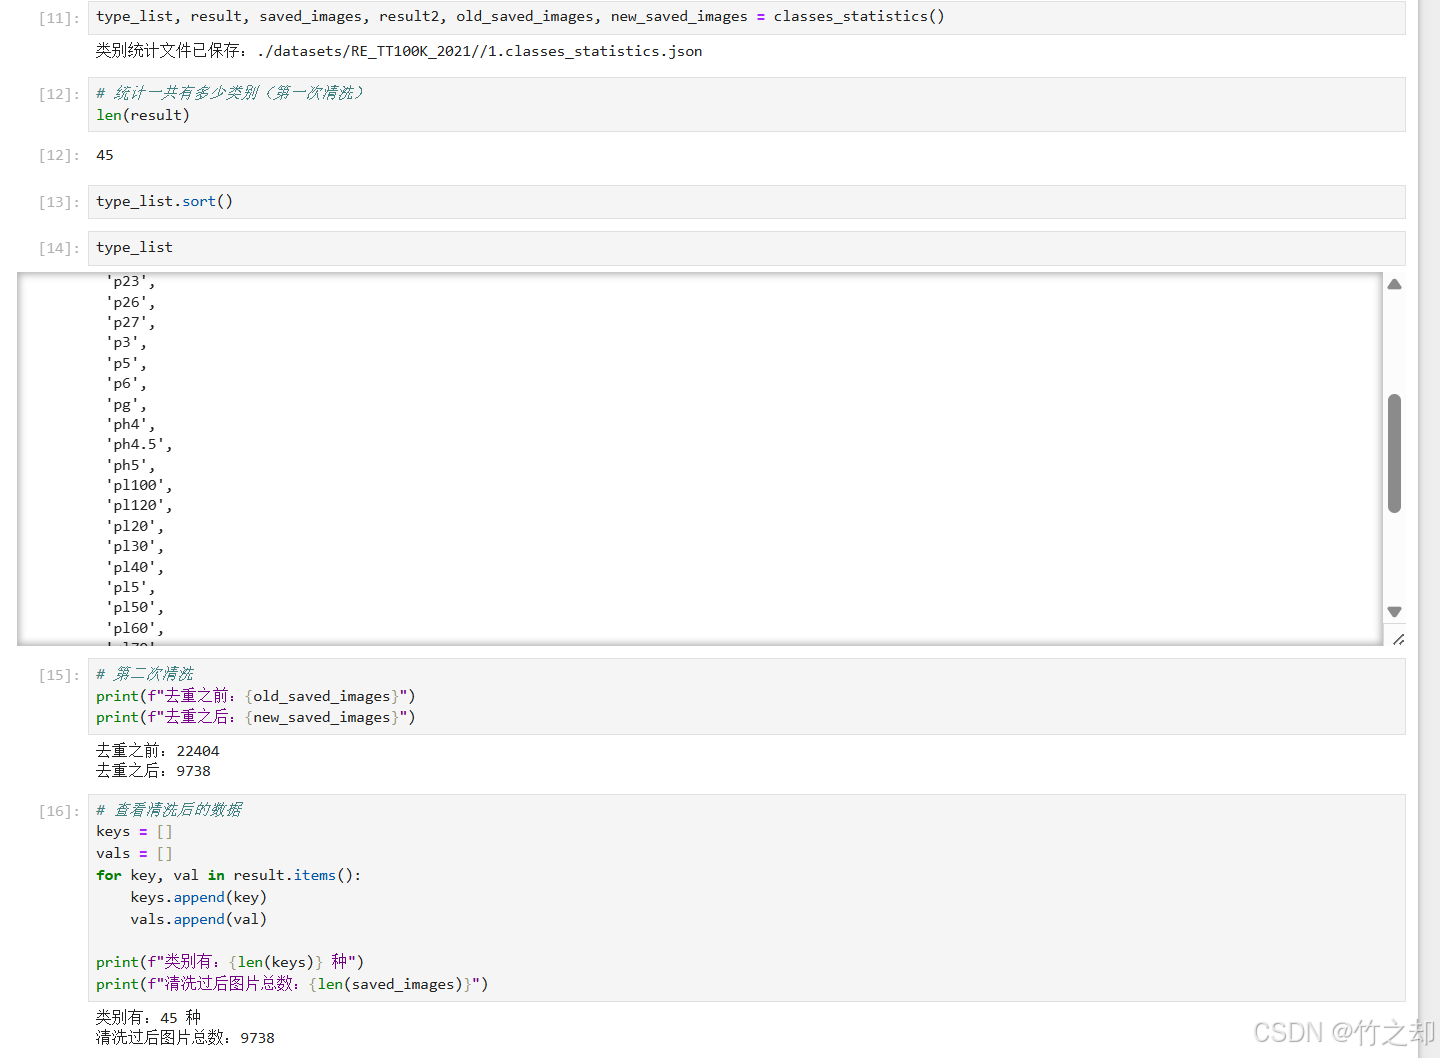
# 读TT100K原始数据集标注文件
with open(annotations) as p:
    # 读取 json 文件
    file = json.load(p)
    # 获取图字典
    img_dict = file['imgs']
    types = file['types']

    classes_list = dict()
    for i in types:
    # i 为所有的类别: 如:‘pl80’, 'w9', 'p6'
    # 将每一个类别作为字典中的键,值为: 空列表 []
        classes_list[i] = 0

    for img_id in img_dict:
        img = images_dict[img_id]
        obj_list = img['objects']
        # 统计实际有多少种类别
        for obj in obj_list:
            classes_list[obj['category']] += 1

    # 大于0的有201个
    d = []
    for keym, val in classes_list.items():
        if val > 0:
            d.append(val)

    print(len(d))
二、划分数据集
数据集划分有四个步骤,依次按照一下步骤执行即可:
-
获取每个类别有多少图片的 classes_statistics.json 文件。此过程会产生一个 json 文件,保存了分类类别,每个类别的详细信息,以及所有图片信息。
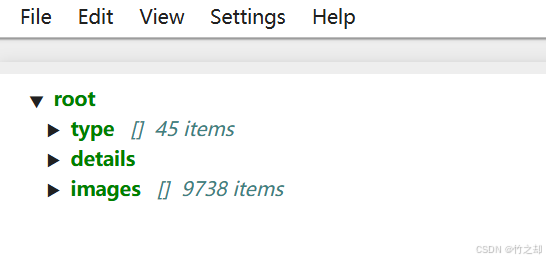
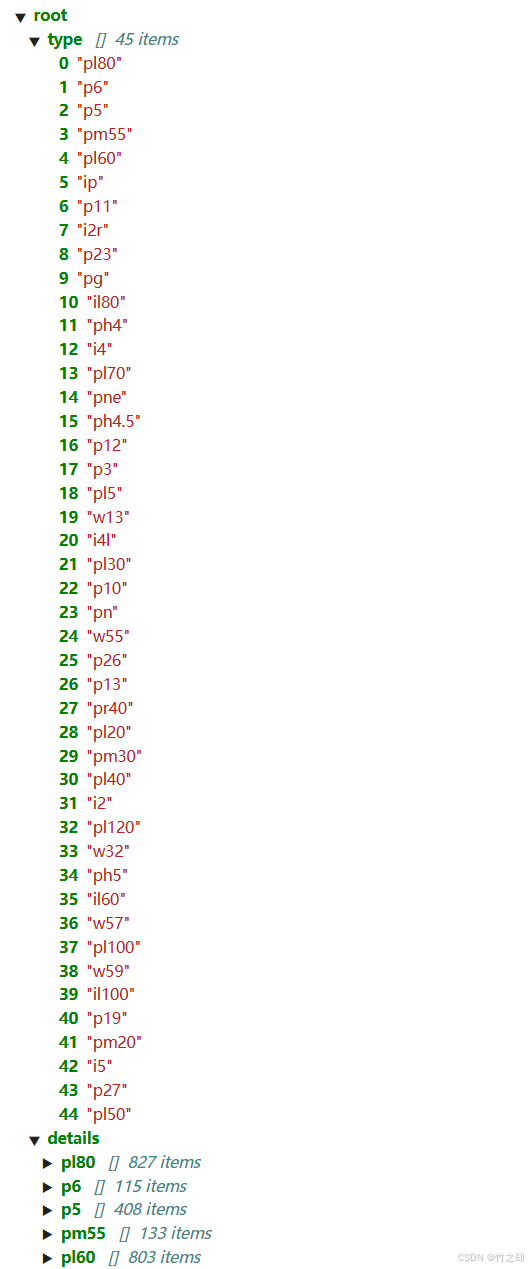
源码如下:def classes_statistics(): """ 类别统计函数,统计每一个类别下有多少张图片 保存在 classes_statistics.json 文件中 :return: """ # 读TT100K原始数据集标注文件 with open(annotations) as origin_json: # 读取 json 文件 origin_dict = json.load(origin_json) # 获取类别列表 classes_list = origin_dict['types'] # 获取图字典 images_dict = origin_dict['imgs'] # 建立统计每个类别包含的图片的字典 sta = dict() for i in classes_list: # i 为所有的类别: 如:‘pl80’, 'w9', 'p6' # 将每一个类别作为字典中的键,值为: 空列表 [] sta[i] = [] # 遍历TT100K的imgs for image_id in images_dict: image_element = images_dict[image_id] image_path = image_element['path'] # 添加图像的信息到dataset中 image_path = image_path.split('/')[-1] # 如:‘62627.jpg’ obj_list = image_element['objects'] # 遍历每张图片的标注信息,将每张图片的路径添加到对应类别的字典中去 for anno_dic in obj_list: label_key = anno_dic['category'] # 防止一个图片多次加入一个标签类别 if image_path not in sta[label_key]: sta[label_key].append(image_path) # 数据清洗--只保留包含图片数超过100的类别 # 清洗之后还剩下:45种类别 result = {k: v for k, v in sta.items() if len(v) > 100} # 将所有标注写入文件 此时写入超过100张图片的 with open('./all_classes.json', 'w', encoding="utf-8") as f: json.dump(result, f, ensure_ascii=False, indent=2) # 记录所有保留的图片 saved_images = [] for i in result: saved_images.extend(result[i]) # 第二次数据清洗。同一张图片有多个类别标注,所以要去重 old_saved_images = len(saved_images) saved_images = list(set(saved_images)) new_saved_images = len(saved_images) # print(f"total types is: {len(result)}") type_list = list(result.keys()) # 字典,三个键:类型(列表),详细信息(字典),所有类型的图片数据(列表) result2 = {"type": type_list, "details": result, "images": saved_images} # 保存结果 json_name = classes_statistics_name with open(json_name, 'w', encoding="utf-8") as f: json.dump(result2, f, ensure_ascii=False, indent=2) print(f"类别统计文件已保存:{json_name}") return type_list, result, saved_images, result2, old_saved_images, new_saved_images结果如下:
-
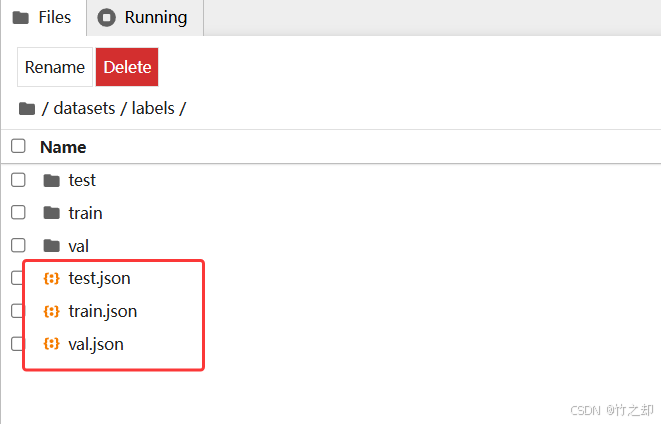
将 TT100K 原始数据集转换为 COCO 数据集格式,并根据图片中各类别的数量比例将数据划分为训练集、验证集和测试集,以便后续的模型训练和评估。此步骤生成,train.json, test.json, val.json 文件,划分比例为7:2:1。
源码如下:def original_datasets2object_datasets_re(): ''' 重新划分数据集 将 TT100K 原始数据集转换为 COCO 数据集格式,并根据图片中各类别的数量比例将数据划分为训练集、验证集和测试集,以便后续的模型训练和评估。 :return: ''' # 读TT100K原始数据集标注文件 with open(annotations) as origin_json: origin_dict = json.load(origin_json) with open(classes_statistics_name) as select_json: select_dict = json.load(select_json) classes = select_dict['type'] train_dataset = {'info': {}, 'licenses': [], 'categories': [], 'images': [], 'annotations': []} val_dataset = {'info': {}, 'licenses': [], 'categories': [], 'images': [], 'annotations': []} test_dataset = {'info': {}, 'licenses': [], 'categories': [], 'images': [], 'annotations': []} label = {} # 记录每个标志类别的id count = {} # 记录每个类别的图片数 owntype_sum = {} info = { "year": 2021, # 年份 "version": '1.0', # 版本 "description": "TT100k_to_coco", # 数据集描述 "contributor": "Tecent&Tsinghua", # 提供者 "url": 'https://cg.cs.tsinghua.edu.cn/traffic-sign/', # 下载地址 "date_created": 2021 - 1 - 15 } licenses = { "id": 1, "name": "null", "url": "null", } train_dataset['info'] = info val_dataset['info'] = info test_dataset['info'] = info train_dataset['licenses'] = licenses val_dataset['licenses'] = licenses test_dataset['licenses'] = licenses # 建立类别和id的关系 for i, cls in enumerate(classes): train_dataset['categories'].append({'id': i, 'name': cls, 'supercategory': 'traffic_sign'}) val_dataset['categories'].append({'id': i, 'name': cls, 'supercategory': 'traffic_sign'}) test_dataset['categories'].append({'id': i, 'name': cls, 'supercategory': 'traffic_sign'}) label[cls] = i count[cls] = 0 owntype_sum[cls] = 0 images_dic = origin_dict['imgs'] obj_id = 1 # 计算出每个类别共‘包含’的图片数 for image_id in images_dic: image_element = images_dic[image_id] image_path = image_element['path'] image_name = image_path.split('/')[-1] # 在所选的类别图片中 if image_name not in select_dict['images']: continue # 处理TT100K中的标注信息 obj_list = image_element['objects'] # 记录图片中包含最多的实例所属的type includes_type = {} for anno_dic in obj_list: if anno_dic["category"] not in select_dict["type"]: continue # print(anno_dic["category"]) if anno_dic["category"] in includes_type: includes_type[anno_dic["category"]] += 1 else: includes_type[anno_dic["category"]] = 1 # print(includes_type) own_type = max(includes_type, key=includes_type.get) owntype_sum[own_type] += 1 # TT100K的annotation_all转换成coco的格式 for image_id in images_dic: image_element = images_dic[image_id] image_path = image_element['path'] image_name = image_path.split('/')[-1] # 在所选的类别图片中 if image_name not in select_dict['images']: continue print(f"dealing with {image_path} ") # 处理TT100K中的标注信息 obj_list = image_element['objects'] # 记录图片中包含最多的实例所属的type includes_type = {} for anno_dic in obj_list: if anno_dic["category"] not in select_dict["type"]: continue # print(anno_dic["category"]) if anno_dic["category"] in includes_type: includes_type[anno_dic["category"]] += 1 else: includes_type[anno_dic["category"]] = 1 # print(includes_type) own_type = max(includes_type, key=includes_type.get) count[own_type] += 1 num_rate = count[own_type] / owntype_sum[own_type] # 划分数据集 7:2:1,train_set,val_set,test_set。 if num_rate < 0.7: dataset = train_dataset elif num_rate < 0.9: dataset = val_dataset else: print("dataset=test_dataset") dataset = test_dataset for anno_dic in obj_list: if anno_dic["category"] not in select_dict["type"]: continue x = anno_dic['bbox']['xmin'] y = anno_dic['bbox']['ymin'] width = anno_dic['bbox']['xmax'] - anno_dic['bbox']['xmin'] height = anno_dic['bbox']['ymax'] - anno_dic['bbox']['ymin'] label_key = anno_dic['category'] dataset['annotations'].append({ 'area': width * height, 'bbox': [x, y, width, height], 'category_id': label[label_key], 'id': obj_id, 'image_id': image_id, 'iscrowd': 0, 'segmentation': [[x, y, x + width, y, x + width, y + height, x, y + height]] }) # 每个标注的对象id唯一 obj_id += 1 im = cv2.imread(os.path.join(datasets_dir, image_path)) H, W, _ = im.shape # 添加图像的信息到dataset中 dataset['images'].append({'file_name': image_name, 'id': image_id, 'width': W, 'height': H}) # 保存结果 for phase in ['train', 'val', 'test']: # 创建保存位置的文件夹 os.makedirs(RETT100K_dir+'/labels', exist_ok=True) json_name = RETT100K_dir+f'/labels/{phase}.json' with open(json_name, 'w', encoding="utf-8") as f: if phase == 'train': json.dump(train_dataset, f, ensure_ascii=False, indent=2) if phase == 'val': json.dump(val_dataset, f, ensure_ascii=False, indent=2) if phase == 'test': json.dump(test_dataset, f, ensure_ascii=False, indent=2)执行结果:

-
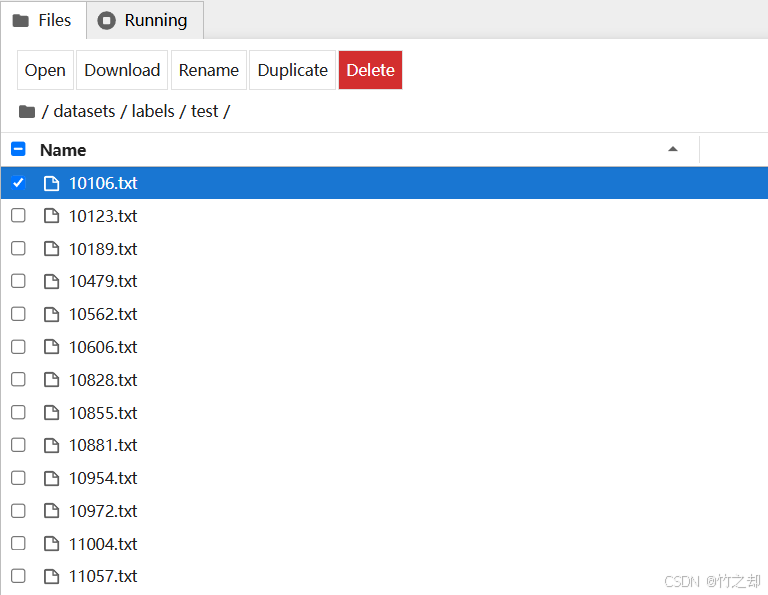
写入归一化的标注文件, 生成 yolo 格式的标注信息。获取标注信息,并划分 yolo 格式的标注信息 *.txt 文件夹
源码如下:def coco_json2yolo_txt(class_json): # 将标注位置坐标做归一化处理 def convert(size, box): dw = 1. / (size[0]) dh = 1. / (size[1]) x = box[0] + box[2] / 2.0 y = box[1] + box[3] / 2.0 w = box[2] h = box[3] x = round(x * dw, 6) w = round(w * dw, 6) y = round(y * dh, 6) h = round(h * dh, 6) return (x, y, w, h) json_file = os.path.join(RETT100K_dir+f'/labels/{class_json}.json') ana_txt_save_path = os.path.join(RETT100K_dir+'labels', class_json) # 保存的路径 data = json.load(open(json_file, 'r')) if not os.path.exists(ana_txt_save_path): os.makedirs(ana_txt_save_path) id_map = {} # coco数据集的id不连续!重新映射一下再输出! with open(os.path.join(ana_txt_save_path, 'classes.txt'), 'w') as f: # 写入classes.txt for i, category in enumerate(data['categories']): f.write(f"{category['name']}\n") id_map[category['id']] = i # 写入图像相对路径的文件位置 list_file = open(os.path.join(ana_txt_save_path, '%s.txt' % class_json.format()), 'w') for img in tqdm(data['images']): filename = img["file_name"] img_width = img["width"] img_height = img["height"] img_id = img["id"] head, tail = os.path.splitext(filename) ana_txt_name = head + ".txt" # 对应的txt名字,与jpg一致 f_txt = open(os.path.join(ana_txt_save_path, ana_txt_name), 'w') for ann in data['annotations']: if ann['image_id'] == img_id: box = convert((img_width, img_height), ann["bbox"]) f_txt.write("%s %s %s %s %s\n" % (id_map[ann["category_id"]], box[0], box[1], box[2], box[3])) f_txt.close() # 将图片的相对路径写入文件 list_file.write('/%s/%s.jpg\n' % (class_json.format(), head)) list_file.close()# 3. 写入归一化的标注文件, 生成 yolo 格式的标注信息 phase=['train', 'val', 'test'] for phase in phase: coco_json2yolo_txt(phase)执行结果:

-
拷贝图片,数据集划分完成。
源码如下:def divide_TrainValTest(source, target, pre_datasets): ''' 创建文件路径并复制数据集 :param source: 源文件位置 :param target: 目标文件位置 :param pre_datasets: 预处理数据集路径 ''' # 创建输出目录 for i in ['train', 'val', 'test']: os.makedirs(f"{target}/{i}", exist_ok=True) # 获取当前处理的数据集类型 dataset_type = None if 'train' in source: dataset_type = 'train' elif 'val' in source: dataset_type = 'val' elif 'test' in source: dataset_type = 'test' # 收集所有需要处理的文件 file_list = [] for root, dirs, files in os.walk(source): for file in files: file_name = os.path.splitext(file)[0] # 排除无关项 if file_name in ['classes', 'test', 'train', 'val', '10106-checkpoint']: continue file_list.append(file_name) for file_name in tqdm(file_list, desc=f"处理{dataset_type}数据集", unit="文件"): image_path = f"{file_name}.jpg" source_path = os.path.join(pre_datasets, image_path) target_path = os.path.join(target, dataset_type, image_path) # 复制文件并处理异常 try: shutil.copyfile(source_path, target_path) except Exception as e: print(f"警告: 无法复制文件 {image_path}: {e}") print(f"{dataset_type}数据集处理完成!")执行结果:

三、目录放置
-
原数据集的目录结构:保持下载时目录不变即可。
E:\机器学习\TT00K\tt100k_2021>tree E:. ├─train ├─test └─other -
处理后的数据集目录结:
E:\机器学习\TT00K\RETT100K_2021>tree E:. ├─images │ ├─test │ ├─train │ └─val └─labels ├─test ├─train └─val -
处理完之后就可以使用 yolo v8/v11 训练了。
data.yaml 文件如下:path: ../datasets/RE_TT100K_2021/ train: images/train val: images/val test: images/test # 分类总数 nc: 45 # 分类类别 names: ['pl80', 'p6', 'p5', 'pm55', 'pl60', 'ip', 'p11', 'i2r', 'p23', 'pg', 'il80', 'ph4', 'i4', 'pl70', 'pne', 'ph4.5', 'p12', 'p3', 'pl5', 'w13', 'i4l', 'pl30', 'p10', 'pn', 'w55', 'p26', 'p13', 'pr40', 'pl20', 'pm30', 'pl40', 'i2', 'pl120', 'w32', 'ph5', 'il60', 'w57', 'pl100', 'w59', 'il100', 'p19', 'pm20', 'i5', 'p27', 'pl50']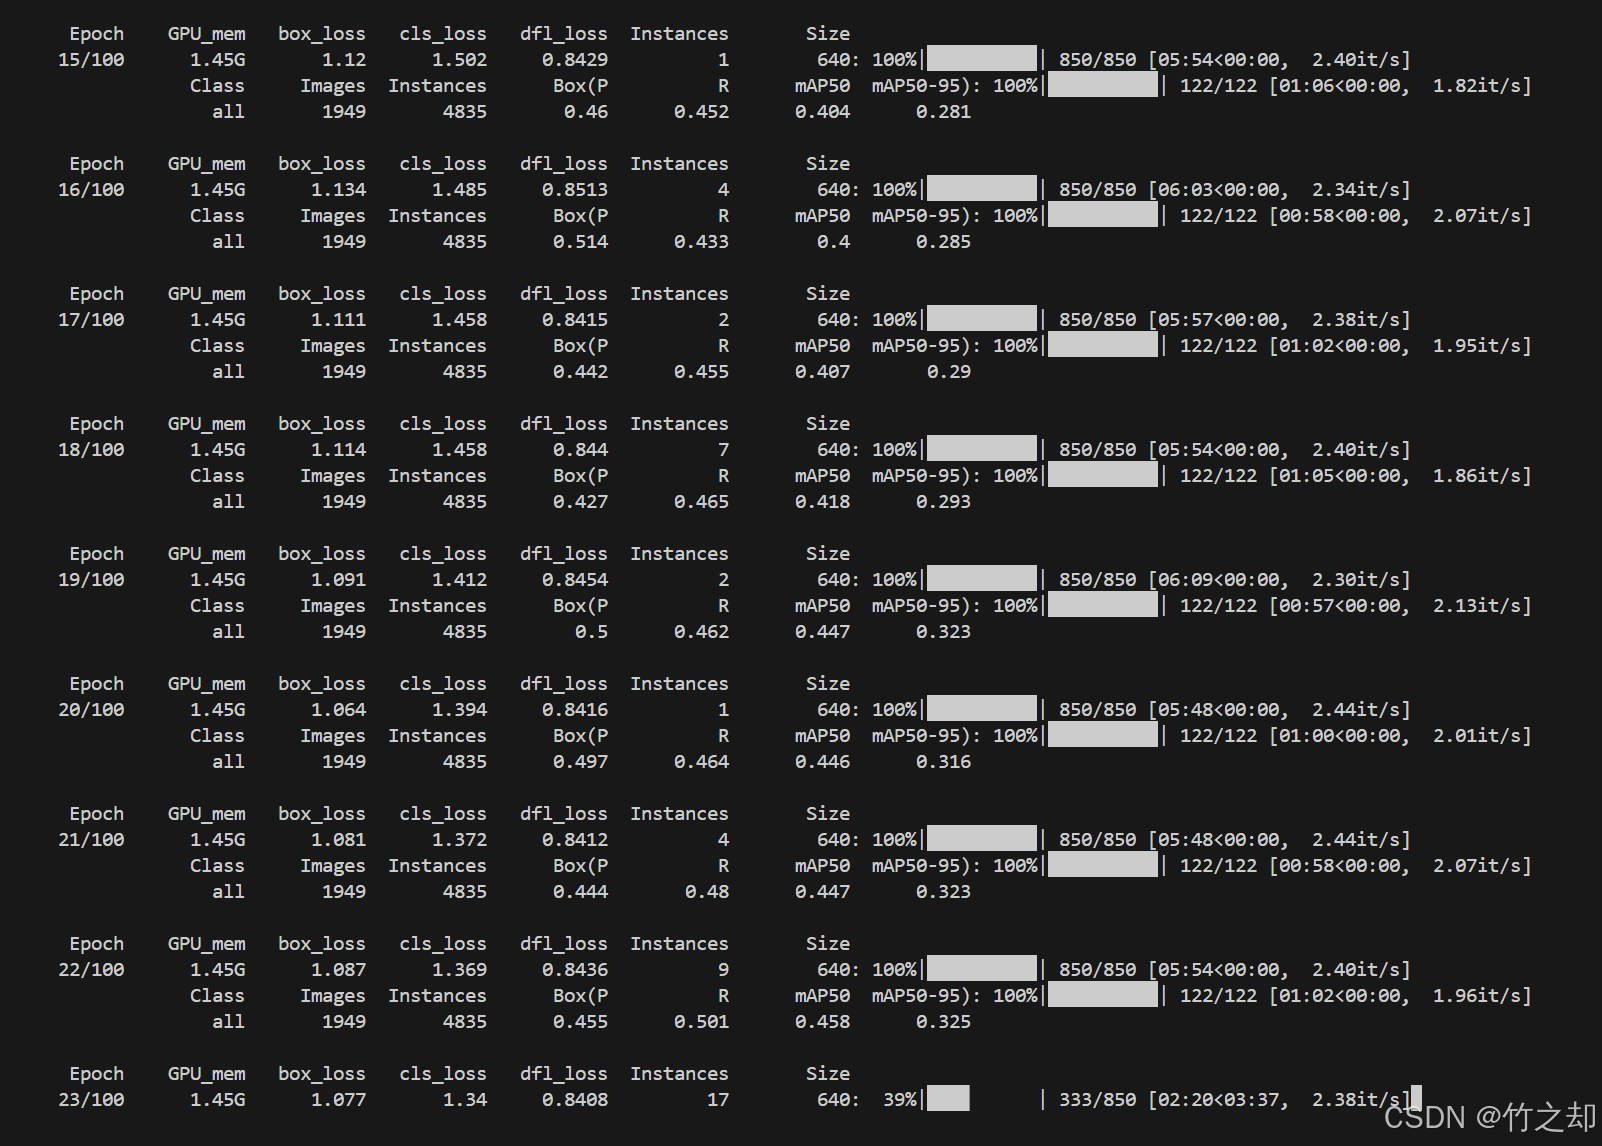
END