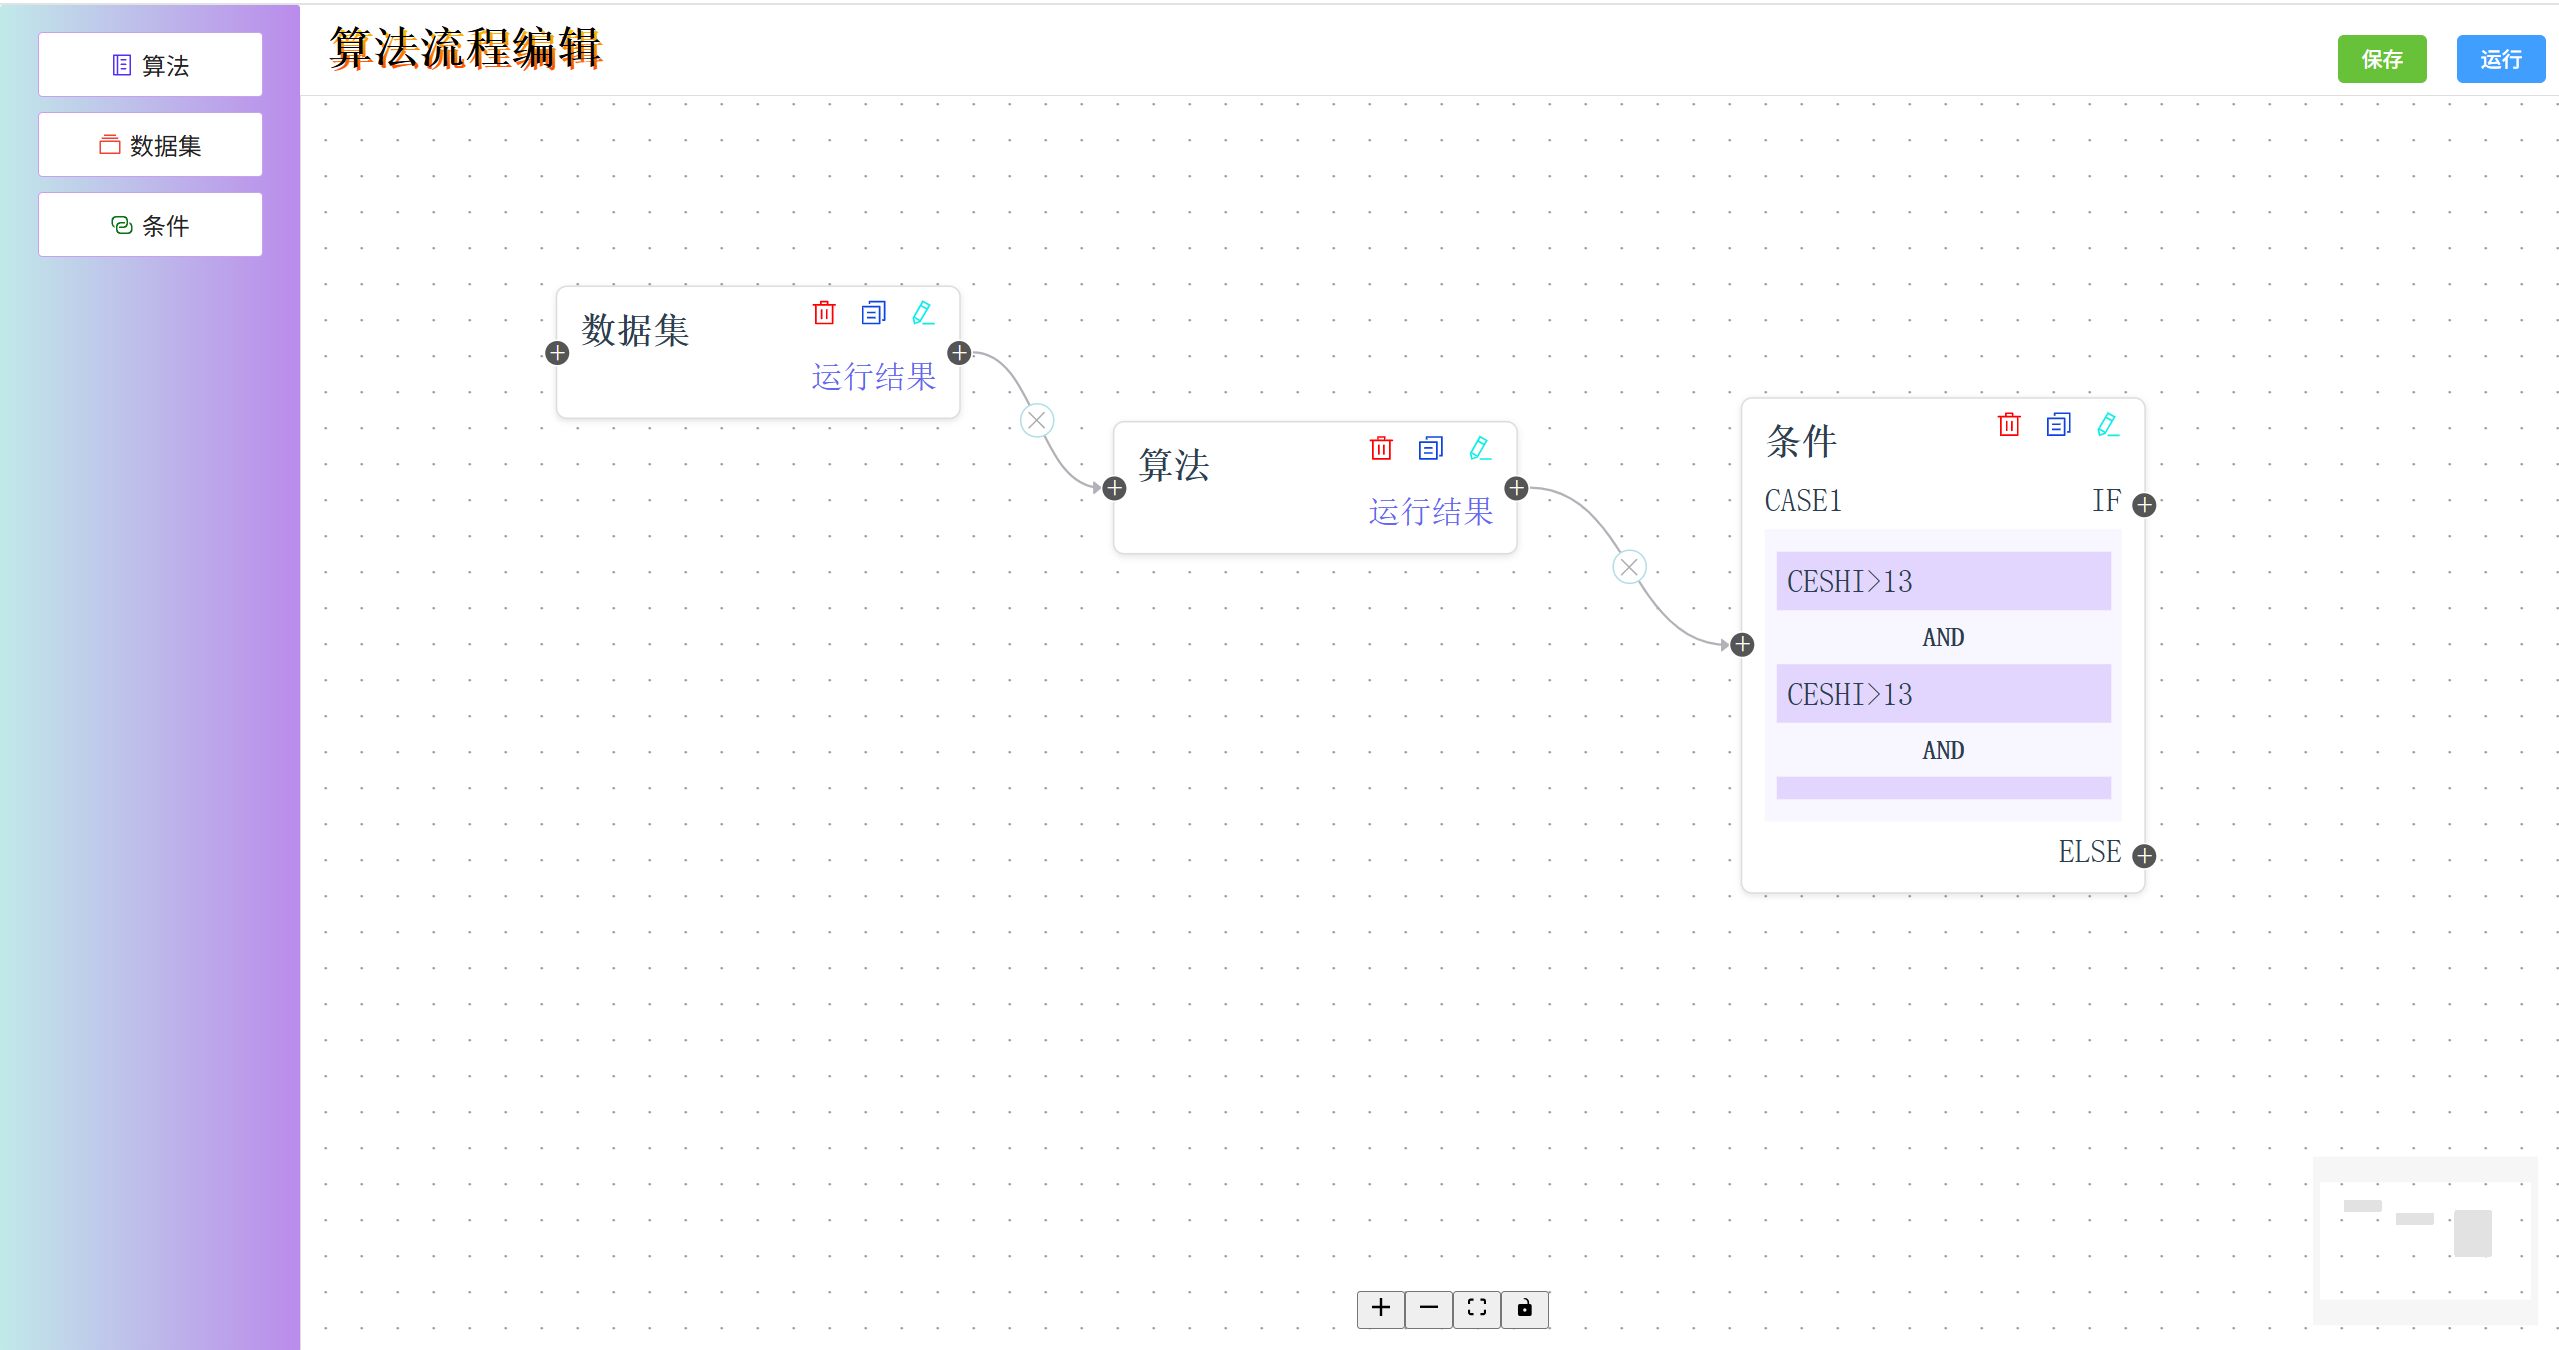
自定义节点,自定义线,具体细节还未完善,实现效果:
1.安装vueflow
2.目录如下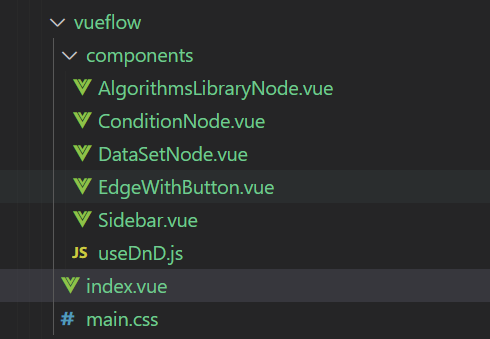
3.
index.vue
<script setup>
import { ref } from 'vue'
import { VueFlow, useVueFlow } from '@vue-flow/core'
import { Background } from '@vue-flow/background'
import { ControlButton, Controls } from '@vue-flow/controls'
import { MiniMap } from '@vue-flow/minimap'
import { MarkerType } from '@vue-flow/core'
import useDragAndDrop from './components/useDnD'
import Sidebar from './components/Sidebar.vue'
const { onInit, onNodeDragStop, onConnect, addEdges, setViewport, toObject, addNodes, project } = useVueFlow()
const { onDragStart, onDragOver, onDrop, onDragLeave, isDragOver } = useDragAndDrop()
import EdgeWithButton from './components/EdgeWithButton.vue'
import { toPng, toJpeg, toBlob } from 'html-to-image'
// const flowContainer = ref(null)
// 导入自定义节点
import DataSetNode from './components/DataSetNode.vue'//数据集
import ConditionNode from './components/ConditionNode.vue'//条件
import AlgorithmsLibraryNode from './components/AlgorithmsLibraryNode.vue'//算法
// 节点
const nodes = ref([])
// 线
const edges = ref([])
// var drawer = ref(false)
// 线的默认颜色
const edgesStyle = {
  style: {
    // stroke: '#6366f1',
    strokeWidth: 1, // 设置线宽
  },
  markerEnd: {
    type: MarkerType.ArrowClosed,
    // color: '#6366f1',
    // width: 6,   // 箭头宽度
    // height: 12,  // 箭头高度
  }

}
// 初始化
onInit((vueFlowInstance) => {
  vueFlowInstance.fitView()
})
// 链接线
onConnect((connection) => {
  addEdges({
    ...connection, // 保留原始连接属性
    type: 'button',
    ...edgesStyle
  })
})
// 双击事件
// const handleNodeDoubleClick = (event, node) => {
//   drawer.value = true
// }
// 阻止右键事件
const showContextMenu = (e) => {
  // e.preventDefault()
}
// 保存按钮
const saveNodes = () => {
  console.log(nodes.value)
  console.log(edges.value)
  edges.value.map(val => {
    val.type = null
  })
  console.log("保存")
}
</script>

<template>
  <div class="dndflow" @drop="onDrop" @click.right.native="showContextMenu($event)">
    <!-- 顶部的按钮 -->
    <div class="top-title-button">
      <div class="top-title">算法流程编辑</div>
      <el-button type="primary" class="ybutton">运行</el-button>
      <el-button type="success" class="ybutton" @click="saveNodes">保存</el-button>
    </div>
    <div ref="flowContainer" class="flow-container">
      <!-- @node-double-click="handleNodeDoubleClick" -->
      <VueFlow v-model:nodes="nodes" v-model:edges="edges" class="basic-flow" :default-viewport="{ zoom: 1.5 }"
        :min-zoom="0.2" :max-zoom="4" @dragover="onDragOver" @dragleave="onDragLeave">
        <template #edge-button="buttonEdgeProps">
          <!-- 删除线的删除按钮 -->
          <EdgeWithButton :id="buttonEdgeProps.id" :source-x="buttonEdgeProps.sourceX"
            :source-y="buttonEdgeProps.sourceY" :target-x="buttonEdgeProps.targetX" :target-y="buttonEdgeProps.targetY"
            :source-position="buttonEdgeProps.sourcePosition" :target-position="buttonEdgeProps.targetPosition"
            :marker-end="buttonEdgeProps.markerEnd" :style="buttonEdgeProps.style" />
        </template>
        <template #node-data-set="props">
          <!-- 数据集节点 -->
          <DataSetNode :id="props.id" :data="props.data"></DataSetNode>
        </template>
        <template #node-algorithms-library="props">
          <!-- 算法库节点 -->
          <AlgorithmsLibraryNode :id="props.id" :data="props.data"></AlgorithmsLibraryNode>
        </template>
        <template #node-condition="props">
          <!-- 条件节点 -->
          <ConditionNode :id="props.id" :data="props.data"></ConditionNode>
        </template>

        <!-- 背景 -->
        <Background :gap="16" />
        <!-- 小地图 -->
        <MiniMap />
        <!-- 小按钮 -->
        <Controls position="bottom-center" />
      </VueFlow>
    </div>
    <!-- 左侧拖动面板 -->
    <Sidebar />
  </div>
</template>
<style>
@import './main.css';
</style>
main.css
/* import the necessary styles for Vue Flow to work */
@import "@vue-flow/core/dist/style.css";

/* import the default theme, this is optional but generally recommended */
@import "@vue-flow/core/dist/theme-default.css";


html,
body,
#app {
    margin: 0;
    height: 100%;
}

#app {
    text-transform: uppercase;
    font-family: 'JetBrains Mono', monospace;
    -webkit-font-smoothing: antialiased;
    -moz-osx-font-smoothing: grayscale;
    text-align: center;
    color: #2c3e50;
}

.clearfix:after {
    content: "";
    display: block;
    clear: both;
}

/* 最外层div样式 */
.dndflow {
    flex-direction: column;
    display: flex;
    height: 100%;
    width: calc(100% - 200px);
    position: absolute;
    left: 200px;
}

.flow-container {
    width: 100%;
    height: calc(100% - 60px);
    background: white;
    border: 1px solid #ddd;
}

/* 小地图 */
.vue-flow__minimap {
    transform: scale(75%);
    transform-origin: bottom right;
}

/* 顶部标题及运行和保存按钮 */
.top-title-button {
    height: 60px;
    text-align: left;
    line-height: 60px;
}

.top-title {
    display: inline-block;
    font-size: 30px;
    font-weight: 800;
    padding-left: 20px;
    font-weight: bold;
    /* color: #0f6cd6; */
    text-shadow:
        -2px -2px 0 #000;
    /* 1px -1px 0 #000,
        -1px 1px 0 #000,
        1px 1px 0 #000; */
    background-image: -webkit-linear-gradient(bottom, red, #fd8403, yellow);
    -webkit-background-clip: text;
    -webkit-text-fill-color: transparent;
}

.ybutton {
    margin: 20px 10px 0;
    float: right;
}

/* 工具行样式 */
.basic-flow .vue-flow__controls .vue-flow__controls-button svg {
    height: 16px;
    width: 16px;
    padding: 2px;
}

/* 在 handle 内部添加 + 号 */
.vue-flow__handle {
    height: 12px;
    width: 12px;
    border-radius: 50%;
}

.vue-flow__handle::after {
    content: "+";
    position: absolute;
    top: 50%;
    left: 50%;
    transform: translate(-50%, -50%);
    font-size: 14px;
    color: #fff;
    pointer-events: none;
    /* 避免干扰拖拽事件 */
}

/* 左侧面板 */
.left-panal {
    position: fixed;
    bottom: 0;
    left: 0;
    top: 0;
    margin: 0;
    background: linear-gradient(to left, #ba8beb, #c1e9e9);
    z-index: 5;
    width: 200px;
}

.left-panal>div {
    margin: 10px auto;
    cursor: grab;
}

/*左侧按钮 */
.vue-flow__node-default {
    /* border-width: 3px; */
    padding: 0;
    border: 1px solid #ca9fed;
    padding: 5px 10px;
    font-size: 16px;
    display: flex;
    align-items: center;
    justify-content: center;
}

.vue-flow__node-default .el-icon {
    margin-right: 5px;
}

/* 删除按钮 */
.edgebutton {
    width:15px;
    height:15px;
    line-height:15px;
    font-size: 12px;
    border: 1px solid #b0dee7;
    background: #ffffff;
    border-radius: 50%;
    cursor: pointer;
    color: #aaa;
}

.edgebutton:hover {
    transform: scale(1.1);
    transition: all ease .5s;
    box-shadow: 0 0 0 1px #a8ddcb80, 0 0 0 2px #c0e4e4
}

/* 节点样式 */
.custom-node {
    width: 180px;
    box-shadow: 0 1px 3px rgba(0, 0, 0, 0.1);
    position: relative;
    text-align: left;
    border: 1px solid #ddd;
    background: #fff;
    border-radius: 5px;
    padding:10px;
}

.node-header {
    font-weight: bold;
    /* border-bottom: 1px solid #eee; */
    padding-bottom: 4px;
}

.vue-flow__node.selected .custom-node {
    box-shadow: 0 1px 3px #6366f1 !important;
    border: 1px solid #6366f1 !important;
}

.deletebtn {
    position: absolute;
    right: 5px;
    top: 0;
    cursor: pointer;
}

.deletebtn .el-icon {
    margin: 5px 5px;
    width: 12px;
    height: 12px;
}

.del-icon {
    color: #f00;
}

.copy-icon {
    color: rgb(13, 67, 227);
}

.edit-icon {
    color: rgb(10, 236, 232);
}

.yxjgbtn {
    float: right;
    color: #6366f1;
    font-size: 14px;
    cursor: pointer;
}

/* .btnList{
    cursor: pointer;
  }
  .btnList>p{
    cursor: pointer;
    text-align: center;
    font-size: 16px;
    border-bottom:1px solid #eee;
    margin: 0;
    padding: 5px 0;
  }
  .btnList>p:last-child{
    border: 0;
  } */
Sidebar.vue
<!-- 左侧拖动节点栏 -->
<script setup>
import useDragAndDrop from './useDnD'
const { onDragStart } = useDragAndDrop()
</script>

<template>
    <aside class="left-panal">
        <!-- <div class="vue-flow__node-input" :draggable="true"
            @dragstart="(event) => onDragStart(event, { type: 'input', label: '开始' })">
            开始
        </div>
        <div class="vue-flow__node-output" :draggable="true"
            @dragstart="(event) => onDragStart(event, { type: 'output', label: '结束' })">
            结束
        </div> -->
        <div class="vue-flow__node-default" :draggable="true"
            @dragstart="(event) => onDragStart(event, 'algorithms-library')">
            <el-icon style="color: #532ff3;">
                <Memo />
            </el-icon>算法
        </div>
        <div class="vue-flow__node-default" :draggable="true" @dragstart="(event) => onDragStart(event, 'data-set')">
            <el-icon style="color: #f34033;">
                <Files />
            </el-icon>数据集
        </div>
        <div class="vue-flow__node-default" :draggable="true" @dragstart="(event) => onDragStart(event, 'condition')">
            <el-icon  style="color: #077215;"><Connection /></el-icon>条件
        </div>
    </aside>
</template>
useDnD.js
import { useVueFlow } from '@vue-flow/core'
import { ref, watch } from 'vue'

/**
 * @returns {string} - A unique id.
 */
function getId() {
  let id = Date.now();
  return `dndnode_${id}`
}

/**
 * In a real world scenario you'd want to avoid creating refs in a global scope like this as they might not be cleaned up properly.
 * @type {{draggedType: Ref<string|null>, isDragOver: Ref<boolean>, isDragging: Ref<boolean>}}
 */
const state = {
  /**
   * The type of the node being dragged.
   */
  draggedType: ref(null),
  isDragOver: ref(false),
  isDragging: ref(false),
}

export default function useDragAndDrop() {
  const { draggedType, isDragOver, isDragging } = state

  const { addNodes, screenToFlowCoordinate, onNodesInitialized, updateNode } = useVueFlow()

  watch(isDragging, (dragging) => {
    document.body.style.userSelect = dragging ? 'none' : ''
  })

  function onDragStart(event, type) {
    if (event.dataTransfer) {
      event.dataTransfer.setData('application/vueflow', type)
      event.dataTransfer.effectAllowed = 'move'
    }

    draggedType.value = type
    isDragging.value = true

    document.addEventListener('drop', onDragEnd)
  }

  /**
   * Handles the drag over event.
   *
   * @param {DragEvent} event
   */
  function onDragOver(event) {
    event.preventDefault()

    if (draggedType.value) {
      isDragOver.value = true

      if (event.dataTransfer) {
        event.dataTransfer.dropEffect = 'move'
      }
    }
  }

  function onDragLeave() {
    isDragOver.value = false
  }

  function onDragEnd() {
    isDragging.value = false
    isDragOver.value = false
    draggedType.value = null
    document.removeEventListener('drop', onDragEnd)
  }

  /**
   * Handles the drop event.
   *
   * @param {DragEvent} event
   */
  function onDrop(event) {
    const position = screenToFlowCoordinate({
      x: event.clientX,
      y: event.clientY,
    })

    const nodeId = getId()

    const newNode = {
      id: nodeId,
      type: draggedType.value,
      position,
      data: { label: nodeId },
    }

    /**
     * Align node position after drop, so it's centered to the mouse
     *
     * We can hook into events even in a callback, and we can remove the event listener after it's been called.
     */
    const { off } = onNodesInitialized(() => {
      updateNode(nodeId, (node) => ({
        position: { x: node.position.x - node.dimensions.width / 2, y: node.position.y - node.dimensions.height / 2 },
      }))

      off()
    })

    addNodes(newNode)
  }

  return {
    draggedType,
    isDragOver,
    isDragging,
    onDragStart,
    onDragLeave,
    onDragOver,
    onDrop,
  }
}
AlgorithmsLibraryNode.vue
<!-- CustomNode.vue -->
<template>
    <div class="custom-node clearfix">
      <div class="deletebtn">
        <el-popconfirm class="box-item" title="确定删除该节点吗?" placement="top-start" @confirm="deleteNode(id)">
          <template #reference>
            <el-icon class="del-icon">
              <Delete />
            </el-icon>
          </template>
        </el-popconfirm>
        <el-icon class="copy-icon" @click="duplicateNode(id)">
          <DocumentCopy />
        </el-icon>
        <el-icon class="edit-icon" @click="xgjd(id)">
          <EditPen />
        </el-icon>
        <!-- <el-popover class="box-item"   placement="top-start">
          <template #reference>
            <el-icon>
              <MoreFilled />
            </el-icon>
          </template>
  <div class="btnList">
    <p @click="deleteNode">删除</p>
    <p>复制</p>
  </div>
  </el-popover> -->
      </div>
      <div class="node-header">
        算法
      </div>
      <div @click="yxjg()" class="yxjgbtn">运行结果</div>
      <Handle type="source" position="right" />
      <Handle type="target" position="left" />
    </div>
    <!-- 运行结果 -->
    <el-drawer v-model="draweryx" :with-header="false" size="20%" append-to-body>
      <span>运行结果</span>
    </el-drawer>
    <!-- 点击节点弹出的弹出框 -->
    <el-drawer v-model="drawerjd" :with-header="false" size="20%" append-to-body>
      <span>修改节点</span>
    </el-drawer>
  </template>

  <script setup>
  import { Handle } from '@vue-flow/core'
  import { useVueFlow } from '@vue-flow/core'
  const { removeNodes, getNodes, addNodes } = useVueFlow()
  var draweryx = ref(false)
  var drawerjd = ref(false)

  const props = defineProps({
    id: String,
    data: Object,
    selected: Boolean
  })
  // 运行结果事件
  const yxjg = (id) => {
    draweryx.value = true
  }
  // 修改节点事件
  const xgjd = (id) => {
    drawerjd.value = true
  }
  // 删除单个节点
  const deleteNode = (nodeId) => {
    removeNodes(nodeId)
  }
  // 复制指定节点
  const duplicateNode = (nodeId) => {
    const originalNode = getNodes.value.find(n => n.id === nodeId)
    if (!originalNode) return

    // 创建新节点(修改ID和位置)
    const newNode = {
      ...originalNode,
      id: `${originalNode.id}-copy-${Date.now()}`, // 确保ID唯一
      position: {
        x: originalNode.position.x + 50, // 偏移位置
        y: originalNode.position.y + 50
      },
      selected: false // 取消选中状态
    }
    addNodes(newNode)
  }

  </script>
ConditionNode.vue
<!-- CustomNode.vue -->
<template>
    <div class="custom-node clearfix" >
        <div class="deletebtn">
            <el-popconfirm class="box-item" title="确定删除该节点吗?" placement="top-start" @confirm="deleteNode(id)">
                <template #reference>
                    <el-icon class="del-icon">
                        <Delete />
                    </el-icon>
                </template>
            </el-popconfirm>
            <el-icon class="copy-icon" @click="duplicateNode(id)">
                <DocumentCopy />
            </el-icon>
            <el-icon class="edit-icon" @click="xgjd(id)">
                <EditPen />
            </el-icon>
        </div>
        <div class="node-header">
            条件
        </div>
        <div v-for="(item, index) in data.conditions" v-if="data.conditions" class="conditionsNode">
            <p v-if="index == 0"><span>Case{{ index + 1 }}</span> <span class="caseif">If</span></p>
            <p v-if="index != 0 && index != data.conditions.length - 1"><span>Case{{ index + 1 }}</span><span
                    class="caseif">Else
                    If</span></p>
            <p v-if="index == data.conditions.length - 1"><span class="caseif">Else</span></p>
            <div class="paramList" v-if="index != data.conditions.length - 1">
                <div v-for="(d, num) in item.rules">
                    <p class="param"> {{ d.param }}{{ d.operator }}{{ d.value }}</p>
                    <p v-if="item.rules.length > 1 && item.rules.length - 1 != num" class="operator">{{ item.operator }}
                    </p>
                </div>
            </div>

            <Handle :position="Position.Right" type="source" :id="item.id + 'right_' + index"
                class="conditionsHandleNode">
            </Handle>
        </div>
        <Handle type="target" position="left" />
        <!-- <Handle v-for="(item, index) in conditions" :position="Position.Right" type="source" :id="'right_' + index"
            :style="getDynamicHandlePos(item, index)">
        </Handle> -->
    </div>
    <!-- 点击节点弹出的弹出框 -->
    <el-drawer v-model="drawerjd" size="20%" append-to-body :with-header="false">
        <div class="drawerTitle"><el-icon style="color: blueviolet;margin-right: 5px;">
                <Edit />
            </el-icon>条件节点</div>
        <p class="nodedescribe">该组件用于根据前面的组件输出相应的引导执行流程,通过定义各种情况并指定操作,或不满足条件时采取默认操作,实现复杂的分支逻辑</p>
        <div v-for="(item, index) in data.conditions" class="drawerCase" v-show="index!=data.conditions.length-1">
            <el-select v-model="item.operator" placeholder="选择" size="large">
                <el-option v-for="item in options" :key="item.value" :label="item.label" :value="item.value" />
            </el-select>
            <div></div>
        </div>
        <el-button type="success">Add Condition</el-button>
        <!-- <div class="addcondition">Add Condition</div> -->
        <el-button type="primary">Add Case</el-button>
        <!-- <div class="addcase">Add Case</div> -->

    </el-drawer>
</template>

<script setup>
import { Position, Handle } from '@vue-flow/core'
import { useVueFlow } from '@vue-flow/core'
import { onMounted } from 'vue'
const { removeNodes, getNodes, addNodes, updateNode } = useVueFlow()
var draweryx = ref(false)
var drawerjd = ref(false)
const options = [
  {
    value: 'AND',
    label: '与',
  },
  {
    value: 'OR',
    label: '或',
  },
]


const props = defineProps({
    id: String,
    data: Object,
    selected: Boolean
})
const initconditions = () => {
    if (props.data.conditions) return
    props.data.conditions = [
        {
            operator: 'AND',
            rules: [
                {
                    param: 'ceshi',
                    operator: '>',
                    value: '13',
                }, {
                    param: 'ceshi',
                    operator: '>',
                    value: '13',
                }, {
                    param: null,
                    operator: null,
                    value: null,
                }
            ]
        }, {
            operator: null,
            rules: null
        }
    ]
}
// 修改节点事件
const xgjd = (id) => {
    drawerjd.value = true
}
// 删除单个节点
const deleteNode = (nodeId) => {
    removeNodes(nodeId)
}
// 复制指定节点
const duplicateNode = (nodeId) => {
    const originalNode = getNodes.value.find(n => n.id === nodeId)
    if (!originalNode) return

    // 创建新节点(修改ID和位置)
    const newNode = {
        ...originalNode,
        id: `${originalNode.id}-copy-${Date.now()}`, // 确保ID唯一
        position: {
            x: originalNode.position.x + 50, // 偏移位置
            y: originalNode.position.y + 50
        },
        selected: false // 取消选中状态
    }
    addNodes(newNode)
}
onMounted(() => {
    initconditions()
    const originalNode = getNodes.value.find(n => n.id === props.id)
    console.log(originalNode)
})
</script>
<style scoped>
.conditionsNode {
    width: 100%;
    position: relative;
    /* text-align: right; */
}

.conditionsNode p {
    font-size: 14px;
    margin: 5px 0;
}

.conditionsHandleNode {
    position: absolute;
    top: 10px;
    right: -10px;
}

.caseif {
    float: right;
}

.paramList {
    padding: 5px;
    background: #f8f6fe;
}

.paramList .param {
    padding: 5px;
    background: #e2d6ff;
}

.paramList .operator {
    text-align: center;
    font-size: 12px;
    font-weight: 800;
}

.drawerTitle {
    font-size: 16px;
    font-weight: 800;
    display: flex;
    align-items: center;
}

.nodedescribe {
    color: #666;
    font-size: 12px;
}
.drawerCase{
    background: #f8f6fe;
    padding: 5px;
}
</style>
DataSetNode.vue
<!-- CustomNode.vue -->
<template>
  <div class="custom-node clearfix" >
    <div class="deletebtn">
      <el-popconfirm class="box-item" title="确定删除该节点吗?" placement="top-start" @confirm="deleteNode(id)">
        <template #reference>
          <el-icon class="del-icon">
            <Delete />
          </el-icon>
        </template>
      </el-popconfirm>
      <el-icon class="copy-icon" @click="duplicateNode(id)">
        <DocumentCopy />
      </el-icon>
      <el-icon class="edit-icon" @click="xgjd(id)">
        <EditPen />
      </el-icon>
      <!-- <el-popover class="box-item"   placement="top-start">
        <template #reference>
          <el-icon>
            <MoreFilled />
          </el-icon>
        </template>
<div class="btnList">
  <p @click="deleteNode">删除</p>
  <p>复制</p>
</div>
</el-popover> -->
    </div>
    <div class="node-header">
     数据集
    </div>
    <div @click="yxjg()" class="yxjgbtn">运行结果</div>
    <Handle type="source" position="right" />
    <Handle type="target" position="left" />
  </div>
  <!-- 运行结果 -->
  <el-drawer v-model="draweryx" :with-header="false" size="20%" append-to-body>
    <span>运行结果</span>
  </el-drawer>
  <!-- 点击节点弹出的弹出框 -->
  <el-drawer v-model="drawerjd" :with-header="false" size="20%" append-to-body>
    <span>修改节点</span>
  </el-drawer>
</template>

<script setup>
import { Handle } from '@vue-flow/core'
import { useVueFlow } from '@vue-flow/core'
const { removeNodes, getNodes, addNodes } = useVueFlow()
var draweryx = ref(false)
var drawerjd = ref(false)

const props = defineProps({
  id: String,
  data: Object,
  selected: Boolean
})

// 运行结果事件
const yxjg = (id) => {
  draweryx.value = true
}
// 修改节点事件
const xgjd = (id) => {
  drawerjd.value = true
}
// 删除单个节点
const deleteNode = (nodeId) => {
  removeNodes(nodeId)
}
// 复制指定节点
const duplicateNode = (nodeId) => {
  const originalNode = getNodes.value.find(n => n.id === nodeId)
  if (!originalNode) return

  // 创建新节点(修改ID和位置)
  const newNode = {
    ...originalNode,
    id: `${originalNode.id}-copy-${Date.now()}`, // 确保ID唯一
    position: {
      x: originalNode.position.x + 50, // 偏移位置
      y: originalNode.position.y + 50
    },
    selected: false // 取消选中状态
  }
  addNodes(newNode)
}

</script>
EdgeWithButton.vue
<script setup>
import { BaseEdge, EdgeLabelRenderer, getBezierPath, useVueFlow } from '@vue-flow/core'
import { computed } from 'vue'

const props = defineProps({
  id: {
    type: String,
    required: true,
  },
  sourceX: {
    type: Number,
    required: true,
  },
  sourceY: {
    type: Number,
    required: true,
  },
  targetX: {
    type: Number,
    required: true,
  },
  targetY: {
    type: Number,
    required: true,
  },
  sourcePosition: {
    type: String,
    required: true,
  },
  targetPosition: {
    type: String,
    required: true,
  },
  markerEnd: {
    type: String,
    required: false,
  },
  style: {
    type: Object,
    required: false,
  },
})

const { removeEdges } = useVueFlow()

const path = computed(() => getBezierPath(props))
</script>

<script>
export default {
  inheritAttrs: false,
}
</script>

<template>
  <!-- You can use the `BaseEdge` component to create your own custom edge more easily -->
  <BaseEdge :id="id" :style="style" :path="path[0]" :marker-end="markerEnd" />

  <!-- Use the `EdgeLabelRenderer` to escape the SVG world of edges and render your own custom label in a `<div>` ctx -->
  <EdgeLabelRenderer>
    <div :style="{
      pointerEvents: 'all',
      position: 'absolute',
      transform: `translate(-50%, -50%) translate(${path[1]}px,${path[2]}px)`,
    }" class="nodrag nopan">
      <div class="edgebutton" @click="removeEdges(id)">×</div>
    </div>
  </EdgeLabelRenderer>
</template>
<style scoped>

</style>