使用postgresql + etcd + patroni + haproxy + keepalived可以实现PG的高可用集群,其中,以postgresql做数据库,Patroni监控本地的PostgreSQL状态,并将本地PostgreSQL信息/状态写入etcd来存储集群状态,所以,patroni与etcd结合可以实现数据库集群故障切换(自动或手动切换),而haproxy可以实现数据库读写分离+读负载均衡(通过不同端口实现),keepalived实现VIP跳转,对haproxy提供了高可用,防止haproxy宕机。
Etcd用于Patroni节点之间共享信息。Patroni监控本地的PostgreSQL状态。如果主库(Primary)故障,Patroni把一个从库(Standby)拉起来,作为新的主(Primary)数据库, 如果一个故障PostgreSQL被抢救过来了,能够重新自动或手动加入集群。
Patroni基于Python开发的模板,结合DCS(Distributed Configuration Store,例如 ZooKeeper, etcd, Consul )可以定制PostgreSQL高可用方案。Patroni接管PostgreSQL数据库的启停,同时监控本地的PostgreSQL数据库,并将本地的PostgreSQL数据库信息写入DCS。Patroni的主备端是通过是否能获得 leader key 来控制的,获取到了leader key的Patroni为主节点,其它的为备节点。
其中Patroni不仅简单易用而且功能非常强大。
支持自动failover和按需switchover
支持一个和多个备节点
支持级联复制
支持同步复制,异步复制
支持同步复制下备库故障时自动降级为异步复制(功效类似于MySQL的半同步,但是更加智能)
支持控制指定节点是否参与选主,是否参与负载均衡以及是否可以成为同步备机
支持通过pg_rewind自动修复旧主
支持多种方式初始化集群和重建备机,包括pg_basebackup和支持wal_e,pgBackRest,barman等备份工具的自定义脚本
支持自定义外部callback脚本
支持REST API
支持通过watchdog防止脑裂
支持k8s,docker等容器化环境部署
支持多种常见DCS(Distributed Configuration Store)存储元数据,包括etcd,ZooKeeper,Consul,Kubernetes
这个架构中,PostgreSQL 提供数据服务,Patroni 负责主从切换,etcd 提供一致性存储,HAProxy 提供访问路由,Keepalived 提供网络VIP高可用,Watchdog 提供节点存活及脑裂防护机制。 六者协同组成一个企业级高可用数据库集群
一、环境准备
软件版本:
Postgresql: 14.6
patroni: 3.1.1
etcd : 3.3.11
HAProxy :1.5.18
Keepalived :1.3.5
系统规划:
| 主机 | IP | 接口 | 组件 | 系统版本 | 备注 |
| pgtest1 | 192.168.24.11 | ens33 | PostgreSQL、Patroni、Etcd,haproxy、keepalived | Centos7.9(3.10.0-1160.88.1.el7.x86_64) | 主节点Master |
| pgtest2 | 192.168.24.12 | ens33 | PostgreSQL、Patroni、Etcd,haproxy、keepalived | Centos7.9(3.10.0-1160.88.1.el7.x86_64) | 备节点1 BACKUP |
| pgtest3 | 192.168.24.13 | ens33 | PostgreSQL、Patroni、Etcd,haproxy、keepalived | Centos7.9(3.10.0-1160.88.1.el7.x86_64) | 备节点2 BACKUP |
| VIP | 192.168.24.15 | 绑定接口 | ens33 | ||
关闭防火墙(比较彻底,也可以放行相应端口):
systemctl stop firewalld
systemctl disable firewalld
关闭selinux
vi /etc/selinux/config,设置selinux=disabled
配置sudo(免密)
# cat >>/etc/sudoers <<EOF
postgres ALL=(ALL) NOPASSWD: ALL
EOF
修改/etc/hosts
cat >>/etc/hosts <<EOF
192.168.24.11 pgtest1
192.168.24.12 pgtest2
192.168.24.13 pgtest3
EOF
所有节点修改主机时间,确保节点间时间和时区同步,有条件的同步时间服务器
systemctl start chronyd.service
安装依赖包
yum install -y perl-ExtUtils-Embed readline zlib-devel pam-devel libxml2-devel libxslt-devel openldap-devel python-devel gcc-c++ openssl-devel cmake gcc* readline-devel zlib bison flex bison-devel flex-devel openssl openssl-devel
二、部署postgresql集群
2.1 数据库安装
--数据库软件安装(三个节点安装)
--创建用户、目录(root)
useradd postgres
echo "postgres" | passwd --stdin postgres
mkdir -p /postgresql/{pg14,pgdata,arch,soft}
chown -R postgres. /postgresql/
chmod -R 700 /postgresql/
--安装(postgres)
tar zxvf postgresql-14.6.tar.gz
cd postgresql-14.6/
./configure --prefix=/postgresql/pg14
make world &&make install-world
--配置环境变量(postgres)
vi /home/postgres/.bash_profile文件添加以下内容
export LANG=en_US.UTF-8
export PGHOME=/postgresql/pg14
export PGDATA=/postgresql/pgdata
export LD_LIBRARY_PATH=$PGHOME/lib:$LD_LIBRARY_PATH
export PATH=$PGHOME/bin:$PATH
source ~/.bash_profile
2.2 数据库配置
主库:
--初始化数据库
[postgres@pgtest1 ~]$ initdb -D $PGDATA
--postgresql.conf文件末尾插入如下内容
cat >> /postgresql/pgdata/postgresql.conf << "EOF"
listen_addresses = '*'
archive_mode = on
archive_command = 'cp %p /postgresql/arch/%f'
log_destination = 'csvlog'
logging_collector = on
EOF
--pg_hba.conf文件插入host all all 0.0.0.0/0 scram-sha-256
sed -i '/^host[[:space:]]\+all[[:space:]]\+all[[:space:]]\+127.0.0.1\/32[[:space:]]\+trust/i\
host all all 0.0.0.0/0 scram-sha-256' /postgresql/pgdata/pg_hba.conf
--pg_hba.conf文件插入host replication all 0.0.0.0/0 scram-sha-256
sed -i '/^host[[:space:]]\+replication[[:space:]]\+all[[:space:]]\+127.0.0.1\/32[[:space:]]\+trust/i\
host replication all 0.0.0.0/0 scram-sha-256' /postgresql/pgdata/pg_hba.conf
--启动数据库
[postgres@pgtest1 ~]$ pg_ctl start
--修改postgres用户默认密码
[postgres@pgtest1 postgresql-14.6]$ psql
psql (14.6)
Type "help" for help.
postgres=# alter user postgres password 'postgres';
ALTER ROLE
备库1:
--复制备库1
[postgres@pgtest2 ~]$ pg_basebackup -Fp -Pv -Xs -R -D /postgresql/pgdata -h 192.168.24.11 -p 5432 -Upostgres
--启动备库1
[postgres@pgtest2 ~]$ pg_ctl start
备库2:
--复制备库2
[postgres@pgtest3 ~]$ pg_basebackup -Fp -Pv -Xs -R -D /postgresql/pgdata -h 192.168.24.11 -p 5432 -Upostgres
--启动备库2
[postgres@pgtest3 ~]$ pg_ctl start
2.3 主备库状态
主库状态:
[postgres@pgtest1 ~]$ pg_controldata |grep cluster
Database cluster state: in production
备库1状态:
[postgres@pgtest2 ~]$ pg_controldata |grep cluster
Database cluster state: in archive recovery
备库2状态:
[postgres@pgtest3 ~]$ pg_controldata |grep cluster
Database cluster state: in archive recovery
2.4 集群状态
# 1.通过pg_controldata输出:
[postgres@pgtest1 postgresql-14.6]$pg_controldata |grep state
Database cluster state: in production
Database cluster state: in archive recovery
# 2.通过数据字典表pg_stat_replication,主机表中能查到记录,备机表中无记录
postgres=#select pid,state,client_addr,sync_priority,sync_state from pg_stat_replication;
pid | state | client_addr | sync_priority | sync_state
-------+-----------+---------------+---------------+------------
84644 | streaming | 192.168.24.13 | 0 | async
84638 | streaming | 192.168.24.12 | 0 | async
(2 rows)
# 3.通过wal进程查看,显示 walsender 的是主机,显示 walreceiver 的是备机
[postgres@pgtest1 ~]$ ps -ef|grep wal
postgres 84435 84430 0 20:05 ? 00:00:00 postgres: walwriter
postgres 84638 84430 0 20:08 ? 00:00:00 postgres: walsender postgres 192.168.24.12(50458) streaming 0/5000060
postgres 84644 84430 0 20:08 ? 00:00:00 postgres: walsender postgres 192.168.24.13(35594) streaming 0/5000060
# 4. 通过自带函数判断,select pg_is_in_recovery();
#主库
[postgres@pgtest1 ~]$ psql -c "select pg_is_in_recovery();"
pg_is_in_recovery
-------------------
f
(1 row)
#备库1
[postgres@pgtest2 ~]$ psql -c "select pg_is_in_recovery();"
pg_is_in_recovery
-------------------
t
(1 row)
#备库2
[postgres@pgtest3 ~]$ psql -c "select pg_is_in_recovery();"
pg_is_in_recovery
-------------------
t
(1 row)
三、部署watchdog
3个节点安装配置
[root@pgtest1 etc]# modprobe softdog
[root@pgtest1 etc]# chown postgres:postgres /dev/watchdog
四、部署ETCD
3个节点安装配置
4.1 添加环境变量
编辑root用户下的.bash_profile文件添加如下变量:
cat >> ~/.bash_profile <<EOF
export PATH=\$PATH:/postgresql/pg14/bin
export LD_LIBRARY_PATH=/postgresql/pg14/lib:\$LD_LIBRARY_PATH
EOF
source ~/.bash_profile,使环境变量立即生效。
4.2 安装etcd
--安装
yum -y install etcd
--查看已安装版本
[root@pgtest1 ~]# etcd --version
etcd Version: 3.3.11
Git SHA: 2cf9e51
Go Version: go1.10.3
Go OS/Arch: linux/amd64
--编辑etcd配置文件
- pgtest1节点配置:
[root@pgtest1 etcd]# cat > /etc/etcd/etcd.conf <<EOF
ETCD_LISTEN_PEER_URLS="http://192.168.24.11:2380"
ETCD_LISTEN_CLIENT_URLS="http://192.168.24.11:2379,http://127.0.0.1:2379"
ETCD_NAME="pgtest1"
ETCD_DATA_DIR="/var/lib/etcd/etcd1"
ETCD_INITIAL_ADVERTISE_PEER_URLS="http://192.168.24.11:2380"
ETCD_ADVERTISE_CLIENT_URLS="http://192.168.24.11:2379"
ETCD_INITIAL_CLUSTER="pgtest1=http://192.168.24.11:2380,pgtest2=http://192.168.24.12:2380,pgtest3=http://192.168.24.13:2380"
ETCD_INITIAL_CLUSTER_TOKEN="etcd-cluster"
ETCD_INITIAL_CLUSTER_STATE="new"
EOF
- pgtest2节点配置
[root@pgtest2 etcd]# cat > /etc/etcd/etcd.conf <<EOF
ETCD_LISTEN_PEER_URLS="http://192.168.24.12:2380"
ETCD_LISTEN_CLIENT_URLS="http://192.168.24.12:2379,http://127.0.0.1:2379"
ETCD_NAME="pgtest2"
ETCD_DATA_DIR="/var/lib/etcd/etcd2"
ETCD_INITIAL_ADVERTISE_PEER_URLS="http://192.168.24.12:2380"
ETCD_ADVERTISE_CLIENT_URLS="http://192.168.24.12:2379"
ETCD_INITIAL_CLUSTER="pgtest1=http://192.168.24.11:2380,pgtest2=http://192.168.24.12:2380,pgtest3=http://192.168.24.13:2380"
ETCD_INITIAL_CLUSTER_TOKEN="etcd-cluster"
ETCD_INITIAL_CLUSTER_STATE="new"
EOF
- pgtest3节点配置
[root@pgtest3 ~]# cat > /etc/etcd/etcd.conf <<EOF
ETCD_LISTEN_PEER_URLS="http://192.168.24.13:2380"
ETCD_LISTEN_CLIENT_URLS="http://192.168.24.13:2379,http://127.0.0.1:2379"
ETCD_NAME="pgtest3"
ETCD_DATA_DIR="/var/lib/etcd/etcd3"
ETCD_INITIAL_ADVERTISE_PEER_URLS="http://192.168.24.13:2380"
ETCD_ADVERTISE_CLIENT_URLS="http://192.168.24.13:2379"
ETCD_INITIAL_CLUSTER="pgtest1=http://192.168.24.11:2380,pgtest2=http://192.168.24.12:2380,pgtest3=http://192.168.24.13:2380"
ETCD_INITIAL_CLUSTER_TOKEN="etcd-cluster"
ETCD_INITIAL_CLUSTER_STATE="new"
EOF
4.3 启动etcd
systemctl start etcd(依次同时启动 pgtest1、pgtest2、pgtest3)
systemctl enable etcd
4.4 查看etcd状态
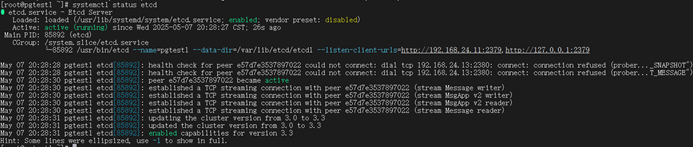
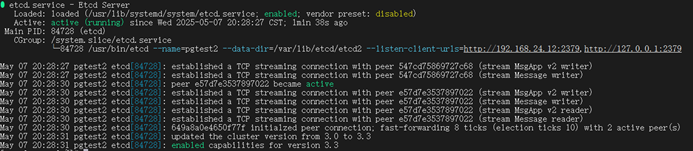
4.1 检查etcd服务状态
#systemctl status etcd.service
- 主节点:
[root@pgtest1 ~]# systemctl status etcd
- 备节点1:
[root@pgtest2 ~]# systemctl status etcd
- 备节点2:
[root@pgtest3 ~]# systemctl status etcd
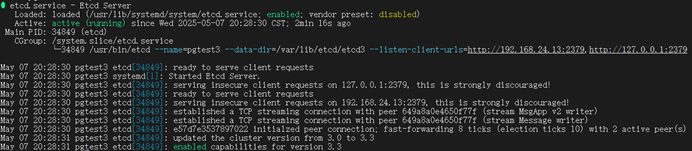
4.2 检查etcd集群状态
- 检查集群成员
[root@pgtest1 keepalived]# etcdctl member list
547cd75869727c68: name=pgtest1 peerURLs=http://192.168.24.11:2380 clientURLs=http://192.168.24.11:2379 isLeader=true
649a8a0e4650f77f: name=pgtest2 peerURLs=http://192.168.24.12:2380 clientURLs=http://192.168.24.12:2379 isLeader=false
e57d7e3537897022: name=pgtest3 peerURLs=http://192.168.24.13:2380 clientURLs=http://192.168.24.13:2379 isLeader=false
- 检查集群状态
[root@pgtest1 keepalived]# etcdctl cluster-health
member 547cd75869727c68 is healthy: got healthy result from http://192.168.24.11:2379
member 649a8a0e4650f77f is healthy: got healthy result from http://192.168.24.12:2379
member e57d7e3537897022 is healthy: got healthy result from http://192.168.24.13:2379
cluster is healthy
五、部署patroni
3个节点安装配置
5.1 安装python
- python安装
yum install -y python3 python3-devel
查看安装情况
[root@pgtest1 bin]# whereis python3
python3: /usr/bin/python3.6-config /usr/bin/python3.6m-config /usr/bin/python3 /usr/bin/python3.6m /usr/bin/python3.6 /usr/bin/python3.6m-x86_64-config /usr/lib/python3.6 /usr/lib64/python3.6 /usr/include/python3.6m /usr/share/man/man1/python3.1.gz
- python系统默认装版本查看
[root@pgtest1 keepalived]# python --version
Python 2.7.5
- 替换默认python
# rm -f /usr/bin/python
# ln -s /usr/bin/python3 /usr/bin/python
[root@pgtest1 ~]# python -V
Python 3.6.8
# 全词匹配替换,python3安装后’yum’命令执行会报错,需要修改以下配置
[root@pgtest1 ~]# sed -i "s:\<python\>:python2:g" /usr/bin/yum
[root@pgtest1 ~]# sed -i "s:\<python\>:python2:g" /usr/libexec/urlgrabber-ext-down
5.2 安装PIP
- 下载pip.py文件(每个节点顺序下载,不可同时下载)
#curl https://bootstrap.pypa.io/pip/3.6/get-pip.py -o get-pip.py
如果下载很慢,则访问 https://bootstrap.pypa.io/get-pip.py,将这些代码复制并粘贴到文本编辑器中,再将文件保存为get-pip.py。
或者
scp 传输get-pip.py到其他节点
- 安装.py文件
--使用清华园
#python3 get-pip.py -i https://pypi.tuna.tsinghua.edu.cn/simple/ --trusted-host mirrors.aliyun.com
5.3 安装patroni
pip3 install psycopg2-binary -i https://pypi.tuna.tsinghua.edu.cn/simple
pip3 install psycopg2==2.7.5 -i Simple Index
pip3 install cdiff -i https://pypi.tuna.tsinghua.edu.cn/simple
pip3 install "patroni[etcd,consul]==3.1.1" -i Simple Index
5.4 查看已安装patroni版本
[root@pgtest1 etcd]# patroni --version
patroni 3.1.1
5.5 编辑patroni配置文件
[root@pgtest1 ]# mkdir -p /app/patroni
创建/app/patroni/patroni_config.yml文件
- pgtest1节点配置
cat > /app/patroni/patroni_config.yml << EOF
scope: postgres_cluster
namespace: /service/
name: pgtest1
restapi:
listen: 192.168.24.11:8008
connect_address: 192.168.24.11:8008
etcd:
host: 192.168.24.11:2379
bootstrap:
dcs:
ttl: 30
loop_wait: 10
retry_timeout: 10
maximum_lag_on_failover: 1048576
master_start_timeout: 300
synchronous_mode: on
postgresql:
use_pg_rewind: true
use_slots: true
parameters:
listen_addresses: "0.0.0.0"
port: 5432
wal_level: "replica"
hot_standby: "on"
wal_keep_segments: 1000
max_wal_senders: 10
max_replication_slots: 10
wal_log_hints: "on"
initdb:
- encoding: UTF8
- data-checksums
postgresql:
listen: 0.0.0.0:5432
connect_address: 192.168.24.11:5432
data_dir: /postgresql/pgdata
bin_dir: /postgresql/pg14/bin
authentication:
replication:
username: postgres
password: postgres
superuser:
username: postgres
password: postgres
rewind:
username: postgres
password: postgres
tags:
nofailover: false
noloadbalance: false
clonefrom: false
nosync: false
EOF
- pgtest2节点配置
cat > /app/patroni/patroni_config.yml << EOF
scope: postgres_cluster
namespace: /service/
name: pgtest2
restapi:
listen: 192.168.24.12:8008
connect_address: 192.168.24.12:8008
etcd:
host: 192.168.24.12:2379
bootstrap:
dcs:
ttl: 30
loop_wait: 10
retry_timeout: 10
maximum_lag_on_failover: 1048576
master_start_timeout: 300
synchronous_mode: on
postgresql:
use_pg_rewind: true
use_slots: true
parameters:
listen_addresses: "0.0.0.0"
port: 5432
wal_level: "replica"
hot_standby: "on"
wal_keep_segments: 1000
max_wal_senders: 10
max_replication_slots: 10
wal_log_hints: "on"
initdb:
- encoding: UTF8
- data-checksums
postgresql:
listen: 0.0.0.0:5432
connect_address: 192.168.24.12:5432
data_dir: /postgresql/pgdata
bin_dir: /postgresql/pg14/bin
authentication:
replication:
username: postgres
password: postgres
superuser:
username: postgres
password: postgres
rewind:
username: postgres
password: postgres
tags:
nofailover: false
noloadbalance: false
clonefrom: false
nosync: false
EOF
- pgtest3节点配置
cat > /app/patroni/patroni_config.yml << EOF
scope: postgres_cluster
namespace: /service/
name: pgtest3
restapi:
listen: 192.168.24.13:8008
connect_address: 192.168.24.13:8008
etcd:
host: 192.168.24.13:2379
bootstrap:
dcs:
ttl: 30
loop_wait: 10
retry_timeout: 10
maximum_lag_on_failover: 1048576
master_start_timeout: 300
synchronous_mode: on
postgresql:
use_pg_rewind: true
use_slots: true
parameters:
listen_addresses: "0.0.0.0"
port: 5432
wal_level: "replica"
hot_standby: "on"
wal_keep_segments: 1000
max_wal_senders: 10
max_replication_slots: 10
wal_log_hints: "on"
initdb:
- encoding: UTF8
- data-checksums
postgresql:
listen: 0.0.0.0:5432
connect_address: 192.168.24.13:5432
data_dir: /postgresql/pgdata
bin_dir: /postgresql/pg14/bin
authentication:
replication:
username: postgres
password: postgres
superuser:
username: postgres
password: postgres
rewind:
username: postgres
password: postgres
tags:
nofailover: false
noloadbalance: false
clonefrom: false
nosync: false
EOF
5.6 配置systemd管理Patroni service
所有节点执行相同操作:
cat >>/usr/lib/systemd/system/patroni.service<<EOF
[Unit]
Description=patroni - a high-availability PostgreSQL
Documentation=https://patroni.readthedocs.io/en/latest/index.html
After=syslog.target network.target etcd.target
Wants=network-online.target
[Service]
Type=simple
User=postgres
Group=postgres
PermissionsStartOnly=true
ExecStart=/usr/local/bin/patroni /app/patroni/patroni_config.yml
ExecReload=/bin/kill -HUP $MAINPID
LimitNOFILE=65536
KillMode=process
KillSignal=SIGINT
Restart=on-abnormal
RestartSec=30s
TimeoutSec=0
[Install]
WantedBy=multi-user.target
EOF
5.7 启动patroni
- 在所有节点依次启动
#chown -R postgres. /app/patroni
#systemctl start patroni
5.8 查看patroni状态
5.8.1 查看patroni服务状态
- 主节点
[root@pgtest1 ~]# systemctl status patroni

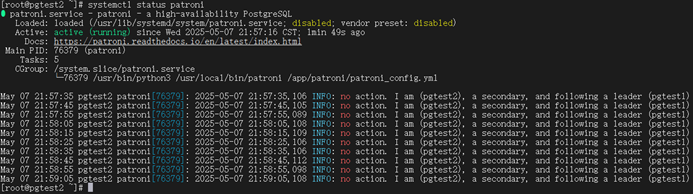
- 备节点1:
[root@pgtest2 ~]# systemctl status patroni
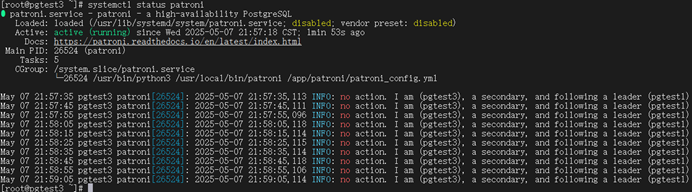
- 备节点2:
[root@pgtest3 ~]# systemctl status patroni
注意:patroni集群启动时,数据库集群会自动重启。重启之后状态恢复正常,如下:


5.8.2 查看patroni集群状态
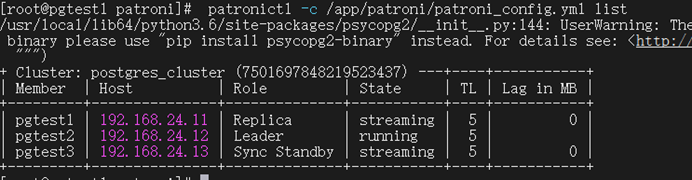
- 在任意节点上查看Patroni集群状态
[root@pgtest1 ~]# patronictl -c /app/patroni/patroni_config.yml list

- 在任意节点上查看ETCD信息:
[root@pgtest1 ~]# etcdctl ls /service/postgres_cluster
[root@pgtest1 ~]# etcdctl get /service/postgres_cluster/members/pgtest1

5.9 设置patroni自启动
systemctl enable patroni
六、部署keepalived
3个节点安装配置
6.1 安装keepalived
yum -y install keepalived
6.2 编辑Keepalived配置文件
- 主服务器的keepalived.conf添加以下内容:
cat > /etc/keepalived/keepalived.conf << EOF
global_defs {
router_id LVS_DEVEL00
script_user root
enable_script_security
}
vrrp_script check_haproxy {
script "/etc/keepalived/check_haproxy.sh"
interval 2
weight 5
fall 3
rise 5
timeout 2
}
vrrp_instance VI_1 {
state Master
interface ens33
virtual_router_id 80
priority 100
advert_int 1
authentication {
auth_type PASS
auth_pass 12345
}
virtual_ipaddress {
192.168.24.15/24
}
track_script {
check_haproxy
}
}
EOF
- 备服务器1的keepalived.conf添加以下内容:
cat > /etc/keepalived/keepalived.conf << EOF
global_defs {
router_id LVS_DEVEL01
script_user root
enable_script_security
}
vrrp_script check_haproxy {
script "/etc/keepalived/check_haproxy.sh"
interval 2
weight 5
fall 3
rise 5
timeout 2
}
vrrp_instance VI_1 {
state BACKUP
interface ens33
virtual_router_id 80
priority 90
advert_int 1
authentication {
auth_type PASS
auth_pass 12345
}
virtual_ipaddress {
192.168.24.15/24
}
track_script {
check_haproxy
}
}
EOF
- 备服务器2的keepalived.conf添加以下内容:
cat > /etc/keepalived/keepalived.conf << EOF
global_defs {
router_id LVS_DEVEL02
script_user root
enable_script_security
}
vrrp_script check_haproxy {
script "/etc/keepalived/check_haproxy.sh"
interval 2
weight 5
fall 3
rise 5
timeout 2
}
vrrp_instance VI_1 {
state BACKUP
interface ens33
virtual_router_id 80
priority 80
advert_int 1
authentication {
auth_type PASS
auth_pass 12345
}
virtual_ipaddress {
192.168.24.15/24
}
track_script {
check_haproxy
}
}
EOF
6.3 创建check_haproxy检查脚本
所有节点执行相同操作
编辑脚本
[root@pgtest1 keepalived]# vi /etc/keepalived/check_haproxy.sh
#!/bin/bash
count=`ps aux | grep -v grep | grep haproxy | wc -l`
if [ $count -eq 0 ]; then
exit 1
else
exit 0
fi
更改脚本权限
[root@pgtest1 ~]# chmod a+x /etc/keepalived/check_haproxy.sh
6.4 启动keepalived
systemctl start keepalived
6.5 查看keepalived状态
6.5.1 查看keepalived服务状态
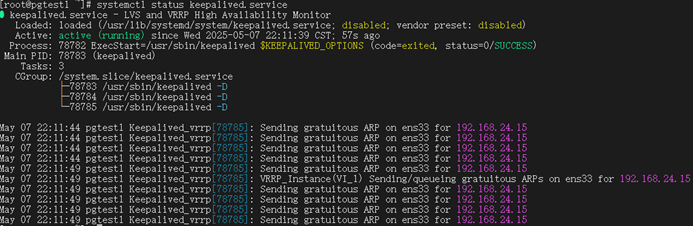
- 主节点:
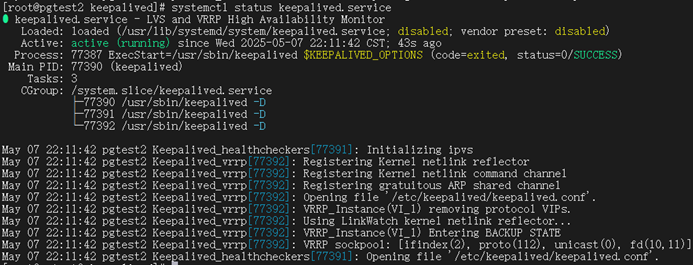
[root@pgtest1 keepalived]# systemctl status keepalived.service
- 备节点1:
[root@pgtest2 ~]# systemctl status keepalived.service
- 备节点2:
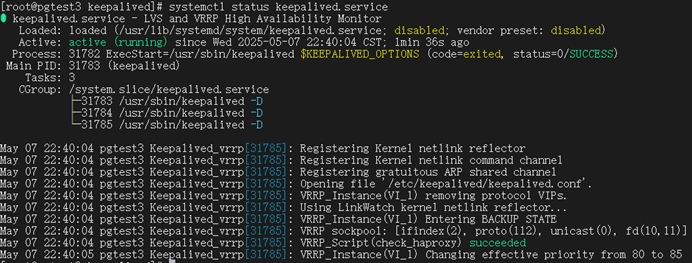
[root@pgtest3 ~]# systemctl status keepalived.service
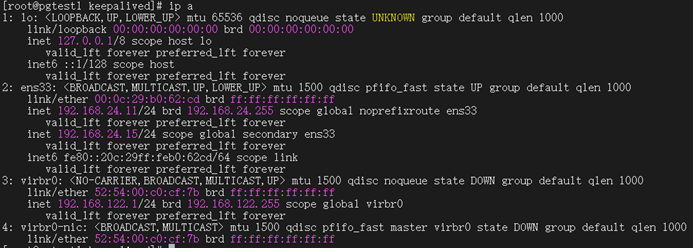
6.5.2 查看VIP绑定状态
[root@pgtest1 keepalived]# ip addr
6.5.3 设置patroni服务自启动
systemctl enable keepalived
七、部署haproxy
3个节点安装配置
7.1安装haproxy
yum -y install haproxy
7.2 编辑HAProxy配置文件
所有节点执行相同操作
cat > /etc/haproxy/haproxy.cfg << EOF
global
log 127.0.0.1 local0 info
log 127.0.0.1 local1 warning
chroot /var/lib/haproxy
pidfile /var/run/haproxy.pid
maxconn 4000
user haproxy
group haproxy
daemon
stats socket /var/lib/haproxy/stats
defaults
mode tcp
log global
option tcplog
option dontlognull
option redispatch
retries 3
timeout queue 5s
timeout connect 10s
timeout client 60m
timeout server 60m
timeout check 15s
maxconn 3000
listen status
bind *:1080
mode http
log global
stats enable
stats refresh 30s
stats uri /
stats realm Private lands
stats auth admin:admin
listen master
bind *:5000
mode tcp
option tcplog
balance roundrobin
option httpchk OPTIONS /master
http-check expect status 200
default-server inter 3s fall 3 rise 2 on-marked-down shutdown-sessions
server pgtest1 192.168.24.11:5432 maxconn 1000 check port 8008 inter 5000 rise 2 fall 2
server pgtest2 192.168.24.12:5432 maxconn 1000 check port 8008 inter 5000 rise 2 fall 2
server pgtest3 192.168.24.13:5432 maxconn 1000 check port 8008 inter 5000 rise 2 fall 2
listen replicas
bind *:5001
mode tcp
option tcplog
balance roundrobin
option httpchk OPTIONS /replica
http-check expect status 200
default-server inter 3s fall 3 rise 2 on-marked-down shutdown-sessions
server pgtest1 192.168.24.11:5432 maxconn 1000 check port 8008 inter 5000 rise 2 fall 2
server pgtest2 192.168.24.12:5432 maxconn 1000 check port 8008 inter 5000 rise 2 fall 2
server pgtest3 192.168.24.13:5432 maxconn 1000 check port 8008 inter 5000 rise 2 fall 2
EOF
7.3 启动haproxy
systemctl start haproxy
7.4 查看haproxy服务
systemctl status haproxy
7.5 设置haproxy服务自启动
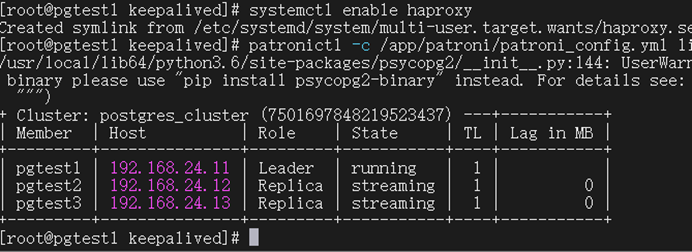
systemctl enable haproxy
7.8 HAProxy监控页面

登录地址:http://192.168.24.15:1080/ (也可以通过各个节点IP+端口登录)
默认用户密码:admin/admin
8、故障演示
8.1 在任意节点上查看Patroni集群状态
#patronictl -c /app/patroni/patroni_config.yml list
 pgtest1节点为Leader节点
任意节点通过虚IP:192.168.24.15端口5000连接数据库:
psql -h 192.168.24.15 -p 5000 -Upostgres
[postgres@pgtest3 pgdata]$ psql -h 192.168.24.15 -p5432 -Upostgres
Password for user postgres:
psql (14.6)
Type "help" for help.
postgres=# \l
List of databases
Name | Owner | Encoding | Collate | Ctype | Access privileges
-----------+----------+----------+-------------+-------------+-----------------------
postgres | postgres | UTF8 | en_US.UTF-8 | en_US.UTF-8 |
template0 | postgres | UTF8 | en_US.UTF-8 | en_US.UTF-8 | =c/postgres +
| | | | | postgres=CTc/postgres
template1 | postgres | UTF8 | en_US.UTF-8 | en_US.UTF-8 | =c/postgres +
| | | | | postgres=CTc/postgres
(3 rows)
8.2 pgtest1节点切换
--当前集群主节点是 pgtest1,将主角色切换到 pgtest2:
# patronictl -c /app/patroni/patroni_config.yml switchover --master pgtest1 --candidate pgtest2
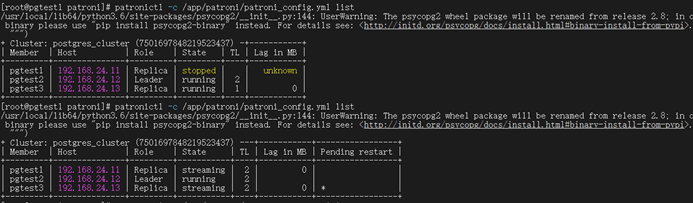
8.4 pgtest2节点切换
--当前集群主节点是 pgtest2,将主角色切换到 pgtest3:
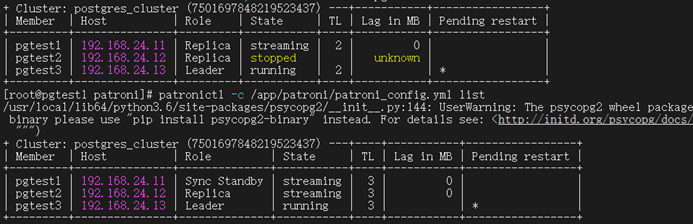
# patronictl -c /app/patroni/patroni_config.yml switchover --master pgtest2 --candidate pgtest3
8.6 pgtest3节点切换
--当前集群主节点是 pgtest3,将主角色切换到 pgtest1:
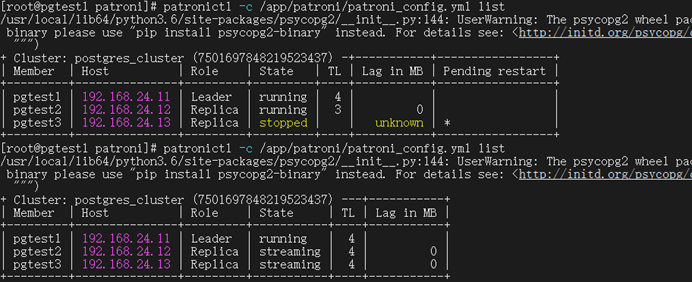
# patronictl -c /app/patroni/patroni_config.yml switchover --master pgtest3 --candidate pgtest1
8.7 failover的切换
停止pgtest1节点的partroni、keepalive、haproxy服务或者关闭节点
[root@pgtest1 ~]# systemctl stop haproxy
[root@pgtest1 ~]# systemctl stop keepalived
[root@pgtest1 ~]# systemctl stop patroni
查看集群状态,集群leader已漂移到2节点
恢复pgtest1节点的集群服务
[root@pgtest1 ~]# systemctl start patroni
[root@pgtest1 ~]# systemctl start keepalived
[root@pgtest1 ~]# systemctl start haproxy
[root@pgtest1 ~]# patronictl -c /app/patroni/patroni_config.yml list
Pgtest1节点恢复,由leader节点变为备节点。
8.8 数据丢失恢复
--pgtest3备节点删除数据目录模拟数据丢失
删除前集群状态查看
[root@pgtest1 ~]# patronictl -c /app/patroni/patroni_config.yml list
+ Cluster: postgres_cluster (7501697848219523437) ---+----+-----------+
| Member | Host | Role | State | TL | Lag in MB |
+---------+---------------+--------------+-----------+----+-----------+
| pgtest1 | 192.168.24.11 | Leader | running | 7 | |
| pgtest2 | 192.168.24.12 | Sync Standby | streaming | 7 | 0 |
| pgtest3 | 192.168.24.13 | Replica | streaming | 7 | 0 |
+---------+---------------+--------------+-----------+----+-----------+
删除data目录
[postgres@pgtest3 postgresql]$ rm -rf pgdata
[postgres@pgtest3 postgresql]$ ls
arch pg14 pgdatabak scripts soft
[postgres@pgtest3 postgresql]$ ls -ltr
total 8
drwx------ 2 postgres postgres 6 Oct 29 12:47 scripts
drwx------ 3 postgres postgres 59 Oct 29 12:50 soft
drwx------ 6 postgres postgres 56 Oct 29 12:56 pg14
drwx------ 2 postgres postgres 4096 Oct 29 14:53 arch
drwx------ 20 postgres postgres 4096 Oct 30 09:31 pgdatabak
删除后集群状态查看
[root@pgtest1 ~]# patronictl -c /app/patroni/patroni_config.yml list
+ Cluster: postgres_cluster (7501697848219523437) ---+----+-----------+
| Member | Host | Role | State | TL | Lag in MB |
+---------+---------------+--------------+-----------+----+-----------+
| pgtest1 | 192.168.24.11 | Leader | running | 7 | |
| pgtest2 | 192.168.24.12 | Sync Standby | streaming | 7 | 0 |
| pgtest3 | 192.168.24.13 | Replica | streaming | 7 | 0 |
+---------+---------------+--------------+-----------+----+-----------+
集群自动恢复开始
[root@pgtest1 ~]# patronictl -c /app/patroni/patroni_config.yml list
+ Cluster: postgres_cluster (7501697848219523437) ---+----+-----------+
| Member | Host | Role | State | TL | Lag in MB |
+---------+---------------+--------------+-----------+----+-----------+
| pgtest1 | 192.168.24.11 | Leader | running | 7 | |
| pgtest2 | 192.168.24.12 | Sync Standby | streaming | 7 | 0 |
| pgtest3 | 192.168.24.13 | Replica | streaming | 7 | 0 |
+---------+---------------+--------------+-----------+----+-----------+
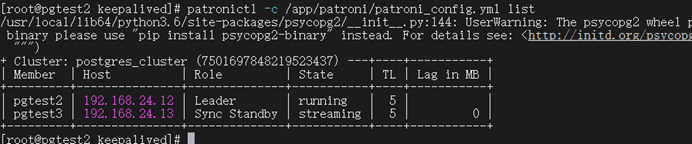
pgtest3数据目录自动恢复

流复制同步状态: