文章目录
- 1. 核心上传逻辑:FileUploadController
- 2. 使文件系统中的文件可通过 HTTP 访问:WebConfig
- 3. 安全性配置:WebSecurityConfig
- 4. 前端实现(这里用的是Angular)
在许多应用程序开发中,我们经常需要实现文件上传功能,例如允许用户上传头像或文档到服务器。虽然 Spring Boot 默认可以从 src/main/resources/static 等目录提供静态文件,但对于用户上传的内容,通常更灵活的做法是将它们保存在服务器文件系统的特定位置,而不是项目资源目录内。这样做的好处包括更精细的权限控制、便于独立管理和备份用户数据等。
那么,如何将文件存储在自定义的文件系统路径下,并且还能通过 HTTP 访问这些文件呢?
下面我们将结合您提供的 Java 代码(Spring Boot Controller 和配置)以及前端(HTML 和 TypeScript)代码,来详细讲解这一过程。
1. 核心上传逻辑:FileUploadController
首先,我们需要一个 Spring Boot Controller 来处理文件上传的 HTTP 请求。您提供的 FileUploadController 就是用于这个目的:
@RestController
@RequestMapping("/file")
public class FileUploadController {

    @Autowired
    IUserService userService; // 用于操作用户数据,如更新头像路径

    @Autowired
    private JwtUtil jwtUtil; // 用于解析 JWT Token,获取用户信息(虽然在提供的uploadFile方法中未完全体现解析逻辑)

    @PostMapping("/avatar/upload")
    public String uploadFile(@RequestParam("file") MultipartFile file, @RequestHeader("Authorization") String token) {
        if (file.isEmpty()) {
            return "文件为空";
        }

        // 获取项目运行目录,并在其下创建 uploads 目录来存放上传文件
        String uploadDir = System.getProperty("user.dir") + File.separator + "uploads" + File.separator;
        File directory = new File(uploadDir);
        if (!directory.exists()) {
            directory.mkdirs(); // 如果目录不存在,则创建
        }

        try {
            String originalFilename = file.getOriginalFilename();
            String extension = "";
            int lastDotIndex = originalFilename.lastIndexOf(".");
            if (lastDotIndex != -1) {
                extension = originalFilename.substring(lastDotIndex + 1); // 获取文件扩展名
            }

            // 生成新的文件名,这里使用了 MD5 哈希(尽管代码中使用的 username 未在此方法内获取)
            // 一个更好的实践是从 Token 中解析出用户标识来生成独一无二的文件名
            // 注意:提供的代码片段中 username 变量未定义,此处需要从 token 或其他途径获取
            String newFileName = HashUtil.calculateMD5(username + file.getOriginalFilename()) + "." + extension;
            String newFilePath = uploadDir + newFileName;

            // 保存文件到指定路径
            file.transferTo(new File(newFilePath));

            // TODO: 这里需要完善根据用户 ID 或其他标识更新用户头像路径的逻辑
            // 例如:String userId = jwtUtil.extractUserId(token);
            //       userService.updateUserAvatar(userId, newFileName);

            // 尝试删除用户旧的头像文件(如果存在且文件名已记录)
            // 注意:此处的 user 对象未在本方法中初始化,需要从 token 或其他途径获取用户实体
             File file1 = new File(uploadDir + user.getAvatar());
             if (file1.exists() && !file1.isDirectory()) {
                 file1.delete(); // 删除旧文件
             }


            return "文件上传成功: " + newFileName; // 通常返回新文件的相对路径或文件名
        } catch (IOException e) {
            e.printStackTrace();
            return "文件上传失败";
        } catch (Exception e) {
             e.printStackTrace();
             return "文件处理失败";
        }
    }

    // 这个 GET 端点 /avatar/load/{fileName} 用于通过特定的 API 路径下载文件
    // 但更常见的做法是结合 WebConfig 配置,直接通过静态资源路径访问
    @GetMapping("/avatar/load/{fileName}")
    public ResponseEntity<Resource> downloadFile(@PathVariable String fileName) {
        try {
            // 构建文件在文件系统中的完整路径
            File file = new File(System.getProperty("user.dir") + "/uploads/" + fileName);
            if (!file.exists()) {
                return ResponseEntity.notFound().build(); // 文件不存在返回 404
            }
            // 将文件封装成 Resource 返回
            Resource resource = new FileSystemResource(file);
            // 设置响应头,告知浏览器是附件下载
            return ResponseEntity.ok()
                    .header(HttpHeaders.CONTENT_DISPOSITION, "attachment; filename=\"" + file.getName() + "\"")
                    .body(resource);
        } catch (Exception e) {
            e.printStackTrace();
            return ResponseEntity.status(HttpStatus.INTERNAL_SERVER_ERROR).build(); // 发生错误返回 500
        }
    }
}
在这个控制器中,uploadFile 方法接收上传的文件 (MultipartFile) 和授权信息 (Authorization header)。它计算出文件应该保存的服务器路径(在项目运行目录下的 uploads 文件夹),并创建一个基于 MD5 散列的新文件名以避免冲突(虽然代码中用于散列的 username 变量需要从 Token 中获取)。文件通过 transferTo 方法保存到服务器文件系统。成功后,通常会更新用户的头像信息到数据库,并可能删除旧的头像文件。
downloadFile 方法提供了一个通过 API 路径 (/file/avatar/load/{fileName}) 获取特定文件的方式,并将其作为资源返回,强制浏览器进行下载。
2. 使文件系统中的文件可通过 HTTP 访问:WebConfig
仅仅将文件保存在文件系统还不够,我们需要让这些文件能够通过 HTTP URL 被浏览器访问到。这就是 WebConfig 中 addResourceHandlers 方法的作用:
@Configuration
public class WebConfig implements WebMvcConfigurer {
    @Override
    public void addResourceHandlers(ResourceHandlerRegistry registry) {
        // 将所有以 /uploads/ 开头的 URL 请求映射到文件系统中的 uploads 目录
        registry.addResourceHandler("/uploads/**")
                .addResourceLocations("file:" + System.getProperty("user.dir") + "/uploads/");
    }
}
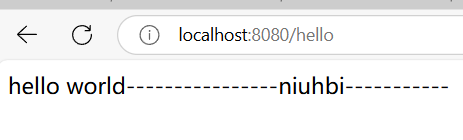
通过这段配置,我们将 /uploads/** 这个 URL 路径映射到了服务器文件系统中的 项目运行目录/uploads/ 路径。这意味着,如果你的 Spring Boot 应用运行在 http://localhost:8080 上,并且上传了一个名为 abcdef123.png 的文件到 项目运行目录/uploads/ 目录下,那么你可以直接通过 http://localhost:8080/uploads/abcdef123.png 这个 URL 在浏览器中访问到它(例如显示为图片)。
这种方式比通过 downloadFile API 端点获取文件更常见,尤其是在需要在网页中直接显示图片时。
3. 安全性配置:WebSecurityConfig
由于一些原因,导致直接访问/file/upload/会发生403错误,所以,我们可以这样做
@Configuration
public class WebSecurityConfig {

    @Bean
    public SecurityFilterChain securityFilterChain(HttpSecurity http) throws Exception {
        http
                .authorizeHttpRequests(auth -> auth
                        .requestMatchers("/**").permitAll() // 允许所有用户访问 (包括上传和下载接口)
                        .anyRequest().authenticated()
                )
                .csrf(csrf -> csrf.disable()); // 禁用 CSRF 防护 (根据需要配置)
        return http.build();
    }
}
当然,在生产环境中,应该根据实际需求调整这里的安全规则,例如只允许认证用户访问上传接口 (/file/avatar/upload),或者对 /uploads/** 路径下的文件访问进行更细粒度的控制(尽管 addResourceHandlers 本身不提供复杂的访问控制)。
4. 前端实现(这里用的是Angular)
在前端,使用 HTML 提供了文件选择输入框和一个触发上传的按钮:
<div class="mb-4 flex flex-col" style="height: auto;">
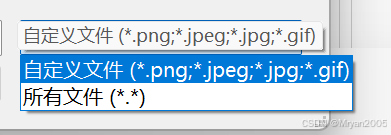
<input type="file" (change)="onFileSelected($event)" class="mb-2 text-base" accept=".png, .jpeg, .jpg, .gif" style="font-size: 0.9rem"/>
<span (click)="onUpload()" class="blue-text-hover-underline w-fit text-base" style="font-size: 0.9rem">上传</span>
</div>
accept=".png, .jpeg, .jpg, .gif"可以考虑不加上,不加上这个就会只出现支持所有文件上传
下图是加上accept=".png, .jpeg, .jpg, .gif"的
下图是不加上accept=".png, .jpeg, .jpg, .gif"的

对应的 TypeScript 代码处理文件选择和上传请求:
selectedFile: File | null = null; // 用于存储选中的文件

onFileSelected(event: Event): void {
    const input = event.target as HTMLInputElement;
    if (input.files && input.files.length > 0) {
        this.selectedFile = input.files[0]; // 将选中的文件存储到变量中
    }
}

onUpload(): void {
    if (this.selectedFile) {
        const formData = new FormData();
        formData.append('file', this.selectedFile); // 将文件添加到 FormData 中,key 为 'file',与后端 @RequestParam("file") 对应

        // 发送 POST 请求到后端上传接口
        // 注意:此处的请求并未携带后端期望的 Authorization header
        this.http.post('http://localhost:8080/file/avatar/upload', formData, { responseType: 'text' }).subscribe({
            next: (response: string) => {
                console.log('上传成功:', response);
                this.loadUserInfo(); // 上传成功后,重新加载用户信息(可能包含新的头像 URL)
            },
            error: (error) => console.error('上传失败:', error),
        });
    } else {
        console.warn('未选择文件');
    }
}
前端通过 onFileSelected 方法获取用户选择的文件,并将其保存在 selectedFile 变量中。当用户点击“上传”按钮时,onUpload 方法会创建一个 FormData 对象,将选中的文件添加进去,然后使用 HTTP 客户端 (this.http) 发送 POST 请求到后端的 /file/avatar/upload 接口。请求成功后,通常会刷新用户界面以显示新的头像。