备注:本文适用于你在SpringBoot2.7以前集成过oauth2,并且项目已经正式投入使用的情况,否则,我建议你直接学习或者找资料学习最新的oauth2集成,就不要纠结于老版本的oauth2。
原因:Spring Security 5.x和Spring Security6.x,我个人认为,你可以理解为两套不同的框架,他们仅仅只是名字差不多而已,升级难度在于,旧系统的登录认证已经在使用了,尤其是已经介入很多子系统时,这时候需升级需要适配原来的认证,不然会导致子系统需要重新单点登录。
Spring Security 5.x → 6.x:
弃用旧 API:spring-security-oauth2-autoconfigure 被移除,取而代之的是更模块化的组件(如 spring-boot-starter-oauth2-client)。
新认证架构:基于 SecurityFilterChain 和 AuthenticationProvider 的声明式配置取代了旧的 WebSecurityConfigurerAdapter。
本文部分内容参考:https://blog.csdn.net/gandilong 写的SpringBoot+SpringSecurity OAuth2 认证服务搭建实战 (二)
文章目录
- 1快速demo 授权服务器
- 1.1依赖
- 1.2AuthorizationServerConfig
- 1.3SecurityConfig
- 1.4验证
- 2老版本/oauth/token
- 3问题:认证接口变了
- 4新版本/oauth2/token
- 4.1定位/oauth2/token
1快速demo 授权服务器
1.1依赖
springBoot版本
   <parent>
		<groupId>org.springframework.boot</groupId>
		<artifactId>spring-boot-starter-parent</artifactId>
		<version>3.4.4</version>
		<relativePath/> <!-- lookup parent from repository -->
	</parent>
		<dependency>
			<groupId>org.springframework.boot</groupId>
			<artifactId>spring-boot-starter-oauth2-authorization-server</artifactId>
		</dependency>
通过查看依赖,发现,SpringBoot3.4.4引用如下依赖
<dependency>
      <groupId>org.springframework.security</groupId>
      <artifactId>spring-security-oauth2-authorization-server</artifactId>
      <version>1.3.0</version>
      <scope>compile</scope>
    </dependency>
1.2AuthorizationServerConfig
import java.security.KeyPair;
import java.security.KeyPairGenerator;
import java.security.NoSuchAlgorithmException;
import java.security.SecureRandom;
import java.security.interfaces.RSAPrivateKey;
import java.security.interfaces.RSAPublicKey;
import java.util.UUID;

import org.springframework.context.annotation.Bean;
import org.springframework.context.annotation.Configuration;
import org.springframework.context.annotation.Import;
import org.springframework.security.core.userdetails.User;
import org.springframework.security.core.userdetails.UserDetails;
import org.springframework.security.core.userdetails.UserDetailsService;
import org.springframework.security.crypto.bcrypt.BCryptPasswordEncoder;
import org.springframework.security.crypto.password.PasswordEncoder;
import org.springframework.security.oauth2.core.AuthorizationGrantType;
import org.springframework.security.oauth2.core.ClientAuthenticationMethod;
import org.springframework.security.oauth2.core.oidc.OidcScopes;
import org.springframework.security.oauth2.jwt.JwtDecoder;
import org.springframework.security.oauth2.jwt.JwtEncoder;
import org.springframework.security.oauth2.jwt.NimbusJwtEncoder;
import org.springframework.security.oauth2.server.authorization.client.InMemoryRegisteredClientRepository;
import org.springframework.security.oauth2.server.authorization.client.RegisteredClient;
import org.springframework.security.oauth2.server.authorization.client.RegisteredClientRepository;
import org.springframework.security.oauth2.server.authorization.config.annotation.web.configuration.OAuth2AuthorizationServerConfiguration;
import org.springframework.security.oauth2.server.authorization.config.annotation.web.configurers.OAuth2AuthorizationServerConfigurer;
import org.springframework.security.oauth2.server.authorization.settings.AuthorizationServerSettings;
import org.springframework.security.oauth2.server.authorization.web.OAuth2ClientAuthenticationFilter;
import org.springframework.security.oauth2.server.authorization.web.OAuth2TokenEndpointFilter;
import org.springframework.security.provisioning.InMemoryUserDetailsManager;

import com.nimbusds.jose.jwk.JWKSet;
import com.nimbusds.jose.jwk.RSAKey;
import com.nimbusds.jose.jwk.source.ImmutableJWKSet;
import com.nimbusds.jose.jwk.source.JWKSource;
import com.nimbusds.jose.proc.SecurityContext;

@Configuration
@Import(OAuth2AuthorizationServerConfiguration.class)
public class AuthorizationServerConfig {

	OAuth2TokenEndpointFilter  OAuth2TokenEndpointFilter ;

	OAuth2AuthorizationServerConfigurer  OAuth2AuthorizationServerConfigurer;

	OAuth2ClientAuthenticationFilter  OAuth2ClientAuthenticationFilter ;

	@Bean
    public PasswordEncoder passwordEncoder() throws NoSuchAlgorithmException {
		return new BCryptPasswordEncoder(12,SecureRandom.getInstanceStrong());
    }

	/**
	 * 提供登录页面用户名密码的认证
	 * @return
	 */
	@Bean
	public UserDetailsService userDetailsService(PasswordEncoder passwdEncoder) {
        UserDetails user= User.builder()
                .username("user")
                //.password(passwdEncoder.encode("123")) // 使用 {noop} 前缀表示密码不会被编码
                .password("{noop}123") // 使用 {noop} 前缀表示密码不会被编码
                .accountExpired(false)
                .credentialsExpired(false)
                .accountLocked(false)
                .authorities("ROLE_USER") // 用户的权限
                .build();

		return new InMemoryUserDetailsManager(user);
	}

	/**
	 * 应用注册仓库
	 * @return
	 */
	@Bean
	public RegisteredClientRepository registeredClientRepository(PasswordEncoder passwdEncoder) {

		RegisteredClient oidcClient = RegisteredClient.withId(UUID.randomUUID().toString())
				.clientId("clientid")
				.clientSecret(passwdEncoder.encode("client_secret"))如果是CLIENT_SECRET_POST才会用到
				.clientAuthenticationMethod(ClientAuthenticationMethod.CLIENT_SECRET_BASIC)
				.clientAuthenticationMethod(ClientAuthenticationMethod.CLIENT_SECRET_POST)
				.clientAuthenticationMethod(ClientAuthenticationMethod.NONE)
				.authorizationGrantType(AuthorizationGrantType.AUTHORIZATION_CODE)
				.authorizationGrantType(AuthorizationGrantType.CLIENT_CREDENTIALS)
				.authorizationGrantType(AuthorizationGrantType.REFRESH_TOKEN)
				.redirectUri("http://localhost:8080/login/oauth2/code/clientid")
				.postLogoutRedirectUri("http://localhost:8080/")
				.scope(OidcScopes.OPENID)
				.scope(OidcScopes.PROFILE)
				.build();

		return new InMemoryRegisteredClientRepository(oidcClient);
	}

	/**
	 * 生成jwk,用在jwt编码和jwt解码器上
	 * @return
	 */
	@Bean
	public JWKSource<SecurityContext> jwkSource() {
		KeyPair keyPair = generateRsaKey();
		RSAPublicKey publicKey = (RSAPublicKey) keyPair.getPublic();
		RSAPrivateKey privateKey = (RSAPrivateKey) keyPair.getPrivate();
		RSAKey rsaKey = new RSAKey.Builder(publicKey)
				.privateKey(privateKey)
				.keyID(UUID.randomUUID().toString())
				.build();
		JWKSet jwkSet = new JWKSet(rsaKey);
		return new ImmutableJWKSet<>(jwkSet);
	}

	/**
	 * 生成RSA256非对称的秘钥对:公钥和私钥,其中公钥会出布出去。
	 * @return
	 */
	private static KeyPair generateRsaKey() {
		KeyPair keyPair;
		try {
			KeyPairGenerator keyPairGenerator = KeyPairGenerator.getInstance("RSA");
			keyPairGenerator.initialize(2048);
			keyPair = keyPairGenerator.generateKeyPair();
		}
		catch (Exception ex) {
			throw new IllegalStateException(ex);
		}
		return keyPair;
	}

	/**
	 * jwt 解码器,给资源服务器用
	 * @param jwkSource
	 * @return
	 */
	@Bean
	public JwtDecoder jwtDecoder(JWKSource<SecurityContext> jwkSource) {
		return OAuth2AuthorizationServerConfiguration.jwtDecoder(jwkSource);
	}

	/**
	 * jwt 编码器,给授权服务器用
	 * @param jwkSource
	 * @return
	 */
	@Bean
	public JwtEncoder jwtEncoder(JWKSource<SecurityContext> jwkSource) {
		return new NimbusJwtEncoder(jwkSource);
	}

	/**
	 * 默认授权服务器配置
	 * @return
	 */
	@Bean
	public AuthorizationServerSettings authorizationServerSettings() {
		return AuthorizationServerSettings.builder().build();
	}
}
1.3SecurityConfig
import org.springframework.context.annotation.Bean;
import org.springframework.context.annotation.Configuration;
import org.springframework.core.annotation.Order;
import org.springframework.security.config.Customizer;
import org.springframework.security.config.annotation.web.builders.HttpSecurity;
import org.springframework.security.config.annotation.web.configuration.EnableWebSecurity;
import org.springframework.security.web.SecurityFilterChain;


@Configuration
@EnableWebSecurity
public class SecurityConfig {

	@Bean
	@Order(1)
	public SecurityFilterChain defaultSecurityFilterChain(HttpSecurity http)
			throws Exception {
		http
		.authorizeHttpRequests((authorize) -> authorize.anyRequest().authenticated())
		.oauth2ResourceServer(resourceServer -> resourceServer.jwt(Customizer.withDefaults()));
		return http.build();
	}

}
1.4验证
需要注意,这里使用post + x-www-form-urlencoded来请求,这个是区别于老版本(大概应该是boot2.7以前)

如果你在springBoot2.7以前用过oauth2,对于上述的方式肯定会很蒙蔽,接下来我们来说明为啥会这样。
2老版本/oauth/token
如下为例,下面是我们一个老版本的oauth2的登录认证接口,这里我用密码模式来举例
http://127.0.0.1:8080/oauth/token?client_id=client_hutao&client_secret=secret_hutao&username=hutao&password=123456&grant_type=password
我们使用postMan调用,如下所示

两者一对比就能发现,老版在url里面传参数,新版在请求体x-www-form-urlencoded传参数。
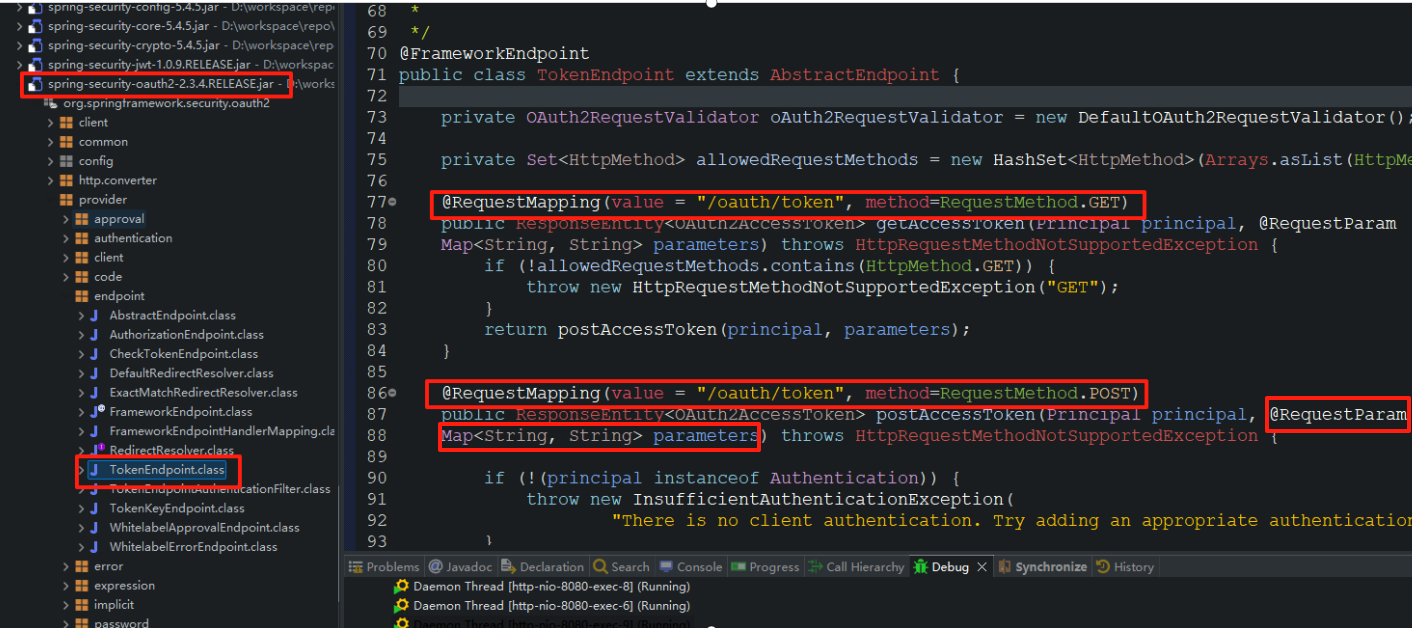
老版oauth2使用我们比较熟悉的Spring框架的接口开发方式来实现,如下代码所示
@RequestMapping(value = "/oauth/token", method=RequestMethod.GET)

@RequestMapping(value = "/oauth/token", method=RequestMethod.POST)

@RequestParam Map<String, String> parameters
因此我们想要去阅读源码或者调试信息时,只需要对org.springframework.security.oauth2.provider.endpoint.TokenEndpoint打debug打断点就可以了,该代码阅读起来难度也比较小,很贴近我们比较常见的restful接口的开发。
3问题:认证接口变了
我们先抛开我们怎么搭建授权服务器的问题,以及我现在为什么要从springBoot2升级到springBoot3,先解决一个问题,那就是,我们做授权服务器来实现单点登录这些功能,为啥要这样做?因为我们有很多系统都会调用这个单点登录来实现登录。也就是说,我们的这个登录认证接口是被很系统正在使用的,现在如果直接就升级,会导致我们很多子系统要跟着改,这影响很大,因此,我们从springBoot2升级到springBoot3(没有商量,必须升级)以后,oauth2也得跟着升级,我们得保证oauth2跟着升级以后,我们在新版本的oauth2下,得适配以前其他系统对接的接口。
4新版本/oauth2/token
通过上面的案例,我们发现接口地址变了,以前是/oauth/token,现在是/oauth2/token,并且
现在TokenEndpoint它不见了,不是说换个名字,是正儿八经的被删除了,通过追踪发现,/oauth2/token的工作原理机制和/oauth/token完全不一样。
| 特性 | 旧版 (Spring Security OAuth2) | 新版 (Spring Authorization Server) |
|---|---|---|
| 依赖 | spring-security-oauth2(已废弃) | spring-boot-starter-oauth2-authorization-server |
| 端点类 | TokenEndpoint(显式 @FrameworkEndpoint) | 无集中式端点类,改为分散的 Filter + AuthenticationProvider OAuth2TokenEndpointFilter |
| 请求方法 | 支持 GET/POST /oauth/token | 仅支持 POST /oauth2/token |
| 代码入口 | 直接由 TokenEndpoint 处理 | 通过过滤器链和认证提供者协作处理 |
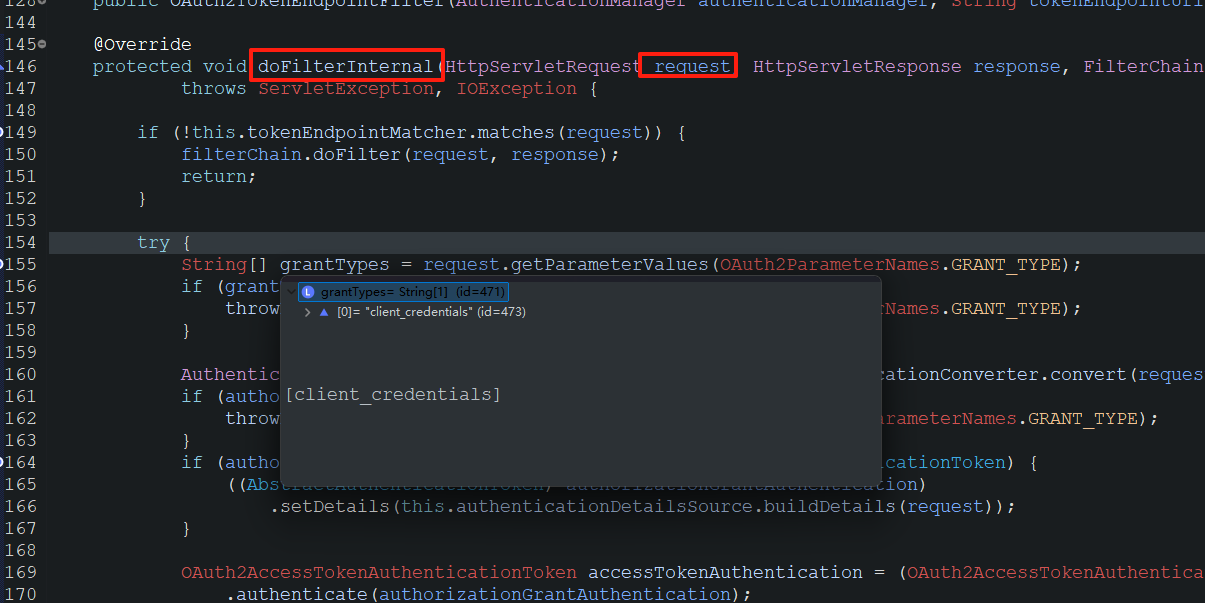
4.1定位/oauth2/token
如下所示,当我们请求这个接口时,实际上是下面这个OAuth2TokenEndpointFilter处理,而不是以前的那种,TokenEndpoint中的@RequestMapping(value = “/oauth/token”)处理
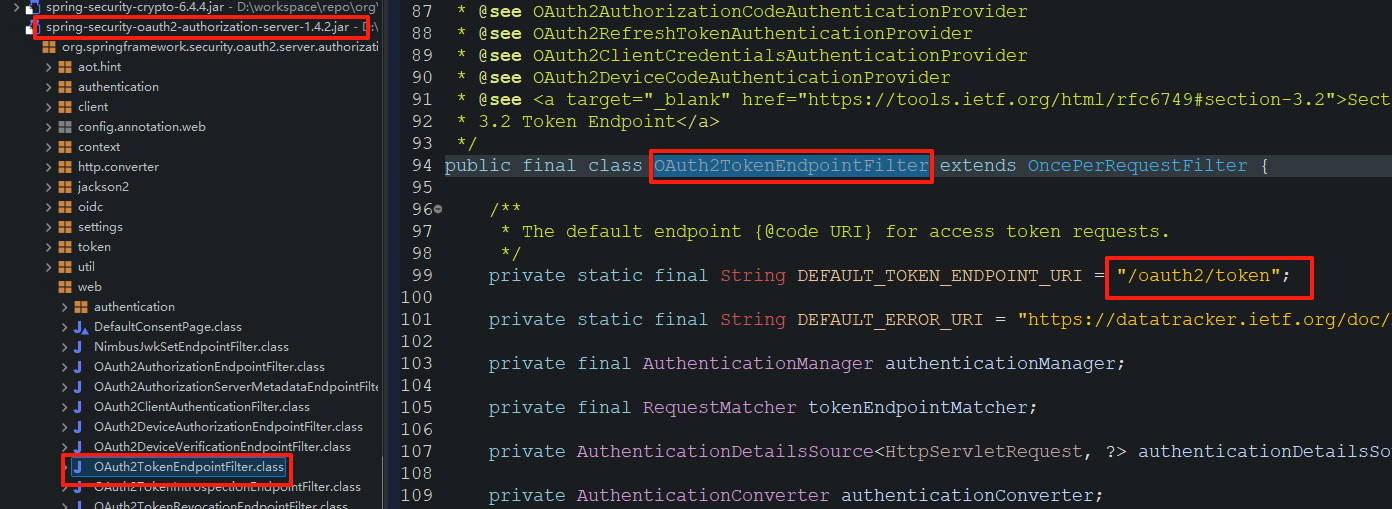
如下所示,你就可以尽情的debug,查看请求参数或者报错信息,来帮助你定位问题了