一、简介
SkyReels-V2 模型集成了多模态大语言模型(MLLM)、多阶段预训练、强化学习以及创新的扩散强迫(Diffusion-forcing)框架,实现了在提示词遵循、视觉质量、运动动态以及视频时长等方面的全面突破。通过扩散强迫框架和 多阶段优化技术 ,首次实现了单镜头 30 秒、40 秒的流畅输出,并通过“ Extend ”无限延伸,彻底打破了时长枷锁。
二、环境部署
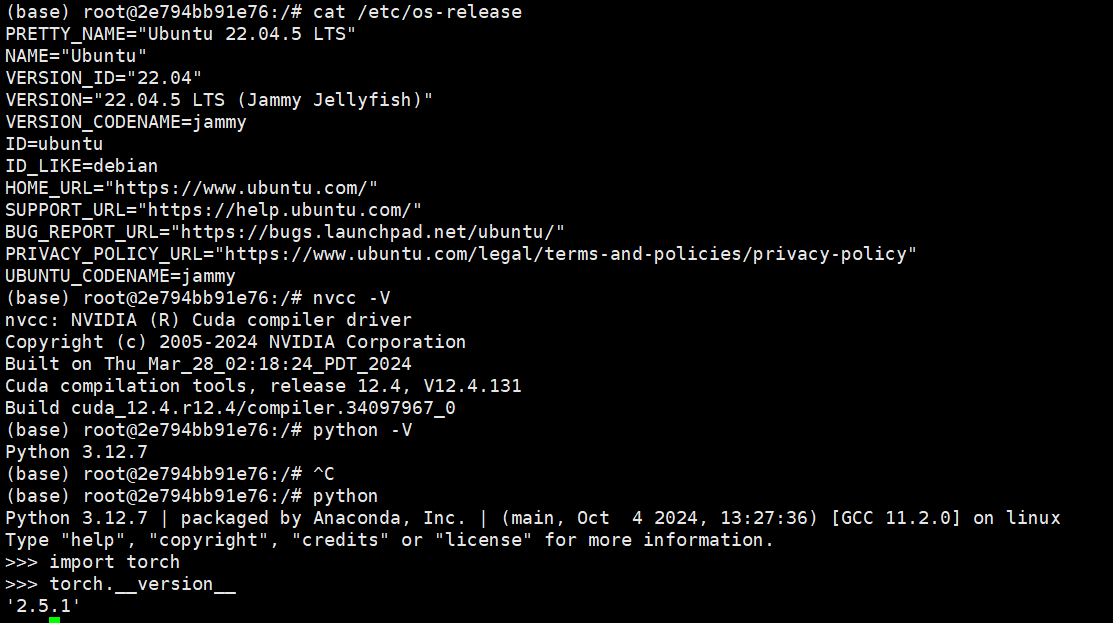
基础环境要求:
| 环境名称 | 版本信息 1 |
|---|---|
| Ubuntu | 22.04.5 LTS |
| Cuda | V12.4.131 |
| Python | 3.12.7 |
| NVIDIA Corporation | RTX 4090 |
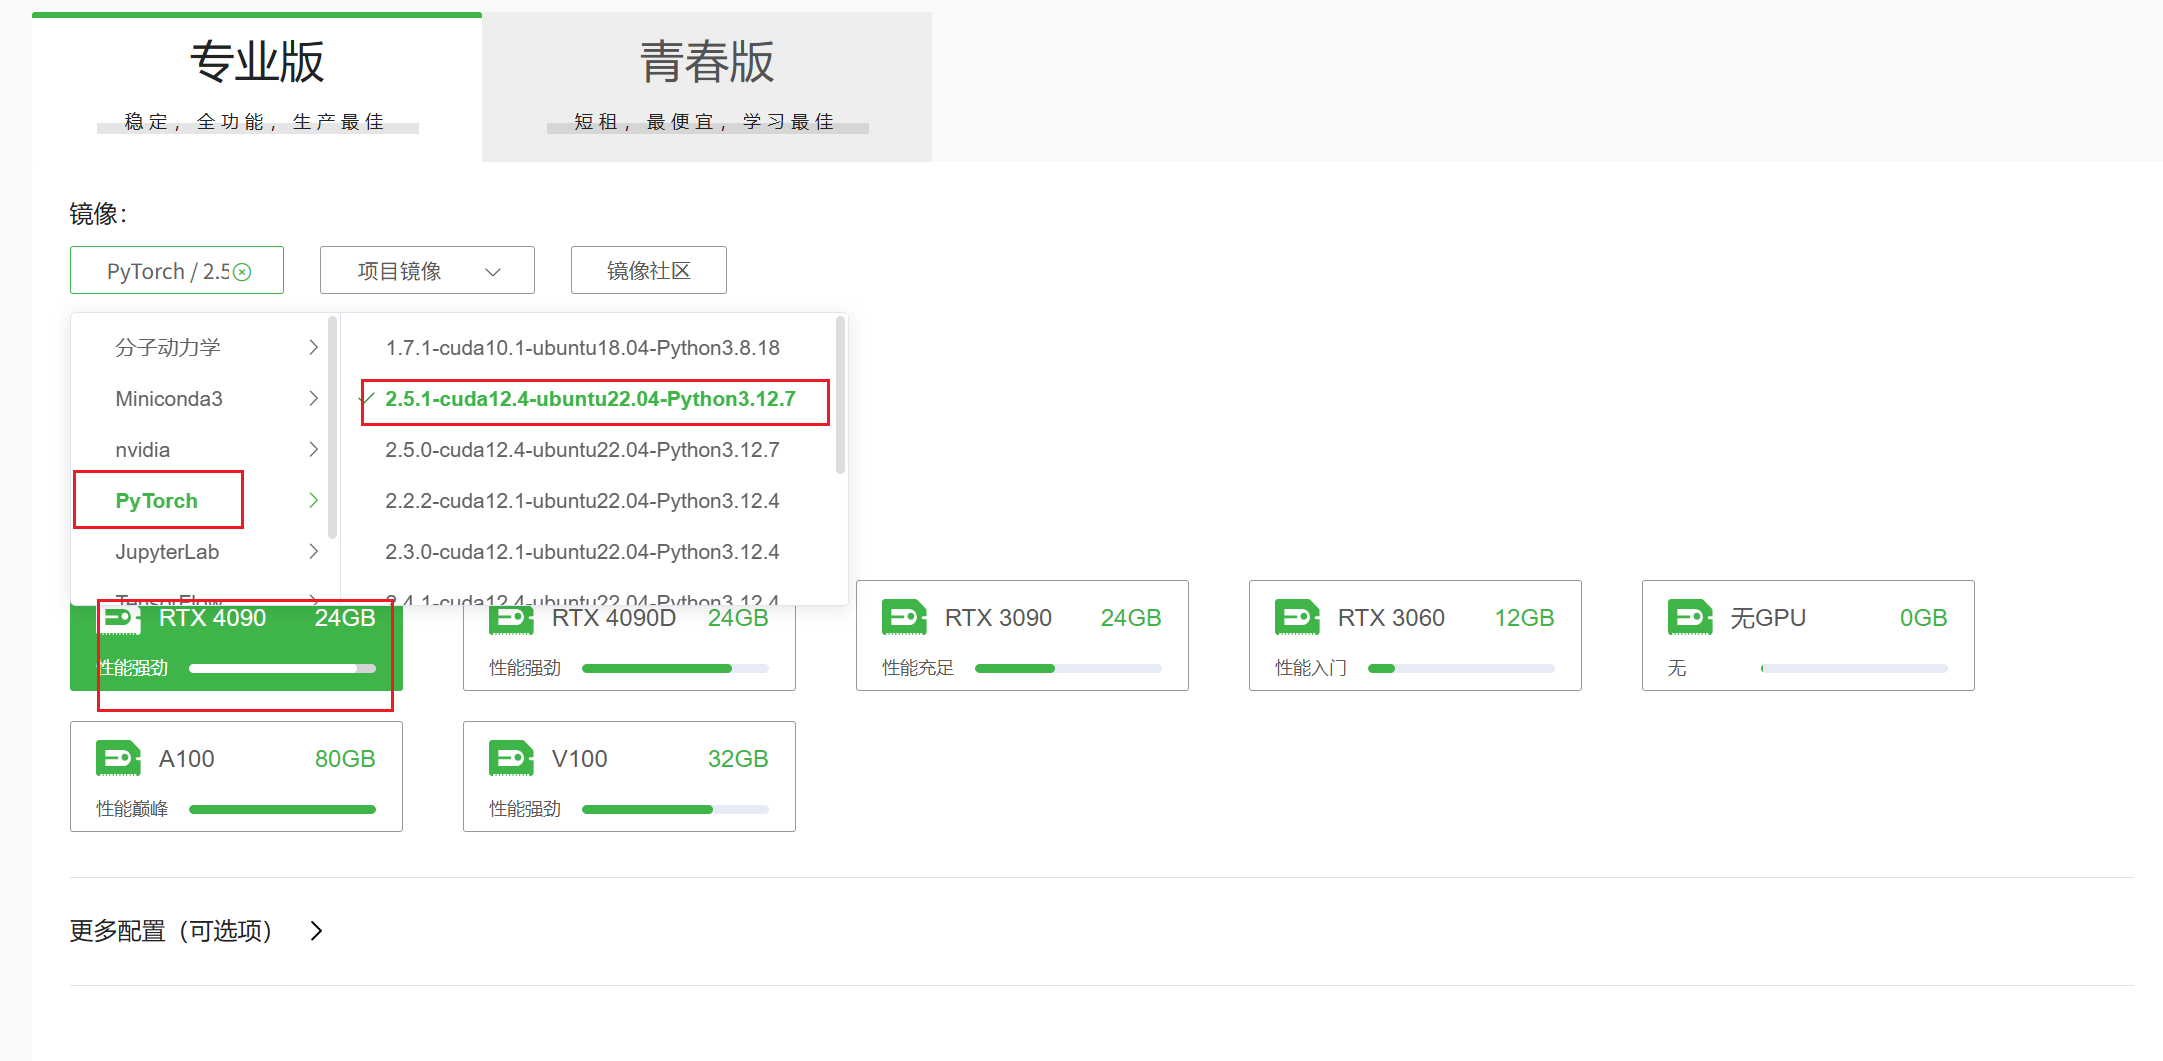
从算家云基础镜像开始创建:
三、SkyReels-V2安装
首先查看环境信息:
从github 克隆代码,然后 pip 安装依赖包。
# clone the repository.
git clone https://github.com/SkyworkAI/SkyReels-V2
cd SkyReels-V2
pip install -r requirements.txt
若遇到 flash_attn 一起在安装的问题:可以真的到Releases · Dao-AILab/flash-attention 下载它的编译好的 whl 包,一定要选择对应的版本,
wget https://github.com/Dao-AILab/flash-attention/releases/download/v2.7.4.post1/flash_attn-2.7.4.post1+cu12torch2.5cxx11abiFALSE-cp312-cp312-linux_x86_64.whl
pip install flash_attn-2.7.4.post1+cu12torch2.5cxx11abiFALSE-cp312-cp312-linux_x86_64.whl
然后在执行 pip install -r requirements.txt
四、下载模型文件
目前开源的模型如下:
| Type | Model Variant | Recommended Height/Width/Frame | Link |
|---|---|---|---|
| Diffusion Forcing | 1.3B-540P | 544 * 960 * 97f | 🤗Huggingface 🤖 ModelScope |
| 5B-540P | 544 * 960 * 97f | Coming Soon | |
| 5B-720P | 720 * 1280 * 121f | Coming Soon | |
| 14B-540P | 544 * 960 * 97f | 🤗Huggingface 🤖 ModelScope | |
| 14B-720P | 720 * 1280 * 121f | Coming Soon | |
| Text-to-Video | 1.3B-540P | 544 * 960 * 97f | Coming Soon |
| 5B-540P | 544 * 960 * 97f | Coming Soon | |
| 5B-720P | 720 * 1280 * 121f | Coming Soon | |
| 14B-540P | 544 * 960 * 97f | 🤗Huggingface 🤖 ModelScope | |
| 14B-720P | 720 * 1280 * 121f | 🤗Huggingface 🤖 ModelScope | |
| Image-to-Video | 1.3B-540P | 544 * 960 * 97f | 🤗Huggingface 🤖 ModelScope |
| 5B-540P | 544 * 960 * 97f | Coming Soon | |
| 5B-720P | 720 * 1280 * 121f | Coming Soon | |
| 14B-540P | 544 * 960 * 97f | 🤗Huggingface 🤖 ModelScope | |
| 14B-720P | 720 * 1280 * 121f | Coming Soon | |
| Camera Director | 5B-540P | 544 * 960 * 97f | Coming Soon |
| 5B-720P | 720 * 1280 * 121f | Coming Soon | |
| 14B-720P | 720 * 1280 * 121f | Coming Soon |
从ModelScope 下载 Diffusion Forcing1.3B-540P 的模型:
git lfs install
git clone https://www.modelscope.cn/Skywork/SkyReels-V2-DF-1.3B-540P.git
五、运行测试
下载完模型后,将下列代码写入:test.sh
model_id=Skywork/SkyReels-V2-DF-1.3B-540P
# synchronous inference
python generate_video_df.py \
  --model_id ${model_id} \
  --resolution 540P \
  --ar_step 0 \
  --base_num_frames 97 \
  --num_frames 257 \
  --overlap_history 17 \
  --prompt "A graceful white swan with a curved neck and delicate feathers swimming in a serene lake at dawn, its reflection perfectly mirrored in the still water as mist rises from the surface, with the swan occasionally dipping its head into the water to feed." \
  --addnoise_condition 20 \
  --offload
运行 sh test.sh 完成后结果保存在:root/SkyReels-V2/result/diffusion_forcing

- 若出现在问题:
Error opening output file: File name too long是由于导出视频的文件名太长所导致的,可以修改generate_video_df.py的代码 :找到下列代码,将[:100]修改为[:10]
    if local_rank == 0:
        current_time = time.strftime("%Y-%m-%d_%H-%M-%S", time.localtime())
        video_out_file = f"{args.prompt[:10].replace('/','')}_{args.seed}_{current_time}.mp4"
        output_path = os.path.join(save_dir, video_out_file)
        imageio.mimwrite(output_path, video_frames, fps=fps, quality=8, output_params=["-loglevel", "error"])
- 无法使用14B模型,若要使用需要至少一张大于60G显存的显卡
六、使用webui界面
通过 python app.py 运行webui
模型可以放在 SkyReels-V2/Skywork 文件夹下,这个镜像中的模型是使用 ln 创建的链接
# app.py
import os
import gradio as gr
import subprocess
import time
import glob
import torch.distributed as dist

def get_model_list(base_dir="./Skywork/"):
    """扫描Skywork目录获取可用的模型列表"""
    try:
        # 确保目录存在
        if not os.path.exists(base_dir):
            os.makedirs(base_dir)
            return ["请选择模型"]  # 返回默认列表

        # 扫描目录下的所有子目录
        model_dirs = glob.glob(os.path.join(base_dir, "*"))
        model_ids = []

        for dir_path in model_dirs:
            if os.path.isdir(dir_path):
                # 将目录路径转换为model_id格式
                model_name = os.path.basename(dir_path)
                model_id = f"{base_dir}/{model_name}"
                model_ids.append(model_id)

        # 如果没有找到模型,返回默认列表
        return model_ids if model_ids else ["请选择模型"]
    except Exception as e:
        print(f"扫描模型目录出错: {str(e)}")
        return ["扫描模型目录出错"]  # 发生错误时返回默认列表

def enhance_prompt(prompt):
    """使用提示词增强器处理提示词"""
    try:
        cmd = [
            "python",
            "skyreels_v2_infer/pipelines/prompt_enhancer.py",
            "--prompt", str(prompt)
        ]

        # 执行提示词增强
        process = subprocess.Popen(
            cmd,
            stdout=subprocess.PIPE,
            stderr=subprocess.STDOUT,
            text=True,
            bufsize=1,
            universal_newlines=True
        )

        output = []
        enhanced_prompt = None
        for line in process.stdout:
            print(line, end='')
            output.append(line)
            if "Enhanced prompt:" in line:
                enhanced_prompt = line.split("Enhanced prompt:")[-1].strip()

        process.wait()
        if process.returncode != 0:
            raise RuntimeError("提示词增强失败")

        return enhanced_prompt if enhanced_prompt else prompt
    except Exception as e:
        print(f"提示词增强失败: {str(e)}")
        return prompt

def run_video_generation(
    prompt,
    model_id="选择模型",
    resolution="540P",
    ar_step=4,
    base_num_frames=97,
    num_frames=257,
    overlap_history=17,
    addnoise_condition=20,
    use_usp=True,
    offload=True,
    seed=42,
    gpu_count=2,
    image=None,
    inference_steps=50,
    fps=24,
    shift=8.0,
    guidance_scale=6.0,
    causal_block_size=5,
    outdir="./video_out",
    prompt_enhancer=False,  # 添加prompt_enhancer参数
    teacache=False  # 添加teacache参数
):
    """执行视频生成命令"""
    # 记录开始时间
    start_time = time.time()

    # 确保输出目录存在并获取绝对路径
    outdir = os.path.abspath(outdir)
    os.makedirs(outdir, exist_ok=True)


    # 根据条件处理提示词增强
    if prompt_enhancer:
        try:
            enhanced = enhance_prompt(prompt)
            if enhanced != prompt:
                print(f"原始提示词: {prompt}")
                print(f"增强后的提示词: {enhanced}")
                prompt = enhanced
        except Exception as e:
            print(f"提示词增强失败,将使用原始提示词: {str(e)}")
            # 自动关闭提示词增强功能
            prompt_enhancer = False

    # 构建基础命令参数,确保参数顺序正确
    base_args = [
        "--prompt", str(prompt),
        "--model_id", str(model_id),
        "--resolution", str(resolution),
        "--ar_step", str(ar_step),
        "--base_num_frames", str(base_num_frames),
        "--num_frames", str(num_frames),
        "--overlap_history", str(overlap_history),
        "--addnoise_condition", str(addnoise_condition),
        "--inference_steps", str(inference_steps),
        "--fps", str(fps),
        "--shift", str(shift),
        "--guidance_scale", str(guidance_scale),
        "--causal_block_size", str(causal_block_size),
        "--outdir", str(outdir)  # 确保outdir在最后
    ]

    if teacache:
        base_args.append("--teacache")

    if image:
        base_args.extend(["--image", str(image)])

    if offload:
        base_args.append("--offload")

    if seed != -1:
        base_args.append("--seed")
        base_args.append(str(seed))

    if prompt_enhancer:
        base_args.append("--prompt_enhancer")

    # 根据是否使用USP构建完整命令
    if use_usp:
        cmd = [
            "torchrun",
            f"--nproc_per_node={gpu_count}",
            f"generate_video_df.py"
        ] + base_args + ["--use_usp"]
    else:
        cmd = ["python", "generate_video_df.py"] + base_args

    # 打印执行命令
    print("执行命令:", " ".join(cmd))

    # 确保输出目录存在并获取绝对路径
    outdir = os.path.abspath(outdir)
    os.makedirs(outdir, exist_ok=True)

    # 执行命令并实时显示输出
    try:
        process = subprocess.Popen(
            cmd,
            stdout=subprocess.PIPE,
            stderr=subprocess.STDOUT,
            text=True,
            bufsize=1,
            universal_newlines=True
        )

        output = []
        video_path = None
        # 实时读取并显示输出
        for line in process.stdout:
            print(line, end='')  # 实时显示
            output.append(line)  # 保存输出
            # 检查是否包含视频路径信息并转换为绝对路径
            if "Saved video to" in line:
                video_path = line.split("Saved video to")[-1].strip()
                video_path = os.path.abspath(video_path)  # 确保是绝对路径
                print(f"视频保存路径: {video_path}")

        process.wait()
        if process.returncode != 0:
            raise RuntimeError("生成视频失败")

        # 计算并添加耗时信息
        end_time = time.time()
        elapsed_time = end_time - start_time
        time_info = f"\n总耗时: {elapsed_time:.2f} 秒"
        output.append(time_info)

        return "".join(output), video_path
    except Exception as e:
        raise RuntimeError(f"执行命令失败: {str(e)}")

def get_available_gpus():
    """获取可用的GPU数量和设备ID"""
    try:
        import torch
        gpu_count = torch.cuda.device_count()
        if gpu_count == 0:
            return 0, []
        return gpu_count, list(range(gpu_count))
    except:
        return 0, []

def scan_video_directory(directory="./video_out"):
    """扫描视频目录并返回所有视频文件"""
    if not os.path.exists(directory):
        return []
    video_files = []
    for ext in ['.mp4', '.avi', '.mov', '.mkv']:
        files = glob.glob(os.path.join(directory, f'*{ext}'))
        # 返回(显示名称, 文件路径)的元组
        for f in files:
            basename = os.path.basename(f)
            video_files.append((basename, f))
    # 按修改时间排序
    return sorted(video_files, key=lambda x: os.path.getmtime(x[1]), reverse=True)

# 在Gradio界面中使用时:
video_list = gr.Dropdown(
    label="选择视频播放",
    choices=scan_video_directory(),
    value=None,
    interactive=True
)

def update_video_list():
    """刷新视频列表"""
    return gr.Dropdown(choices=scan_video_directory())

def on_video_select(video_path):
    """当选择视频时"""
    if video_path:  # video_path现在是完整路径
        return video_path
    return None

def on_generate_click(*args):
    """生成视频并更新列表"""
    try:
        # 获取参数
        prompt, model_id, resolution, ar_step, base_num_frames, num_frames, \
        overlap_history, addnoise_condition, use_usp, offload, seed, gpu_count, \
        image, inference_steps, fps, shift, guidance_scale, \
        causal_block_size, outdir, prompt_enhancer, teacache = args  # 添加teacache

        # 如果ar_step为0(同步模式),强制设置causal_block_size为1
        if ar_step == 0:
            causal_block_size = 1

        # 如果同时启用了use_usp和prompt_enhancer,先进行提示词增强
        if use_usp and prompt_enhancer:
            try:
                enhanced = enhance_prompt(prompt)
                if enhanced != prompt:
                    print(f"原始提示词: {prompt}")
                    print(f"增强后的提示词: {enhanced}")
                    prompt = enhanced
            except Exception as e:
                print(f"提示词增强失败,将使用原始提示词: {str(e)}")
            # 禁用prompt_enhancer参数,因为提示词已经增强过了
            prompt_enhancer = False

        # 执行视频生成
        output, video_path = run_video_generation(
            prompt, model_id, resolution, ar_step, base_num_frames, num_frames,
            overlap_history, addnoise_condition, use_usp, offload, seed, gpu_count,
            image, inference_steps, fps, shift, guidance_scale,
            causal_block_size, outdir, prompt_enhancer,teacache
        )

        # 更新视频列表
        new_choices = scan_video_directory()
        if video_path and os.path.exists(video_path):
            return output, video_path, gr.Dropdown(choices=new_choices, value=video_path)
        return output, None, gr.Dropdown(choices=new_choices)
    except Exception as e:
        error_msg = f"生成失败: {str(e)}"
        return error_msg, None, gr.Dropdown(choices=scan_video_directory())

# 创建Gradio界面
with gr.Blocks(title="SkyReels-V2 视频生成器") as demo:
    gr.Markdown("# SkyReels-V2 视频生成器")

    with gr.Row():
        with gr.Column():
            prompt = gr.Textbox(
                label="提示词 (prompt)",
                lines=3,
                value="A graceful white swan with a curved neck and delicate feathers swimming in a serene lake at dawn"
            )

            # 图片输入
            image = gr.Image(
                label="输入图片 (仅用于图像到视频生成)",
                type="filepath",
                visible=True
            )

            # In the Gradio interface definition, update the model_id dropdown:
            model_id = gr.Dropdown(
                choices=get_model_list(),
                label="模型ID (model_id)",
                value="选择模型",# Changed to match the available model
                allow_custom_value=True
            )

            resolution = gr.Dropdown(
                choices=["540P", "720P"],
                label="分辨率 (resolution)",
                value="540P"
            )

            with gr.Row():
                num_frames = gr.Number(
                    label="生成帧数 (num_frames)",
                    value=97,
                    precision=0
                )
                base_num_frames = gr.Number(
                    label="基础帧数 (base_num_frames)",
                    value=97,
                    precision=0
                )

            with gr.Row():
                inference_steps = gr.Number(
                    label="推理步骤数 (inference_steps)",
                    value=50,
                    precision=0
                )
                fps = gr.Number(
                    label="输出视频帧率 (fps)",
                    value=24,
                    precision=0
                )

            with gr.Row():
                shift = gr.Number(
                    label="流匹配参数 (shift)",
                    value=8.0,
                    info="T2V模型推荐8.0,I2V模型推荐5.0"
                )
                guidance_scale = gr.Number(
                    label="文本匹配强度 (guidance_scale)",
                    value=6.0,
                    info="T2V模型推荐6.0,I2V模型推荐5.0"
                )

            with gr.Row():
                ar_step = gr.Number(
                    label="AR步数 (ar_step)",
                    value=4,
                    info="0表示同步模式"
                )
                causal_block_size = gr.Number(
                    label="因果块大小 (causal_block_size)",
                    value=4,
                    info="异步推理时推荐使用(ar_step>0)"
                )

            with gr.Row():
                overlap_history = gr.Number(
                    label="重叠历史帧数 (overlap_history)",
                    value=17
                )
                addnoise_condition = gr.Number(
                    label="噪声条件 (addnoise_condition)",
                    value=20
                )

            with gr.Row():
                use_usp = gr.Checkbox(
                    label="启用use_usp(使用多GPU并行推理)",
                    value=True
                )
                offload = gr.Checkbox(
                    label="启用offload(使用显存优化)",
                    value=True
                )
                prompt_enhancer = gr.Checkbox(
                    label="启用prompt_enhancer(提示词扩展)",
                    value=True,
                )
                teacache = gr.Checkbox(
                    label="启用teacache(使用缓存加速)",
                    value=False,
                )

            with gr.Row():
                seed = gr.Number(
                    label="随机种子 (-1为随机)",
                    value=42
                )
                gpu_count = gr.Number(
                    label="使用GPU数量",
                    value=2,
                    precision=0
                )

            outdir = gr.Textbox(
                label="输出目录 (outdir)",
                value="./video_out"
            )

            # 添加说明
            gr.Markdown("""
            ### 使用说明
            1. 单GPU模式:取消勾选"启用USP"选项
            2. 多GPU模式:
               - 勾选"启用USP"选项
               - 设置要使用的GPU数量
               - 需要固定的随机种子
               - 多GPU无法使用teacache
            3. 无法使用14B模型,若要使用需要单张显存大于60G
            ### 更多信息
            访问 [GitHub仓库](https://github.com/SkyworkAI/SkyReels-V2) 获取详细文档和更新。
            """)

            # 生成按钮和输出信息
            generate_btn = gr.Button("生成视频")
            output_text = gr.Textbox(label="输出信息", visible=True, lines=3)

            # 视频预览部分
            gr.Markdown("### 视频预览")
            with gr.Row():
                with gr.Column(scale=4):
                    video_player = gr.Video(
                        label="视频播放",
                        format="mp4",
                        autoplay=False,     # 自动播放选中的视频
                        interactive=True   # 允许用户控制播放
                    )
                with gr.Column(scale=1):
                    video_list = gr.Dropdown(
                        label="选择视频",
                        choices=scan_video_directory(),
                        value=None,
                        interactive=True
                    )
                    refresh_btn = gr.Button("🔄 刷新视频列表")

            # 更新事件绑定
            generate_btn.click(
                on_generate_click,
                inputs=[prompt, model_id, resolution, ar_step, base_num_frames, num_frames,
                       overlap_history, addnoise_condition, use_usp, offload, seed, gpu_count,
                       image, inference_steps, fps, shift, guidance_scale,
                       causal_block_size, outdir, prompt_enhancer, teacache],  # 添加teacache
                outputs=[output_text, video_player, video_list]
            )

            video_list.change(
                on_video_select,
                inputs=[video_list],
                outputs=[video_player]
            )

            refresh_btn.click(
                update_video_list,
                outputs=[video_list]
            )

if __name__ == "__main__":
    try:
        # 设置CUDA架构列表
        os.environ["TORCH_CUDA_ARCH_LIST"] = "8.6;8.9"  # 30系和40系的架构

        # 设置CUDA内存分配策略
        os.environ["PYTORCH_CUDA_ALLOC_CONF"] = "expandable_segments:True"

        # 检测GPU
        gpu_count, gpu_ids = get_available_gpus()
        # 设置环境变量以消除tokenizers警告
        os.environ["TOKENIZERS_PARALLELISM"] = "false"
        if gpu_count == 0:
            print("警告:未检测到可用的GPU,系统将使用CPU运行(不推荐)")
        else:
            print(f"检测到{gpu_count}个GPU {gpu_ids}")
            os.environ["CUDA_VISIBLE_DEVICES"] = ",".join(map(str, gpu_ids))

        # 启动Gradio界面,移除不支持的参数
        demo.launch(
            server_name="0.0.0.0",
            server_port=8080,
            share=False,
        )
    finally:
        # 确保在程序退出时销毁进程组
        if dist.is_initialized():
            dist.destroy_process_group()